


HI 83200
Instruction Manual
HI 83200
Multiparameter Bench
Photometer
for Laboratories
www.hannainst.com
1

Dear Customer,
Thank you for choosing a Hanna product. Please read this instruction manual carefully before using the
instrument. This manual will provide you with the necessary information for the correct use of the
instrument. If you need additional technical information, do not hesitate to e-mail us at tech@hannainst.com.
TABLE OF CONTENTS
PRELIMINARY EXAMINATION ............................................. 3
GENERAL DESCRIPTION ..................................................... 3
ABBREVIATIONS ............................................................... 4
SPECIFICATIONS .............................................................. 4
PRECISION AND ACCURACY ............................................... 4
PRINCIPLE OF OPERATION ................................................ 5
FUNCTIONAL DESCRIPTION ............................................... 6
TIPS FOR AN ACCURATE MEASUREMENT ........................... 8
HEALTH & SAFETY ..........................................................11
METHOD REFERENCE TABLE ............................................. 11
OPERATIONAL GUIDE ....................................................... 12
SETUP ........................................................................... 14
HELP MODE ................................................................... 16
SAMPLE PREPARATION .................................................... 17
ALUMINUM ....................................................................21
ALKALINITY ....................................................................23
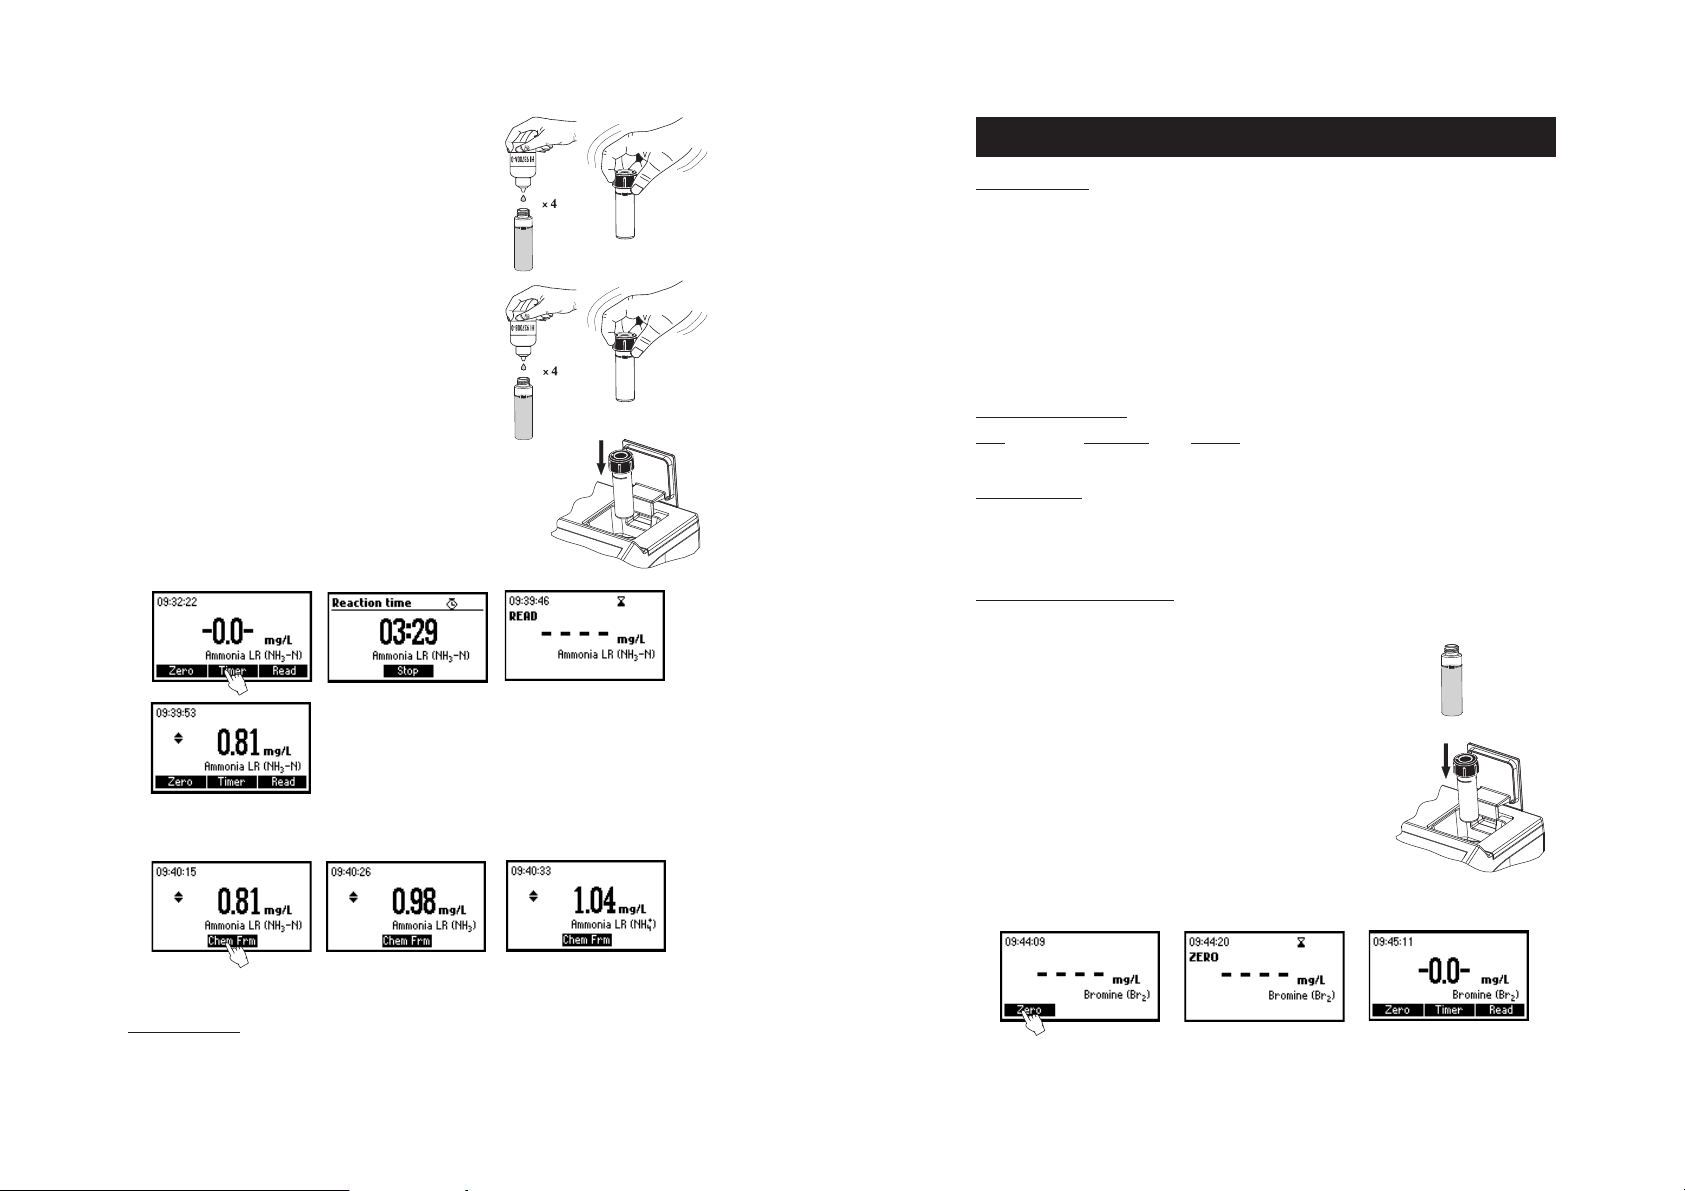
AMMONIA MR ................................................................ 25
AMMONIA LR .................................................................27
BROMINE ......................................................................29
CALCIUM ....................................................................... 31
FREE CHLORINE ............................................................. 33
TOTAL CHLORINE ............................................................36
CHLORINE DIOXIDE ......................................................... 39
CHROMIUM VI HR ..........................................................42
CHROMIUM VI LR ...........................................................44
COLOR OF WATER ........................................................... 46
COPPER HR ....................................................................48
COPPER LR ....................................................................50
CYANURIC ACID .............................................................. 52
FLUORIDE ...................................................................... 54
CALCIUM HARDNESS ....................................................... 56
MAGNESIUM HARDNESS .................................................59
All rights are reserved. Reproduction in whole or in part is prohibited without the written consent of the copyright owner, Hanna
Instruments Inc., Woonsocket, Rhode Island, 02895 , USA.
HYDRAZINE .................................................................... 62
IODINE .......................................................................... 64
IRON HR ........................................................................66
IRON LR .........................................................................68
MAGNESIUM .................................................................. 71
MANGANESE HR .............................................................73
MANGANESE LR ............................................................. 75
MOLYBDENUM ............................................................... 78
NICKEL HR ..................................................................... 81
NICKEL LR ......................................................................83
NITRATE .........................................................................86
NITRITE HR .................................................................... 88
NITRITE LR ..................................................................... 90
DISSOLVED OXYGEN ........................................................ 92
OZONE .......................................................................... 94
pH ................................................................................97
PHOSPHATE HR ..............................................................99
PHOSPHATE LR ............................................................. 101
PHOSPHORUS ............................................................. 103
POTASSIUM HR ............................................................ 105
POTASSIUM MR ............................................................ 108
POTASSIUM LR ............................................................. 110
SILICA ......................................................................... 112
SILVER ........................................................................ 114
SULFATE ......................................................................117
ZINC ............................................................................ 119
ERRORS AND WARNINGS ............................................... 121
DATA MANAGEMENT ...................................................... 122
STANDARD METHODS .................................................... 123
ACCESSORIES .............................................................. 124
WARRANTY .................................................................. 127
HANNA LITERATURE ...................................................... 127
PRELIMINARY EXAMINATION
Please examine this product carefully. Make sure that the instrument is not damaged. If any damage
occurred during shipment, please notify your local Hanna Office.
Each meter is supplied complete with:
• Four Sample Cuvettes and Caps
• Sample Preparation Kit (for turbid or concentrated samples see page 17)
• Cloth for wiping cuvettes (1 pcs)
• 60 mL glass bottle for dissolved oxygen analysis (1 pcs)
• Scissors
• AC/DC Power Adapter
• Instruction Manual
The sample preparation kit contains:
• 4 cuvettes (10 mL) with caps
• 2 plastic beakers (100 and 170 mL)
• 1 graduated cylinder (100 mL)
• 1 syringe with screw rim (60 mL)
• 1 syringe (5 mL)
• 1 funnel
• 25 filter discs
• 1 spoon
• 2 pipettes
• Carbon powder packets (50 pcs)
• 1 Demineralizer Bottle with filter cap for about 12 liters of deionized water (depending on the
hardness level of water to be treated)
Note: Save all packing material until you are sure that the instrument works correctly. Any defective item
must be returned in its original packing with the supplied accessories.
GENERAL DESCRIPTION
HI 83200 is a multiparameter bench photometer dedicated for Laboratory analysis. It measures 44 different
methods using specific liquid or powder reagents. The amount of reagent is precisely dosed to ensure
maximum reproducibility.
HI 83200 bench photometer can be connected to a PC via an USB cable. The optional HI 92000
Windows® Compatible Software helps users manage all their results.
HI 83200 has a powerful interactive user support that assists the user during the analysis process.
Each step in the measurement process is help supported. A tutorial mode is available in the Setup Menu.
2 3
ABBREVIATIONS
PRINCIPLE OF OPERATION
EPA: US Environmental Protection Agency
°C: degree Celsius
°F: degree Fahrenheit
µg/L: micrograms per liter (ppb)
mg/L: milligrams per liter (ppm)
g/L: grams per liter (ppt)
mL: milliliter
HR: high range
MR: medium range
LR: low range
PAN: 1-(2-pyridylazo)-2-naphtol
TPTZ: 2,4,6-tri-(2-pyridyl)-1,3,5-triazine
SPECIFICATIONS
Light Life Life of the instrument
Light Detector Silicon Photocell
Environment 0 to 50°C (32 to 122°F);
max 90% RH non-condensing
Power Supply external 12 Vdc power adapter
built-in rechargeable battery
Dimensions 235 x 200 x 110 mm (9.2 x 7.87 x 4.33")
Weight 0.9 Kg
For specifications related to each method (e.g. range, resolution, etc.) refer to the related measurement
section.
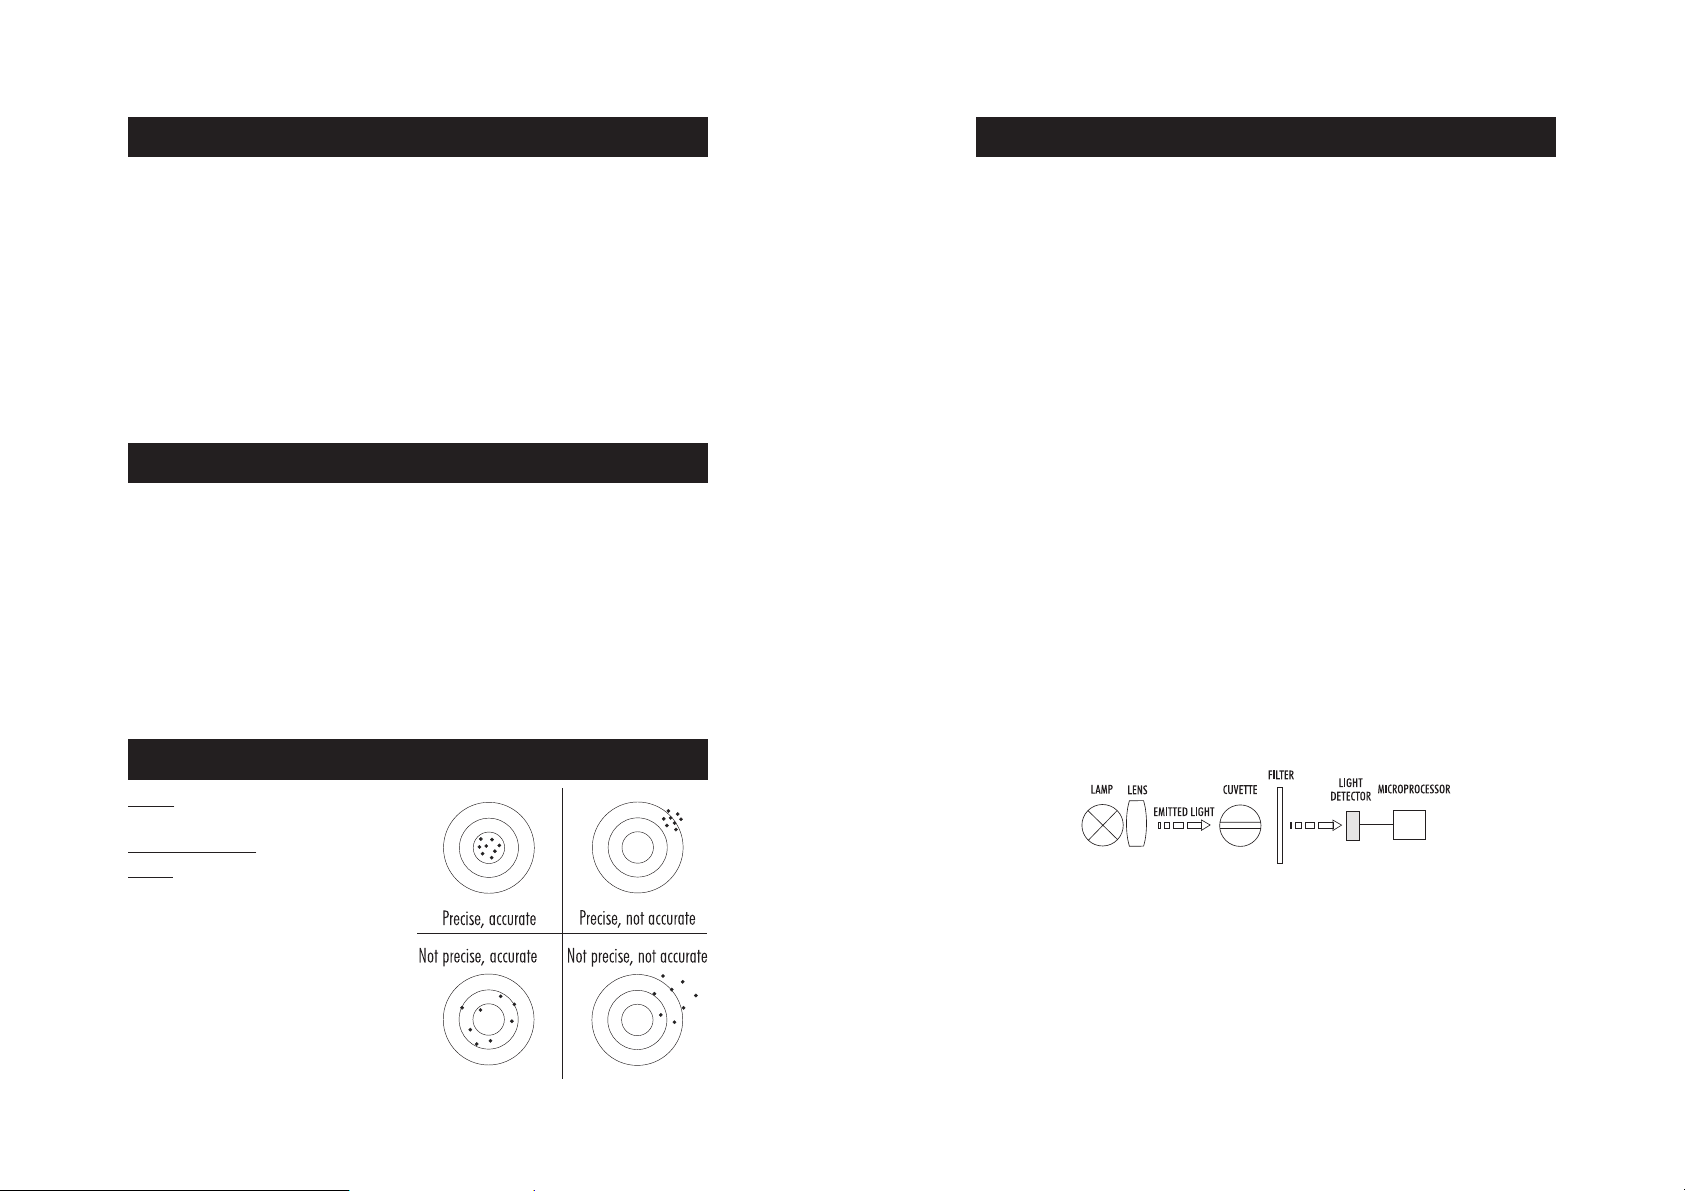
PRECISION AND ACCURACY
Absorption of light is a typical phenomenon of interaction between electromagnetic radiation and matter.
When a light beam crosses a substance, some of the radiation may be absorbed by atoms, molecules or
crystal lattices.
If pure absorption occurs, the fraction of light absorbed depends both on the optical path length through the
matter and on the physical-chemical characteristics of substance according to the Lambert-Beer Law:
-log I/Io = ελ c d
or
A = ελ c d
Where:
-log I/I
Therefore, the concentration "c" can be calculated from the absorbance of the substance as the other factors
are known.
Photometric chemical analysis is based on the possibility to develop an absorbing compound from a specific
chemical reaction between sample and reagents.
Given that the absorption of a compound strictly depends on the wavelength of the incident light beam,
a narrow spectral bandwidth should be selected as well as a proper central wavelength to optimize
measurements.
The optical system of HI 83200 is based on special subminiature tungsten lamps and narrow-band
interference filters to guarantee both high performance and reliable results.
Five measuring channels allow a wide range of tests.
= Absorbance (A)
o
Io= intensity of incident light beam
I = intensity of light beam after absorption
ελ= molar extinction coefficient at wavelength λ
c = molar concentration of the substance
d = optical path through the substance
Precision is how closely repeated measurements agree
with each other. Precision is usually expressed as
standard deviation (SD).
Accuracy is defined as the nearness of a test result to
the true value.
Although good precision suggests good accuracy, precise
results can be inaccurate. The figure explains these
definitions.
For each method, the accuracy is expressed in the
related measurement section.
Instrument block diagram (optical layout)
A microprocessor controlled special tungsten lamp emits radiation which is first optically conditioned and beamed
through the sample contained in the cuvette. The optical path is fixed by the diameter of the cuvette. Then
the light is spectrally filtered to a narrow spectral bandwidth, to obtain a light beam of intensity Io or I.
The photoelectric cell collects the radiation I that is not absorbed by the sample and converts it into an
electric current, producing a potential in the mV range.
The microprocessor uses this potential to convert the incoming value into the desired measuring unit and to
display it on the LCD.
4 5
ESC
RCL
HELP
SETUP
The measurement process is carried out in two phases: first the meter is zeroed and then the actual
measurement is performed.
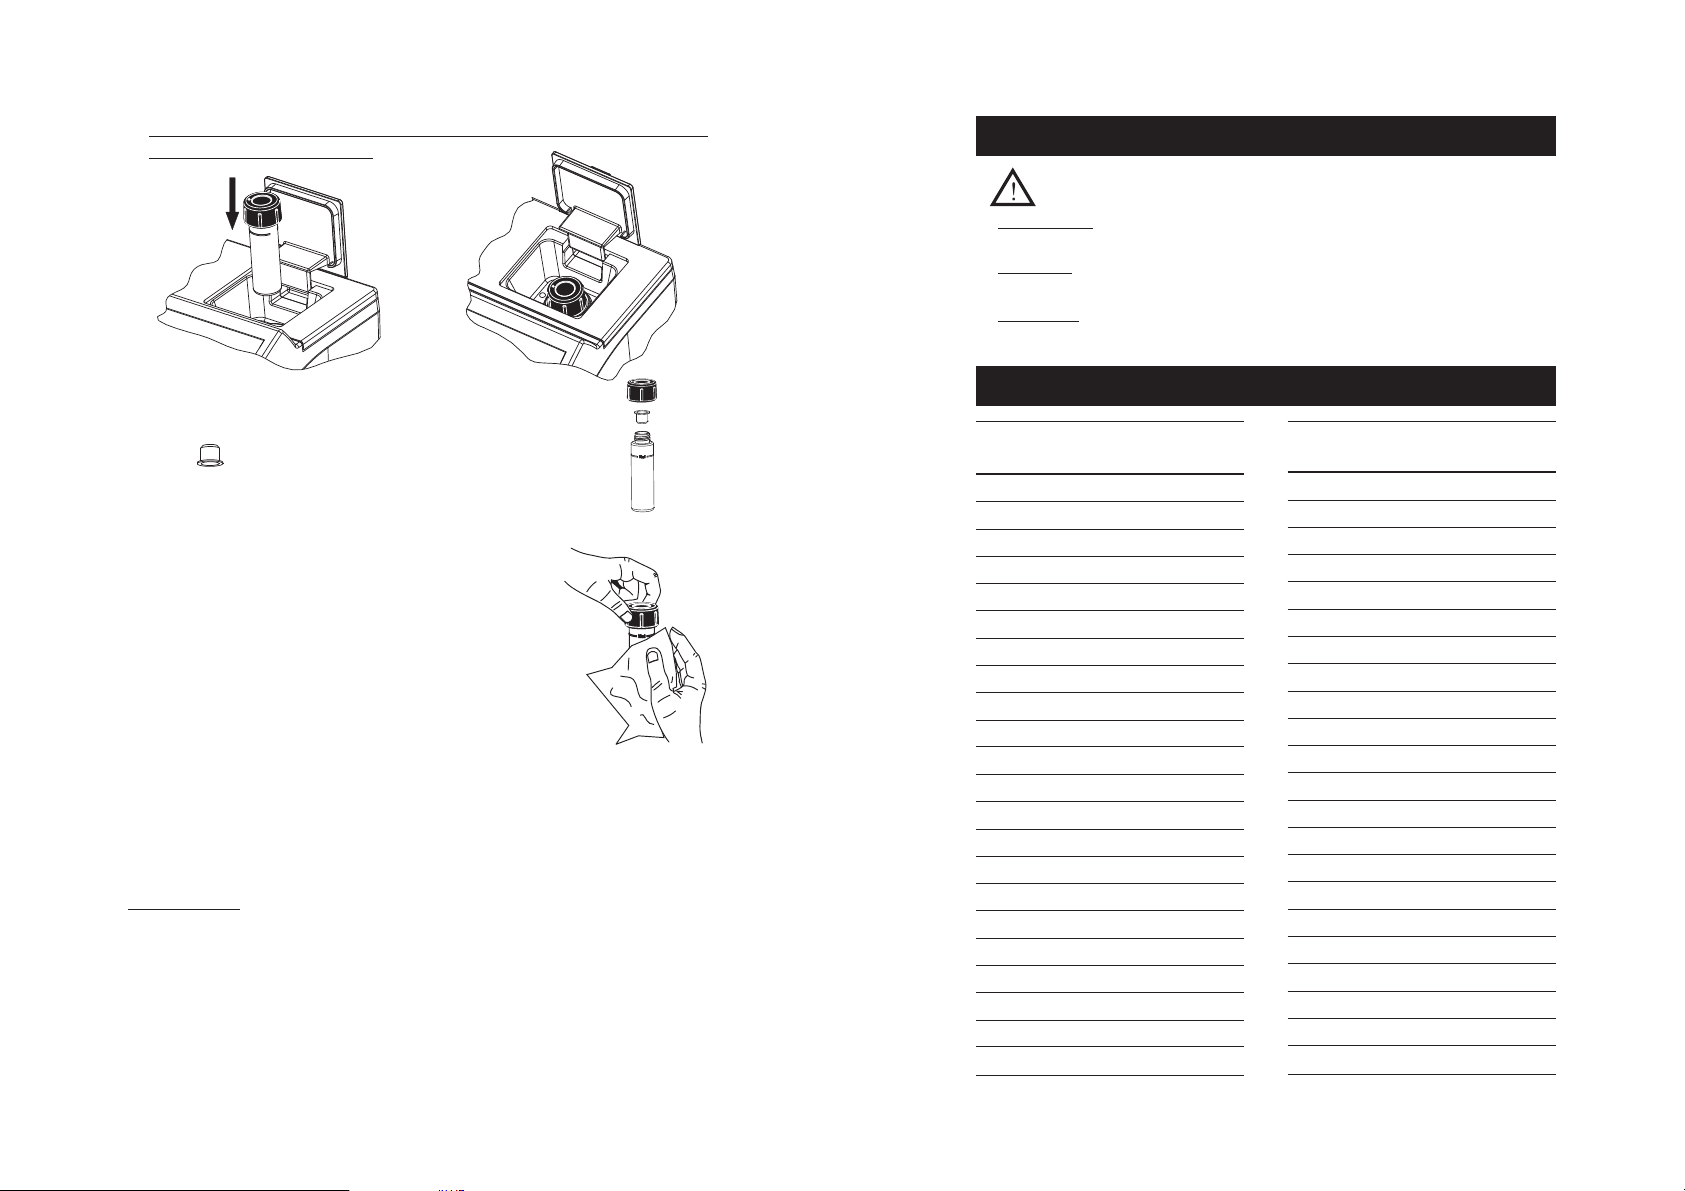
The cuvette has a very important role because it is an optical element and thus requires particular attention. It
is important that both the measurement and the calibration (zeroing) cuvette are optically identical to provide the
same measurement conditions. Most methods use the same cuvette for both, so it is important that measurements
are taken at the same optical point. The instrument and the cuvette cap have special marks that must be
aligned in order to obtain better reproducibility.
The surface of the cuvette must be clean and not scratched. This is to avoid measurement interference due to
unwanted reflection and absorption of light. It is recommended not to touch the cuvette walls with hands.
Furthermore, in order to maintain the same conditions during the zeroing and the measurement phases,
it is necessary to cap the cuvette to prevent any contamination.
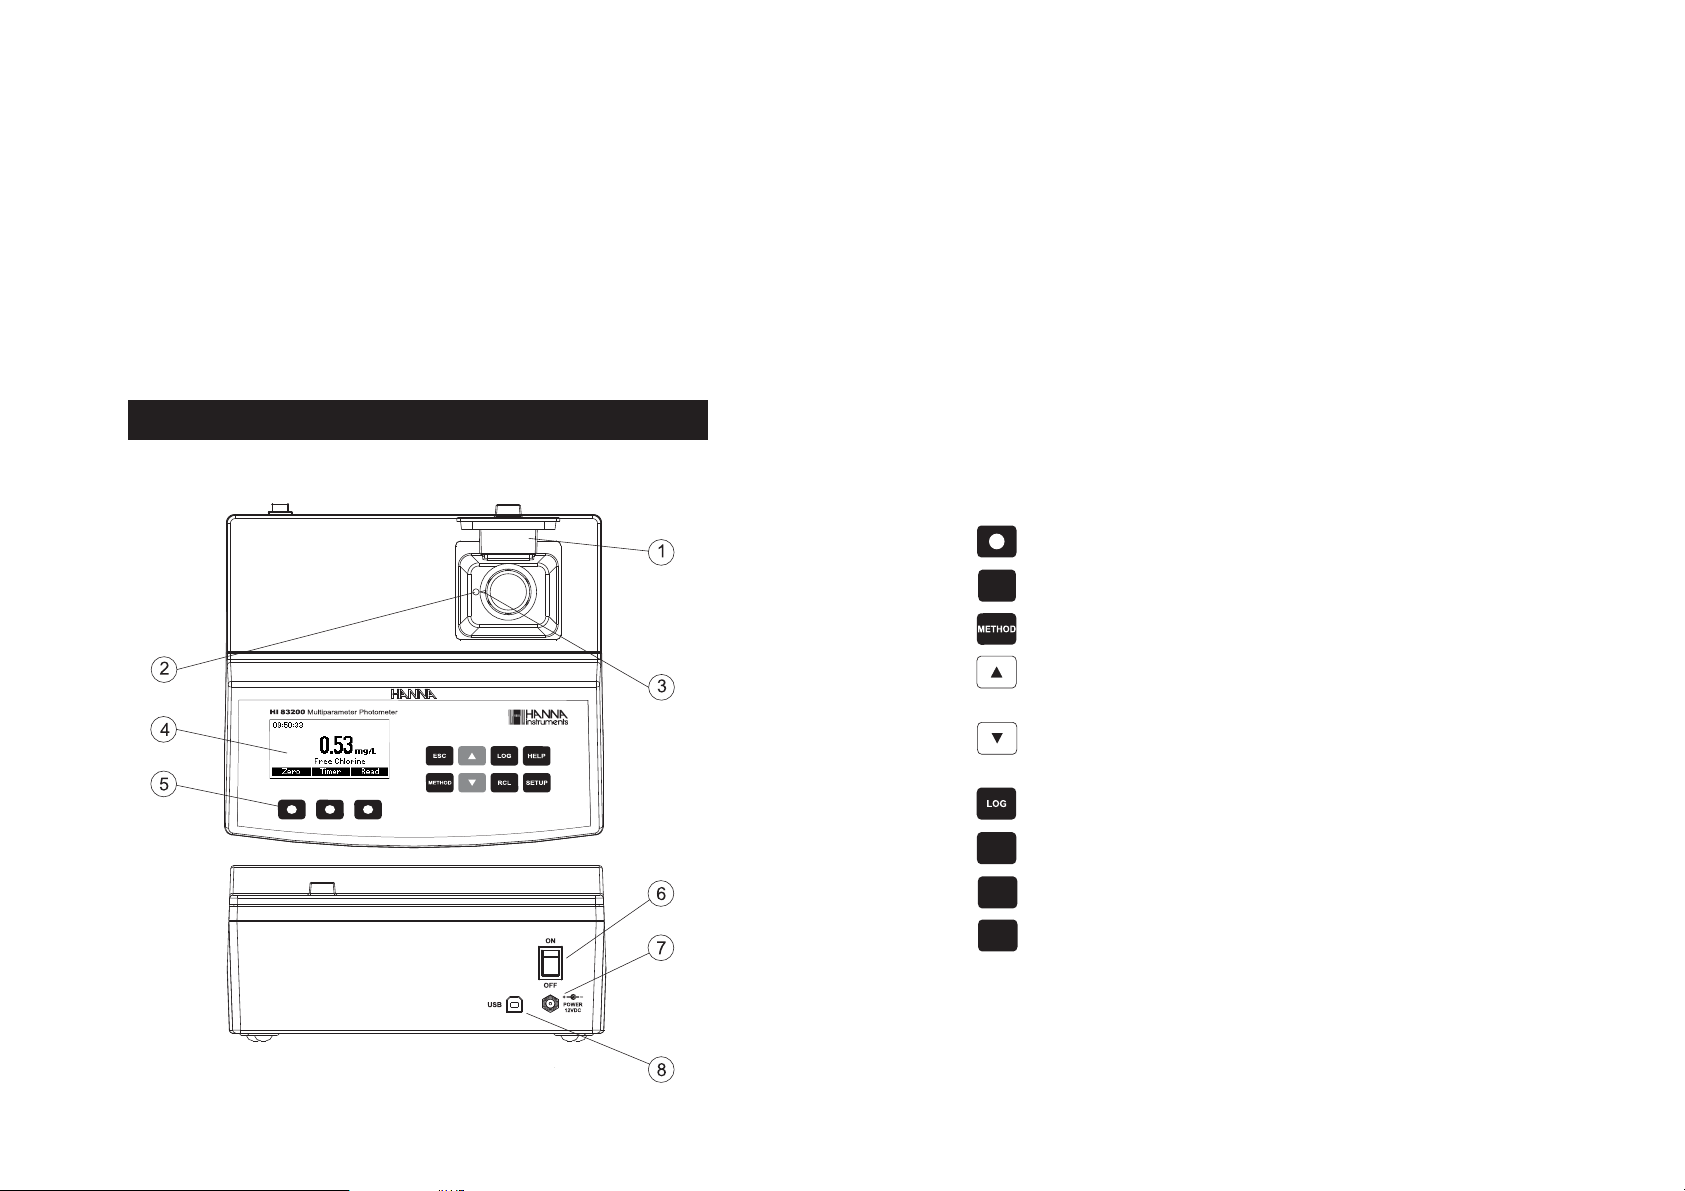
FUNCTIONAL DESCRIPTION
1) Open Cuvette Lid
2) Indexing mark
3) Cuvette point
4) Liquid Crystal Display (LCD)
5) Splash proof keypad
6) ON/OFF power switch
7) Power input connector
8) USB connector
INSTRUMENT DESCRIPTION
KEYPAD DESCRIPTION
The keypad contains 8 direct keys and 3 functional keys with the following functions:
Press to perform the function displayed above it on the LCD.
Press to exit the current screen.
Press to access the select method menu.
Press to move up in a menu or a help screen, to increment a set value, to access second level
functions.
Press to move down in a menu or a help screen, to decrement a set value, to access second
level functions.
Press to log the current reading.
Press to recall the log.
Press to display the help screen.
Press to access the setup screen.
6 7
(c)
(a) (b)
Probable level of
liquid taken up
by syringe
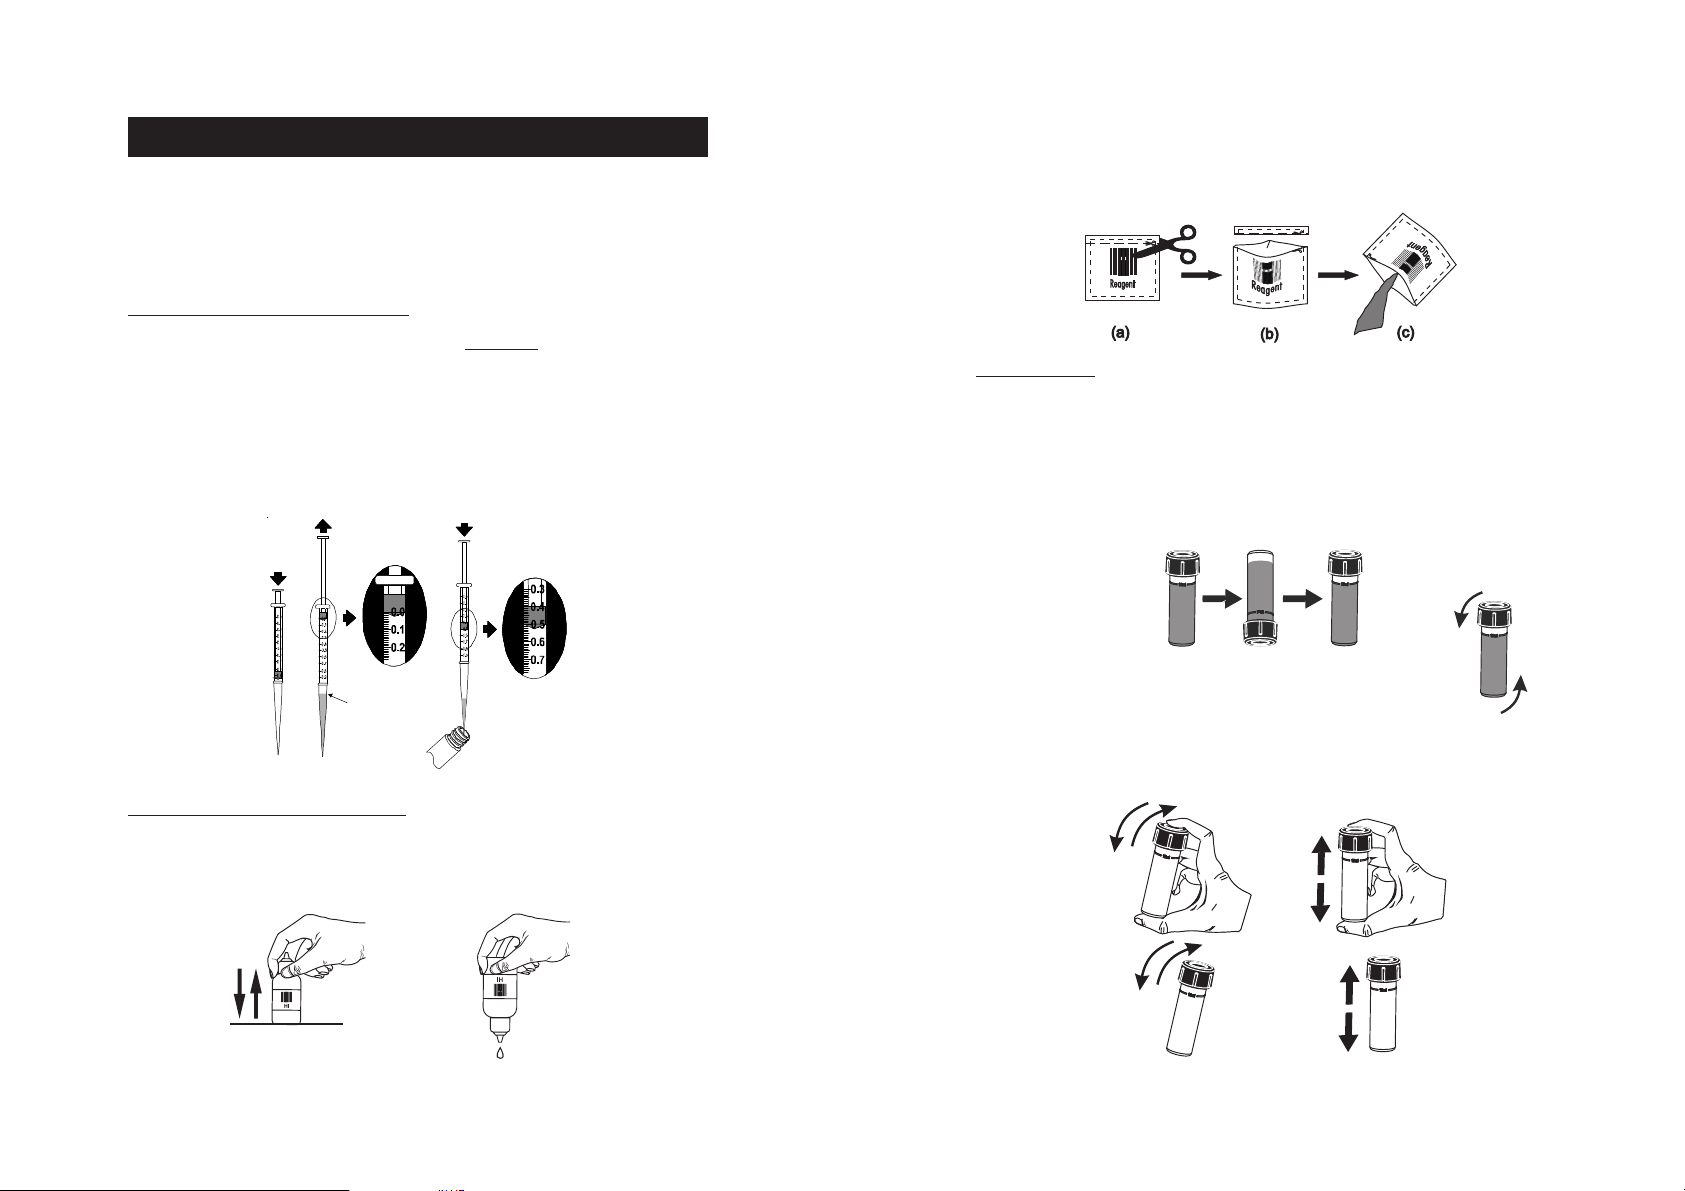
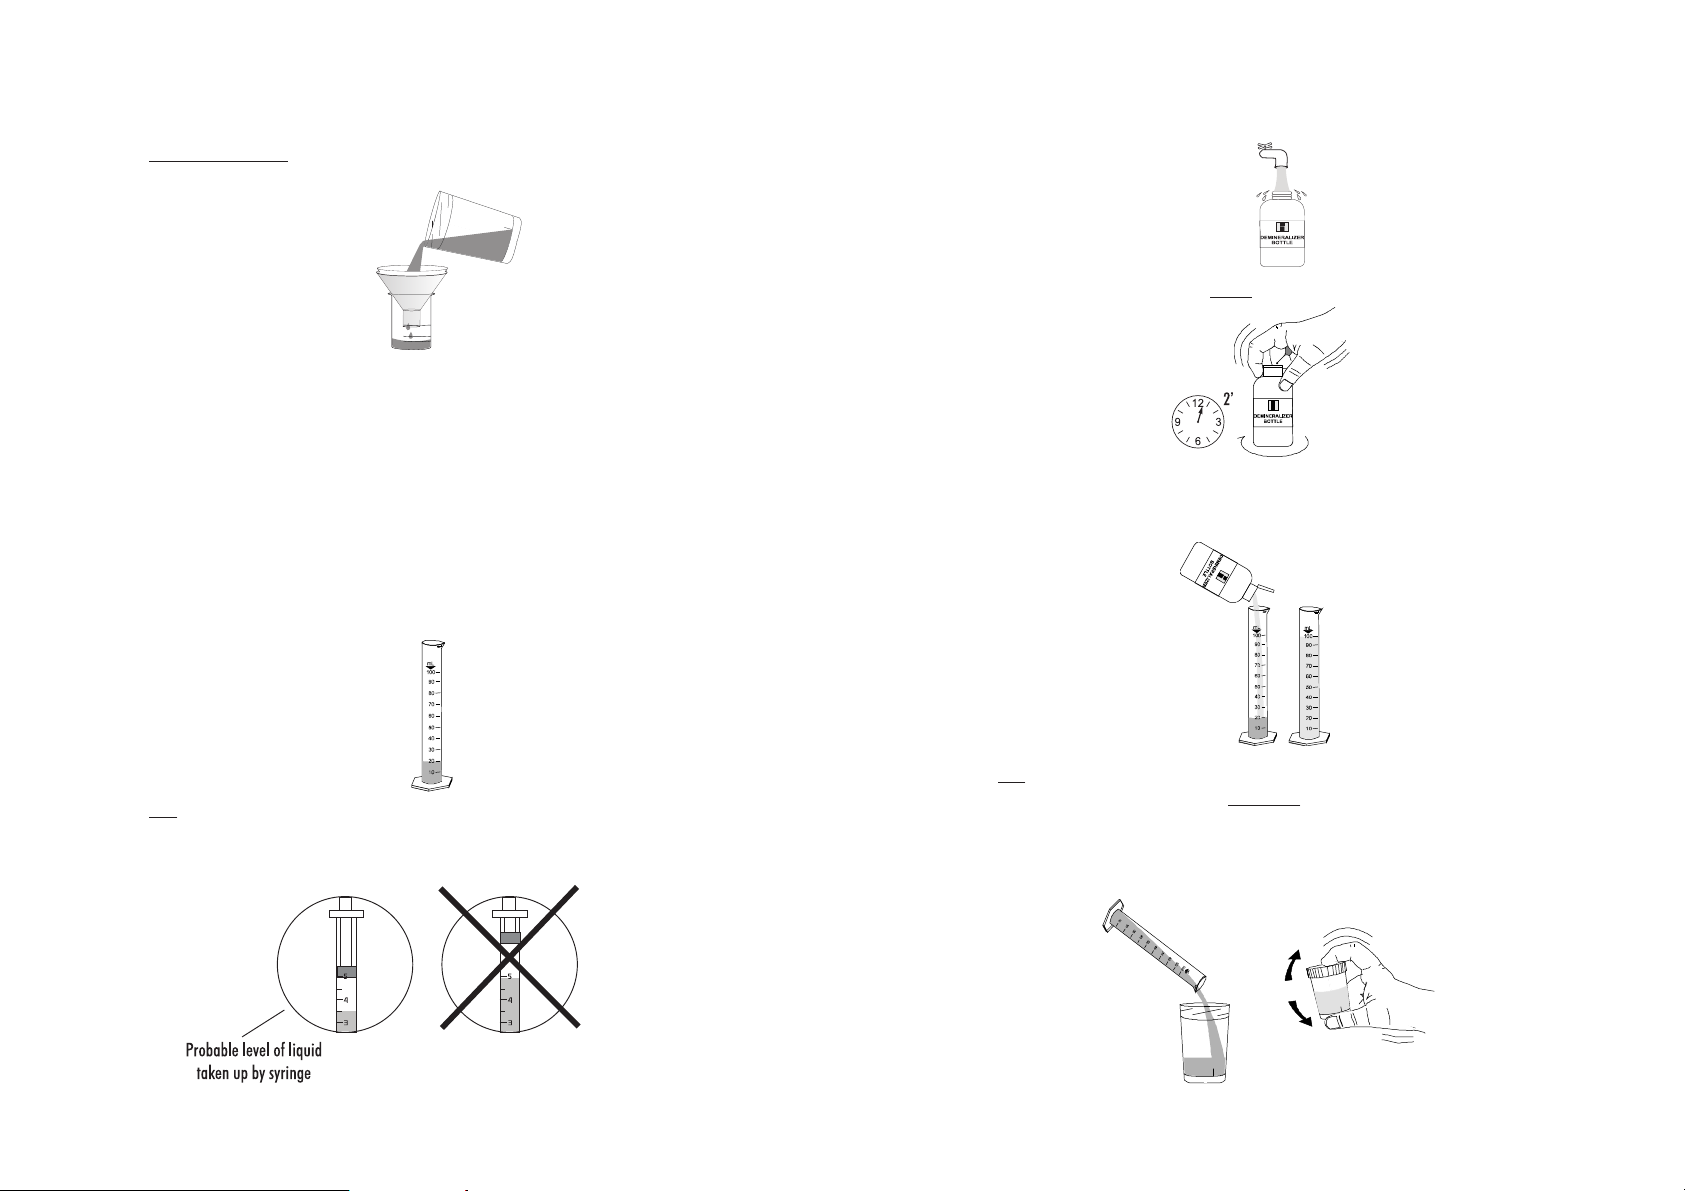
TIPS FOR AN ACCURATE MEASUREMENT
The instructions listed below should be carefully followed during testing to ensure most accurate results.
• Color or suspended matter in large amounts may cause interference, and should be removed by
treatment with active carbon and filtration: refere to Sample Preparation Chapter (page 17).
• Ensure the cuvette is filled correctly: the liquid in the cuvette forms a convexity on the top; the bottom
of this convexity must be at the same level as the 10 mL mark.
COLLECTING AND MEASURING SAMPLES
• In order to measure exactly 0.5 mL of reagent with the 1 mL syringe:
(a) push the plunger completely into the syringe and insert the tip into the solution.
(b) pull the plunger up until the lower edge of the seal is exactly on the 0.0 mL mark.
(c) take out the syringe and clean the outside of the syringe tip. Be sure that no drops are hanging
on the tip of the syringe, if so eliminate them. Then, keeping the syringe in vertical position above
the cuvette, push the plunger down into the syringe until the lower edge of the seal is exactly on
the 0.5 mL mark. Now the exact amount of 0.5 mL has been added to the cuvette, even if the
tip still contains some solution.
• Proper use of the powder reagent packet:
(a) use scissors to open the powder packet;
(b) push the edges of the packet to form a spout;
(c) pour out the content of the packet.
USING CUVETTES
• Proper mixing is very important for reproducibility of the measurements. The right way of mixing a
cuvette is specified for each method in the related chapter.
(a) invert the cuvette a couple of times or for a specified time: hold the cuvette in the vertical position. Turn
the cuvette upside-down and wait for all of the solution to flow to the cap end, then return the cuvette
to the upright vertical position and wait for all of the solution to flow to the cuvette bottom. This is one
inversion. The correct speed for this mixing technique is 10-15 complete inversions in 30 seconds.
This mixing technique is indicated with “invert to mix” and the following icon:
USING LIQUID AND POWDER REAGENTS
• Proper use of the dropper:
(a) for reproducible results, tap the dropper on the table for several times and wipe the outside of the
dropper tip with a cloth.
(b) always keep the dropper bottle in a vertical position while dosing the reagent.
(a) (b)
8 9
(b) shaking the cuvette, moving the cuvette up and down. The movement may be gentle or vigorous.
This mixing method is indicated with “shake gently” or “shake vigorously”, and one of the following
icons:
shake gently shake vigorously
• Pay attention to push the cuvette completely down in the holder and to align the white point on the
cap to the indexing mark on the meter.
HEALTH & SAFETY
• The chemicals contained in the reagent kits may be hazardous if improperly handled.
• Read the Material Safety Data Sheet (MSDS) before performing tests.
• Safety equipment: Wear suitable eye protection and clothing when required, and follow instructions
carefully.
• Reagent spills: If a reagent spill occurs, wipe up immediately and rinse with plenty of water.
If reagent contacts skin, rinse the affected area thoroughly with water. Avoid breathing released vapors.
• Waste disposal: for proper disposal of reagent kits and reacted samples, refer to the Material Safety
Data Sheet (MSDS).
• In order to avoid reagent leaking and to obtain more accurate
measurements, close the cuvette first with the supplied HDPE plastic
stopper and then the black cap.
• Each time the cuvette is used, the cap must be tightened to the same degree.
• Whenever the cuvette is placed into the measurement cell, it must be dry
outside, and free of fingerprints, oil or dirt. Wipe it thoroughly with
HI 731318 or a lint-free cloth prior to insertion.
• Shaking the cuvette can generate bubbles in the sample, causing higher
readings. To obtain accurate measurements, remove such bubbles by
swirling or by gently tapping the cuvette.
• Do not let the reacted sample stand too long after reagent is added. For
best accuracy, respect the timings described in each specific method.
• It is possible to take multiple readings in a row, but it is recommended
to take a new zero reading for each sample and to use the same cuvette
for zeroing and measurement when possible (for most precise results follow
the measurement procedures carefully).
• Discard the sample immediately after the reading is taken, or the glass might become permanently
stained.
• All the reaction times reported in this manual are at 25 °C (77 °F). In general, the reaction time
should be increased for temperatures lower than 20 °C (68 °F), and decreased for temperatures higher
than 25 °C (77 °F).
INTERFERENCES
• In the method measurement section the most common interferences that may be present in an average
sample matrix have been reported. It may be that for a particular treatment process other compounds
do interfere with the method of analysis.
METHOD REFERENCE TABLE
Method Method Page
description
1 Aluminum 21
2 Alkalinity 23
3 Ammonia MR 25
4 Ammonia LR 27
5 Bromine 29
6 Calcium 31
7 Free Chlorine 33
8 Total Chlorine 36
9 Chlorine Dioxide 39
10 Chromium VI HR 42
11 Chromium VI LR 44
12 Color of Water 46
13 Copper HR 48
14 Copper LR 50
15 Cyanuric Acid 52
16 Fluoride 54
17 Calcium Hardness 56
18 Magnesium Hardness 59
19 Hydrazine 62
20 Iodine 64
21 Iron HR 66
22 Iron LR 68
Method Method Page
description
23 Magnesium 71
24 Manganese HR 73
25 Manganese LR 75
26 Molybdenum 78
27 Nickel HR 81
28 Nickel LR 83
29 Nitrate 86
30 Nitrite HR 88
31 Nitrite LR 90
32 Dissolved Oxygen 92
33 Ozone 94
34 pH 97
35 Phosphate HR 99
36 Phosphate LR 101
37 Phosphorus 103
38 Potassium HR 105
39 Potassium MR 108
40 Potassium LR 110
41 Silica 112
42 Silver 114
43 Sulfate 117
44 Zinc 119
10 11
OPERATIONAL GUIDE
POWER CONNECTION AND BATTERY MANAGEMENT
The meter can be powered from an AC/DC adapter (included) or from the built-in rechargeable battery.
Note: Always turn the meter off before unplugging it to ensure no data is lost.
When the meter switches ON, it verifies if the power supply adapter is connected. The battery icon on the
LCD will indicate the battery status:
- battery is charging from external adapter - battery fully charged (meter connected to AC/DC adapter)
• After the desired method is selected, follow the measurement described in the related section.
• Before performing a test you should read all the instructions carefully.
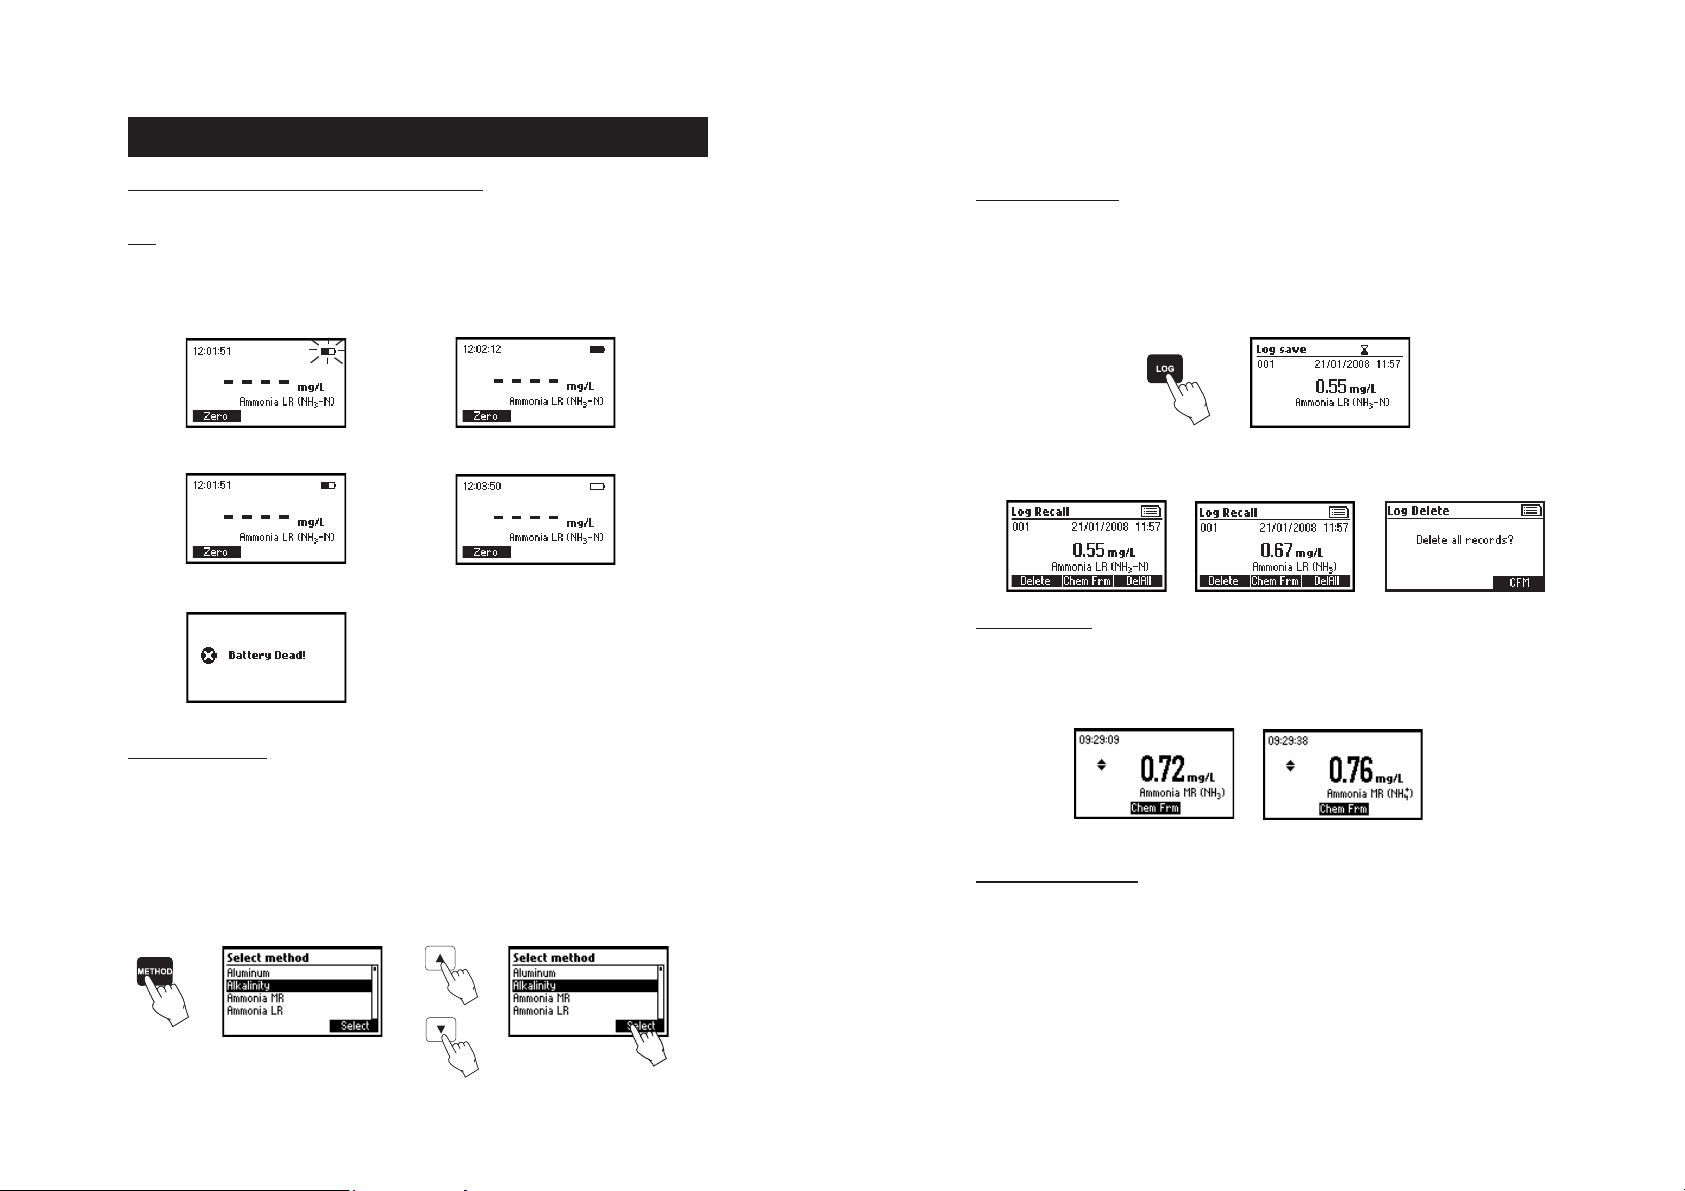
DATA MANAGEMENT
The instrument features a data log function to help you keep track of all your analysis. The data log can
hold 200 individual measurements. Storing, viewing and deleting the data is possible using the LOG
and
RCL keys
Storing data
stored with date and time stamps.
..
.
..
: You can store only a valid measurement. Press LOG
and the last valid measurement will be
- battery capacity (no external adapter) - battery Low (no external adapter)
- battery Dead (no external adapter)
METHOD SELECTION
• Turn the instrument ON via the ON/OFF power switch.
• The meter will perform an autodiagnostic test. During this test, the Hanna Instrument logo will appear
on the LCD. After 5 seconds, if the test was successful, the last method used will appear on the display.
• In order to select the desired method press the METHOD key and a screen with the available methods
will appear.
• Press the st keys to highlight the desired method. Press Select.
Viewing and deleting
the last saved measurement. Additionally, you can delete the data records all at once.
: You can view and delete the data log by pressing the RCL key. You can only delete
CHEMICAL FORM
Chemical form conversion factors are pre-programmed into the instrument and are method specific. In order
to view the displayed result in the desired chemical form press s or t to access the second level function
and then press the Chem Frm key to toggle between the available chemical forms for the selected method.
SPECIAL CONVERSIONS
For Magnesium and Calcium Hardness, special conversion factors can be used to convert the readings from
mg/L to French degrees (°f), German degrees (°dH) and English degrees (°E) of hardness. This can be
achieved by pressing s or t to access the second level functions and then press the Unit key to toggle
between °f, °dH, °E and mg/L.
12 13
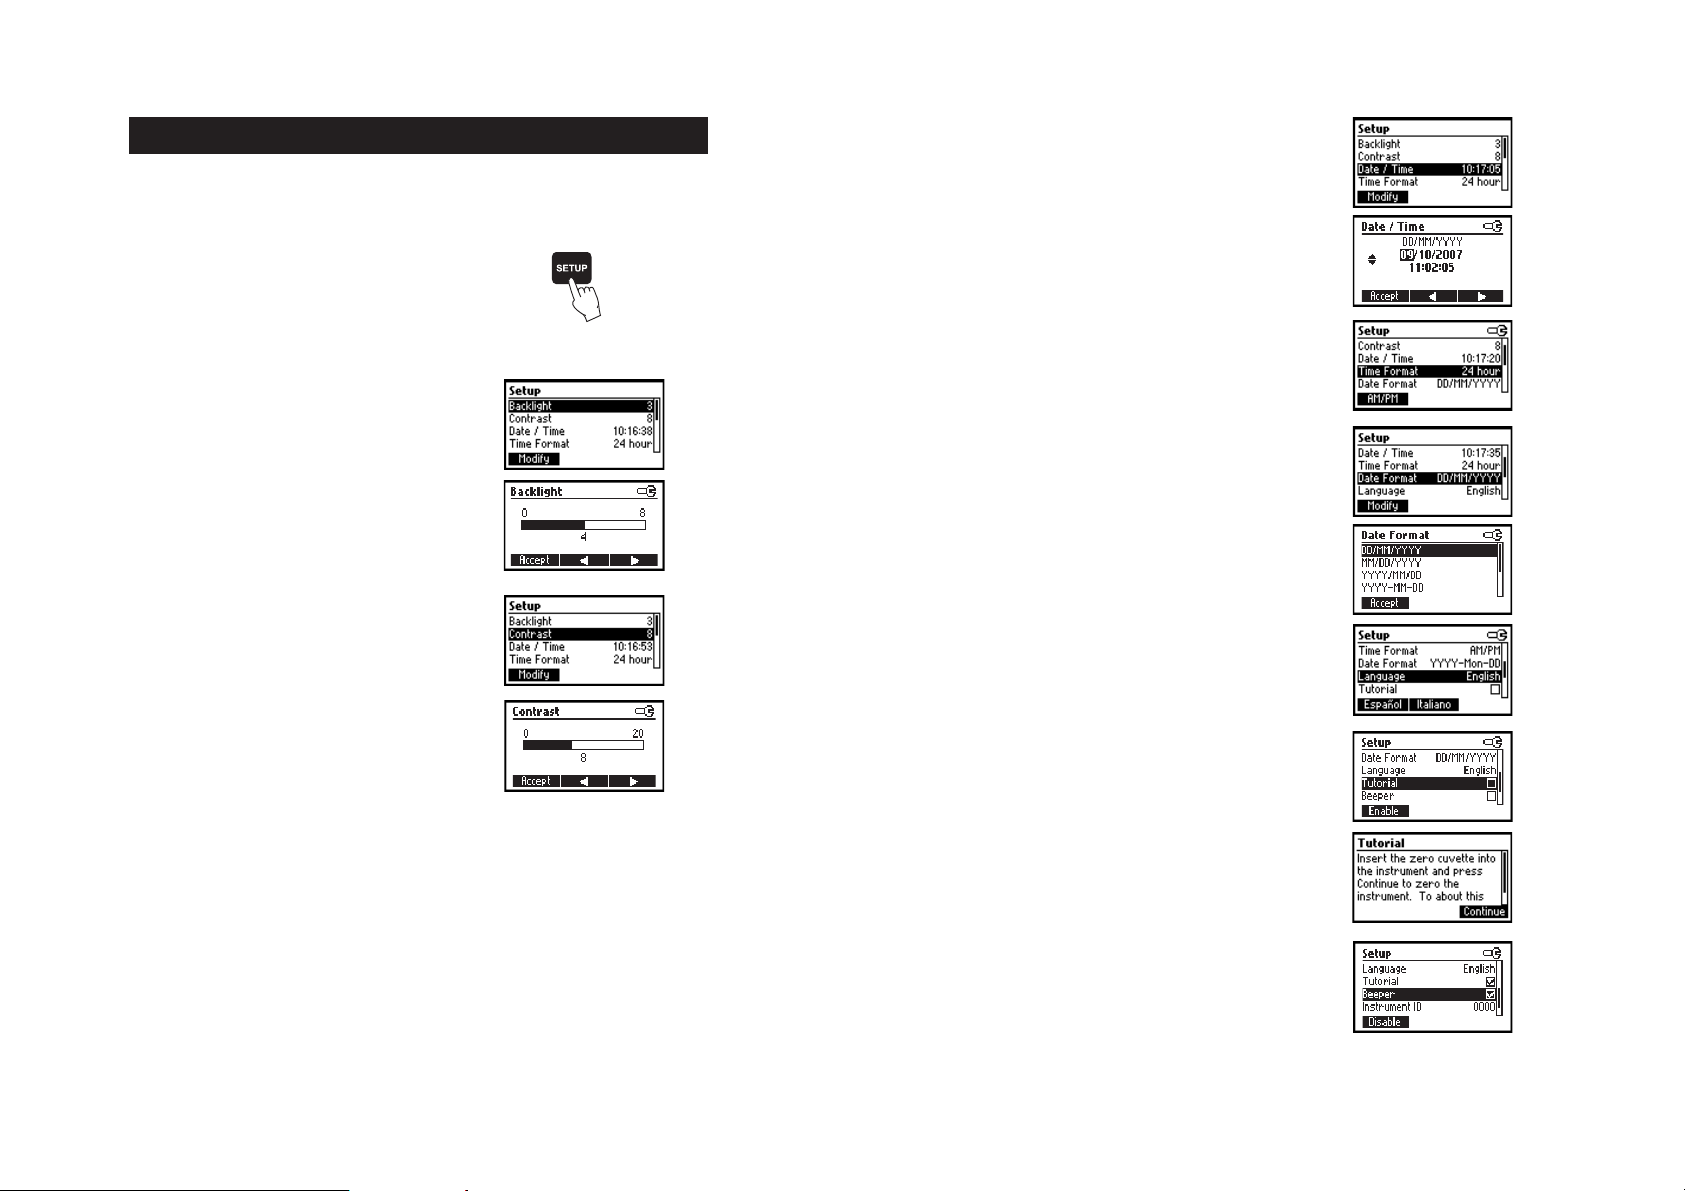
SETUP
In the Setup mode the instrument’s parameters can be changed. Some parameters affect the measuring
sequence and others are general parameters that change the behavior or appearance of the instrument.
Press SETUP to enter the setup mode.
Press ESC or SETUP to return to the main screen.
A list of setup parameters will be displayed with currently
configured settings. Press HELP for additional information.
Press the s t keys to select a parameter and change the
value as follows:
Backlight
Values: 0 to 8.
Press the Modify key to access the backlight value.
Use the ⊳ u functional keys or the s t keys to increase or
decrease the value.
Press the Accept key to confirm or ESC to return to the setup
menu without saving the new value.
Contrast
Values: 0 to 20.
This option is used to set the display’s contrast.
Press the Modify key to change the display’s contrast.
Use the ⊳ u functional keys or the s t keys to increase or
decrease the value.
Press the Accept key to confirm the value or ESC to return to the
setup menu without saving the new value.
Date / Time
This option is used to set the instrument’s date and time.
Press the Modify key to change the date/time.
Press the ⊳ u functional keys to highlight the value to be
modified (year, month, day, hour, minute or second). Use the
s t keys to change the value.
Press the Accept key to confirm or ESC to return to the setup
without saving the new date or time.
Time format
Option: AM/PM or 24 hour.
Press the functional key to select the desired time format.
Date format
Press the Modify key to change the Date Format.
Use the s t keys to select the desired format.
Press Accept key to confirm or ESC to return to the setup menu
without saving the new format.
Language
Press the corresponding key to change the language.
If the new language cannot be loaded, the previously selected
language will be reloaded.
Tutorial
Option: Enable or Disable.
If enabled this option will provide the user short guide related to
the current screen.
Press the functional key to enable/disable the tutorial mode.
Beeper
Option: Enable or Disable.
When enabled, a short beep is heard every time a key is pressed.
A long beep alert sounds when the pressed key is not active or an
error is detected.
Press the functional key to enable/disable the beeper.
14 15
Instrument ID
Option: 0 to 9999.
This option is used to set the instrument’s ID (identification
number). The instrument ID is used while exchanging data with
a PC.
Press the Modify key to access the instrument ID screen. Press
the s t keys in order to set the desired value.
Press the Accept key to confirm the value or ESC to return to the
setup menu without saving the new value.
Meter information
Press the Select key to view the instrument model, firmware
version, language version and instrument serial number.
Press ESC to return to the Setup mode.
HELP MODEHELP MODE
HELP MODE
HELP MODEHELP MODE
HELP MODE
HI 83200 offers an interactive contextual help mode that assists the user at any time.
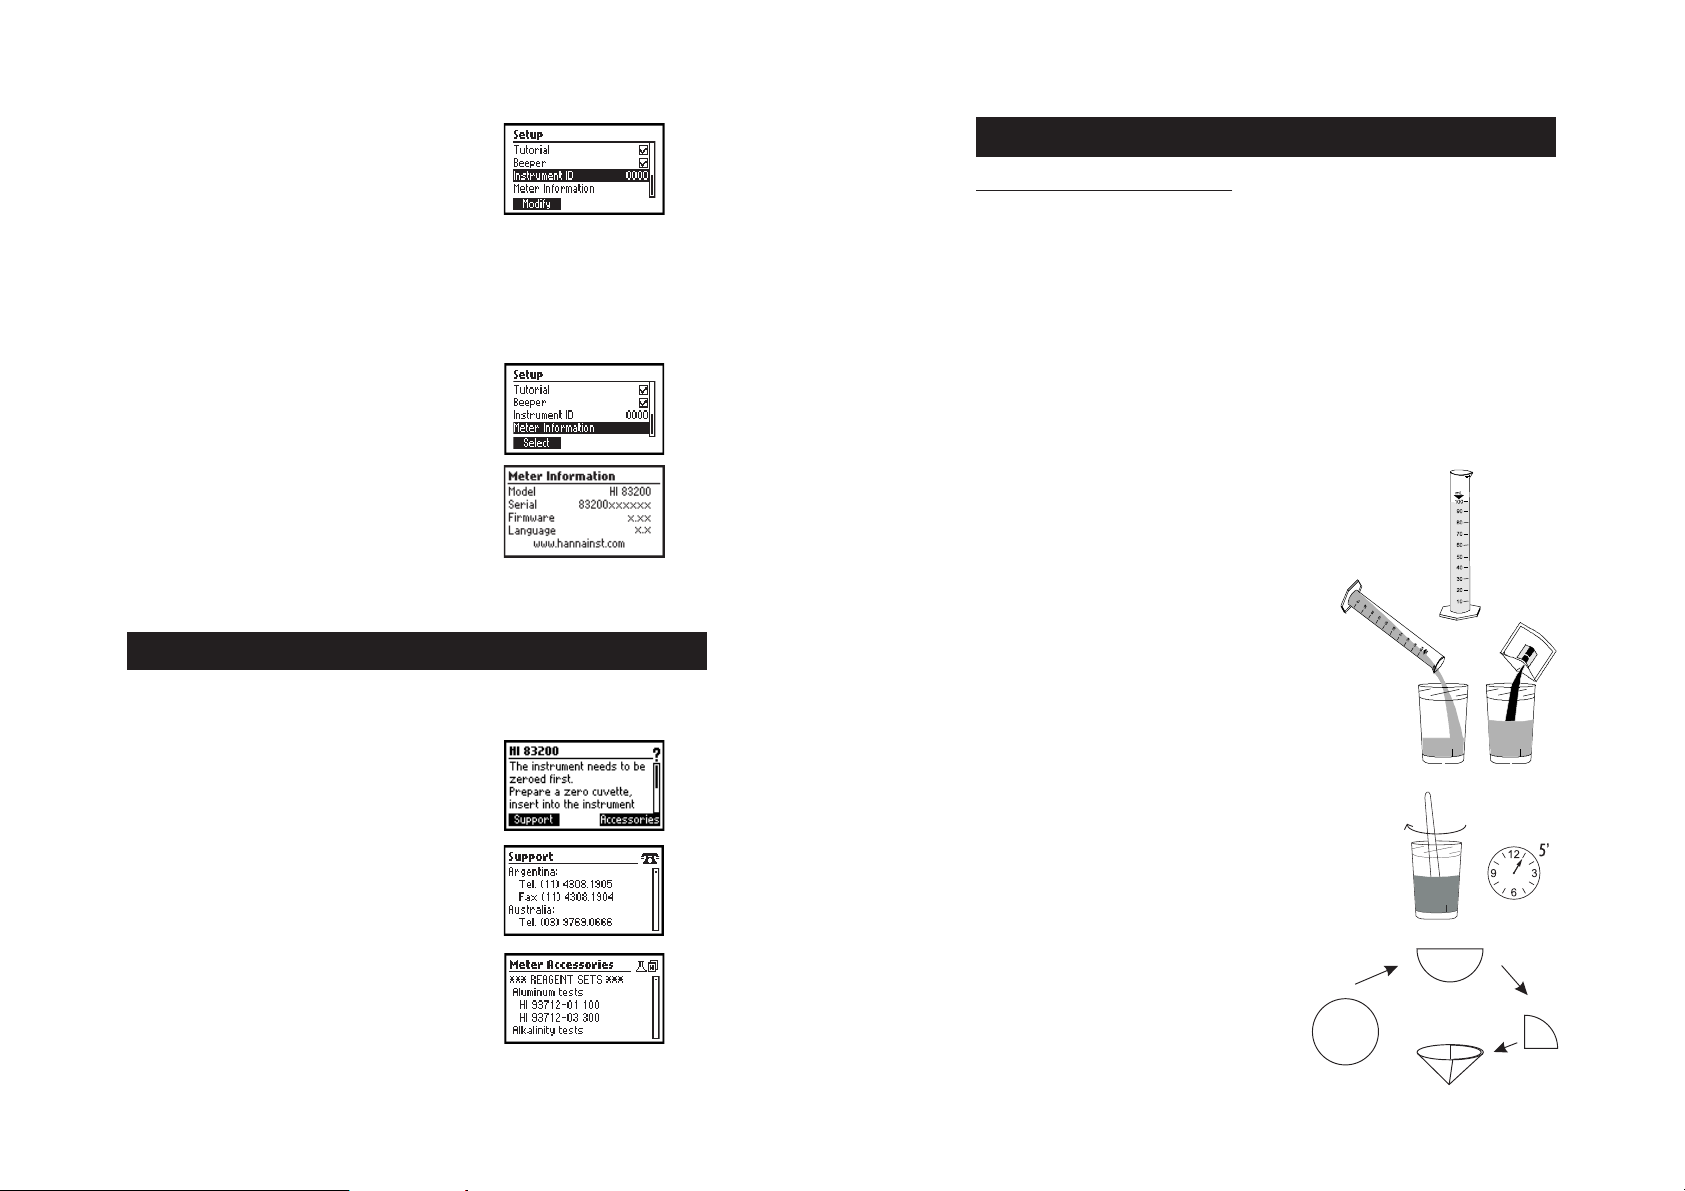
SAMPLE PREPARATION
SAMPLE PREPARATION PROCEDURE
The following Sample Preparation Procedure applies in case of:
• Samples with color or suspended matter (turbidity).
• Concentrated samples, for which the analysis result is over the range of the parameter.
Use the accessories contained in the Sample Preparation Kit to prepare the sample according to the
following instructions.
COLORED OR TURBID SAMPLES:
Colored or suspended matter in large amounts may cause interference. They should be removed by
treatment with active carbon and filtration.
• If the water sample contains suspended matter, let it stand in a beaker until most of the solid particles
have settled. Then, use the pipette to transfer the supernatant solution to the other beaker. To prevent
the displacement of the settled solids at the bottom of the beaker, do not induce air bubbles into the
solution.
• Measure 100 mL of sample with the graduated cylinder.
• If the solution still contains some turbidity or color, pour
it in the large 170 mL beaker and add a powder packet
of active carbon.
To access the help screens press HELP.
The instrument will display additional information related to the
current screen. To read all the available information, scroll the
text using the s t keys.
Press the Support key to access a screen with Hanna service
centers and their contact details.
Press the Accessories key to access a list of instrument reagents
and accessories.
To exit support or accessories screens press ESC and the instrument
will return to the previous help screen.
To exit help mode press the HELP or ESC key again and the
meter will return to the previously selected screen.
16 17
• Mix well using the spoon and then wait for 5 minutes.
• Fold a filter disc twice as shown in the figure. Separate
one side from the other three to form a cone. Insert the
folded filter disc in the funnel.
• Filter the treated sample into an empty beaker.
The sample is now ready.
• If the solution is still turbid or colored, treat it again with a packet of active carbon. After use, throw
the filter disc away and wash the syringe and the filter assembly well. Always use a new disc for
another sample.
• Remove the cap and fill the Demineralizer Bottle with tap water.
• Replace the cap and shake gently for at least 2 minutes.
CONCENTRATED SAMPLES:
If the analysis result is over the method range, the sample should be diluted. The following procedure
describe how to dilute the sample by a factor “N” (that is, to dilute by “N times”):
• Use the graduated cylinder to measure exactly V mL of sample. For volumes V < 20 mL, accurately
dose the sample by mean of the syringe.
Note: To measure exactly 5 mL of sample with the syringe, push the plunger completely into the
syringe and insert the tip into the sample. Pull the plunger out until the lower edge of the seal is on
the 5 mL mark of the syringe.
• Open the upper part of the Demineralizer Bottle cap and gently squirt the demineralized water into the
cylinder, up to the 100 mL mark.
Note: The ion exchange resin contained in the Demineralizer Bottle is provided with an indicator
substance. The indicator will change from green to blue when the resin has been exhausted and needs
to be replaced.
• Pour the solution in the 170 mL beaker, replace the cap and invert several times to mix.
18 19

• If the solution contains some turbidity or color, add a powder packet of active carbon and follow the
procedure described in previous section Colored or Turbid Samples.
• Calculate the dilution factor N:
N = 100/V
Where:
V is the volume of original sample poured in the cylinder, expressed in mL, and 100 is the final volume
in the cylinder, expressed in mL.
• When performing the reading, pay attention to multiply the read value by the dilution factor in order
to obtain the real concentration of the analyte in the original sample:
Example:
Reading = value A
Dilution factor = N
Real value in the original sample = A x N
Note: The methods Potassium Medium Range and Potassium High Range require a dilution of 1:5
(N = 5, V = 20 mL) and 1:10 (N = 10, V = 10 mL) of the sample. As the dilution is always
done, it is already included in the final result and is not necessary to multiply by the dilution factor.
ALUMINUM
SPECIFICATIONS
Range 0.00 to 1.00 mg/L
Resolution 0.01 mg/L
Accuracy ±0.02 mg/L ±4% of reading at 25 °C
Typical EMC ±0.01 mg/L
Deviation
Light Source Tungsten lamp with narrow band interference filter @ 525 nm
Method Adaptation of the aluminon method. The reaction between aluminum and reagents
causes a reddish tint in the sample.
REQUIRED REAGENTS
Code Description Quantity
HI 93712A-0 Ascorbic acid 1 packet
HI 93712B-0 Aluminon reagent 1 packet
HI 93712C-0 Bleaching powder 1 packet
REAGENT SETS
HI 93712-01 Reagents for 100 tests
HI 93712-03 Reagents for 300 tests
For other accessories see page 124.
MEASUREMENT PROCEDURE
• Select the
the
Method Selection
Aluminum
method using the procedure described in
section (see page 12).
• Fill a graduated beaker with 50 mL of sample.
• Add the content of one packet of HI 93712A-0 Ascorbic acid
and mix until completely dissolved.
• Add the content of one packet of HI 93712B-0 Aluminon
reagent and mix until completely dissolved. This is the sample.
• Fill two cuvettes with 10 mL of sample each (up to the mark).
20 21
10 mL
# 1
10 mL
# 2
Aluminum
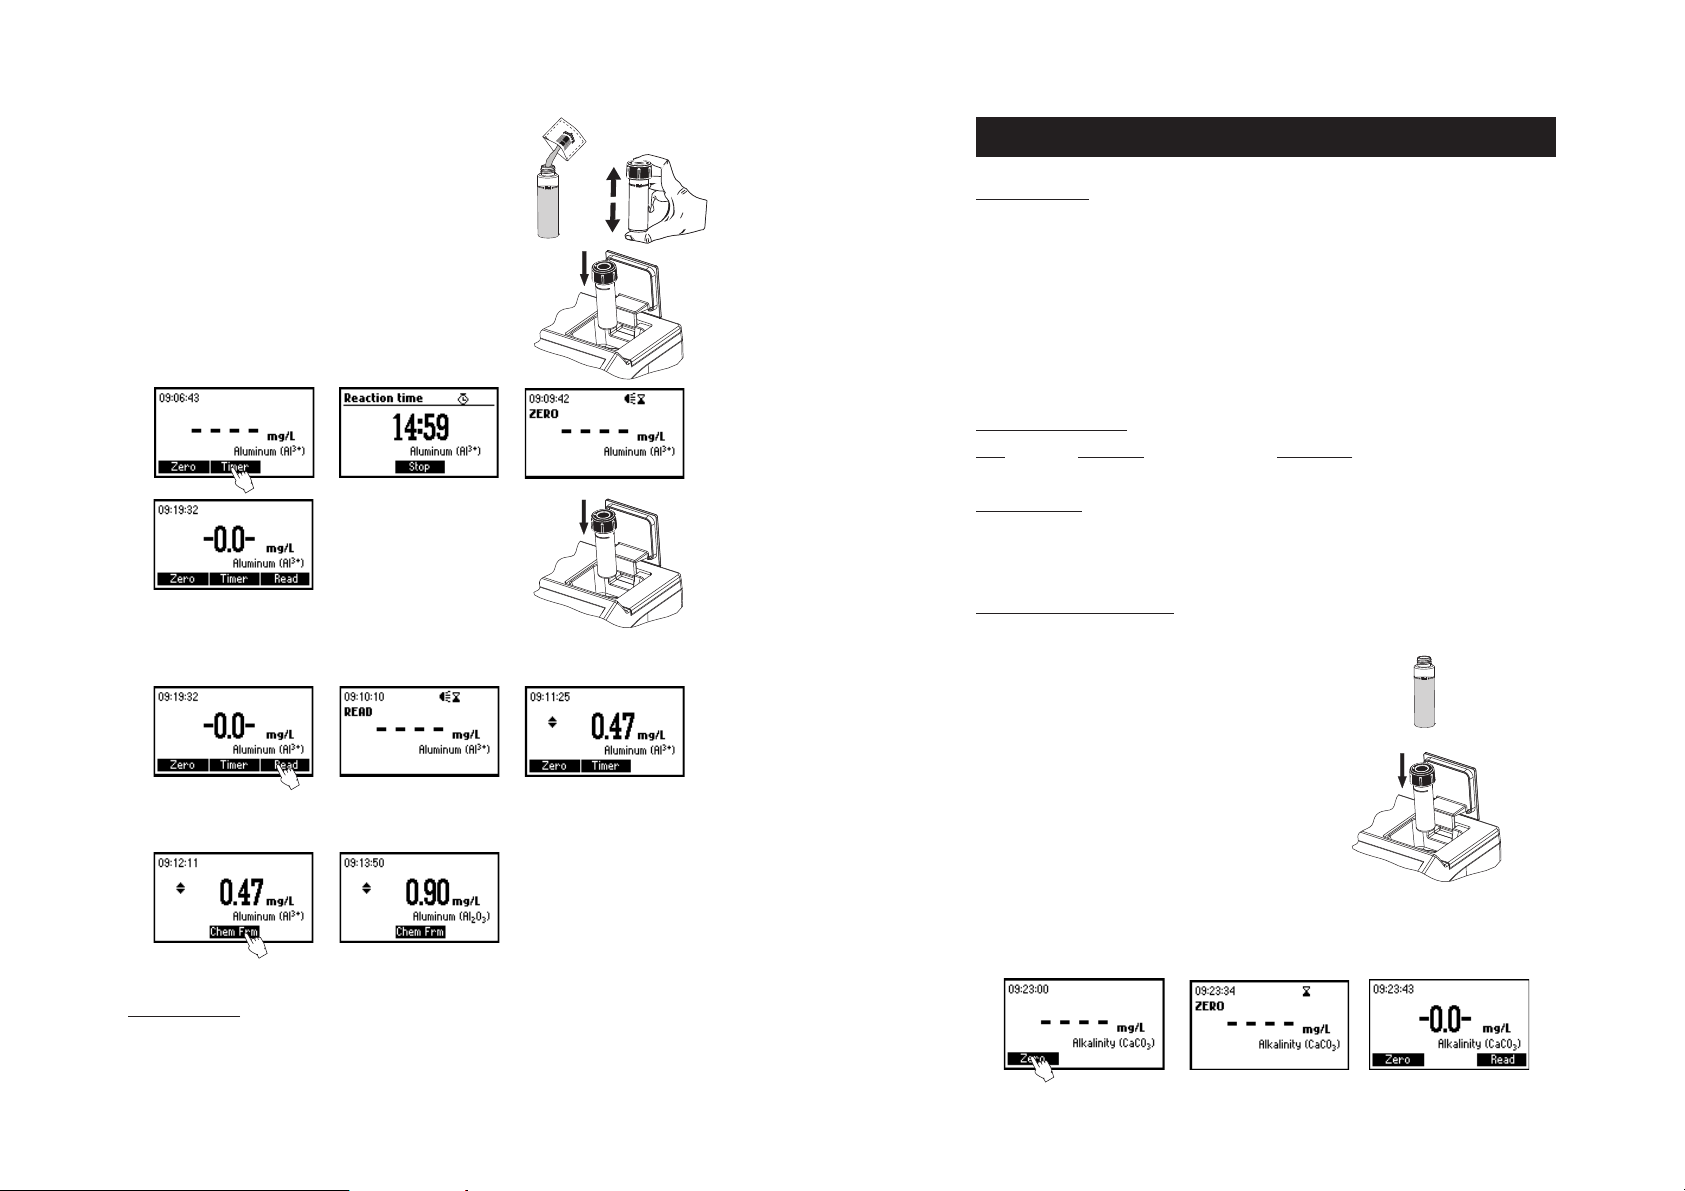
• Add the content of one packet of HI 93712C-0 Bleaching
powder to one of the two cuvettes. Replace the cap and shake
vigorously until completely dissolved. This is the blank.
# 1
• Place the blank into the holder and close the lid.
• Press Timer and the display will show the countdown prior to
# 1
zeroing the blank. Alternatively wait for 15 minutes and then press
Zero. The display will show “-0.0-“ when the meter is zeroed and
ready for measurement.
# 2
• Remove the blank and insert the other cuvette into the instrument.
• Press the Read key and the meter will perform the reading. The instrument displays the results in
mg/L of aluminum.
ALKALINITY
SPECIFICATIONS
Range 0 to 500 mg/L (as CaCO3)
Resolution 5 mg/L
Accuracy ±5 mg/L ±10 % of reading at 25 °C
Typical EMC ±5 mg/L
Deviation
Light Source Tungsten lamp with narrow band interference filter @ 575 nm
Method Colorimetric Method. The reaction causes a distinctive range of colors from yellow to
green to greenish blue to develop.
REQUIRED REAGENTS
Code Description Quantity/test
HI 93755-0 Alkalinity Indicator Reagent 1 mL
REAGENT SETS
HI 93755-01 Reagents for 100 tests
HI 93755-03 Reagents for 300 tests
For other accessories see page 124.
MEASUREMENT PROCEDURE
• Select the
in the
Method Selection
Alkalinity
method using the procedure described
section (see page 12).
10 mL
• Press s or t to access the second level functions.
• Press the Chem Frm key to convert the result in mg/L of Al2O3.
• Press s or t to return to the measurement screen.
INTERFERENCES
Interference may be caused by:
Iron above 20 mg/L, Alkalinity above 1000 mg/L, Phosphate above 50 mg/L; Fluoride must be absent.
Aluminum
22 23
• Fill the cuvette with 10 mL of unreacted sample (up to the
mark) and replace the cap.
• Place the cuvette into the holder and close the lid.
• Press the Zero key. The display will show “-0.0-” when the meter is zeroed and ready for
measurement.
Alkalinity
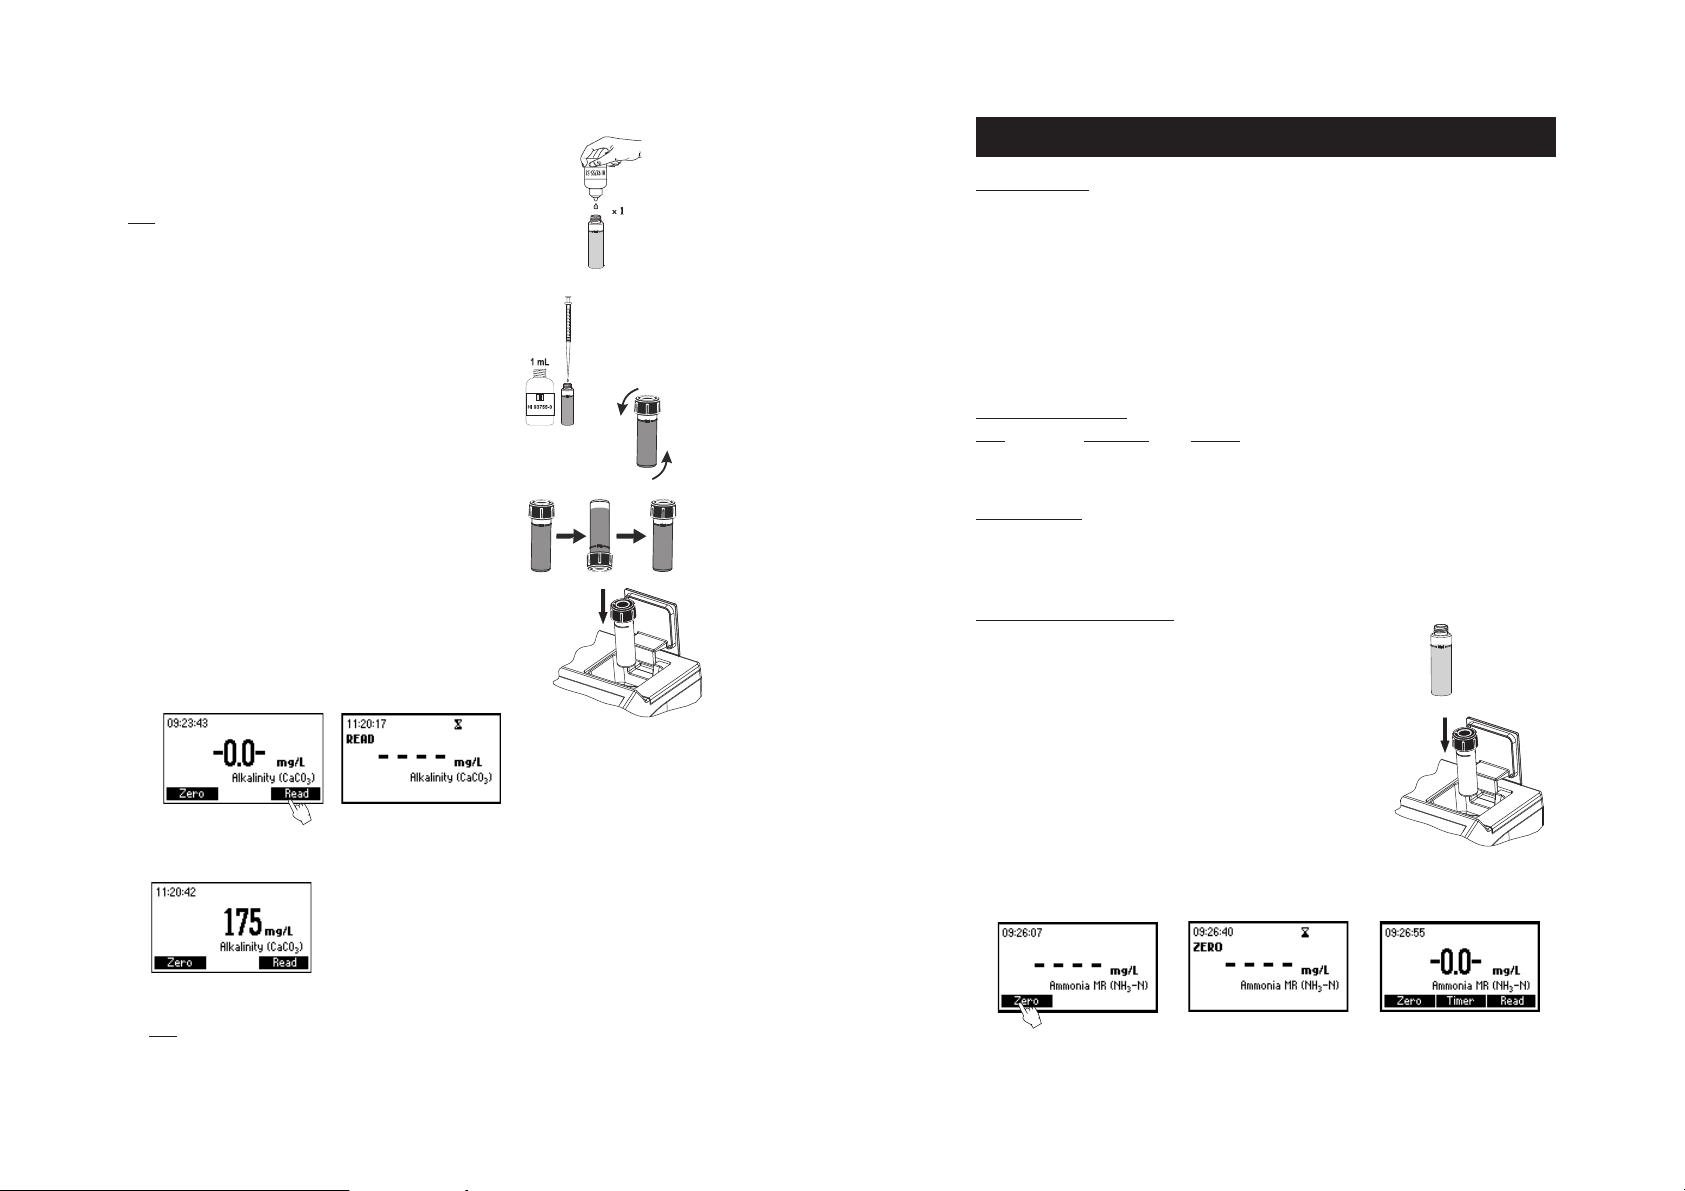
• Remove the cuvette.
Note: Any chlorine present in the sample will interfere with the
reading. To remove the chlorine interference add one drop
of HI 93755-53 Chlorine Remover to the unreacted sample.
• Carefully add exactly 1 mL of HI 93755-0 Liquid Alkalinity
Reagent using the supplied syringe.
• Replace the cap and invert 5 times.
• Reinsert the cuvette into the instrument and close the lid.
• Press Read to start the reading.
AMMONIA MEDIUM RANGE
SPECIFICATIONS
Range 0.00 to 10.00 mg/L
Resolution 0.01 mg/L
Accuracy ±0.05 mg/L ±5% of reading at 25 °C
Typical EMC ±0.01 mg/L
Deviation
Light Source Tungsten lamp with narrow band interference filter @ 420 nm
Method Adaptation of the
Nessler method. The reaction between ammonia and reagents causes a yellow tint in
the sample.
REQUIRED REAGENTS
Code Description Quantity
HI 93715A-0 First Reagent 4 drops (6 drops for seawater)
HI 93715B-0 Second Reagent 4 drops (10 drops for seawater)
REAGENT SETS
HI 93715-01 Reagents for 100 tests
HI 93715-03 Reagents for 300 tests
For other accessories see page 124.
MEASUREMENT PROCEDURE
• Select the
• Fill the cuvette with 10 mL of unreacted sample (up to the mark)
Ammonia MR
the
Method Selection
and replace the cap.
section (see page 12).
ASTM Manual of Water and Environmental Technology, D1426-92
method using the procedure described in
,
10 mL
• The instrument displays the results in mg/L of alkalinity (CaCO3).
Note: If using a meter with software version 1.14 or earlier, readings can be improved for samples
with less than 75 ppm alkalinity by adding 0.7 mL of reagent instead of 1.0 mL.
Alkalinity
24 25
• Place the cuvette into the holder and close the lid.
• Press the Zero key. The display will show “-0.0-” when the meter is zeroed and ready for
measurement.
Ammonia MR
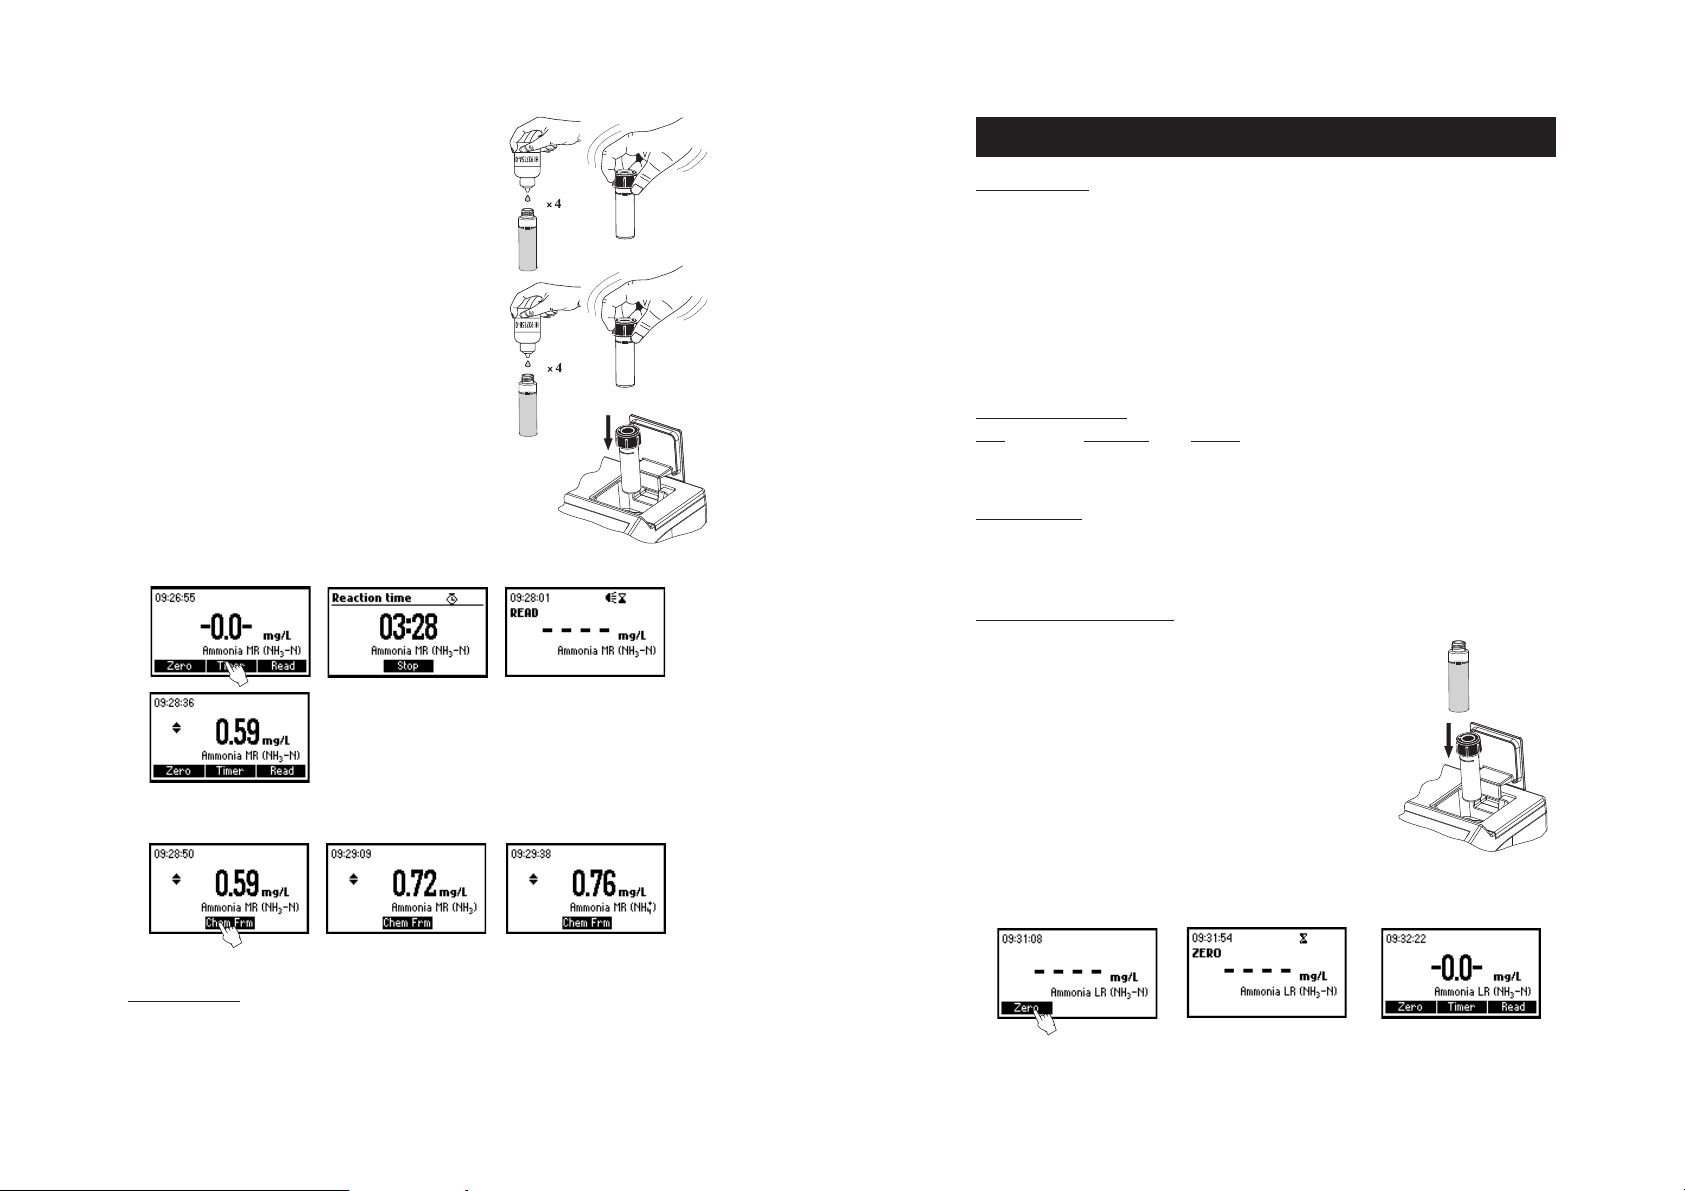
• Remove the cuvette.
AMMONIA LOW RANGE
• Add 4 drops of HI 93715A-0 First Reagent (6 drops for
seawater analysis). Replace the cap and mix the solution.
• Add 4 drops of HI 93715B-0 Second Reagent (10 drops for
seawater analysis). Replace the cap and mix the solution.
• Reinsert the cuvette into the instrument.
• Press Timer and the display will show the countdown prior to the
measurement or, alternatively, wait for 3 minutes and 30 seconds
and press Read. When the timer ends the meter will perform the
reading. The instrument displays the results in mg/L of ammonia
nitrogen (NH3-N).
SPECIFICATIONS
Range 0.00 to 3.00 mg/L
Resolution 0.01 mg/L
Accuracy ±0.04 mg/L ±4% of reading at 25 °C
Typical EMC ±0.01 mg/L
Deviation
Light Source Tungsten lamp with narrow band interference filter @ 420 nm
Method Adaptation of the
ASTM Manual of Water and Environmental Technology, D1426-92
Nessler method. The reaction between ammonia and reagents causes a yellow tint in
the sample.
REQUIRED REAGENTS
Code Description Quantity
HI 93700A-0 First Reagent 4 drops (6 drops for seawater)
HI 93700B-0 Second Reagent 4 drops (10 drops for seawater)
REAGENT SETS
HI 93700-01 Reagents for 100 tests
HI 93700-03 Reagents for 300 tests
For other accessories see page 124.
MEASUREMENT PROCEDURE
• Select the
• Fill the cuvette with 10 mL of unreacted sample (up to the mark)
Ammonia LR
Method Selection
section (see page 12).
and replace the cap.
method using the procedure described in the
,
10 mL
• Press s or t to access the second level functions.
• Press the Chem Frm key to convert the result in mg/L of ammonia (NH3) and ammonium (NH
+
4
• Press s or t to return to the measurement screen.
INTERFERENCES
Interference may be caused by:
acetone, alcohols, aldehydes, glycine, hardness above 1 g/L, iron, organic chloramines, sulfide, various
aliphatic and aromatic amines.
Ammonia MR
26 27
• Place the cuvette into the holder and close the lid.
).
• Press the Zero key. The display will show “-0.0-” when the meter is zeroed and ready for
measurement.
Ammonia LR
• Remove the cuvette.
• Add 4 drops of HI 93700A-0 First Reagent (6 drops for
seawater analysis). Replace the cap and mix the solution.
• Add 4 drops of HI 93700B-0 Second Reagent (10 drops for
seawater analysis). Replace the cap and mix the solution.
• Reinsert the cuvette into the instrument.
• Press Timer and the display will show the countdown prior to the
measurement or, alternatively, wait for 3 minutes and 30 seconds and
press Read. When the timer ends the meter will perform the reading.
The instrument displays the results in mg/L of ammonia nitrogen
(NH3-N).
BROMINE
SPECIFICATIONS
Range 0.00 to 8.00 mg/L
Resolution 0.01 mg/L
Accuracy ±0.08 mg/L ±3% of reading at 25 °C
Typical EMC ±0.01 mg/L
Deviation
Light Source Tungsten lamp with narrow band interference filter @ 525 nm
Method Adaptation of the
18
th
edition
pink tint in the sample.
REQUIRED REAGENTS
Code Description Quantity
HI 93716-0 DPD Reagent 1 packet
REAGENT SETS
HI 93716-01 Reagents for 100 tests
HI 93716-03 Reagents for 300 tests
For other accessories see page 124.
MEASUREMENT PROCEDURE
• Select the
• Fill the cuvette with 10 mL of unreacted sample (up to the
Bromine
method using the procedure described in the
Method Selection
section (see page 12).
mark) and replace the cap.
Standard Methods for the Examination of Water and Wastewater,
, DPD method. The reaction between bromine and the reagent causes a
10 mL
• Press s or t to access the second level functions.
• Press the Chem Frm key to convert the result in mg/L of ammonia (NH3) and ammonium (NH
+
4
• Press s or t to return to the measurement screen.
INTERFERENCES
Interference may be caused by: acetone, alcohols, aldehydes, glycine, hardness above 1 g/L, iron, organic
chloramines, sulfide, various aliphatic and aromatic amines.
Ammonia LR
28 29
• Place the cuvette into the holder and close the lid.
).
• Press the Zero key. The display will show “-0.0-” when the meter is zeroed and ready for
measurement.
Bromine
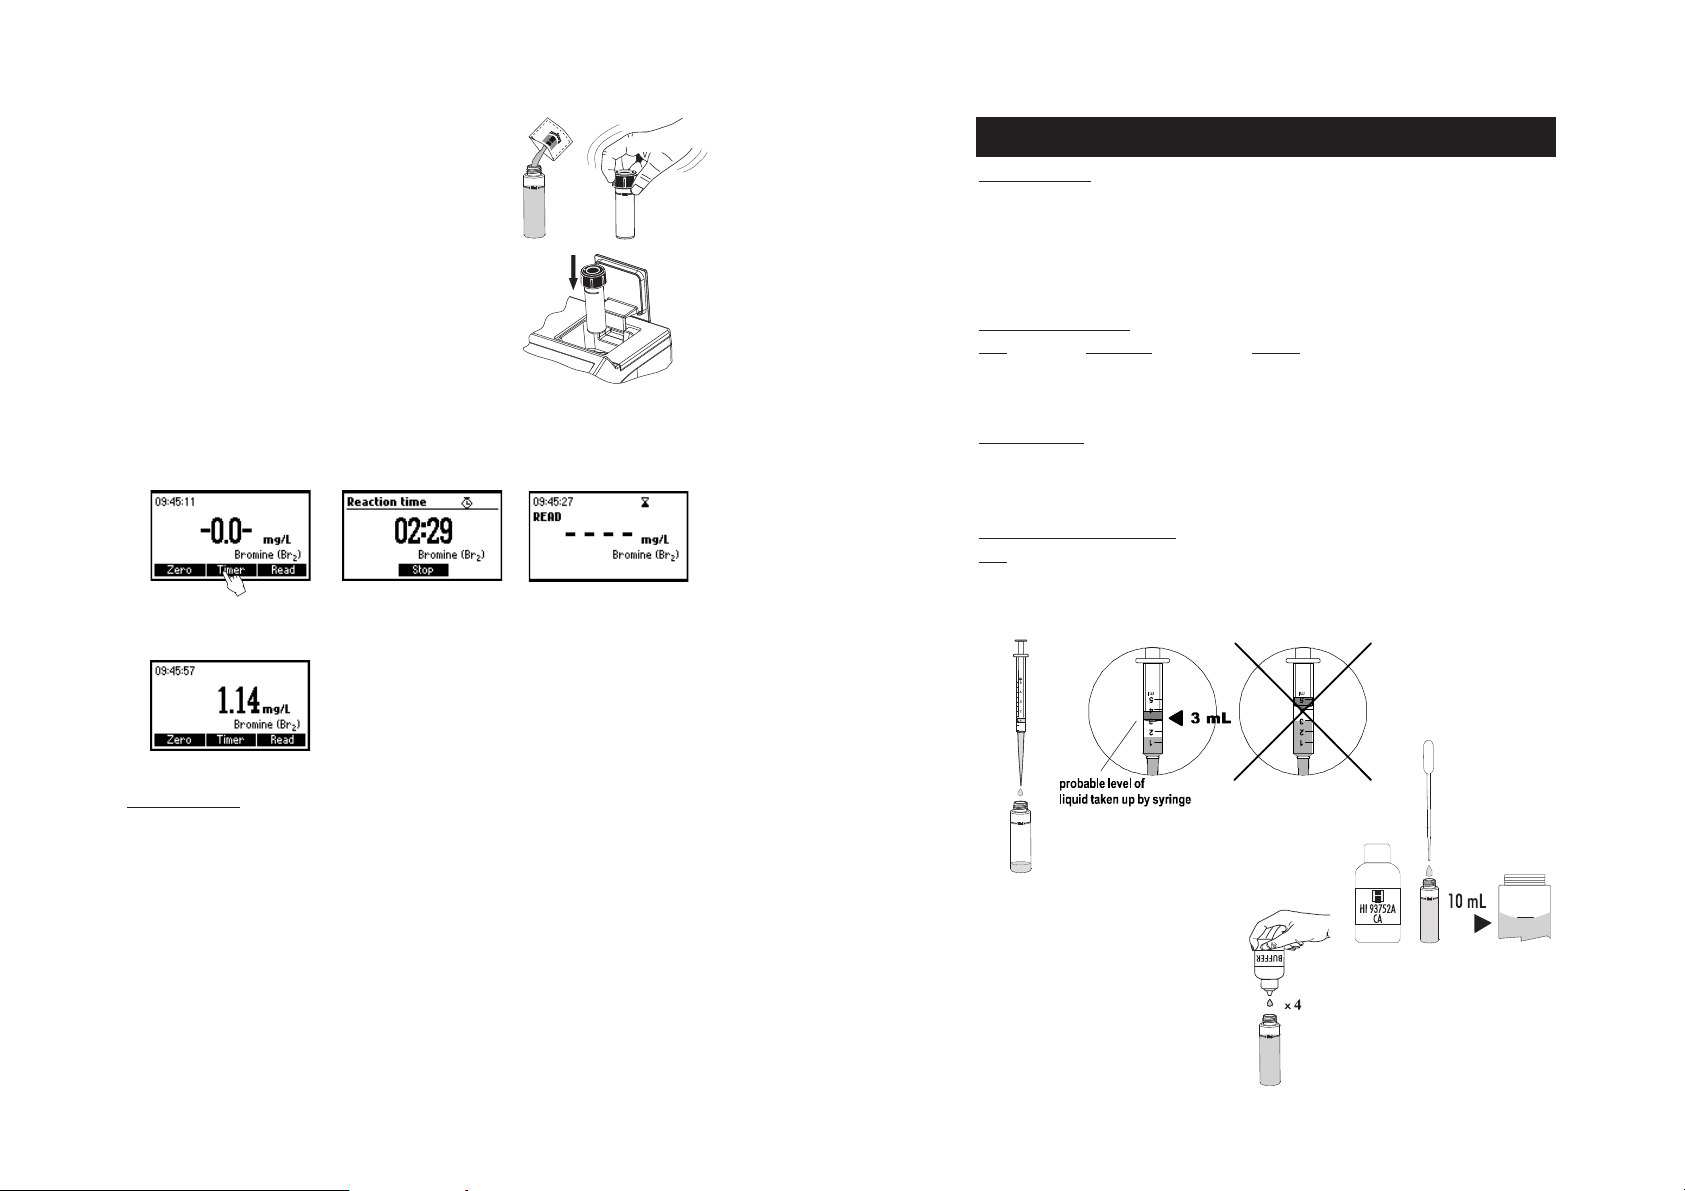
• Remove the cuvette and add the content of one packet of
HI 93716-0 DPD reagent. Replace the cap and shake gently for
about 20 seconds to dissolve most of the reagent.
• Reinsert the cuvette into the instrument.
• Press Timer and the display will show the countdown prior to the measurement or, alternatively, wait
for 2 minutes and 30 seconds and press Read. When the timer ends the meter will perform the
reading.
CALCIUM
SPECIFICATIONS
Range 0 to 400 mg/L
Resolution 10 mg/L
Accuracy ±10 mg/L ±5% of reading at 25 °C
Light Source Tungsten lamp with narrow band interference filter @ 466 nm
Method Adaptation of the Oxalate method.
REQUIRED REAGENTS
Code Description Quantity
- Buffer Reagent 4 drops
HI 93752A-0 Ca Calcium Buffer Reagent 7 mL
HI 93752B-0 Ca Calcium Oxalate Reagent 1 mL
REAGENT SETS
HI 937521-01 Reagents for 50 tests
HI 937521-03 Reagents for 150 tests
For other accessories see page 124.
MEASUREMENT PROCEDURE
Note: for sample preparation follow the COLORED OR TURBID SAMPLES procedure at page 17.
• Select the
Calcium
method using the procedure described in the
Method Selection
section (see page 12).
• The instrument displays the results in mg/L of bromine.
INTERFERENCES
Interference may be caused by: Chlorine, Iodine, Ozone, Oxidized forms of Chromium and Manganese.
In case of water with hardness greater than 500 mg/L CaCO3, shake the sample for approximately
2 minutes after adding the reagent.
In case of water with alkalinity greater than 250 mg/L CaCO3 or acidity greater than 150 mg/L CaCO3,
the color of the sample may develop only partially, or may rapidly fade. To resolve this, neutralize the
sample with diluted HCl or NaOH.
Bromine
30 31
• Using the 5 mL syringe add exactly 3.00 mL of sample to the cuvette.
3 mL of sample
• Use the pipette to fill the cuvette up to the
10 mL mark with the HI 93752A-0 Calcium
Buffer Reagent.
• Add 4 drops of Buffer Reagent.
Calcium
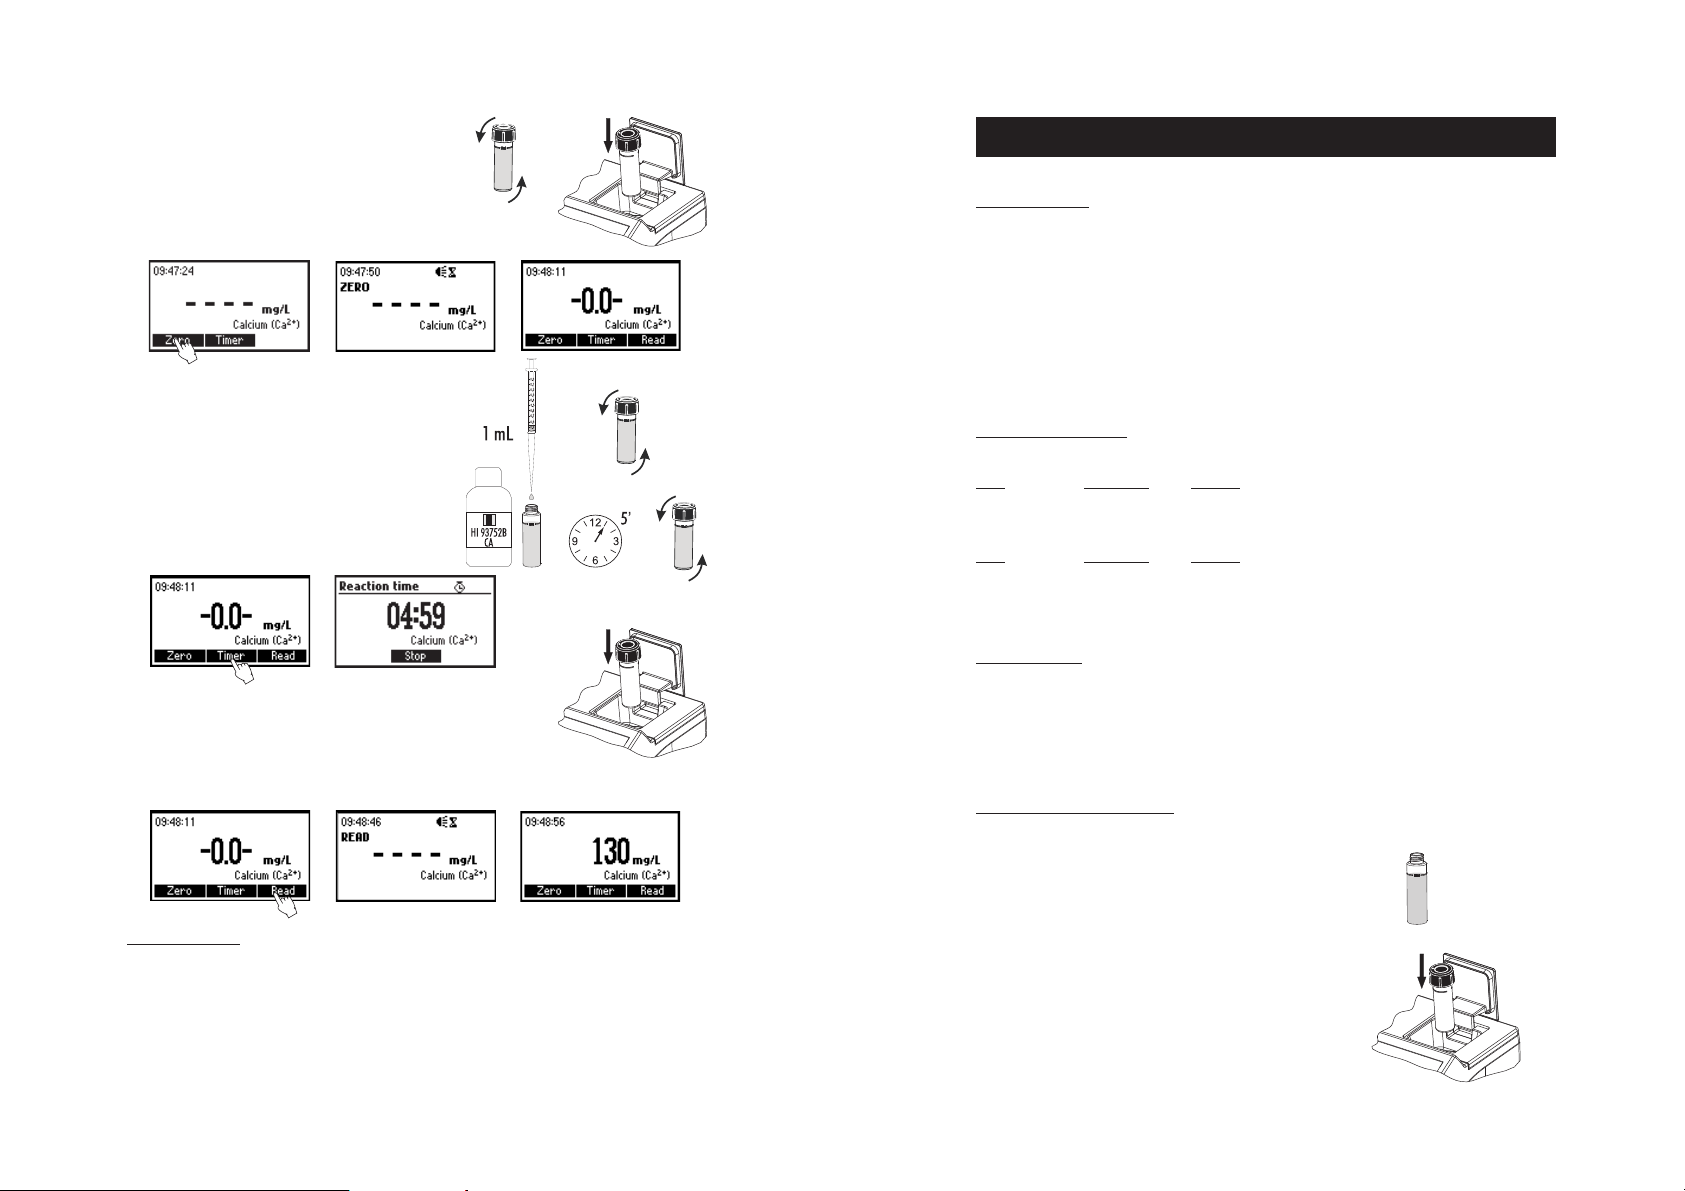
• Replace the cap and invert several times to mix.
• Place the cuvette into the holder and close the lid.
• Press the Zero key. The display will show “-0.0-” when
the meter is zeroed and ready for measurement.
• Remove the cuvette.
• Using the 1 mL syringe, add exactly 1 mL of the
HI 93752B-0 Calcium Oxalate Reagent. Replace the
cap and invert the cuvette 10 times to mix (about
15 seconds).
• Press Timer or wait for 5 minutes. Then invert again
the cuvette 10 times to mix (about 15 seconds).
• Reinsert the cuvette into the instrument.
• Press Read to start the reading. The instrument displays the results in mg/L of Calcium.
INTERFERENCES:
Interferences may be caused by:
Acidity (as CaCO3) above 1000 mg/L
Alkalinity (as CaCO3) above 1000 mg/L
Magnesium (Mg2+) above 400 mg/L
FREE CHLORINE
FREE CHLORINEFREE CHLORINE
FREE CHLORINE
FREE CHLORINEFREE CHLORINE
SPECIFICATIONS
Range 0.00 to 2.50 mg/L
Resolution 0.01 mg/L
Accuracy ±0.03 mg/L ±3% of reading at 25 °C
Typical EMC ±0.01 mg/L
Deviation
Light Source Tungsten lamp with narrow band interference filter @ 525 nm
Method Adaptation of the
DPD reagent causes a pink tint in the sample.
EPA DPD method 330.5.
The reaction between free chlorine and the
REQUIRED REAGENTS
POWDER:
Code Description Quantity
HI 93701-0 DPD 1 packet
LIQUID:
Code Description Quantity
HI 93701A-F DPD1 Indicator 3 drops
HI 93701B-F DPD1 Buffer 3 drops
REAGENT SETS
HI 93701-F Reagents for 300 tests (liquid)
HI 93701-01 Reagents for 100 tests (powder)
HI 93701-03 Reagents for 300 tests (powder)
For other accessories see page 124.
MEASUREMENT PROCEDURE
• Select the
• Fill the cuvette with 10 mL of unreacted sample (up to the
• Place the cuvette into the holder and close the lid.
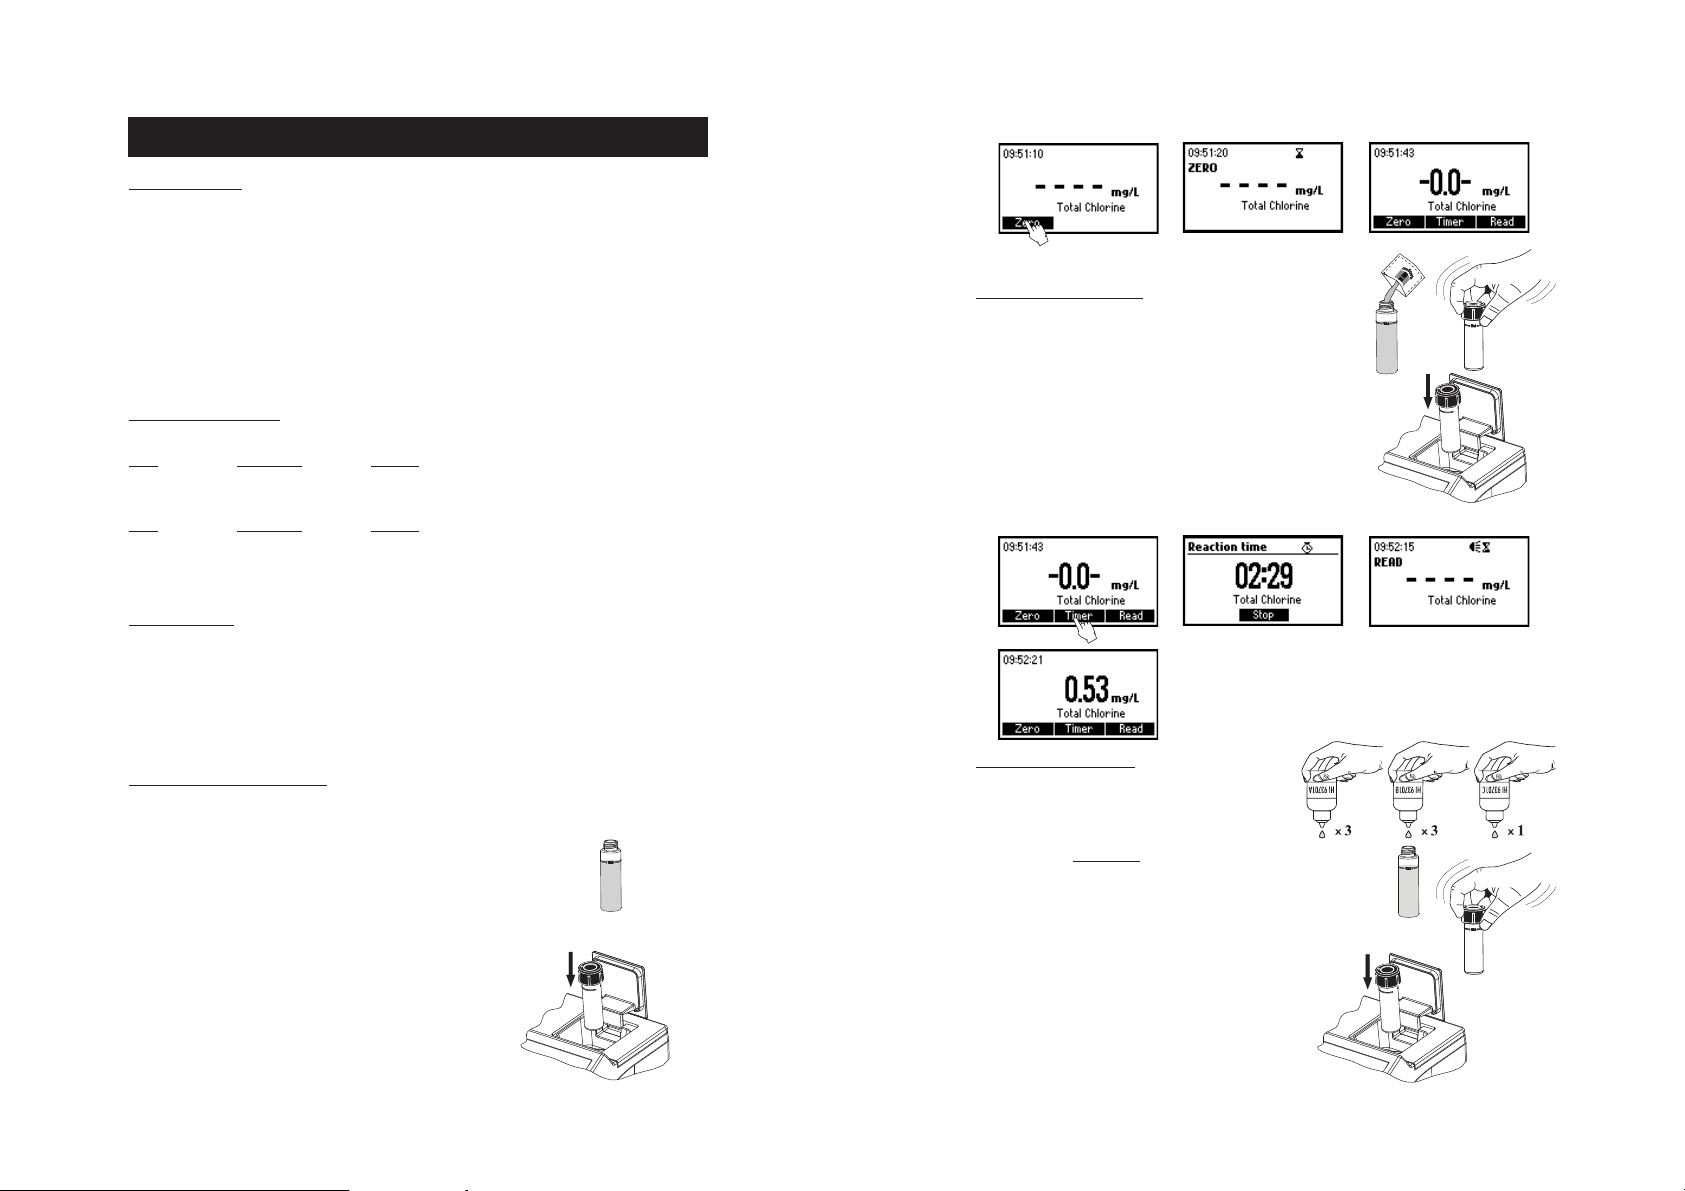
Free Chlorine
in the
Method Selection
mark) and replace the cap.
method using the procedure described
section (see page 12).
10 mL
Calcium
32 33
Free Chlorine
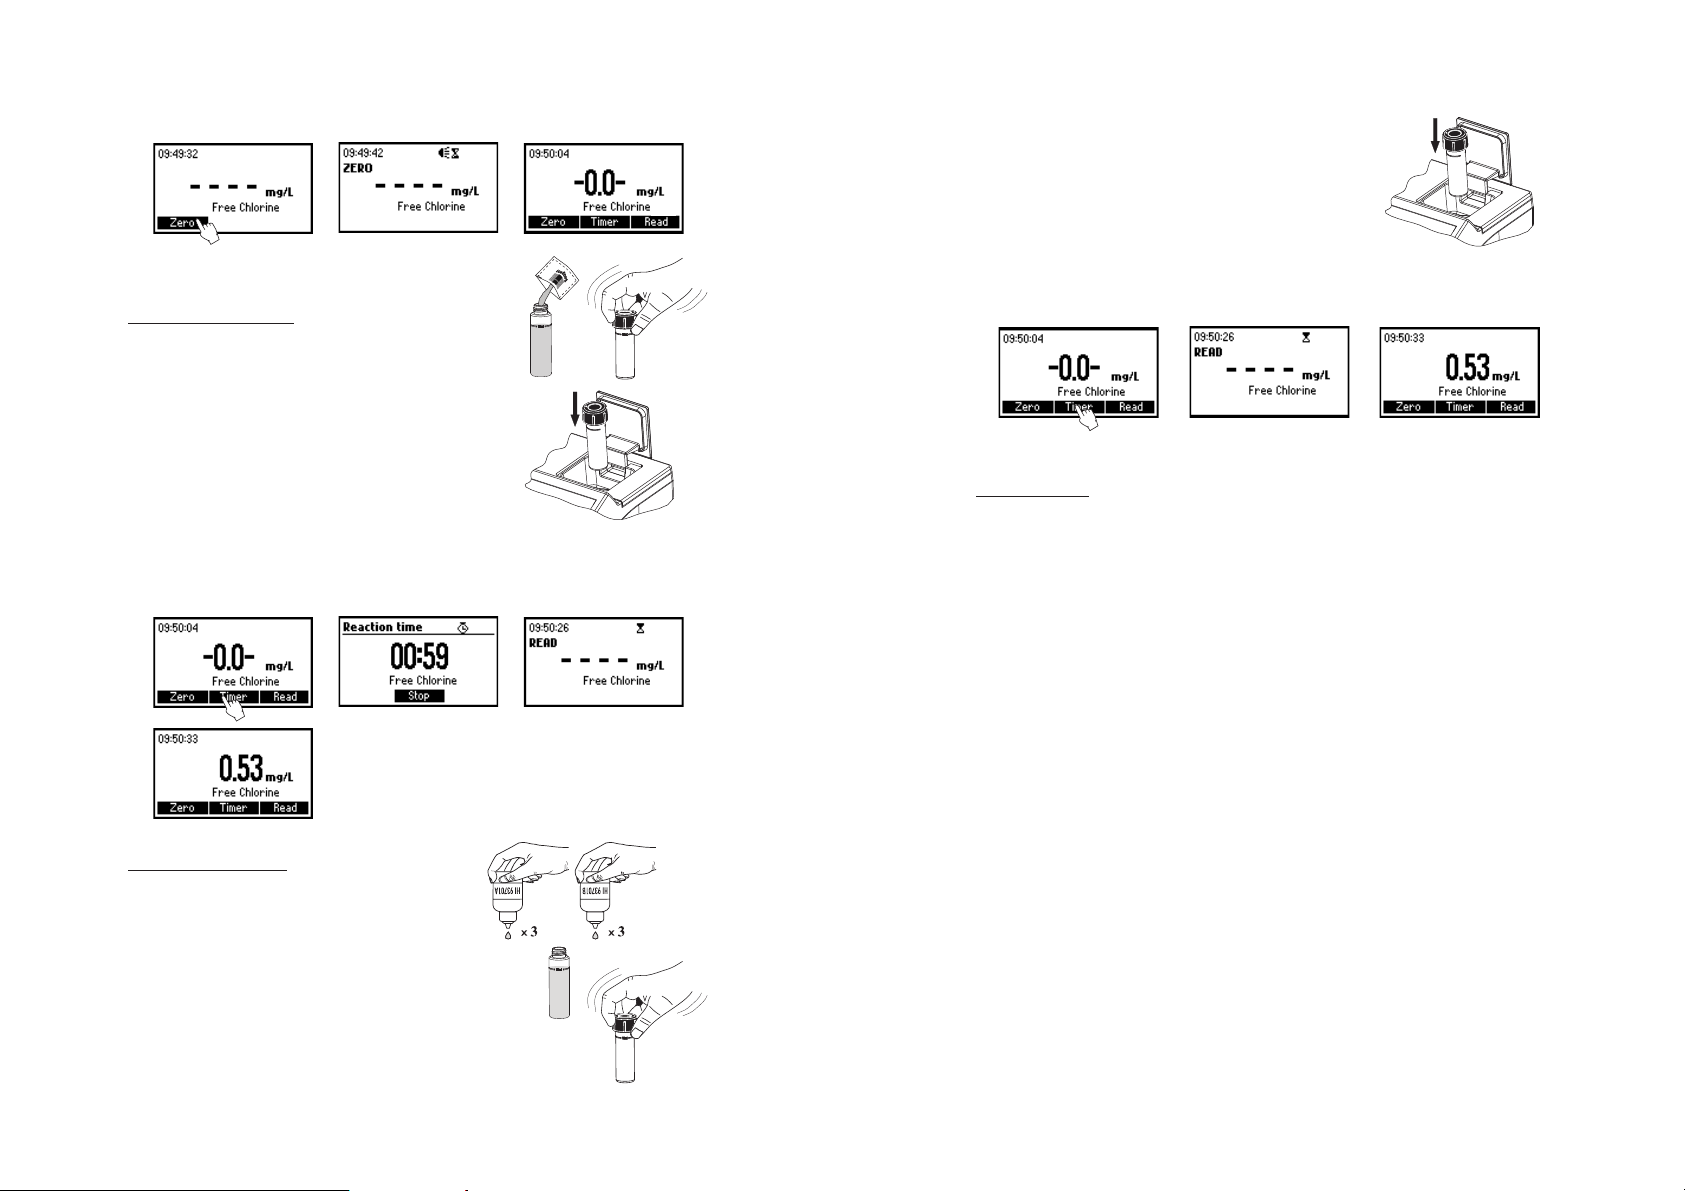
• Press the Zero key. The meter will show “-0.0-” when the meter is zeroed and ready for measurement.
• Remove the cuvette.
Powder reagents procedure
• Add the content of one packet of HI 93701 DPD reagent. Replace
the cap and shake gently for 20 seconds (or 2 minutes for seawater
analysis).
• Reinsert the cuvette into the instrument.
• Press Timer and the display will show the countdown prior to the measurement or, alternatively, wait
for 1 minute and press Read. When the timer ends the meter will perform the reading. The instrument
displays the results in mg/L of free chlorine.
• Reinsert the cuvette into the instrument.
• Press Read to start the reading. The instrument displays the results in mg/L of free chlorine.
INTERFERENCES
Interference may be caused by: Bromine, Iodine, Ozone, Oxidized forms of Chromium and Manganese.
In case of water with hardness greater than 500 mg/L CaCO3, shake the sample for approximately
2 minutes after adding the powder reagent.
In case of water with alkalinity greater than 250 mg/L CaCO3 or acidity greater than 150 mg/L CaCO3,
the color of the sample may develop only partially, or may rapidly fade. To resolve this, neutralize the
sample with diluted HCl or NaOH.
Liquid reagents procedure
• To an empty cuvette add 3 drops of HI 93701A-F DPD1
indicator and 3 drops of HI 93701B-F DPD1 buffer. Swirl
gently to mix, and immediately add 10 mL of unreacted
sample. Replace the cap and shake gently again.
34 35
Free ChlorineFree Chlorine
TOTAL CHLORINE
SPECIFICATIONS
Range 0.00 to 3.50 mg/L
Resolution 0.01 mg/L
Accuracy ±0.03 mg/L ±3% of reading at 25 °C
Typical EMC ±0.01 mg/L
Deviation
Light Source Tungsten lamp with narrow band interference filter @ 525 nm
Method Adaptation of the
DPD reagent causes a pink tint in the sample.
REQUIRED REAGENTS
POWDER:
Code Description Quantity
HI 93711-0 DPD 1 packet
LIQUID:
Code Description Quantity
HI 93701A-T DPD1 indicator 3 drops
HI 93701B-T DPD1 buffer 3 drops
HI 93701C DPD3 solution 1 drop
REAGENT SETS
HI 93701-T Reagents for 300 total chlorine tests (liquid)
HI 93711-01 Reagents for 100 total chlorine tests (powder)
HI 93711-03 Reagents for 300 total chlorine tests (powder)
For other accessories see page 124.
EPA DPD method 330.5.
The reaction between the chlorine and the
• Press the Zero key. The meter will show “-0.0-” when the meter is zeroed and ready for measurement.
• Remove the cuvette.
Powder reagents procedure
• Add 1 packet of HI 93711 DPD reagent. Replace the cap and
shake gently for 20 seconds (or 2 minutes for seawater analysis).
• Reinsert the cuvette into the instrument.
• Press Timer and the display will show the countdown prior to the
measurement or, alternatively, wait for 2 minutes and 30 seconds
and press Read. When the timer ends the meter will perform the
reading. The instrument displays the results in mg/L of total
chlorine.
MEASUREMENT PROCEDURE
• Select the
described in the
• Fill the cuvette with 10 mL of unreacted sample (up to the
mark) and replace the cap.
• Place the cuvette into the holder and close the lid.
Total Chlorine
Total Chlorine
Method Selection
method using the procedure
section (see page 12).
36 37
10 mL
Liquid reagents procedure
• To an empty cuvette add 3 drops of HI 93701A-T
DPD1 indicator, 3 drops of HI 93701B-T DPD1 buffer
and 1 drop of HI 93701C DPD3 solution. Swirl gently
to mix and immediately add 10 mL of unreacted
sample. Replace the cap and shake gently again.
• Reinsert the cuvette into the instrument.
Total Chlorine
• Press Timer and the display will show the countdown prior to the measurement or, alternatively, wait
for 2 minutes and 30 seconds and press Read. When the timer ends the meter will perform the
reading.
• The instrument displays the results in mg/L of total chlorine.
Note: free and total chlorine have to be measured separately with fresh unreacted samples following
the related procedure if both values are requested.
INTERFERENCES
Interference may be caused by: Bromine, Iodine, Ozone, Oxidized forms of Chromium and Manganese.
In case of water with hardness greater than 500 mg/L CaCO3, shake the sample for approximately
2 minutes after adding the powder reagent.
In case of water with alkalinity greater than 250 mg/L CaCO3 or acidity greater than 150 mg/L CaCO3,
the color of the sample may develop only partially, or may rapidly fade. To resolve this, neutralize the
sample with diluted HCl or NaOH.
CHLORINE DIOXIDE
SPECIFICATIONS
Range 0.00 to 2.00 mg/L
Resolution 0.01 mg/L
Accuracy ±0.10 mg/L ±5% of reading at 25 °C
Typical EMC ±0.01 mg/L
Deviation
Light Source Tungsten lamp with narrow band interference filter @ 575 nm
Method Adaptation of the Chlorophenol Red method. The reaction between chlorine dioxide and
reagents causes a colorless to purple tint in the sample.
REQUIRED REAGENT
Code Description Quantity
HI 93738A-0 Reagent A 1 mL
HI 93738B-0 Dechlorinating Reagent B 1 packet
HI 93738C-0 Reagent C 1 mL
HI 93738D-0 Reagent D 1 mL
REAGENT SETS
HI 93738-01 Reagents for 100 tests
HI 93738-03 Reagents for 300 tests
For other accessories see page 124.
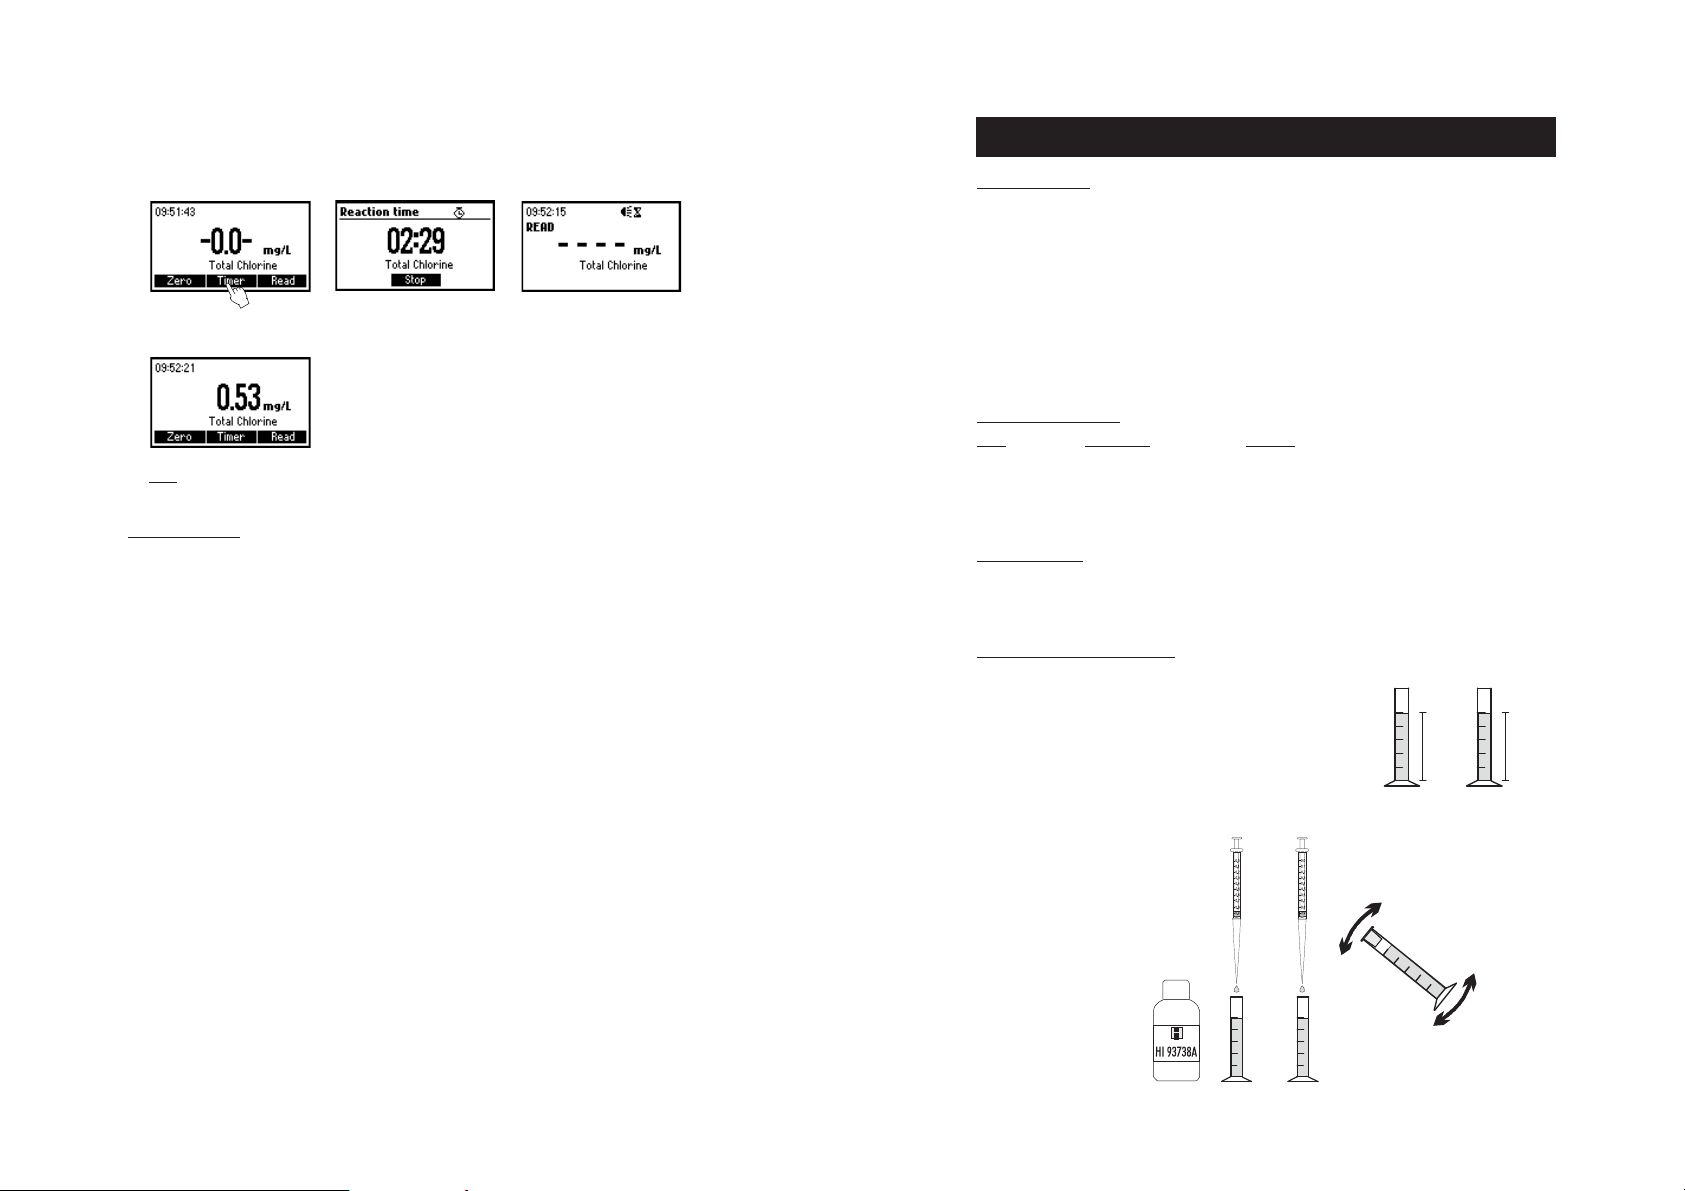
MEASUREMENT PROCEDURE
• Select the
described in the
• Fill two graduated mixing cylinders (#1 & #2) up to the
25 mL mark with the sample.
Chlorine Dioxide
Method Selection
method using the procedure
section (see page 12).
# 1
25 mL
# 2
25 mL
Total Chlorine
• Add 0.5 mL of HI 93738A-0 Chlorine Dioxide Reagent to each cylinder (#1 & #2), close them and
invert several times to mix.
# 1 # 2
38 39
# 1 & # 2
Chlorine Dioxide
 Loading...