


WD-9999-14
User Manual
Guide de l’Utilisateur
Manual del Usuario Modelo
Space Saving 120 Volt
Portable Compact Electronic
Top Load Washer
French
Spanish
Quality
ß
Innovation
ß
Style
S
P
P
O
O
STAT
US
H
EA
V
Y
C
Y
CL
E
QU
I
CK
W
A
S
H
NO
RM
AL
Welcome to the world of
Haier Compact Portable Laundry!
• Efficient, Compact and Portable
• Easy Installation and Use
• Uses Convenient Standard120VAC -15 amp Outlets
• You can install them anywhere!
HLP021-WM
HLP021-WM
HLP021-WM

DANGER
Risk of child entrapment. Before throwing away your old
appliance, remove the door so that children may not easily
become trapped inside.
Thank you for purchasing our Haier
product. This easy-to-use manual will
guide you in getting the best use of
your washer.
Remember to record the model and
serial number. They are on a label in
back of the washer.
Model number
Serial number
Date of purchase
1
unpacking your washing machine
English English
1. Inspect and remove all packing materials. This includes the foam and any
adhesive tape both inside and outside of the unit.
2. Inspect and remove any remains of packing, tape or printed materials before
powering on the Washer.
product registration
Staple your receipt to your manual.
You will need it to obtain warranty service.
Please register your product online at www.prodregister.com/haier

IMPORTANT SAFETY
INSTRUCTIONS
Warning – To reduce the risk of fire, electric shock, or injury
to persons when using your appliance, follow basic
precautions, including the following:
1.
Read all instructions before using the appliance.
2. Use this appliance only for its intended purpose as described in this use and
care guide.
3. Use only detergents or softeners as recommended for use in this manual and
keep them out of the reach of children.
4. This appliance must be properly installed in accordance with the installation
instructions before it is used.
5. Never unplug your appliance by pulling on the power cord. Always grasp
the plug firmly and pull straight out from the outlet.
6. Replace immediately any worn power cords, loose plugs and power outlets.
7. Unplug your appliance before cleaning or before making any repairs.
8. If your old appliance is not being used, we recommend that you remove the
door. This will reduce the possibility of danger to children.
9. Do not operate your appliance in the presence of explosive fumes.
10. Do not use this appliance to wash clothes that have been soaked, spotted
or washed in gasoline, dry cleaning solvents or any other explosive or flam-
mable substances that may ignite and explode.
11. Clothes or rags used to clean flammable or explosive materials should not be
washed in this appliance until all traces of this material have been removed.
12. Do not add or mix any flammable or explosive substances to the wash.
13. Do not try to remove clothes while the tub is moving. Allow it to come to a
complete stop before reaching in.
14. The appliance’s loading door must be closed when the tub is spinning.
15. Do not operate your appliance when parts are missing or broken.
16. Do not use this appliance for commercial uses.
17. Do not operate this appliance unless all enclosure panels are properly in
place.
18. Do not tamper with controls.
19. To reduce the risk of injury, do not allow children to play in or on the
appliance. Close supervision of children is necessary when the appliance is
used near children.
2
WARNING

20. This appliance must be connected to a proper electrical outlet with the
correct electrical supply.
21. Proper grounding must be ensured to reduce the risk of shock and fire. DO
NOT CUT OR REMOVE THE GROUNDING PLUG. If you do not have a
three-prong electric receptacle outlet in the wall, have a certified electrician
install the proper receptacle. The wall receptacle MUST be properly
grounded.
22. Hydrogen gas may be produced if the water heater has not been used in
more than 2 weeks. This may be explosive under certain circumstances.
If this is the case turn on all the hot faucets and let the hot water run for a
few minutes before using this appliance. This will let the trapped hydrogen
escape. Avoid accidents during this process by refraining from turning
ON any electrical appliances, smoking, lighting a match/lighter, and using
flames.
23. Do not repair or replace any part of the appliance or attempt any servicing
unless specifically recommended in the user-repair instructions, which you
understand and have the skill to carry out.
If for any reason this product requires service, we strongly
recommend that a certified technician perform the service.
24. To reduce the risk of electric shock or fire, do not use extension cords or
adapters to connect the unit to an electrical power source.
SAVE THESE INSTRUCTIONS
HOUEHOLD USE ONLY
English English
3
Note:
Tools and Materials Required
You will need to use the following tools when installing your washer:
1. Phillips Screwdriver - For bottom plate.
2. Open End Plyers - To secure fintake hose.
3. Tape Measure - Check measurement of washer location.
4. Level - To balance washer.
5. Wrench - To attach and lock caster.
1 2 3 4 5

safety instructions
Avoid fire hazard or
electric shock. Do not use an extension
cord or an adapter plug. Do not remove
any prong from the power cord.
WARNING
Do not, under any
circumstances,
cut, remove,
or bypass the
grounding prong.
Grounding type
wall receptacle
Power supply
cord with 3-prong
grounding plug
Electrical Requirements
Grounding Instructions
This appliance must be grounded. It is equipped with a 3-wire cord having
a grounded plug. The plug must be plugged into an outlet which is properly
installed and grounded.
Warning! Improper use of the grounded wire can result in the risk of electric
shock. Consult a qualified electrician if necessary. Do not attempt to defeat this
safety feature by modifying the plug.
Avoid the use of an extension cord because it may overheat and cause a risk of
fire. However, if it is necessary to use an extension cord:
A. Use only 3-wire extension cord with 3-blade grounding plug.
B. The marked rating of the extension cord must be equal to or greater
than the rating of this appliance.
C. It should be positioned such that it does not drape over the counter
or tabletop where it can be pulled on children or tripped over.
Attempting any maintenance or cleaning:
To minimize the possibility of electric shock, unplug this appliance from the power
supply or disconnect the dryer at the household distribution panel by removing the
fuse or switching off the circuit breaker before attempting any
maintenance or cleaning (except the removal and cleaning of the lint filter).
Pressing the Power ON/OFF button to an off position or pressing Start /
PAUSE button, does NOT disconnect the appliance from the power supply.
Wiring Requirements
• This appliance must be plugged into at least a 15 AMP
110-115 VOLT, 60 HZ GROUNDED OUTLET.
WARNINGS:
4
Note:

PAGE
SAFETY INSTRUCTIONS ............................................................1-2
PARTS AND FEATURES .............................................................4-5
OPERATING YOUR WASHER .................................................6-11
UNPACKING AND ACCESSORIES INVENTORY ........................12
PROPER LOCATION ...................................................................13
INSTALLATION INSTRUCTIONS ........................................... 14-16
UNIT DIMENSIONS .................................................................... 17
ELECTRICAL CONNECTIONS....................................................... 18
PROPER CARE AND CLEANING ................................................19
TROUBLESHOOTING GUIDE ................................................ 20-21
WARRANTY................................................................................ 22
English English
table of contents
5
Unpacking
1. Remove all packing materials. This includes the foam base and all adhesive
tape holding the washer accessories inside and outside. Slide out and remove
the
bottom Styrofoam that is used to protect the washer from shipping damage
due to vibrations and shock.
2. Inspect and remove any remaining packing, tape or printed materials before
using the washer.
The bottom panel is located between the top foam used for
protection and box.
a
b
c
d
f
g
Sink Faucet
Quick Sink
Faucet
Adapter
Silver Faucet
Connector
HOSE
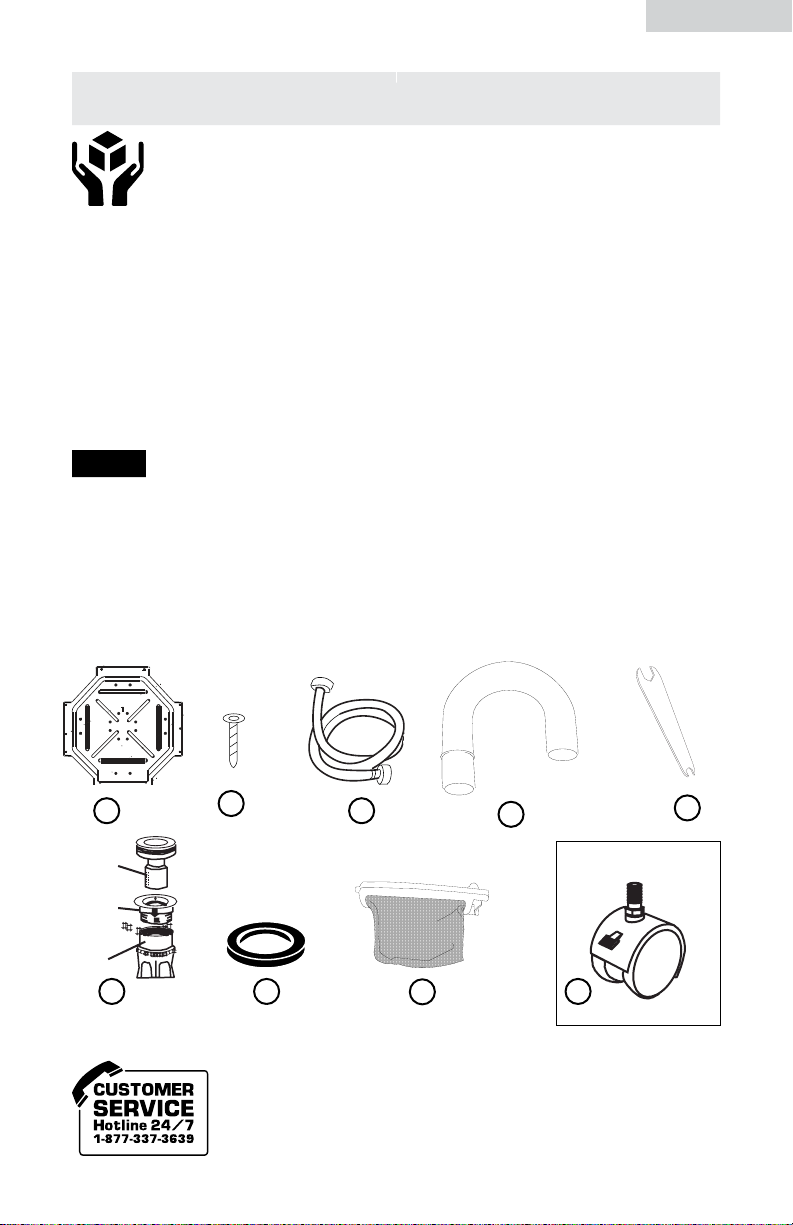
Check to make sure that the accessories are present and in
good condition. If you find that they are not in good condition
or are missing, please contact our customer service department
for assistance. Our Toll-Free number is
1-877-337-3639.
unpacking and checking parts
Parts
a) 1 Bottom Panel
b) 6 Screws for the Bottom Plate
c) 1 Water Inlet Hose
d) 1 Drain Hook (Gooseneck)
e)
1 Quick Sink Faucet Adapter
f)
2 Washers
g)
1 Lint Filter
h)
Optional 4 Pack
6
Note:
fi
h
e
fi) 4 Caster
1 Wrench
FRONT
FACE TO FLOOR
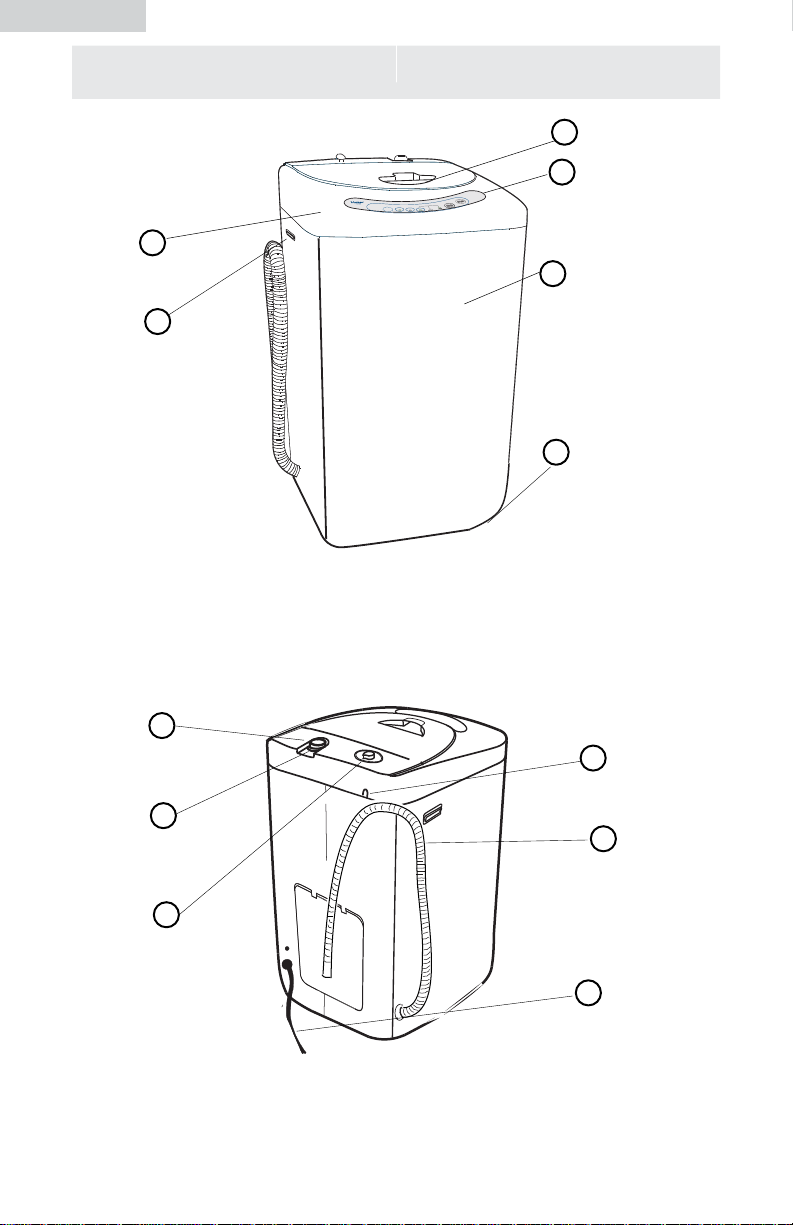
1. Top Lid
2. Control Panel
3. Washer Cabinet
4. Front Leveling Leg (or for Caster)
5. Cabinet Handle (located on both
sides of the washer)
6. Control panel
7. Water Inlet Fitting
8. Water Absorption Cushion
9. Water Level Selector
10. Power Cord Holder Clip
11. Drain Hose
12.
Power Cord (120 Volt / 60 Hz)
4
5
2
3
1
6
10
8
9
7
11
12
washer parts and features
Front View
Back View
English English
7
S
P
P
O
O
STAT
US
H
EA
V
Y
C
Y
CL
E
QU
I
CK
W
A
S
H
NO
RM
AL
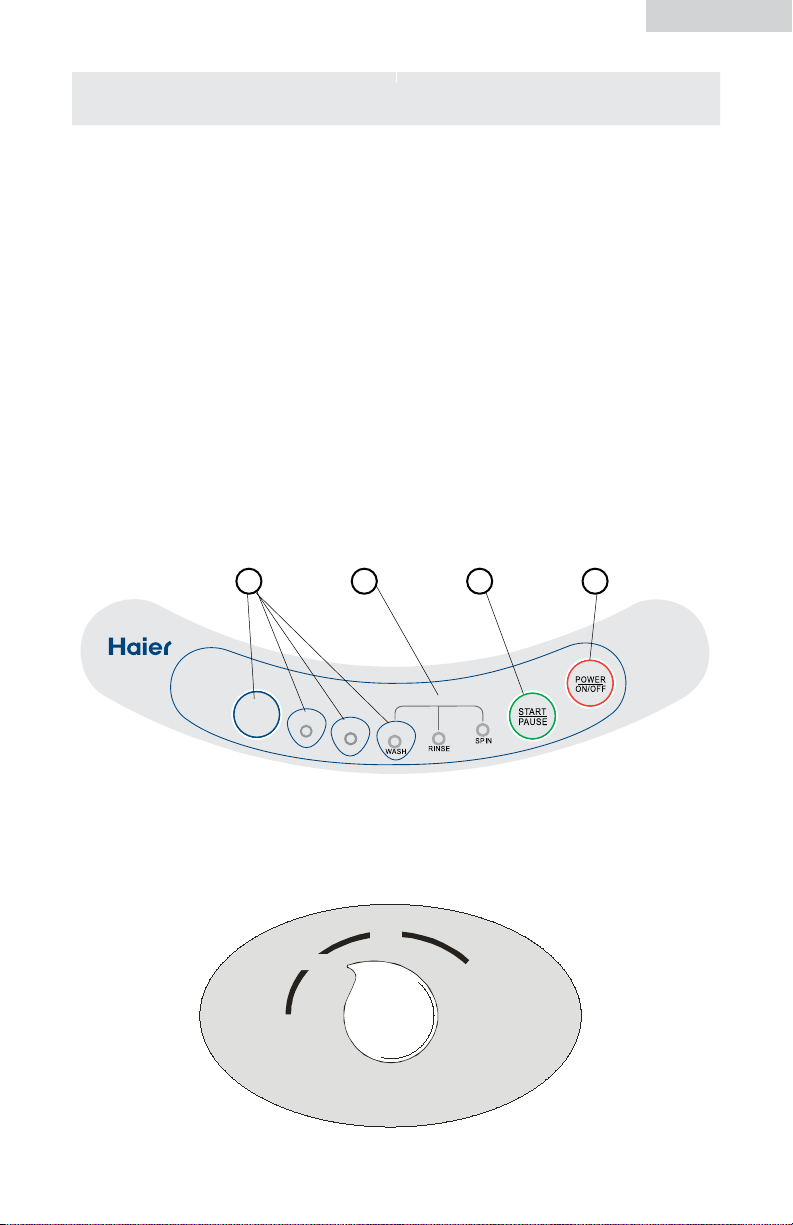
control panel
STATUS
HEAVY
CYCLE
QUICK WASH
NORMAL
1. Cycle Button
Choose washing cycle
Normal - Normal Wash
Heavy - Huge and heavy garments
Quick Wash - Small loads that are slightly soiled
2. Status Incicator Lights
Indicates cycle chosen with stages of cycle in operation.
3. Start/Pause Button
With Power "ON" Press the "Start/Pause" button to start washing cycle, pause
operation, or resume operation.
4. Power ON/OFF Button
Press in the "Power On/Off" button to turn on the power of the washer.
1 2 3 4
Water Level Selector Knob
Select water height in drum based on laundry being washed.
Low
Man ual
Wate r L ev el
Med ium
Hig h
8
HLP021-WM
 Loading...