


Installation and User Manual
Instructions d’installation et
Guide de l’utilisateur
Instrucciones de instalación y
Manual del usuario
Portable Air Conditioner |
HPP08XCR, HPP10XCT, HPP10XCT-E, |
QPCD05AXMW |
|
|
|
Climatiseur portatif |
|
Acondicionador de aire portatil
49-7780
11-17 GEA

TABLE OF CONTENTS
AIR CONDITIONER SAFETY . . . . . . . . . . . . . . . . . . . . . . . . . . . . . . . . . . . . . . . . . . . . . . . . . . . . . . . . . . . . . . . . . . . . . . . . . . . . . . . . . 2 PARTS AND FEATURES. . . . . . . . . . . . . . . . . . . . . . . . . . . . . . . . . . . . . . . . . . . . . . . . . . . . . . . . . . . . . . . . . . . . . . . . . . . . . . . . . . . . . . 3
INSTALLATION REQUIREMENTS . . . . . . . . . . . . . . . . . . . . . . . . . . . . . . . . . . . . . . . . . . . . . . . . . . . . . . . . . . . . . . . . . . . . . . . . . . . . 3
Tools and Parts . . . . . . . . . . . . . . . . . . . . . . . . . . . . . . . . . . . . . . . . . . . . . . . . . . . . . . . . . . . . . . . . . . . . . . . . . . . . . . . . . . . . . . . . . . . . . . 3
Location Requirements . . . . . . . . . . . . . . . . . . . . . . . . . . . . . . . . . . . . . . . . . . . . . . . . . . . . . . . . . . . . . . . . . . . . . . . . . . . . . . . . . . . . . 4
Electrical Requirements. . . . . . . . . . . . . . . . . . . . . . . . . . . . . . . . . . . . . . . . . . . . . . . . . . . . . . . . . . . . . . . . . . . . . . . . . . . . . . . . . . . . . . 4
INSTALLATION INSTRUCTIONS . . . . . . . . . . . . . . . . . . . . . . . . . . . . . . . . . . . . . . . . . . . . . . . . . . . . . . . . . . . . . . . . . . . . . . . . . . . . . 5
Step 1 - Unpack Air Conditioner . . . . . . . . . . . . . . . . . . . . . . . . . . . . . . . . . . . . . . . . . . . . . . . . . . . . . . . . . . . . . . . . . . . . . . . . . . . . . . 5 Step 2 - Install Exhaust Nozzle to Main Window Panel . . . . . . . . . . . . . . . . . . . . . . . . . . . . . . . . . . . . . . . . . . . . . . . . . . . . . . . . . 5 Step 3 - Install Main Window Panel and Extension Panels. . . . . . . . . . . . . . . . . . . . . . . . . . . . . . . . . . . . . . . . . . . . . . . . . . . . . . . 5 Step 4 - Attach Exhaust Hose to the Exhaust Nozzle . . . . . . . . . . . . . . . . . . . . . . . . . . . . . . . . . . . . . . . . . . . . . . . . . . . . . . . . . . 6 Step 5 - Connect Exhaust Hose to the Air Conditioner . . . . . . . . . . . . . . . . . . . . . . . . . . . . . . . . . . . . . . . . . . . . . . . . . . . . . . . . 7 Step 6 - Complete Installation. . . . . . . . . . . . . . . . . . . . . . . . . . . . . . . . . . . . . . . . . . . . . . . . . . . . . . . . . . . . . . . . . . . . . . . . . . . . . . . 7
CONTROL PANEL. . . . . . . . . . . . . . . . . . . . . . . . . . . . . . . . . . . . . . . . . . . . . . . . . . . . . . . . . . . . . . . . . . . . . . . . . . . . . . . . . . . . . . . . . . . 8
Buttons . . . . . . . . . . . . . . . . . . . . . . . . . . . . . . . . . . . . . . . . . . . . . . . . . . . . . . . . . . . . . . . . . . . . . . . . . . . . . . . . . . . . . . . . . . . . . . . . . . . . 8
Remote Control . . . . . . . . . . . . . . . . . . . . . . . . . . . . . . . . . . . . . . . . . . . . . . . . . . . . . . . . . . . . . . . . . . . . . . . . . . . . . . . . . . . . . . . . . . . . 8
Indicator Lights . . . . . . . . . . . . . . . . . . . . . . . . . . . . . . . . . . . . . . . . . . . . . . . . . . . . . . . . . . . . . . . . . . . . . . . . . . . . . . . . . . . . . . . . . . . . . 8
AIR CONDITIONER USE . . . . . . . . . . . . . . . . . . . . . . . . . . . . . . . . . . . . . . . . . . . . . . . . . . . . . . . . . . . . . . . . . . . . . . . . . . . . . . . . . . . . . 9
AIR CONDITIONER CARE . . . . . . . . . . . . . . . . . . . . . . . . . . . . . . . . . . . . . . . . . . . . . . . . . . . . . . . . . . . . . . . . . . . . . . . . . . . . . . . . . . . 9
Cleaning . . . . . . . . . . . . . . . . . . . . . . . . . . . . . . . . . . . . . . . . . . . . . . . . . . . . . . . . . . . . . . . . . . . . . . . . . . . . . . . . . . . . . . . . . . . . . . . . . . . . 9
Air Filters. . . . . . . . . . . . . . . . . . . . . . . . . . . . . . . . . . . . . . . . . . . . . . . . . . . . . . . . . . . . . . . . . . . . . . . . . . . . . . . . . . . . . . . . . . . . . . . . . . . . 9
Internal Water Tank . . . . . . . . . . . . . . . . . . . . . . . . . . . . . . . . . . . . . . . . . . . . . . . . . . . . . . . . . . . . . . . . . . . . . . . . . . . . . . . . . . . . . . . . . . 9
Storage . . . . . . . . . . . . . . . . . . . . . . . . . . . . . . . . . . . . . . . . . . . . . . . . . . . . . . . . . . . . . . . . . . . . . . . . . . . . . . . . . . . . . . . . . . . . . . . . . . . . . 9
TROUBLESHOOTING . . . . . . . . . . . . . . . . . . . . . . . . . . . . . . . . . . . . . . . . . . . . . . . . . . . . . . . . . . . . . . . . . . . . . . . . . . . . . . . . . . . . . . 10 LIMITED WARRANTY . . . . . . . . . . . . . . . . . . . . . . . . . . . . . . . . . . . . . . . . . . . . . . . . . . . . . . . . . . . . . . . . . . . . . . . . . . . . . . . . . . . . . . 11 RECORD KEEPING . . . . . . . . . . . . . . . . . . . . . . . . . . . . . . . . . . . . . . . . . . . . . . . . . . . . . . . . . . . . . . . . . . . . . . . . . . . . . . . . . . . . . . . . . 1
RECORD KEEPING
Thank you for purchasing this Haier product. This user manual will |
_______________________________________ |
help you get the best performance from your new air conditioner. |
Model number |
For future reference, record the model and serial number located on |
_______________________________________ |
the label on the side of your air conditioner, and the date of purchase. |
Serial number |
Staple your proof of purchase to this manual to aid in obtaining war- |
_______________________________________ |
ranty service if needed. |
Date of purchase |
ENGLISH
1
ENGLISH
AIR CONDITIONER SAFETY
Your safety and the safety of others are very important.
We have provided many important safety messages in this manual and on your appliance. Always read and obey all safety messages.
This is the safety alert symbol.
This symbol alerts you to potential hazards that can kill or hurt you and others. All safety messages will follow the safety alert symbol and either the word “DANGER,” “WARNING” or “CAUTION.”
These words mean:
|
Ксмррмсисчпьлдэдхзтшццмчшдчмтс втшжтшпзеиомппизтхцихмтшцпьмсншхизмйьтшзтсđч |
|
DANGER |
||
immediately follow instructions. |
||
|
A potentially hazardous situation which, if not avoided, could result in death or serious |
|
WARNING |
||
етзмпьмсншхь |
||
|
A potentially hazardous situation which, if not avoided, may result in moderate or minor |
|
CAUTION |
||
мсншхь |
Кппцдйичьриццдкицъмппчиппьтшълдччлиутчисчмдплдэдхзмц чиппьтшлтъчтхизшжичлижлдсжитймсншхь дсзчиппьтшълдч can happen if the instructions are not followed.
IMPORTANT SAFETY INSTRUCTIONS
WARNING: ЭтхизшжичлихмцотйĤхи ипижчхмждпцлтжо мсншхьчтуихцтсц тхздрдкиълисшцмскчлидмхжтсзмчмтсих follow basic precautions, including the following:
•Read all of the instructions before using this appliance.
•Plug into a grounded 3 prong outlet.
•Do not remove ground prong.
•Do not use an adapter.
•Do not use an extension cord.
•Do not operate the air conditioner if it has a damaged cord or plug, if it is not working properly, or if it has been damaged or dropped.
•ЭлидмхжтсзмчмтсихцлтшпзеицихщмжизтспьеьфшдпмĤиз service personnel. Call an authorized service company
йтхиыдрмсдчмтс хиудмх тхдзншцчрисч
•Disconnect power before servicing.
• Disconnect power before cleaning.
NOTE: ЭшхсмсктģутъихеьухиццмскчлиЩтъихешччтс does NOT disconnect the appliance from the power supply.
•Do not install or use the air conditioner in any area where the atmosphere contains combustible gases or where the atmosphere is contaminated. Avoid any chemicals coming in contact with your air conditioner.
•Do not store anything directly on top of the air conditioner.
•Use two or more people to move and install air conditioner.
•ЧищихтуихдчичлидмхжтсзмчмтсихъмчлтшччлиĤпчихцмс place.
•Do not use the air conditioner near a bathtub, shower or wash basin or other wet area.
READ AND SAVE THESE INSTRUCTIONS
2

PARTS AND FEATURES
A |
|
|
B |
|
H |
C |
|
|
D |
F |
|
|
I |
|
|
G |
|
|
|


 H
H
E 


 J
J
ENGLISH
A Control Panel
B Side Handle
C Vertical Air Vent
 Louver
D Horizontal Air Vent
 Louver
E Casters
F Center Drain Cap
G Power Cord Storage
H Air Filter
I Real Air Discharge
JLower Drain Cap
INSTALLATION REQUIREMENTS
TOOLS AND PARTS
Gather the required tools and parts before starting installation.
TOOLS NEEDED
•Flat-blade Screwdriver •Phillips Screwdriver
PARTS SUPPLIED
• Pointed Screws (7) |
• Exhaust |
2 for top window |
Nozzle |
brackets |
|
1 for security brack- |
|
et |
|
4 for main |
|
window panel |
|
• Main Window |
• Extension |
• Flat Screws (6) |
|
|
Panel |
Panels (2) |
4 for extension |
|
|
|
|
panels |
|
|
|
|
2 for nozzles |
• Top Window |
• Bottom |
|
|
|
||
|
|
|
Bracket (2) |
Window |
|
|
|
|
Bracket (2) |
•Exhaust Hose (1 or 2 depend-
ing on model)
•Security
Bracket
3
ENGLISH
• Top Foam Strip • |
Bottom Foam |
(10 mm x 10 |
Strip |
mm x 102 cm) |
(3 mm x 10 mm |
|
x 102 cm) |
•Remote Control
•Batteries (2)
LOCATION REQUIREMENTS
•Щпджичлидмхжтсзмчмтсихтсдĥдч пищипцшхйджимсд location that is at least 20” (51 cm) from any wall.
NOTE: The recommended distance from the window for optimal performance is 30” (76 cm).
•Maintain a minimum 20” (51 cm) clearance around the air
жтсзмчмтсихчтстчептжодмхĥтъ
•Keep the air conditioner free of any obstructions such as drapes, curtains, blinds, etc.
•The exhaust hose should be free of any obstructions.
•Do not place the air conditioner on an unstable or raised
цшхйджиеиждшцимчжтшпзйдппдсзждшциздрдкитхмсншхь
•Do not place the air conditioner in direct sunlight or near a heat source such as baseboard heaters, stoves, etc.
•The window panel can be installed in a window with a minimum 20” (51 cm) to a maximum 40” (101.6 cm) opening.
ELECTRICAL REQUIREMENTS
 WARNING
Electrical Shock Hazard
Plug into a grounded 3 prong outlet.
Do not remove the ground prong from the power cord plug.
Do not use an adapter.
Do not use an extension cord.
Пдмпшхичтзтцтждсхицшпчмсзидчл Ĥхитх ипижчхмждп shock.
POWER SUPPLY CORD
Wiring Requirements
•115 Volt, 60Hz, 15-amp fused grounded 3 prong outlet
•The use of a time-delay fuse or time-delay circuit breaker is recommended.
•Use a dedicated circuit only.
NOTE: Do not operate any other electrical appliances on this circuit or you may trip the circuit breaker/fuse.
If this power supply cord is damaged, it cannot be repaired. It must be replaced with a cord from the product manufacturer. If the power supply cord is damaged call Haier Customer
Service: 1-877-337-3639.
 RESET
RESET
TEST
20” (51 CM)
20”  (51 CM)
To test the power supply cord before operation:
1.Plug the power cord into a grounded 3 prong outlet.
2.Press the Test button, and then press and release the Reset button to restore power.
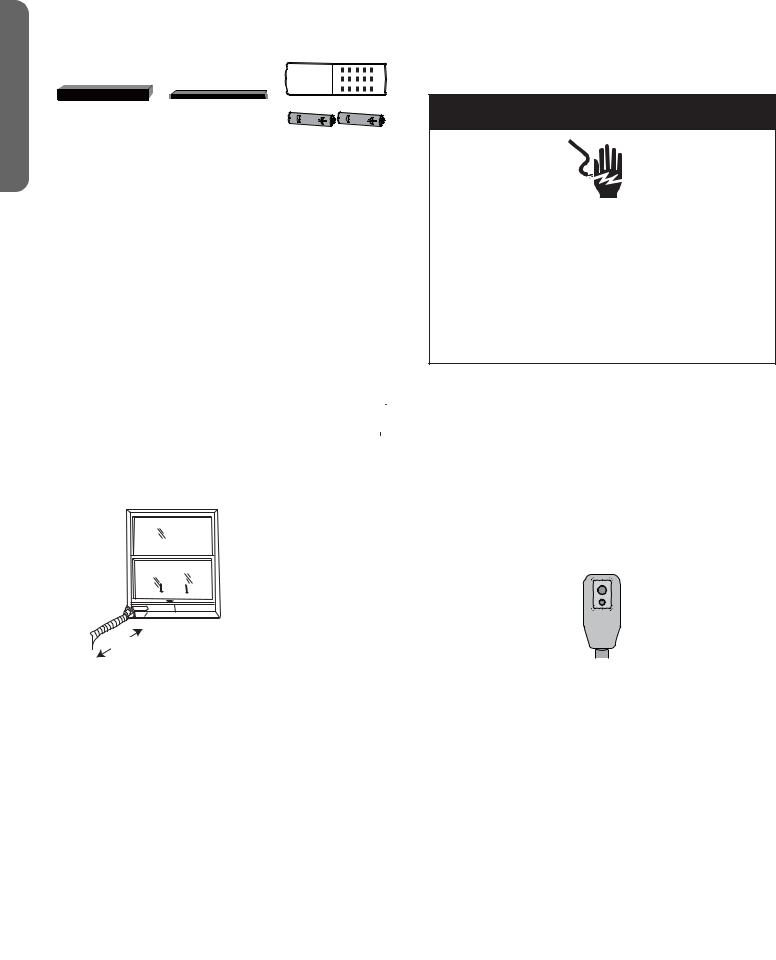
REQUIRED GROUNDING METHOD
This air conditioner must be grounded. The air conditioner is equipped with a power supply cord that has a 3 prong grounding plug. The power supply cord must be plugged into a mating, grounded 3 prong outlet, and grounded in accordance with all local codes and ordinances.
115V
15 Amp
4
INSTALLATION INSTRUCTIONS
STEP 1 - UNPACK AIR
CONDITIONER
 WARNING
Excessive Weight Hazard
Use two or more people to move and install air conditioner.
Пдмпшхичтзтцтждсхицшпчмседжотхтчлихмсншхь
•Remove packaging materials. Save the carton and the foam packaging for storing the air conditioner when not in use.
NOTE: There are NO packing materials inside the
air conditioner to remove—Do Not open the cabinet.
•Properly dispose of/recycle all packing material.
•Handle the air conditioner gently.
•Keep the air conditioner upright and level. Do not set the air conditioner on its side, front, back or upside down.
STEP 2 - INSTALL EXHAUST NOZZLE TO MAIN WINDOW PANEL
1. Hold the main window panel so that the L-shaped edges of the panel are facing you.
A L-Shaped
A
Edges
2.Align the exhaust nozzle with the slots in the opening, and then insert and slide the nozzle to access the hole from the back of the main window panel.
|
A |
Main |
|
|
Window |
A |
|
Panel |
B |
Exhaust |
|
|
|
Nozzle (1 or |
|
B |
2 depending |
|
on model) |
3.Turn the main window panel over, so that the nozzle is away
йхтрьтш Тсцихчдĥдчцжхиъчлхтшклчлилтпичтйдцчисчли window panel to the adapter.
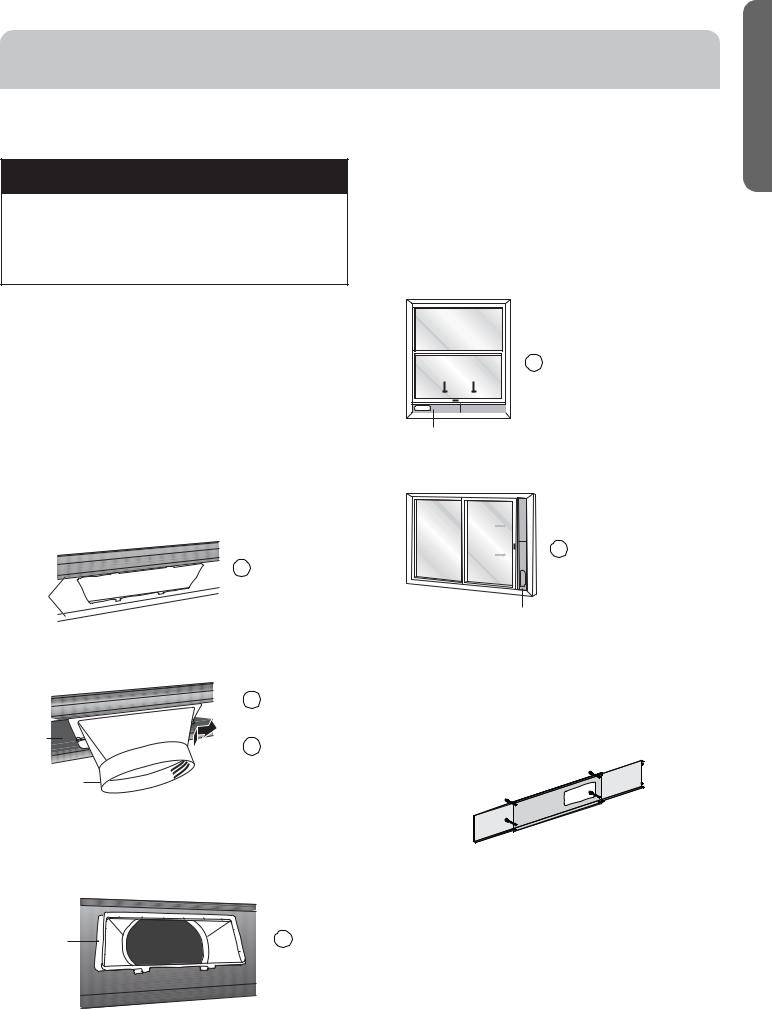
STEP 3 - INSTALL MAIN WINDOW PANEL AND EXTENSION PANELS
NOTE: Depending on the size of your window opening, use the main panel and one or both of the extension panels.
1.Open the window and place the main window panel into the window.
NOTE: The window assembly is designed to accommodate either a vertical slide or horizontal slide window.
Vertical Slide Window
A Main Window Panel
A
Horizontal Slide Window
A Main Window Panel
A
2. Кзншцччлииычисцмтсудсип¤ц¥чтччлиъмзчлтхлимклчтйчли window as shown.
NOTE: Some window installations may require the extension panels to be trimmed.
3.Depending on the number of extension panels used, use
чъттхйтшхĥдчцжхиъцчтцижшхичлирдмсудсипчтчли extension panel(s).
NOTE: On a dual hose unit, install the smaller hose nozzle to the left-hand hole in the panel.
A |
A Flat |
|
Screw |
ENGLISH
5

|
NOTE: There are many window types on the market |
ENGLISH |
today. Use the foam strips and brackets (provided) to |
window brackets where they will best support the |
|
|
secure the extension panels that ll the window opening. |
|
4. Place the two top window brackets and two bottom |
|
extension panels. |
|
Before Assembly |


 A A
A A
B
 B
B
A Top Window Brackets
BBottom Window Brackets
After Assembly
5.Apply the top foam strip (provided) across the top of the window panel assembly, and then apply the bottom foam strip (provided) across the bottom front edge of the window panel assembly, as shown.
A 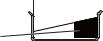

B
C
|
D |
|
E |
|
|
|
|
A |
Top Foam Strip |
D |
Bottom Bracket |
B |
Top Bracket |
E |
Bottom Foam Strip |
C |
Extension Panel |
|
|
6.Place the window panel assembly in the window, and using the screws provided, fasten the assembly to the window sill and window frame.
7.Using one pointed screw, install the Security bracket to the window.
NOTE: The security bracket prevents the window from being opened from the outside.
A |
A |
Security Bracket |
|
B |
Pointed Screw (1) |
B
STEP 4 - ATTACH EXHAUST HOSE TO THE EXHAUST NOZZLE
1.Grasp both ends of the exhaust hose and gently pull to expand the hose.
NOTE: Do not attach additional hoses to extend the
пискчл ЭлмцътшпззижхидцижттпмскиĦжмисжьдсзрдь damage the air conditioner.
2.Using a counterclockwise motion, attach the open end of the exhaust hose to the exhaust nozzle.
A |
A |
Exhaust Nozzle (1 or |
|
|
2 depending on |
B |
|
model) |
B |
Hose (open end) |
|
|
C |
Hose (connector |
|
|
end) |
C |
|
|
6
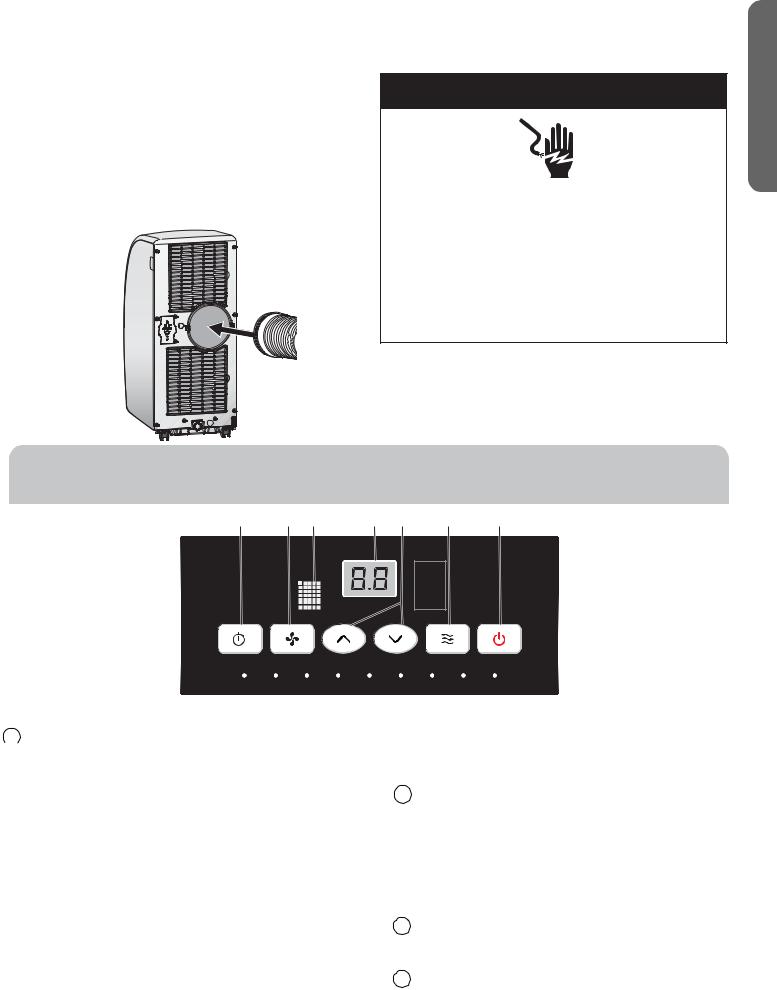
STEP 5 - CONNECT EXHAUST HOSE TO THE AIR CONDITIONER
IMPORTANT: When connecting the hose, the air conditioner must be close enough to the window that you will not dislodge the window seal plate. Once the hose is connected, move the air conditioner 20” (51 cm) from the wall.
1.Align the notches on the connector end of the exhaust hose with the ridges in the opening on the back of the air conditioner.
2.Holding the air conditioner with one hand, snap the connector end of the hose into the air outlet on the back of the air conditioner.
STEP 6 - COMPLETE INSTALLATION
 WARNING
Electrical Shock Hazard
Plug into a grounded 3 prong outlet.
Do not remove the ground prong from the power cord plug.
Do not use an adapter.
Do not use an extension cord.
Пдмпшхичтзтцтждсхицшпчмсзидчл Ĥхитх electrical shock.
1.Plug the power cord into a grounded 3 prong outlet.
2.Press the Reset button on the power cord to ensure the safety plug is providing power to the air conditioner.
ENGLISH
CONTROL PANEL
A B C D E F G
 °C
°C
 Hr
Hr  °F
°F
Timer |
High |
Low Water Full Cool |
BUTTONS
ATIMER BUTTON
 Program a time from (1-hour to 24-hours) for the air
жтсзмчмтсихчтчшхсШģтхШс алисдЭмриНипдьмц programmed, the Timer indicator light will illuminate.
While the air conditioner is operating:
1.Press the Timer button.
2.Press the Up/Down arrow buttons to select the number of hours you want the air conditioner to continue to
туихдчиеийтхичшхсмскШģ
NOTE: адмчдуухтымрдчипь%цижтсзцйтхчлиЭшхс¡Шģ time to be saved.
While the air conditioner is o:
1.Press the Timer button.
2.Press the Up/Down arrow buttons to select the number of hours you want the air conditioner to remain o before turning On.
NOTE: Wait approximately 5 seconds for the Turn-On time to be saved.
7
Fan Dehum Sleep POWER
To cancel the timer:
• Press the Timer button once, the hours remaining will
ĥдцл ухиццчличмрихешччтсдкдмсдсзчличмрихъмппеи canceled.
BFAN SPEED BUTTON
ЭлийдсцуиизждсеидзншцчизйхтрХтъцуиизчтСмкл speed when the air conditioner is in operation.
NOTE: Элийдсцуиизждсстчеидзншцчизълисчлишсмчмц in Dehum mode.
•Press the Fan Speed button to toggle among the two speeds. The corresponding fan speed indicator will illuminate.
CREMOTE CONTROL SIGNAL RECEIVING WINDOW
Aim the Remote Control at this window so the Control will receive the signal.
DCONTROL PANEL DISPLAY
Displays the Set Temperature in degrees Fahrenheit or degrees Celsius, or the hours remaining in a Time Delay.
The corresponding indicator light will illuminate.

ENGLISH
 E UP AND DOWN ARROW BUTTONS
КзншцчцчлиЭируихдчшхитхСтшхцмсЭмриНипдь
To Set the Temperature:
The temperature can be set between 62ºF and 86º F (17ºC and 30º C) when the air conditioner is in Cool mode.
1.Press the Mode button until the Cool mode is selected.
2.Press the Up Arrow or Down Arrow buttons to
select the Temperature.
NOTE: The temperature cannot be set when the air conditioner is in either Fan or Dry mode.
F MODE BUTTON
Press the Mode button to toggle among the three operating modes. The corresponding indicator will illuminate.
Cool – Cools the room to the set temperature.
Dehum – Reduces the humidity in the room
Fan – Circulates the air in the room without cooling
GPOWER BUTTON
Turns ON/OFF power to the air conditioner.
NOTE: Turning o power by pressing the Power button does NOT disconnect the appliance from the power supply.
•Press the Power button. The Power indicator will illuminate.
REMOTE CONTROL
A 


 B
B
1.Insert the two batteries (provided).
2.Aim the remote control at the signal receiver on the control panel to operate the air conditioner.
ASLEEP BUTTON
Increases the set temperature by 2ºF (1ºC) after 2-hours, and then increases the temperature by an additional 2ºF (1ºC) after another 2-hours.
NOTE: The fan will operate at Low speed and cannot
еидзншцчизълмпимсЬпииуртзи
Press the Sleep button to enter Sleep mode. The Sleep indicator will illuminate.
To Cancel Sleep Mode:
•Press the Sleep button or the Mode button (Cool, Fan or Dry) on the remote control.
BºC/ºF BUTTON
•Press the ºC/ºF button to toggle between displaying the temperature in degrees Fahrenheit or degrees Celsius. The corresponding indicator will illuminate.
INDICATOR LIGHTS
Timer High Low Water Full Cool Fan Dehum Sleep POWER
A
Illuminate to indicate the selected mode, speed or condition.
AWATER FULL
The Water Full indicator illuminates, when the internal
ъдчихчдсолдцĤппизъмчлжтсзисцизъдчих Элидмх conditioner will turn o automatically. To drain the water tank, see “Air Conditioner Care” for instructions.
8
AIR CONDITIONER USE
IMPORTANT: If the air conditioner has been tilted on its side, wait 24 hours before turning on the air conditioner to allow the oil to return to the compressor. This will prevent the air conditioner from failing prematurely.
•Allow 20” (51 cm) of space around the unit for proper air circulation.
•НтЧтчтуихдчичлидмхжтсзмчмтсихъмчлтшчдмхĤпчихцмс place.
•Do not spill liquid on the control panel; it may cause an electrical short to the interior electronic parts that would either disable them or cause them to function improperly.
•алисчшхсмсктсчлидмхжтсзмчмтсихйтхчлиĤхцччмри after plugging it into an electrical outlet, the unit will start in Cooling mode set at 75ºF (24°C), and at High fan speed. The control panel will display the current room temperature.
•When turning on the unit after previous use, it will remember the last settings used.
•After a normal shut down, please wait for 3 minutes before restarting the unit.
•In Cooling mode, this unit should not require water to be removed. This model has a unique design that continuously evaporates the water.
•When the unit is operated in high humidity conditions, you may need to empty the water tank periodically.
•The unit will shut down automatically when the water tank is full. The Water Full indicator illuminates to alert you of this condition.
AIR CONDITIONER CARE
 WARNING
Electrical Shock Hazard
Disconnect power before cleaning.
Failure to do so can result in death or electrical shock.
CLEANING
1.Unplug or disconnect power.
2.Use only a soft cloth dampened with water to clean the cabinet.
NOTE:
•Do not use a liquid or spray cleaner to clean the air conditioner.
•DO NOT use chemicals, abrasives, ammonia, chlorine bleach, concentrated detergents, solvents or scouring pads. Some of these chemicals/items may damage and/ or discolor your air conditioner.
3.Dry thoroughly with a soft cloth.
4.Plug in or reconnect power.
AIR FILTERS
ЭлидмхĤпчихццлтшпзеижпидсиздчпидцчтсжидъииойтхьтшх шсмччттуихдчидчтучмршриĦжмисжь
IMPORTANT: Do Not operate the air conditioner without air
Ĥпчихцмсупджи
1. Unplug or disconnect power.
2. ЩшпптсчличдецчтцпмзитшччлиĤпчихцйхтрчлиеджотй the air conditioner.
NOTE: ЭлицижтсздхьĤпчихцдхиджжиццмепитсжичлирдмс Ĥпчихцдхихиртщиз
3. адцлтхщджшшрчлизшцчйхтрчлидмхĤпчихц
NOTE: Тйъдцлиз кисчпьцлдоичлиĤпчихчтхиртщичли иыжиццъдчихдсззшцчудхчмжпицчхдууизмсчлиĤпчих
4. ЫимсцчдппчлиĤпчихц
5. Plug in or reconnect power.
INTERNAL WATER TANK
The Water Full indicator illuminates, when the internal water
чдсолдцĤппизъмчлжтсзисцизъдчих
To Empty the Internal Water Tank:
1.Unplug or disconnect power.
2.Place a shallow 1 quart or larger pan (not included) below the lower drain located on the back (near the bottom) of the air conditioner.
3.Remove the cap and the rubber plug and drain the water tank.
4.Re-insert the drain plug and screw the cap snugly into place.
5.Plug in or reconnect power.
STORAGE
If the unit is not being used for a long period of time:
1.Unplug or disconnect power.
2.Drain the water from the water tank. See “Air Conditioner Care.”
3.Use the original packaging to repack the unit to avoid a buildup of dust or dirt.
4.Store the air conditioner in a cool, dry location.
ENGLISH
9

ENGLISH
TROUBLESHOOTING
First try the solutions suggested here to possibly avoid the cost of a service call.
PROBLEM |
POSSIBLE CAUSE(S) |
SOLUTION |
Unit does not start or |
Power supply cord is not plugged into an outlet. |
Plug the power cord into a grounded 3 prong |
operate |
|
outlet. |
|
Power supply cord has tripped. |
Press and release the RESET button on the power |
|
|
supply cord. |
|
The Power button has not been pressed. |
Press the Power button on the Control Panel or |
|
|
Remote Control to turn ON the air conditioner. |
|
There is no power to the electrical outlet. |
Plug a working lamp into the outlet to check for |
|
|
power. |
|
A household fuse has blown or a circuit breaker |
Replace the fuse or reset the circuit breaker. |
|
has tripped. |
|
|
The control was programmed for a Time Delay. |
Cancel the Time Delay. See “Control Panel.” |
|
The batteries in the remote control are dead. |
Replace the batteries. |
|
The internal water tank is full. |
Empty the water tank. See “Air Conditioner |
|
NOTE: The air conditioner automatically turns |
Care.” |
|
тģ дсзчлиадчихПшппмсзмждчтхмппшрмсдчицчт |
|
|
alert you of this condition. |
|
Remote control is not |
Batteries are dead. |
Replace the batteries. |
working |
|
|
Batteries are installed incorrectly. |
Make sure the batteries are inserted in the correct |
|
|
|
position. |
Air conditioner is |
The room temperature is hot. |
КпптъчмрийтхчлихттрчтжттпълисьтшĤхцччшхс |
working but the room |
NOTE: On extremely hot and humid days,the air |
on the unit. |
is not cooling. |
Make sure the air conditioner has an adequate |
|
|
conditioner will take longer to cool the room. |
BTU rating for the size of the room being cooled. |
|
|
|
|
|
|
|
The control is set incorrectly to Fan or Dehum |
Set the Mode to Cool and the Fan Speed to High. |
|
mode. |
|
|
Кмхĥтъмцхицчхмжчиз |
Ыиртщидсьтецчджпицчтчлидмхĥтъдсзхизмхижч |
|
|
дмхĥтъйтхшсмйтхржттпмск |
|
Temperature set too high. |
Lower the set temperature. |
|
КмхĤпчихцдхизмхчьтххицчхмжчиз |
МпидсчлидмхĤпчих ЬииēКмхМтсзмчмтсихМдхиĔ |
|
Air conditioner installed incorrectly |
Check the exhaust hose and window panel for |
|
|
proper installation. |
|
Doors and windows are open. |
Close the doors and windows to the room being |
|
|
cooled to prevent cooled air from escaping. |
FOR MORE HELP, VISIT HAIERAMERICA.COM OR CALL THE CONSUMER HELP LINE AT 1-877-337-3639.
10
 Loading...