


HRF-628A*6
HRF-628I*6
*=F,S,T,W,N,X,CR,
BB,GW,GB,GR
GB
D
F
I
E
NL
PL
RO
CZ
HU
Downloaded |
|
|
|
|
|
|
|
Refrigeratorfrom |
|
GB |
|
User Guide |
www |
|
|
|
|
||
|
|
|
|
|
. |
|
|
Bedienungsanleitungvandenborre |
|
|
|
|
|
||
Kühlschrank |
|
|
D |
|
|
. |
|
|
|
be |
|
Réfrigérateur |
F |
|
Mode d'emploi |
||
|
||
Frigorifero |
I |
|
Guida per l'utente |
|
|
Frigorífico |
E |
|
Manual del usuario |
||
|
||
Koelvriescombinatie |
NL |
|
Handleiding |
||
|
||
Lodówka |
PL |
|
Podręcznik użytkownika |
||
|
||
Congelator |
RO |
|
Manual de utilizare |
||
Chladnička |
CZ |
|
Uživatelská příručka |
||
|
||
Hűtőszekrény |
HU |
|
Felhasználói útmutató |
||
|
Downloaded from
www . vandenborre . be

Contents
1. Before You Start |
1 |
Safety |
1 |
Refrigerant Gas Information |
2 |
Caring for the Environment |
2 |
2. About Your Refrigerator |
3 |
|
About the Fresh Food Compartment |
5 |
|
About the Freezer Compartment |
6 |
|
The Icemaker/Water Dispenser |
7 |
|
Home bar |
7 |
|
Fridge-Freezer Operation |
9 |
|
Operating the Water and Ice Dispenser 12 |
||
Safety |
12 |
|
Automatic Defrosting |
12 |
|
Alarm Function |
12 |
|
Display Power Down |
12 |
|
3. |
Food Storage Tips |
13 |
|
Tips on Storing Fresh Food |
13 |
|
Tips on Freezing Food |
14 |
4. |
Installation |
15 |
|
Positioning Your Appliance |
15 |
|
Removing and Installing the Doors |
16 |
|
Levelling the Fridge-freezer and |
17 |
|
Adjusting the Doors |
|
|
|
|
|
Fitting the Handles |
17 |
|
Electrical Supply Connection |
17 |
|
Water Supply Connection |
18 |
|
Downloaded |
|
|
|
|
|
|
|
|
|
|
||
|
|
from |
|
|
|
GB |
5. |
|
www |
19 |
|
||
Cleaning and Maintenance |
|
|
|
|||
|
Defrosting |
|
. |
19 |
|
|
|
When Not in Use |
|
vandenborre19 |
|
||
|
Cleaning |
|
|
19 |
|
|
|
Shutting Off the Refrigerator |
|
19 |
|
|
|
|
|
|
|
|
. |
|
|
Water Filter |
|
|
19 |
|
be |
|
|
|
|
|
||
6. |
Troubleshooting |
|
|
20 |
|
|
7. |
Technical Data |
|
|
23 |
|
|
Before start-up,be sure to read the User’s Guide. Keep the User’s Guide in a safe place.
Keep ventilation openings,in the appliance enclosure or in the built-in structure,clear of obstruction. Do not use mechanical devices or other means to accelerate the defrosting process,other than those recommended by the manufacturer.
Do not damage the refrigerant circuit.
Do not use electrical appliances inside the food storage compartments of the appliance,unless they are of the type recommended by the manufacturer.
Due to our policy of continual improvement,we reserve the right to change specifications without prior notice.

1. Before You Start |
|
Downloaded |
|
|
|
|
from |
|
|
||
|
|
|
|
|
|
Thank you for buying this fridge freezer appliance. We |
• |
When replacing old appliances, make sure that you |
|
||
hope that it provides a stylish and practical solution to |
|
have disabled any locking mechanismswwwbefore disposal |
|
||
your cooling needs. Please read this manual before |
|
|
. |
|
|
|
– it may even be best to remove the appliance door |
|
|||
is anything you are unsure of please contact us (see the |
|
|
vandenborre |
||
using your new fridge freezer. Please keep this manual |
|
completely to prevent children from becoming trapped |
|
||
safe and pass it onto any new owner. We hope that this |
|
inside the appliance. |
|
|
|
manual supplies all the information you require. If there |
• |
The appliance must be connected to the power supply |
|
||
|
|
|
|||
Warranty section for Customer Care details). |
|
safely. Loose connections, broken plugs and bare wires |
. |
||
|
|
|
|||
|
are a safety hazard. Make sure that all connections are be |
||||
! |
WARNING! This appliance must be earthed . |
|
sound. |
|
|
! |
Please leave the appliance to stand for at least six |
• |
Before undertaking any routine maintenance or minor |
|
|
|
hours. This will allow the cooling system to settle |
|
repairs, disconnect the appliance from the electrical |
|
|
|
following transportation. |
|
supply. This includes cleaning and changing light bulbs. |
||
! |
Always make sure a qualified person installs this |
• |
DO NOT touch cold surfaces of the appliance while it is |
||
|
|
|
|
||
appliance. |
in use as this will cause hands to stick to them leading |
|
to freezer burns. |
||
|
!The freezer compartment is rated at 4 stars.
!This appliance is designed for domestic use only. Using it for any other purpose could invalidate any warranty or liability claim.
•Before you plug the appliance into the mains, clean the inside of the appliance using warm water and bicarbonate of soda, then dry thoroughly.
•When moving the appliance take care not to damage the leads, pipes or condenser unit. Should these parts become damaged, contact a qualified service engineer.
•Effervescent liquids (fizzy drinks) should never be frozen. These liquids expand during freezing and this may lead to the bottles/containers shattering or exploding.
•Check that no parts of the appliance are damaged, especially parts of the cooling system, pipes or leads. If damage has occurred, DO NOT install the appliance; you should contact a qualified service engineer or contact Customer Care.
•If the accessories inside the appliance have been disturbed during transit, reposition them in accordance with the instructions.
•Make sure that the electrical supply to your socket is correct for this appliance – the required power information is on the data label of the appliance. The data label is located inside the appliance (top of refrigerator compartment).
•Once the appliance is installed, cleaned dry, and has been allowed to stand following transportation, it is ready to be plugged in and switched on.
•Foods that are intended to be defrosted or cooked first, such as breads or meats, must not be eaten in their frozen state.
•If food looks or smells strange, do not attempt to eat it. If in doubt throw it away.
•Never use sharp, metal implements to scrape ice off the surface of this appliance. Only use implements, which are fit for this purpose (such as plastic scrapers) and use carefully to avoid damaging the lining of the appliance.
•The cooling system contains refrigerant and oils, all of which are harmful to health if leaked. Should leakage occur, disconnect the appliance and ventilate the room. Make sure that you do not get any coolant near to, or in, your eyes.
Contact a service engineer or arrange to have the appliance removed.
Safety
!WARNING! Use drinking water only with this appliance.
!WARNING! Keep this appliance clear of any obstruction.
!DO NOT damage the refrigerant circuit. If it does become damaged, do not use the appliance.
!WARNING! DO NOT use mechanical devices (such as hair dryers) to defrost this appliance.
!WARNING ! The water and ice pipework MUST be flushed through before use. Refer to the Icemaker/Water Dispenser section of this manual.
Electrical Safety
•Connections to the mains supply should be in accordance with local regulations.
•The plug MUST be accessible after the appliance has been positioned.
•Make sure that the refrigerator does not trap the electric cable.
•Do not step on the cable.
•Avoid damage to the electric cable when moving the refrigerator.
Damaged electrical cable
refrigerator and consult an authorised agent for replacement.
1

Refrigerant Gas Information
IMPORTANT:This appliance is provided with refrigerant gas, ISOBUTHANE (R600a). When moving the appliance take care to ensure that it is not excessively struck or shaken. Failure to do so could damage the appliance.
Damage to the refrigerating circuit, with possible leaking of refrigerating gas, could create a risk of explosion caused by
In the Event of Accidental Leakage
Allow the material to evaporate providing that adequate ventilation is provided.
Behaviour of the Gas
Gas R600a is heavier than air: if released it forms a high
First Aid
Inhalation
Take the exposed person from the polluted area and carry them to a warm, well ventilated place.
Long exposure can cause the onset of asphyxia and
respiration, and in the most serious cases, administer oxygen under close medical supervision.
Skin contact
It is unlikely that occasional contact with the skin is dangerous. If this should happen thoroughly wash the
Liquid splashes and atomised liquid can cause freezing burns.
to treat any burns.
Eye contact
Wash with plenty of water, with eyelids well open, and call a specialist doctor as soon as possible.
In any event, should you inhale or come into contact with R600a gas, we advise you to consult your own doctor.
|
|
|
|
Downloaded |
|
|
|
|
|
|
|
|
|
Caring for the Environment |
|
|
||||
Disposing of Your Packagingfrom |
|
GB |
||||
Your new refrigerator was protected by suitable packaging |
|
|||||
while on its way to you. All of the materialswwwused are |
|
|
||||
. |
|
|
||||
environmentally friendly for disposal and can be recycled. |
|
|
||||
Please make a contribution to protecting the environment by |
||||||
disposing of the packaging appropriately. |
|
|
||||
Disposing of Your Old Refrrigerator vandenborre |
||||||
|
|
|
|
|
. |
|
|
|
|
|
This symbol on the product or its packaging |
|
be |
|
|
|
|
|||
indicates that the product may not be treated as household waste. Instead it should be handed
over your local community waste collection/

 recycling centre.
Old appliances still have some residual value. An environmentally friendly method of disposal will ensure that valuable raw materials can be recovered and used again.
When an appliance has reached the end of its working life
of it together with the plug.
the door so that children cannot accidentally lock themselves in.
ozone, is used as an expander for the insulating foam.
When transporting the appliance, take care not to damage the cooling circuit.
By ensuring this product is disposed of correctly, you will help prevent potential negative consequences for the environment and human health, which could otherwise be caused.
For more detailed information about recycling of this product, please contact your local council, your household waste disposal service or the shop where you purchased the product.
2

2. About Your Refrigerator |
|
Downloaded |
|
|
from |
||
|
|
|
|
Fig.2-1(HRF-628I*6) |
|
|
www |
Freezer compartment |
1 |
12 |
|
|
|
|
Fridge compartment |
|
|
|
. |
|
|
|
vandenborre |
|
|
|
10 |
|
|
|
. |
2 |
|
|
be |
|
|
|
|
|
|
|
11 |
3 |
|
|
|
4 |
|
|
|
|
|
|
10 |
5 |
|
|
|
6 |
|
|
11 |
|
|
|
|
7 |
|
|
|
|
|
|
10 |
|
8 |
9 |
|
The HRF-628I*6 (Fig.2-1) has the following features:
1.Ice cream shelf
2.Ice bin with ice maker (inside bin)
3.Water and ice dispenser
4.Freezer LED light
5.3 freezer storage shelves
6.Freezer LED light (behind drawer)
7.2 freezer door bins
8.2 freezer drawers
9.2 crisper drawers
10.4 fridge door bins
11.4 fridge storage shelves
12.Fridge LED light
CFC free and frost free
Super-freeze, super-cool and holiday options Automatic temperature display
Excessive temperature and door ajar alarms
3

Fig.2-2(HRF-628A*6) |
|
|
Freezer compartment |
1 |
13 |
2 |
|
|
3 |
|
|
4 |
|
|
5 |
|
|
6 |
|
|
7 |
|
|
|
8 |
9 |
Downloaded |
|
from |
GB |
|
|
Fridgewwwcompartment |
|
|
. |
|
10 |
|
vandenborre |
|
. |
|
be |
|
12 |
11 |
12 |
10 |
The HRF-628A*6 (Fig.2-2) has the following features:
1.Ice cream shelf
2.Ice bin with ice maker (inside bin)
3.Water and ice dispenser
4.Freezer LED light
5.3 freezer storage shelves
6.Freezer LED light (behind drawer)
7.2 freezer door bins
8.2 freezer drawers
9.2 crisper drawers
10.2 fridge door bins
11.Home bar inner cover
12.4 fridge storage shelves
13.Fridge LED light
CFC free and frost free
Super-freeze, super-cool and holiday options Automatic temperature display
Excessive temperature and door ajar alarms
4

Fig.2-3 |
4 |
5 |
6 |
7 |
8 |
Fig.2-4 |
Shelf |
Shelf runner |
About the FreshDownloadedFood Compartment
|
It is recommended to leave storage space between the |
|
||
|
|
|
from |
|
|
foods for good cold air circulation. The temperatures in the |
|
||
|
refrigerator are slightly warmer near the top and colder near |
|
||
|
the base. |
www |
|
|
|
. |
|
||
|
|
|
|
|
1 |
Foods that are likely to perish quickly should be placed |
|
||
towards the rear of the appliance – where it is coolest. |
|
|||
|
Suggestions for storage(Fig.2-3): |
vandenborre |
||
|
|
|
||
|
1. |
Eggs, butter, cheese, etc. |
|
. |
|
|
be |
||
|
2. |
Tins, cans, condiments, etc. |
|
|
2 |
|
|
||
3. |
Drinks and all kinds of bottled foods. |
|
||
|
|
|||
|
4. |
Pickled foods, drinks or cans. |
|
|
5.
6.Flour foods, cans, dairy, etc.
7.Cooked meats, sausage, etc.
8.Fruits, vegetables or salads.
Shelves
3 |
needs.
The shelves will not pull out accidentally when you remove
!
any food placed on the shelf.
Shelves
To remove the shelf, tilt the front upwards so that the restraining pegs are clear of the side guides (Fig.2-4) and pull towards you. Keep the shelf tilted to allow the retaining stops to clear the side guides.
When repositioning, make sure the shelf is pushed back fully and the retaining stops have located securely.
The Light
The LED interior light comes on when the door is opened.
appliances other settings.
5

About the Freezer Compartment
The freezer compartment consists of three drawers, an ice cream shelf, two glass shelves and three door shelves (Fig.2-5).
As with the fridge, certain areas of the freezer are better for storage of certain foods.
Ice creams and water ices are best stored the ice cream shelf or towards the rear of the appliance where it is coldest.
Large/heavier portions of food, such as meats joints for roasting are best stored in the drawers at the bottom of the appliance, while less weighty items should be stored on the shelves – this is to prevent damage to the appliance.
You should always make sure that food stored is suitable for freezing, and that you have stored it securely inside the appliance.
!Please keep the distance more than 10 mm between the food placed and the sensor to ensure the cooling effect.
!Please keep the lowest drawer when the refrigerator working in order to ensure the cooling effect.
Shelves
To remove the shelf, tilt the front upwards so that the restraining pegs are clear of the side guides (Fig.2-5) and pull towards you. Keep the shelf tilted to allow the retaining stops to clear the side guides.
When repositioning, make sure the shelf is pushed back fully and the retaining stops have located securely.
The Light
The LED interior lights comes on when the door is opened.
appliances other settings.
Defrosting Food for Cooking
Should food become partially thawed or defrosted, it should be consumed as soon as possible as the quality will be
!Always make sure that food is thoroughly defrosted before cooking and no ice crystals remain. This
is especially important for poultry, as this can be extremely harmful to health.
Always follow the defrosting instructions on packaging when defrosting ready meals – manufacturers’ guidelines are always best, as some frozen foods should be cooked from frozen.
Fig.2-5 |
Downloaded |
|
|
|
from |
|
|
||
|
|
GB |
||
1 |
www |
|||
|
||||
|
|
|||
|
|
. |
|
|
|
|
vandenborre |
||
2 |
|
|
. |
|
|
|
be |
||
|
|
|
||
3 |
|
Sensor |
|
|
|
|
|
||
4 |
|
|
|
|
5 |
|
|
|
|
1. |
Ice cream shelf |
4. |
Storage drawers |
2. |
Ice bin |
5. |
Door bins |
3.Storage shelves
Fig.2-6 |
Shelf |
Shelf runner |
6
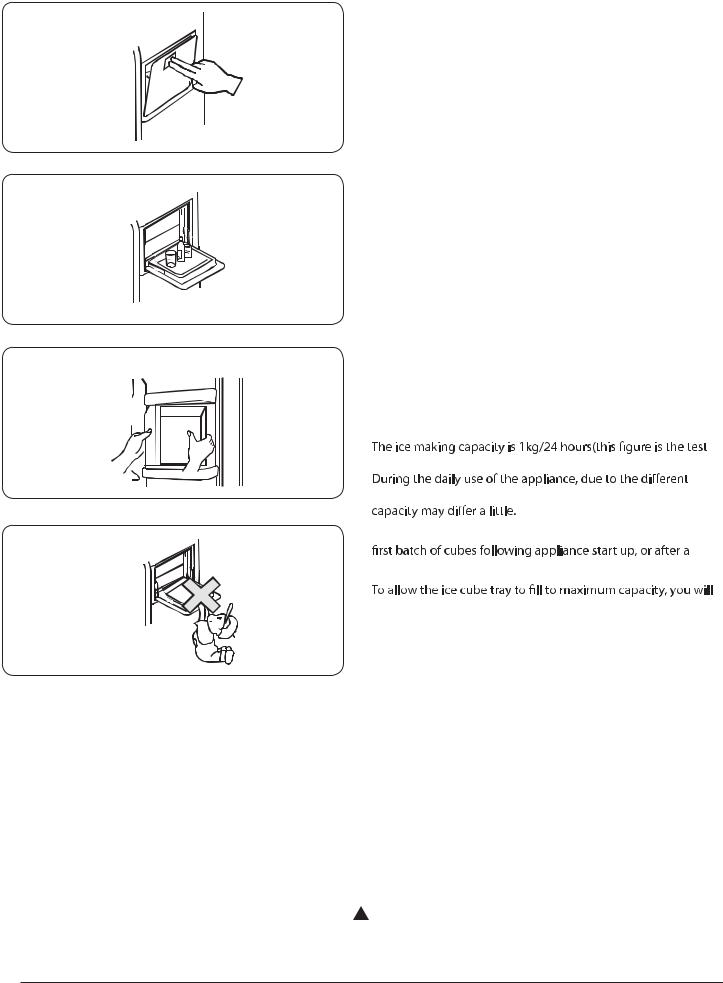
Fig.2-7
Fig.2-8
Fig.2-9
Fig.2-10
Downloaded |
|
|
The Icemaker/Water Dispenser |
|
|
Precautions |
from |
|
• NEVER expose the water pipe to temperatures below |
||
0°C to avoid freezing. |
www |
|
|
|
. |
|
|
vandenborre |
• Test the tubing for leaks by flushing the tube through |
||
with water, until the water runs clear. |
|
|
• |
After the appliance has been sited into the location of |
|
|
your choice, make sure that the water tube is arranged |
|
|
so it does not incur damage through bends and kinks . |
|
|
and is clear of any heat sources. |
be |
|
|
|
• Once the temperature inside the freezer is at –12°C ice production will begin.
• DO NOT over use the icemaker. If you attempt to use the ice cube button too often it will go into a shut down mode. This is perfectly normal and requires you to wait for one hour before attempting to re-use it.
• DO NOT use delicate or fragile glassware.
• DO NOT touch the ice cube outlet with your hands, or any implements to avoid injury or damage.
• DO NOT manually add water – this is an automatic water system. If the ice maker is turned on but the appliance is not connected to water, the ice maker will not work.
How the Icemaker Works
result in lab under the 32°C ambient temperature condition).
ambient temperature and water pressure, the ice making
Do not store ice cubes, which are produced during the
prolonged break. Discard these cubes.
need to manually arrange the ice cubes periodically.
Some ice cubes may stick together when dropped into the storage box – you will need to separate these to allow maximum use of the icebox.
Home Bar
•To open the bar, press the compartment button(Fig.2-7). The bar compartment opens.
The home bar can be used without opening the appliance door which saves energy.
When the home bar is opened, the refrigerator light comes on.
•You can place drinks and other foods in the home bar(Fig.2-8).
•Do not remove the inner cover of the home bar(Fig.2-9).
The home bar will not operate if the cover has been removed.
•Keep children away from the home bar(Fig.2-10).
Otherwise children could be injured and the home bar damaged.
!Close the home bar as soon as possible to keep the cold inside the appliance. The warning system is activated if the door is not properly closed.
7
First use of the Icemaker / Water Dispenser
!DO NOT of water, as there may be dust and / or impurities within the water pipes.
This will make sure that the pipes are cleared. If in doubt, keep re-using the dispenser until the water runs clear.
Noises during Ice Making
The ice making process can be noisy. You may hear ice being dropped into the storage compartment. This is perfectly normal.
Storing Ice for ExtendedPeriods
Ice, which is stored for a long period of time, may go an opaque colour and have a strange odour. We recommend that you dispose of this ice, remove and clean the icebox. Allow the tray to dry thoroughly and cool down before replacing into the appliance to prevent ice from sticking.
Preventing Ice from Being Made
If you do not require any ice over a prolonged period of time
water supply and the appliance. It is recommended that you clean the icebox, dry it carefully and replace it back into the appliance – this will prevent any odours being produced.
Installing and Removing the Ice Cube Storage
Drawer
To remove the icebox, lift the middle of the drawer and then pull it out, releasing the unit(Fig.2-11).
Note: Water moisture may have condensed and frozen the icebox in place.
mechanism 90° clockwise(Fig.2-12). Reinstall the icebox,
If the Ice Maker does not Work Properly
The volume of the icebox equals the quantity of ice cubes, which the appliance can make in one day. Occasionally small number of ice cubes may remain inside the box. If the ice gets stuck, this will result in abnormal operation of the ice cube maker. To avoid this problem, remove the icebox and rearrange the ice cubes, and remove the ice cubes which cannot be separated.
!Always keep the ice cube outlet clean and clear of obstructions.
!If you take out the icebox,you will get extra space for food storage,please install the additionally provided bottle holder at the position above the inlet on the freezer door for easy food storage(Fig.2-13).
Fig.2-11 |
Downloaded |
|
|
from |
|
|
|
|
|
GB |
|
|
www |
||
|
|
||
|
|
. |
|
|
|
vandenborre |
|
|
|
Icebox |
. |
|
|
be |
|
|
|
|
|
Icebox
Fig.2-12
Cam mechanism
Fig.2-13
Bottle holder
8
Fridge-Freezer Operation
|
|
|
|
|
|
|
|
G |
H |
I |
||||
A |
|
|
|
|
|
|
|
|
|
|
|
|
|
|
|
|
|
|
|
|
|
|
|
|
|
|
|
||
|
|
|
Disp |
|
|
|
|
|
|
|
||||
|
|
-enser |
|
|
|
|
|
|
|
|||||
|
|
|
|
|
Water |
Crushed Cubed |
Filter |
Ice on |
||||||
C |
|
|
|
|
|
|
|
|
|
|
|
|
|
|
|
|
Frz. |
|
|
|
|
|
|
|
|
|
|
||
|
|
Temp |
|
|
|
|
|
|
|
|
|
|
||
|
|
|
|
|
|
|
|
|
|
|
|
|
||
|
|
Func. |
|
|
|
|
|
|
|
|||||
E |
|
Set |
S-Frz. |
Holiday |
Lock |
|||||||||
|
|
|
S-Cool |
|||||||||||
|
|
|
|
|
|
|
|
|
|
|
|
|
||
J K L M
Downloaded |
|
from |
|
www |
|
|
Fig.2-14 |
|
. |
|
vandenborre |
|
. |
B |
be |
|
|
Ice
On/Off
Sec. |
|
Ref. |
D |
Temp |
OK
 F
F
Sec.
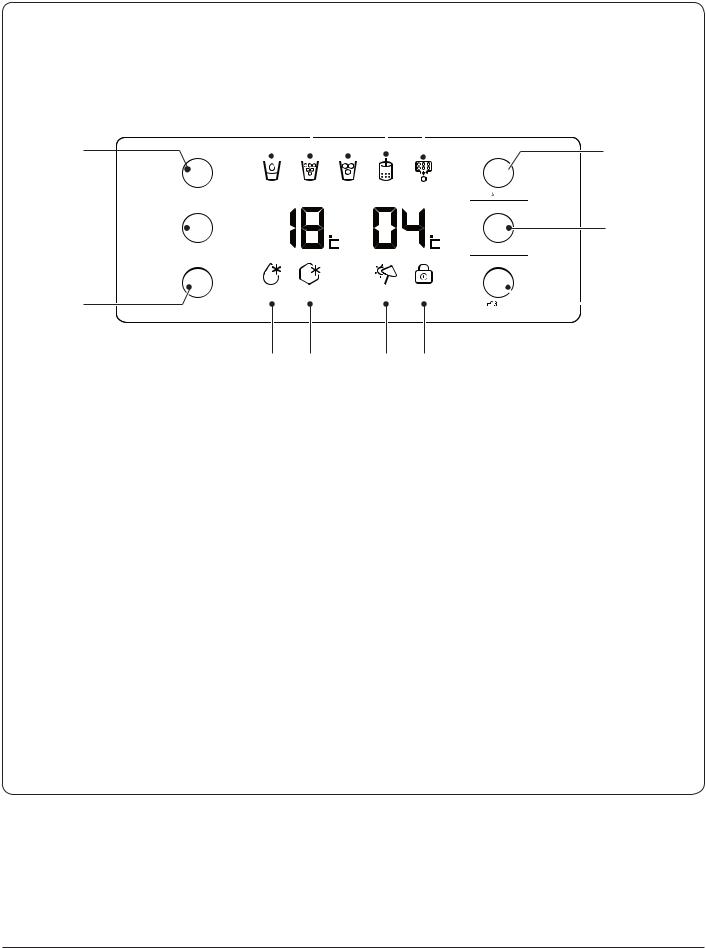
A – Dispenser selector button B – Ice maker on/off button
C – Freezer temperature button D – Fridge temperature button E – Function selector button
F – Function confirm button |
K – Quick freezing icon |
G – dispenser status icon |
L – Holiday mode icon |
H – Filter change status icon |
M – Lock icon |
I – Ice maker on status icon |
|
J – Quick chill icon |
|
The water and ice dispenser digital display and function buttons are shown in Fig.2-14.
9

!WARNING!
You cannot adjust the appliance temperature settings under Quick Freeze mode or Lock mode.
If you try to adjust the settings under these modes,
the special function icon beside the freezer temperature display icon will blink, along with the beep sound to indicate that you cannot adjust the temperature at that time.
Fig.2-15
Disp |
|
|
|
Ice |
-enser |
|
|
|
On/Off |
|
|
|
|
Sec. |
Frz. |
|
|
|
Ref. |
Temp |
21 |
|
|
Temp |
|
|
|
|
|
Func. |
|
|
|
OK |
Set |
|
|
|
|
|
|
Lock |
||
|
|
|
||
|
|
|
|
Sec. |
Fig.2-16
|
Disp |
Ice |
|
|
-enser |
On/Off |
|
1 |
|
Sec. |
2 |
Frz. |
Ref. |
||
|
Temp |
Temp |
|
|
|
21 |
|
Func. |
OK |
|
Set |
||
Holiday |
||
|
||
|
Sec. |
Fig.2-17
|
Disp |
Ice |
|
|
-enser |
On/Off |
|
1 |
|
Sec. |
2 |
Frz. |
Ref. |
||
|
Temp |
Temp |
|
|
|
21 |
|
Func. |
OK |
|
Set |
||
S-Cool |
||
|
||
|
Sec. |
Lock Mode |
Downloaded |
|
|
|
|||
This feature will lock the temperature and function settings. |
|
||
When locked, the lock icon will blinkfromand a beep will sound. |
GB |
||
To lock |
www |
||
|
|||
|
. |
|
|
Press and hold the ‘OK’ button for 3 seconds (Fig.2-15). |
|
||
The LOCK icon will switch on and the refrigerator will lock. |
|
||
To unlock |
|
|
Press and hold the ‘OK’ button for 3 seconds.vandenborreThe LOCK |
||
icon will switch off and the refrigerator will unlock. |
. |
|
be |
||
|
||
Holiday Mode
!WARNING ! Before selecting Holiday Mode remove all food and drink from the fridge compartment as is maybe unsafe to eat or drink after a short period of time.
This feature allows you to leave the fridge section unused while the freezer section operate as normal. When in this mode, the fridge will be automatically set to 17 °C.
To turn on
1.Press the ‘FUNC.SET’ button until Holiday mode is selected (Fig.2-16).
2.Now press the ‘OK’ button: the HOLIDAY mode icon will turn on.
To turn off
1.Press the ‘FUNC.SET’ button until Holiday mode is selected.
2.Now press the ‘OK’ button: the HOLIDAY mode icon will turn off.
Quick Cool Mode
This function is to chill food quickly so that the food remains fresh for as long as possible. Use this feature before putting large quantities of food in to the fridge chamber at any one time.
The Quick Cool mode will turn off once it has reached the set temperature.
To turn on
1.Press the ‘FUNC.SET’ button until Quick Cool mode is selected (Fig.2-17).
2.Now press the ‘OK’ button: the S-COOL icon will turn on.
To turn off
1.Press the ‘FUNC.SET’ button until Quick Cool mode is selected.
2.Now press the ‘OK’ button: the S-COOL icon will turn off. Quick Cool mode is now turned off.
10

Quick Freeze Mode
This function is designed to freeze food completely in the shortest possible time to maintain the nutrients within the
food. |
|
Disp |
|
|
-enser |
||
|
|
||
The Quick Freeze mode will turn off once it has reached the |
1 |
|
|
Frz. |
|||
Temp |
|||
|
|
set temperature. |
|
21 |
|
Func. |
|||
|
|||
|
Set |
||
Use this feature before putting large quantities of food in to |
|
|
|
the freezer chamber at any one time. We recommend that |
|
|
|
you turn on the Quick Freeze mode 12 hours in advance, as |
|
|
|
this will lower the temperature in the freezer compartment |
|
|
|
before you place any food in it. |
|
|
|
|
Disp |
||
|
-enser |
||
To turn on
1.Press the ‘FUNC.SET’ button until Quick Freeze mode is selected (Fig.2-18).
2.Now press the ‘OK’ button: the S-Frz. icon will turn on.
To turn off
1.Press the ‘FUNC.SET’ button until Quick Freeze mode is selected.
2.Now press the ‘OK’ button: the S-Frz. icon will turn off. Quick Freeze mode is now turned off.
Adjusting the Fresh Food Temperature
Press the ‘Ref. Temp’ button (Fig.2-19). The fridge temperature display will start blinking, which means the fridge is in the temperature setting mode.
Press the ‘Ref. Temp’ button to scroll, in turn, through the fridge temperature range from 09 °C through to 01 °C.
Without any further operation in 5 seconds, the blinking will stop and the temperature will be set. The temperature will also stay still at the time you press any other button during the blinking.
Adjusting the Freezer Temperature
Press the ‘Frz. Temp’ button (Fig.2-20). The freezer temperature display will start blinking, which means the freezer section is in the temperature setting mode.
Press the ‘Frz. Temp’ button to scroll, in turn, through the freezer temperature range from –14 °C through to –24 °C.
Without any further operation in 5 seconds, the blinking will stop and the temperature will be set. The temperature will also stay still at the time you press any other button during the blinking.
Frz.
Temp
21
Func.
Set
Disp -enser
Frz.
Temp
21
Func.
Set
Downloaded |
|
|
|
|
Fig.2-18 |
|
||
|
from |
|
|
|
|
|||
|
|
|
|
|
|
|
||
|
|
|
Ice |
|
|
|
|
|
|
|
www |
|
|
|
|||
|
|
|
On/Off |
|
|
|
|
|
|
|
|
Sec. |
|
|
|
|
|
|
|
|
Ref. |
|
|
|
2 |
|
|
|
|
vandenborre |
|||||
|
|
|
Temp . |
|
|
|||
|
S-Frz. |
|
OK |
|
|
|
|
|
|
|
|
|
|
|
|
|
|
|
|
|
Sec. |
|
|
|
|
|
|
|
|
|
|
|
|
|
. |
|
|
|
|
|
|
Fig.2-19 |
be |
|
|
|
|
|
|
|
|
||
Ice
On/Off
Sec.
Ref.
Temp
OK
Sec.
Fig.2-20
Ice
On/Off
Sec.
Ref.
Temp
OK
Sec.
11

Operating the Water and Ice Dispenser
This fridge-freezer has three options available – cool water, crushed ice and cubed ice.
To avoid spillages, ALWAYS make sure that you hold your glass up to the dispenser before making your selection. We recommend using a 80 mm wide cup or larger when taking ice from the dispenser.
Ice Maker On/Off Setting
When the fridge-freezer is first powered on, the ice maker defaults to off.
To turn on
•Press the ‘ICE MAKER ON/OFF’ button for 3 seconds. The Ice Maker On icon will turn on and the ice maker will start working.
To turn off
•Press the ‘ICE MAKER ON/OFF’ button for 3 seconds.
The Ice Maker On icon will turn off and the ice maker will stop working.
IMPORTANT: Make sure that you empty the ice maker container before you turn off the ice maker, as the ice will melt into water.
Cool Water Supply
1.Hold the glass to the dispenser.
2.Press the Dispenser Selector button to select cool water. The WATER icon will illuminate.
3.Slightly push the glass onto the lever switch and cool water will dispense into the glass.
Crushed Ice Supply
1.Hold the glass to the dispenser.
2.Press the Dispenser Selector button to select crushed ice. The CRUSHED icon will illuminate.
3.Slightly push the glass onto the lever switch and crushed ice will dispense into the glass.
Cubed Ice Supply
1.Hold the glass to the dispenser.
2.Press the Dispenser Selector button to select ice cubes. The CUBED icon will illuminate.
3.Slightly push the glass onto the lever switch and ice cubes will dispense into the glass.
Changing The Water Filter
When the Filter Change Status Icon turn on,it is indicating that the water filter requires changing(approximately every 6 months).After finishing the change,press Function Selector button for 3 seconds,Filter Change Status Icon will disappear.
Safety |
Downloaded |
|
|
||
|
|
||||
|
from |
|
|||
|
|
|
|
||
! |
DO NOT use excessively deep, narrow, fragile or |
GB |
|||
|
delicate glasses. |
|
www |
||
|
|
|
|||
• |
|
|
|
|
|
Hold the glass as close as possible to dispenser to |
|
||||
|
|
|
|
. |
|
|
avoid spilling water, dropping ice or blockages in the |
|
|||
|
glass still for a further 2-3 seconds (for ice),vandenborre1-2 seconds |
|
|||
|
|
||||
|
ice cube dispenser. |
|
|
|
|
• |
Five seconds after the final delivery of ice or water, the |
|
|||
|
dispenser flap will close with a ‘phutt’ sound. Hold the |
|
|||
|
|
|
|
|
. |
(for water) after you have filled your glass and releasedbe the lever switch as additional water or ice may be produced.
• Regularly clean the dispenser.
• To maintain water quality, the filter will need replacing from time to time. We recommend that the water filter
is replaced every 6 months . However, if the water quality show signs of deterioration, either visually or in taste, then the filter should be changed sooner.
• Crushed ice may be dispensed instead of cubed ice if crushed ice was the last option selected.
! NEVER place canned drinks or foods inside the dispenser, as this will damage the crushing mechanism.
! DO NOT touch the dispenser, or remove the icemaker cover to prevent accidental injury or damage to the appliance.
• First supply of water (seven glass approx) and ice cubes (20 pieces approx) should not be consumed after initial start up or following a lengthy break in use. Dispose of these accordingly.
• Do not place ice cubes, which have not been produced by the icemaker into the storage drawer to prevent damage to the mechanism.
• Insufficient water supply may lead to small ice cubes. Excessive water supply may lead to larger cubes, which may stick together, cause leaks and block the dispenser. You should adjust the tap or contact a service engineer.
Automatic Defrosting
There is no need to defrost the refrigerator as this appliance has automatic defrost.
!DO NOT use mechanical devices to accelerate the defrosting process – unless they are of a type recommended by the manufacturer.
Alarm Function
If you leave a door open for a long time or close a door inappropriately, the fridge-freezer will beep at regular intervals, to remind you to close the door properly.
Display Power Down
fridge-freezer is used again.
12

3. Food Storage Tips |
|
Downloaded |
|
|
|
from |
|
||
Tips on Storing Fresh Food |
|
|
||
• |
Melon, pineapples and bananas can go directly into the |
|||
• Keep your fridge temperature below 5 . |
||||
|
www |
|||
• 'Best before' and 'use by' dates.Food with a "use by" |
|
|||
|
freezer after preparing, for storage over a.longer period. |
|||
date goes off quite quickly. It can be dangerous to |
• |
Packaging fresh foods properly, using the correct |
||
eat after this date. Food with a "best before" date is |
|
temperature and taking into account food hygiene, will |
||
longer-lasting. It should be safe to eat but may not |
|
enhance the quality of fresh foods stored within this |
||
be at its best quality after this date. |
|
appliance. |
vandenborre |
|
• Make sure that food that have been cooked and |
• |
|
. |
|
Use plastic bags, aluminium foil or other food wraps to be |
||||
require chilling, are at room temperature before |
|
cover fresh foods not in packaging to prevent flavour |
||
placing them into the fridge freezer. Make sure that |
|
transfer and prevent contamination. |
|
|
these foods are stored in suitable containers. |
• |
Before storing items in multi-packs (i.e. yoghurt) remove |
||
• Foods stored in the refrigerator should be washed |
||||
|
any excess packaging. |
|
||
and dried before storing. |
|
|
||
|
! |
|
||
• Some food are best left wrapped in the |
|
|
||
|
explosive inside the appliance. |
|
||
manufactures original packaging when put in the |
|
|
||
refrigerator. If unwrapped, it is recommended that |
• |
Beverages with high alcohol content should be stored |
||
the food should be re-wrapped, so that the water |
|
vertically in tightly sealed bottles. |
|
|
cannot evaporate. Some fruit and vegetables keep |
• |
Delicate foods should be stored in the coolest part of |
||
fresher and food smells will not mix if wrapped. |
the appliance. |
•Stored foods can be marked in bags or containers.
• |
Foods eaten daily should be stored at the front of |
• |
Try not to open the door too often. |
|
• |
Set the thermostat to make sure that foods remain |
|||
|
the shelf. |
|||
• |
Make sure that food is stored systematically (raw |
|
suitably cold; try to avoid freezing within the fridge. |
|
|
meats with raw meats, dairy with dairy) to avoid |
|
Using a thermometer will help you to judge how cool |
|
|
flavour transfer and cross contamination. Raw |
|
the appliance is. Place it into a glass of water and leave |
|
|
meats should be stored at the bottom of the fridge |
|
it inside the appliance for several hours to get a reliable |
|
|
to prevent the possibility of it dripping onto |
|
reading. |
|
|
uncooked food. Other foods should be stored |
• |
Some foods contain natural oils and acids (e.g. citric |
|
|
above raw meat. |
|
acid) which can damage plastics if spilled – make sure |
|
• |
When storing food in the fresh food section always |
|
these foods are suitably contained. |
|
|
make sure there is adequate space for airflow |
• |
Unpleasant odours inside the fridge are a sign that |
|
|
circulation. This helps to maintain the shelf life of |
|||
|
|
something has spilled and cleaning is required. Using |
||
|
the food. |
|
||
|
|
warm water with bicarbonate of soda will clean the |
||
• |
When storing food in the refrigerator make sure that |
|
||
|
interior of the appliance and remove most spillages (see |
|||
|
foods are not too close to the rear wall to avoid the |
|
||
|
|
‘Cleaning and Maintenance’). |
||
|
risk of freezing. |
|
||
|
• |
Always remember to remove perishable foods from this |
||
• |
It is suggested for radishes and other root vegetables |
|||
|
appliance before taking prolonged trips of holidays. |
|||
|
to trim the leaves. This keeps the nutrition in the root |
|
||
|
|
|
||
|
and not absorbed by the leaves. |
|
|
•Put frozen foods into the fresh food area to let them defrost. The low temperature of the refrigerator reduces the formation of bacteria and extends food life.
•Some foods like onions, garlic, bananas and root vegetables are better stored at room temperature than in the fridge.
13

Tips on Freezing Food |
|
Downloaded |
|
|
|
• When storing commercially frozen foods, please |
|
|
|
• As with storing fresh foods, suitable packaging, correct |
|
follow these guidelines: |
|
|
|
|
|
||
temperature and food hygiene will enhance the quality |
|
from |
|
|
|
• Always follow manufacturers’ guidelines for |
|
GB |
|
of the food you are freezing. |
|
the length of time you should store food for. |
|
|
• Avoid putting hot foods into the freezer. First let them |
|
Do not exceed these guidelines! |
|
|
cool until they reach room temperature. |
|
• Try to keep the length of timewwwbetween |
|
|
|
|
. |
|
|
• Make sure that all foods for freezing are of a high quality, |
|
purchase and storage as short as possible |
|
|
|
|
|
||
can be mixed without affecting the quality. Make sure that |
|
• Avoid buying food which has icevandenborreor frost on |
||
and suitable for freezing. |
|
to preserve food quality. |
|
|
• Use packaging material that is odourless and airproof |
|
• Buy frozen foods, which have been stored at |
|
|
(such as plastic bags) to store food in so different foods |
|
a temperature of –18 °C or below. |
|
|
it is airtight. Leaking packaging will dehydrate the products |
|
the packaging – This indicates that the |
. |
|
|
|
be |
||
and lead to loss of beneficial vitamins. |
|
products might have been partially defrosted |
|
|
• Keep the surface of the packaging dry – this keeps the |
|
and refrozen at some point – temperature |
|
|
packs from freezing together. |
|
rises affect the quality of food. |
|
|
• Mark packages with the kind of food contained and the |
|
• Should there be a power cut, or the fridge / |
|
|
date of storage. |
|
freezer fail for any length of time, for more |
|
|
• Food needs to be frozen quickly, so it is best to freeze |
|
than 3 hours, you may need to remove food |
|
|
small portions whenever possible and ensure that they |
|
from the freezer and if possible store in |
|
|
are as cold as possible before storage. The recommended |
|
another working freezer or a cold, hygienic |
|
|
maximum weight for each portion is 2.5 kg. |
|
place (i.e. garage or out house area) until |
|
|
• Keep food which is fresh away from food which is already |
|
the power is restored, or the appliance is |
|
|
frozen, if you need to freeze fresh food every day, make |
|
repaired. To prevent undue temperature rise |
|
|
sure that it is in small portions to prevent this. |
|
you should store the food in a cool box or |
|
|
• Do not exceed the maximum load for freezing – which is |
|
wrap the food in layers of insulating material, |
|
|
given as 10 kg / 24-hours (see data badge for details). |
|
such as newspaper, to help to maintain the |
|
|
• Write the expiry date and food names on the outside of the |
|
temperature. |
|
|
packaging so you can be assured of the food type and |
|
It is important that any food that defrosts |
|
|
when it is safe to eat. |
|
should be either consumed, or cooked and |
|
|
• Take food from the freezer to defrost when needed. |
|
refrozen (where suitable) soon afterwards in |
|
|
Defrosted food cannot be refrozen unless it is cooked. |
|
order to prevent health risks. |
|
|
• Do not put too much fresh food into the freezer at once. |
|
|
|
|
This could go beyond the freezer’s cooling capacity (see |
|
|
|
|
‘Technical Data’). |
|
|
|
|
14
4. Installation |
|
Downloaded |
|
|
|
from |
|
||
Positioning Your Appliance |
|
|
||
|
|
www |
Fig.4-1 |
|
Choosing the Right Location |
|
|
||
|
|
|
||
|
|
|
. |
|
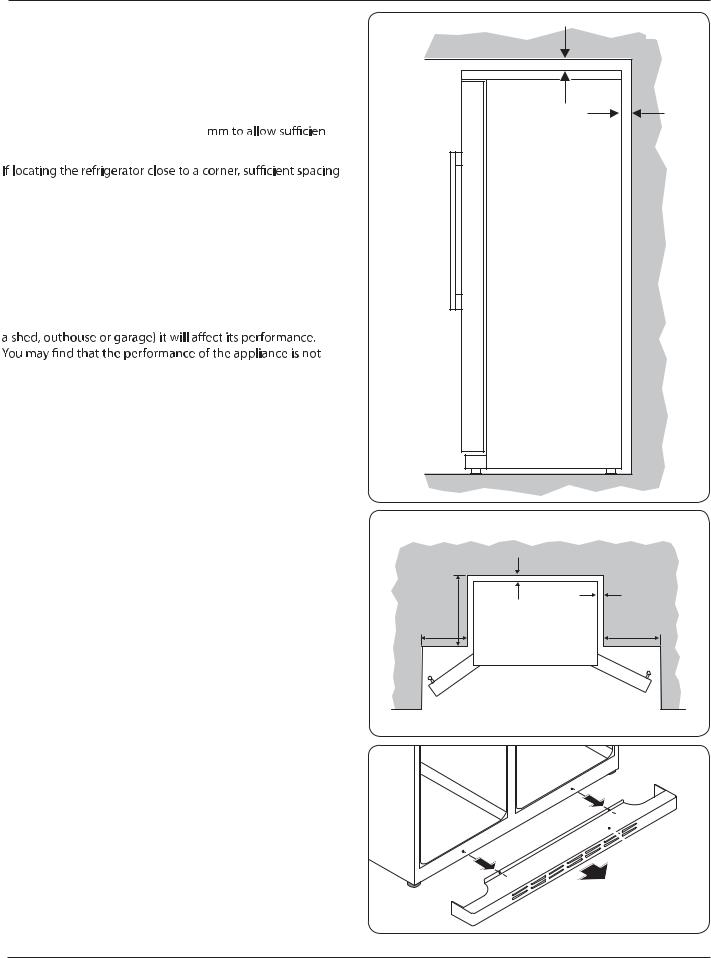
This appliance should be installed in a room that is dry |
|
vandenborre |
||
|
|
|
||
and well ventilated. To provide adequate ventilation, make |
|
|
|
|
sure the refrigerator is at least 15 mm clear on all sides |
15mm |
|
|
|
from kitchen cabinetry(Fig.4-1). Any units placed above |
|
|
||
the appliance must be clear by 15 |
t |
ArtNo.600-0034 - Clearances |
|
. |
ventilation. |
|
|
be |
|
|
|
|
||
must be left for opening the doors and removing the shelves |
|
|
|
|
(Fig.4-2). |
|
|
|
|
This appliance should be at least 100mm from any electric or |
|
|
|
|
gas cooker and 300mm from any coal or oil stove. If this is not |
|
|
|
|
possible, make sure that appropriate insulation is used. |
|
|
|
|
Avoid exposing the appliance to direct sunlight, and sources |
|
|
|
|
of heat (such as radiators, heaters or cookers). |
|
|
|
|
If this appliance is situated in a cold environment (such as |
|
|
|
|
consistent and this may damage foods. A consistent ambient |
|
|
|
|
temperature of 10°C or above is recommended. |
|
|
|
|
|
|
|
|
Fig.4-2 |
|
590 |
15 |
|
|
|
15 |
|
|
|
|
400 |
|
450 |
|
All dimensions in mm
Fig.4-3
 Toe
Toe
moulding
(Doors omitted for clarity)
15

Fig.4-4
water DxD |
-600.ArtNo |
tconnec |
- 0048 |
Fig.4-5
Hinge cover
|
Downloaded |
|
|
|
|
|
|
|
|
|
|
Removing and Installing the Doors |
|
|
|||
|
from |
|
|
|
|
! |
In the event that you need to remove the |
|
|
GB |
|
|
refrigerator doors, please follow the door removal |
|
|||
|
and installation instructions below. |
www |
|
|
|
|
|
|
|
|
|
! |
It is suggested, for your safety, to have t |
. |
|
|
|
o or more |
|
|
|||
and remove(Fig.4-3). |
|
vandenborre |
|
||
|
|
||||
|
people to assist you in completing the below task to |
|
|
||
|
avoid injury, product damage or property loss. |
|
|
||
Unscrew the 2 screws holding the toe moulding in positi n |
|
|
|||
|
|
|
|
. |
|
|
|
|
|
|
be |
Fig.4-6
3. Lift the refrigerator compartment door to remove it.
Fig.4-7 |
Hinge cover |
oor |
|
|
Fig.4-8
16
Levelling the Fridge-freezer and
Adjusting the Doors
Make sure that the appliance is on solid level flooring. If the refrigerator is placed on a plinth, flat, strong and fire resistant materials must be used.
This appliance has front adjustable feet, which can be used to level the appliance.
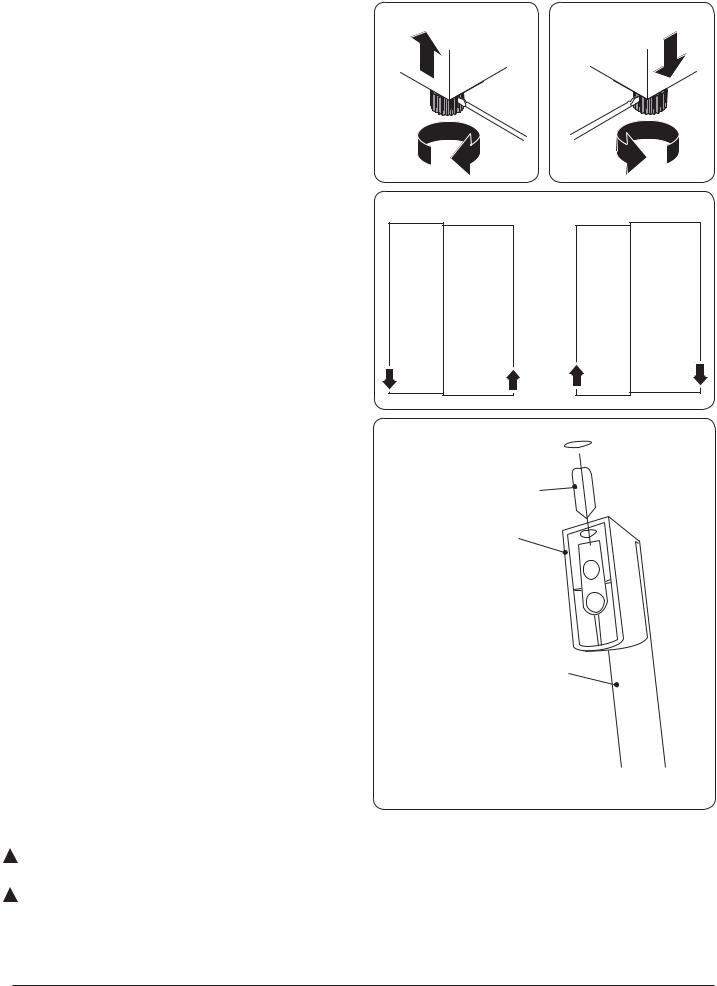
Insert a suitable flat screwdriver into the slots of the adjustable feet. Turn the screwdriver clockwise to raise the feet (Fig.4-9), and counter-clockwise to lower the feet (Fig.4-10).
Levelling the Doors
The doors may require some alignment before connecting the fridge-freezer to the electrical supply. This can be done by adjusting the levelling feet (Fig.4-9 and Fig.4-10).
To raise the left-hand door turn the left-hand foot clockwise until it is level (Fig.4-11).
To raise the right-hand door, turn the right-hand foot clockwise until the it is level.
Fitting the Handles
The door handles fix onto the mounting studs already fitted to each door (Fig.4-12).
Use the Allen key from the instruction kit bag.
1.Place the handle firmly over the mounting studs.
2.Insert the grub screw into the hole located under each handle standoff bar.
3.Using the Allen key, tighten the grub screw fixing the handle to the door.
4.Fix the cover of top bolts to the right position.
Do not over-tighten the grub screw.
Electrical Supply Connection
Connect the appliance to the electrical supply (220-240V ~ 50Hz) with the plug and lead, which ar
Connections to the mains supply should be in accordance with local regulations.
!The appliance must be plugged into an earthed socket.
!Always make sure that the plug is accessible after the appliance has been positioned.
Downloaded |
|
Fig.4-10 |
|
Fig.4-9 |
from |
||
|
|
||
|
|
www |
|
.600-0035 - Adjus |
sting the feet |
|
. |
|
vandenborre |
||
|
|
|
|
|
|
|
. |
|
|
|
be |
|
|
|
Fig.4-11 |
Fig.4-12
Screw cover 
Grub screw
Standoff bar
Handle
17
Fig.4-13
ArtNo.601-0010 - SxS 661-9 - Pipe to filter
Fig.4-14
ArtNo.601-0005 - SxS 661-9 - Securing the pipe
Fig.4-15
ArtNo |
BSP connector |
Fig.4-16
|
|
Downloaded |
|
|
|
|
|
|
|
||
Water Supply Connection |
|
|
|||
|
|
|
from |
|
|
|
! |
It is recommended to have this product installed by |
GB |
||
|
|
|
|
||
|
|
a qualified technician. |
|
|
|
Note: For further installation details referwwwto the instructions |
|
||||
|
|
|
|
. |
|
|
|
|
|
vandenborre |
|
|
|
|
|
||
|
Pressure of the cold water supplied to the automatic |
|
|||
|
|
icemaker is between 0.15-0.6 Mpa. |
|
|
|
The water tube should be of an appropriate length, |
|
||||
|
|
usually 8 metres, and should be free of bends after . |
|||
|
|
being inserted into place. If the water pipe is too long |
be |
||
|
|
|
|||
ice and cold water content.
•DO NOT connect to the water supply when the ambient temperature is below 0°C, otherwise the water pipe may freeze.
|
Always connect to the drinking water supply. |
|
Keep the water pipe away from heat sources. |
|
The water filter is there to filter impurities in the water, |
|
and to make ice clean and hygienic. It cannot sterilise |
|
or destroy anything , so be certain to connect the water |
|
pipe to a drinkable water source. |
Automatic water system,do not manually add water. |
|
|
If the ice maker is turned on but the appliance is not |
connected to water,the ice maker will not work.
Fitting the Water Filter
Measure out and cut the length of pipe required from the
supply. Make sure that you achieve a square cut using a sharp knife.
(Fig.4-13).
groove as shown(Fig.4-14).
Connect the end into the plastic adaptor(Fig.4-15). Screw the adaptor onto a suitable ½” BSP connector water outlet.
Access the water valve assembly at the back of the refrigerator. Push the pipe into the valve assembly (Fig.4-16).
Open the wa water pipe joints and allow the water to run until it is clear.
Comissioning the Water Dispenser
for 1 minute. Do not press for more than 1 minute to prevent overheating of the pad activator solenoid. Cold water will
18
5. Cleaning and Maintenance |
|
Downloaded |
|
|
|
|
from |
|
|
||
Defrosting |
|
|
|
||
Shutting Off the Refrigerator |
|
|
|||
Defrosting is done automatically so there is no need to |
|
www |
|||
In the event of a power cut, food should remain safely cold for |
|||||
manually defrost this appliance. |
about 3 hours. |
|
. |
|
|
! DO NOT use mechanical devices to accelerate the |
suitable temperatures. |
vandenborre |
|||
Should there be a prolonged power cut you may need to |
|||||
|
defrosting process. |
remove food from the freezer compartment and store it in |
|||
Cleaning |
a cold place, wrapped in layers of newspaper to preserve |
||||
|
|
. |
|||
! |
Disconnect the appliance from the power supply |
|
|
|
be |
|
Once power is restored replace the food back into the freezer |
||||
|
before cleaning. |
compartment. |
|
|
|
To keep internal odours to a minimum it is best to periodicallyShould food begin to defrost, or the power cut last longer clean the inside shelves, crispers, bins and wall. than expected, it is advised that you consume any food
removed from the freezer.
!DO NOT use harsh abrasives, or aggressive cleaners as these can damage the interior of the appliance.
Shelves and other accessories (plastic and glass parts) can be cleaned in the sink using liquid dishwashing liquid and warm
If the power outage is short term, most foods can be left inside the freezer compartment – this is the best way of preserving temperature – and surrounded by ice cubes from the icebox. This is also an ideal solution for power outages you may have been pre-warned about.
When experiencing a power cut of any kind, do not add any extra foods to the freezer.
before replacing them inside the appliance.
Always keep the door seals clean.
!The fridge is heavy. When moving the refrigerator be careful to protect the floor.Keep the refrigerator vertical and do not tilt the refrigerator – this prevents damage to the floor.
!DO NOT spray or rinse the fridge with water or other liquids. This could harm the electrical parts.
When Not in Use
If you are not using the appliance for an extended length
supply, empty any food out, clean the inside of the appliance and leave the door ajar. This will save energy, and also prevent a build up of stale odours inside.
Water Filter
!
!
!
!
!
Use a dry cloth when cleaning near the electrical parts (such as the light or switch).
DO NOT clean the fridge with a stiff or wire brush.
DO NOT use an organic solvent such as detergent, petrol, lacquer, thinners, acetone or acid.
To prevent your skin sticking to cold steel parts, make sure your hands are not wet when touching the parts.
DO NOT use HOT water to clean the glass shelves, as they may break or crack.
every 6 months. However, if the water quality show signs of
be changed sooner.
!After installing a new water filter,discard all ice produced during the first 24 hours.
19
6. Troubleshooting |
|
|
Downloaded |
|
|
|||
|
|
|
|
|||||
|
|
from |
|
|
|
|||
|
|
|
|
|
|
|
GB |
|
|
|
|
|
|
www |
|
||
|
|
|
|
|
|
|
||
|
|
|
|
|
. |
|
|
|
Problem |
Cause |
|
Solution |
vandenborre |
|
|
||
|
|
|
|
|
||||
|
|
|
|
|
|
|
|
|
The temperature is too low |
|
|
|
|
|
|
|
|
1.1 |
The temperature inside the |
1.1.1 |
The temperature inside the |
1.1.1.1 |
Set the temperature in the freezer slightly |
|
|
|
|
freezer is too low, with the fresh |
|
freezer section is set too low. |
|
higher then wait 24 hours for new balance to be. |
|||
|
|
|
|
|
achieved. |
be |
||
|
|
|
|
|
|
|
||
1.2 |
The temperature inside the |
1.2.1 |
The temperature inside the |
1.2.1.1 |
Set the temperature inside the fresh food |
|
|
|
|
fresh food compartment is too |
|
fresh food area is set too low. |
|
section slightly warmer. The temperatures will |
|
|
|
|
cold, while the freezer sections |
|
|
|
reach new balance within 24 hours. |
|
|
|
1.3 |
The foods stored in the full |
1.3.1 |
The control setting in the |
1.3.1.1 |
Set the fresh food control setting slightly higher. |
|
||
|
width pantry are frozen. |
|
fresh food area is set too cold. |
The new set point temperature will reach a |
|
|
||
|
|
|
|
|
balance within 24 hours. |
|
|
|
1.4 |
The foods stored in the crisper |
1.4.1 |
The settings for the fresh |
1.4.1.1 |
Raising the fresh food control settings to a |
|
|
|
|
are frozen. |
|
food compartment are too |
|
slightly higher temperature and/or lowering the |
|
|
|
|
|
|
cold. |
|
humidity control setting will prevent frost or ice |
|
|
|
|
|
|
|
|
forming. |
|
|
|
1.5 |
Readings on the dispenser |
1.5.1 |
An electronic operating |
1.5.1.1 |
Call your service engineer who can diagnose the |
|
||
|
display are showing error |
|
problem has been |
|
problem and make correction. |
|
|
|
|
codes. |
|
encountered. |
|
|
|
|
|
The temperature is too high
2.1 |
The freezer drawer sections |
2.1.1 The doors are opened |
|
or fresh food compartment |
frequently or for too long |
|
temperatures are too high. |
each time. |
|
|
2.1.2 The doors are left open. |
2.2 |
The temperature is too warm in |
2.2.1 The temperature setting in |
|
the freezer but okay in the fresh |
the freezer is set too warm. |
|
food section. |
|
2.3 |
The temperature is too warm in |
2.3.1 The temperature setting in |
|
the fresh food section but okay |
the fresh food section is set |
|
in the freezer. |
too warm. |
2.4 |
The temperature inside the |
2.4.1 The fresh food set |
|
crisper is too warm. |
temperature is too warm. |
2.1.1.1Try to reduce the frequency of opening doors.
2.1.2.1Take extra care to keep gaskets sealing well around the perimeter of the doors. Keep gaskets clean and dirt free.
2.2.1.1Set the temperature colder for the freezer section. Then allow it to balance within 24 hours at new colder temperature.
2.3.1.1Set the food temperature control slightly colder. The new colder temperature can be achieved within 24 hours.
2.4.1.1Set the fresh food temperature colder and the balance to colder temperature will be achieved within 24 hours
Water, humidity or frost/ice in the fridge
3.1Moisture formation on the inside of the fridge.
3.1.1.1 Try raising the temperature slightly in the
3.1.2.1 Check to make sure the door gaskets are clean and sealing well against the metal cabinet frame.
3.1.3 The door or drawer is opened 3.1.3.1 Reduce the frequency of door openings. too frequently or for too long
each time.
3.1.4Food containers or liquids are 3.1.4.1 Let hot foods cool to room temperature and
left open. |
cover foods and liquids. |
3.2Water droplets collect in the lower crisper drawer areas.
3.2.1 Humidity settings are set too |
3.2.1.1 It is normal for some wet air to collect inside the |
high. |
enclosed crisper. To reduce the accumulation |
|
of moisture, lower the humidity setting and/or |
|
raise the fresh food compartment temperature. |
20

Problem |
Cause |
|
Solution |
Downloaded |
|
|
from |
|
|||
3.3 Water forms at underside of the 3.3.1 |
|
3.3.1.1 |
|
||
crisper glass covers. |
|
foods. |
|
with a dry cloth to remove excess moisture. |
|
|
3.3.2 |
Door seal leaks or frequent |
3.3.2.1 Check the door gaskets andwwwreduce door |
|
|
|
|
door openings in humid |
|
. |
|
|
|
|
openings. Possibly raise fresh food temperature. |
||
|
|
environment. |
|
|
|
|
|
|
|
||
Water/humidity/frost on the outside of the fridge |
4.1.1.1 A small amount of dew or water moisturevandenborreis |
||||
4.1 Wet air forms droplets of water |
4.1.1 |
Warm, humid air in the |
|||
on the outside edges of the |
|
environment mixes with |
|
normal. It is best to wipe it down with a dry |
. |
|
|
be |
|||
fridge. |
|
cooler air at the door gasket |
|
cloth to improve performance. |
|
|
|
areas of the fresh food |
4.1.1.2 A slight increase in the compartment |
|
|
|
|
|
|
||
and freezer compartments
causing condensation.
temperatures can reduce this moisture formation.
4.1.1.3 Check door gasket for proper seal and clean.
Automatic Ice maker
5.1The ice maker does not work properly.
5.2Ice cubes are too large or too small.
Cold water & ice dispenser
6.1Cold water not dispensing.
5.1.1Ice cubes are sticking together.
5.1.2Ice cubes may end up sticking together if stored too long.
5.2.1Ice maker water supply set incorrectly.
6.1.1The freezer or refrigerator door is not fully closed. The water supply pipe is not open.
5.1.1.1Take out the lump of ice cubes, crush it and then return only the separated ice cubes back to the ice cube container.
5.1.2.1See 5.1.1.1 above.
5.2.1.1Adjust the ice maker water supply.
6.1.1.1Close all appliance doors.
Open the water supply line all the way.
|
|
6.1.2 |
|
6.1.2.1 |
|
|
|
6.1.3 |
The water line is blocked. |
6.1.3.1 |
Check that the water tubes are not kinked or |
|
|
|
|
|
restricted. |
6.2 |
The water has a strange odour. 6.2.1 |
The water has been stored |
6.2.1.1 |
Remove 7 cups of water and throw away. |
|
|
|
|
too long without use. |
|
Check if the odour improves. |
|
|
6.2.2 |
The local potable water |
6.2.1.2 |
Contact your local water supply company to |
|
|
|
source is suspect. |
|
check quality of the water. |
6.3 |
Ice not dispensing. |
6.3.1 |
The freezer or refrigerator |
6.3.1.1 |
Close all appliance doors. |
|
|
|
door is not fully closed. |
|
|
|
|
6.3.2 |
No ice cubes in the container 6.3.2.1 |
Wait until ice cubes are supplied. |
|
|
|
6.3.3 |
Freezer temperature set too |
6.3.3.1 |
Lower the freezer temperature to improve the |
|
|
|
high. |
|
ice cube maker performance. |
6.4 |
Dispenser is jammed |
6.4.1 |
Defrosting water has frozen |
6.4.1.1 |
Remove the container. Clean and dry the |
|
|
|
on the spindle. |
|
spindle. Replace the container. |
|
|
6.4.2 |
Ice cubes are jammed |
6.4.2.1 |
Remove the ice cubes between the ice maker |
|
|
|
between the ice maker and |
|
and container. |
|
|
|
container. |
|
|
|
|
6.4.3 |
Ice cubes are sticking |
6.4.3.1 |
Take out the lump of ice cubes, crush it and then |
|
|
|
together. |
|
return only the separated ice cubes back to the |
|
|
|
|
|
ice cube container. |
|
|
6.4.4 |
Other ice cubes were placed |
6.4.4.1 |
Only ice cubes produced by the ice maker can |
|
|
|
in the dispenser. |
|
be used in the dispenser. |
21

7.1
8.1
Cause |
Solution |
Downloaded |
|
||
|
|||||
from |
|
||||
|
|
|
GB |
||
The inside of the fridge is dirty. 7.1.1 |
The inside walls, shelves, and |
7.1.1.1 Clean all inside surfaces with arm water and |
|||
|
|||||
|
door bins need cleaning |
|
www |
|
|
|
|
a clean soft damp cloth then wipe.dry. |
|
||
7.1.2 |
Food in the fridge has been |
7.1.2.1 Wrap and cover foods to extend useful food life. |
|
||
|
stored beyond its useful life. |
|
vandenborre |
||
|
|
|
|||
The door has a closing problem. 8.1.1 |
The door may have food |
8.1.1.1 Reposition the shelves, door bins, or internal |
. |
||
be |
|||||
|
articles or packages that are |
|
containers to allow the door to close. |
||
|
|
|
|||
|
obstructing closure. |
|
|
|
|
8.1.2 |
The level of the refrigerator is |
8.1.2.1 |
|
|
|
|
causing the door to shift out |
|
|
|
|
|
of position. |
|
|
|
|
8.1.3 |
The door could be hitting |
8.1.3.1 Provide a good 25mm (1”) clearance on all |
|
||
|
against adjacent cabinets or |
|
3 sides and on top of the cabinet so doors can |
|
|
|
appliances. |
|
open and close freely. |
|
|
General
9.1 |
The compressor does not work. 9.1.1 |
The refrigerator is in deep |
9.1.1.1 |
This is normal for a refrigerator that goes into |
||
|
|
|
freeze cooling |
|
deep freeze automatically. The period of deep |
|
|
|
|
|
|
freeze cooling lasts about 30 minutes. |
|
|
|
9.1.2 |
The refrigerator is not |
9.1.2.1 |
Make sure the plug is inserted all the way into |
|
|
|
|
powered on. |
|
the power outlet. |
|
|
|
|
|
9.1.2.2 |
Has the circuit breaker tripped? Check and |
|
|
|
|
|
|
change to a new 13A fuse and/or reset the |
|
|
|
|
|
|
circuit breaker. |
|
|
|
|
|
9.1.2.3 |
Check the electrical supply to the room. Call the |
|
|
|
|
|
|
local electricity company. |
|
9.2 |
The fridge operates frequently |
9.2.1 |
The room temperature or |
9.2.1.1 |
It is normal for the fridge to operate |
|
|
or operates for a long time. |
|
ambient temperature is high. |
|
continuously. |
|
|
|
9.2.2 |
The ice maker is in operation. 9.2.2.1 |
This is normal – the ice maker adds extra work |
||
|
|
|
|
|
load in the refrigerator. |
|
|
|
9.2.3 |
The doors are frequently |
9.2.3.1 |
Try to reduce frequency of door or drawer |
|
|
|
|
opened and closed. |
|
openings. |
|
|
|
9.2.4 |
The control settings in |
9.2.4.1 |
Raise up the compartment temperatures slightly |
|
|
|
|
the freezer and fresh food |
|
and allow 24 hours to reach new balance. |
|
|
|
|
compartments are set to cold |
|
|
|
|
|
|
level. |
|
|
|
|
|
9.2.5 |
Door seals may be dirty, |
9.2.5.1 |
|
|
|
|
|
frayed or cracked. |
|
hair dryer so gasket takes contour of metal |
|
|
|
|
|
|
frame. |
|
9.3 |
The compressor frequently |
9.3.1 |
The compartment |
9.3.1.1 |
This is normal. The fridge compressor will |
|
|
|
|
temperature sensors keep |
|
provide the required cooling level. |
|
|
|
|
the fridge at the set points |
|
|
|
|
|
|
causing the compressor to |
|
|
|
|
|
|
cycle. |
|
|
|
10.1 |
The light is out. |
10.1.1 |
The light switch is blocked |
10.1.1.1 |
Disconnect the power supply cord plug. |
|
|
|
|
somehow with debris or food |
|
Locate the light switch on the food liner wall and |
|
|
|
|
particles |
|
move it to see if pressing the switch in and out a |
|
|
|
|
|
|
few times can dislodge the food. |
|
|
|
10.1.2 |
|
10.1.2.1 |
Make sure the power cord plug is fully engaged |
|
|
|
|
|
|
into the wall outlet socket. |
|
11.1 A beeping noise from inside the 11.1.1 |
A door is open for over 60 |
11.1.1.1 |
This is normal and will repeat every 1 minute |
|||
|
fridge or freezer. |
|
seconds. |
|
until the door is closed. |
|
|
|
|
|
|
|
|

8. Technical Data |
Downloaded |
|
|
|
|
|
from |
|
|
|
|
|
|
|
|
|
|
Ratings |
|
www |
|
||
|
|
|
. |
|
|
|
|
|
|
|
|
Model |
|
|
vandenborre |
|
|
|
HRF-628A*6 |
|
|
||
Electrical – voltage / frequency |
|
220-240V 50Hz |
|
|
|
Energy efficiency class |
|
A+ |
|
|
. |
Climate class |
|
SN-N-ST |
|
||
|
|
be |
|||
Freezer compartment star rating |
|
*/*** |
|
||
|
|
|
|||
Refrigerant |
|
R600a |
80g |
|
|
Gross capacity |
|
610 litres |
|
|
|
Net capacity |
|
550 litres |
|
|
|
Net capacity – refrigerator compartment |
|
375 litres |
|
|
|
Net capacity – freezer compartment |
|
175 litres |
|
|
|
Freezer capacity / 24 hours |
|
10kg / 24 hours |
|
|
|
Energy consumption / year |
|
420kW. h / year |
|
|
|
Energy consumption (EN153) |
|
1.15kW.h / 24h |
|
|
|
Maximum noise level |
|
42dB(A) |
|
|
|
Maximum storage time by power failure |
|
5 hours |
|
|
|
Ice making capacity |
|
1 kg/24h |
|
||
|
|
|
|
|
|
Model |
|
HRF-628I*6 |
|
|
|
Electrical – voltage / frequency |
|
220-240V 50Hz |
|
|
|
Energy efficiency class |
|
A+ |
|
|
|
Climate class |
|
SN-N-ST |
|
|
|
Freezer compartment star rating |
|
*/*** |
|
|
|
Refrigerant |
|
R600a |
80g |
|
|
Gross capacity |
|
610 litres |
|
|
|
Net capacity |
|
550 litres |
|
|
|
Net capacity – refrigerator compartment |
|
375 litres |
|
|
|
Net capacity – freezer compartment |
|
175 litres |
|
|
|
Freezer capacity / 24 hours |
|
10kg / 24 hours |
|
|
|
Energy consumption / year |
|
420kW. h / year |
|
|
|
Energy consumption (EN153) |
|
1.15kW.h / 24h |
|
|
|
Maximum noise level |
|
42dB(A) |
|
|
|
Maximum storage time by power failure |
|
5 hours |
|
|
|
Ice making capacity |
|
1 kg/24h |
|
||
23

Inhalt
1. |
Erste Schritte |
1 |
|
Sicherheit |
1 |
|
Informationen zum Kühlmittel |
2 |
|
Umweltschutz |
2 |
2. |
Informationen zu Ihrem |
|
|
Kühlgerät |
3 |
|
Informationen zum Aufbewahrungsfach für |
|
|
frische Lebensmittel |
5 |
|
Informationen zum Gefrierbereich |
6 |
|
Eiswürfel-/Wasserbereiter |
7 |
|
Hausbar |
7 |
|
Betrieb der Kühl-/Gefrierkombination |
9 |
|
Verwenden des Wasser-/ |
|
|
Eiswürfelbereiters |
12 |
|
Sicherheit |
12 |
|
Abtauautomatik |
12 |
|
Alarmfunktion |
12 |
|
Abschalten des Displays |
12 |
3.Tipps zur Lebensmittelaufbewahrung 13
Tipps zur Lagerung frischer |
|
Lebensmittel |
13 |
Tipps zum Einfrieren von |
|
Lebensmitteln |
14 |
|
Downloaded |
|
|
|
|
|
4. |
from |
|
15 |
|
|
|
Installation |
www |
|
|
|||
|
Aufstellen des Geräts |
15 |
|
|
||
|
|
. |
|
|
||
|
Ausund Einbau der Türen |
|
|
16 |
|
|
|
Ausrichten der Kühl-/ |
|
|
|
|
D |
|
Gefrierkombination in der Waagerechtenvandenborre |
. |
||||
|
und Einstellen der Türen |
|
|
17 |
|
|
|
|
|
|
be |
||
|
Ausrichten der Türen in der |
|
|
|
|
|
|
Waagerechten |
|
|
17 |
|
|
|
Anbringen der Griffe |
|
|
17 |
|
|
|
Anschluss für Stromversorgung |
|
17 |
|
|
|
|
Anschluss für Wasserzufuhr |
|
|
18 |
|
|
5. |
Reinigung und Wartung |
|
19 |
|
|
|
|
Abtauen |
|
|
19 |
|
|
|
Reinigen |
|
|
19 |
|
|
|
Den Kühlschrank ausschalten |
|
19 |
|
|
|
|
Bei Nichtgebrauch |
|
|
19 |
|
|
|
|
|
|
19 |
|
|
6. |
Fehlerbehebung |
|
|
20 |
|
|
7. |
Technische Daten |
|
|
23 |
|
|
•Lesen Sie zunächst die Bedienungsanleitung durch.
•Bewahren Sie die Bedienungsanleitung an einem sicheren Ort auf.
•Achten Sie darauf, dass Lüftungsöffnungen im Gehäuse des Geräts oder in der eingebauten Struktur nicht blockiert sind.
•Verwenden Sie nur vom Hersteller empfohlene mechanische Geräte oder Mittel zum Beschleunigen des Abtauprozesses.
•Beschädigen Sie den Kühlkreislauf nicht.
•Verwenden Sie nur vom Hersteller empfohlene elektrische Geräte in den Aufbewahrungsfächern für Lebensmittel.
•Aufgrund unserer Richtlinie der kontinuierlichen Verbesserung behalten wir uns das Recht vor, ohne Vorankündigung Änderungen an den technischen Daten vorzunehmen.

1. Erste Schritte |
|
Downloaded |
|
||
|
from |
|
|
||
|
|
|
|
|
|
Vielen Dank, dass Sie sich für diese Kühl-/Gefrierkombination |
|
www |
|
||
! |
WARNUNG! Verwenden Sie KEINE mechanischen |
|
|||
entschieden haben. Wir hoffen, dass diese moderne und |
|
Geräte (z. B. Haartrockner) zum Abtauen des. Geräts. |
|
||
Sie die Bedienungsanleitung an einem sicheren Ort auf, |
|
Wasserbereiter“ in dieser Bedienungsanleitung.vandenborre |
|||
praktische Lösung Ihren Kühlanforderungen gerecht wird. |
! |
WARNUNG! Die Wasserund Eisschläuche |
|
||
Lesen Sie diese Bedienungsanleitung vor Verwendung |
|
MÜSSEN vor der Verwendung durchgespült |
|
||
Ihrer neuen Kühl-/Gefrierkombination durch. Bewahren |
|
|
|||
|
werden. Weiteres erfahren Sie unter „Eiswürfel-/ |
|
|||
|
|
|
|
||
und machen Sie sie gegebenenfalls neuen Eigentümern |
|
|
|
. |
|
zugänglich. Wir hoffen, dass Ihnen diese Bedienungsanleitung |
• |
Achten Sie beim Entsorgen alter Geräte darauf, dass |
be |
||
alle gewünschten Informationen liefert. Sollten Sie Fragen |
|
die Verriegelungsmechanismen vor der Entsorgung |
|
||
haben, wenden Sie sich bitte an uns (unter „Garantie“ |
|
deaktiviert wurden. Es empfiehlt sich, die Tür des |
|
||
erhalten Sie Informationen zum Kundenservice). |
|
Geräts komplett abzunehmen, damit sich Kinder |
|
||
! |
WARNUNG! Dieses Gerät muss geerdet werden. |
|
nicht versehentlich im Gerät einsperren können. |
|
|
• |
Das Gerät muss sicher an die Stromversorgung |
|
|||
|
|
|
|||
! Lassen Sie das Gerät zunächst mindestens sechs |
|
angeschlossen werden. Lose Kabel, defekte Stecker |
|
||
|
Stunden ruhen. So kann sich das Kühlsystem nach |
|
und ungeschützte Drähte stellen ein Sicherheitsrisiko |
|
|
|
dem Transport stabilisieren. |
|
dar. Stellen Sie sicher, dass alle Anschlüsse in |
|
|
! |
Achten Sie darauf, dass dieses Gerät von einer |
|
Ordnung sind. |
|
|
• |
Vor routinemäßigen Wartungsarbeiten oder |
|
|||
|
qualifizierten Person installiert wird. |
|
|||
|
|
kleineren Reparaturen muss das Gerät von der |
|
||
! Der Gefrierbereich wurde mit 4 Sternen bewertet. |
|
|
|||
|
Stromversorgung getrennt werden. Dazu zählen |
|
|||
! |
Dieses Gerät ist nur für den Privatgebrauch |
|
auch Reinigungsarbeiten und das Austauschen von |
|
|
|
Leuchtmitteln. |
|
|||
|
konzipiert. Wenn es für andere Zwecke verwendet |
|
|
||
|
• |
Achten Sie darauf, die kalten Oberflächen des |
|
||
|
wird, werden Gewährleistungsansprüche |
|
|||
|
möglicherweise ungültig. |
|
Geräts während des Betriebs NICHT zu berühren, da |
|
|
• |
Reinigen Sie das Gerät vor dem Anschluss an die |
|
Hände daran haften bleiben und Kaltverbrennungen |
|
|
|
entstehen können. |
|
|||
|
Stromversorgung innen mit warmem Wasser und |
|
|
||
|
• |
Achten Sie beim Ändern des Abstellorts darauf, |
|
||
|
Natron, und trocknen Sie anschließend alles sorgfältig. |
|
|||
|
|
dass Leitungen, Schläuche und der Kondensator |
|
||
• |
Stellen Sie sicher, dass keine Teile des Geräts |
|
|
||
|
nicht beschädigt werden. Wenden Sie sich bei |
|
|||
|
beschädigt sind, insbesondere Kühlsystem, |
|
entsprechenden Beschädigungen an einen |
|
|
|
Schläuche oder Kabel. Falls Beschädigungen |
|
qualifizierten Servicetechniker. |
|
|
|
vorhanden sind, darf das Gerät NICHT installiert |
• |
Schäumende Flüssigkeiten (kohlensäurehaltige |
|
|
|
werden. Wenden Sie sich an einen qualifizierten |
|
|||
|
|
Getränke) dürfen nicht eingefroren werden. Beim |
|
||
|
Servicetechniker oder an den Kundenservice. |
|
|
||
|
|
Gefrieren vergrößert sich das Volumen dieser |
|
||
• |
Wenn sich die Zubehörteile im Inneren des Geräts |
|
|
||
|
Flüssigkeiten, wodurch die entsprechenden Flaschen |
|
|||
|
beim Transport verlagert haben, bringen Sie sie gemäß |
|
bzw. Behälter brechen oder explodieren können. |
|
|
|
den Anweisungen wieder an die richtige Position. |
• |
Lebensmittel, die vor dem Verzehr zunächst |
|
|
• |
Achten Sie darauf, dass die Stromversorgung |
|
aufgetaut oder zubereitet werden müssen, wie Brot |
|
|
|
für dieses Gerät korrekt ist. Die erforderlichen |
|
oder Fleisch, dürfen nicht gefroren verzehrt werden. |
|
|
|
Stromdaten befinden sich auf dem Datenetikett des |
• |
Wenn Lebensmittel nicht wie gewohnt aussehen |
|
|
|
Geräts. Das Datenetikett befindet sich im Inneren |
|
oder einen unangenehmen Geruch verströmen, |
|
|
|
des Geräts (oben im Kühlbereich). |
|
sollten Sie diese nicht verzehren. Entsorgen Sie sie |
|
|
• |
Wenn das Gerät aufgestellt, gereinigt und getrocknet |
|
im Zweifelsfall. |
|
|
• |
Verwenden Sie keine scharfen Metallgegenstände, |
|
|||
|
wurde und sich nach dem Transport einige Zeit in |
|
|||
|
der Ruheposition befand, kann es eingesteckt und |
|
um Eis von den Oberflächen des Geräts zu kratzen. |
|
|
|
eingeschaltet werden. |
|
Verwenden Sie nur speziell dafür vorgesehene |
|
|
Sicherheit |
|
Utensilien (z. B. Schaber aus Kunststoff), und gehen |
|
||
|
Sie dabei vorsichtig vor, um Beschädigungen an der |
|
|||
! |
WARNUNG! Verwenden Sie mit diesem Gerät |
|
Beschichtung zu vermeiden. |
|
|
• |
Das Kühlsystem beinhaltet Kühlmittel und Öle, die |
|
|||
|
ausschließlich Trinkwasser. |
|
|||
|
|
gesundheitsschädlich sind, sobald sie austreten. |
|
||
! WARNUNG! Achten Sie darauf, dass um das Gerät |
|
|
|||
|
Stecken Sie das Gerät in diesem Fall aus, und |
|
|||
|
keine Gegenstände stehen. |
|
lüften Sie den Raum. Stellen Sie sicher, dass kein |
|
|
! |
Beschädigen Sie den Kühlkreislauf nicht. Im Falle |
|
Kühlmittel in oder an Ihre Augen gelangt. |
|
|
von Beschädigungen darf das Gerät nicht verwendet |
Wenden Sie sich an einen Servicetechniker, oder |
|
sorgen Sie dafür, dass das Gerät entfernt wird. |
||
werden. |
||
|
1

Elektrische Sicherheit
•Netzanschlüsse müssen den örtlichen Vorschriften entsprechen.
•Nach dem Aufstellen des Geräts MUSS der Stecker zugänglich sein.
•Achten Sie darauf, dass das Netzkabel freiliegt.
•Treten Sie nicht auf das Kabel.
•Vermeiden Sie eine Beschädigung des Netzkabels, wenn Sie die Position des Kühlgeräts verändern.
Beschädigtes Netzkabel
Wenn das Netzkabel beschädigt ist oder Verschleißerscheinungen zeigt, schalten Sie das Kühlgerät aus, und wenden Sie sich zum Ersatz des Kabels an einen autorisierten Händler.
Informationen zum Kühlmittel
WICHTIG: Dieses Gerät enthält das Kühlmittel ISOBUTAN (R600a). Achten Sie beim Ändern des Abstellorts
darauf, dass das Gerät keinen abrupten Stößen oder Schüttelbewegungen ausgesetzt ist. Andernfalls könnte das Gerät beschädigt werden.
Beschädigungen des Kühlkreislaufs, mit einem möglichen Austreten von Kühlmittel, können zu einem Explosionsrisiko durch externe Funken oder Flammen führen.
Kühlmittelaustritt
Warten Sie, bis das Mittel verdunstet ist, und stellen Sie sicher, dass für entsprechende Belüftung gesorgt ist.
Verhalten des Kühlmittels
Flammen in Kontakt kommt. Das Kühlmittel R600a ist schwerer als Luft: Beim Austreten bildet sich eine hohe Konzentration auf Bodenebene, wo keine ausreichende Belüftung vorhanden ist.
Erste Hilfe
Einatmung
Bringen Sie die betroffene Person aus der verunreinigten Zone in einen warmen, gut belüfteten Raum.
Die Einatmung über einen längeren Zeitraum kann zu Erstickungserscheinungen und möglicherweise zu Bewusstlosigkeit führen. Beginnen Sie falls notwendig
mit der künstlichen Beatmung, und verabreichen Sie in schweren Fällen unter strenger ärztlicher Aufsicht Sauerstoff.
Hautkontakt
Gelegentlicher Hautkontakt birgt sehr geringe Gesundheitsrisiken. Waschen Sie in diesem Fall die betroffene Hautpartie gründlich ab.
Flüssigkeitsspritzer undDownloadedzerstäub nde Flüssigkeit können |
|
|
||
zu Kaltverbrennungen führen. Waschen Sie die betroffene |
|
|
||
Hautpartie mit ausreichend Wasserfromab, und lassen Sie |
|
|
||
|
www |
|
|
|
sich bei Verbrennungen von einem Arzt behandeln. |
|
|
||
Augenkontakt |
|
. |
|
|
Waschen Sie das Auge bei geöffnetem Lid mit |
vandenborre |
|
|
|
|
|
|||
|
|
|
||
ausreichend Wasser, und wenden Sie sich so bald wie |
|
D |
||
möglich an einen Facharzt. |
|
|
|
|
Allgemein gilt: Sollten Sie das Kühlmittel R600a einatmen |
. |
|||
oder damit in Kontakt kommen, konsultieren Sie Ihren |
be |
|||
Hausarzt. |
|
|
|
|
Umweltschutz
Entsorgung der Verpackung
Ihr neues Kühlgerät wurde für den Transport zu Ihnen entsprechend verpackt. Alle verwendeten Materialien können umweltfreundlich entsorgt und recycelt werden. Bitte tragen Sie zum Schutz der Umwelt bei, und entsorgen Sie die Verpackung entsprechend.
Entsorgung Ihres alten Kühlgeräts
Dieses Symbol auf dem Produkt bzw. der
Verpackung gibt an, dass das Produkt nicht mit dem normalen Hausmüll entsorgt werden darf. Stattdessen sollte es an die Sammelbzw.

 Recyclingstelle Ihres Bezirks gebracht werden.
Alte Geräte können teilweise noch verwertet werden. Eine umweltfreundliche Entsorgungsmethode stellt sicher, dass wertvolle Rohmaterialien gewonnen und neu verwendet werden können.
Wenn ein Gerät das Ende seiner Betriebszeit erreicht hat, trennen Sie die Verbindung zur Stromversorgung. Schneiden Sie das Netzkabel ab, und entsorgen Sie es zusammen mit dem Stecker.
Sorgen Sie dafür, dass die Tür nicht mehr verwendet werden kann (durch Entfernung der Dichtungen), oder nehmen Sie die Tür ab, damit sich Kinder nicht versehentlich darin einschließen können.
wird als Treibmittel für den Isolierschaum verwendet.
Achten Sie beim Transport des Geräts darauf, dass der Kühlkreislauf nicht beschädigt wird.
Indem Sie sicherstellen, dass dieses Produkt korrekt entsorgt wird, vermeiden Sie potenzielle negative Auswirkungen auf die Umwelt und die Gesundheit des Menschen.
Um weitere Informationen zum Recycling dieses Produkts zu erhalten, wenden Sie sich an die Behörden vor Ort, Ihre Abfallstelle für Hausmüll oder die Verkaufsstelle.
2

2. Informationen zu Ihrem Kühlgerät |
Downloaded |
|||
from |
||||
|
|
|
||
Abb. 2-1 (HRF-628I*6) |
|
|
www |
|
Gefrierbereich |
1 |
12 |
||
|
|
|
. |
|
|
|
|
Kühlbereich |
|
|
|
|
vandenborre10 |
|
|
|
|
. |
|
|
|
|
be |
|
2 |
|
|
|
|
|
|
|
11 |
|
3 |
|
|
|
|
4 |
|
|
|
|
|
|
|
10 |
|
5 |
|
|
|
|
6 |
|
|
11 |
|
|
|
|
||
7 |
|
|
|
|
|
|
|
10 |
|
|
8 |
9 |
|
|
Der HRF-628I*6 (Abb. 2-1) bietet die folgende Ausstattung:
1.Eisfach
2.Eiswürfelbehälter mit Eiswürfelbereiter (im Behälter)
3.Wasserund Eiswürfelbereiter
4.LED-Lampe im Gefrierschrank
5.3 Aufbewahrungsfächer im Gefrierschrank
6.LED-Lampe im Gefrierschrank (hinter Schub)
7.2 Türfächer im Gefrierschrank
8.2 Schübe im Gefrierschrank
9.2 Gemüsefächer
10.4 Türfächer im Kühlschrank
11.4 Aufbewahrungsfächer im Kühlschrank
12.LED-Lampe im Kühlschrank
FCKWund frostfrei
Schnellgefrier-, Schnellkühlund Urlaubsfunktion Automatische Temperaturanzeige
Alarmsignale bei zu hoher Temperatur und offener Tür
3
 Loading...