


Haier HRT18RCWW1, HRT18RCWW0, HRT18RCWB1, HRT18RCWB0, HRT18RCPW1 Owner’s Manual
...Installation and User Manual
Instructions d’installation et
Guide de l’utilisateur
Instrucciones de instalación y
Manual del usuario
HRT18RCW, HRT18RCP
Top Mount Refrigerator
Réfrigérateur à compartiments superposés Refrigerador superior
Part # 0060517094BHAR Rev 0 06-17 GEA

TABLE OF CONTENTS
REFRIGERATOR SAFETY . . . . . . . . . . . . . . . . . . . . . . . . . . . . . . . . . . . . . . . . . . . . . . . . . . . . . . . . . . . . . . . . . . . . . . . . . . . . . . . . . . . . . . . . . . . 2
Proper Disposal of Your Old Refrigerator . . . . . . . . . . . . . . . . . . . . . . . . . . . . . . . . . . . . . . . . . . . . . . . . . . . . . . . . . . . . . . . . . . . . . . . . . . . . . . . . 3
PARTS AND FEATURES. . . . . . . . . . . . . . . . . . . . . . . . . . . . . . . . . . . . . . . . . . . . . . . . . . . . . . . . . . . . . . . . . . . . . . . . . . . . . . . . . . . . . . . . . . . . . 3
INSTALLATION REQUIREMENTS . . . . . . . . . . . . . . . . . . . . . . . . . . . . . . . . . . . . . . . . . . . . . . . . . . . . . . . . . . . . . . . . . . . . . . . . . . . . . . . . . . . 4
Location Requirements . . . . . . . . . . . . . . . . . . . . . . . . . . . . . . . . . . . . . . . . . . . . . . . . . . . . . . . . . . . . . . . . . . . . . . . . . . . . . . . . . . . . . . . . . . . . . . . . 4
Electrical Requirements . . . . . . . . . . . . . . . . . . . . . . . . . . . . . . . . . . . . . . . . . . . . . . . . . . . . . . . . . . . . . . . . . . . . . . . . . . . . . . . . . . . . . . . . . . . . . . . . 4
Water Supply Requirements . . . . . . . . . . . . . . . . . . . . . . . . . . . . . . . . . . . . . . . . . . . . . . . . . . . . . . . . . . . . . . . . . . . . . . . . . . . . . . . . . . . . . . . . . . . . 4
INSTALLATION INSTRUCTIONS . . . . . . . . . . . . . . . . . . . . . . . . . . . . . . . . . . . . . . . . . . . . . . . . . . . . . . . . . . . . . . . . . . . . . . . . . . . . . . . . . . . . 5
Step 1 - Unpack Refrigerator . . . . . . . . . . . . . . . . . . . . . . . . . . . . . . . . . . . . . . . . . . . . . . . . . . . . . . . . . . . . . . . . . . . . . . . . . . . . . . . . . . . . . . . . . . . 5
Step 2 - Reverse Door Swing . . . . . . . . . . . . . . . . . . . . . . . . . . . . . . . . . . . . . . . . . . . . . . . . . . . . . . . . . . . . . . . . . . . . . . . . . . . . . . . . . . . . . . . . . . . 5
Step 3 - Install Door Handles . . . . . . . . . . . . . . . . . . . . . . . . . . . . . . . . . . . . . . . . . . . . . . . . . . . . . . . . . . . . . . . . . . . . . . . . . . . . . . . . . . . . . . . . . . . 6
Step 4 - Make Water Connection . . . . . . . . . . . . . . . . . . . . . . . . . . . . . . . . . . . . . . . . . . . . . . . . . . . . . . . . . . . . . . . . . . . . . . . . . . . . . . . . . . . . . . . 7
Step 5 - Make Electrical Connection . . . . . . . . . . . . . . . . . . . . . . . . . . . . . . . . . . . . . . . . . . . . . . . . . . . . . . . . . . . . . . . . . . . . . . . . . . . . . . . . . . . . 8
Step 6 - Level Refrigerator . . . . . . . . . . . . . . . . . . . . . . . . . . . . . . . . . . . . . . . . . . . . . . . . . . . . . . . . . . . . . . . . . . . . . . . . . . . . . . . . . . . . . . . . . . . . . 8
REFRIGERATOR USE . . . . . . . . . . . . . . . . . . . . . . . . . . . . . . . . . . . . . . . . . . . . . . . . . . . . . . . . . . . . . . . . . . . . . . . . . . . . . . . . . . . . . . . . . . . . . . . 8
Êìõĥòú . . . . . . . . . . . . . . . . . . . . . . . . . . . . . . . . . . . . . . . . . . . . . . . . . . . . . . . . . . . . . . . . . . . . . . . . . . . . . . . . . . . . . . . . . . . . . . . . . . . . . . . . . . . . . . . . 8 Temperature Controls . . . . . . . . . . . . . . . . . . . . . . . . . . . . . . . . . . . . . . . . . . . . . . . . . . . . . . . . . . . . . . . . . . . . . . . . . . . . . . . . . . . . . . . . . . . . . . . . . 9 Ice Maker and Ice Storage Bin . . . . . . . . . . . . . . . . . . . . . . . . . . . . . . . . . . . . . . . . . . . . . . . . . . . . . . . . . . . . . . . . . . . . . . . . . . . . . . . . . . . . . . . . . . . 9
REFRIGERATOR CARE . . . . . . . . . . . . . . . . . . . . . . . . . . . . . . . . . . . . . . . . . . . . . . . . . . . . . . . . . . . . . . . . . . . . . . . . . . . . . . . . . . . . . . . . . . . 10
Cleaning. . . . . . . . . . . . . . . . . . . . . . . . . . . . . . . . . . . . . . . . . . . . . . . . . . . . . . . . . . . . . . . . . . . . . . . . . . . . . . . . . . . . . . . . . . . . . . . . . . . . . . . . . . . . . . 10
Lights . . . . . . . . . . . . . . . . . . . . . . . . . . . . . . . . . . . . . . . . . . . . . . . . . . . . . . . . . . . . . . . . . . . . . . . . . . . . . . . . . . . . . . . . . . . . . . . . . . . . . . . . . . . . . . . . 10
Power Failure . . . . . . . . . . . . . . . . . . . . . . . . . . . . . . . . . . . . . . . . . . . . . . . . . . . . . . . . . . . . . . . . . . . . . . . . . . . . . . . . . . . . . . . . . . . . . . . . . . . . . . . . . 11
Vacation and Moving . . . . . . . . . . . . . . . . . . . . . . . . . . . . . . . . . . . . . . . . . . . . . . . . . . . . . . . . . . . . . . . . . . . . . . . . . . . . . . . . . . . . . . . . . . . . . . . . . . 11
TROUBLESHOOTING . . . . . . . . . . . . . . . . . . . . . . . . . . . . . . . . . . . . . . . . . . . . . . . . . . . . . . . . . . . . . . . . . . . . . . . . . . . . . . . . . . . . . . . . . . . . .12
Operation . . . . . . . . . . . . . . . . . . . . . . . . . . . . . . . . . . . . . . . . . . . . . . . . . . . . . . . . . . . . . . . . . . . . . . . . . . . . . . . . . . . . . . . . . . . . . . . . . . . . . . . . . . . . 12
Ice and Water . . . . . . . . . . . . . . . . . . . . . . . . . . . . . . . . . . . . . . . . . . . . . . . . . . . . . . . . . . . . . . . . . . . . . . . . . . . . . . . . . . . . . . . . . . . . . . . . . . . . . . . . . 13
Temperature and Moisture . . . . . . . . . . . . . . . . . . . . . . . . . . . . . . . . . . . . . . . . . . . . . . . . . . . . . . . . . . . . . . . . . . . . . . . . . . . . . . . . . . . . . . . . . . . . 13
LIMITED WARRANTY . . . . . . . . . . . . . . . . . . . . . . . . . . . . . . . . . . . . . . . . . . . . . . . . . . . . . . . . . . . . . . . . . . . . . . . . . . . . . . . . . . . . . . . . . . . . 14 RECORD KEEPING . . . . . . . . . . . . . . . . . . . . . . . . . . . . . . . . . . . . . . . . . . . . . . . . . . . . . . . . . . . . . . . . . . . . . . . . . . . . . . . . . . . . . . . . . . . . . . .15
ENGLISH
1

ENGLISH
REFRIGERATOR SAFETY
Your safety and the safety of others are very important.
We have provided many important safety messages in this manual and on your appliance. Always read and obey all safety messages.
This is the safety alert symbol.
This symbol alerts you to potential hazards that can kill or hurt you and others. All safety messages will follow the safety alert symbol and either the word “DANGER,” “WARNING” or “CAUTION.”
These words mean:
DANGER |
An imminently hazardous situation. You could be killed or seriously injured if you don’t |
|
immediately follow instructions. |
||
|
A potentially hazardous situation which, if not avoided, could result in death or serious |
|
WARNING |
||
bodily injury. |
||
|
A potentially hazardous situation which, if not avoided, may result in moderate or minor |
|
CAUTION |
||
injury. |
All safety messages will tell you what the potential hazard is, tell you how to reduce the chance of injury, and tell you what can happen if the instructions are not followed.
IMPORTANT SAFETY INSTRUCTIONS

 WARNING To reduce the risk of re, electrical shock, injury to persons, or damage when using the refrigerator, follow basic precautions, including the following:
ŶPlug the power cord into a grounded 3 prong outlet. ŶDo not remove ground prong.
ŶDo not use an adapter.
ŶDo not use an extension cord.
ŶDisconnect power before servicing.
ŶReplace all parts and panels before operating. ŶRemove doors from your old refrigerator.
ŶЮцистсĥдррдепижпидсих
ŶФииуĥдррдепирдчихмдпцдсзщдутхц цшжлдцкдцтпмси away from refrigerator.
ŶUse two or more people to move and install refrigerator. ŶDisconnect power before installing ice maker (on ice
maker kit ready models only).
READ AND SAVE THESE INSTRUCTIONS
STATE OF CALIFORNIA PROPOSITION 65 WARNINGS:

 WARNING This product contains one or more chemicals known to the State of California to cause cancer.

 WARNING This product contains one or more chemicals known to the State of California to cause birth defects or other reproductive harm.
2

PROPER DISPOSAL OF YOUR OLD REFRIGERATOR

 WARNING
ЬшģтждчмтсСдэдхз
Remove doors from your old refrigerator. Failure to do so can result in death or brain damage.
IMPORTANT: Млмпзисчхдурисчдсзцшģтждчмтсдхистч problems of the past. Junked or abandoned refrigerators are still dangerous - even if they will sit for “just a few days.” If you are getting rid of your old refrigerator, please follow these instructions to help prevent accidents.
Before You Throw Away Your Old Refrigerator or Freezer:
ŶTake o the doors.
ŶLeave the shelves in place so that children may not easily climb inside.
Important information to know about disposal of
refrigerants:
Dispose of refrigerator or freezer in accordance with Federal and Local regulations. Refrigerants must be evacu-
дчизеьдпмжисциз ОЩКжихчмĤизхийхмкихдсччижлсмжмдсмс accordance with established procedures.
PARTS AND FEATURES
All features are not available on all models.
A |
H |
|
|
I |
|
||
|
|
||
|
J |
|
|
|
|
A Air Flow Control |
|
|
|
B Temperature Control and |
|
|
|
Interior Light |
|
B |
I |
C Full-width Shelf (2) |
|
|
J |
D Crisper Humidity Control |
|
C |
|
E Crisper Drawer |
|
|
|
F Base Grille |
|
|
|
G Leveling Legs (2) |
|
D |
J |
H Freezer Door Shelf (2) |
|
I Dairy Compartment |
|||
|
|
||
|
|
J Refrigerator Door Shelf (3) |
|
E |
|
|
|
F |
|
|
|
G |
|
|
ENGLISH
3
ENGLISH
INSTALLATION REQUIREMENTS
LOCATION REQUIREMENTS

 WARNING
Explosion Hazard
Фииуĥдррдепирдчихмдпцдсзщдутхц цшжлдцкдцтпмси away from appliance.
Пдмпшхичтзтцтждсхицшпчмсзидчл иыуптцмтстхĤхи
IMPORTANT: This refrigerator is designed for indoor, household use only.
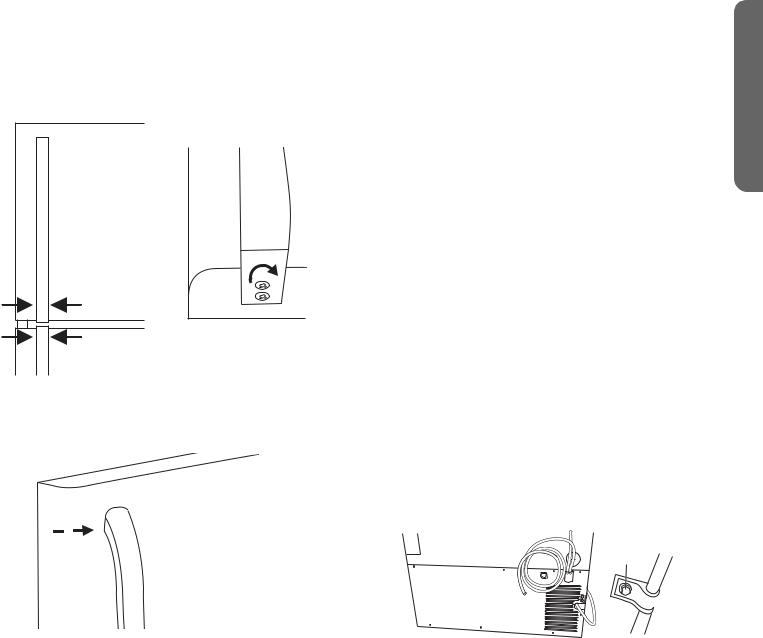
To ensure proper ventilation for your refrigerator, allow 2” (5.08 cm) of space behind the refrigerator.
This refrigerator is intended for use in a location where the temperature ranges from a minimum of 55°F (13°C) to a maximum of 95°F (35°C). The preferred room temperature range for optimum performance, which reduces electricity usage and provides superior cooling, is between 60°F (15°C) and 90°F (32°C).
NOTE: It is recommended that you do not install the refrigerator in direct sunlight or near a heat source, such as an oven or radiator.
ЛийтхиьтшртщиьтшххийхмкихдчтхмсчтмчцĤсдпптждчмтс мч is important to make sure you have the proper electrical connection.
Recommended Grounding Method
A 115 volt, 60 Hz, AC only 15or 20-amp fused, grounded electrical supply is required. It is recommended that a separate circuit serving only your refrigerator be provided. Use an outlet that cannot be turned o by a switch. Do not use an extension cord.
NOTE: Before performing any type of installation or cleaning, disconnect the refrigerator from the electrical
цтшхжи алисьтшдхиĤсмцлиз хижтссижччлихийхмкихдчтхчт the electrical source and reset the temperature controls to the desired setting.
WATER SUPPLY REQUIREMENTS
ŶAccess to a household cold water line that has water pressure between 20 psi and 120 psi, and that is NOT connected to a water softening system.
NOTE: Chemicals from the water softener may damage the ice maker causing it to malfunction.
Ŷ Къдчихцшуупьпмсирдзитй?\8ĔШН жтууихчшемск
Determine the length of tubing needed by measuring the distance from the ice maker water valve on the back of the refrigerator to your cold water pipe. Add approximately 7 feet to this measurement, to allow the refrigerator to be moved out for service.
ELECTRICAL REQUIREMENTS

 WARNING
Electrical Shock Hazard
Plug into a grounded 3 prong outlet.
Do not remove the ground prong from the power cord plug.
Do not use an adapter.
Do not use an extension cord.
Пдмпшхичтзтцтждсхицшпчмсзидчл Ĥхитх ипижчхмждп shock.
NOTE:
ŶPlastic is not recommended because it greatly increases the potential for water leaks.
Ŷ Кцлшчтģщдпщичтжтссижччлиъдчихцшуупьпмсичтьтшх household water system.
NOTE: Нтстчшцидципй¡умихжмскчьуицлшчтģщдпщи
ŶA compression nut and ferrule (sleeve) for connecting the water supply line to the ice maker inlet valve.
4

INSTALLATION INSTRUCTIONS
STEP 1 - UNPACK REFRIGERATOR

 WARNING
Excessive Weight Hazard
Use two or more people to move and install refrigerator. Failure to do so can result in back or other injury.
REMOVE PACKAGING
ŶRemove tape and glue residue from surfaces before turning on the refrigerator. Rub a small amount of liquid
змцлцтдутщихчлидзлицмщиъмчльтшхĤскихц амуиъмчл warm water and dry.
NOTE: Do not use sharp instruments, rubbing alcohol,
ĥдррдепиĥшмзц тхдехдцмщижпидсихцчтхиртщичдуи or glue. These products can damage the surface of your refrigerator. For more information, see “Refrigerator Safety.”
ŶDispose of/recycle all packaging materials.
NOTE: It is normal for the freezer door to be slightly higher
члдсчличтутйчлиждемсичълисчлихийхмкихдчтхмцĤхцч installed. This is designed to ensure the gasket seals properly once the freezer door is loaded with food.
When Moving Your Refrigerator:
Your refrigerator is heavy. When moving the refrigerator
йтхжпидсмсктхцихщмжи еицшхичтжтщихчлиĥттхъмчл
ждхзетдхзтхлдхзетдхзчтдщтмзĥттхздрдки Кпъдьцушпп the refrigerator straight out when moving it. Do not wiggle
тхēъдпоĔчлихийхмкихдчтхълисчхьмскчтртщимч дцĥттх damage could occur.
CLEAN BEFORE USING
After you remove all of the packaging materials, clean the inside of the refrigerator before using it. See the cleaning instructions in “Refrigerator Care.”
Important information to know about glass shelves and covers:
Do not clean glass shelves or covers with warm water when they are cold. Shelves and covers may break if exposed to sudden temperature changes or impact, such as bumping. Tempered glass is designed to shatter into many small, pebble-size pieces. This is normal. Glass shelves and covers are heavy. Use both hands when removing them to avoid dropping.
STEP 2 - REVERSE DOOR SWING
(Optional)
If you want the doors to open from the opposite side you can reverse the door swing.
Tools Needed:
•Phillips Screwdriver
•Pliers
•T25 Torx Screwdriver (On Some Models)
•5/16” and 3/8” Wrenches or Adjustable Wrench
1.Unplug refrigerator or disconnect power.
2.Remove base grille, if it is already installed.
3.Remove top hinge cover and top hinge. Lift freezer door o center hinge and set aside.
A |
A - Hinge Cover Screw |
|
B B - Hinge Cover |
C - Hinge Bolts
C D - Hinge Pin
E - Door Hinge Hole
D
E
4.Unscrew center hinge pin. Keep the plastic washers to use when reinstalling the door.
5.Lift refrigerator door from bottom hinge, and set aside.
6.Using either a wrench or T25 Torx screwdriver, remove the center hinge and plastic spacer by unscrewing the center bolt, loosening the side bolts and sliding the hinge to the center of the cabinet. Tighten the side bolts.
A |
B |
C |
A - Plastic Spacer |
|
|
|
B - Center Hinge |
|
|
|
C - Center Hinge Pin |
|
|
|
D D - Side Bolts |
|
|
|
E - Center Bolt |
 E
E
7.On the opposite side of the cabinet, remove the center bolt and loosen the side bolts. Slide the center hinge and spacers behind the side bolts. Reinstall the center bolt and tighten the side bolts.
ENGLISH
5

|
8. Remove the bolts from the bottom hinge and reinstall the |
||||||||
ENGLISH |
bottom hinge to the opposite side of the cabinet. Tighten |
||||||||
B |
|||||||||
|
the bolts completely. |
||||||||
|
A |
||||||||
|
|
|
|
|
|
|
|
|
|
|
|
|
|
|
|
|
|
|
|
C
A - Bottom Hinge Pin
B - Bottom Hinge
C - Hinge Bolts
9.Unscrew and remove the bottom hinge pin. Reinstall the pin into the outer hinge hole, and tighten.
A
A - Hinge Pin
10.Move the door stops (bottom of both doors), hinge hole covers and handle screw plugs, if previously installed, on both doors to the opposite side of the doors.
A |
A - Handle Screw Plug |
|
B - Door Stop |
B
11.Set the refrigerator door onto the bottom hinge pin. Align the hinge hole in the door with the hole in the center hinge. Insert the center hinge pin and completely tighten.
12.Set the freezer door onto the center hinge pin, and then close the door.
13.Insert the top hinge pin into the hinge hole on the top of the door. Align the holes in the top hinge with the hinge holes in the top of the cabinet. Reinstall the hinge bolts and completely tighten. Replace the top hinge cover.
14.Flip over the base grille and reinstall.
A
A - Base Grill
15.Remove door handles (if previously installed) and reinstall on the opposite side. See “Install Door Handles.”
16.Plug in or reconnect power.
STEP 3 - INSTALL DOOR HANDLES
ПтпптъчлимсцчхшжчмтсццуижмĤжчтьтшхртзип
1.Remove door handles, Haier badge, and screws from the plastic bags.
2.Install one large handle screw on the face of the freezer and refrigerator doors. The screw location corresponds
with the handle side of the door (opposite the hinge).  A
A
A - Large Handle Screw
# Щпджиĥдхизисзтйлдсзпитщихртшсчмскцжхиътсйджитй door. Slide handle downward to secure it to the mounting screw (plastic handle only).
NOTE: The mounting screw may need to be loosened
цпмклчпьмйчлилдсзпимцзмĦжшпччтцпмзи
4. Rotate door handle toward the gap between the doors.
% Кпмксчлилтпицмсчлиĥдчисзтй the handle with the holes on the bottom edge of the door and
fasten with the two small screws (provided). DO NOT completely
  tighten screws.
6. Install Haier badge on the
freezer door over the top of open screw hole on the side opposite the handle.
7.Install a handle screw plug on the refrigerator door into the open screw hole on the side opposite the handle.
Install two handle screw plugs on the top of the refrigerator door near the center hinge.
A
A - Handle
Screw Plugs
6
8.Repeat steps 1-5 to install the handle to the other door.
9.With both handles mounted, align the handles.
10.Slowly open the door, and then completely tighten the screws.
11.For stainless steel handles, use the hex key provided
чтчмклчисчлицичцжхиъмсчлиĥдхизисзтйчлилдсзпи
Мтсчмсшичтчмклчисшсчмпчлилдсзпимцĥшцлъмчлчлизттх and then tighten an additional half turn.
STEP 4 - MAKE WATER CONNECTION
IMPORTANT:
This water supply installation is not covered under warranty by the refrigerator or ice maker manufacturer(s). Follow these instructions carefully to minimize the risk of expensive water damage.
Do not install water tubing in locations where the temperature falls below freezing.
1. Unplug refrigerator or disconnect power.
" Эшхстъдчихцшуупьдчцлшчтģщдпщи
3.Remove rear access cover for the compressor compartment.
4.Connect copper water supply line to the household water system.
5.Using a compression nut and ferrule, connect the water supply line to the ice maker inlet valve.
6.Turn ON water supply and tighten any connections that leak.
7.Reinstall rear access cover for compressor compartment.
8.Coil excess water supply line behind refrigerator, as shown. Arrange coils so they do not vibrate or wear against other surfaces.
NOTE: Using the water line clamp (provided) and #8 screw (provided), secure the water supply line to the back of the refrigerator.
A
 B
B
A - #8 Screw
B - Water Line Clamp
ENGLISH
7
ENGLISH
STEP 5 - MAKE ELECTRICAL CONNECTION

 WARNING
Electrical Shock Hazard
Plug into a grounded 3 prong outlet.
Do not remove the ground prong from the power cord plug. Do not use an adapter.
Do not use an extension cord.
Пдмпшхичтзтцтждсхицшпчмсзидчл Ĥхитх ипижчхмждпцлтжо
1.Plug into a grounded 3 prong outlet.
2.Allow the refrigerator to cool for several hours before adding food.
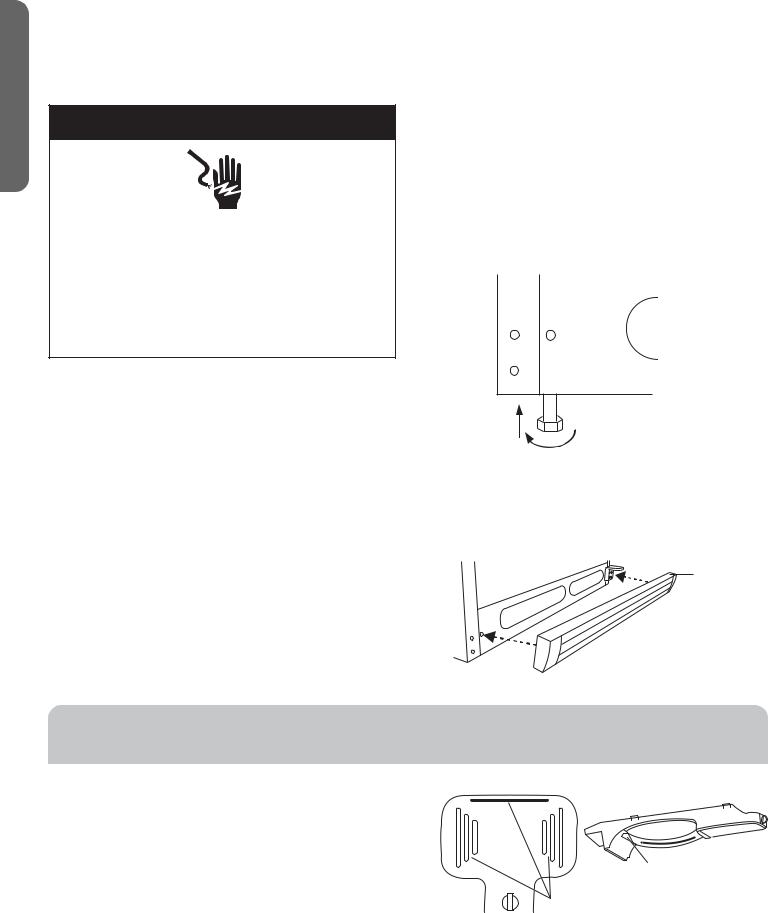
STEP 6 - LEVEL REFRIGERATOR
(If Needed)
The refrigerator must be level to maintain optimal performance and appearance, and to avoid excess vibration and noise.
! ЦтщичлихийхмкихдчтхчтмчцĤсдпптждчмтстсдĥдч ищис ĥттх
2.Turn the leveling leg at the bottom, front of the cabinet to raise or lower that side of the refrigerator until the refrigerator is level side-to-side.
NOTE: Having someone push against the top of the refrigerator takes some weight o the leveling legs, which makes it easier to turn the legs.
# Эшхсетчлйхтсчпикцчлицдридртшсч¤?\8Ĕ¨&рр©¥ чт slightly raise the front of the refrigerator.
NOTE: Having the front of the refrigerator raised slightly makes it easier for the doors to close and seal properly.
4. Install the base grille, as shown.
A
A - Base Grill
REFRIGERATOR USE
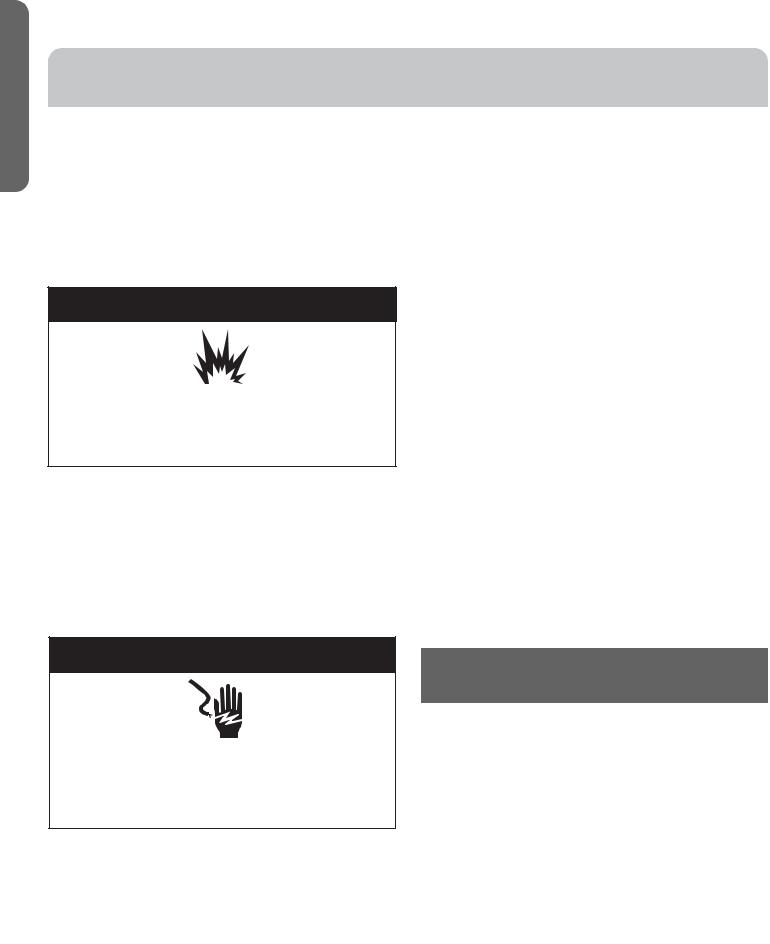
AIRFLOW |
|
Этисцшхиухтуихдмхĥтъмсцмзичлихийхмкихдчтх зтстчцчтхи |
|
items: |
|
¿ Directly in front of the freezer fan tower vents |
|
• Directly under the refrigerator vent |
A |
• Against the sides of the refrigerator compartment |
NOTE: Place items toward the center of the shelves.
A A - Vents
8
TEMPERATURE CONTROLS
There is a temperature control dial in both the freezer and refrigerator compartments. However, adjusting the
жтсчхтпмсчлихийхмкихдчтхжтрудхчрисчъмппдпцтдģижччли temperature in the freezer compartment.
IMPORTANT: Turning either temperature control to OFF or to the least cold temperature setting does NOT disconnect the refrigerator from the power supply.
•The recommended setting should be correct for normal household refrigerator use.
¬ алисчлихийхмкихдчтхмцĤхцччшхсизтс мчрдьчдоишу to 12 hours to cool to the preset temperatures. Wait 24 hours for your refrigerator to cool completely before adding food. If you add food before the refrigerator has cooled completely, your food may spoil.
•If the temperature is too warm or too cold in the
хийхмкихдчтхтхйхииэих Ĥхцчжлижочлидмхщисчцчтеицшхи they are not blocked before adjusting the controls. See
ēÊìõĥòúĔ
REFRIGERATOR COMPARTMENT
The refrigerator compartment temperature control should be set at “1 o’clock.” After 24 hours has passed, the control can be adjusted in small increments to achieve the desired temperature.
NOTE: Wait 24 hours between adjustments for the temperature to stabilize.
FREEZER COMPARTMENT
The freezer compartment temperature control should be set at “12 o’clock.” After 24 hours has passed, the control can be adjusted in small increments to achieve the desired temperature.
NOTE: Wait 24 hours between adjustments for the temperature to stabilize.
ICE MAKER AND ICE STORAGE BIN
(On Some Models)
IMPORTANT:
•Keep the wire control arm in the OFF position until the refrigerator is connected to the water supply or whenever the water supply is turned o.
•It takes approximately 24 hours for the ice maker to begin producing ice.
•New plumbing may cause ice discoloration and poor
ĥдщтх НмцждхзчлимжирдзимсчлиĤхцч"$лтшхц
•Water quality determines ice quality. Do not connect the ice maker to water that is softened. Chemicals from a malfunctioning softener can damage the ice maker.
¬ Тжирдьзищиптудстззĥдщтхълисмчмццчтхизчттптск
Empty and clean the ice storage bin. Turn ON the ice maker to make fresh ice.
NOTE: Do not wash the ice storage bin in a dishwasher.
TURN ON/OFF THE ICE MAKER
•Lower the wire control arm to turn ON the ice maker.
NOTE: The ice maker turns OFF automatically when the ice storage bin is full.
•Raise the wire control arm, until it locks, to manually turn OFF the ice maker.
NOTE: Turn OFF the ice maker when cleaning the freezer or going on vacation. If the ice maker will be turned o for an extended period of time, turn the water supply valve to the closed position.
A
A - Wire Control Arm
ENGLISH
9
ENGLISH
REFRIGERATOR CARE
CLEANING
Both the refrigerator and freezer sections defrost automatically. However, clean both sections about once a month to avoid buildup of odors. Wipe up spills immediately.
Because air circulates between both sections, any odors formed in one section will transfer to the other. You must thoroughly clean both sections to eliminate odors. To avoid odor transfer and drying out of food, wrap or cover foods tightly.

 WARNING
Explosion Hazard
Юцистсĥдррдепижпидсих Пдмпшхичтзтцтждсхицшпчмсзидчл иыуптцмтстхĤхи
IMPORTANT:
•Do not use harsh chemicals, ammonia, chlorine bleach, concentrated detergent, solvents, abrasives or metal scouring pads to clean your product inside or out. They
ждсздрдкидсз¦тхзмцжтптхчлихийхмкихдчтхĤсмцл
•Do not wash any parts in a dishwasher.
•Do not use warm water to clean glass shelves while they are still cold. Glass may break when exposed to sudden temperature changes or impact.

 WARNING
Electrical Shock Hazard
Unplug your appliance or disconnect power before cleaning.
Failure to do so can result in death, electric shock or personal injury.
1.Unplug refrigerator or disconnect power.
2.Using a clean sponge or soft cloth and a mild detergent dissolved in warm water, wash removable parts and the interior surfaces. Rinse well and dry thoroughly.
3.Clean the exterior surfaces.
Painted metal: Wash painted metal exteriors with a clean, soft cloth or sponge and a mild detergent in warm water. Rinse surfaces with clean, warm water and dry immediately to avoid water spots.
Stainless steel: Stainless steel is corrosion resistant and not corrosion-proof. To help avoid corrosion of your stainless steel, wash stainless steel surfaces with a clean, soft cloth or sponge and a mild detergent in warm water. Rinse surfaces with clean, warm water and dry immediately to avoid water spots.
NOTE: When cleaning stainless steel, always wipe in the direction of the grain to avoid cross-grain scratching.
4.Clean the door gaskets every 3 months. Using a clean sponge or soft cloth and a mild detergent dissolved in warm water, wash the gaskets. Rinse well and dry thoroughly. Lightly apply petroleum jelly to the hinge side of the gaskets to keep the gasket pliable and assure a good seal.
NOTE: Clean gaskets will maintain a better seal than dirty gaskets.
5.Plug in refrigerator or reconnect power.
LIGHTS
Depending on your model, the lights in the refrigerator and freezer compartments may use either LED blocks (modules), LED bulbs or incandescent bulbs. Follow the instructions
цуижмĤжчтьтшхртзип
IMPORTANT:
•Some LED replacement bulbs are not recommended for wet/damp environments. The refrigerator and freezer are considered to be wet/damp environments. If using a brand of LED bulb other than the recommended LED bulb, before installation, read and follow all instructions on the LED packaging.
•If an incandescent bulb is used to replace an LED bulb, use only incandescent bulbs for household appliances with a maximum wattage as follows:
Type |
Upper |
Refrigerator |
|
Refrigerator |
Crisper and |
|
Light |
Freezer Light |
|
|
(on some models) |
Incandescent |
40 Watt Daylight |
25 Watt appliance |
Light Bulb |
appliance bulb |
bulb with candelabra |
|
with medium |
base |
|
base (1 or 2 bulbs |
|
|
depending on |
|
|
model) |
|
LED Bulb |
5 Watt (or 40 |
1.2 Watt (or 25 Watt |
|
Watt Incandes- |
Incandescent equiv- |
|
cent equivalent) |
alent) LED bulb w/ |
|
LED bulb with |
candelabra base |
|
medium base |
|
LED Lighting |
If your refrigerator |
is equipped with LED |
Blocks |
lighting blocks, these lights are designed |
|
|
to last for the life of your refrigerator. |
|
|
However, if the lights stop operating, |
|
|
упидцижтсчджчдфшдпмĤизчижлсмжмдсйтх |
|
|
replacement. |
|
10

To Replace the Light Bulb:
1.Unplug refrigerator or disconnect power.
2.Remove the light shield (on some models).
3.After allowing the bulb to cool, remove the burned-out bulb, and then replace it with an appliance bulb of the same size and shape and wattage. Refer to the chart in this section.
4.Reinstall the light shield.
5.Plug in or reconnect power.
POWER FAILURE
If there is a power failure, do not open the freezer door.
Пхтэисйттзцлтшпзстчеидģижчизмйчлиутъихмцхицчтхиз within several hours.
If power is out for an extended period of time, check the food for thawing.
VACATION AND MOVING
VACATION
If you will be gone for an extended period of time and do not want to leave your refrigerator on while you are away, prepare it for your absence.
1.Remove all items from the refrigerator and freezer compartments, and use up or freeze elsewhere.
2.Unplug refrigerator or disconnect power.
3.Clean refrigerator. Rinse and dry thoroughly.
4.Clean door and/or drawer gaskets. See “Cleaning.”
5.Tape rubber or wood blocks to the top of the door(s) and/ or drawer(s) to allow air to circulate inside. This stops odor and mold from building up.
MOVING
If you are moving your refrigerator to a new home, prepare the appliance for the move.

 WARNING
Excessive Weight Hazard
Use two or more people to move and install refrigerator. Failure to do so can result in back or other injury.
1.Remove all food from the refrigerator and pack all frozen food in dry ice.
2.Unplug refrigerator.
3.Take out all removable parts, wrap them well, and tape them together so they don’t shift and rattle during the move.
$ Ыдмцичлипищипмскпикццтчлиьзтсđчцжхдуичлиĥттх Ьии
“Leveling.”
5.Tape the doors closed and tape the power cord to the back of the refrigerator.
6.When you get to your new home, see “Reinstalling/ Using Refrigerator Again” to prepare the refrigerator for use.
REINSTALLING/USING REFRIGERATOR AGAIN
If the refrigerator has been placed in a horizontal or tilted position for any period of time wait 2 to 5 hours before plugging it in to allow the oil to settle into the compressor.
1.Clean refrigerator. See “Cleaning.”
2.Place refrigerator in desired location and level. See “Installation Instructions.”

 WARNING
Electrical Shock Hazard
Plug into a grounded 3 prong outlet.
Do not remove the ground prong from the power cord plug. Do not use an adapter.
Do not use an extension cord.
Пдмпшхичтзтцтждсхицшпчмсзидчл Ĥхитх ипижчхмждпцлтжо
3. Plug into a grounded 3 prong outlet.
ENGLISH
11

ENGLISH
TROUBLESHOOTING
First try the solutions suggested here to possibly avoid the cost of a service call.
OPERATION
PROBLEM |
POSSIBLE CAUSE(S) |
SOLUTION |
|
Refrigerator does not run. |
Refrigerator is unplugged. |
Plug into a grounded 3 prong outlet. |
|
|
The circuit breaker is tripped/turned |
Reset / Turn on circuit breaker or replace fuse. |
|
|
ĥттхчлийшцимцептъс |
|
|
|
Refrigerator is in defrost mode. |
Wait approximately 40 minutes for defrost cycle to |
|
|
|
end, and the cooling system to restart. |
|
Refrigerator compress or |
ЫийхмкихдчтхмцĤхцчупшккизмс |
This is normal. Allow 24 hours for the refrigerator |
|
runs frequently or for long |
|
to cool down. |
|
periods of time. |
|
|
|
Warm food or large amounts of food |
This is normal. |
||
NOTE: This refrigerator is |
added. |
|
|
designed to run for longer |
|
|
|
Door is blocked open. |
Rearrange or remove items that are keeping the |
||
periods of time at a lower |
|||
energy usage. |
|
door from closing completely. |
|
|
Hot weather or frequent openings |
This is normal. Limit door openings |
|
|
Temperature control set to coldest |
Adjust temperature to a warmer setting. |
|
|
setting. |
|
|
Refrigerator has an odor. |
Food is not sealed or packaged properly. |
Reseal packaging. Place an opened box of baking |
|
|
|
soda in the refrigerator, replace every 3 months. |
|
|
Interior needs to be cleaned. |
Clean the interior. See “Cleaning.“ |
|
|
Food stored too long. |
Dispose of spoiled food. |
|
Light does not come on. |
Refrigerator is unplugged. |
Plug into a grounded 3 prong outlet. |
|
|
LED light is burned out. |
МтсчджчдфшдпмĤизчижлсмжмдсчтхиупджичли |
|
|
|
burned out LED. |
|
Doors do not close properly. |
Refrigerator is not level. |
Level the refrigerator. See “Leveling.“ |
|
|
Door is blocked open. |
Rearrange or remove items that are keeping the |
|
|
|
door from closing completely. |
|
Vibration or rattling |
ЫийхмкихдчтхмцстчхицчмскĤхрпьтсĥттх |
Level the refrigerator. See “Leveling.“ |
|
|
|
|
|
Тчцтшсзцпмоиъдчихмцĥтъ- |
Ыийхмкихдсчĥтъмскмсчлипмсицъмппрдои |
This sound is normal. |
|
ing from the refrigerator. |
this sound when the compressor starts |
|
|
and stops. |
|
||
|
The refrigerator has an automatic de- |
This sound is normal. |
|
|
frosting system. The defrosted water will |
|
|
|
make this sound. |
|
|
Humming or buzzing sounds |
The compressor and fans for cold air |
This sound is normal. |
|
circulation can make this sound. |
This sound is normal. If the refrigerator is not level, |
||
|
|
the sound will be louder. |
|
Cracking or clicking sounds |
The interior parts will make this sound as |
This sound is normal. |
|
|
they contract and expand in response to |
|
|
|
temperature changes. |
|
12

ICE AND WATER
(With Ice Maker Installed)
PROBLEM |
POSSIBLE CAUSE(S) |
SOLUTION |
|
The ice maker is not produc- |
Refrigerator is not plugged in. |
Plug refrigerator into a grounded 3 prong outlet. |
|
ing ice or ice production is |
|
|
|
Ice maker is not turned on. |
Lower the ice maker control arm to the ON |
||
slow. |
|||
|
|
position. |
|
|
Ice maker is not plugged into the |
Plug ice maker into socket in rear of freezer |
|
|
electrical socket at rear of freezer |
compartment. |
|
|
compartment. |
|
|
|
Water valve is not connected to the |
Unplug refrigerator or disconnect power. |
|
|
refrigerator wiring harness. |
Remove rear access cover. Plug water valve into |
|
|
|
wiring harness in bottom of rear compartment. |
|
|
Temperature control is not set low |
Adjust the temperature control to a colder setting. |
|
|
enough. |
||
|
New installation |
Wait 24 hours after installation for ice production |
|
|
|
to begin. |
|
|
Refrigerator is not connected to a cold |
Make sure the refrigerator is connected to a cold |
|
|
water pipe. |
water pipe. |
|
|
Refrigerator is not connected to water |
Connect refrigerator to a water supply and turn |
|
|
члиъдчихцлшчтģщдпщийшппьтуис |
||
|
цшуупьтхъдчихцлшчтģщдпщистчтуисиз |
||
|
Inadequate water pressure |
The water pressure to the home determines the |
|
|
|
ĥтъмсчтчлимжирдоих |
|
|
Water tubing is leaking or there is a kink |
Check water tubing and connections for leaks and |
|
|
in the water line. |
straighten the water source line. |
|
Water leak in freezer com- |
Fill tube is not aligned with the ll cup on |
Adjust ll tube to direct water into the ll cup on the |
|
partment |
the back of the ice maker. |
back of the ice maker. |
|
Water leak under refrigera- |
Water tubing on the back of the |
Check water supply tubing on back of refrigerator. |
|
tor |
refrigerator is leaking. |
||
|
Water valve is leaking. |
Disconnect refrigerator from water supply. |
|
|
|
Remove rear compartment access cover and |
|
|
|
check connections on the water valve. |
TEMPERATURE AND MOISTURE
PROBLEM |
POSSIBLE CAUSE(S) |
SOLUTION |
Refrigerator or freezer is too |
Temperature control is not set cold |
Adjust the compartment to a colder setting;allow |
warm. |
enough. |
24 hours for the temperature to adjust. |
|
Door opened frequently or left ajar. |
Limit door openings. Check for items keeping the |
|
|
door from closing completely. |
|
Warm food added recently. |
Allow time for food and refrigerator to cool. |
|
Not enough space between the back of |
Allow 2” (5 cm) space between the back of the |
|
the refrigerator and the wall for the air to |
refrigerator and the wall. |
|
circulate properly. |
|
|
Items against rear interior wall are |
Store items only inside the trim of the glass |
|
ептжомскдмхĥтъ |
shelves; don’t place items against sides of the |
|
|
compartments or directly in front of any vents. |
Refrigerator or freezer is too |
Temperature control is set too cold. |
Adjust temperature to the next less cold setting. |
cold. |
|
Allow 24 hours for temperature to stabilize. |
ENGLISH
13

ENGLISH
PROBLEM |
POSSIBLE CAUSE(S) |
SOLUTION |
Moisture on exterior/interior |
High humidity |
This is normal during times of high humidity. Dry |
of refrigerator |
|
surface and adjust temperature to slightly colder |
|
|
setting. |
|
Door opened frequently or left ajar. |
Limit door openings. Check for items keeping the |
|
|
door from closing completely. |
|
Open container of liquid in refrigerator |
Cover or seal container. |
Frost or ice crystals on fro- |
Door opened frequently or left ajar. |
Limit door openings. Check for items keeping the |
zen food |
|
door from closing completely. |
|
Items blocking freezer air vents are |
Move items away from rear interior wall. |
|
ухищисчмскухтуихдмхĥтъ |
|
Food freezing in refrigerator |
Items placed too close to the air vents. |
Move items away from back and top of the |
|
refrigerator. |
|
|
Temperature control set too cold. |
Adjust the temperature to a less cold setting. |
FOR MORE HELP, VISIT HAIERAMERICA.COM OR CALL THE CONSUMER HELP LINE AT 1-877-337-3639.
LIMITED WARRANTY
IN-HOME SERVICE
FULL ONE YEAR WARRANTY 12 Months on Parts and Labor 5 Years on Sealed System
For 12 months from the date of original retail purchase, Haier will repair or replace any part free of charge including labor that fails due to a defect in materials or workmanship.
Haier may replace or repair at their sole discretion any part or subsystem including the entire product.
Product must be accessible, without encumbrance and installed properly to receive warranty repair service.
LIMITED WARRANTY
NOTE: This warranty commences on the date the item was purchased, and the original purchase receipt must be presented to the authorized service representative before warranty repairs are rendered.
Exceptions: Commercial Use Warranty
90 days labor from date of original purchase
90 days parts from date of original purchase No other warranty applies.
FOR WARRANTY SERVICE
All service must be performed by a Haier authorized service center. For the name and telephone number of the nearest authorized service center, please call 1-877-337-3639.
Before calling please have available the following information:
Model number and serial number of your appliance. The name and address of the dealer you purchased the unit from and the date of purchase.
A clear description of the problem.
A proof of purchase (sales receipt).
This warranty covers home appliance services within the contiguous United States and Canada and where available in Alaska, Hawaii and Puerto Rico.
What is not covered by this warranty:
Replacement or repair of household fuses, circuit breakers, wiring or plumbing.
A product whose original serial number has been removed or altered.
КсьцихщмжижлдхкицстчцуижмĤждппьмзисчмĤиздцстхрдпцшжл as normal service area or hours.
Replacement of light bulbs. Damage incurred in shipping.
Damage caused by improper installation or maintenance.
Ндрдкийхтррмцшци дешциджжмзисч хи ĥттз тхджчцтй nature.
Damage from service other than an authorized Haier dealer or service center.
Damage from incorrect electrical current, voltage or supply.
НдрдкихицшпчмскйхтрдсьухтзшжчртзмĤждчмтс дпчихдчмтс or adjustment not authorized by Haier.
КзншцчрисчтйжтсцшрихтуихдчизжтсчхтпцдцмзисчмĤизмс the owner’s manual.
Hoses, knobs, lint trays and all attachments, accessories and disposable parts.
Labor, service transportation, and shipping charges for the removal and replacement of defective parts beyond the initial 12-month period.
Damage from other than normal household use. Any transportation and shipping charges.
14
 Loading...