


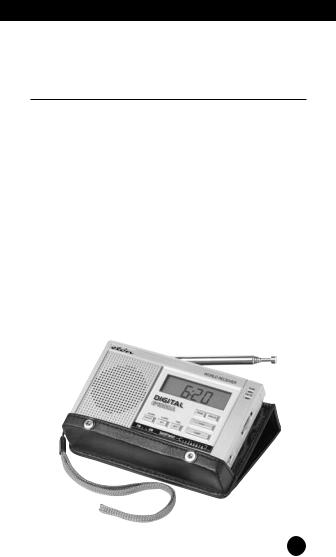
w w w . e t o n c o r p . c o m
G 1 0 0 0 A
O P E R AT I O N M A N U A L
A M / F M / S H O R T W A V E R A D I O

DO YOU NEED HELP? Here’s how to contact us:
From the United States: (800) 872-2228 From Canada: (800) 637-1648
From Everywhere Else: (650) 903-3866 Email: customersvc@etoncorp.com Internet: www.etoncorp.com
2

G1000A OPERATION MANUAL
TABLE OF CONTENTS |
|
|
1 |
INTRODUCTION.................................................................................... |
4 |
2 |
FEATURES ............................................................................................ |
5 |
3 |
CONTROL LOCATIONS ......................................................................... |
6 |
4 |
BASIC OPERATION ............................................................................... |
7 |
|
• BATTERIES ......................................................................................... |
7 |
|
• POWER ON/OFF / VOLUME ................................................................ |
7 |
|
• FM RADIO ......................................................................................... |
7 |
|
• AM / SW1-8 RADIO ........................................................................... |
7 |
|
• ANTENNA .......................................................................................... |
7 |
|
• AC ADAPTOR ..................................................................................... |
8 |
|
• CLOCK .............................................................................................. |
8 |
|
• ALARM SET ....................................................................................... |
8 |
|
• ALARM ON/OFF ................................................................................. |
9 |
|
• LIGHT ................................................................................................ |
9 |
|
• SLEEP FUNCTION ............................................................................... |
10 |
|
• PRECAUTIONS ................................................................................... |
11 |
5 |
INTRODUCTION TO SHORTWAVE .......................................................... |
11 |
|
• WHAT ARE BANDS? ........................................................................... |
12 |
|
• DAY BANDS/NIGHT BANDS ................................................................ |
13 |
|
• DAYTIME LISTENING .......................................................................... |
14 |
|
• EVENING LISTENING .......................................................................... |
15 |
|
• HOW TO IDENTIFY WHAT YOU’RE LISTENING TO ................................ |
16 |
|
• HOW TO FIND STATIONS THAT YOU WANT TO HEAR .......................... |
16 |
6 |
SERVICE INFORMATION ........................................................................ |
16 |
7 |
ONE YEAR LIMITED WARRANTY ............................................................ |
17 |
3

1 INTRODUCTION
Thank you for purchasing the G1000A AM/FM/SW Radio. This owner’s manual is conveniently divided into two sections, BASIC OPERATION and INTRODUCTION TO SHORTWAVE. Both sections are important. If you are new to shortwave listening, the INTRODUCTION TO SHORTWAVE section will give you all the information that you need to enjoy broadcasts from around the world.
4
G1000A OPERATION MANUAL
2 FEATURES
MAJOR FEATURES OF THE G1000A
•AM, FM-stereo and 8 shortwave bands (49, 41, 31, 25, 22, 19, 16 and 13 meters).
•Analog tuning with digital frequency readout.
•Clock, alarm and sleep timer.
•Digital display shows frequency, time, sleep time and symbols for sleep timer and alarm activation.
•Rotary volume control.
•Earphone socket.
•DC socket for AC adaptor use (AC adaptor not included).
•Telescopic antenna for FM and SW reception.
•Internal ferrite bar antenna for AM (MW) reception.
•Operates on 2 AA batteries.
5

3 CONTROL LOCATIONS
1. Antenna |
|
|
12. |
Band Indicator |
|
|
|
|
|
|
|
|
|
|
|
|
|||||||||||||||
2. |
Stand (rear) |
|
|
13. |
Band Selector |
|
|
|
|
|
|
|
|
|
|
|
|
||||||||||||||
3. |
Display |
|
|
|
|
|
14. Time Set |
|
|
|
|
|
|
|
|
|
|
|
|
||||||||||||
4. Tune LED |
|
|
|
|
|
15. Alarm Set |
|
|
|
|
|
|
|
|
|
|
|
|
|||||||||||||
5. |
FM ST. LED |
|
|
|
|
|
16. Alarm On/Off |
|
|
|
|
|
|
|
|
|
|
|
|
||||||||||||
6. Tuning Knob |
|
|
17. |
Battery Compartment (rear) |
|||||||||||||||||||||||||||
7. |
Hour |
|
|
18. |
Hand Strap |
|
|
|
|
|
|
|
|
|
|
|
|
||||||||||||||
8. |
Minute |
|
|
19. |
DC Jack |
|
|
|
|
|
|
|
|
|
|
|
|
||||||||||||||
9. |
Light |
|
|
20. |
Earphone Jack |
|
|
|
|
|
|
|
|
|
|
|
|
||||||||||||||
10. Sleep |
|
|
|
|
|
21. Volume Knob |
|
|
|
|
|
|
|
|
|
|
|
|
|||||||||||||
11. Power On/Off |
|
|
|
|
|
|
|
|
|
|
|
|
|
|
|
|
|
|
|
|
|
|
|
|
|||||||
|
1 |
|
|
2 |
|
|
|
3 |
|
|
|
|
|
|
|
|
|
|
|
|
|
|
|
||||||||
|
|
|
|
|
|
|
|
|
|
|
|
|
|
|
|
|
|
|
|
|
|
|
|
|
|
4 |
|||||
|
|
|
|
|
|
|
|
|
|
|
|
|
|
|
|
|
|
|
|
|
|
|
|
|
|
||||||
|
|
|
|
|
|
|
|
|
|
|
|
|
|
|
|
|
|
|
|
|
|
|
|
|
|||||||
|
21 |
|
|
|
|
|
|
|
|
|
|
|
|
|
|
|
|
|
|
|
5 |
||||||||||
|
|
|
|
|
|
|
|
|
|
|
|
|
|
|
|
|
|
|
|||||||||||||
|
|
|
|
|
|
|
|
|
|
|
|
|
|
|
|
|
|
|
|
|
|
|
|
|
6 |
||||||
|
|
|
|
|
|
|
|
|
|
|
|
|
|
|
|
|
|
|
|
|
|
|
|
|
|||||||
|
|
|
|
|
|
|
|
|
|
|
|
|
|
|
|
|
|
|
|
|
|
|
|
|
|
|
|||||
|
|
|
|
|
|
|
|
|
|
|
|
|
|
|
|
|
|
|
|
|
|
|
|
|
|||||||
20 |
|
|
|
|
|
|
|
|
|
|
|
|
|
|
|
|
|
|
|
|
|
7 |
|||||||||
|
|
|
|
|
|
|
|
|
|
|
|
|
|
|
|
|
|
|
|||||||||||||
|
|
|
|
|
|
|
|
|
|
|
|
|
|
|
|
|
|
|
|
|
|
|
|
|
|
|
|
|
8 |
||
19 |
|
|
|
|
|
|
|
|
|
|
|
|
|
|
|
|
|
|
|
|
|
||||||||||
|
|
|
|
|
|
|
|
|
|
|
|
|
|
|
|
|
|
|
|||||||||||||
|
|
|
|
|
|
|
|
|
|
|
|
|
|
|
|
|
|
|
|
|
|
9 |
|||||||||
|
|
|
|
|
|
|
|
|
|
|
|
|
|
|
|
|
|||||||||||||||
18 |
|
|
|
|
|
|
|
|
|
|
|
|
|
|
|
|
|
|
|
|
|
|
|
|
10 |
||||||
|
|
|
|
|
|
|
|
|
|
|
|
|
|
|
|
|
|
|
|
|
|
|
|
|
|
|
|||||
|
|
|
|
|
|
|
|
|
|
|
|
|
|
|
|
|
|
|
|
||||||||||||
|
|
|
|
|
|
|
|
|
|
|
|
|
|
|
|
|
|
11 |
|||||||||||||
|
|
|
|
|
|
|
|
|
|
|
|
|
|
|
|
|
|
||||||||||||||
|
|
|
|
|
|
|
|
|
|
|
|
|
|
|
|
|
|
|
|
||||||||||||
|
|
|
|
|
|
|
|
16 |
|
|
|
|
|
|
|
|
13 |
|
|
|
|
|
|
|
|
|
|
12 |
|||
|
|
|
|
|
|
|
|
|
|
|
|
|
|
|
|
|
|
|
|
|
|
||||||||||
17 |
|
|
|
|
|
|
15 |
|
|
|
|
|
|
|
|
14 |
|
|
|
|
|
|
|
|
|
|
|
|
|
||
|
|
|
|
|
|
|
|
|
|
|
|
|
|
|
|
|
|
|
|
|
|
|
|
|
|
||||||
6

G1000A OPERATION MANUAL
4 BASIC OPERATIONS
1.BATTERIES
Remove the battery compartment cover by pushing it in the direction of the arrow. Install two ‘AA’ batteries according to the polarity symbols (+ and -) marked next to the compartment.
For easy removal, place the batteries on top of the lift-out ribbon.
2.POWER ON/OFF/VOLUME
Turn the radio on by switching the power on/off switch (11). Use the volume knob (21) to adjust the volume.
3.FM RADIO
Select the FM band by using the band selector switch (13).
Use the tuning knob (6) to tune the radio to the desired frequency. When a strong signal is found, the TUNE indicator will light.
If you are using an earphone to listen to FM stereo, the
FM ST. LED (5) will light. Note that the frequency of the station appears in the display (3).
4.AM/SW1-8 RADIO
Select the desired band, AM or SW 1-8, by using the band selector switch (13). Turn the tuning knob (6) to the desired frequency \ which appears in the display (3) or just tune around and listen for stations. Note that MW appears in the display when AM is seleced. That’s because the AM band is called MW (for medium wave) in some parts of the world. SW appears in the display when SW 1-8 is selected.
5.ANTENNA
A.For AM (MW) the radio uses an internal, directional, ferrite bar antenna. Rotate the radio for best reception.
B.For FM/SW, fully extend the telescopic antenna (1). For FM, rotate it for best reception.
7
BASIC OPERATIONS continued
6.AC ADAPTOR (NOT INCLUDED)
The G1000A can be used with an AC adaptor that supplies an output of 3 volts DC, negative polarity (center tip set to negative), capable of supplying 100 milliamperes or greater current. Plug tip diameters: 3.4 millimeters outer; 1.3 millimeter inner.
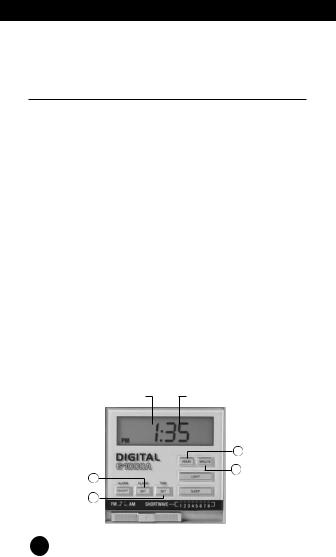
7.CLOCK
The clock displays time in 12 hour, AM/PM format.
While keeping the TIME SET button (14) pressed, set the correct hour and minutes with the HOUR (7) and MINUTE (8) buttons. They can be pressed with quick, short presses to advance slowly or they can be kept pressed down to advance rapidly. When finished, release the TIME SET button.
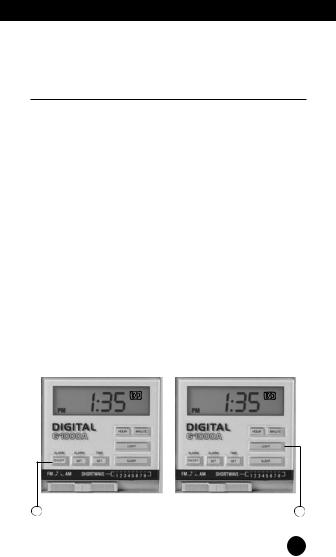
8.ALARM SET
While keeping the AL.SET button (15) pressed, set the
correct wake-up hour and minutes with the HOUR (7) and MINUTE
(8) buttons. They can be pressed with quick, short presses to advance slowly or they can be kept pressed down to advance rapidly. When finished, release the AL.SET button.
hour minute
7
8
15
14
8
G1000A OPERATION MANUAL
BASIC OPERATIONS continued
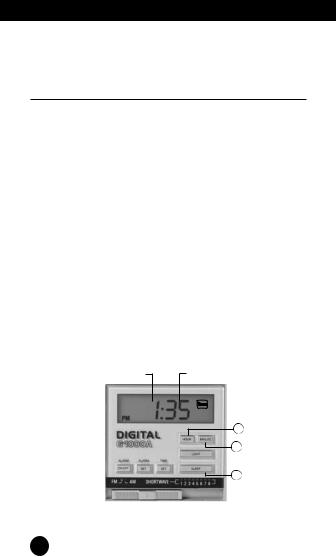
9. ALARM ON/OFF
(ACTIVATING/DEACTIVATING THE ALARM)
Press the AL.ON/OFF (16) button. The alarm activation symbol appears in the upper right corner of the LCD and looks like a loudspeaker. When the loudspeaker symbol appears in the display, the alarm is activated. When the loudspeaker symbol is not in
the display, the alarm is deactivated.
When the activated alarm turns the radio on, it can be turned off by pressing the AL.ON/OFF button. This will cause the loudspeaker symbol to disappear from the display.
10.LIGHT
The LIGHT button (9) causes the display to be illuminated. It will turn off automatically after about 10 seconds. Note that using the light feature decreases battery life.
16 |
9 |
9
BASIC OPERATIONS continued
11.SLEEP FUNCTION
The sleep function enables the radio to play for a specified time before automatically shutting off (from 1 hour 59 minutes to just one minute).
1.With the radio turned off, press and do not release the SLEEP (10) button. This turns the radio on and 59 minutes appears in the display. This also activates the sleep timer activation
symbol [  ] in the upper right corner of the LCD. This symbol looks like a little bed with a person lying in it.
2.If 59 minutes is OK for your needs, release the SLEEP button at this point. If not, proceed to the next step.
3.While continuing to keep the SLEEP button pressed, use the HOUR and MINUTE buttons to adjust the sleep time for your needs. When finished, release the SLEEP button.
While it is playing in sleep mode, it can be turned off by pressing the SLEEP button. The sleep timer activation symbol will disappear from the display.
hour minute
7
8
10
10
G1000A OPERATION MANUAL
BASIC OPERATIONS continued
12.PRECAUTIONS
Do not use any abrasive powder to clean the cabinet. Wipe it with a soft cloth moistened with a mild soap and water solution. Do not leave the unit in a location near heat sources, or in a place subject to direct sunlight, excessive dust or mechanical shock.
If the sound becomes low or distorted, replace the batteries with new. Do not use old and new batteries together and never inte mix different brands or types of batteries. If the set is not used for a long time, remove the batteries to prevent to possible battery acid leakage.
5 INTRODUCTION TO SHORTWAVE
Shortwave enables you to hear stations from around the world. Now that you have a shortwave radio, no doubt you’ll want to hear worldwide stations right away. If you’re new to shortwave, please take some time to learn the basics outlined below. To successfully listen to shortwave stations you must know how to find them. They are found in the shortwave ‘bands’. If you’re an experienced shortwave listener, you’ll already know what bands are and how to use them, but if you’re new, you’ll need to learn about bands first. After that, you will have excellent success. Please read on.
11

INTRODUCTION TO SHORTWAVE continued
WHAT ARE BANDS?
If you have ever listened to AM or FM radio, then you already know what a band is. The AM band is a frequency range stretching form 530 to 1600 kilohertz, the FM band is 88-108 megahertz. A band is simply a frequency range where stations are located. When you look for stations in these ‘bands’, you simply tune around with the tuning knob until you find a station you like. Shortwave is similar and the shortwave bands have names like 25 meters, 31 meters, 49 meters, etc. These are abbreviated 25m, 31m and 49m. Just like in AM and FM radio, one simply gets into the shortwave band and tunes around, looking for stations.
For example, the 19 meter shortwave band encompasses the frequency range of 15.1 to 15.6 megahertz. Below is a list of the shortwave bands used for international shortwave broadcasts and their corresponding frequency ranges, as found in the Etón model G1000A.
IMPORTANT NOTE: The Etón G1000A shows shortwave frequencies in megahertz, abbreviated MHz. Since shortwave broadcast schedules usually show frequency in kilohertz, the chart below shows both. Remember, the same frequency can be stated in either megahertz or kilohertz, just as the same distances can be expressed in either meters or kilometers, feet or miles.
12

G1000A OPERATION MANUAL
INTRODUCTION TO SHORTWAVE continued
BAND |
MEGAHERTZ (MHz) |
KILOHERTZ (KHz) |
G1000A’S |
|
(as on the G1000A) |
(as in most broadcast) |
switch setting |
|
|
|
|
49 meters |
5.950-6.20 MHz |
59506200 KHz |
SW1 |
41 meters |
7.10-7.60 MHz |
71007600 KHz |
SW2 |
31 meters |
9.20-9.90 MHz |
95009900 KHz |
SW3 |
25 meters |
11.600-12.200 MHz |
11600-12100 KHz |
SW4 |
22 meters |
13.570-13.870 MHz |
13570-13870 KHz |
SW5 |
19 meters |
15.10-15.80 MHz |
15100-15800 KHz |
SW6 |
16 meters |
17.480-17.90 MHz |
17480-17900 KHz |
SW7 |
13 meters |
21.450-21.850 MHz |
21450-21850 KHz |
SW8 |
|
|
|
|
DAY BANDS / NIGHT BANDS – THE DIFFERENCE IS VERY IMPORTANT
Because shortwave signals depend on such factors as the sun, the ionosphere and interaction with the earth itself, signals cannot be heard on all bands throughout the day. Some bands are best during the daylight hours, and some are best at night. Here are some good ‘rules of thumb’.
•In general, the bands with frequencies below 13000 KHz are better at night and the bands with frequencies above 13000 KHz are best during the day. This guideline is not ‘cast in concrete’ but is a useful general rule of thumb.
•Around sunrise and sunset, both the day and night bands might be good, sometimes exceptionally good.
•In the summer time, the day bands often are good into the early night.
•While most shortwave stations are found within the frequency limits of these defined bands, some are found outside of them. It pays to take the time to tune in-between bands too.
•These guidelines can be used worldwide and are not dependent on location.
13

INTRODUCTION TO SHORTWAVE continued
Listed below are the characteristics of the major shortwave bands. Follow these guidelines for best listening results.
DAYTIME LISTENING
Shortwave listening is generally at its poorest during the daylight hours of about two hours after sunrise until about two hours before sunset. The major reason for this is that the broadcasters are not transmitting to your area at this time, assuming that we are all either at work or at school and are not able to listen during the day. If you want to try daytime listening, use the guidelines below.
DAY |
|
BANDS |
CHARACTERISTICS |
|
|
13meters |
Results vary. Worth trying. Sometimes extremely good |
|
around sunrise and sunset. |
|
|
16meters |
Similar to 19m. |
|
|
19meters |
The best overall daytime band. May also be good at night |
|
in the summer months. Sometimes extremely good |
|
around sunrise and sunset. Sometimes good at night in |
|
the summer. |
22meters |
Similar to 19m. |
|
|
14

G1000A OPERATION MANUAL
INTRODUCTION TO SHORTWAVE continued
EVENING/NIGHT LISTENING
This is the best time to listen, because the broadcasters are deliberately transmitting to your area. These bands may be extremely good around sunset and sunrise too.
NIGHT |
|
BANDS |
CHARACTERISTICS |
|
|
25meters |
Similar to 31m. |
|
|
31meters |
Good all night, everywhere. Often extremely good at |
|
sunrise and sunset. Good results often start about an |
|
hour before sunset. |
|
|
41meters |
Similar to 49m, but not as many stations. |
|
|
49meters |
The best overall night band. |
|
|
IMPORTANT NOTE: Getting close to a window may substantially improve your reception. The construction materials of some buildings simply do not let signals in very well. Signals penetrate wood frame buildings easiest, while concrete and brick buildings usually block signals. If you are in a building with one or more stories above you, signals can also be impaired in strength. In such a situation, situate the radio as close to a window as possible while listening. Holding the radio while close to a window may also improve reception.
15

INTRODUCTION TO SHORTWAVE continued
HOW TO IDENTIFY WHAT YOU’RE LISTENING TO AND HOW TO FIND STATIONS THAT YOU WANT TO HEAR
For this, you’ll need to use a shortwave directory.
We recommend the use of a comprehensive shortwave directory, especially if you want to hear specific countries or to identify the station you’re listening to. Such a directory will alphabetically list the countries broadcasting on shortwave, showing their language, target area, broadcast time and frequency that is used.
The best shortwave directory is PASSPORT TO WORLD BAND RADIO, available in major bookstores. Published by International Broadcasting Services, Ltd., Box 300, Penn's Park, Pennsylvania 18943 (www.passband.com). This publication has separate chapters for English and non-English broadcasts, titled World-Wide Broadcasts In English and Voices From Home.
6 SERVICE INFORMATION
You may contact the Etón Service Department for additional information or assistance by calling toll-free Monday through Friday, 8:30am - 4:00pm Pacific Standard Time:
1-800-872-2228 (United States)
1-800-673-1648 (Canada)
Call for a Return Authorization prior to shipping your unit. Should you want to return your unit for service, pack the receiver carefully using the original carton or other suitable container. Write your return address clearly on the shipping carton and on an enclosed cover letter describing the service required, symptoms or problems. Also, include your daytime telephone number and a copy of your proof of purchase. The receiver will be serviced under the terms of the Etón Limited Warranty and returned to you.
16

G1000A OPERATION MANUAL
7 ONE YEAR LIMITED WARRANTY
Etón warrants to the original purchaser this product shall be free from defects in material or workmanship for one year from the date of original purchase.
During the warranty period Etón or an authorized Etón service facility will provide, free of charge, both parts and labor necessary to correct defects in material and workmanship. At their option, Etón may replace a defective unit.
(1)Complete and send in the Warranty Registration Card within ten (10) days of purchase.
(2)Call Etón or the nearest authorized service facility, as soon as possible after discovery of a possible defect. Have ready:
(a)the model and serial number.
(b)the identity of the seller and the approximate date of purchase.
(c)a detailed description of the problem, including details on the electrical connection to associated equipment and the list of such equipment.
(3)Etón will issue a Return Authorization number and the address to which the unit can be shipped. Ship the unit in its original container or equivalent, fully insured and shipping charges prepaid.
Correct maintenance, repair, and use are important to obtain proper performance from this product. Therefore carefully read the Instruction Manual. This warranty does not apply to any defect that Etón determines is due to:
17
 Loading...