


LCD TV WITH DVD
PLAYER
GLCD1906HDV
GLCD1906HDVW
GLCD2206HDV
GLCD2206HDVW
The Gold Technical Support Line: 1902 215 259
Personal Product Support
(Charges will apply at $2.95 per minute)
Introduction
Thank you for buying this Grundig product, which is designed to give you many years of trouble-free service.
You may already be familiar with using a similar unit, but please take time to read these instructions. They are designed to familiarise you with the unit’s many features and to ensure you get the very best from your purchase.
Safety is important
Your safety and the safety of others is important.
Therefore, please ensure you read the “Safety Instructions” before you operate this unit.
Warranty
In the unlikely event that your product fails to work normally, please call the below free phone number to discuss the problem with one of our qualified service engineers.
Australia.
Grundig Warranty: 1800 509 394
New Zealand
Grundig Warranty: 0800 450 259
- 1 -
Contents
Introduction …………………………………..….………1
Safety Instructions ……………………………………...3
Unpacking ………………………………………..…..…5
Wall Mount Bracket Installation Guidelines ……..……6 View of TV/Monitor ………..………………………….…7
Remote Control …………………..………………….…… 9 Installation and Connection …………….…………..…….12
TV/Monitor Screen Operation …….……………………13 TV Channel Menu and Adjustment …….……….….….15
DVD Player Operation ….……………..…………………23
Other Operation ….……………………………………..34
Notes …………….……………………………………….37
Maintenance …….………………………………………38 Specifications ….………………………………………..39
Display Modes .………………………………………….41
Warranty ..………………………………….……………..42
- 2 -
Safety instructions
1.Do not use this apparatus near water.
2.Clean only with a dry cloth.
3.Do not block any ventilation openings. Install in accordance with the manufacturers instructions.
4.Do not install near any heat sources such as radiators, heat registers, stoves, or other apparatus (including amplifiers) that produce heat.
5.Protect the power cord from being walked on or pinched particularly at plugs convenience receptacles, and the point where they exit from the apparatus.
6.Only use attachments/accessories specified by the manufacturer.
7.Unplug this apparatus during lightning storms or when unused for long periods of time.
8.Refer all servicing to qualified service personnel. Servicing is required when the apparatus has been damaged in any way, such as power-supply cord or plug is damaged, liquid has been spilled or objects have fallen into apparatus, the apparatus has been exposed to rain or moisture, does not operate normally, or has been dropped.
9.The apparatus should not be exposed to dripping or splashing and no objects filled with liquids, such as vases, should be placed on the apparatus.
10.The apparatus should not be exposed to dripping or splashing and no objects filled with liquids, splashing and no objects filled with liquids such as vases, should be placed on the apparatus.
11.If the television is to be built into a compartment or similar enclosed space, the minimum distances must be maintained. Heat build-up can reduce the service life of your television, and can also be dangerous.
Installation notes
This TV can be connected to AC 100-240 Volts. 50/60 Hz. Never connect to a DC supply or any other power supply.
Locate the TV in the room where light does not strike the screen.
-3 -
Total darkness or a reflection on the picture screen can cause eyestrain. Soft and indirect lighting is recommended for comfortable viewing.
Allow enough space between the TV and the wall to permit ventilation.
Avoid excessively warm locations to prevent possible damage to the cabinet or premature component failure.
Do not cover the ventilation openings when using the TV.
Additional Safety notes
Never tamper with any components inside the TV, or any other adjustment controls not mentioned in this manual.
All LCD TVs are high voltage instruments. When you clean up dust or water drops on the LCD PANEL or CABINET, the power cord should be pulled out from the receptacle, then wipe the TV with a dry soft cloth.
During thunder and lighting, unplug the power cord and antenna cord to prevent damage to your TV.
All repairs to this TV should only be performed by qualified TV service personnel.
- 4 -
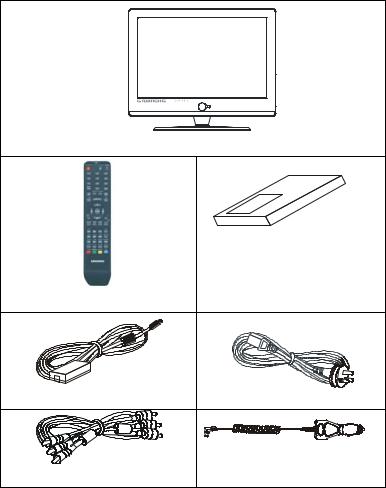
Unpacking
___________________________________________
Please make sure that the following items are included with your LCD TV/Monitor. If any item is missing, please contact the warranty line.
|
TFT LCD TV/ Monitor |
|
Operation manual |
Remote control |
|
DC adaptor |
Power cord |
|
Car Cord |
RCA cable |
|
|
- 5 - |
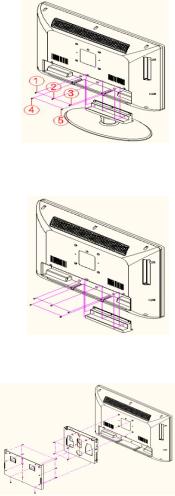
Wall Mount Bracket Installation Guidelines
____________________________________________
1.Place the “LCD TV” on a solid surface. Use soft material to place over the front screen to avoid any damage.
2.Remove the 5 screws from the unit and take away the stand (Refer picture 1).
(picture 1)
3.Using the plastic cover that came with the LCD screw in the 5 screws to fix the plastic cover on the bottom of the unit (Refer picture 2).
(picture 2)
4.Use 4 screws to fix the TV on the wall mount bracket .Please find there are 4 VESA holes on the back of the unit (Refer picture 3).
(picture 3)
- 6 -
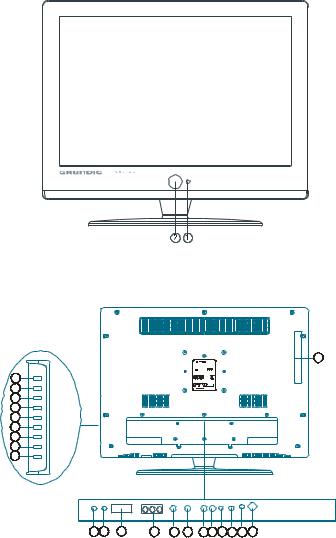
I. View of the TV/Monitor
Front view
Back view
12
GLCD 2206HDVW
DC 12V 5A Adaptor
3
4
5
6
7
8
9
10
11
MADE INPRC
13 14 |
15 |
16 |
17 |
18 |
1920 21 22 23 24 |
- 7 -
1.Remote sensor
To receive remote signal from remote control.
2.Power button / power indicator
To switch on/off the unit, in power on mode the indicator will turn to blue and in standby mode the indicator will turn to red.
3.PLAY/PAUSE button
To play/pause playback of disc.
4.STOP button
To stop playback of disc.
5.EJECT/CLOSE button
To eject a disc from the disc slot or close a disc to the disc slot.
6.VOLbutton
To decrease the volume level.
7.VOL+ button
To increase the volume level.
8.CHbutton
To select channels downward in TV mode.
9.CH+ button
To select channels upward in TV mode.
10.MENU button
To enter menu mode.
11.SOURCE button
To select input source.
12.DVD disc slot
To load disc for playback.
13.DC IN jack
To connect DC 12V power supply
14.HDMI input jack
15.VGA input jack
To connect with PC.
16.YPbPr input jack
17.S-Video input jack
18.Video input jack
19.Audio input (Left) jack
20.Audio input (Right) jack
21.PC audio input jack
22.Earphone jack
23.RF IN jack
To connect the external aerial.
24.COAXIAL OUT
To connect the input socket on your surround sound system, this jack only output the digital signal from DVD.
- 8 -

II. Remote Control
- 9 -
(1) Remote control keys function
1.STANDBY: To switch on/off the unit.
2.Numeric buttons: To select a channel by number input or input numbers in menus.
3.CH.LIST: To show the channel list and used to input the track number for discs that have more than 9 tracks.
4.ASPECT: To switch the size of the picture.
5.VOL+/-: To adjust the volume up or down.
6.DISPLAY: To display the source and channel’s information.
7.Navigation buttons: To select the items of on-screen menus.
8.LCD MENU: To display LCD OSD Menu
9.SOURCE: To display INPUT source.
10.P.MODE: To select the picture mode.
11.PLAY/PAUSE: To play/pause the track being played in DVD mode or show the favourite list in TV mode.
12.STOP: To stop DVD playback.
13.TEXT: To switch on/off teletext in TV mode and skip to previous track in DVD mode.
14.HOLD: Hold on or off for current page display in TELETEXT mode and skip to next track in DVD mode.
15.INDEX: To display the index page in Teletext mode and fast backward playing in DVD mode.
16.SIZE: To change the display size in teletext mode or fast forward playing in DVD mode.
17.D.MENU: To display DVD-disc menu.
18.TITLE: To display DVD title menu.
19.PROG: To enter program setting in DVD mode,display red subject in Teletext mode and select DVB program in DVB mode.
20.INTRO: To INTRO play (play the first 10 seconds of each track) when playing CD discs and display green subject in Teletext mode.
21.REPEAT: To repeat play in DVD mode and display yellow subject in Teletext mode.
22.A-B: To repeat A-B playback or display blue subject in Teletext mode.
23.D.DISP: To display track information in DVD mode.
24.GOTO: To find a play point in DVD mode.
25.REVEAL: To reveal or hide the words in Teletext mode and select angle in DVD mode (Angle function depends on DVD discs).
26.SUBPAGE: To access sub-coded page in Teletext mode and zoom function of DVD playback.
27.LANG: To select a program’s language in DVB mode and DVD mode (where available).
28.SUBTITLE: To switch the dialogue at the bottom of the screen.
29.>I: Slow motion playback in DVD mode.
30.EPG: To show the electronic program Guide menu
31.S.MODE: To select different sound mode.
32.SLEEP: To set the unit to turn off automatically after a set period of time.
33.EXIT: To display the setup menu in DVD mode or exit the current mode.
34.CH+/-: To change channels up or down.
35.NICAM: To turn on/off Nicam in TV mode.
36.CYCLE: Switch between the current channel being viewed and the last channel viewed in TV mode.
37.EJECT: To eject/close the disc in DVD mode.
38.MUTE: To turn the sound on and off.
- 10 -
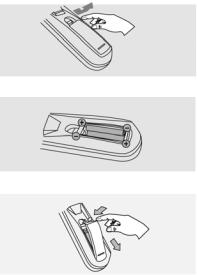
(2) Remote control battery installation and cautions
Replace battery by following the below steps: Requires two AAA batteries.
1.Open the battery cover as shown below:
2.Install the battery into the battery tray.
3.Close the battery cover
Caution:
1.Keep batteries out of children’s reach.
2.Don’t attempt to recharge, short-circuit, disassemble, heat or throw the batteries into the fire.
3.Always replace both batteries at the same time. Never mix new and old batteries or batteries of a different type.
4.If you don’t intend to use the remote control for an extended period,
remove the batteries to prevent possible leakage and corrosion.
Notes:
1.Do not drop, apply shock or step on the remote control.
2.Do not spill water on the remote control.
3.Do not use the remote control for other equipment at the same time.
4.If the TV does not operate when operating the remote control from a close range, you need to replace the batteries.
See above for directions on replacing batteries.
-11 -
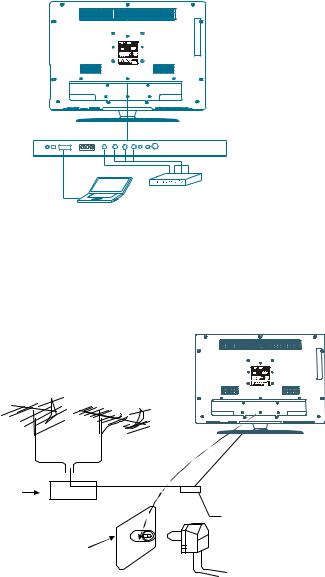
III. Installation and Connection
Connect the LCD TV/monitor
GLCD2206HDV
1. Connect the TV RF source to the RF IN port. TVRF signal including: Receiving antenna /satellite TV/CATV net. You can use 75Ω coaxial cable to connect the outdoor antenna.
Outdoor Antenna Connection:
Use 75Ω coaxial cable plug or 300-75Ω impedance converter to plug in antenna input terminal on the rear of the cabinet.
VHF antenna |
UHF antenna |
Mixer |
75ΩCo-axis cable Input terminal of |
|
antenna |
||
|
||
|
Co-axis antenna |
plug
Antenna in jack
75ΩCo-axis cable
- 12 -
2.Connect the audio sources (Including DVD, VCDR, etc.) to the proper AUDIO input jacks ‘L’ and ‘R’.
3.Connect the video source to the VIDEO input jack by RCA cable.
4.Connect the video source to the S-VIDEO input jack of the TV by the S-video cable
5.Insert the AC power to the DC adaptor, then connect 12V input jack from the monitor to its DC output jack.
6.When using the LCD as a computer screen, connect the PC from the VGA jack of the monitor by the relevant cable.
IV. TV/Monitor Screen Operation
(1) Basic operation
1.Press the STANDBY button on the unit or from the remote control to switch on the power. The power indicator will light up in blue colour. Press the STANDBY button again to switch off the power, and the indicator will change to red.
2.Press the VOL - or VOL + button to adjust the volume level. Press the VOL - button repeatedly to decrease the volume; press the VOL + button repeatedly to increase the volume from 0 to 100.
(2) Changing Channels
1.Press the SOURCE button on the remote control to select the TV or DTV input mode. If you are using the receiver for the first time, an Installation Guide menu will be displayed to guide you through the channel scan, Use the remote control to finish channel scan (you can also refer to Chapter V in this manual for the channel scan operation).
-13 -
 Loading...