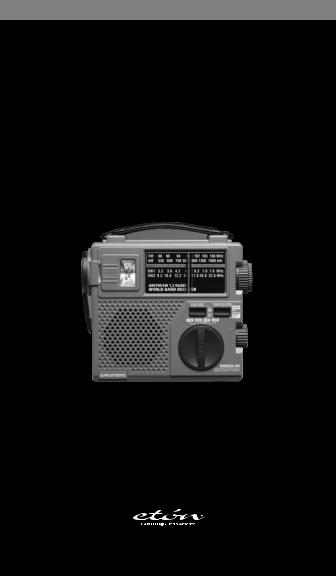
Grundig FR-200-G, FR-200 Owners Manual

w w w . e t o n c o r p . c o m
F R 2 0 0 F R 2 0 0 G
O P E R AT I O N M A N U A L
A M / F M / S H O R T W A V E R A D I O

FR200/FR200G OPERATION MANUAL
TABLE OF CONTENTS
DO YOU NEED HELP? |
1 |
INTRODUCTION |
4 |
|
|||
Here’s how to contact us: |
2 |
FEATURES............................................................................................ |
5 |
3 |
CONTROL LOCATIONS......................................................................... |
6 |
|
From the United States: (800) 872-2228 |
4 |
CONNECTING POWER SOURCES.......................................................... |
8 |
5 |
EXTERNAL POWER/RECHARGEABLE BATTERY...................................... |
8 |
|
From Canada: (800) 637-1648 |
6 |
AA BATTERY OPERATION..................................................................... |
9 |
From Everywhere Else: (650) 903-3866 |
7 |
DYNAMO POWER................................................................................ |
9 |
Email: customersvc@etoncorp.com |
8 |
EMERGENCY OPERATION.................................................................. |
10 |
Internet: www.etoncorp.com |
9 |
OPERATION GUIDE............................................................................ |
10 |
|
|
• HOW TO TURN ON AND OFF............................................................ |
10 |
|
|
• HOW TO ADJUST THE VOLUME........................................................ |
10 |
|
|
• HOW TO TUNE-IN STATIONS............................................................ |
10 |
|
|
• HOW TO OPTIMIZE SHORTWAVE RECEPTION................................... |
11 |
|
|
• HOW TO USE THE EMERGENCY LIGHT............................................. |
11 |
|
|
• HOW TO USE THE EARPHONE JACK................................................. |
11 |
|
10 |
PRECAUTIONS................................................................................... |
11 |
|
11 |
SERVICE INFORMATION..................................................................... |
12 |
|
12 |
ONE YEAR LIMITED WARRANTY......................................................... |
12 |
2 |
3 |

FR200/FR200G OPERATION MANUAL
1 INTRODUCTION
Thank you for purchasing the FR200/FR200G AM/FM/Shortwave Radio – a perfect emergency radio and a great radio for daily use. Its unique design allows it to be powered from a variety of sources: 1) From the built-in rechargeable Ni-MH rechargeable battery that takes charge from the dynamo crank and from an AC adaptor (AC adaptor only included with FR200G Model); 2) From 3 AA batteries; 3) From the AC adaptor alone (AC adaptor only included with FR200G Model); 4) From the dynamo crank alone, even with no battery pack installed.
Please carefully read this OPERATION MANUAL to take advantage of the many features and excellent reception of local AM and FM stations as well as international shortwave broadcasts from around the world.
2 FEATURES
The FR200/FR200G AM/FM/Shortwave Radio is fully portable and with many functions and features:
•Receives AM, FM, and international shortwave broadcasts
•Receives continuous shortwave frequency coverage from 3.2-22 megahertz, which includes the 13, 16, 19, 22, 25, 31, 41, 49, 60, 75 and 90 meter bands
•Incorporates fine-tuning control knob superimposed on the main tuning control knob
•Operates on power from four different sources: 1) From the built-in rechargeable Ni-MH rechargeable battery that takes charge from the dynamo crank and from an AC adaptor (AC adaptor only included with FR200G Model); 2) From 3 AA batteries; 3) From the AC adaptor alone (AC adaptor only included with FR200G Model); 4) From the dynamo crank alone, even with no battery pack installed
•Includes built-in emergency flashlight
•Plays quality audio from the 2 1/2 inch speaker
•Incorporates all built-in antennas: telescopic antenna for FM and shortwave, and internal ferrite bar antenna for AM
4 |
5 |

FR200/FR200G OPERATION MANUAL
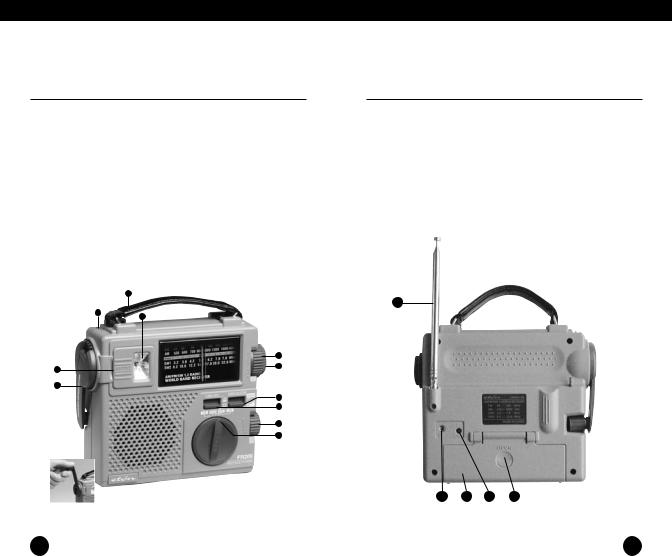
3 CONTROL LOCATIONS
1. |
DYNAMO-CRANK |
12. |
ANTENNA |
2. |
COIN OPENING GAP (FOR CHANGING LIGHT BULB) |
13. |
EARPHONE JACK |
3. |
CHARGING INDICATOR |
14. |
DC JACK |
4. |
CARRYING HANDLE |
15. |
RECHARGEABLE BATTERY (INSIDE THE COMPARTMENT, |
5. |
EMERGENCY LIGHT |
|
NOT SHOWN) |
6. |
TUNING KNOB |
16. |
BATTERY COMPARTMENT |
7.FINE TUNING KNOB
8.POWER SELECTOR
9.LIGHT ON/OFF SWITCH
10.VOLUME
11.BAND SELECTOR
4.
12.
3.
5.
6.
7.
2.
1.
8.
9.
10.
11.
13. 15. 14. 16.
6 |
7 |

4 CONNECTING POWER SOURCES
The rechargeable Ni-MH (nickel-metal-hydride) battery pack is installed and fully charged at the factory. To use this radio with AC power, an AC Adaptor is needed. When purchasing an AC Adaptor, it must meet the following specifications:
Output of 4.5 volt DC; negative polarity; 80-100 milliamperes current capability; plug tip outer diameter of 3.4 millimeter, inner diameter of 1.3 millimeter.
For the FR200G Model, a proper AC Adaptor is included.
An AC Adaptor of 80-100 milliamperes, as noted above, should charge the radio in approximately 8 hours, after which the adaptor can be left plugged in if desired and the battery will not overcharge.
IMPORTANT NOTE: If using an AC adaptor rated higher than 80-100 milliamps, or one other than that included with the FR200G, do not allow it to charge for more than two hours and unplug the AC adaptor after charging. If using such an AC adaptor to continuously power the radio, unplug the internal rechargeable battery.
5 EXTERNAL POWER/RECHARGEABLE BATTERY
Plugging an AC adaptor (AC adaptor only included with FR200G Model) into the DC 4.5 V socket on the back of the radio will provide power for operation and will charge the Ni-MH battery pack. To play the radio, set the POWER SELECTOR switch to the DYNAMO ADAPTOR position. The Ni-MH battery pack will charge with the POWER SELECTOR switch set in any of its positions.
FR200/FR200G OPERATION MANUAL
6 AA BATTERY OPERATION
This radio is designed to operate on three AA batteries (not included). Alkaline batteries should be used for longest playtime. Install the batteries by removing the battery compartment cover and following the battery polarity diagrams imprinted on the underside of the cover. Remove the cover by simultaneously pressing on the indentation labeled OPEN and pulling it down toward the bottom of the radio. Turn the radio on by setting the POWER SELECTOR switch to the BATTERY position.
NOTE: if an AC adaptor is in use, the AA batteries are switched off automatically.
7 DYNAMO POWER
The Ni-MH battery pack can also be charged by turning the dynamo crank following the instructions below:
1.Switch the power selector to the POWER OFF position.
2.Turn the dynamo-crank vigorously either clockwise or counterclockwise. The red charging LED will be lighted during charging.
NOTE: It can be charged while the radio is playing, however it does not charge as efficiently, thus reducing playtime.
With hand-crank dynamo charging, radio operation time depends on the number of turns and time per turn. On the average, 60-90 seconds of vigorous cranking results in about 40-60 minutes of radio play at low volume, without light use. If the light is on while playing the radio, the radio playtime will be dramatically reduced. The light will always result in the Ni-MH battery discharging at a faster rate.
8 |
9 |

FR200/FR200G OPERATION MANUAL
8 EMERGENCY OPERATION
Even if no power source is available, including the Ni-MH battery pack, the radio and the light can still be operated by continually turning the dynamo crank. Set the POWER SELECTOR switch to the DYNAMO ADAPTOR position.
9 OPERATION GUIDE
HOW TO TURN ON AND OFF
Turn it on by selecting a power source of your choice as described above and then by setting the POWER SELECTOR switch to the DYNAMO ADAPTOR or BATTERY position.
Turn it off by setting the POWER SELECTOR switch to the POWER OFF position.
HOW TO ADJUST THE VOLUME
Turn the VOLUME control knob until the desired volume level is heard.
HOW TO TUNE-IN STATIONS
Set the band selector rotary switch to the FM, AM, SW1, or SW2 position. Tune stations in with the TUNING knob, using the superimposed FINE TUNING control as desired. For best FM and shortwave reception, fully extend the telescopic antenna. FM reception can often be improved by rotating the telescopic antenna. For AM reception, the telescopic antenna need not be extended, as the AM antenna is an internal, directional, ferrite bar antenna. For best AM reception, rotate the radio until the best signal strength is achieved. See the next section for how to optimize shortwave reception.
OPERATION GUIDE continued
HOW TO OPTIMIZE SHORTWAVE RECEPTION
Being aware of the following information will help you get the best results listening to shortwave.
•Shortwave reception is best around sunrise, sunset, and at night
•Night shortwave is usually superior to day shortwave reception
•During the day, frequencies above 13 MHz are usually best
•At night, frequencies below 13 MHz are usually best
•Around sunset and sunrise, the entire shortwave range may be good
•Getting very close to a window improves shortwave reception
•Holding the radio improves shortwave reception
HOW TO USE THE EMERGENCY LIGHT
Set the FLASHLIGHT to the ON position.
HOW TO USE THE EARPHONE JACK
Plug in a set of earphones (Earphones only included with FR200G Model) of your choice that have a 1/8 inch mono or stereo plug. When using earphones the built-in speaker will be switched off automatically. Note that stereo earphones will work and sound will be heard from both sides, although FM is not received in stereo.
10PRECAUTIONS
1.Do not drop and keep away from fire.
2.Do not use abrasive powders to clean the cabinet. Wipe it with a soft cloth moistened with a mild soap and water solution.
3.Do not leave the unit in a location near heat sources, or in a place subject to direct sunlight, excessive dust or mechanical shock.
4.Do not use old and new batteries together or different brands and types together.
10 |
11 |

FR200/FR200G OPERATION MANUAL
PRECAUTIONS continued
5.Always remove the batteries from the radio when it is not going to be used for a long time. This will prevent the batteries from leaking inside the battery compartment.
11 SERVICE INFORMATION
You may contact the Etón Service Department for additional information or assistance by calling toll-free Monday through Friday, 8:30am - 4:00pm Pacific Standard Time:
1-800-872-2228 (United States)
1-800-673-1648 (Canada)
Call for a Return Authorization prior to shipping your unit. Should you want to return your unit for service, pack the receiver carefully using the original carton or other suitable container. Write your return address clearly on the shipping carton and on an enclosed cover letter describing the service required, symptoms or problems. Also, include your daytime telephone number and a copy of your proof of purchase. The receiver will be serviced under the terms
of the Etón Limited Warranty and returned to you.
12 ONE YEAR LIMITED WARRANTY
Etón warrants to the original purchaser this product shall be free from defects in material or workmanship for one year from the date of original purchase.
ONE YEAR LIMITED WARRANTY continued
During the warranty period Etón or an authorized Etón service facility will provide, free of charge, both parts and labor necessary to correct defects in material and workmanship. At their option, Etón may replace a defective unit.
(1)Complete and send in the Warranty Registration Card within ten (10) days of purchase.
(2)Call Etón or the nearest authorized service facility, as soon as possible after discovery of a possible defect. Have ready:
(a)the model and serial number.
(b)the identity of the seller and the approximate date of purchase.
(c)a detailed description of the problem, including details on the electrical connection to associated equipment and the list of such equipment.
(3)Etón will issue a Return Authorization number and the address to which the unit can be shipped. Ship the unit in its original container or equivalent, fully insured and shipping charges prepaid.
Correct maintenance, repair, and use are important to obtain proper performance from this product. Therefore carefully read the Instruction Manual. This warranty does not apply to any defect that Etón determines is due to:
(1)Improper maintenance or repair, including the installation of parts or accessories that do not conform to the quality and specification of the original parts.
(2)Misuse, abuse, neglect or improper installation.
(3)Accidental or intentional damage.
(4)Battery leakage.
12 |
13 |

FR200/FR200G OPERATION MANUAL
ONE YEAR LIMITED WARRANTY continued
All implied warranties, if any, including warranties of merchantability and fitness for a particular purpose, terminate one (1) year from the date of the original purchase.
The foregoing constitutes Etón entire obligation with respect to this product, and the original purchaser shall have no other remedy and no claim for incidental or consequential damages, losses, or expenses. Some states do not allow limitations on how long an implied warranty lasts or do not allow the exclusions or limitation of incidental or consequential damages, so the above limitation and exclusion may not apply to you.
This warranty give you specific legal rights and you may also have other rights which vary from state to state.
FOR SERVICE INFORMATION CONTACT:
Etón Corporation
1015 Corporation Way
Palo Alto, CA 94303
U.S.A.
14 |
15 |
 Loading...