

Page 1
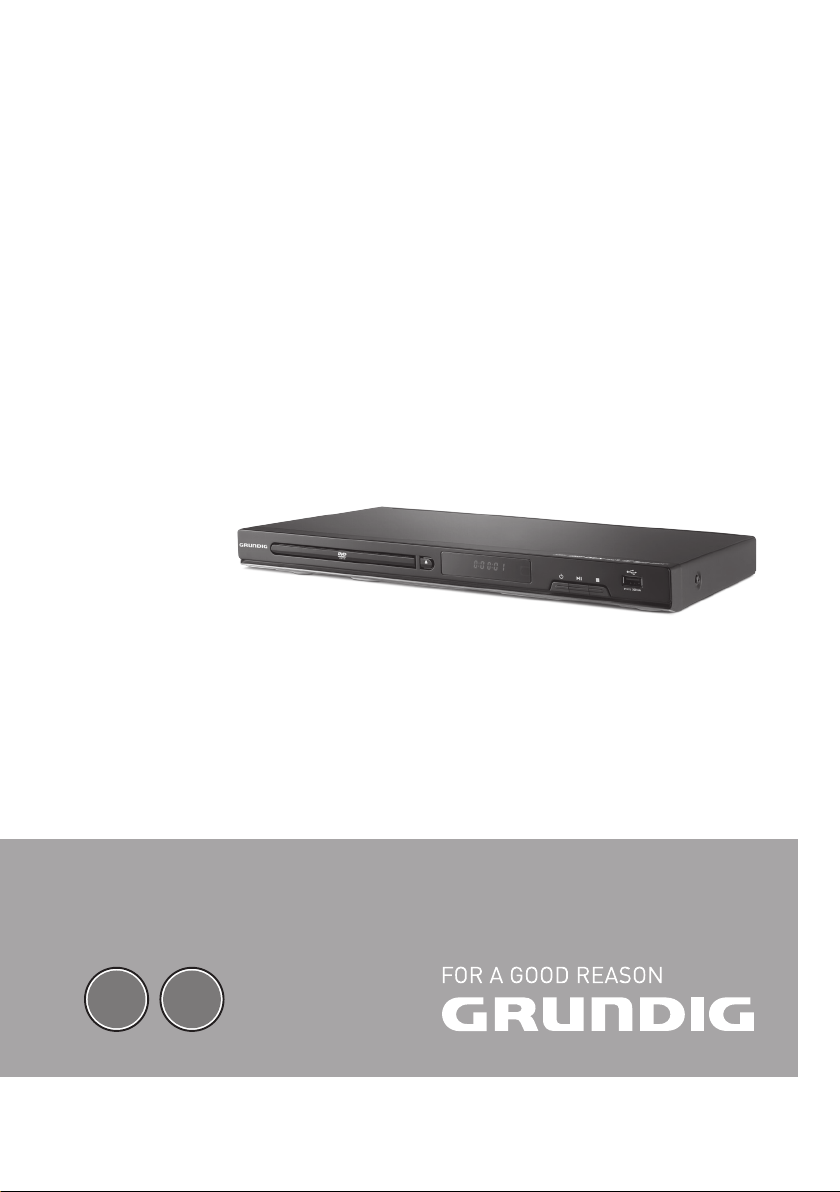
DVD Oynatıcı
GDP 5500
TR EN
Page 2

İÇİNDEKİLER
----------------------------------------------------------------------------------------------------------------------------
3 ÖNEMLİ GÜVENLİK VE ÇEVRE
ÖNLEMLERİ
4 Ambalaj İçin Uyarı!
4 Pil İçin Uyarı!
4 Çevre ile ilgili not
4 Yasaklı Madde Kullanımının Kısıtlanmasına
Uyum:
4 PCB Uygunluğu:
4 Enerji Tasarrufu İçin Yapılması Gerekenler
5 GDP 5500
5 Paket içeriği
5 Özel nitelikleri
7 GENEL BAKIŞ
7 DVD oynatıcı kontrolleri
8 Uzaktan kumanda
10 BAĞLANTI VE HAZIRLIK
10 TV'nin HDMI kablo kullanılarak bağlanması
10 TV'nin SES/VIDEO kablo kullanılarak
bağlanması
11 Ses sistemine bağlanması
11 Dijital ses girişine ve TV donanımlı bir
amfiye bağlantı
12 Bir MP3 çaların veya USB hafıza
çubuğunun bağlanması
12 Elektrik prizine bağlantı
12 Uzaktan kumanda cihazına pillerin takılması
19 SES/GÖRÜNTÜ/VİDEO
DOSYALARININ OYNATILMASI
19 Bir veri cihazı ya da USB hafıza çubuğu
içeriğinin okunması
19 Resim CD'lerinin oynatılması
20 MP3 Ses CD'lerinin çalınması
21 ÖZEL AYARLAR
21 Genel Kurulum Ayarları
21 Görüntü menü ayarları
22 Dil (Lisan) Ayarla
22 Ses Ayarları
23 Kalite Ayarları
23 USB Kayıt Özelliği (Cd Rip)
24 Seçenekler
25 BİLGİLER
25 Lisans koşulları
25 Cihazın temizlenmesi
25 Diskin temizlenmesi
26 Teknik veriler
26 Sistem
27 Sorun Giderme
13 İLK KURULUM
13 DVD oynatıcının çalıştırılması
13 Ekran menüsünün dilinin seçilmesi
13 DVD oynatıcının TV'ye uyarlanması
14 TV formatının seçilmesi
15 DVD OYNATMA
15 DVD'nin özel nitelikleri
15 Hazırlık
15 Diskin takılması
15 Oynatma
15 Diskin çıkartılması
15 İlave oynatma işlevleri
TÜRKÇE
2
Page 3

ÖNEMLİ GÜVENLİK VE ÇEVRE ÖNLEMLERİ
-----------
Bu kılavuzda ve cihazın üzerinde bulunan tüm
uyarıları ve talimatları okuyun ve bunlara uyun.
Gelecekte referans olarak başvurmak için bu kılavuzu saklayın.
7
Bu cihaz kompakt disk, USB ve benzeri veri
cihazlarındaki video ve ses sinyallerinin yürütülmesi için tasarlanmıştır. Bunun dışında bir
amaçla kullanılmasına kesinlikle izin verilmez.
7
Cihazı duvar raflarına veya dolaplara kurmak
istiyorsanız, lütfen yeterli düzeyde havalandırılmasını sağlayın. Cihazın yanlarında, üstünde ve arkasında en az 10 cm boşluk olmalıdır.
7
Cihazı gazete, masa örtüsü, perde vb. ile kapatmayın. Cihazı yatak, kanepe, halı veya benzeri
yüzeyler üzerine koymayın. Cihaz hava alamayacağı için elektrikli parçaları aşırı ısınır. Bu durum cihazın arızalanmasına neden olur.
7
Bu cihazı sabit olmayan araba, ayak, tripod,
köşebent veya masa üzerine yerleştirmeyin.
Cihazın düşmesi sonucunda çocuk ve yetişkinlerde ağır yaralanma ve cihazda ciddi hasar
meydana gelebilir.
7
Cihazın kurulumunu yaparken, mobilyaların
çoğu kez kimyasal katkı malzemesi ihtiva eden
farklı vernik ve plastik maddelerle kaplanmış
olduğunu unutmayın. Bu katkı maddeleri ünitenin ayak kısımlarında korozyona neden olabilir. Bu tür bir korozyon oluşması durumunda,
ünitenin yüzeyinde çıkarılması zor veya imkansız lekeler oluşabilir.
7
Cihaz ani sıcaklık değişimlerine maruz kaldığında, örneğin soğuk bir ortamdan alınıp
sıcak bir odaya getirildiğinde, kullanmadan
önce en az iki saat bekleyin.
7
Bu cihaz kapalı mekanlar için tasarlanmıştır.
Cihazı açık alanlarda kullanırsanız, damlama
veya su sıçraması gibi neme sebep olabilecek
durumlardan koruyun.
7
Cihazı sadece ılıman ortamlarda kullanın.
7
Cihazı ısıtma ünitelerinin yakınına veya doğrudan güneş ışığına maruz kalacağı yerlere
yerleştirmeyin; bu, soğutma sistemini zayıflatacaktır.
7
Cihaz üstüne vazo gibi içerisinde sıvı bulunan
eşyaları koymayın. Cihazın disk bölmesine yabancı madde sokmayın.
7
Cihazın üzerine yanan mum gibi eş-
yaları koymayın.
7
Hiçbir koşulda cihazın kasasını açmayın. Ha-
talı kullanımdan kaynaklanan hasarlarla ilgili
garanti talepleri kabul edilmez.
7
Gök gürültülü fırtınalar tüm elektrikli cihazlar
için tehlikelidir. Cihaz kapalı olsa bile, şebekeye ulaşacak bir yıldırım çarpması ile hasar
görebilir. Şimşekli fırtınalarda daima elektrik
fişini prizden çekin.
7
Lazer optik donanımlarında toz birikmesini
önlemek için disk bölmesini her zaman kapalı
tutun.
7
Disk sürücüsü kapanırken parmağınızın sıkış-
mamasına dikkat edin. Aksi takdirde yaralanma veya cihaz hasarı meydana gelebilir.
7
Bu cihazı bir TV, radyo ya da VCR’ın yakınına
koyduğunuzda, oynatılan görüntü zayıflayabilir ya da ses bozulabilir. Bu durumda cihazı
TV, radyo ya da VCR’dan uzaklaştırın.
7
Gövdeye zarar verebilecekleri için temizlik
maddelerini kullanmayın. Cihazı temiz ve kuru
bir bez ile temizleyin. Temizlemeden önce cihazın fişini prizden çıkarın.
7
Açık haldeyken cihaza başka bir cihaz bağ-
lamayın. Bağlantılarını yapmadan önce diğer
cihazları kapatmayı unutmayın.
7
Sadece harici cihazları bağladıktan sonra ci-
hazın fişini elektrik prizine takın. Elektrik fişinin
kolay erişilebilir bir yerde olmasını sağlayın.
7
Eğer elektrik kablosu hasarlıysa tehlikeyi en-
gellemek amacıyla üretici, satış sonrası servis
veya benzer derecede yetkin, sertifikalı bir kişi
(tercihen elektrik teknisyeni) ya da ithalatçı firmanın tarif edeceği bir kişi tarafından kablo
değiştirilmelidir.
TÜRKÇE
3
Page 4
ÖNEMLİ GÜVENLİK VE ÇEVRE ÖNLEMLERİ
7
Aşağıdaki durumlarda cihazın fişini prizinden
çekin ve yetkili servis çağırın:
a) Elektrik kablosu veya fişi hasarlı olduğunda.
b) Cihazın içine sıvı döküldüğünde veya nesne
düştüğünde.
c) Cihaz yağmura veya suya maruz kaldığın-
da.
d) Normal kullanım talimatları takip edildiğin-
de cihaz normal çalışmıyorsa.
e) Cihaz düşürüldüğünde veya herhangi bir
şekilde hasar gördüğünde.
f) Cihaz performansında belirgin bir değişiklik
olduğunda.
Ambalaj İçin Uyarı!
Ulusal Çevre Mevzuatımız gereği
ambalajlar, geri dönüştürülebilir
malzemelerden üretilmiştir. Ambalajların normal ev çöpüne atılmaması, yerel otoritenin belirttiği
ambalaj toplama noktalarına atıl-
ması sağlanmalıdır.
Pil İçin Uyarı!
Ulusal Çevre Mevzuatımız gereği
üründe bulunan pil uygun şekilde
geri dönüştürülmeli veya yerel
otoritenin belirttiği atık pil kutusuna atılmalıdır. Pili kullanma kı-
lavuzunda belirtildiği şekilde şarj
ediniz veya değiştiriniz. Pili geri dönüştürmek
için lütfen yerel yetkili servise başvurun.
Çevre ile ilgili not
Bu ürün tekrar kullanılabilen ve
geri dönüşüme müsait yüksek nitelikli parçalardan ve malzemeden
üretilmiştir.
Bu nedenle ürünü hizmet ömrü
sonunda normal evsel atıklarla
birlikte atmayın. Elektrik ve elektronik ekipmanların geri dönüşümü için olan bir
geri dönüşüm toplama noktasına götürün. Bu
durum ürün üzerinde, kullanım kılavuzu içerisinde ve ambalajda bu simgeyle belirtilmektedir.
En yakınınızdaki toplama noktasını öğrenmek
için yetkililere danışın.
Kullanılmış ürünleri geri dönüşüme sokarak
çevreyi korumaya yardımcı olun.
Yasaklı Madde Kullanımının
Kısıtlanmasına Uyum:
EEE Yönetmeliğine Uygundur. Aldığınız ürün,
T.C. Çevre ve Orman Bakanlığı tarafından
30.05.2008 tarih ve 26891 sayılı Resmi
Gazete’de yayımlanan Elektrikli ve Elektronik
Eşyalarda Bazı Zararlı Maddelerin Kullanımının
Sınırlandırılmasına Dair Yönetmelikte belirtilen
zararlı ve yasaklı maddeleri içermez.
PCB Uygunluğu:
“PCB (Poliklorlubifenil ) içermez.”
Enerji Tasarrufu İçin Yapılması
Gerekenler
7
Cihazı kısa süreli kullanmama durumunda
Standby ( bekleme ) konumuna getirin. Uzun
süre kullanmama durumunda cihazın fişini
prizden çekin.
7
Ekran koruyucusunu açık konuma getirin. Bu
özellik ayrıca TV’niz için de yararlı olup panelin ömrünü uzatır.
-----------
4
Menşei: P.R.C.
TÜRKÇE
Page 5

GDP 5500
-------------------------------------------------------------------------------------------------------------------------------------
Paket içeriği
5V 500 mA
DVD disk oynatıcı
Piller
RCA Video / Audio kablosu
GDP 5500
Kullanım kılavuzu
Uzaktan
kumanda
DVD disk oynatıcı
Uzaktan kumanda
1 adet pil (Mikro, R03/UM 4/AAA, 1 x 1,5 V)
Kullanım kılavuzu
RCA Video / Audio kablosu
Özel nitelikleri
7
»HDMI 1080P« çıkışı ile yüksek ses ve görüntü kalitesi
7
»DMP« Digital Medya Okuyabilme özelliği
7
USB 2.0 Bellek Girişi
7
DivX (MPEG 4), XViD, DVD, DVD-R, DVD+R,
VCD, SVCD, CD, CD-R, CD-RW, MP3,
WMA(PCM), JPEG, KODAK CD oynatabilme
özelliği
7
Dahili Dolby Digital (AC-3) decoder
7
Progressive scan özelliği
7
Audio (Track) CD'den direk olarak USB belleğe müzik kaydı yapabilme.
7
Çoklu dil (8 ses ve 8 altyazı) desteği
7
Koaksiyel 5.1 Kanal Dijital ses çıkışı ile Ev sinema sisteminizden yüksek kaliteli ses elde
edebilme
Görüntü Codec Desteği
(Divx Modunda)
7
Divx 3.11, Divx 4.12, Divx 5.x, Divx 6.0, Xvid
with B-Frame, Xvid with Q-pel, Divx Pro.
Not:
7
( .mp4 uzantılı dosyalar desteklenmemekte-
dir)
Altyazı Format Desteği
7
.srt, .sub, .smi, .ssa, .ass, .txt
Progressive Scan (İlerlemeli) Tarama Özelliği (Non Interlaced)
7
Hareketli görüntülerde resmin tüm satırlarının
aynı anda ekrana getirildiği, depolandığı
veya iletildiği bir yöntemdir. Dolayısıyla standart video sinyaline göre daha net ve titreşimsiz bir görüntü elde edilir. Progressive Scan
ile bilgisayar monitörlerindeki gibi titreşimsiz
bir görüntü elde edebilirsiniz. İnsan gözünü
daha fazla yoran interlaced (sıralı) taramada
ise resmin sırasıyla önce tek, sonra çift satırları
gösterilerek tam resim izlenimi verilmeye çalışılır. İlerlemeli tarama kısaca »p« ile gösterilir.
Örneğin: 480p ve 720p için TV’nizin »HD
Ready« olması gerekir. 1080p kalitesinde
görüntü alabilmek için ise TV'nizin »Full HD«
olması gereklidir. Bu durumda HDMI bağlantısının kullanılması gereklidir.
Aynı İsimdeki Altyazı Dosyalarını
Görüntüleme Desteği
7
Altyazıların gösterilmesi için video dosyası ile
altyazı dosyasının aynı isme sahip olması gerekmektedir.
TÜRKÇE
5
Page 6

GDP 5500
-------------------------------------------------------------------------------------------------------------------------------------
Notlar:
7
Yazılabilir DVD diskleri (DVD-RW, DVD-R)
sonlandırılmış olmalıdır, kaydedilebilir disklerde sadece oynatma moduna izin verilir.
Oynatma işlemi bazı disk türlerinde veya
açı değiştirme ve görüntü boyutu ayarı gibi
özel işlemler gerçekleştirildiğinde çalışmayabilir. Disklerle ilgili bilgiler kutusu üzerinde detaylı olarak yazılmıştır. Gerektiğinde
lütfen bakın.
7
Diskin kirlenmesine veya çizilmesine izin
vermeyin. Kayıt yüzeyindeki parmak izleri,
kir, toz, çizik veya sigara dumanı birikintileri
diskin oynatılmasını tamamen engelleyebilir.
7
Windows Media Audio WMA (PCM) dos-
yaları, tanınabilmeleri ve düzgün çalınabilmeleri için .wma dosya uzantısıyla kaydedilmiş olarak diske yazılmalıdır.
7
JPEG resim dosyaları, tanınabilmeleri ve
düzgün görüntülenebilmeleri için .jpeg veya
jpg uzantısıyla kaydedilmiş olarak diske yazılmalıdır.
6
TÜRKÇE
Page 7
GENEL BAKIŞ
-------------------------------------------------------------------------------------------------------------------------
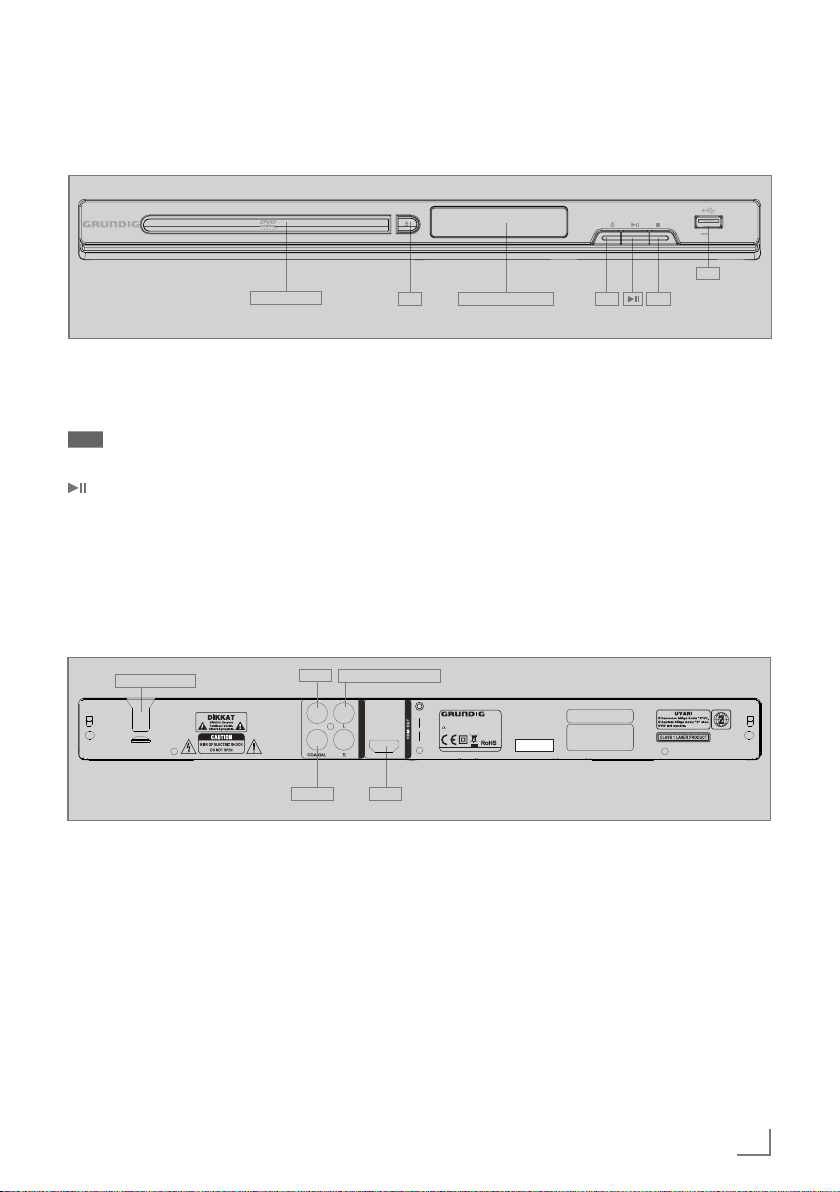
DVD oynatıcı kontrolleri
Cihazın ön görünümü
Disk bölmesi
9 Cihazı bekleme modundan çalış-
maya geçirir ve tekrar kapatır.
. Disk bölmesini açar veya kapatır.
Cihazın led gösterge ekranı
(5 hane 7 segment ).
Oynatmayı başlatır ve duraklatır.
7 Oynatmayı durdurur.
USB MP3 çalar, USB hafıza çubuğu ya
da kart okuma aparatı bağlamak
için USB girişi.
Cihazın arka görünümü ve bağlantılar
.
Led gösterge ekranı
5V 500 mA
USB
7
9
VİDEO
VIDEO
COAXIAL
2-CH AUDIO OUT L/R
AUDIO / VIDEO OUT
HDMI
Elektrik Kablosu
110 -240 V Elektrik kablosu.
HDMI
OUT
2-CH
AUDIO
TV bağlantısı için video/ses çıkış
soketi (dijital sinyal).
Ses sistemi bağlantısı için ses çıkış
soketleri (sol/sağ analog kanal).
OUT L/R
COAXIAL Dijital çok kanallı video/ses amfisi
bağlantısı için ses çıkış soketi (koaksiyel).
VIDEO TV veya AV alıcısını bir RCA so-
ketiyle bağlamak için video çıkış
soketi.
DVD Oynat›c› GDP 5500
Gerilim: AC 110-240V
50/60 Hz 12 W
˜
Dikkat :Cihaz›n›z›n kapa¤›n›
açmadan önce fiini prizden çekiniz.
Arçelik A..
Manufactured under license from Dolby
Laboratories. Dollby and the double-D
symbol are trademarks of Dolby Laboratories.
Covered by one or more of the following
U.S. Patents: 7,295,673; 7,460,668;
7 ,515, 710; 7,519,274
®
DivX
Stock No: 8929281600
Serial No: YY100001MM
Made in P.R.C.
, DivX Certified® and associated logos
are trademarks of Rovi Corporation or its
subsidiaries and are used under license.
TÜRKÇE
7
Page 8

GENEL BAKIŞ
-------------------------------------------------------------------------------------------------------------------------
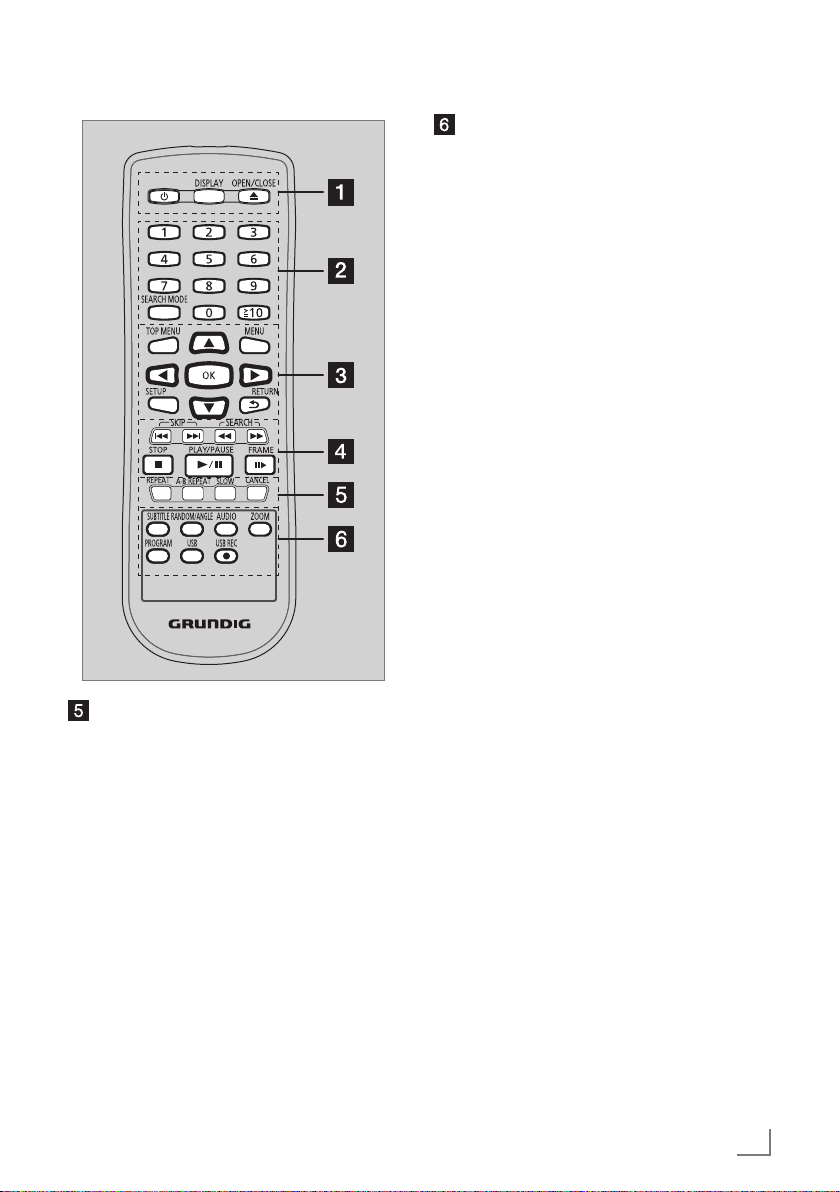
Uzaktan kumanda
Açma Kapama 9
Cihazı bekleme modundan çalışmaya geçirir ve tekrar kapatır. Cihazınız bekleme
modunda az miktarda güç harcamaktadır.
DISPLAY
Televizyon ekranında disk ve/veya oynatı-
lan dosya hakkında bilgiler görüntülenir.
OPEN/CLOSE .
Disk bölmesini açar veya kapatır.
0-9, 10
Başlık, bölüm, parça seçmekte kullanılır.
Örneğin: 5 için: 5
15 için: 10 5
SEARCH MODE
Arama fonksiyonunu başlatır.
1. ◂ ▸ tuşlarına basarak seçim yapılır.
2. 0 - 9 tuşlarına basarak konumu seçin.
3. OK tuşuna basın.
TOP MENU
Başlık menüsünü gösterir.
MENU
▯
Menüyü gösterir
▯
PBC (Oynatma Denetimi) destekleyen
VCD’lerde PCB özelliğini açar
▾ ▴
◂ ▸
▯
İmleç düğmeleri. İmleci seçenekler arasında sola, sağa, aşağı, yukarı kaydırır.
- Büyütülmüş resimleri ekranda kaydırır.
- JPEG dosyalarını çevirir
OK
Menülerdeki seçilmiş işlevleri teyit eder.
SETUP
Ana menüyü açar ya da kapatır.
RETURN
Önceki ekrana döner.
SKIP, ,
▯
Önceki ya da sonraki başlık/bölüm/
parça ya geçiş sağlar.
▯ PBC (Oynatma Denetimi) destekleyen
VCD’lerde MENU sayfasını değiştirir.
SEARCH, ,
Hızlı ileri / geri oynatma
STOP 7
Oynatmayı durdurma
PLAY/PAUSE /
Oynatmayı başlatma ve duraklatma
FRAME
Görüntüyü kare kare oynatır
8
TÜRKÇE
Page 9
GENEL BAKIŞ
REPEAT
Çeşitli tekrarlama modlarından birini seçmeyi sağlar.
Seçilebilir modlar oynatılan içeriğe göre
değişiklik gösterebilir.
REP DIR seçilen klasördeki aynı tip dosyaları çalar.
A-B REPEAT
Seçilen içerikte belirlenen A ve B noktaları
arasında tekrarlama yapar.
SLOW
Yavaş çekim oynatma modu.
CANCEL
Seçimleri iptal eder.
-------------------------------------------------------------------------------------------------------------------------
SUBTITLE
Altyazı gösterir ve farklı altyazı seçimini
sağlar.
RANDOM/ANGLE
Rastgele oynatmayı başlatır / Kamera
açısını değiştirir.
AUDIO
Görüntüye ait farklı ses kayıtlarının seçilmesini sağlar
ZOOM
Büyütme oranını değiştirir.
PROGRAM
Oynatma sırasının ayarlanmasını sağlar
1.
▾▴
◂▸
2. 0 - 9 tuşlarına basarak sıralamayı
belirtin
İptal etmek için CANCEL tuşuna basın
3.
◂▸
dosyayı seçin:
Tüm programı iptal etmek için CLEAR
tuşuna basın.
4. 4. Onaylamak için OK tuşuna basın.
USB
Disk modunda USB moduna geçmeyi ve
tekrar Disk moduna geçmeyi sağlar.
USB REC
Müzik CD’lerinden USB’ye kayıt yapmayı
sağlar
tuşlarına basarak dosya seçin.
▾▴
tuşlarına basarak çalınacak
TÜRKÇE
9
Page 10
BAĞLANTI VE HAZIRLIK
--------------------------------------------------------------------------------
Notlar:
7
Cihaz açıkken veya çalışırken HDMI ve di-
ğer bağlantıları yapmayın. Bağlantılarını
yapmadan önce diğer ekipmanları kapatmayı unutmayın.
7
Sadece harici cihazları bağladıktan sonra
cihazın fişini elektrik prizine takın.
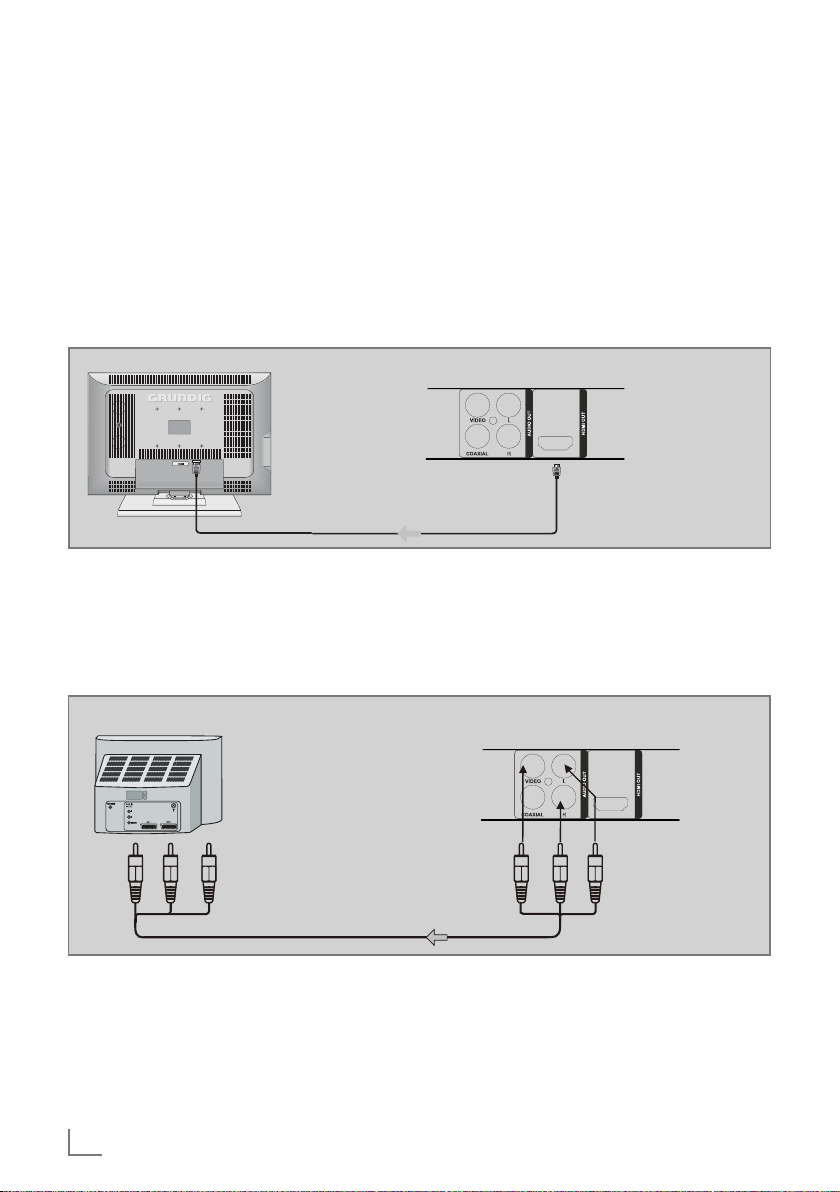
TV'nin HDMI kablo kullanılarak bağlanması
Televizyon
HDMI girişine
DVD Oynatıcı
HDMI çıkışına
1 Cihazın arka tarafındaki »HDMI« soketine ve
TV'deki ilgili sokete (HDMI) bir HDMI kablo
bağlayın.
TV'nin SES/VIDEO kablo kullanılarak bağlanması
Televizyon
Kırmızı
Beyaz
Sarı Sarı
Video girişlerine (sarı)
Ses girişlerine (kırmızı, beyaz)
DVD Oynatıcı
Kırmızı
Beyaz
1 Cihazın arkasındaki »VIDEO« soketine ve
TV'nin ilgili soketine (VIDEO IN) standart
kablo bağlayın.
2 Cihazın arkasındaki »2-CH AUDIO OUT«
soketlerine ve TV'deki ilgili soketlere (AUDIO
IN) standart kabloları bağlayın.
TÜRKÇE
10
Page 11
BAĞLANTI VE HAZIRLIK
VİDEO
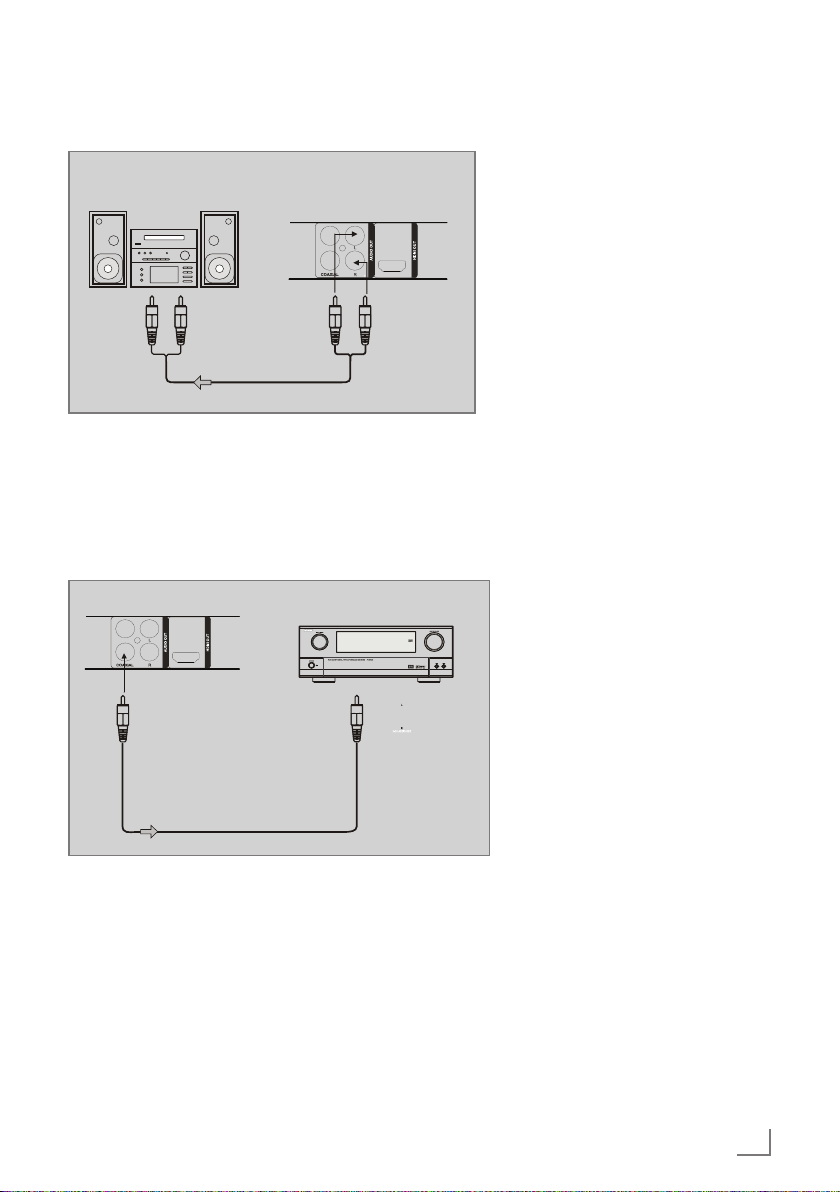
Ses sistemine bağlanması
--------------------------------------------------------------------------------
Ses Sistemi
Kırmızı
Beyaz
Amfinin ses girişlerine
DVD Oynatıcı
VİDEO
Kırmızı
Beyaz
1 Cihazın arkasındaki »2-CH AUDIO OUT«
soketlerine ve ses sistemindeki ilgili soketlere
(AUDIO IN) standart kabloyu bağlayın.
Dijital ses girişine ve TV donanımlı bir amfiye bağlantı
DVD Oynatıcı
KOAKSİYEL
tipte dijital ses
girişine
Amfi
Koaksiyel kablo
1 Cihazın arkasındaki »COAXIAL« soketine ve
amfinin ilgili soketine digital kabloyu bağlayın.
TÜRKÇE
11
Page 12

BAĞLANTI VE HAZIRLIK
--------------------------------------------------------------------------------
Bir MP3 çaların veya USB
hafıza çubuğunun bağlanması
5V 500 mA
Not:
7
Bu cihaz USB aygıtı bağlantısı yapılırken
veya aygıtı çıkartılırken kapatılmalıdır. Kapatılmazsa veriler kaybedilebilir.
7
Cihazınızda harici hdd sürücü desteklenme-
mektedir. Bu tip depolama aygıtlarını cihazınıza bağlamayınız.
1 »9« düğmesine basarak cihazı kapatın.
2 MP3 çaların USB arabirimini cihaz üzerindeki
(ön kapağın altında) »USB« soketine standart
bir USB kablosu kullanarak bağlayın;
ya da
USB hafıza çubuğunun USB ucunu cihazın
üzerindeki »USB« soketine takın.
Notlar:
7
MP3 çaları veya USB hafıza çubuğunu çı-
karmak için cihazı kapatın ve veri ortamı
kablosunu çıkartın.
7
Cihaz üzerindeki USB bağlantı girişi USB
uzatma kablosu bağlantısını desteklemez
ve doğrudan bilgisayara bağlanmak üzere
tasarlanmamıştır. USB Uzatma kablosuyla
Bilgisayara bağlantıyı desteklemez.
Elektrik prizine bağlantı
Notlar:
7
Tip etiketindeki (cihazın arkasında) şebeke
voltajının kendi yerel şebeke kaynağınızla
aynı olduğunu kontrol edin. Aynı değilse
yetkili satıcınıza danışın.
7
Elektrik fişini duvardaki prize takmadan
önce, diğer tüm bağlantıların yapıldığını
kontrol edin.
TÜRKÇE
12
1 Elektrik kablosunu duvardaki prize takın.
Uyarı:
7
Cihaz şebekeye elektrik kablosuyla bağ-
lanır. Cihaz sisteminin elektrik kaynağıyla
bağlantısını kesmek istiyorsanız, fişi prizden
çıkartın.
7
Cihaz çalışır haldeyken elektrik fişinin kolay
erişilebilir bir yerde durmasına ve diğer nesnelerin onu engellememesine dikkat edin.
Uzaktan kumanda cihazına
pillerin takılması
1 Kumandanın arka yüzündeki pil bölmesi kapa-
ğını açın.
2 Pili (mikro tip, 1 x 1,5 V, R 03/UM 4/AAA)
yerleştirirken pil bölmesinde gösterilen kutup
işaretlerine dikkat edin.
3 Pil bölmesinin kapağını kapatın.
Notlar:
7
Pilleri, örneğin doğrudan güneş ışığı, ısıtıcı-
lar ya da ateşten kaynaklanan aşırı sıcaklığa maruz bırakmayın.
7
Pilleri, bittiklerinde ya da cihazın uzun süre
kullanılmayacağını bildiğiniz zaman çıkarın.
Üretici, sızıntı yapan pillerden kaynaklanan
hasardan dolayı sorumluluk kabul etmez.
Çevre ile ilgili not:
7
Pilleri, ağır metal içermeyenler de dahil ol-
mak üzere ev atıklarıyla birlikte atmayın.
Kullanılmış pilleri her zaman yerel çevre
mevzuatı uyarınca atın.
Page 13
İLK KURULUM
---------------------------------------------------------------------------------------------------------------------
DVD oynatıcının çalıştırılması
1 Elektrik kablosunu duvardaki prize takın.
2 Cihaz üzerindeki »9« düğmesine basın.
– Ekranda şu görüntülenir: »LOAD«.
3 TV'yi çalıştırın, DVD oynatıcıyı bağlamak için
kullandığınız bağlantı yöntemiyle eşleşen giriş
seçeneğini TV'de seçin.
Not:
7
Cihazınız direk prize takıldığında veya
üzerindeki düğmeden kapatıldığında bekleme modunda olduğunu gösteren gösterge
yada ışık bulunmamaktadır.
Menüde gezinme
Cihazı çalıştırdığınızda cihazın logosu ekranda
otomatik olarak gösterilir. Eğer disk bölmesinde
disk yoksa »NODSC« yazısı ekrana gelir.
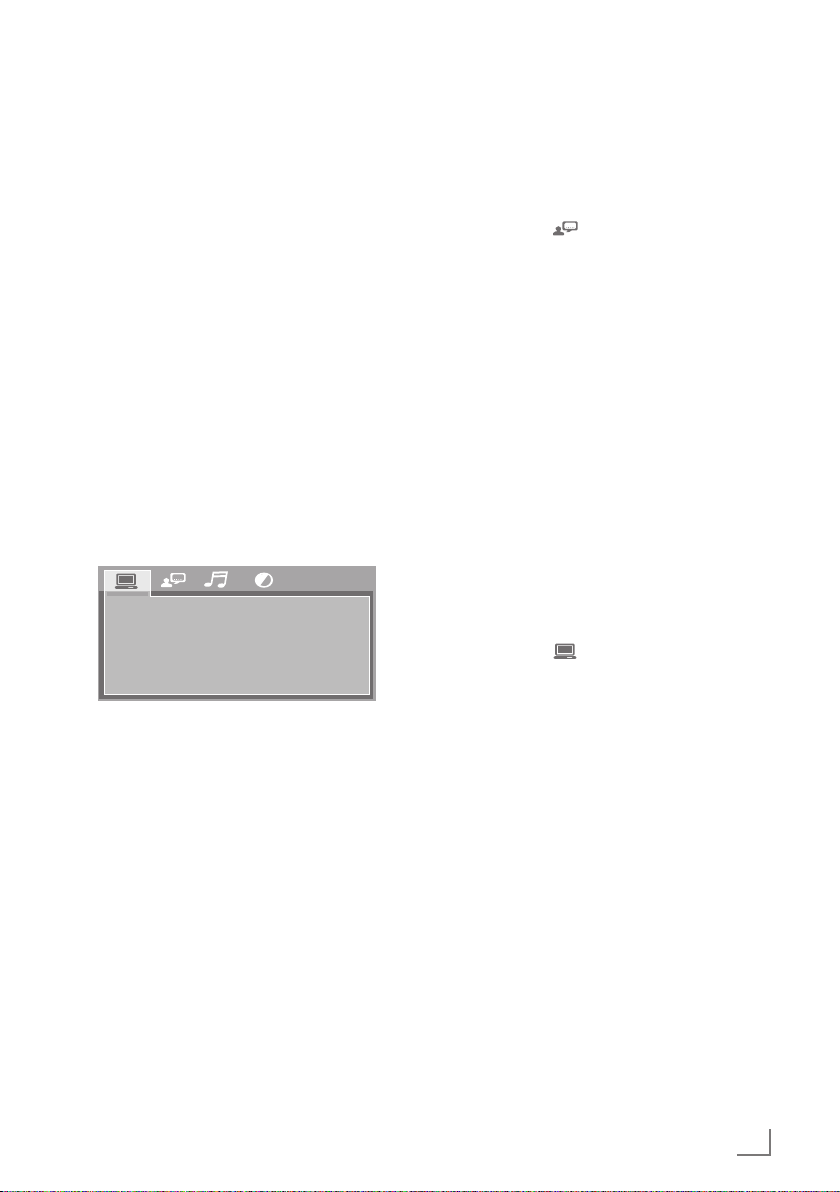
1 Ana menüyü açmak için »SETUP« düğmesine
basın.
TV SİSTEMİ
TV TİPİ
HD ÇIKIŞI
EKRAN KORUYU.
PAROLA
EBEVEYN
VARSAYILAN
2 Menüde dolaşmak için »▾«, »▴«, »◂« veya
»▸« imleç düğmelerini kullanın.
3 »OK« düğmesine basarak seçiminizi onaylayın.
4 Ana menüden çıkmak için »SETUP« düğmesine
basın.
Ekran menüsünün dilinin
seçilmesi
1 Ana menüyü açmak için »SETUP« düğmesine
basın.
2 Ana menüde » « seçeneğini, »◂« veya »▸«
düğmesini kullanarak seçin ve onaylamak için
»OK« düğmesine basın.
3 »Ekran Dili« seçeneğini »▾« veya »▴« düğ-
mesini kullanarak seçin ve onaylamak için
»OK« düğmesine basın.
4 İstediğiniz dili »▾« veya »▴« düğmesini kulla-
narak seçin ve onaylamak için »OK« düğmesine basın.
5 Ana menüden çıkmak için »SETUP« düğmesi-
ne basın.
DVD oynatıcının TV'ye
uyarlanması
TV sisteminin ayarlanması (TV normu)
1 Ana menüyü açmak için »SETUP« düğmesine
basın.
2 Ana menüde » « seçeneğini, »◂« veya »▸«
düğmesini kullanarak seçin ve onaylamak için
»OK« düğmesine basın.
3 »TV SİSTEMİ« seçeneğini »▾« veya »▴«
düğmesini kullanarak seçin ve onaylamak için
»OK« düğmesine basın.
4 PAL sistemi için »PAL« veya NTSC sistemi için
»NTSC« seçeneğini »▾« veya »▴« düğmesini
kullanarak seçin ve onaylamak için »OK« düğmesine basın.
5 Ana menüden çıkmak için »SETUP« düğmesi-
ne basın.
TÜRKÇE
13
Page 14
İLK KURULUM
---------------------------------------------------------------------------------------------------------------------
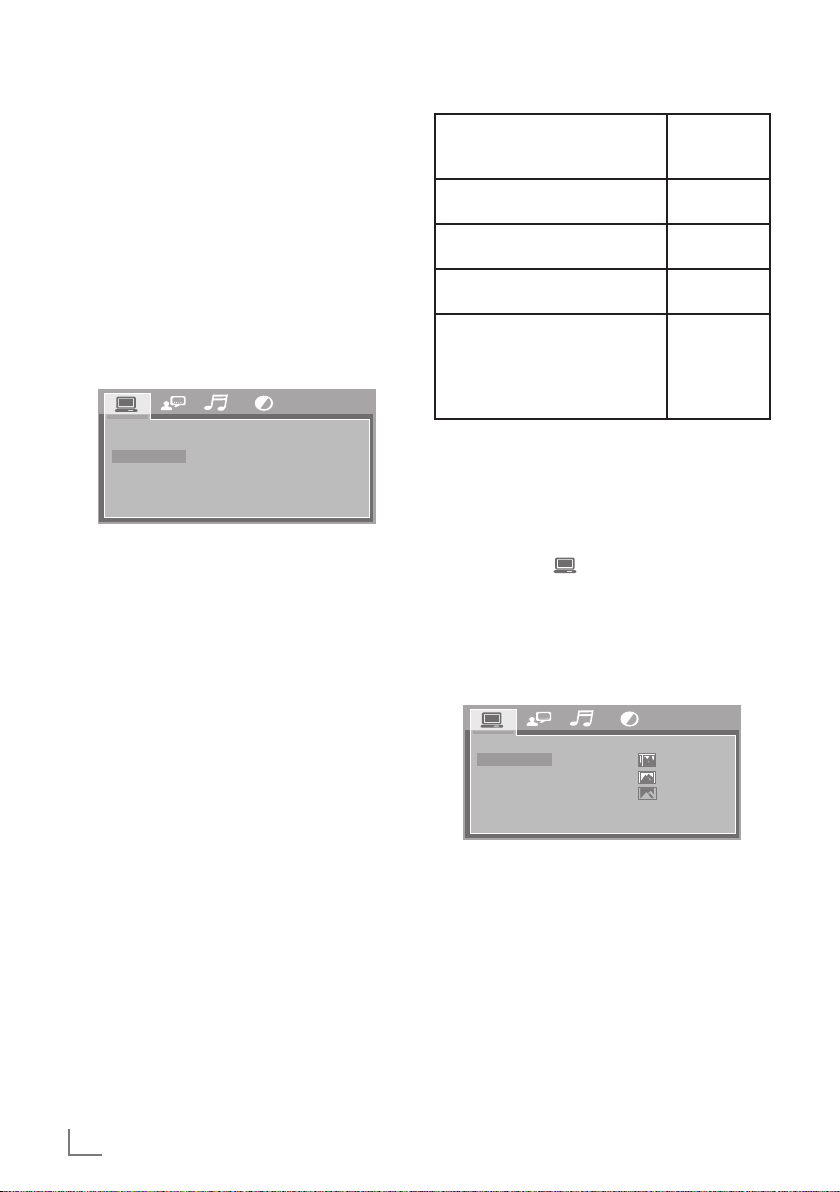
HDMI çözünürlüğünün ayarlanması
Bağladığınız TV'niz için ideal ayarı seçebilirsiniz. Rakamdan sonra gelen kısaltmanın anlamı:
Progressive (İlerlemeli), İnterlace (Geçişli).
Bu işlev yalnızca »HDMI« so ketine bir LED/
LCD-TV bağlandığı zaman seçilebilir.
1 Ana menüyü açmak için »SETUP« düğmesine
basın.
2 Ana menüde »HD ÇIKIŞI« seçeneğini, »◂«
veya »▸« düğmesini kullanarak seçin ve onaylamak için »OK« düğmesine basın.
TV SİSTEMİ
TV TİPİ
HD ÇIKIŞI
EKRAN KORUYU.
PARALO
EBEVEYN
VARSAYILAN
3 »HD ÇIKIŞI« seçeneğini »▾« veya »▴« düğ-
mesini kullanarak seçin ve onaylamak için
»OK« düğmesine basın.
4 Ayarı (»HD KAPAT«, »720p«, »1080i«,
»1080p«) »▾« veya »▴« düğmesini kullanarak seçin ve onaylamak için »OK« düğmesine
basın.
5 Ana menüden çıkmak için »SETUP« düğmesi-
ne basın.
Not:
7
Çıkış çözünürlüğü cihaza bağlanmış LED/
LCD-TV tipine bağlı olup aşağıdaki tabloda
anlatıldığı şekildedir:
HD KAPAT
720P
1080i
1080P
Doğru
LED/LCD-TV TİPİ
Çözünürlük
Ayarı
TV'niz standart tanımlı bir PAL
TV ise (SD TV)
TV'niz sadece 720p gösterebilen yüksek tanımlı TV (HDTV) ise
TV'niz sadece 1080i gösterebilen yüksek tanımlı TV (HDTV) ise
HD OFF
720p
1080i
TV'nize HDMI takılıysa ve TV'niz
1080p (her kare hızında) gösterebilen yüksek tanımlı bir TV
ise (HDTV) ve TV'nize HDMI ile
1080p
(HDMI)
bağlantı kurulmuşsa,
TV formatının seçilmesi
Bu ayar TV'nize bağlıdır.
1 Ana menüyü açmak için »SETUP« düğmesine
basın.
2 Ana menüde » « seçeneğini, »◂« veya »▸«
düğmesini kullanarak seçin ve onaylamak için
»OK« düğmesine basın.
3 »TV Tipi« seçeneğini »▾« veya »▴« düğmesini
kullanarak seçin ve onaylamak için »OK« düğmesine basın.
TV SİSTEMİ
TV TİPİ
HD ÇIKIŞI
EKRAN KORUYU.
PARALO
EBEVENY
VARSAYILAN
4 Ayarı (»4:3/PS «, »4:3/LB«, »16:9«) »▾«
veya »▴ düğmesini kullanarak seçin ve onaylamak için »OK« düğmesine basın.
5 Ana menüden çıkmak için »SETUP« düğmesi-
ne basın.
4:3PS
4:3LB
16:9
14
TÜRKÇE
Page 15
DVD OYNATMA
---------------------------------------------------------------------------------------------------------------
DVD'nin özel nitelikleri
Bir DVD'yi etiketindeki
logosundan tanımlarsınız.
Disklerde DVD içeriğine
bağlı olarak bir veya
daha fazla parça vardır.
Her bir parçada bir veya daha fazla bölüm yer
alır. Parçayı ve bölümü seçmek basit ve pratiktir.
DVD'yi, televizyon ekranında açılan DVD oyna-
tıcı menüsünü kullanarak kontrol edip oynatabilirsiniz.
Hazırlık
1 TV'yi çalıştırın, DVD oynatıcıyı bağlamak için
kullandığınız bağlantı yöntemiyle eşleşen giriş
seçeneğini TV'de seçin.
2 DVD oynatıcıya bir ses sistemi veya bir AV alı-
cısı bağlanmışsa çalıştırın ve DVD oynatıcı için
ses girişini seçin.
3 DVD oynatıcıyı çalıştırın.
– Bölmede herhangi bir disk yoksa, kısa bir
süre sonra ekranda »NODSC« ibaresi görüntülenecektir.
– Bir disk takılmışsa, taranır ve ekranda
»LOAD« ibaresi gözükür.
Diskin takılması
1 Disk bölmesini açmak için ».« düğmesine basın.
– Ekranda şu görüntülenir: »OPEN«.
2 Diski etiketi yukarı bakacak şekilde bölmeye
yerleştirin.
3 Disk bölmesini kapatmak için ».« düğmesine
basın.
– Ekranda şu görüntülenir: »CLOSE« ve sonra
»LOAD«; disk taranır ve diskin toplam süresi
gösterilir.
– Disk menüsü otomatik olarak açılır.
Oynatma
1 Bu seçenek mevcut ise imleç düğmelerini kulla-
narak »Oynat« komutunu seçin ve »OK« düğ-
mesine basın;
ya da
oynatmayı başlatmak için » « düğmesine ba-
sın.
– Oynatma işlemi başlar.
Not:
7
Televizyon ekranında »GEÇERSİZ GİRİŞ«
işareti gözükürse seçilen işlev bu disk için
geçersizdir.
2 Oynatmayı duraklatmak için » « düğmesine
basın (kare dondurma).
3 Oynatmayı sürdürmek için » « düğmesine
basın.
4 Oynatmayı durdurmak için »7« düğmesine
basın.
5 Normal oynatmayı sürdürmek için » « düğ-
mesine basın.
6 Oynatmayı bitirmek için »7« düğmesine iki
kez basın.
Diskin çıkartılması
1 Disk bölmesini açmak için ».« düğmesine ba-
sın.
2 Diski bölmesinden çıkartın.
3 Disk bölmesini kapatmak için ».« düğmesine
basın.
İlave oynatma işlevleri
Not:
7
İşletim sırasında TV ekranında »GEÇERSİZ
GİRİŞ« işareti görünebilir. »GEÇERSİZ GİRİŞ« işareti ilgili işleme cihaz ya da disk tarafından izin verilmediği anlamına gelir.
Not:
7
Bazı disk menüleri ilk önce sizi menü dilini
seçmeye yönlendirir. Bu gerçekleşirse imleç
düğmelerini kullanarak dili seçin ve »OK«
düğmesine basın.
Bilgilerin görüntülenmesi
Başlık, bölüm, oynatma süresi ve daha fazla bilgiyi ekranda görüntüleyebilirsiniz.
TÜRKÇE
15
Page 16

DVD OYNATMA
---------------------------------------------------------------------------------------------------------------
1 Uzaktan kumandada »DISPLAY« düğmesine
basın.
–Ekrana bilgi satırları gelir.
2 Uzaktan kumandada tekrar »DISPLAY« düğ-
mesine basın.
–Ekrana ek bilgi satırları gelir.
3 Bu işlevi sonlandırmak için uzaktan kumanda-
da »DISPLAY« düğmesine basın.
–Bilgi satırları kaybolur.
Disk menüsünde dolaşma
Diskte seçim yapabileceğiniz birden fazla başlık
ve bölüm bulunabilir.
1 Uzaktan kumanda üzerindeki »MENU« düğ-
mesine basın.
– Diskin ana menüsü açılır.
2 İmleç düğmelerini kullanarak istediğiniz başlı-
ğı seçin ve »OK« düğmesine basarak onaylayın.
3 Seçilen başlıkta imleç düğmelerini kullana-
rak istediğiniz bölümü veya parçayı seçin ve
»OK« düğmesine basarak onaylayın.
4 Diskin ana menüsüne geri dönmek için uzak-
tan kumandadaki » MENU « düğmesine basın.
Hızlı ileri ve hızlı geri gitme
1 Oynatma esnasında disk içerisinde hızla geri
gitmek için uzaktan kumandada » « düğmesine veya hızla ileri gitmek için uzaktan kumandada » « düğmesine basın.
Not:
7
Tuşa arka arkaya bastığınızda her basışta
hızlı ileri veya hızlı geri gitme hızı değişir.
Hız değişimi şu sıraya göre olur: X2, X4, X8,
X20.
2 Normal oynatmayı sürdürmek için » « düğ-
mesine basın.
– Oynatma devam eder.
Önceki ve sonraki bölümlerin
seçilmesi
1 Oynatma sırasında önceki bölümü oynatmak
için » « düğmesine veya sonraki bölümü oy-
natmak için » « düğmesine basın.
– Tuşu bıraktığınızda cihaz geçerli bölümü
atlayarak seçilen bölümden oynatmaya
başlar.
Arama fonksiyonları
1 İstenen başlık, bölüm ve süreye gitme fonksiyo-
nunu açmak için »SEARCH MODE« düğme-
sine basın
2 İstediğiniz modu »▾« veya »▴« düğmesini
kullanarak seçin »OK« düğmesine basın.
3 Seçilen modda oynatmak istediğiniz noktayı
seçmek için rakam düğmelerine basın.
Not:
7
Örneğin, 4. başlığı seçmek için sırasıyla
»0«, »4« düğmelerine basmalısınız.
– Seçilen nokta otomatik olarak oynatılma-
ya başlar.
Resmi büyütmek veya küçültmek
(sadece DVD)
1 ZOOM 2, ZOOM 3, ZOOM 4, ZOOM 1/2,
ZOOM 1/3, ZOOM 1/4, ZOOM OFF ara-
sında geçiş yapmak için »ZOOM« düğmesine
arka arkaya basın.
– Ekranda şu görüntülenir:
»ZOOM 2«, resmin seçilen kısmı 2 kat
büyütülür;
»ZOOM 3«, resmin seçilen kısmı 3 kat
büyütülür.
»ZOOM 4«, resmin seçilen kısmı 4 kat
büyütülür.
» ZOOM 1/2«, resmin seçilen kısmı 1/2 kat
küçültülür.
» ZOOM 1/3«, resmin seçilen kısmı 1/3 kat
küçültülür.
» ZOOM 1/4«, resmin seçilen kısmı 1/4 kat
küçültülür.
16
TÜRKÇE
Page 17

DVD OYNATMA
---------------------------------------------------------------------------------------------------------------
Not:
7
Resmi ekranda »▾«, »▴«, »◂« veya »▸«
düğmesiyle kaydırabilirsiniz.
2 İşlevden çıkmak için »ZOOM OFF« ibaresi
belirinceye kadar »ZOOM« düğmesine tekrar
basın.
– Ekrandaki görüntü normal boyutuna gelir.
Bir bölümü veya parçayı tekrar
etme
(DVD Disk tarafından kontrol edilir)
1 Oynatma sırasında tekrarlama modunu seç-
mek için »REPEAT« düğmesine arka arkaya
basın: »KAPALI«, »BÖLÜM«, »BAŞLIK«,
»TÜMÜNÜ TEKRARLA«.
– Ekranda şu görüntülenir: »BÖLÜM«, geçerli
bölüm tekrar edilir.
– Ekranda şu görüntülenir: »BAŞLIK«, geçerli
başlık tekrar edilir.
– Ekranda şu görüntülenir: »TÜMÜNÜ TE-
KRARLA«, tüm disk tekrar edilir.
2 İşlevden çıkmak için »KAPALI« seçin.
Seçilen bir bölümün tekrar edilmesi
(DVD Disk tarafından kontrol edilir)
1 Oynatma sırasında tekrar edilecek bölümün
başlangıcını seçmek için »A-B REPEAT« düğmesine basın.
– Ekranda şu görüntülenir: »TEKRARLA A-«,
bölümün başlangıç noktası seçilmiştir.
2 Bitiş noktasını seçmek istediğinizde tekrarla-
nacak bölümün bitişini seçmek için »A-B RE-
PEAT« düğmesine tekrar basın.
– Ekranda şu görüntülenir: »TEKRARLA
A-B«, bölümün bitiş noktası seçilmiştir. Seçi-
len bölüm tekrar edilmeye başlar.
3 Bu işlevi sonlandırmak için »A-B İPTAL« gö-
rüntüleninceye kadar »A-B REPEAT« düğmesine tekrar basın.
Bölüm veya parçaların rastgele
sırada çalınması
1 Oynatma sırasında »RANDOM/ANGLE«
düğmesine basın.
– Ekran: »KARIŞIK«.
– Rastgele çalma otomatik olarak başlar.
2 Bu fonksiyondan çıkmak için oynatma esnasın-
da »RANDOM/ANGLE« düğmesine tekrar
basın.
– Ekran: »KAPALI« yazısı ekrandan silinir.
Altyazıların seçilmesi ve görüntülenmesi
Diskte altyazı varsa TV ekranınızda görüntülenebilir. Altyazılar çeşitli dillerde mevcutsa istediğinizi seçebilirsiniz.
1 Oynatma sırasında, uzaktan kumanda üzerin-
deki »SUBTITLE« düğmesine basın.
– »KAPALI«.
2 »SUBTITLE« düğmesini kullanarak istediğiniz
seçeneği seçin ve »OK« düğmesine basarak
onaylayın.
3 Altyazıları kapatmak için adım 1 deki »Altyazı
Kapalı« ibaresi görününceye kadar »SUB-
TITLE« düğmesine tekrar basın.
Notlar:
7
Altyazıyı disk menüsünden de ayarlayabilir-
siniz. "Disk menüsünde dolaşma" bölümüne
bakın.
Başlık menüsü
Diskte açılır menü veya başlık menüleri varsa bu
fonksiyonu kullanabilirsiniz.
1 Oynatma sırasında açılır menüyü veya başlık
menüsünü açmak için »TOP MENU« düğme-
sine basın.
2 İmleç düğmelerini kullanarak istediğiniz seçe-
neği seçin ve »OK« düğmesine basarak onay-
layın.
3 İşlevden çıkmak için »TOP MENU« düğmesi-
ne tekrar basın.
TÜRKÇE
17
Page 18

DVD OYNATMA
---------------------------------------------------------------------------------------------------------------
Belirli sahnelerde kamera açısını
seçme
Bazı disklerde aynı sahne veya farklı kamera
açılarından yapılmış çekimleri bulunur.
1 Oynatma sırasında, uzaktan kumanda üzerin-
deki »RANDOM/ANGLE« düğmesine basın.
– Açı menüsü gözükür.
2 »RANDOM/ANGLE« düğmesine ard arda
basarak istediğiniz açıyı seçin ve »OK« düğmesine basarak onaylayın.
– Ekranda şu görüntülenir: örneğin »01/03«.
18
TÜRKÇE
Page 19
SES/GÖRÜNTÜ/VİDEO DOSYALARININ
OYNATILMASI
Bir veri cihazı ya da USB hafıza
çubuğu içeriğinin okunması
DVD oynatıcı temelde 2.0 versiyonunu desteklemekle birlikte eski 1.0 ve 1.1 versiyonları ile de
uyumludur. Bazı durumlarda farklı veri formatlarına bağlı olarak uyumsuzluk ortaya çıkabilir.
Standartlara uygun olmayan farklı format ve
parametreler nedeniyle, hata veya takılmayla
sonuçlanabilir. WMA(PCM) formatı Windows
medya oynatıcı özel formatıdır; sıkıştırılmış veri
bu cihazda oynatılabilir.
1 DVD oynatıcıyı »9« düğmesiyle kapatın.
2 Veri cihazını »USB« soketine standart bir USB
kablosu kullanarak bağlayın;
ya da
USB hafıza çubuğunun USB ucunu cihazın
üzerindeki »USB« soketine takın (“Bir MP3
çaların veya USB hafıza çubuğunun bağlanması” bölümüne bakın).
3 TV'yi çalıştırın, DVD oynatıcıyı bağlamak için
kullandığınız bağlantı yöntemiyle eşleşen giriş
seçeneğini TV'de seçin.
4 DVD oynatıcıyı »9« düğmesiyle çalıştırın. ci-
haz açıldığında ilk olarak CD sürücüsü oynatılır.
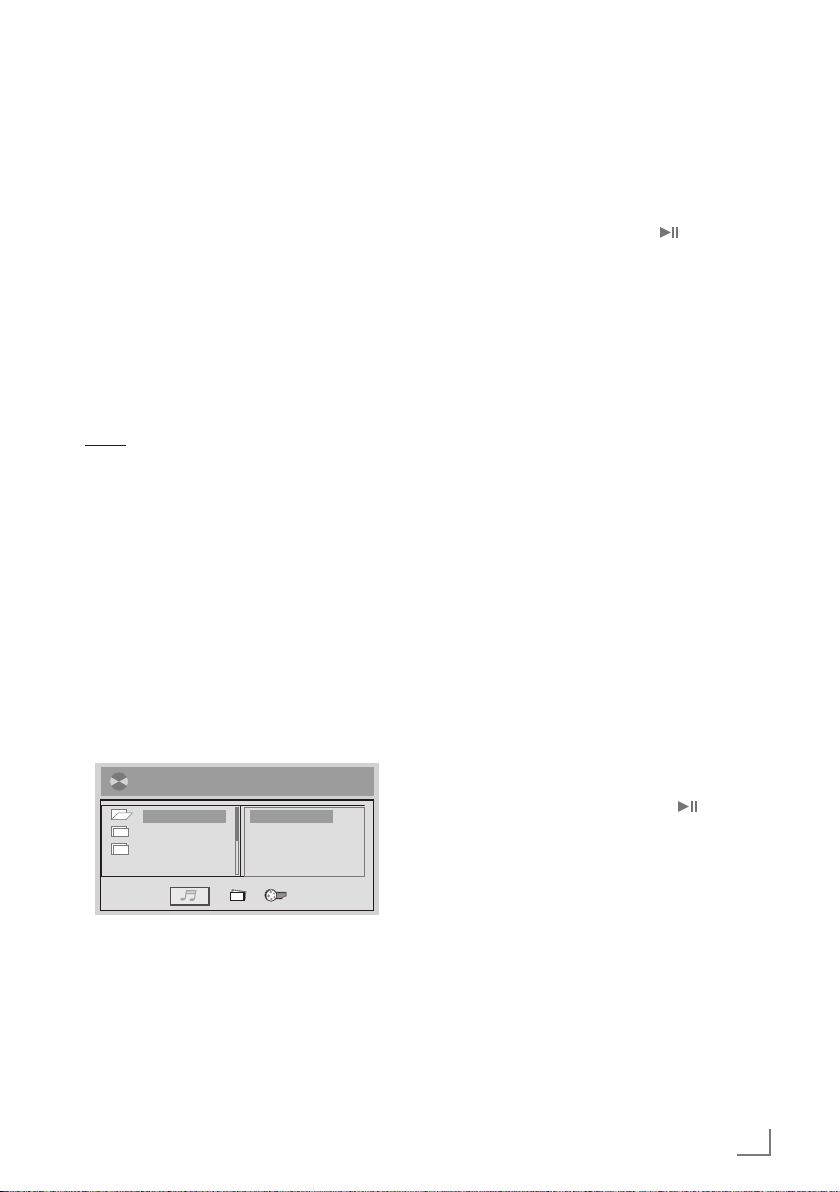
USB moduna geçmek için »USB« düğmesine
basarak ekrana gelen menüden »▾« veya
»▴« düğmelerini kullanın ve »OK« düğmesine
basarak onaylayın.
[1]————.MP3
01.1 01.————
02.2
03.3
Eğer birden fazla içerik mevcutsa (Resim , video veya müzik ) liste halinde ekranda görüntülenmez diğer içeriklere geçiş için »◂« veya
»▸« düğmesiyle en alttaki Resim,video,müzik
ikonlardan bir tanesini seçerek »OK« basın
------------------------------------------------------------------------------------------------------------------------
5 Klasör seçimi için »▾« veya »▴« düğmelerini
kullanın ve »OK« düğmesine basarak onay-
layın. Video, müzik veya görüntü dosyalarını
»▾« veya »▴« düğmeleriyla seçin ve »OK«
düğmesine basarak onaylayın.
6 Oynatmayı başlatmak için » « düğmesine
basın.
– Seçilen dosya oynatılmaya başlar.
7 Oynatmayı durdurmak için »7« düğmesine
basın.
Resim CD'lerinin oynatılması
1 DVD oynatıcıyı »9« düğmesiyle çalıştırın.
2 Disk bölmesini açmak için ».« düğmesine ba-
sın.
– Ekranda şu görüntülenir: »OPEN«.
3 İçinde resimler bulunan diski disk bölmesine
yerleştirin.
4 Disk bölmesini kapatmak için ».« düğmesine
basın.
– Cihazın ekranında şu görüntülenir: »CLOSE«.
– Cihazın ekranında şu görüntülenir: »LOAD«.
Ekranda resim dosyalarının ve klasörlerin bu-
lunduğu menü görüntülenir
5 Klasör seçimi için »▾« veya »▴« düğmelerini
kullanın ve »OK« düğmesine basarak onayla-
yın. Görüntü dosyalarını »▾« veya »▴« düğ-
meleriyla seçin ve »OK« düğmesine basarak
onaylayın.
6 Slayt gösterisini başlatmak için » « düğmesi-
ne basın.
– Resim diskindeki her bir resim arka arkaya
slayt gösterisi şeklinde gösterilir.
7 Oynatmayı durdurmak için »7« düğmesine
basın.
TÜRKÇE
19
Page 20
SES/GÖRÜNTÜ/VİDEO DOSYALARININ
OYNATILMASI
MP3 Ses CD'lerinin çalınması
1 DVD oynatıcıyı »9« düğmesiyle çalıştırın.
2 Disk bölmesini açmak için ».« düğmesine basın.
– Ekranda şu görüntülenir: »OPEN«.
3 Ses dosyalarını içeren diski disk bölmesine yer-
leştirin.
4 Disk bölmesini kapatmak için ».« düğmesine
basın.
– Ekranda şu görüntülenir: »CLOSE«.
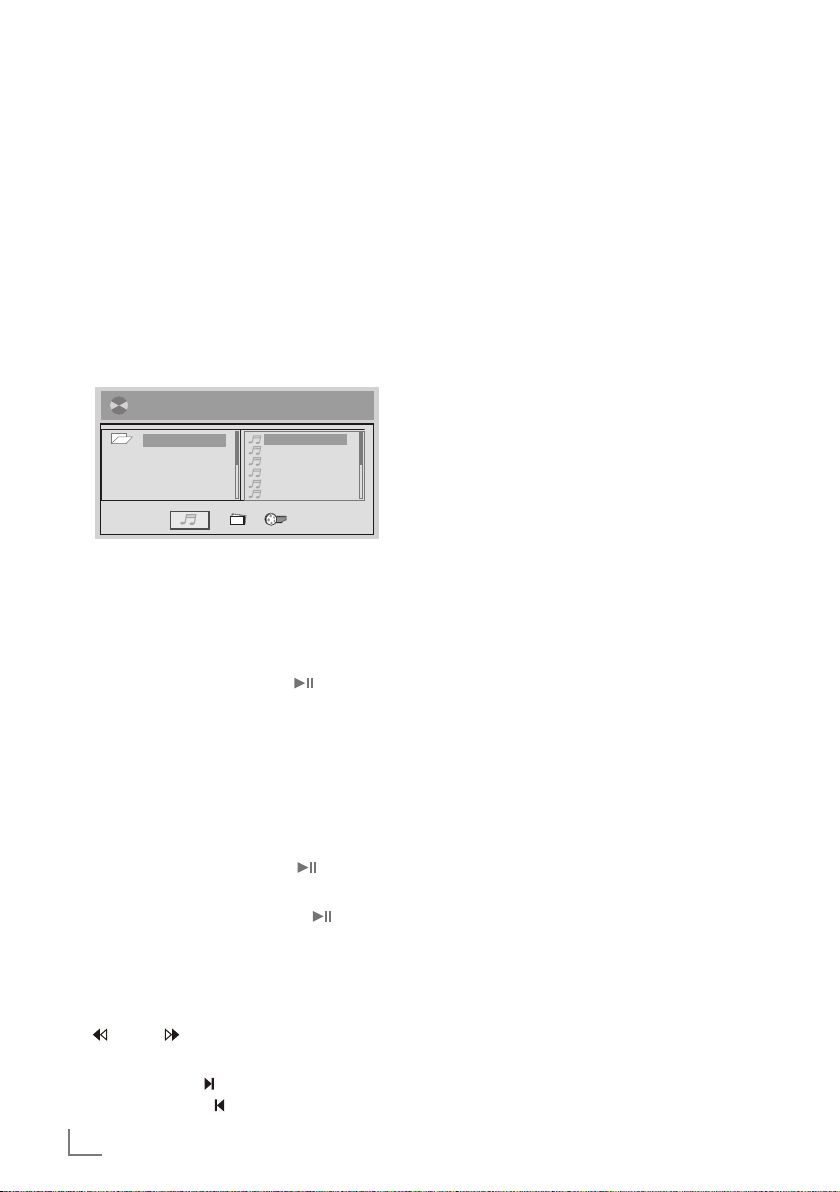
– »LOAD«, disk menüsü açılır.
[—]LE 6 ——01 VALENTI.MP3
01.—
5 Klasör seçimi için »▾« veya »▴« düğmelerini
kullanın ve »OK« düğmesine basarak onaylayın. Ses dosyalarını »▾« veya »▴« düğmeleriyla seçin ve »OK« düğmesine basarak onaylayın.
6 Oynatmayı başlatmak için » « düğmesine
basın.
– Seçilen klasör oynatılmaya başlar.
7 Oynatmayı durdurmak için »7« düğmesine
basın.
Ses/ Görüntü/Video dosyaları için
ilave oynatma işlevleri
7
Oynatmayı duraklatmak için » « düğmesine
basın.
7
Oynatmayı devam ettirmek için » « düğmesine tekrar basın.
7
Bir önceki menüye dönmek için »◂« düğmesine
basın.
7
Oynatma sırasında geri veya ileri gitmek için
» « veya » « düğmesine basın.
7
Oynatma sırasında istediğiniz bir sonraki parçayı/görüntüyü » « düğmesiyle veya bir önceki parçayı/resimi » « düğmesiyle seçin.
------------------------------------------------------------------------------------------------------------------------
7
Oynatma sırasında tekrarlama modunu seç-
mek için »REPEAT« düğmesine arka arkaya
basın:
– »TEKRARLA KAPALI«
– »TEKRARLA 1«
– »TEKRAR DIR«
– »TÜMÜNÜ TEKRARLA«
7
Görüntüyü döndürmek için »▾«, »▴«, »◂«
veya »▸« düğmesine arka arkaya basın.
Notlar:
7
Cihaz üzerindeki USB bağlantı girişi USB
uzatma kablosu bağlantısını desteklemez
001.BOA SINGLE
002.GUNS N' RO
003.JTL - A BE
004.JULIELONDO
001.MBC————0
001.MCB————0
ve doğrudan bilgisayara bağlanmak üzere
tasarlanmamıştır.
7
Bu cihazın USB girişi standart bir giriştir. Tek-
nolojideki hızlı gelişmeler ve her gün yeni
üreticilerin görülmesi nedeniyle USB hafıza
çubuklarının uyumluluğu sadece kısmi olarak sağlanabilmektedir.
7
Cihaza bağlanan USB aygıtı tanımıyorsa
veya düzgün okunamıyorsa bu durum cihazın arızalandığına işaret etmez.
7
EN 55022/EN 555024 standardında ITE
cihazları için tanımlandığı gibi çift yönlü veri
aktarımı yapılamaz.
7
USB aktarımı kendisinin bir işletim modu de-
ğildir. Sadece ilave bir fonksiyondur.
7
İşlem esnasında asla USB aygıtlarını çıkar-
mayın. Bu durum USB aygıtına ve cihaza
zarar verebilir. Bu gibi bir hasar garantinizi
geçersiz kılar.
7
Cihaz durma modunda iken, kart ve USB
takıp çıkartabilirsiniz.
7
Kart okunurken, DISC moduna dönmek için
»USB« düğmesine basın.
20
TÜRKÇE
Page 21
ÖZEL AYARLAR
-----------------------------------------------------------------------------------------------------------------
Genel Kurulum Ayarları
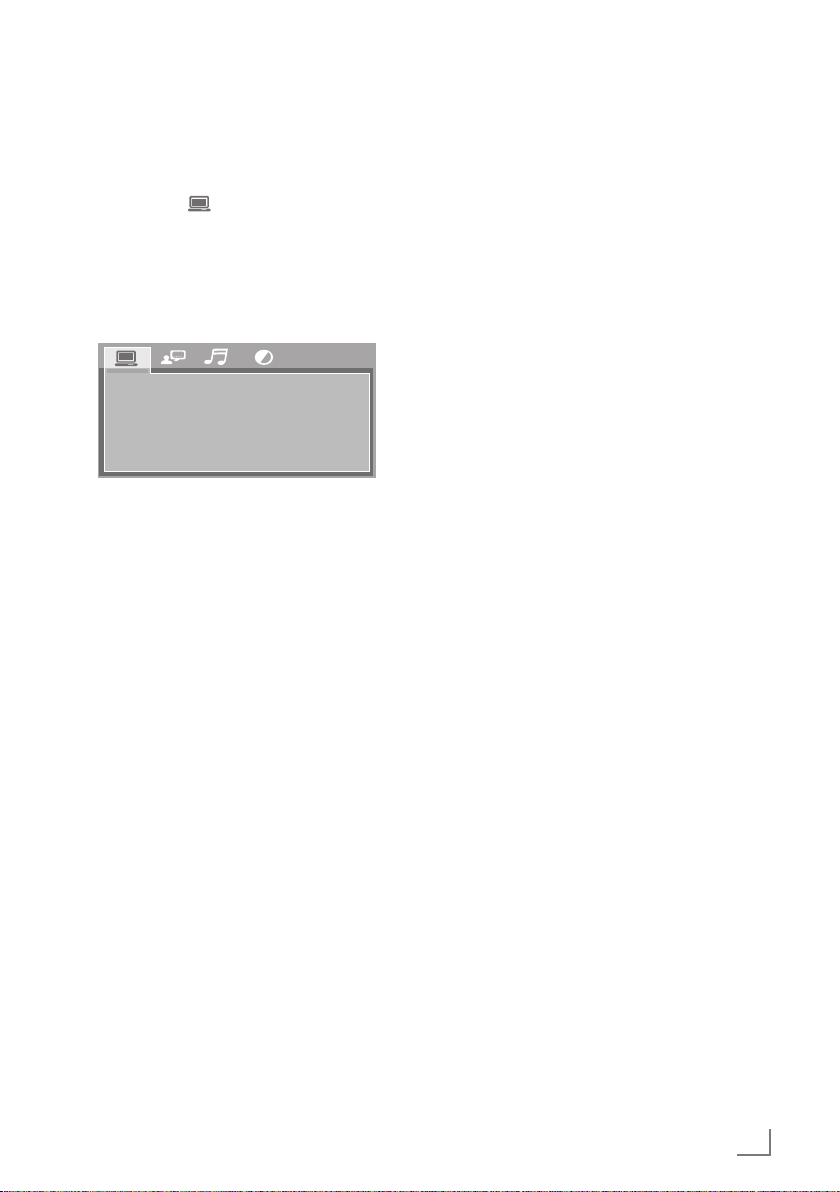
1 Ana menüyü açmak için »SETUP« düğmesine
basın.
2 Ana menüde » « seçeneğini, »◂« veya »▸«
düğmesini kullanarak seçin ve onaylamak için
»OK« düğmesine basın.
3 Gerekli işlevi »▾« veya »▴« düğmesini kulla-
narak seçin ve onaylamak için »OK« düğmesine basın.
TV SİSTEMİ
TV TİPİ
HD ÇIKIŞI
EKRAN KORUYU.
PAROLA
EBEVEYN
VARSAYILAN
4 İstenen ayarları »▾« veya »▴« düğmesini kul-
lanarak seçin ve onaylamak için »OK« düğmesine basın.
5 Ana menüden çıkmak için »SETUP« düğmesine
basın.
Görüntü menü ayarları
TV SİSTEMİ
Bu oynatıcı, NTSC ve PAL sistemleri de dahil
olmak üzere farklı TV çıkışlarını destekler.
TV’niz yalnızca NTSC veya PAL’ı destekliyorsa
ve yanlışlıkla hatalı TV türünü seçtiyseniz, TV görüntüsünde titreme meydana gelecek ve siyah
beyaz olacaktır.
TV TİPİ
TV Gösterimi menüsünden farklı ekran formatlarını ve TV ekranını seçebilirsiniz. Disk ve TV
arasındaki farklı eşleşmeler için çeşitli ekran formatları bulunmaktadır.
Not:
7
Hangi ekran formatı seçilirse seçilsin, standart
4:3 formatında kaydedilmiş bir görüntü her
zaman 4:3 en-boy oranında görüntülenir.
7
DVD başlıklarının ekran formatı değişebilir;
lütfen DVD başlığına eşlik eden bilgilere
başvurun.
7
DVD başlığı 16:9 geniş ekran formatında
kaydedilmişken TV standart 4:3 ekranlı bir
TV ise, görüntü yatay olarak sıkıştırılacaktır.
7
Bazı DVD başlıkları özel formatlarda kaydedilmiş olabilir. Bu gibi durumlarda, DVD
başlıkları, seçmiş olduğunuz TV ekranı formatından bağımsız olarak ekranda her zaman kendi orijinal formatlarında görüntülenecektir.
HD ÇIKIŞI
Bu seçenek cihazınızda izlediğiniz mevcut
DVD’nin TV çıkış çözünürlüğünü değiştirerek görüntü kalitesini yükseltir.
Ayarları »▾« veya »▴« düğmelerini kullanarak
seçin ve onaylamak için »OK« düğmesine basın.
Not:
7
Bu ayar seçeneği sadece HDMİ kablo ile
yapılan bağlantıda performans artışı sağlar.
EKRAN KORUYUCU
Cihazınızın açıkken hiçbir işlem yapılmadığında
ekran koruyucu devreye girerek TV’nizin panelin
ömrünü uzatır.
Ekran koruyucu açık ise, DVD oynatıcı belirli bir
süreyle boş kaldığında ekranda animasyon bir
görüntü belirecektir.
Ekran koruyucuyu açmak veya kapatmak için
»▾« veya »▴« düğmesini kullanarak seçin ve
onaylamak için »OK« düğ-mesine basın.
PAROLA
Parolayı değiştirebilirsiniz. Yeni şifrenizi oluşturmak için »1...0« arasındaki rakam düğmelerini
kullanarak 4 haneli bir rakam girin, »OK« ile
onaylayın. Lütfen seçtiğiniz şifreyi unutmayın.
Not: (İlk parola: 0000).Yeni şifreyi unutmamak
için not edin. Ebeveyn denetimi fonksiyonunu
ayarlamak için yeni şifreyi girmeniz gerekir.
EBEVEYN
Ebeveyn denetimi fonksiyonu, DVD’lere atanmış
olan farklı sansür sınıflarıyla bağlantılı olarak
çalışır. Bu sınıflar, ailenizin izlediği DVD türlerini
denetlemenize yardımcı olur.
TÜRKÇE
21
Page 22
ÖZEL AYARLAR
-----------------------------------------------------------------------------------------------------------------
DVD’ler için 8 sansür sınıfı bulunmaktadır.
– 1[Çocuklar için Güvenli]: Tüm çocuklar için
uygundur.
– 2[G]: Genel izleyici.
– 3[PG]: Ebeveyn yönlendirmesi önerilir.
– 4[PG-13]: 13 yaş altındakiler için uygun de-
ğildir.
– 5[PG-R]: Ebeveyn yönlendirmesi önerilir.
– 6[R]: Bir ebeveyn veya veli olmaksızın 17 yaş
altındaki kişiler için uygun değildir.
– 7[NC-17]:17 yaş altındakiler için uygun de-
ğildir.
– 8[Yetişkin]: Tüm diskler oynatılabilir.
Ebeveyn denetimini değiştirmek için »▾« veya
»▴« düğmesini kullanarak seçin ve onaylamak
için »OK« düğmesine basın.
Not:
7
Bu ayarı değiştirmek için parola girmeniz
gerekir. (İlk parola: 0000)
VARSAYILAN (Fabrika Ayarı)
Oynatıcının fabrika ayarlarını yeniden kurar. Sıfırlama işlemini gerçekleştirmek için »SIFIRLA«
seçerek »OK« ile onaylayın.
Fabrika ayarlarının yeniden kurulması "Ebeveyn
Kontrol Şifresi" ni sıfırlamaz.
Dil (Lisan) Ayarla
Bu ayar menüsü cihazın menu dili atyazı ve seslendirme gibi ayarları yapmanıza olanak tanır.
1 Ana menüyü açmak için »SETUP« düğmesine
basın.
2 Ana menüde » « seçeneğini, »◂« veya »▸«
düğmesini kullanarak seçin ve onaylamak için
»OK« düğmesine basın.
3 İstenen ayarları »▾« veya »▴« düğmesini kul-
lanarak seçin ve onaylamak için »OK« düğ-
mesine basın.
4 Ana menüden çıkmak için »SETUP« düğmesi-
ne basın.
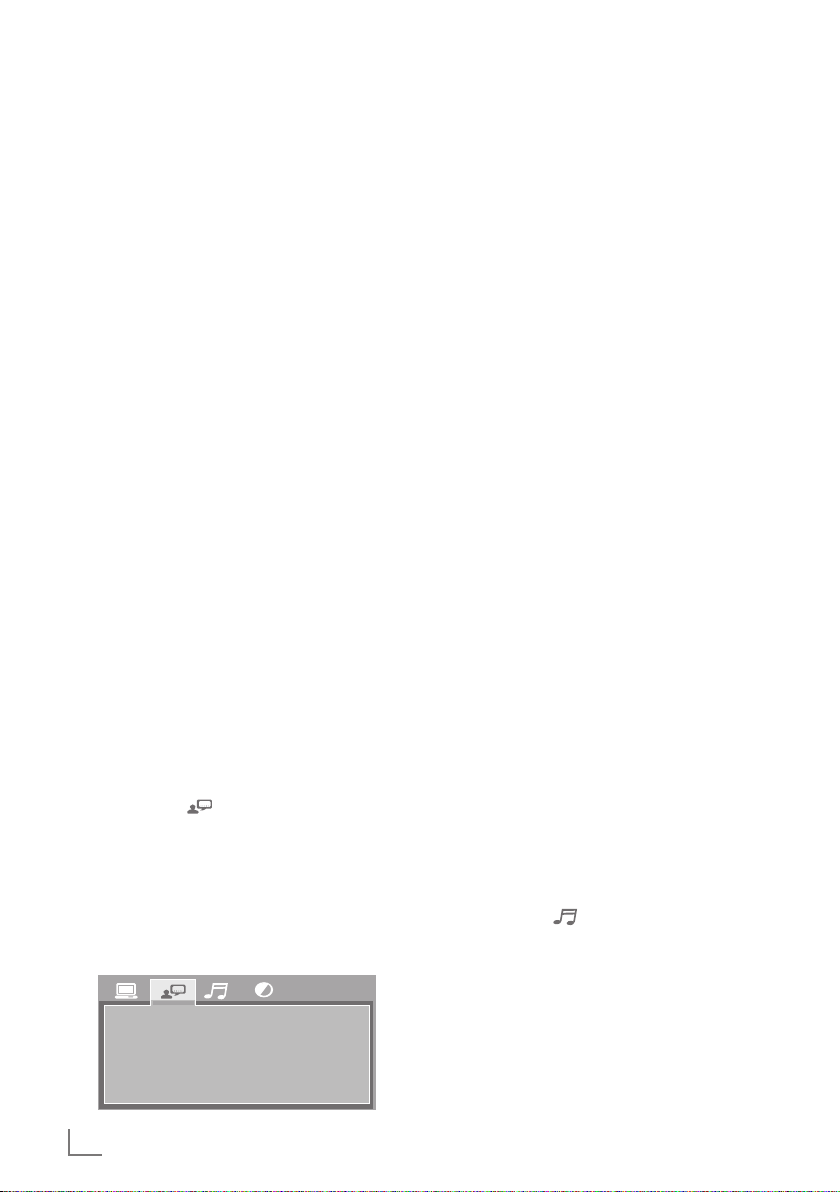
EKRAN DİLİ
KONUŞMA DİLİ
ALTYAZI DİLİ
MENÜ DİLİ
DIVX ALT. DİLİ
EKRAN DİLİ
Cihazınızın OSD menu ve ekran üstü menülerin
dil seçimini yapmanıza imkan tanır.
KONUŞMA DİLİ
Cihazınızda izlediğiniz DVD filmlerin seslendirme dilini seçmenize imkan tanır.
(DVD’nin bu özelliği destekliyor olması gerekir).
ALTYAZI DİLİ
Cihazınızda izlediğiniz DVD filmlerin altyazı dilini seçmenize imkan tanır.
(DVD’nin bu özelliği destekliyor olması gerekir).
MENÜ DİLİ
DVD oynatılırken tercih edilen menü dilini ayarlamanızı sağlar.
(DVD’nin bu özelliği destekliyor olması gerekir).
DIVX ALTYAZI DİLİ
Cihazınızda izlediğiniz Divx filmlerin altyazı dilini ayarlar. (İzlenen divx filmin bu özelliği destekliyor olması gerekir).
Not:
7
Bu özellik divx film izleme esnasında menü-
de aktif değildir.İzlenen divx filmin altyazı
dilini seçmek için »OPEN/CLOSE« düğmesine basarak disk bölmesini açın.
7
Daha sonra menüden DIVX ALTYAZI DİLİ ni
değiştirin.
Ses Ayarları
1 Ana menüyü açmak için »SETUP« düğmesine
basın.
2 Ana menüde » « seçeneğini, »◂« veya »▸«
düğmesini kullanarak seçin ve onaylamak için
»OK« düğmesine basın.
3 İstenen ayarları »▾« veya »▴« düğmesini kul-
lanarak seçin ve onaylamak için »OK« düğmesine basın.
22
TÜRKÇE
Page 23
ÖZEL AYARLAR
-----------------------------------------------------------------------------------------------------------------
4 Ana menüden çıkmak için »SETUP« düğmesi-
ne basın.
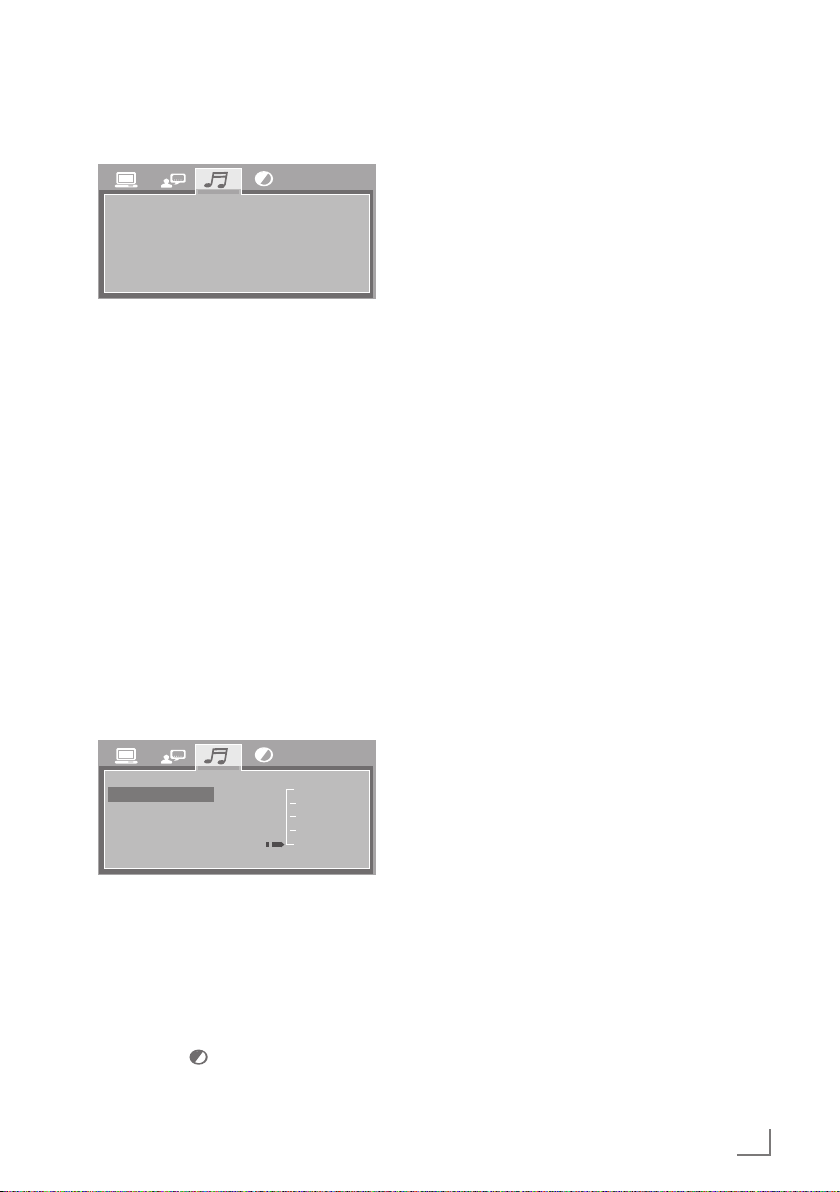
SES ÇIKIŞ
DİNAMK. ARALIK
Ses menüsündeki mevcut ayarlar
SES ÇIKIŞ: Ses çıkışlarını ayarlar. Bu DVD oynatıcı, üç tür ses çıkışı içerir:
– SPDIF Kapalı: 2-CH ses çıkışı için arka panel
bağlantıları üzerinden bir analog surround ses
format çıkışı sağlanmıştır.
– SPDIF/RAW veya SPDIF/PCM: Bu surround
ses formatı, ürünün arka panelindeki koaksiyel
konnektörler vasıtasıyla Dolby Digital / DTS
kodlu çıkış sağlar.
DİNAMİK ARALIK
Bu fonksiyon, rahatsızlığı önlemek için geceleri
yüksek sesli programları dinlerken kullanılır. Bu
ayar, ses düzeyini dinamik olarak düşürürken
orijinal ton kalitesini korur.
Bu, bir müzik parçasındaki en yüksek ve en
düşük ses kayıtları arasında yer alan, desibel
(dB) cinsinden ölçülen aralıktır.
SES ÇIKIŞ
DİNAMK. ARALIK
TAM
6 / 8
4 / 8
2 / 8
KAPA
Kalite Ayarları
Bu ayar menüsü izlediğiniz DVD filmin
Parlaklık,Kontrast vb ayarları yaparak görüntü
kalitesini iyileştirmeye yardımcı olur.
1 Ana menüyü açmak için »SETUP« düğmesine
basın.
2 Ana menüde » « seçeneğini, »◂« veya »▸«
düğmesini kullanarak seçin ve onaylamak için
»OK« düğmesine basın.
3 İstenen ayarları »▾« veya »▴« düğmesini kul-
lanarak seçin ve onaylamak için »OK« düğmesine basın.
4 Ana menüden çıkmak için »SETUP« düğmesi-
ne basın.
Parlaklık: Video çıkışının parlaklık seviyesini
ayarlar.
»▸« düğmesine bastığınızda ekranda değer
görüntülenir. Ayarlamak için »▾« veya »▴«
düğmesine basın ve onaylamak için »OK« düğmesine basın.
Menüye geri dönmek için »◂« düğmesine basın.
Kontrast: Video çıkışının kontrast seviyesini
ayarlar.
»▸« düğmesine bastığınızda ekranda değer
görüntülenir. Ayarlamak için »▾« veya »▴«
düğmesine basın ve onaylamak için »OK« düğmesine basın.
Menüye geri dönmek için »◂« düğmesine basın.
Renk Tonu: Video çıkışının renk sıcaklığını
ayarlar.
»▸« düğmesine bastığınızda ekranda değer
görüntülenir. Ayarlamak için »▾« veya »▴«
düğmesine basın ve onaylamak için »OK« düğmesine basın.
Menüye geri dönmek için »◂« düğmesine basın.
Doygunluk: Video çıkışının doygunluk seviye-
sini ayarlar.
»▸« düğmesine bastığınızda ekranda değer
görüntülenir. Ayarlamak için »▾« veya »▴«
düğmesine basın ve onaylamak için »OK« düğmesine basın.
Menüye geri dönmek için »◂« düğmesine basın.
Netlik: Video çıkışının netlik seviyesini ayarlar.
»▸« düğmesine bastığınızda ekranda değer
görüntülenir. Ayarlamak için »▾« veya »▴«
düğmesine basın ve onaylamak için »OK« düğmesine basın.
Menüye geri dönmek için »◂« düğmesine basın.
TÜRKÇE
23
Page 24
ÖZEL AYARLAR
-----------------------------------------------------------------------------------------------------------------
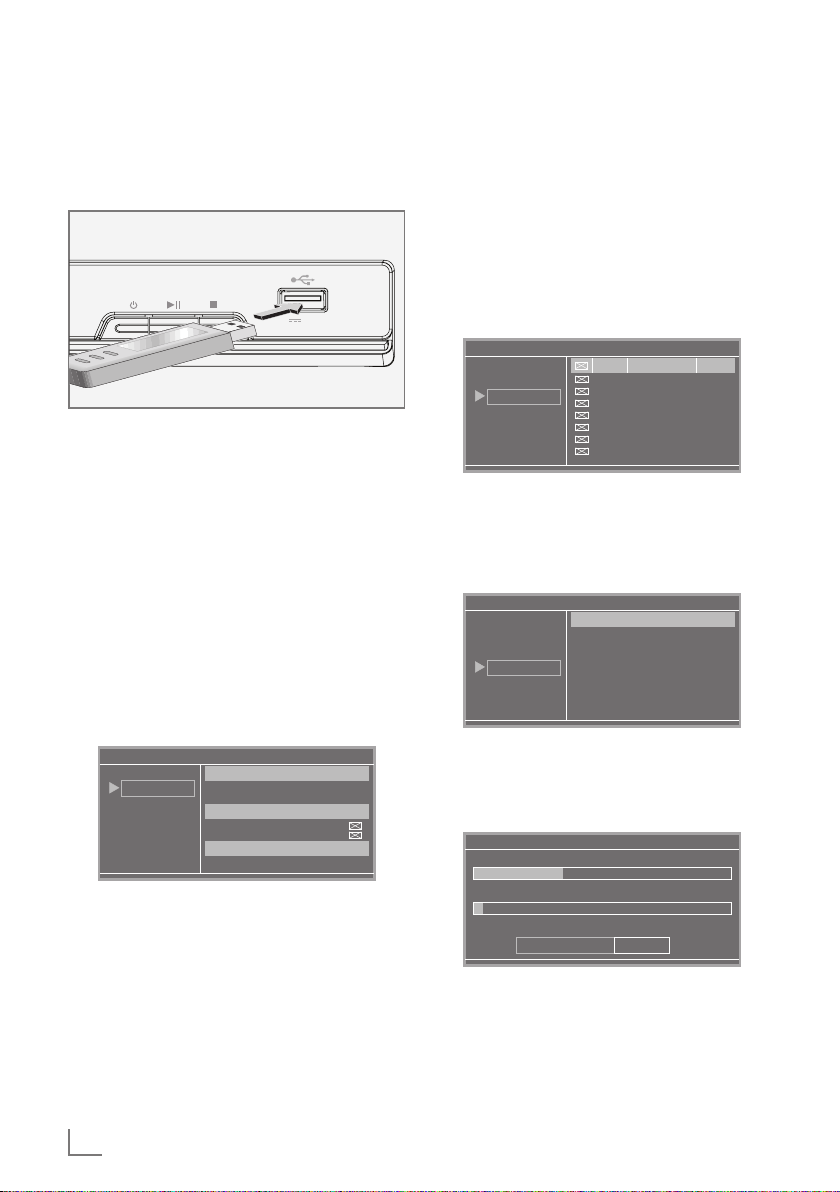
USB Kayıt Özelliği (Cd Rip)
Kayıt özelliği sayesinde cihazınızın disk bölmesinde oynattığınız Audio Track CD’lerini sıkıştırmak suretiyle USB belleğe kaydedebilirsiniz.
5V 500 mA
1 Kayıt özelliğini kullanmak için ilk olarak disk
bölmesine Audio Track CD takın.
2 USB girişine USB bellek yerleştirin ve
»USB REC« düğmesine basın.
3 Ekrana gelen kayıt menü ayarlarından »▸«
düğmesine bastığınızda ilgili ayar seçeneği
görüntülenir. Ayarları değiştirmek için »OK«
düğmesine basın.Menüye geri dönmek için
»◂« düğmesine basın.
4 BAŞLA seçeneğini »▾« veya »▴« düğmesini
kullanarak seçin kaydetmeye başlamak için
»OK« basın.
Seçenekler
Bu ayar menüsü kayıt ve sıkıştırma ayarlarını içerir.
RIP CD — BİLİNMEYEN ALBÜM
SEÇENEKLER
PARÇA
BAŞLA
ÇIKIŞ
HIZ: CD’den USB belleğe kayıt hızını değiştir-
mek için »OK« basın.
BİT ORANI: Sıkıştırma oranını değiştirerek
daha az yer kaplayan kayıtlar yapabilirsiniz.
Bit oranını değiştirmek için »OK« basın.Bit oranını arttırmak kayıt kalitesini yükseltir.
ID3 ETİKET OLUŞTUR: Bu seçenek destekle-
nen Track CD’deki Sanatçı,Albüm,Parça adı vb.
bilgilerde kaydedilir.
Bu seçeneği işaretlemek için »OK« basın.
TÜRKÇE
24
KODLAMA SEÇENEKLERİ
HIZ 4X
BIT ORANI 160KBPS
DOSYA SEÇENEKLERİ
ID3 ETİKET OLUŞTUR
MÜZİK LİSTE OLUŞTUR
KAYIT ORTAM SEÇENEĞİ
KAYIT ORTAMI USB
MÜZİK LİSTE OLUŞTUR: USB Bellekte klasör
oluşturarak müzikleri bu klasöre kaydeder.
Bu seçeneği işaretlemek için »OK« basın.
PARÇA
Bu alt ayar menüsünde Audio Track CD deki tüm
parçalar ve toplam süreleri ekranda gösterilir.
Menüde kaydetmek istemediğiniz parçaları »▾«
veya »▴« düğmesini kullanarak seçin ve işaretle-
mek için »OK« basın.
RIP CD — BİLİNMEYEN ALBÜM
SEÇENEKLER
PARÇA
BAŞLA
ÇIKIŞ
BAŞLIK SÜRE
PRÇ
1. PARÇA1 3:46
2. PARÇA2 4:00
3. PARÇA3 3:20
4. PARÇA4 4:04
5. PARÇA5 4:46
6. PARÇA6 3:05
7. PARÇA7 3:20
BAŞLA
Ekrana gelen pencerede Toplam kaydedilecek
parça sayısı ,süre ve boyut görüntülenir.Kaydetmeye başlamak için »OK« basın.
RIP CD — BİLİNMEYEN ALBÜM
SEÇENEKLER
PARÇA
BAŞLA
ÇIKIŞ
TOPLAM PARÇA 7
TOPLAM SÜRE 26:21
TOPLAM BOYUT 36.7MB
BAŞLAMAK İÇİN OK BASIN
Kayıt ekranında kaydedilen parça sırasına göre
işaret çubuğu ilerler.Kayıt esnasında hızı değiştirmek için »OK« basın. İptal etmek için »▸« düğmesiyle İPTAL seçerek »OK« basın.
PARÇA
PARÇA İŞLENİYOR
TOPLAM İŞLENEN
HIZ:1X
HIZI DEĞİŞTİR
İPTAL
Not:
7
Kayıt esnasında USB belleği çıkarmayın aksi
takdirde bellek veya içindeki veriler zarar
görebilir.
7
Kayıt özelliği için sadece USB bellek kulla-
nın.USB Hafıza kart dönüştürücü adaptörler
kayıtta çalışmamaktadır.
ÖZET
Page 25
BİLGİLER
------------------------------------------------------------------------------------------------------------------------------------------
Lisans koşulları
Dolby Laboratories lisan-
ticari markalardır.
bir sayısal video formatıdır. Bu ürün resmi DivX
Sertifikası® 'na sahip, DivX video oynatabilen bir
cihazdır. Daha fazla bilgi ve videolarınızı DivX
Video'ya çevirebilecek araçlar için divx.com sitesini ziyaret edin.
DIVX VIDEO-ON-DEMAND HAKKINDA: DivX
Video-on-Demand (VOD) servislerinden yararlanabilmek için cihazınızın kayıt ettirilmesi
gerekmektedir. Kayıt kodunuzu edinmek için cihazınızın ayarlar menüsünden DivX VOD bölümüne gidin. Kayıt işlemleri için daha detaylı bilgi
için vod.divx.com sitesini ziyaret edebilirsiniz.
DivX®, DivX Certified® ve ilgili logolar, Rovi Şirketinin ya da alt kuruluşlarının ticari markalarıdır
ve lisans ile korunmaktadır.
Lazerli cihazlar hakkında genel
bilgi
maksimum izin verilebilir emisyon değerini sağlayacak şekilde tasarlandığı anlamına gelmektedir.
sıyla üretilmiştir.
Dolby ve çift D simgesi
Dolby Laboratories'e ait
DIVX VIDEO HAKKINDA:
DivX®, Rovy Şirketi'nin
alt kuruluşu olan DivX,
LLC. firmasının yarattığı
Bu cihaz CLASS 1
LASER PRODUCT. 1.
Sınıf Lazerli Ürün, lazerin hiçbir koşul altında aşılamayacak
Uyarı:
7
Burada belirtilenler dışında çalıştırma araç-
ları ya da yöntemleri kullanılırsa, bu durum
tehlikeli biçimde emisyonlara maruz kalmaya yol açabilir.
7
Bu cihaz lazer ışını yaymaktadır. Göz yara-
lanmaları tehlikesinden dolayı, ünite sadece
eğitimli olan personel tarafından açılabilir
veya onarılabilir.
7
Burada belirtilen haricinde başka ayarlar
kullanılırsa veya diğer prosedürler gerçekleştirilirse, bu durumda tehlike arz eden radyasyona maruz kalınabilir.
Cihazın temizlenmesi
Elektrik kablosunu duvardaki prizden çıkartın.
Hafif deterjan solüsyonuyla biraz nemlendirilmiş
olan yumuşak bir bezle cihazı temizleyin. Alkol,
ispirto, amonyum veya aşındırıcı maddeler içeren solüsyonları kullanmayın.
Diskin temizlenmesi
Cihaz CD'leri tam okuyamıyorsa, lazer optik
donanımlarını temizlemek için satılan standart temizleme CD'si
kullanın.
Diğer temizleme yön-
temleri lazer optik donanımlarına zarar verebilir.
Disk üzerindeki parmak izleri, toz ve kirler gö-
rültü ve seste bozulmalara neden olabilir.
CD'yi temizlemek için hafif nemlendirilmiş temiz
ve yumuşak bir bez kullanın ve her zaman düz
bir çizgi halinde içeriden dışarıya doğru silin.
Plaklar için temizleme maddesi, solvent veya
aşındırıcı temizleyiciler kullanmayın.
TÜRKÇE
25
Page 26

BİLGİLER
------------------------------------------------------------------------------------------------------------------------------------------
Teknik veriler
Bu cihaz yürürlükteki AB direktiflerine göre parazit bastırma
sistemine sahip bir cihazdır.
Bu ürün 20 04/108/E C,
2006/95/EC, 2009/125/EC ve 2011/65/
EU direktiflerinde belirtilen gereklilikleri karşılamaktadır.
Sistem
Güç kaynağı
Çalışma voltajı: 110 - 240 V~
Ana şebeke frekansı: 50/60 Hz
Maks. güç tüketimi: 12 W
Bekleme modunda güç tüketimi: ≤ 0,5 W
Standart Oynatım
PAL, 50 Hz, 625 satır
NTSC, 60 Hz, 525 satır
Disk türleri
DivX (MPEG 4), DVD, DVD-R, DVD+R, VCD,
SVCD, CD, CD-R, CD-RW, MP3, WMA (PCM),
JPEG, XViD
USB
USB 2.0 uyumlu FAT 32/16
Ses formatı
Dolby Digital,
Boyutlar ve ağırlık
Boyutları: G x Y x D: 415 x 296 x 85 mm
Ağırlık: 1,7 kg
Teknik ve tasarım değişiklikleri yapma hakkı saklıdır.
TÜRKÇE
26
Page 27
BİLGİLER
------------------------------------------------------------------------------------------------------------------------------------------
Sorun Giderme
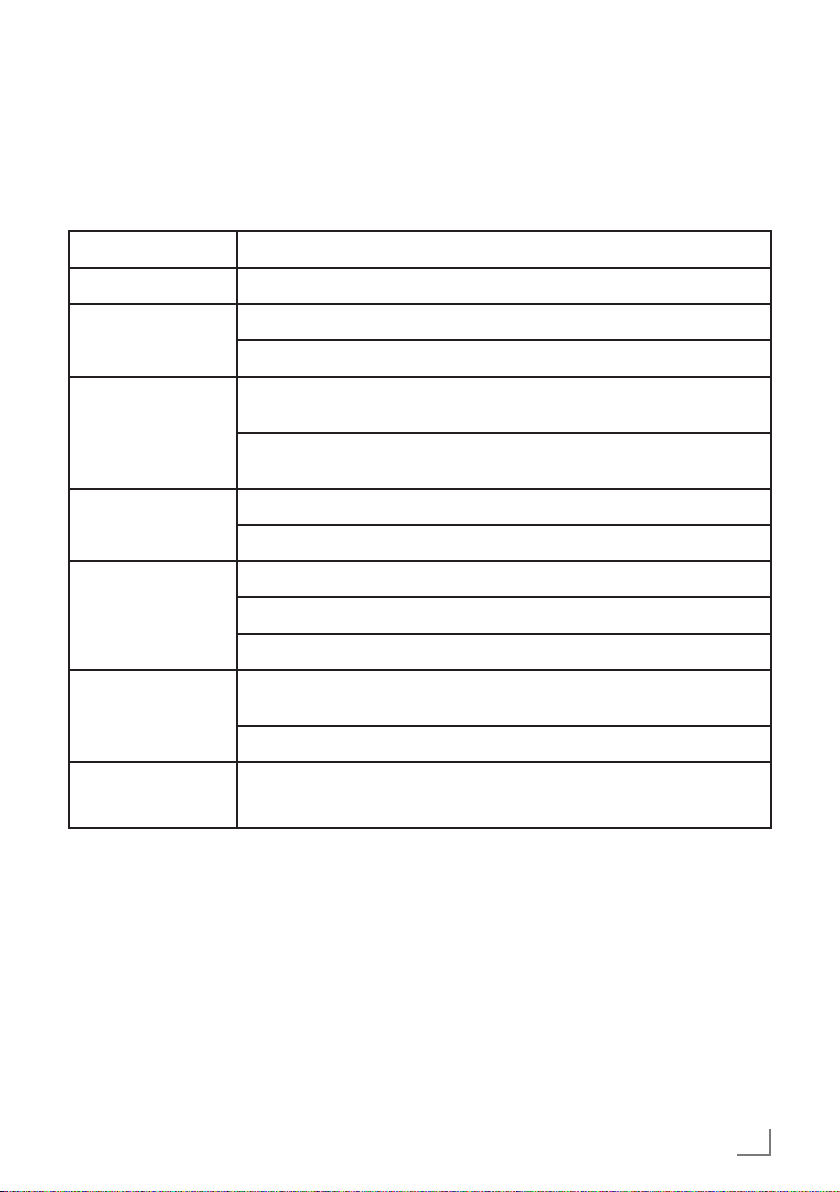
Onarım için en yakın servis merkezini veya yetkili satıcıyı aramadan önce sorunun olası nedeni
ve çözümü için lütfen aşağıdaki kılavuzu kontrol
edin.
BELİRTİ DÜZELTME YÖNTEMİ
Güç gelmiyor Elektrik bağlantısının düzgün olduğunu kontrol edin.
Görüntü yok
Ses yok
Oynatmıyor
Uzaktan kumandaya yanıt vermiyor
Görüntü Parazitli
Düğmelerle
çalıştırılmıyor
Oynatıcı ile TV arasındaki bağlantıları kontrol edin.
TV’nin düzgün çalıştığını kontrol edin.
Oynatıcı ile diğer cihazlar arasındaki bağlantıların düzgün olduğunu
kontrol edin.
TV’nin ve Amfinin düzgün çalıştığından ve doğru şekilde ayarlandığını
kontrol edin.
Diskin doğru şekilde yerleştirildiğini kontrol edin.
Diski temizleyin.
Uzaktan kumanda ile ünite arasındaki engelleri kaldırın.
Uzaktan kumandayı ön paneldeki alıcıya doğru tutun.
Pilleri kontrol edin ve gerekirse değiştirin.
Diskte kir veya çizik olup olmadığını kontrol edin. Diski temizleyin ya da
değiştirin.
Cihazı kapatın, on saniye bekleyin ve yeniden çalıştırın.
Elektrik dalgalanmaları veya başka bir elektriksel sorun.
Cihazı kapatın, on saniye bekleyin ve yeniden çalıştırın.
TÜRKÇE
27
Page 28

CONTENTS
----------------------------------------------------------------------------------------------------------------------------------
29 IMPORTANT SAFETY AND
ENVIRONMENT MEASURES
30 Warning for the Packaging!
30 Warning for the Battery!
30 Environmental note
30 Compliance with the Restriction of Use of
Prohibited Substances:
30 PCB Compliance:
30 Actions to Take for Energy Saving
31 GDP 5500
31 Packing contents
31 Special features
32 OVERVIEW
32 DVD player controls
33 Remote control
35 CONNECTION AND PREPARATION
35 Connecting TV with HDMI cable.
35 Connecting the TV using an AUDIO/VIDEO
cable
36 Connecting the device to the audio system
36 Connection to an amplifier with TV
equipment
37 Connecting an MP3 player or a USB
memory stick
37 Connecting to the mains supply
37 Putting batteries in the remote control
43 PLAYING AUDIO/PICTURE/VIDEO
FILES
43 Reading the contents of a data device or a
USB memory stick
43 Playing picture CDs
43 Playing MP3 audio CDs
45 SPECIAL SETTINGS
45 General Setup Page Settings
45 Existing settings in the General menu
46 Osd Language Setting
46 Audio Settings
47 Quality Settings
47 Usb Record Function (Cd Ripping)
48 Preparation
49 INFORMATION
49 License Terms
49 Cleaning the device
49 Cleaning the disc
50 Technical Data
50 System
51 Troubleshooting
38 INITIAL SETUP
38 Switching on the DVD player
38 Selecting the display language
38 Adapting the DVD player to the TV
39 Selecting the TV format
40 DVD Playback
40 Special features of the DVD
40 Preparation
40 Inserting the disc
40 Playback
40 Removing the disc
40 Additional playback functions
ENGLISH
28
Page 29

IMPORTANT SAFETY AND ENVIRONMENT MEASURES
---
Read and follow all of the warnings and instructions given on this manual and the device. Keep
this manual for future reference.
7
The device is designed for the playback of
video and audio signals from compact discs,
USB and similar data devices. Any other use is
expressly prohibited.
7
If you want to set up the device on wall shelves
or in cupboards, please ensure that it is adequately ventilated. There must be at least 10
cm of space at the side, above and behind the
device.
7
Do not cover the device with newspapers,
table cloths, curtains, etc. Do not place the
device on bed, coach, carpet or other similar
surfaces. Since the device on such surfaces is
not ventilated well, its electrical parts becomes
overheated. This overheating may lead to the
failure of device.
7
Do not place this device on trolleys, legs, tripods, brackets or tables which are not fixed.
If it falls, it may lead to severe injuries in the
children and adults and serious damage may
occur on the device.
7
When setting up the device, remember that
furniture is often coated with various types of
varnish and plastic, which often contain chemical additives. These additives may cause corrosion to the feet of the unit. This may leave
stains on the surface of the furniture which can
be difficult or impossible to remove.
7
If the device is exposed to sudden changes in
temperature, for example when taken from the
cold into a warm room, wait at least two hours
before using it.
7
This device is designed for closed spaces. If
you use it outdoors, make sure it is protected
from moisture such as dripping or splashing
water.
7
Use the device only in warm environments.
7
Do not place the device close to heating units
or under direct sunlight, as this will impair cooling.
7
Do not place any vessels containing liquids,
such as vases, on the device. Do not insert any
foreign objects in the disc compartment.
7
Do not place any objects such as
burning candles on the device.
7
Do not open the device casing under any cir-
cumstances. Warranty claims are excluded for
damage resulting from improper handling.
7
Thunderstorms are a danger to all electrical de-
vices. Even if the device is switched off, it can
be damaged by a lightning strike to the mains.
Always disconnect the mains during a storm.
7
Always keep the disc compartment closed to
prevent dust from collecting on the laser optics.
7
Avoid your finger being trapped while the disc
tray is being closed. Otherwise injuries or device damage may occur.
7
When you place this device beside a TV, ra-
dio or VCR, the image or sound being played
may deteriorate. In this case, move the device
away from TV, radio or VCR.
7
Do not use cleaning agents as they may dam-
age the housing. Clean the device with a clean
and dry cloth. Unplug the device from wall
socket before cleaning it.
7
Do not connect any other equipment while the
device is switched on. Make sure you close the
other devices before making the connections.
7
Only plug the device into the mains socket af-
ter you have connected the external devices.
Make sure the power plug is freely accessible.
7
If the power cord is damaged, it should be re-
placed by its manufacturer, aftersales service
or another competent and certified personnel
(preferably an electrician) or the person to be
assigned by the importer.
ENGLISH
29
Page 30
IMPORTANT SAFETY AND ENVIRONMENT MEASURES
7
Unplug the device in the following situations
and call the authorized service:
a) If the power cord or the plug is damaged.
b) If liquid poured or an object fell down into
the device.
c) When the device is exposed to rain or wa-
ter.
d) If the device does not operate properly al-
though the normal instructions for use are
followed.
e) When the device is dropped or damaged
in any way.
f) When a major change occurs in the per-
formance of the device.
Warning for the Packaging!
In accordance with our National
Environment Legislation, the packages are manufactured from recyclable materials. Make sure that
the packages are not treated as
domestic waste but disposed of
in the collection facilities specified by the local
authorities.
Warning for the Battery!
In accordance with our National
Environment Legislation, the battery contained in the product
should be duly recycled or disposed of into the waste battery
container specified by the local
authority. Charge or replace the battery as
specified in the user manual. Please consult the
local authorized service in order to recycle the
battery.
Environmental note
This product has been manufactured with high quality parts and
materials which can be reused
and are suitable for recycling.
Therefore, do not dispose the
product with normal domestic
waste at the end of its service life.
Take it to a collection point for the recycling of
electrical and electronic equipment. This is indicated by this symbol on the product, in the user
manual and on the packaging.
Please consult your local authorities to learn the
nearest collection point.
Help protect the environment by recycling used
products.
Compliance with the Restriction of Use of Prohibited
Substances:
Conforms to the EEE Regulation. The product
which you have purchased does not contain
harmful or prohibited substances which are specified in the Regulation on the restriction of the use
of certain hazardous substances in electrical and
electronic equipment as issued by the Ministry of
Environment and Forestry of Republic of Turkey
in the Official Gazette dated 30.05.2008 and
numbered 26891.
PCB Compliance:
“It does not contain PCB (Polychlorinated Biphenyl).”
Actions to Take for Energy
Saving
7
Switch the device to the Standby mode if you
will not use it for a short period of time. If you
will not use the device for a longer period of
time, unplug it.
7
Activate the screen saver. This feature is
also beneficial for your TV and lengthen the
lifespan of its panel.
---
30
Made in P.R.C.
ENGLISH
Page 31
GDP 5500
-------------------------------------------------------------------------------------------------------------------------------------
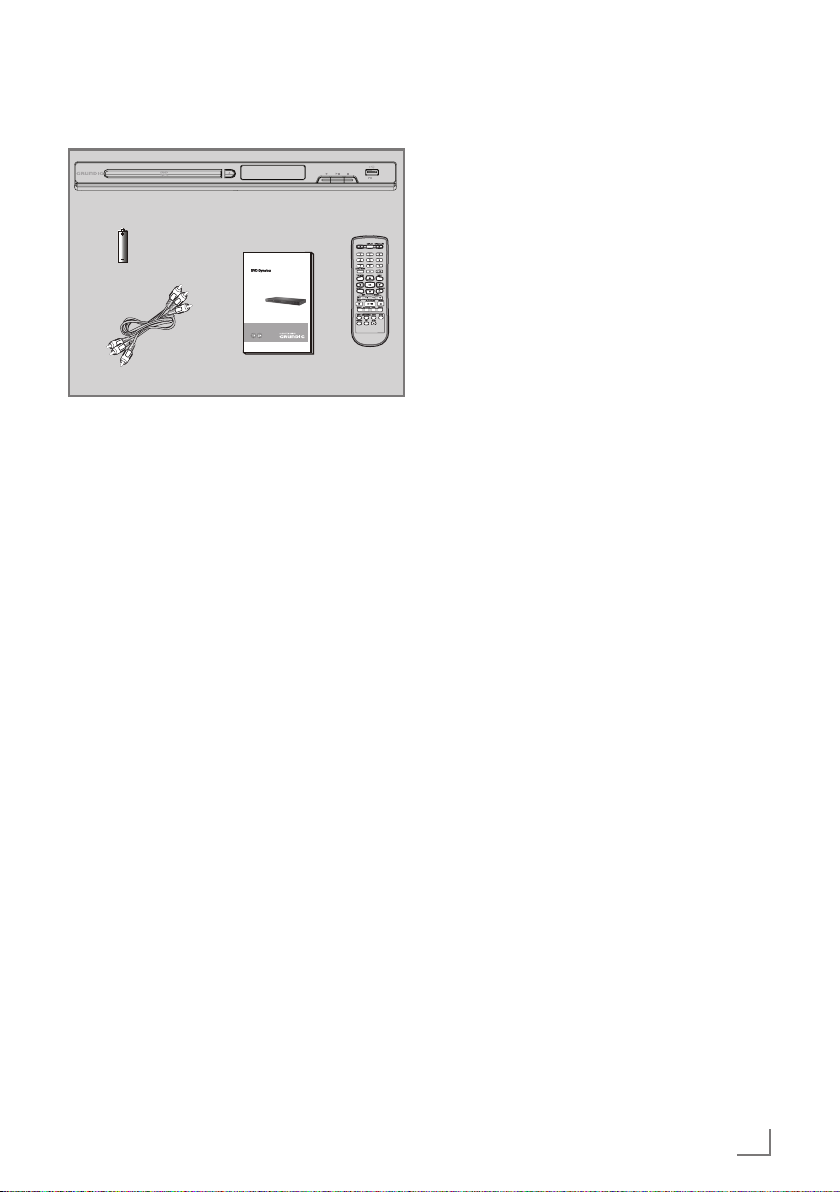
Packing contents
5V 500 mA
DVD disc player
Batteries
RCA Video / Audio cable
GDP 5500
User manual
Remote
control
DVD disc player
Remote control
1 batteries (Micro, R03/UM 4/AAA, 1 x 1.5 V)
User manual
RCA Video / Audio cable
Special features
7
High audio and video quality with »HDMI
1080P« output
7
USB 2.0 Storage Device Input
7
Supports playing DivX (MPEG 4), DVD,
DVD-R, DVD+R, VCD, CD, CD-R, CD-RW,
MP3, WMA(PCM), JPEG, KODAK CD
7
Internal Dolby Digital (AC-3) decoder
7
Progressive scan
7
Multi-language support (6 audio and 6 subtitle)
7
Obtaining high quality audio from your Home
Theatre System with Coaxial 5.1 Channel Digital audio output
Image Codec Support
(In Divx Mode)
7
Divx 3.11, Divx 4.12, Divx 5.x, Divx 6.0, Xvid/
B-Frame, Xvid/Q-pel, Divx Pro.
Note:
7
(files with .mp4 extension are not supported)
Subtitle Format Support
7
.srt, .sub, .smi, .ssa, .ass, .txt
Progressive Scan (Non Interlaced)
7
For motion picture, it is a method by which
all rows of the picture are displayed, stored
or transmitted simultaneously. Therefore, a
sharper and flickerless image is obtained compared to the standard video signal. Progressive Scan provides a flickerless image as on
a computer monitor. In the interlaced scanning
which tires the eye more, it is intended to create a full image impression by displaying the
odd rows first and then the even rows. Progressive scanning is indicated by »p« in short. For
instance, for 480p and 720p your TV should
be »HD Ready«. In order to obtain 1080p
quality image, your TV should be »Full HD«.
In this case, you should use the HDMI connection.
Displaying Subtitle Files with same
names
7
It is necessary that the video file and the subtitle file have the same name in order to display
subtitles.
Notes:
7
Writeable DVD discs (DVD-RW, DVD-R)
should be finalized; only the playback
mode is allowed in the recordable discs.
Playback may not work for some types of
discs, or when specific operations, such as
angle change and aspect ratio adjustment,
are being performed. Information about
the discs is written in detail on the disc box.
Please refer them when necessary.
7
Do not allow the disc to become dirty or
scratched. Fingerprints, dirt, dust, scratches
or deposits of cigarette smoke on the recording surface may make it impossible to use
the disc for playback.
7
Windows Media Audio WMA (PCM) files
must be written to the disc with a .wma file
extension in order to be recognized and
played back properly.
7
JPEG picture files must be written to the disk
with a .jpeg or .jpg file extension in order to
be recognized and played back properly.
ENGLISH
31
Page 32
OVERVIEW
----------------------------------------------------------------------------------------------------------------------------------
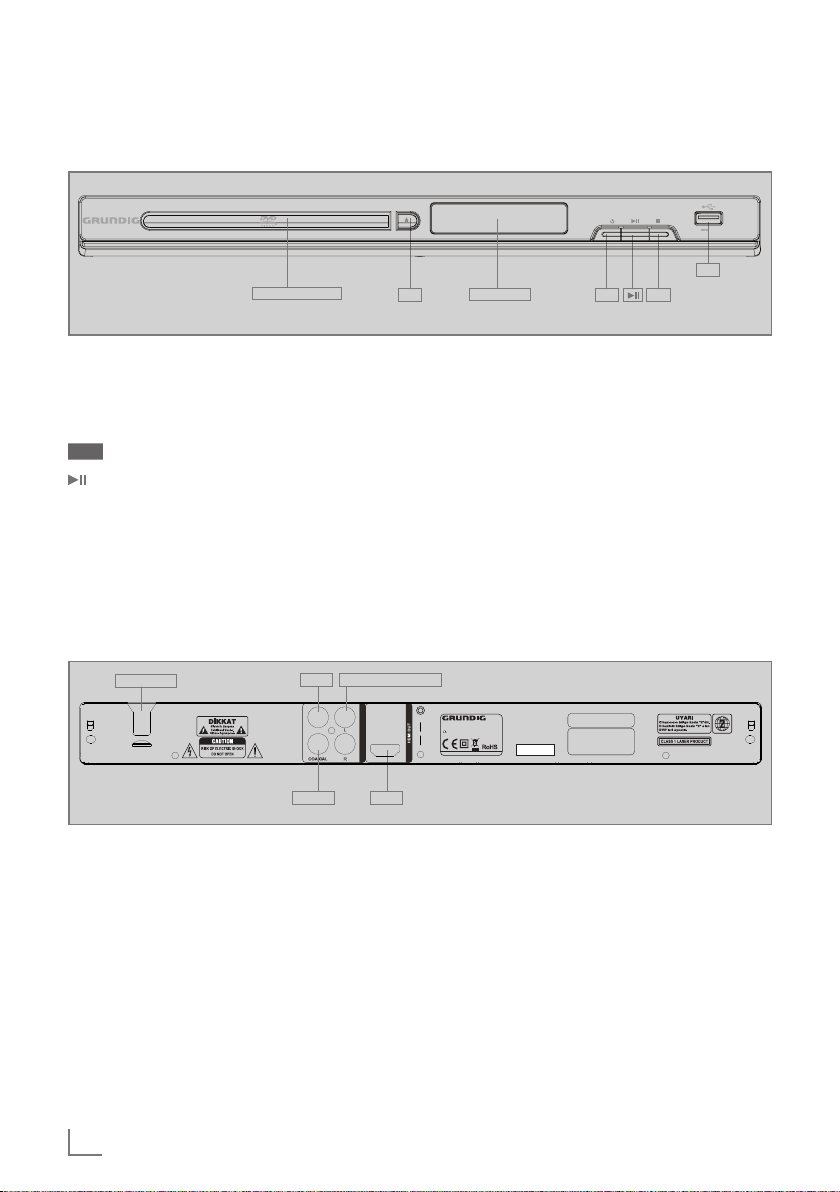
DVD player controls
Front View of the Device
Disc compartment
9 Switches the device on from
Standby mode and off again.
. Opens or closes the disc compart-
ment.
Device Led display.
Starts and pauses playback.
7 Stops the playback.
USB USB socket for connecting MP3
player, a USB memory stick or a
card-reader.
Back view of the device and connections
.
LED Display
5V 500 mA
USB
7
9
VİDEO
VIDEO
COAXIAL
2-CH AUDIO OUT L/R
AUDIO / VIDEO OUT
HDMI
Power Cord
110-240 V Power cord.
HDMI
OUT
2-CH
AUDIO
OUT L/R
Video/audio output socket for TV
connection (digital signal).
Audio output sockets (left/right
analogue channel) for connecting
an audio system.
COAXIAL Audio output socket (coaxial) for
connecting a digital multi-channel
video/audio amplifier.
VIDEO Video output socket for connecting
a TV or AV receiver with a RCA
socket.
ENGLISH
32
DVD Oynat›c› GDP 5500
Gerilim: AC 110-240V
˜
Dikkat :Cihaz›n›z›n kapa¤›n›
açmadan önce fiini prizden çekiniz.
Arçelik A..
50/60 Hz 12 W
Manufactured under license from Dolby
Laboratories. Dollby and the double-D
symbol are trademarks of Dolby Laboratories.
Covered by one or more of the following
U.S. Patents: 7,295,673; 7,460,668;
7 ,515, 710; 7,519,274
®
DivX
Stock No: 8929281600
Serial No: YY100001MM
Made in P.R.C.
, DivX Certified® and associated logos
are trademarks of Rovi Corporation or its
subsidiaries and are used under license.
Page 33
OVERVIEW
----------------------------------------------------------------------------------------------------------------------------------
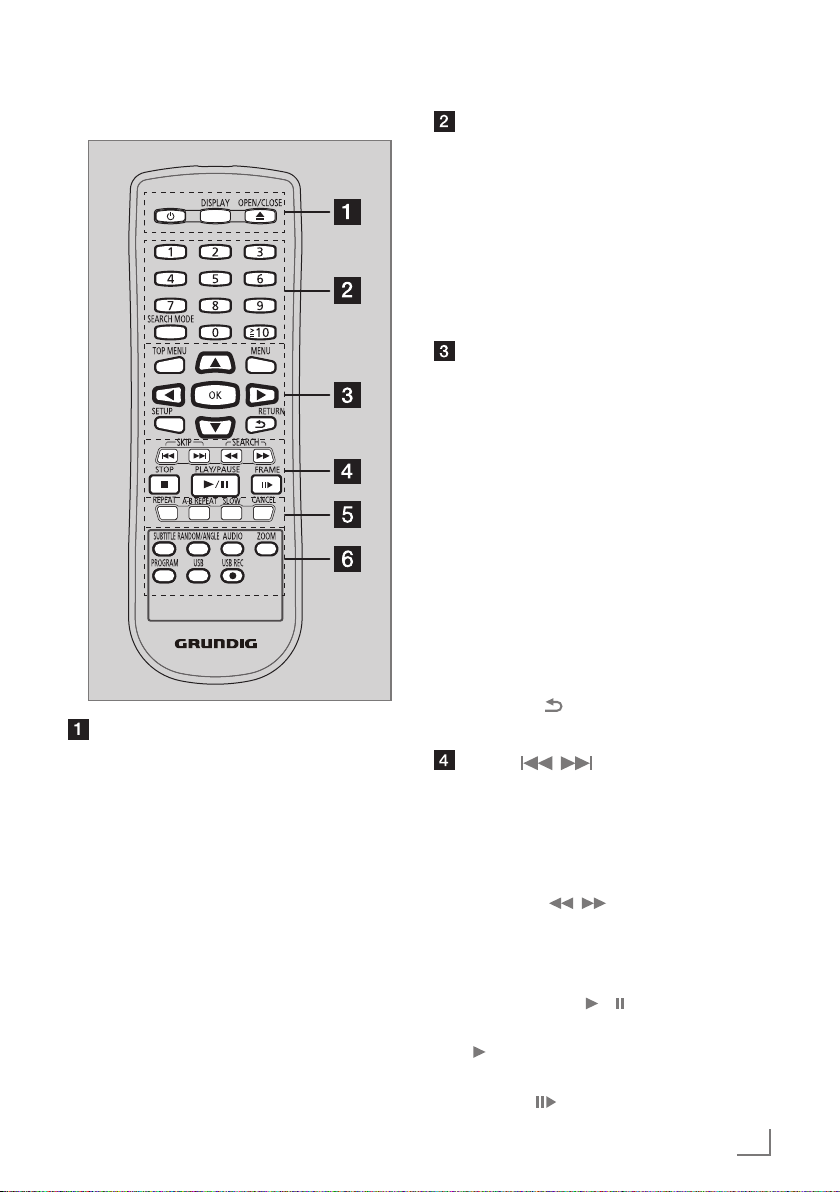
Remote control
Standby/on switch 9
Press to switch the unit from on to Standby
mode or vice versa. In Standby mode, the
unit is still consuming a small amount of
power.
DISPLAY
Displays information on TV screen during
playback.
OPEN/CLOSE .
Opens/closes the disc tray
0-9, 10
To select title/chapter/track numbers etc.
e.g., 5: 5
15: 10 5
SEARCH MODE
Starts to select the point
1. Press ◂ ▸ to select the item.
2. Press 0 to 9 to specify the location.
3. Press OK.
TOP MENU
Shows Top menu
MENU
▯
Shows Menu
▯
Sets PBC of VCD equipped with Play-
back Control (PBC) function to On/Off
▾ ▴
◂ ▸
▯
Selects items, input position, etc.
- For moving the display position of enlarged images
- For rotating JPEG images
OK
Confirms menu selection
SETUP
Enters or exits the system setup menu
RETURN
Returns to the previous display
SKIP, ,
▯
Skips to previous title/chapter/track or
next title/chapter/track
▯ Switches the MENU page of VCD
equipped with Playback Control (PBC)
function
SEARCH, ,
Starts fast reverse or fast forward
STOP 7
Stops playback
PLAY/PAUSE /
Starts or pauses playback
Starts playback
FRAME
Plays Video frame by frame
ENGLISH
33
Page 34
OVERVIEW
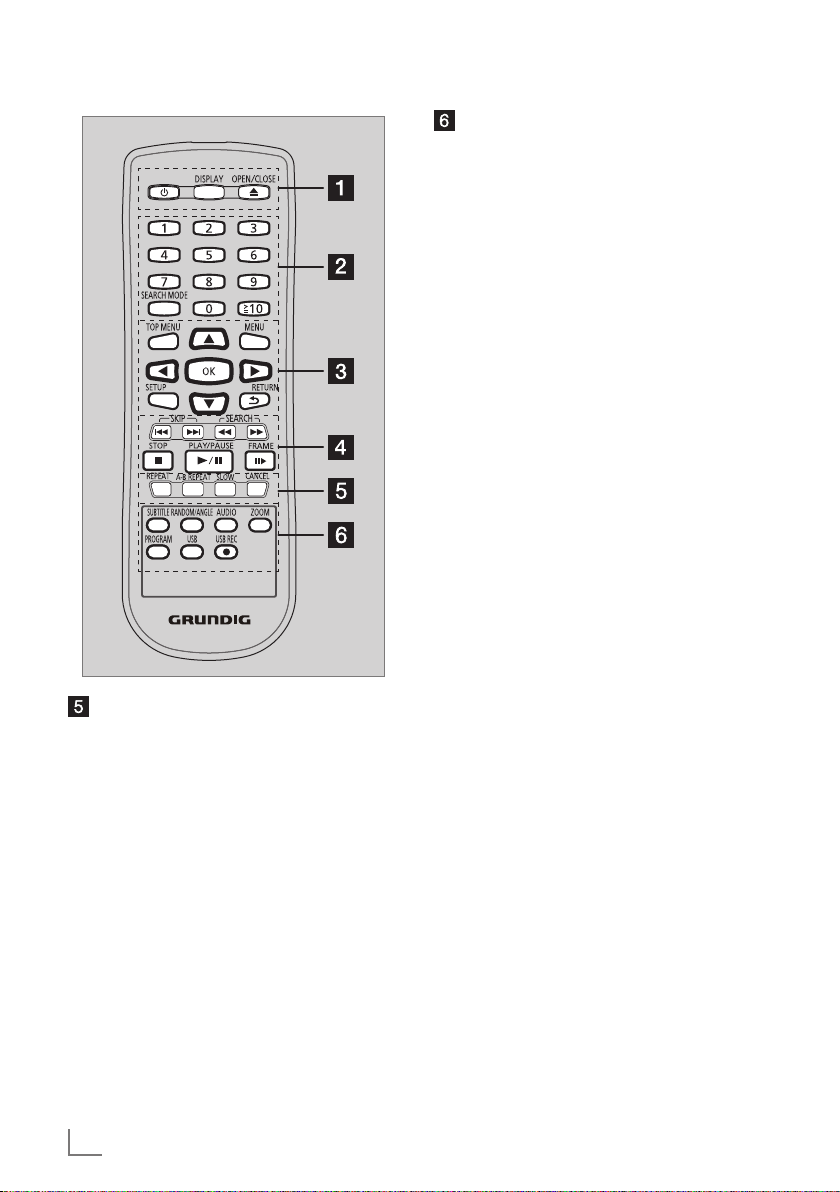
REPEAT
Selects various repeat mode
Selectable modes differ depending on the
type of contents
REP DIR plays all the same type of files in
the selected folder repeatedly.
A-B REPEAT
Repeats playback from point A to B on a
media
SLOW
Starts slow motion playback
CANCEL
Clear the input information
----------------------------------------------------------------------------------------------------------------------------------
SUBTITLE
Shows the subtitle and selects different
subtitle
RANDOM/ANGLE
Starts random playback/Switches the
camera angle
AUDIO
Changes soundtracks
ZOOM
Changes zoom ratio
PROGRAM
Sets the playback order
1. Press
2. Press 0 to 9 to specify the order.
To cancel: Press CANCEL.
3. Press
To clear the whole program:
Press to select CLEAR.
4. Press OK.
USB
Switches to the USB mode / Returns to the
disc mode
USB REC
CD Ripping
◂▸
◂▸
▾▴
to select the item.
▾▴
to select PLAY
34
ENGLISH
Page 35
CONNECTION AND PREPARATION
Notes:
7
Do not make HDMI or other connections
while the device is switched on. Switch off
other equipment as well before connecting it.
7
Plug in the device into the wall socket only
after you have connected the external devices.
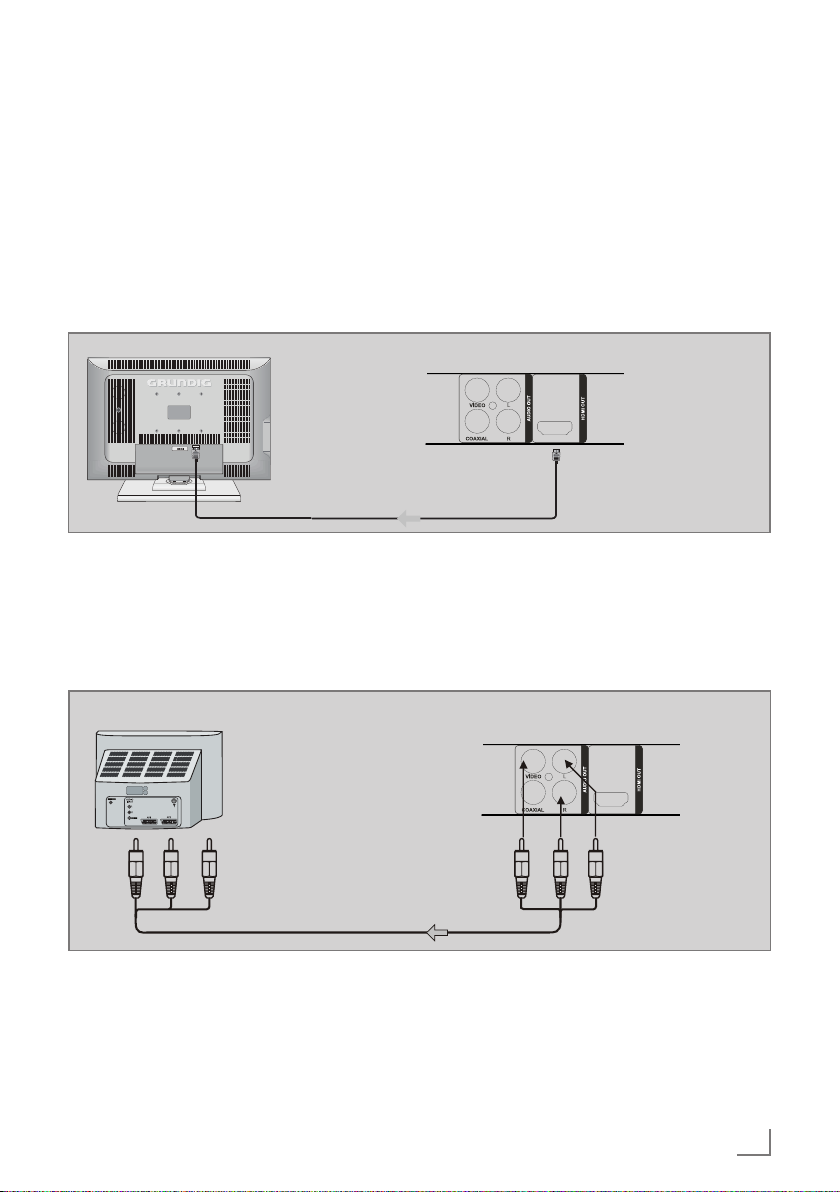
Connecting TV with HDMI cable.
---------------------------------------
Television
To the HDMI input
DVD Player
To the HDMI output
1 Connect an HDMI cable into the »HDMI«
socket on the back of the device and the corresponding socket (HDMI) on the TV.
Connecting the TV using an AUDIO/VIDEO cable
Television
Red
White
Yellow Yellow
To the Video inputs (yellow)
To the audio inputs (red, white)
DVD Player
Red
White
1 Connect a standard cable into the »VIDEO«
socket on the back of the device and corresponding socket (VIDEO IN) of the TV.
2 Connect standard cables into the
»2-CH AUDIO OUT« sockets and the corresponding sockets (AUDIO IN) on the TV.
ENGLISH
35
Page 36
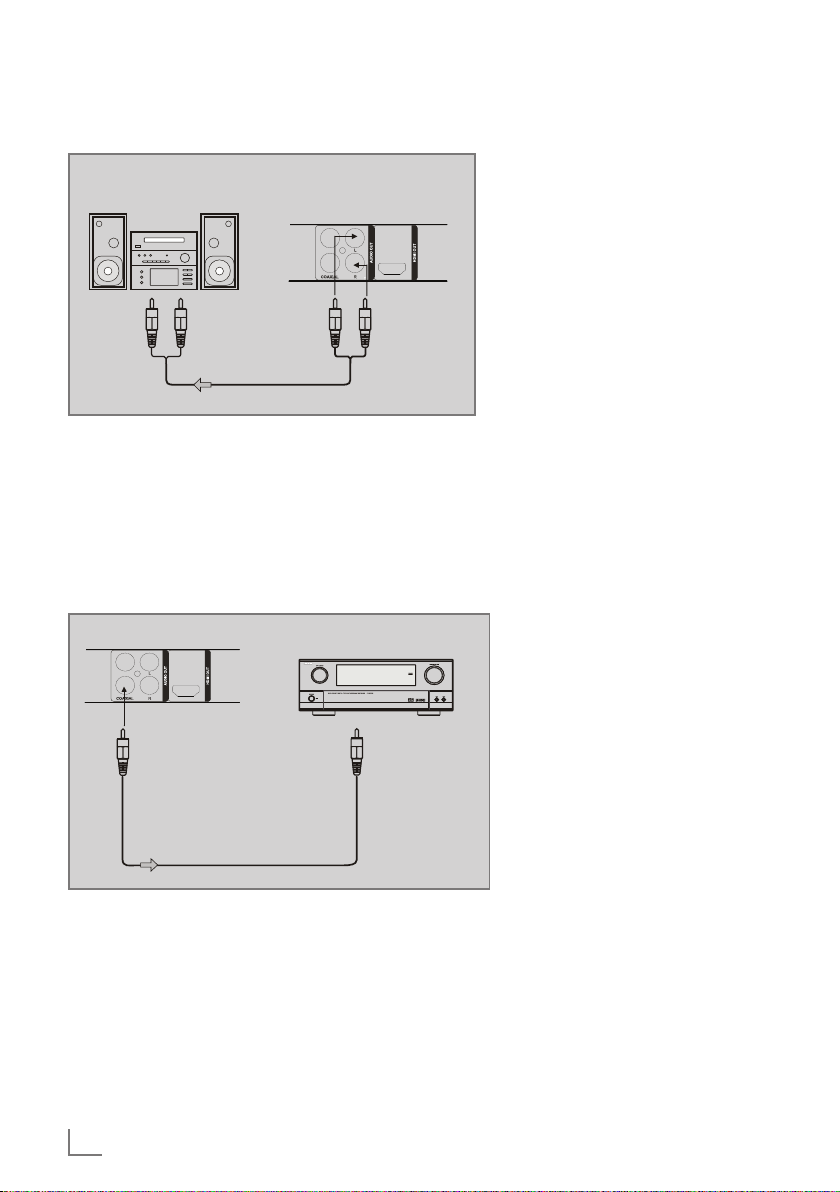
CONNECTION AND PREPARATION
VİDEO
Connecting the device to the audio system
---------------------------------------
Audio System
Red White
To the audio input of the amplifier
White
DVD Player
VİDEO
Red
1 Connect the standard cable into the
»2-CH AUDIO OUT« sockets and the corresponding sockets on the audio system
(AUDIO IN).
Connection to an amplifier with TV equipment
DVD Player
Amplifier
To the COAXIAL
type digital
audio input
Coaxial cable
1 Connect the digital cable into the »COAXIAL«
socket on the back of the device and the corresponding socket of the amplifier.
ENGLISH
36
Page 37
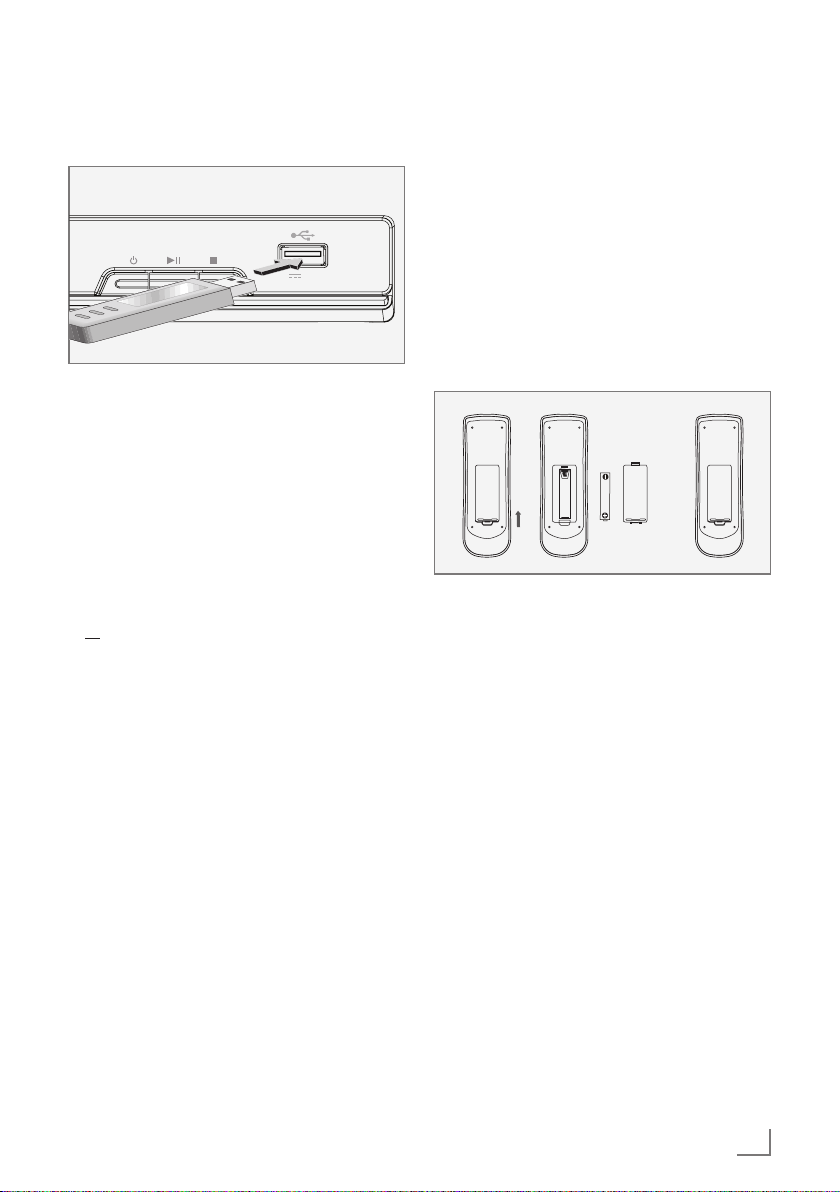
CONNECTION AND PREPARATION
---------------------------------------
Connecting an MP3 player or
a USB memory stick
5V 500 mA
Note:
7
The device must be switched off while the
USB device is being connected or removed.
If it is not switched off, data could be lost.
7
External USB Hard Drives are not supported
by your device. Do not connect such devices
to your DVD Player.
1 Switch off the device by pressing »9«.
2 Connect the MP3 player’s USB interface with
a standard USB cable into the »USB« socket
on the device (under the front flap);
or
insert the USB plug of the USB memory stick in
the »USB« socket on the device.
Notes:
7
To remove the MP3 player or the USB memory stick, switch off the device and pull out
the cable for the data medium.
7
The USB socket on the device does not support USB extension cable connection and
is not designed for connecting directly to a
computer. It does not support connecting to
a computer with a USB extension cable.
Connecting to the mains supply
Notes:
7
Check that the mains voltage on the type
plate (on the back of the device) corresponds
to your local mains supply. If this is not the
case, contact your authorized dealer.
7
Before connecting the power cord to the
wall socket, ensure that all other connections have been made.
1 Plug the power cord into the wall socket.
Warning:
7
The device is connected to the mains with a
power cord. Pull out the power plug if you
want to completely disconnect the device
from the mains.
7
Make sure the power plug is easily acces-
sible during operation and not hindered by
other objects.
Putting batteries in the remote
control
1 Open the battery compartment on the back-
side of the remote control.
2 Observe the polarity marked on the base of
the battery compartment when inserting the
battery (micro battery, 1 x 1.5 V, R 03/UM 4/
AAA).
3 Close the battery compartment lid.
Notes:
7
Do not expose the batteries to extreme heat,
caused for example by direct sunlight, heaters or fire.
7
Remove the batteries when they are flat or
when you know that the device will not be
used for a long period of time. The manufacturer accepts no liability for damage caused
by leaking batteries.
Environmental note:
7
Batteries, including those which do not con-
tain heavy metals, should not be disposed
of with household waste. Always dispose
of used batteries in accordance with local
environmental regulations.
ENGLISH
37
Page 38
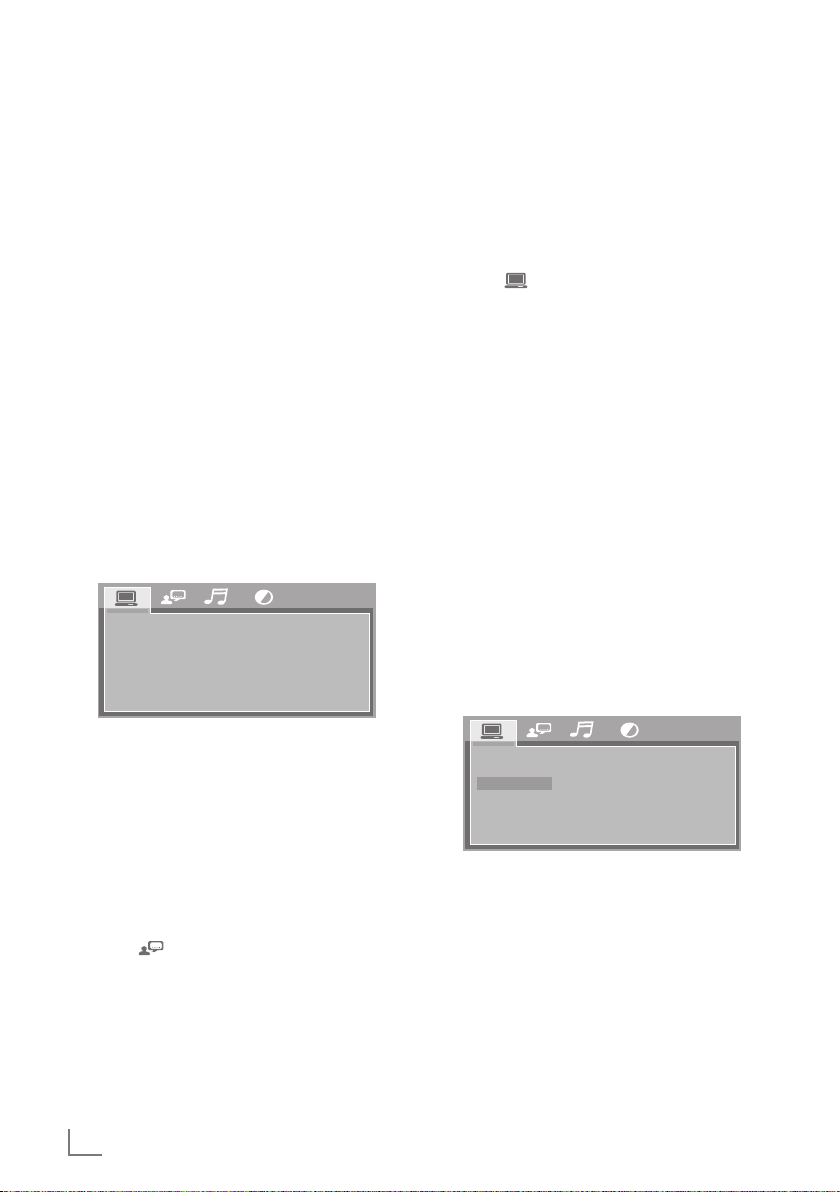
INITIAL SETUP
----------------------------------------------------------------------------------------------------------------------
Switching on the DVD player
1 Plug the power cord into the wall socket.
2 Press the »9« button on the device.
– Display: »LOAD«.
3 Switch on the TV, select the input setting on the
TV that matches the connection method you
used to connect the DVD player.
Note:
7
When first plugged to mains power or when
the power button on the remote control is
pressed your DVD Player will enter Standby
mode. There is no visual indication in
Standby mode.
Menu navigation
When you switch on the device, the device logo
automatically appears on the screen. If there is
no disc in the disc compartment, »NODSC« appears on the screen.
1 Press »SETUP« to open the main menu.
TV SYSTEM
TV TYPE
HD OUTPUT
SCREEN SAVER
PASSWORD
RATING
DEFAULT
5 Press »SETUP« to exit the main menu.
Adapting the DVD player to
the TV
Setting the TV system (TV Standard)
1 Press »SETUP« to open the main menu.
2 Select » « in the main menu with »◂« or »▸«
and press »OK« to confirm.
3 Select »TV SYSTEM« with »▾« or »▴« and
press »OK« to confirm.
4 Select »PAL« for PAL system or »NTSC« for
NTSC system with »▾« or »▴« and press
»OK« to confirm.
5 Press »SETUP« to exit the main menu.
Setting the HDMI resolution
You can select the ideal setting for the TV you
have connected. The abbreviation behind the
number means: Progressive, Interlace.
This function can only be selected when a LED/
LCD-TV is connected to the »HDMI« socket.
1 Press »SETUP« to open the main menu.
2 Select »HD OUTPUT« in the main menu with
»◂« or »▸« and press »OK« to confirm.
2 To navigate in the menu, use »▾«, »▴«, »◂«
or »▸« cursor buttons.
3 Press »OK« to confirm you selection.
4 Press »SETUP« to exit the main menu.
Selecting the display language
1 Press »SETUP« to open the main menu.
2 Select » « in the main menu with »◂« or »▸«
and press »OK« to confirm.
3 Select »OSD LANGUAGE« with »▾« or
»▴« and press »OK« to confirm.
4 Select the desired language with »▾« or »▴« and
press »OK« to confirm (select »İNGİLİZCE« for
English).
ENGLISH
38
TV SYSTEM
TV TYPE
HD OUTPUT
SCREEN SAVER
PASSWORD
RATING
DEFAULT
HD OFF
720P
1080i
1080P
3 Select the »resolution« with »▾« or »▴« and
press »OK« to confirm.
4 Select the desired value (»HD OFF«, »720p«,
»1080i«, »1080p«) with »▾« or »▴« and
press »OK« to confirm.
5 Press »SETUP« to exit the main menu.
Page 39
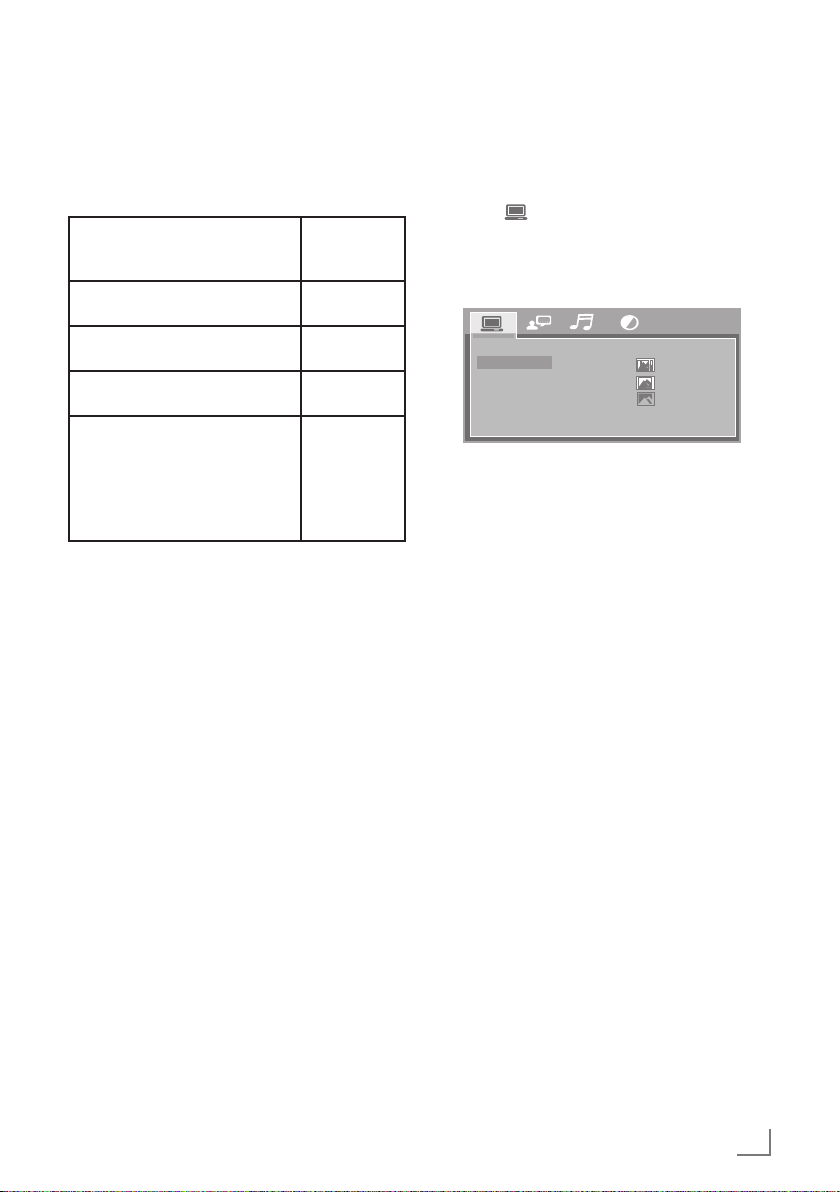
INITIAL SETUP
----------------------------------------------------------------------------------------------------------------------
Note:
7
The output resolution depends on the type
of LED/LCD-TV connected to the device, as
described in the table below:
Correct
LED/LCD-TV TYPE
Resolution
Setting
If your TV is standard definition
PAL TV (SD TV)
If your TV is a high definition TV
(HDTV) capable of 720p only
If your TV is a high definition TV
(HDTV) capable of 1080i only
HD OFF
720p
1080i
If your TV is equipped with
HDMI and if it is a high definition TV (HDTV) capable of
1080p [at any frame rate], and
1080p
(HDMI)
your device is connected to
your TV via HDMI
Selecting the TV format
This setting depends on your TV.
1 Press »SETUP« to open the main menu.
2 Select » « in the main menu with »◂« or »▸«
and press »OK« to confirm.
3 Select »TV TYPE« with »▾« or »▴« and press
»OK« to confirm.
TV SYSTEM
TV TYPE
HD OUTPUT
SCREEN SAVER
PASSWORD
RATING
DEFAULT
4 Select the desired value (»4:3/PS«, »4:3/LB«,
»16:9«) with »▾« or »▴« and press »OK« to
confirm.
5 Press »SETUP« to exit the main menu.
4:3PS
4:3LB
16:9
ENGLISH
39
Page 40
DVD PLAYBACK
---------------------------------------------------------------------------------------------------------------
Special features of the DVD
You can recognize a
DVD by the logo on its
label.
The discs have one or
more tracks depending
on the content of the DVD.
Each track can contain one or more chapters.
Selecting the track and chapter is simple and
convenient.
You can control and playback a DVD using the
menu of the DVD player on the television screen.
Preparation
1 Switch on the TV, select the input on the TV that
matches the connection method you have used
to connect the DVD player.
2 If an audio system or an AV receiver is con-
nected to the DVD player, switch it on and select the audio input for the DVD player.
3 Switch on the DVD player.
– If there is no disc in the disc compartment,
»NODSC« appears on the display after a
short time.
– If a disc has been inserted, it is scanned
and »LOAD« appears on the display.
Inserting the disc
1 Press ».« to open the disc compartment.
– Display: »OPEN«.
2 Place the disc into the compartment with its la-
bel facing upwards.
3 Press ».« to close the disc compartment.
– Display: »CLOSE« and then »LOAD«; the disc
is scanned and then the total duration of the
disc is shown.
– The disc menu opens automatically.
Note:
7
Some disc menus direct you to choose the
menu language first. If this happens select
the language with cursor buttons and press
»OK«.
Playback
1 If this option is available, select »Play« with
cursor buttons and press »OK«;
or
press » « to start playback.
– The playback starts.
Note:
7
If »INVALID KEY« appears on the televi-
sion screen, the selected function is invalid
for this disc.
2 Press » « (freeze frame) to pause playback.
3 Press » « to resume playback.
4 Press »7« to stop playback.
5 Press » « to resume normal playback.
6 Press »7« twice to end the playback.
Removing the disc
1 Press ».« to open the disc compartment.
2 Remove the disc from the compartment.
3 Press ».« to close the disc compartment.
Additional playback functions
Note:
7
During operation, »INVALID KEY« sign may
appear on the TV screen. »INVALID KEY«
sign means that the device or the disc does
not allow the relevant process.
Viewing information
You can view information about the title, chapter,
playing time and much more on the screen.
1 Press »DISPLAY« on the remote control.
–Information lines appear on the screen.
2 Press »DISPLAY« on the remote control aga-
in.
- More information lines appear on the screen.
3 Press »DISPLAY« on the remote control to de-
activate this function.
–Information lines disappear.
40
ENGLISH
Page 41

DVD PLAYBACK
---------------------------------------------------------------------------------------------------------------
Navigating in the disc menu
The disc may contain several titles and chapters
you can choose from.
1 Press »MENU« on the remote control.
– Main menu of the disc opens.
2 Select the title you want with the cursor buttons
and press »OK« to confirm.
3 In the selected title, choose the chapter or part
that you want with the cursor buttons and press
»OK« to confirm.
4 Press »MENU« on the remote control to return
to the main menu of the disc.
Fast forward and fast rewind
1 During playback, press » « on the remote
control to fast rewind or press » « to fast forward within the disc.
Note:
7
When you press the button consecutively,
at each press fast forward or fast rewind
speed changes. Speed change happens
with this sequence: X2, X4, X8, X20.
2 Press » « to resume normal playback.
–Playback is resumed.
Selecting the previous or next
chapters
1 During playback, press » « to play the previ-
ous chapter or press » « to play the next chapter.
– When you release the button, the device
skips the current chapter and playback
starts from the selected chapter.
Search functions
1 Press »SEARCH MODE« in order to open the
function for going to the desired title, chapter
or time.
2 Select the desired mode with »◂« or »▸« and
press »OK« to confirm.
3 In the selected mode, press number buttons to
select the point you want to play.
Note:
7
For example, you should press »0«, »4«
buttons respectively to select the fourth title.
– Selected point will be played back
automatically.
Enlarging or reducing the picture
(only DVD)
1 To switch through ZOOM 2, ZOOM 3,
ZOOM 4, ZOOM 1/2, ZOOM 1/3, ZOOM
1/4, ZOOM OFF, press »ZOOM« repeatedly.
– Display:
»ZOOM 2«, selected area of the picture is
enlarged by 2 times;
»ZOOM 3«, selected area of the picture is
enlarged by 3 times.
»ZOOM 4«, selected area of the picture is
enlarged by 4 times.
»ZOOM 1/2«, selected area of the picture is reduced by 1/2 times.
»ZOOM 1/3«, selected area of the picture is reduced by 1/3 times.
»ZOOM 1/4«, selected area of the picture is reduced by 1/4 times.
Note:
7
You can slide the picture with »▾«, »▴«,
»◂« or »▸« on the screen.
2 To exit the function, press »ZOOM« repeat-
edly until »ZOOM OFF« symbol appear.
– Picture on the screen restores to its normal
size.
Repeating a chapter or a track
(controlled by the DVD Disc)
1 During playback, press » REPEAT « repeatedly
to select a repeat mode: »OFF«, »CHAPTER«,
»TITLE«, »REP ALL«.
– Display: »OFF«, »CHAPTER«, »TITLE«,
»REP ALL«, current chapter is repeated.
– Display: »CHAPTER«, current chapter is
repeated.
– Display: »TITLE«, the entire disc is repeated.
2 To exit the function, press select »OFF«.
ENGLISH
41
Page 42

DVD PLAYBACK
---------------------------------------------------------------------------------------------------------------
Repeating a selected chapter
(controlled by the DVD Disc)
1 During playback, press »A-B REPEAT« to se-
lect a start point for a chapter to be repeated.
– Display: »REPEAT A-«, the start point of the
chapter is selected.
2 At the point you want to be the end point, press
»A-B REPEAT« again to set the end point for
the chapter to be repeated.
– Display: »REPEAT A-B«, end point of the
chapter is selected. The selected chapter
starts to be repeated.
3 To deactivate this function, press »A-B RE-
PEAT« again to set »A-B CANCEL«.
Playing chapters and tracks in random order
1 Press »RANDOM/ANGLE« during play-
back.
– Display: »RANDOM«.
– Random playback starts automatically.
2 To deactivate this function, press »RAN-
DOM/ANGLE« again during playback.
– Display: »OFF« disappears from the display.
Title menu
If the disc provides pop-up or title menus, you
can use this function.
1 During playback, press the »TOP MENU« but-
ton to open the pop-up or title menu.
2 Select the option you want with the cursor but-
tons and press »OK« to confirm.
3 Press »TOP MENU« again to cancel the func-
tion.
Selecting the camera angle for particular scenes
Some discs provide scenes which were filmed
several times from different camera angles.
1 During playback, press »RANDOM/ANGLE«
on the remote control.
– Angle menu appears.
2 Select the angle you want by pressing »RAN-
DOM/ANGLE« repeatedly and press »OK«
to confirm.
– Display: for example »01/03«.
Selecting and displaying the subtitles
If the disc includes subtitle, it can be displayed
on the TV screen. If there are language options,
you can select any language available.
1 During playback, press »SUBTITLE« on the re-
mote control.
– »OFF«.
2 Select the option you want with »SUBTITLE«
and press »OK« to confirm.
3 To turn the subtitle off, press »SUBTITLE« until
»Subtitle Off« in Step 1 appears on the screen.
Notes:
7
You can set the subtitle from the disc menu
too. Refer to the section "Navigating in the
disc menu".
ENGLISH
42
Page 43
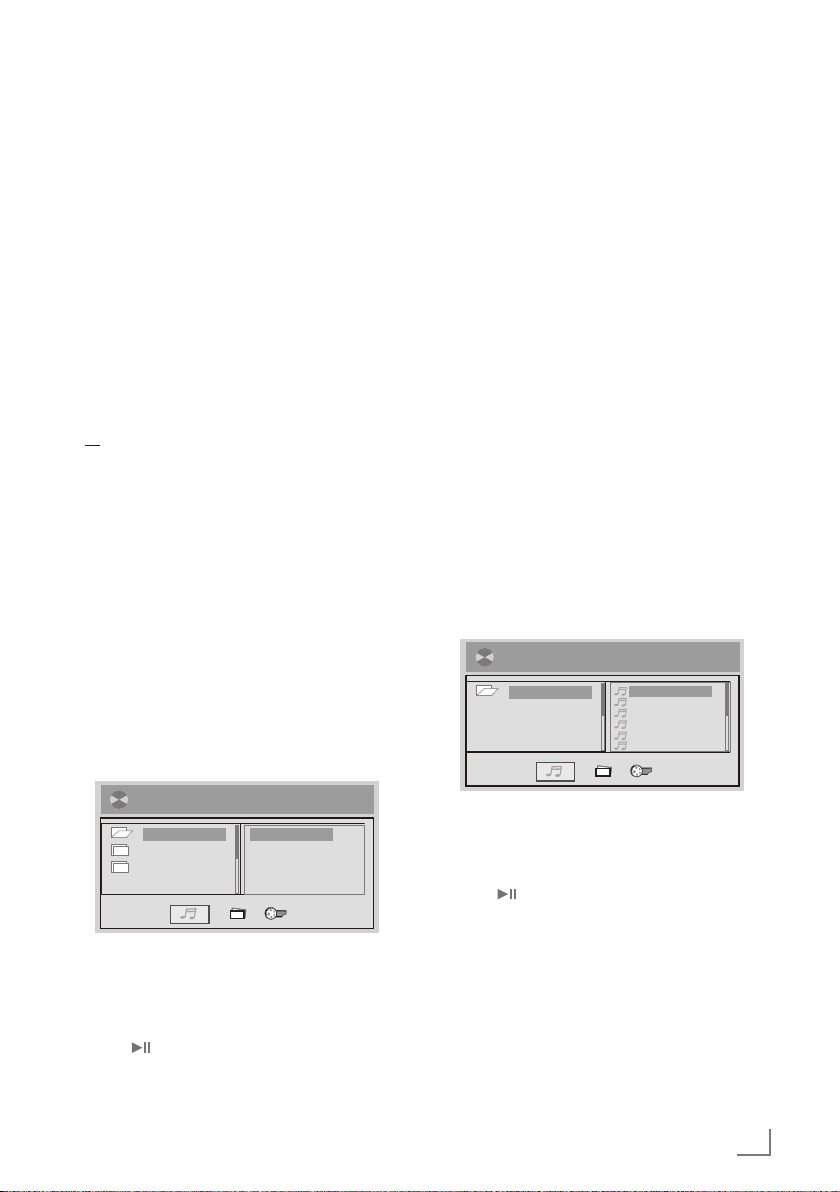
PLAYING AUDIO/PICTURE/VIDEO FILES
--------------------
Reading the contents of a data
device or a USB memory stick
DVD player basically supports the version 2.0
and is also compatible with the previous 1.0 and
1.1 versions. In some cases, incompatibility may
occur due to the different data formats.
Playback may result in errors or jamming due
to the non-standard different formats and parameters. WMA(PCM) is the specific format for
Windows media player; compressed data can
be played back in this device.
1 Press »9« to switch off the DVD player.
2 Connect the data device to the »USB« socket
with a standard USB cable;
or
insert the USB plug of the USB memory stick
in the »USB« socket on the device (refer to the
section “Connecting an MP3 player or a USB
memory stick”).
3 Switch on the TV, select the input setting on the
TV that matches the connection method you
used to connect the DVD player.
4 Start the DVD player with »9«. If the proce-
dure is successful, a navigation menu is automatically displayed.
– »Loading«; external device menu is opened.
Note:
7
If more than one data source is connected,
press »USB« to select the USB source.
Playing picture CDs
1 Press »9« to switch on the DVD player.
2 Press ».« to open the disc compartment.
– Display: »OPEN«.
3 Insert the disc with pictures into the disc com-
partment.
4 Press ».« to close the disc compartment.
– Display: »CLOSE«.
– Display: »LOAD«The disc automatically plays.
5 Press »7« to stop playback.
Playing MP3 audio CDs
1 Press »9« to switch on the DVD player.
2 Press ».« to open the disc compartment.
– Display: »OPEN«.
3 Insert the disc with audio files into the disc
compartment.
4 Press ».« to close the disc compartment.
– Display: »CLOSE«.
– »LOAD«; disc menu is opened.
[—]LE 6 ——01 VALENTI.MP3
01.—
001.BOA SINGLE
002.GUNS N' RO
003.JTL - A BE
004.JULIELONDO
001.MBC————0
001.MCB————0
[1]————.MP3
01.1 01.————
02.2
03.3
5 Select folders with »▾« or »▴« and press
»OK« to confirm. Select the video, music or
image files with »▾« or »▴« and press »OK«
to confirm.
6 Press » « to start playback.
– The selected file starts playing.
7 Press »7« to stop playback.
5 Select folders with »▾« or »▴« and press
»OK« to confirm. Select the audio files with
»▾« or »▴« and press »OK« to confirm.
6 Press » « to start playback.
– The selected folder starts playing.
7 Press »7« to stop playback.
ENGLISH
43
Page 44

PLAYING AUDIO/PICTURE/VIDEO FILES
------------------
Additional playback functions for
Audio/Picture/Video files
7
Press » « to pause playback.
7
Press » « again to resume playback.
7
Press the »◂« to return to the previous menu.
7
During playback, press » « or » « to go
forward or backward.
7
Select the next track/picture with » « or previous track/picture with » « during playback.
7
During playback, press »REPEAT« repeatedly
to select a repeat mode:
– »REP OFF«
– »REP 1«
– »REP DIR«
– »REP ALL«
7
Press »▾«, »▴«, »◂« or »▸« repeatedly to rotate the picture.
Notes:
7
The USB socket on the device does not support a connection for a USB extension cable
and is not designed for directly connecting
to a computer.
7
The USB socket of this device is a standard
socket. Due to rapid advances in technology and new manufacturers appearing every
day, the compatibility of USB memory sticks
can only be partially guaranteed.
7
If the connected USB device is not recognized or is not read well, this situation does
not necessarily suggest a failure of the device.
7
Bi-directional data transfer as defined for
ITE devices in EN 55022/EN 555024 is
not possible.
7
USB transfer is not in itself an operating
mode. It is only an additional function.
7
Never disconnect the USB devices during
any procedure. This could damage the USB
device and the device. Any such damage
will invalidate your warranty.
7
When the device is in stop mode, you can
insert or remove the card and USB devices.
7
While the card is being read, press »USB«
to return DISC mode.
44
ENGLISH
Page 45
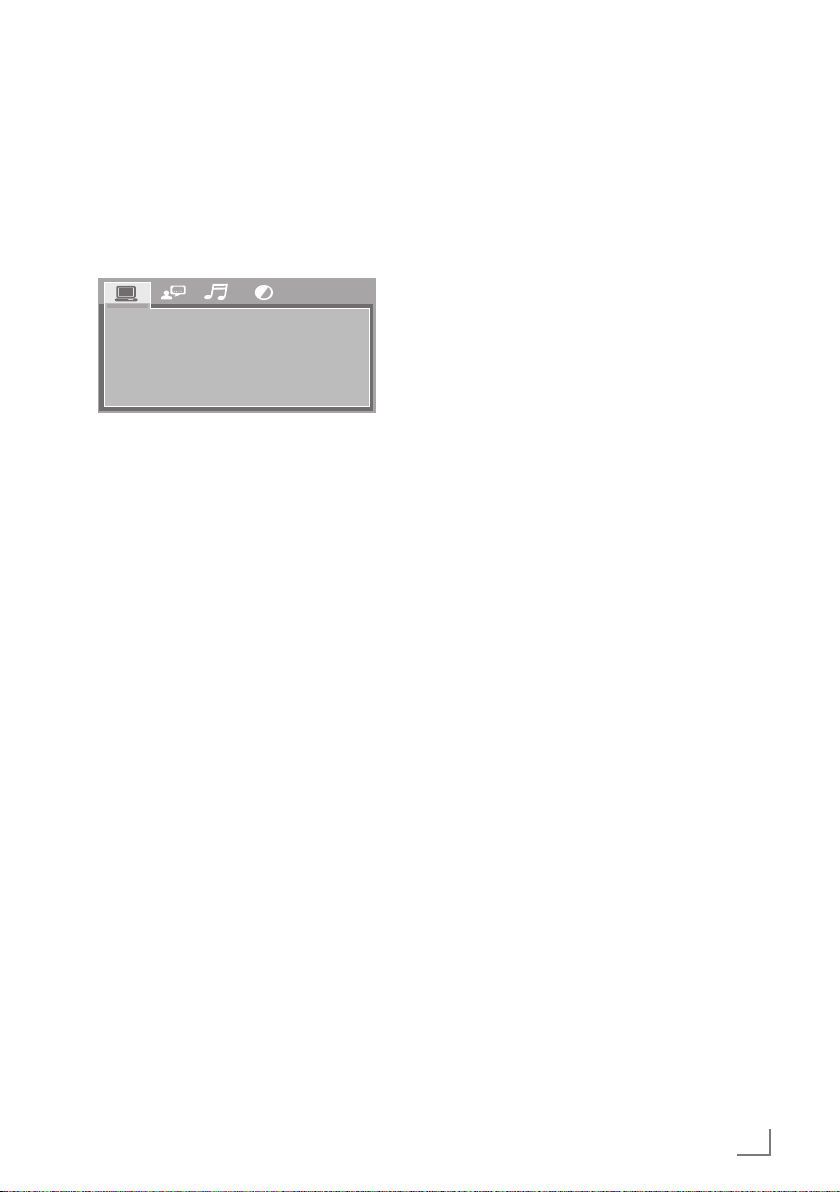
SPECIAL SETTINGS
-----------------------------------------------------------------------------------------------------
General Setup Page Settings
1 Press »SETUP« to open the main menu.
2 Select »General« in the main menu with »◂« or
»▸« and press »OK« to confirm.
3 Select the necessary function with »▾« or »▴«
and press »OK« to confirm.
TV SYSTEM
TV TYPE
HD OUTPUT
SCREEN SAVER
PASSWORD
RATING
DEFAULT
7
Some DVD titles may have been recorded
in special formats. In such cases, DVD titles
could be displayed in their own original
formats on the screen regardless of the TV
screen format you choose.
HD OUTPUT
This option increases the video output resolution
of your DVD Player resulting in a better video
quality.
Use »▾« or »▴« buttons to change the settings
and press »OK« to confirm.
Note: This setting only improves the quality of
video transferred over HDMI cable.
4 Select the desired settings with »▾« or »▴«
and press »OK« to confirm.
5 Press »SETUP« to exit the main menu.
Existing settings in the
General menu
TV SYSTEM
Your DVD Player supports different TV output formats including NTSC and PAL systems.
If your TV supports only NTSC or PAL and you
select opposite TV output format on your DVD
Player, the image on the TV could flicker and
lose color.
TV TYPE
You can select different screen formats and the
TV screen in the TV Viewing menu. For different
matches between the disc and the TV, there are
various screen formats.
Note:
7
Regardless of the selected screen format, a
picture which is recorded as 4:3 format is
always displayed in 4:3 aspect ratio.
7
Screen format of the DVD titles could vary;
please refer to the information accompanying the DVD title.
7
If the TV is a standard 4:3 screen while the
DVD title was recorded as 16:9, the picture
will be fitted horizontally.
SCREEN SAVER
While the screen saver is on, if the DVD player
is not operated for a certain period of time, an
animation picture will appear on the screen. This
will improve the lifetime of your TV panel.
To enable or disable the screen saver use »▾«
or »▴« buttons to select and press »OK« to confirm.
PASSWORD
You can change the password. Enter a 4-digit
number by using the number buttons between
»1...0« and press »OK« to confirm. Please do
not forget the password you choose.
Note: (Initial password: 0000). Note down the
new password in order not to forget it. You have
to enter your new password to adjust the parental control function.
PARENTAL CONTROL
Parental control function works with different censuring classes assigned to DVDs. These classes
help you control the DVD types viewed by your
family.
8 censuring classes are available for DVDs.
– 1[KID SAF]: Suitable for all children.
– 2[G]: General audiences.
– 3[PG]: Parental guidance suggested.
– 4[PG-13]: Not suitable for anyone under 13.
– 5[PG-R]: Parental guidance suggested.
– 6[R]: Not suitable for anyone under 17 unless
supervised by a parent or adult guardian.
ENGLISH
45
Page 46
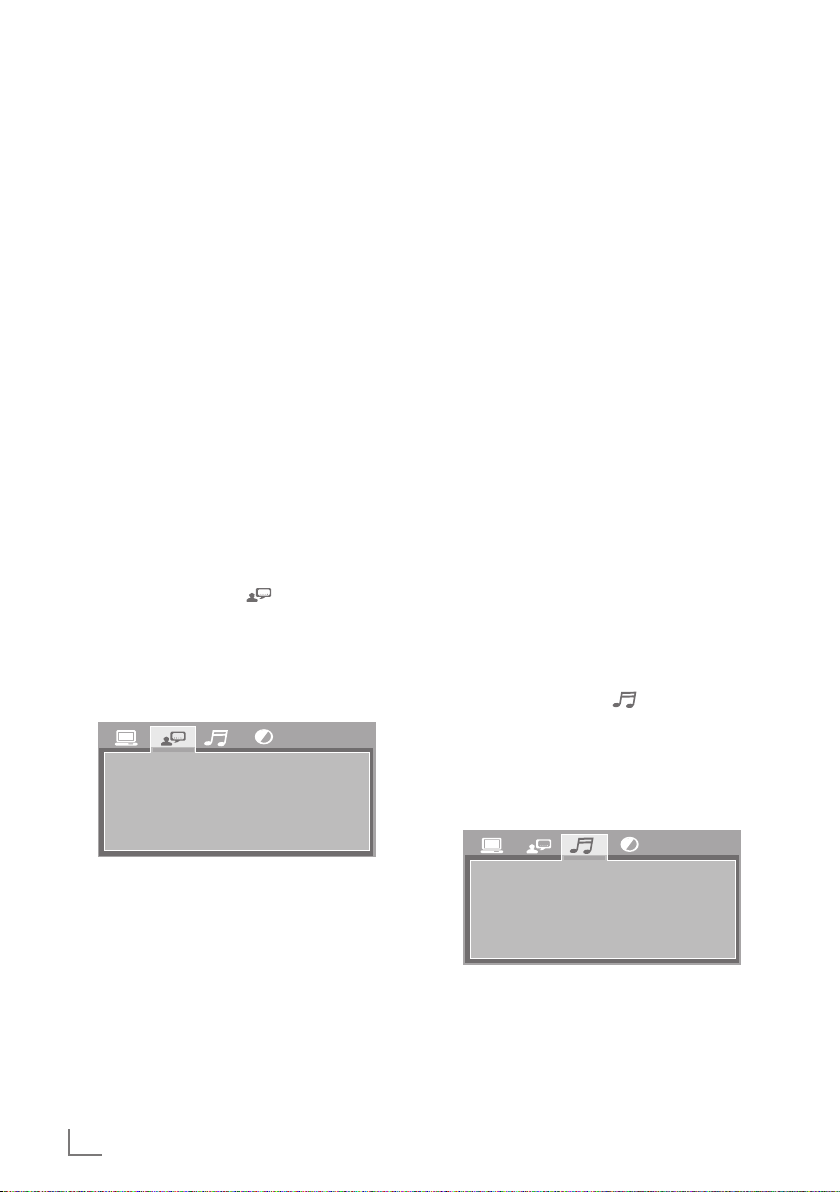
SPECIAL SETTINGS
-----------------------------------------------------------------------------------------------------
– 7[NC-17]: Not suitable for anyone under 17.
– 8[ADULT]: All discs can be played.
To change Parental control level use »▾« or »▴«
buttons to select and press »OK« to confirm.
Note:
7
You have to enter the password to change
this setting. (Initial password: 0000)
DEFAULT (Factory Settings)
Resets your player to the default factory settings.
To reset, select »RESTORE« and press »OK« to
confirm.
Restoring to the factory defaults will not reset the
“Parental Control Password”
Osd Language Setting
In this menu, you can adjust the menu language,
subtitle language and audio track language settings.
1 Press »SETUP« button to enter main menu.
2 On main menu select » « using »◂« or »▸«
buttons and pres »OK« to confirm.
3 Select desired function by using »▾« or »▴«
buttons and press »OK« to confirm.
4 Press »SETUP« button to exit main menu.
OSD LANGUAGE
AUDIO LANG
SUBTITLE LANG
MENU LANG
DIVX LANG
SUBTITLE LANGUAGE
Adjusts the subtitle language of the DVD titles
being viewed on your DVD player.
(DVD title may not support this feature).
MENU LANGUAGE
Adjusts the menu language of the DVD titles
being viewed on your DVD player.
(DVD title may not support this feature).
DIVX SUBTITLE LANGUAGE
Adjusts the subtitle language of the DivX titles
being viewed on your DVD player.
(DivX title may not support this feature).
Note:
7
This feature is not active while watching a
DivX title. To adjust the subtitle language of
the DivX title being viewed press »STOP«
button twice.
And then change the settings in DIVX SUBTITLE
LANGUAGE menu.
Audio Settings
1 Press »SETUP« button to enter main menu.
2 On main menu select » « using »◂« or »▸«
buttons and pres »OK« to confirm.
3 Select desired function by using »▾« or »▴«
buttons and press »OK« to confirm.
4 Press »SETUP« button to exit main menu.
OSD LANGUAGE
Adjusts the OSD Language and screen menu
language.
CAPTION LANGUAGE
Adjusts the caption language of the DVD titles
being viewed on your DVD player.
(DVD title may not support this feature).
ENGLISH
46
AUDIO OUT
DYNAMIC RANGE
Existing Settings in the Audio Menu
AUDIO OUT: Adjusts audio output settings. Your
DVD Player has three types of audio output:
– SPDIF OFF: 2-CH analog audio is output on
back panel Left/Right analog audio output
connectors.
Page 47
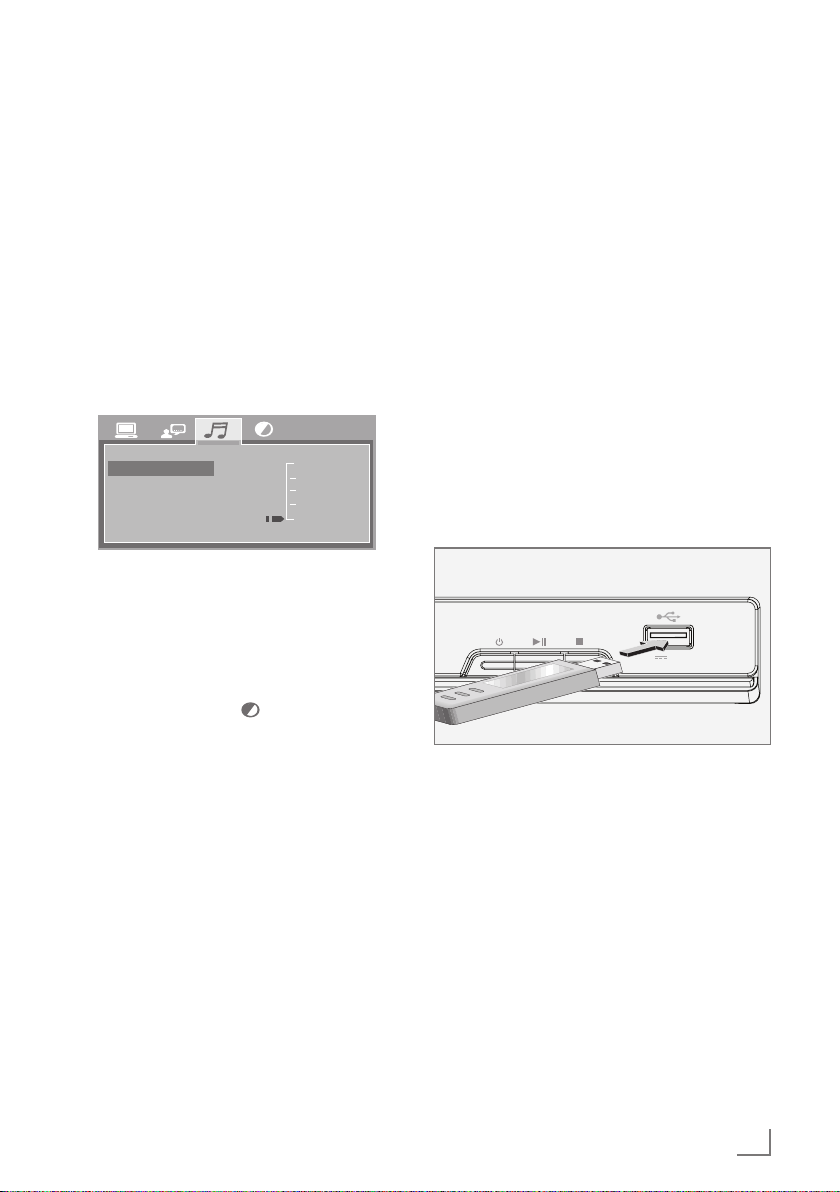
SPECIAL SETTINGS
-----------------------------------------------------------------------------------------------------
– SPDIF/RAW or SPDIF/PCM: Surround digital
audio coded in Dolby Digital / DTS format is
output on back panel coaxial audio output
connector.
DYNAMIC RANGE
This function could be used to avoid disturbance
when viewing content with high audio output
level during the night. This function lowers the
dynamic range of the audio while preserving the
tonal quality of the original audio.
Dynamic range is the difference of highest and
lowest level audio in a given track in decibel
(dB) units.
AUDIO OUT
DYNAMIC RANGE
FULL
6 / 8
4 / 8
2 / 8
OFF
Quality Settings
This menu enables you to adjust the video quality settings of your DVD video output such as
Brightness and Contrast.
1 Press »SETUP« button to enter main menu.
2 On main menu select » « option using »◂« or
»▸« buttons and press »OK« to confirm.
3 Select desired function by using »▾« or »▴«
buttons and press »OK« to confirm.
4 Press »SETUP« button to exit main menu.
Brightness: Adjusts the brightness level of the
video output.
When you press »▸«, a value is displayed on the
screen. Adjust with »▾« or »▴« and press »OK«
to confirm.
Press »◂« to return to the menu.
Contrast: Adjusts the contrast level of the video
output.
When you press »▸«, a value is displayed on the
screen. Adjust with»▾« or »▴« and press »OK«
to confirm.
Press »◂« to return to the menu.
Color: Adjusts the color temperature level of the
video output.
When you press »▸«, a value is displayed on the
screen. Adjust with »▾« or »▴« and press »OK«
to confirm.
Press »◂« to return to the menu.
Saturation: Adjust the saturation level of the
video output.
When you press »▸«, a value is displayed on the
screen. Adjust with »▾« or »▴« and press »OK«
to confirm.
Sharpness: Adjusts the sharpness level of the
video output as »8,6,4,2,0«.
Press »◂«t o return to the menu.
Usb Record Function
(Cd Ripping)
It is possible to record the Audio tracks on an
Audio CD to USB mermory using this function.
5V 500 mA
1 To be able to use this function first insirt an Au-
dio CD.
2 Place a USB memory to the USB slot on the
front panel of your DVD Player and press
»USB REC« button.
3 Recording setting will be displayed on the scre-
en. Press »▸« to view the settings. To adjust any
of the settings move the cursor on that setting
and press »OK« button. To go back to the
Menu press »◂« button.
4 Select START option using »▾« or »▴« buttons
and press »OK« button to start recording.
ENGLISH
47
Page 48
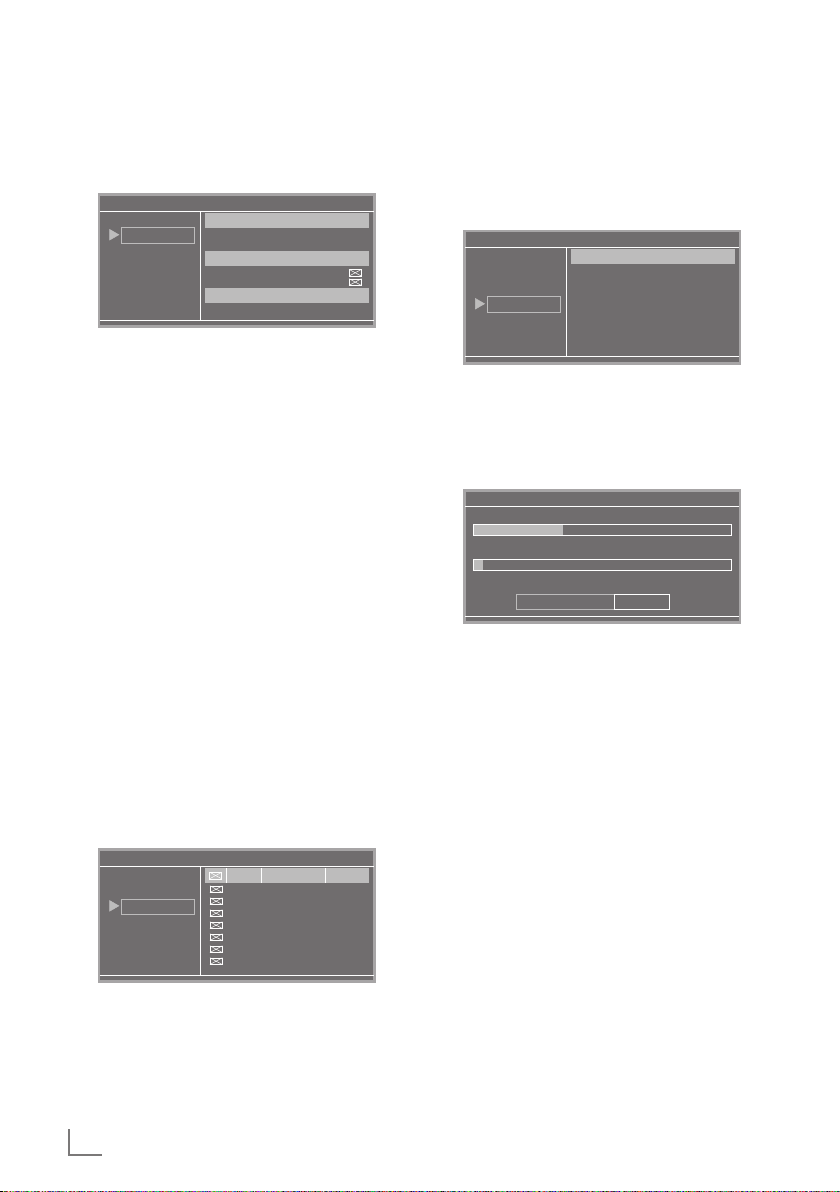
SPECIAL SETTINGS
-----------------------------------------------------------------------------------------------------
Settings
Recording and encoding settings could be adjusted in this menu.
RIP CD — UNKNOWN ALBUM
OPTIONS
TRACKS
START
QUIT
SPEED: To adjust recording settings from CD to
USB mermory press »OK« button.
BİT RATE: You could change the compression
ratio to adjust. Higher bit rate results in higher
quality Audio. Lower bitrate results in lower size
file.
To adjust the Bit Rate press »OK« button.
CREATE ID3 TAG: Artist, Album and Track
names could be recorded if this function is supported by the Audio CD inserted.
To enable this function press »OK« button.
CREATE PLAYLIST: Creates a specific folder
on USB memory to store the encoded audio
files.
To enable this function press »OK« button.
TRACK
This sub menu displays all tracks and their lengts
on the Audio CD.
Select the tracks you wish to record to USB
memory by using »▾« or »▴« buttons and press
»OK« to confirm.
RIP CD — UNKNOWN ALBUM
OPTIONS
TRACKS
START
QUIT
ENCODER OPTIONS
SPEED 4X
BITRATE 128KBPS
FILE OPTIONS
CREATE ID3 TAG
CREATE PLAYLIST
STORAGE OPTIONS
STORAGE USB
TITLE
TRK
1. PARÇA1 3:46
2. PARÇA2 4:00
3. PARÇA3 3:20
4. PARÇA4 4:04
5. PARÇA5 4:46
6. PARÇA6 3:05
7. PARÇA7 3:20
LENGTH
START
The sub menu will display total number of tracks
to be recorded, total length of tracks to be recorded and total size the tracks will take on USB
memory. To start recording press »OK« button.
RIP CD — UNKNOWN ALBUM
OPTIONS
TRACKS
START
QUIT
TOTAL TRACKS 7
TOTAL TIME 26:21
TOTAL SIZE 36.7MB
PRESS ENTER TO BEGIN
Overall progess could be monitored by the
progress bars. To adjust recording speed press
»OK« button. To cancel recording press »▸«
button to highlight CANCEL function and press
»OK« to confirm.
TRACK 1
TRACK PROGRESS
TOTAL PROGRESS
SPEED:4X MUTE
CHANGE SPEED
Note:
7
Do not remove the USB mermoy while recording is in progress. Doing so could damage
the USB mermory and/or the files in it.
7
Using only USB memories is recommended
for recording function. Mermory card adaptors may not function proparly.
SUMMARY
CANCEL
48
ENGLISH
Page 49
INFORMATION
------------------------------------------------------------------------------------------------------------------
License Terms
Manufactured under the
bol are trademarks of Dolby Laboratories.
poration. This is an official DivX Certified® device
that plays DivX video. Visit divx.com for more information and software tools to convert your files
into DivX videos.
ABOUT DIVX VIDEO-ON-DEMAND: This DivX
Certified® device must be registered in order to
play purchased DivX Video-on-Demand (VOD)
movies. To obtain your registration code, locate
the DivX VOD section in your device setup menu.
Go to vod.divx.com for more information on
how to complete your registration.
DivX®, DivX Certified® and associated logos are
trademarks of Rovi Corporation or its subsidiaries and are used under license.
DivX Certified® to play DivX® video, including
premium content.
General information about the
laser products.
way not to exceed the permitted maximum laser
emission limits under any circumstances.
license of Dolby Laboratories.
Dolby and double D sym-
ABOUT DIVX VIDEO:
DivX® is a digital video format created by DivX, LLC,
a subsidiary of Rovi Cor-
This device is a CLASS
1 LASER PRODUCT.
Class 1 Laser Product
means that the product
is designed in such a
Warning:
7
Using operation tools or methods other than
those mentioned herein may lead to hazardous exposure to the laser emissions.
7
This device emits laser beams. Due to the
danger of eye injuries, the unit may only be
dismantled and repaired by the trained and
qualified personnel.
7
If the settings apart from those stated herein
are used or other procedures are performed, you may be exposed to dangerous
radiation.
Cleaning the device
Disconnect the power plug of the device from
the wall outlet. Clean the device with a soft cloth
slightly moistened with a detergent water. Do not
use solutions containing alcohol, ethyl alcohol,
ammonium or abrasive substances.
Cleaning the disc
If the player cannot
read the CDs, use a
standard cleaning CD
which are available
on the market to clean
the laser optic hardware.
Other cleaning methods may damage the laser
optic hardware.
Fingerprints, dust and dirt may cause noise and
audio deformation.
Use a slightly moistened and soft cloth to clean
a CD and wipe on a linear direction from the
center to the edge. Do not use cleaning substances, solvents or abrasive cleaners for the
gramophone records.
ENGLISH
49
Page 50
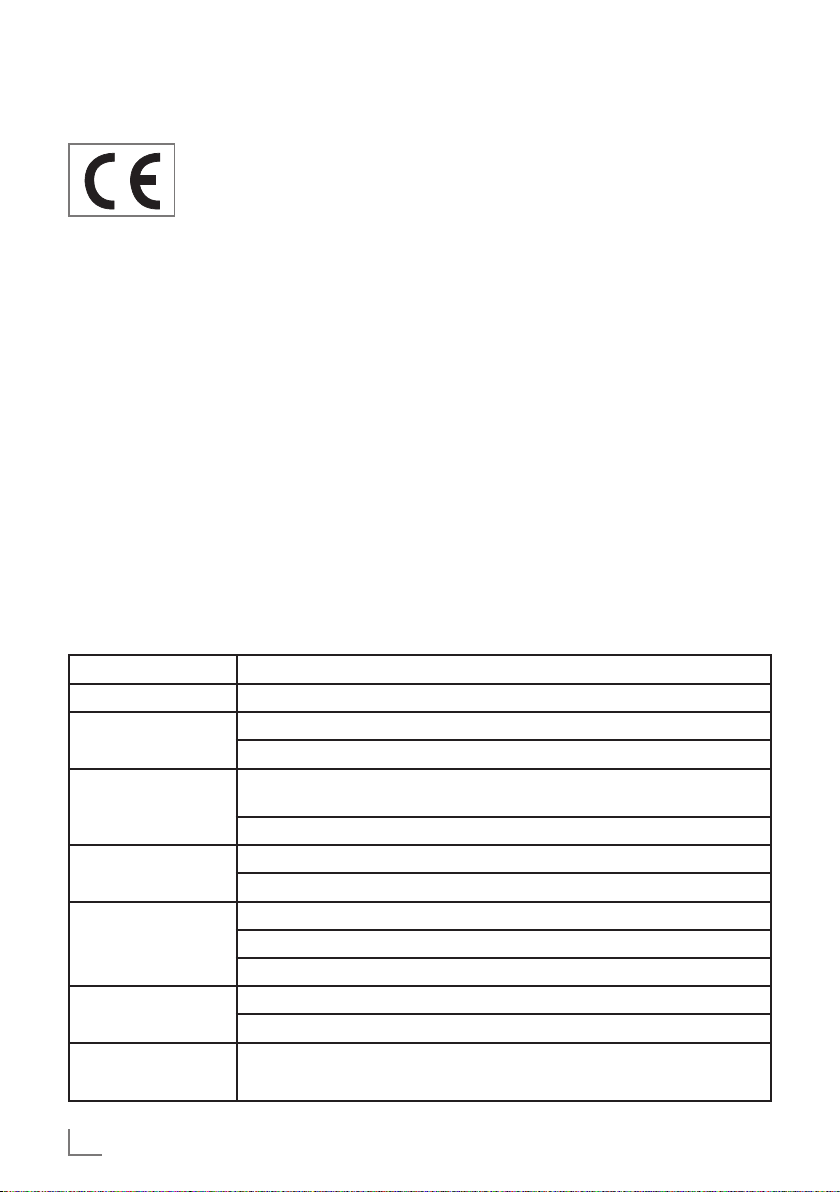
INFORMATION
------------------------------------------------------------------------------------------------------------------
Technical Data
This device is equipped with
a noise suppression system as
per EU Directives in force.
This product meets the requirements of the EU Directives 2004/108/EC,
2006/95/EC, 2009/125/EC and 2011/65/
EU.
System
Power supply
Operat ing voltage: 110 - 240 V~
Mains frequency: 50/60 Hz
Max. power consumption: 12 W
Power consumption in Standby mode: ≤ 0,5 W
Standard Playback
PAL, 50 Hz, 625 rows
NTSC, 60 Hz, 525 rows
Disc types
DivX (MPEG 4), DVD, DVD-R, DVD+R, VCD,
SVCD, CD, CD-R, CD-RW, MP3, WMA (PCM),
JPEG, KODAK CD
USB
USB 2.0 compatible FAT 32/16
Audio format
Dolby Digital
Dimensions and weight
Dimensions: W x H x D 415 x 296 x 85 mm
Weight: 1.7 kg
Technical and design modifications are reserved.
Troubleshooting
Please read the following manual for the possible reason and solution of the problem before
calling the nearest service or authorized reseller
for your repair requests.
SIGN CORRECTION METHOD
It is not energised Check whether the power connection is properly made.
No image on the
screen
No sound
It does not play
Remote control does
not respond
Image Interference
It is not activated by
means of the buttons.
Check the connections between the player and the TV.
Check whether your TV operates properly or not.
Check the connections between the player and the other devices are in
place.
Make sure that the TV and amplifier works properly and set correctly.
Check whether the disc is inserted correctly.
Clean the disc.
Remove the obstructions between the remote control and the device.
Aim the remote control to the receiver on the front panel of the device.
Check the batteries and replace them if necessary.
Check whether the disc is dirty or scratched. Clean or replace the CD.
Switch of the device, wait for ten seconds and restart again.
Electrical fluctuations or some other electric problem.
Switch of the device, wait for ten seconds and restart again.
50
ENGLISH
Page 51

Garanti Konusunda
Dikkat Edilmesi Gereken Hususlar
Garanti Kapsamı:
Grundig tarafından verilen bu garanti, DVD Oynatıcının normalin dışında
kullanılmasından doğacak arızaların giderilmesini ve aşağıdaki durumları
kapsamamaktadır.
1. Kullanma hatalarından meydana gelen hasar ve arızalar,
2. Ürünün müşteriye tesliminden sonraki yükleme, boşaltma ve taşıma sırasında
oluşan hasar ve arızalar,
3. Voltaj düşüklüğü veya fazlalığı; hatalı elektrik tesisatı; ürünün etiketinde yazılı
voltajdan farklı voltajda kullanma nedenlerinden meydana gelecek hasar ve
arızalar,
4. Yangın ve yıldırım düşmesi ile meydana gelecek arızalar ve hasarlar,
5. Ürünün kullanma kılavuzlarında yer alan hususlara aykırı kullanılmasından
kaynaklanan arızalar.
Yukarıda belirtilen arızaların giderilmesi garanti kapsamı dışında olup, ücret
karşılığında yapılmaktadır.
Ürünün kullanım yerine montajı ve nakliyesi ürün fiyatına dahil değildir.
Garanti belgesinin tekemmül ettirilerek tüketiciye verilmesi sorumluluğu, tüketicinin
malı satın aldığı satıcı, bayi, acente ya da temsilciliklere aittir.
Garanti belgesi üzerinde tahrifat yapıldığı, ürün üzerindeki orijinal seri numarası
kaldırıldığı veya tahrif edildiği takdirde bu garanti geçersizdir.
Müşteri Hizmetleri:
Tüm sorularınız için Grundig Hizmet Merkezi’ni haftanın 7 günü 24 saat aşağıdaki
numaradan arayabilirsiniz.
Grundig Hizmet Merkezi 444 9 888
(Sabit telefonlardan veya cep telefonlarından alan kodu çevirmeden *)
Diğer numara 0 216 423 22 07
* Sabit telefonlardan yapılan aramalarda şehir içi arama tarifesi üzerinden, cep
telefonu ile yapılan aramalarda ise GSM-GSM tarifesi üzerinden ücretlendirme
yapılmaktadır.
Hizmet Merkezimize ayrıca www.grundig.com.tr adresinden, 0216 423 22 07
nolu telefonu arayarak ya da 0216 423 23 53 nolu hattımıza fax çekerek de
ulaşabilirsiniz.
Yazılı başvurular için adresimiz: Grundig Hizmet Merkezi, Arçelik A.Ş. Ankara
Asfaltı Yanı, 34950 Tuzla/İSTANBUL
Öneriler:
Garanti hizmetinden en iyi şekilde faydalanabilmeniz için aşağıdaki önerilere
uymanızı rica ederiz.
1. Ürününüzü aldığınızda garanti belgesini yetkili satıcınıza onaylatınız.
2. Ürününüzü kullanım kılavuzu esaslarına göre kullanınız.
3. Ürününüzle ilgili hizmet talebiniz olduğunda yukarıdaki telefon numarasından
Grundig Hizmet Merkezi’ne başvurunuz.
4. Hizmet için gelen teknisyene "Teknisyen Kimlik Kartı"nı sorunuz.
5. Servis hizmeti bittikten sonra, servis teknisyeninden hizmet fişi istemeyi
unutmayınız. Alacağınız hizmet fişi ileride ürününüzde meydana gelebilecek
herhangi bir sorunda size yarar sağlayacaktır.
6. Ürünün kullanım ömrü boyunca fonksiyonunu yerine getirebilmesi için gerekli
yedek parça bulundurma süresi 7 yıldır.
İthalatçı/İmalatçı: Arçelik A.Ş.
Adres: Genel Müdürlük Karaağaç Caddesi No:2-6 Sütlüce 34445 İstanbul-Türkiye
Page 52
GARANTİ BELGESİ
Garanti süresi Grundig DVD Oynatıcı'nın, kullanma kılavuzunda gösterildiği
şekilde kullanılması ve Arçelik’in yetkili kıldığı Servis elemanları dışındaki
şahıslar tarafından bakım, onarım veya başka bir nedenle müdahale
edilmemiş olması şartıyla, bütün parçaları dahil olmak üzere tamamı malzeme, işçilik ve üretim hatalarına karşı
2 (İKİ) YIL SÜRE İLE GARANTİ EDİLMİŞTİR.
Garanti kapsamı içinde gerek malzeme ve
Garanti kapsamı içinde gerek malzeme ve Garanti kapsamı içinde gerek
malzeme ve işçilik gerekse montaj hatalarından dolayı arızalanması halinde
yapılan işlemler için işçilik masrafı, değiştirilen parça bedeli ya da başka bir
ad altında hiçbir ücret talep edilmeyecektir. Garanti süresi içinde yapılacak
onarımlarda geçen süre, garanti süresine ilave edilir. Tamir süresi en fazla
20 iş günüdür. Bu süre mamulün yetkili servis atölyelerimize, yetkili servis
atölyelerimiz bulunmaması durumunda Yetkili Satıcılarımıza veya Firmamıza
bildirildiği tarihten itibaren başlar. Ürünün arızasının 10 iş günü içerisinde
giderilememesi halinde Arçelik A.Ş. ürünün tamiri tamamlanıncaya kadar,
benzer özelliklere sahip başka bir ürünü, müşterinin kullanımına tahsis edecektir.
Arızanın giderilmesi konusunda uygulanacak teknik yöntemlerin tespiti ile
değiştirilecek parçaların saptanması tamamen firmamıza aittir. Arızanın
giderilmesi ürünün bulunduğu yerde veya yetkili servis atölyelerinde
yapılabilir. Bu konuda müşteri onayı alınması zorunludur.
Ancak;
Tüketicinin onarım hakkını kullanmasına rağmen malın ;
--Tüketiciye teslim edildiği tarihten itibaren, garanti süresi içinde kalmak
kaydıyla, bir yıl içerisinde en az dört defa veya imalatçı-üretici ve/veya ithalatçı
tarafından belirlenen garanti süresi içerisinde altı defa arızalanmasının yanı
sıra, bu arızaların maldan yararlanmamayı sürekli kılması,
--Ürünün tamiri için gereken azami sürenin aşılması,
--Yetkili Servis atölyelerince; mevcut olmaması halinde sırasıyla yetkili
satıcımız, bayi, acente temsilciliği, ithalatçı ya da imalatçıdan birisinin bölgeye en yakın servis yetkilisiyle birlikte veya firmamız yetkilisince düzenlenecek
raporla arızanın tamirinin mümkün bulunmadığının belirlenmesi durumunda,
tüketici malın ücretsiz değiştirilmesini, bedel iadesi veya ayıp oranında indirimi talep edebilir.
Garanti belgesi ile ilgili olarak çıkabilecek sorunlar için Gümrük ve Ticaret
Bakanlığı, Tüketicinin Korunması ve Piyasa Gözetim Genel Müdürlüğü’ne
başvurulabilir. Bu belgenin kullanılmasına; 4077 sayılı Tüketicinin Korunması
Hakkında Kanun ve bu kanuna dayanılarak yürürlüğe konulan Garanti
Belgesi Uygulama Esaslarına Dair Yönetmelik uyarınca, T.C. Gümrük ve Ticaret Bakanlığı Tüketicinin Korunması ve Piyasa Gözetim Genel Müdürlüğü
tarafından izin verilmiştir.
Arçelik A.Ş.
GENEL MÜDÜR
Bu belge, Gümrük ve Ticaret Bakanlığı’nın 105941 no’lu ve 06.10.2011 izin tarihli belgesine göre düzenlenmiştir.
Bu bölümü, ürünü aldığınız Yetkili Satıcı imzalayacak ve kaşeleyecektir
GENEL MÜDÜR YRD.
 Loading...