


MO20A4W
MO20A4X
www.gorenje.com
Instruction manual / Microwave oven |
|
EN ..................................................................................................................................................... |
4 |
Gebrauchsanweisung / Mikrowellengerät |
|
D ....................................................................................................................................... |
19 |
Notice d’utilisation / Micro-ondes |
|
F....................................................................................................................................... |
37 |
Návod na použití / Mikrovlnná trouba |
|
CZ ................................................................................................................................... |
54 |
Návod na obsluhu / Mikrovlnná rúra |
|
SK................................................................................................................................... |
70 |
Használati utasítás / Mikrohullámú sütõ |
|
H ..................................................................................................................................... |
86 |
Instrukcja obsługi / Kuchenka mikrofalowa |
|
PL.................................................................................................................................. |
102 |
Istruzioni per l’uso / Microwave oven |
|
IT ................................................................................................................................................... |
120 |
|
MICROWAVE OVEN |
|
|
|
|
|
|
GB |
|
||
|
|
|
|
|
|
|
|
|
|
|
|
DEAR CUSTOMER
INSTRUCTIONS FOR USE
We sincerely thank you for your purchase. We believe you will soon find ample evidence that you can really rely on our products. To make the use of the appliance easier, we attach these comprehensive instruction manual.
The instructions should aid you in getting familiar with your new appliance. Please, read them carefully before using the appliance for the first time.
In any case, please make sure the appliance was supplied to you undamaged. Should you identify and transport damage, contact your sales representative or the regional warehouse from where the product was delivered. You will find the telephone number on the receipt or delivery report.
We wish you a lot of pleasure with your new household appliance.
The appliance for household use for heating food and beverages using electromagnetic energy, for indoor use only.
These instructions are intended for the user.
They describe the cooker and how to use it. They also apply to different types of appliances, therefore you may find some descriptions of functions that may not apply to your appliance.
4

IMPORTANT SAFETY INSTRUCTIONS
Never touch the surfaces of heating or cooking appliances. They will become hot during operation. Keep children at a safe distance. There is a risk of burning!
Microwave energy & High voltage! Do not remove the cover.
WARNING! The appliance and its accessible parts become hot during use. Care should be taken to avoid touching heating elements. Children less than 8 years of age shall be kept away unless continuously supervised. Children should be supervised to ensure that they do not play with the appliance.
This appliance can be used by children aged from 8 years and above and persons with reduced physical, sensory or mental capabilities or lack of experience and knowledge if they have been given supervision or
instruction concerning use of the appliance in a safe way and understand the hazards involved. Children shall not play with the appliance. Cleaning and maintenance shall not be made by children unless they are older than 8 and supervised.
Keep the appliance and its cord out of reach of children less than 8 years.
•WARNING: When the appliance is operated in the combination mode, children should only use the oven under adult supervision due to the temperatures generated; (Only for the model with grill function)
5

•WARNING: If the door or door seals are damaged, the oven must not be operated until it has been repaired by a competent person;
•WARNING: It is hazardous for anyone other than a competent person to carry out any service or repair operation that involves the removal of a cover which gives protection against exposure to microwave energy;
•WARNING: liquids and other foods must not be heated in sealed containers since they are liable to explode.
•Children should be supervised to ensure that they do not play with the appliance.
•Don't remove oven's feet, do not block air events of the oven.
•Only use utensils that are suitable for use in microwave ovens.
•When heating food in plastic or paper containers, keep an eye on the oven due to the possibility of ignition;
•If smoke is observed, switch off or unplug the appliance and keep the door closed in order to stifle any flames;
•Microwave heating of beverages can result in delayed eruptive boiling, therefore care must be taken when handling the container;
•The contents of feeding bottles and baby food jars shall be stirred or shaken and the temperature checked before consumption, in order to avoid burns;
•Eggs in their shell and whole hard-boiled eggs should not be heated in microwave ovens since they may explode, even after microwave heating has ended;
6

•When cleaning surfaces of door, door seal, cavity of the oven, use only mild, nonabrasive soaps, or detergents applied with a sponge or soft cloth.
•The oven should be cleaned regularly and any food deposits removed;
•Failure to maintain the oven in a clean condition could lead to deterioration of the surface that could adversely affect the life of the appliance and possibly result in a hazardous situation;
•If the supply cord is damaged, it must be replaced by the manufacturer, its service agent or similarly qualified persons in order to avoid a hazard.
•Do not let the cord hang over the edge of the table or worktop.
•Never connect this appliance to an external timer switch or remote control system in order to avoid a hazardous situation.
•Never replace the light bulb inside the oven. It must always be replaced by Gorenje service.
•Do not clean the appliance with steam cleaners, highpressure cleaners, sharp objects, abrasive cleaning agents, and abrasive sponges and stain removers.
7

SAFETY INSTRUCTIONS FOR GENERAL USE
Listed below are, as with all appliances, certain rules to follow and safeguards to assure top performance from this oven:
1.Always have the glass tray, roller arms, coupling and roller track in place when operating the oven.
2.Do not use the oven for any reason other than food preparation, such as for drying clothes, paper, or any other nonfood items, or for sterilizing purposes.
3.Do not operate the oven when empty. This could damage the oven.
4.Do not use the oven cavity for any type of storage, such a papers, cookbooks, etc.
5.Do not cook any food surrounded by a membrane,such as egg yolks, potatoes, chicken livers, etc without first being pierced several times with a fork.
6.Do not insert any object into the openings on the outer case.
7.Do not at any time remove parts from the oven such as the feet, coupling, screws, etc.
8.Do not cook food directly on the glass tray. Place food in/on proper cooking utensil before placing in the oven. IMPORTANT - COOKWARE NOT TO USE IN YOUR
MICROWAVE OVEN
–Do not use metal pans or dishes with metal handles.
–Do not use anything with metal trim.
–Do not use paper covered wire twist-ties on plastic bags.
–Do not use melamine dishes as they contain a material which will absorb microwave energy. This may cause the dishes to crack or char and will slow down the cooking speed.
–Do not use Centura Tableware. The glaze is not suitable for microwave use. Corelle Livingware closed handle cups should not be used.
–Do not cook in a container with a restricted opening, such as a pop bottle or sealed oil bottle, as they may explode if heated in a microwave oven.
–Do not use conventional meat or candy thermometers.
–There are the thermometers available specifically for microwave cooking. These may be used.
9.Microwave utensils should be used only in accordance with manufacturer's instructions.
10.Do not attempt to deep-fry foods in this oven.
11.Please remember that a microwave oven only heats the liquid in a container rather than the container itself.
8

Therefore, even though the lid of a container is not hot to the touch when removed from the oven, please remember that the food/liquid inside will be releasing
the same amount of steam and/or spitting when the lid is removed as in conventional cooking.
12.Always test the temperature of cooked food yourself especially if you are heating or cooking food/liquid for babies. It is advisable never to consume food/liquid straight from the oven but allow it to stand for a few minutes and stir food/liquid to distribute heat evenly.
13.Food containing a mixture of fat and water, e.g.stock,should stand for 30-60 seconds in the oven after it has been turned off. This is to allow the mixture to settle and to prevent bubbling when a spoon is placed in the food/liquid or a stock cube is added.
14.When preparing/cooking food/liquid and remember that there are certain foods, e.g. Christmas puddings, jam and mincemeat, which heat up very quickly. When heating or cooking foods with a high fat or sugar content do not use plastic containers.
15.Cooking utensil may become hot because of heat transferred from the heated food. This is especially true if plastic wrap has been covering the top and handles of the utensil. Potholders may be needed to handle the utensil.
16.To reduce the risk of fire in the oven cavity:
a)Do not overcook food. Carefully attend microwave oven if paper, plastic, or other combustible materials are placed inside the oven to facilitate cooking.
b)Remove wire twist-ties from bags before placing bag in oven.
c)If materials inside the oven should ignite, keep oven door closed, turn the oven off at the wall switch, or shut off power at the fuse or circuit breaker panel.
9

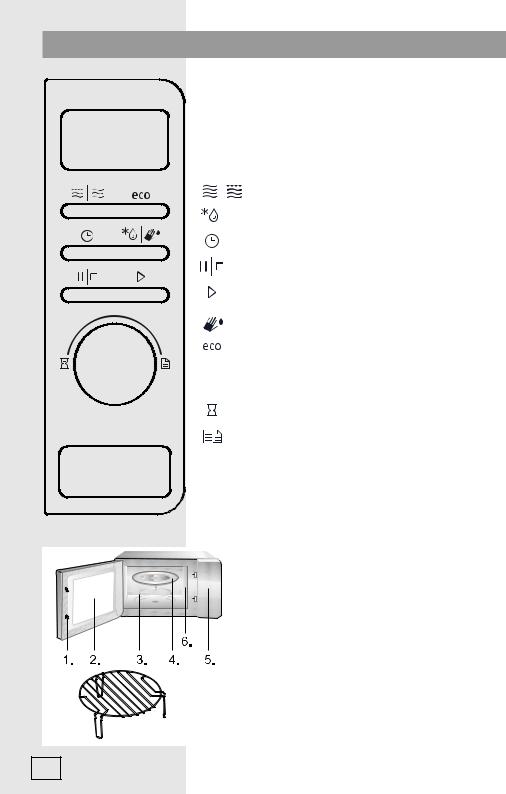
CONTROL PANEL
DISPLAY UNIT
Displays the selected functions and time.
KEYS
Microwaves / Grill / Combined
Defrosting
Delay start / Clock
Pause / Stop
Start
Self clean function – aquaclean
ECO mode – power saving
ROTARY KNOB
Timer
Automenu
DOOR OPENING KNOB
1. Door Safety Lock System
2. Oven Window
3. Roller Ring
4. Glass Tray
5. Control Panel
6. Wave guide (please do not remove the mica plate covering the wave guide)
Grill rack (Only be used for grill or for combination function and be placed on glass tray
10
INSTRUCTIONS FOR USE
1. CLOCK
2. COOKING AND REHEATING WITH MICROWAVES
3. GRILL
The oven is fitted with a digital clock. When the oven is in the standby mode, the clock can be set in the 24-hour mode by pressing the CLOCK key.
Example: To set the time to 8:30:
a)Press CLOCK key. Turn knob to set 8 hours.
b)Press CLOCK key once. Turn knob to set 30 min.
c)Press CLOCK key once to confirm the setting.
NOTE: During cooking, clock can be displayed at any time by pressing the CLOCK key. Clock has to be set every time the oven is connected or re-connected to the power mains.
This function has two options:
a)Rapid heating with microwaves (100% power)
Example: Cooking with 100% power for 5 minutes.
1.Use the rotary knob to set the time to 05:00.
2.Press the START key to start the program.
b)Cooking and reheating with microwaves
For example, suppose you want to cook for 10 minute at 60% of microwave power.
1.Press the MICROWAVE key repeatedly or use the rotary knob to select power level (60%). Press the START.
2.Turn the knob to select time 10:00.
3.Press the START key to start.
There are 5 power levels available (100%, 80%, 60%, 40%, 20%), maximum operating time is 60 minutes.
Grilling is especially suitable for thin slices of meat, escalopes or steaks, meat chops, skewers, sausages, or pieces of chicken. Grilling is also suitable for toasting bread or sandwiches and finishing dishes au gratin. Maximum operating time that can be set for the grill is 60 minutes.
Example: Grilling for 12 minutes
1.Press the MICROWAVE key repeatedly or use roaty knob until »G« displays, press START to confirm.
2.Rotate the knob to set the time to 12:00.
3.Press the START key to start the program.
NOTE: During cooking or grilling, the oven will automatically beep twice when halfway through the progress. This is to remind you to turn around the food. After this is done, close the oven door and press the START key. If you do not wish to turn around the food, cooking or grilling will continue.
11

4. COMBINET
OPERATION C-1
5. COMBINED
OPERATION C-2
6. AUTO DEFROST DEF1
7.SPEED DEFROST DEF2
8.AUTO MENU
12
The oven will operate with microwaves 30 percent of the time, and with grill 70 percent of the time. This operating mode is suitable for cooking pudding, soufflés, omelettes, baked potatoes, and poultry. Maximum operating time that can be set is 60 minutes.
Example: Set combined operation C-1 for 25 minutes.
1.Press the MICROWAVE key several times or use the rotary knob until C-1 appears on the screen.
2.Confirm the selected combination by pressing START.
3.Rotate the knob to set the time to 25:00.
4.Press the START key to start the program.
The oven will operate with microwaves 55 percent of the time, and with grill 45 percent of the time. This operating mode is suitable for cooking fish or dishes au gratin. Maximum operating time that can be set is 60 minutes.
Example: Set combined operation C-2 for 25 minutes.
1.Press the MICROWAVE key several times or use the rotary knob until C-2 appears on the screen. Confirm by press START.
2.Use the knob to set the time to 25:00.
3.Press the START key to start the program.
The oven allows defrosting of meat, poultry, and seafood. Defrosting time and operating power will be adjusted automatically according to the preset weight. Weight of the food to be defrosted may be between 100 g and 2000 g.
Example: Defrosting 600 g of frozen fish
1.Press the DEFROST key.
2.Rotate the knob to set the weight to 600 g.
3.Press the START key to start the program.
The oven also allows speed defrosting.
Example: Rapid defrosting of bread
1.Press the DEFROST key twice.
2.Rotate the knob to set the desired time.
3.Press the START key to start the program.
For the food in the auto menu, only the type of food and the weight/amount have to be set. The oven will aid you in the setting of power and time.
Example:
1.In standby mode, turn knob right to select corresponding food code from A1 - to A11. Press the
START key.
2.Turn the knob to indicate the food weight.
3.Press the START key to start.

9. MULTI-STAGE COOKING
Menu |
Weight/amount |
Microwave power |
|
|
|
|
|
A1 |
150, 300 g |
100% |
|
pizza |
|||
|
|
||
|
|
|
|
A2 |
100, 200, 300 ml |
100% |
|
Liquid |
|||
|
|
||
|
|
|
|
A3 |
100g |
100% |
|
Popcorn |
|||
|
|
||
|
|
|
|
A4 |
100, 200, 300 g |
100% |
|
Meat |
|||
|
|
||
|
|
|
|
A5 |
100, 200, 300 g |
100% |
|
Potatoes |
|||
|
|
||
|
|
|
|
A6 |
100, 200, 300 g |
100% |
|
Vegetables |
|||
|
|
||
|
|
|
|
A7 |
100, 200, 300 g |
100% |
|
Fish |
|||
|
|
||
|
|
|
|
|
100 g (450 ml water) |
|
|
A8 |
|
|
|
200 g (800 ml water) |
100% |
||
Pasta |
|||
|
|
||
|
300 g (1200 ml water) |
|
|
|
|
|
|
A9 |
100g |
30% + 10% |
|
|
|
||
softmelt |
200, 300 g |
30% + 20% + 10% |
|
|
|||
|
|
|
|
A10 |
1, 2, 6 pcs |
100% |
|
plate warmer |
|||
|
|
||
|
|
|
|
A11 |
100, 200, 300 g |
80% + 60% + 80% |
|
staywarm |
|||
|
|
||
|
|
|
Microwave oven allows cooking in four steps.
Example: To defrost frozen meat for 10 minutes, then heat it for 5 minutes at 60%:
1.Press the DEFROST key twice.
2.Use the knob to set the time to 10:00.
3.Press the MICROWAVE key several times or use the rotary knob to select power level (60%). Press the
START key.
4.Turn the knob to select time 05:00.
5.Press the START key to start the program.
NOTE: Defrost function can only be used in the first step. Auto menu cannot be a step in a multi-step cooking program.
13

10. QUICK START
11. CHILD LOCK
12. DELAY START
13.ECO MODE – POWER
SAVING
14.SELF CLEAN FUNCTION – AQUACLEAN
Tips for using the oven
Use this function to rapidly heat (100% microwave power) or cook your food. In the standby mode, press the START key and the oven will operate for 30 seconds. With each consecutive press of the START key, the operating time will be extended by 30 seconds.
NOTE: Pressing the START key again will prolong the cooking time by 30 seconds in all programs except in automatic mode, and in the auto defrost mode.
This function is used to prevent uncontrolled or inadvertent use of the oven by children.
To set: In standby or preset mode, hold down the PAUSE/
STOP key for 3 seconds, a beep sounds and lock indicator lights. In the locked mode, all buttons are disabled except PAUSE/STOP key.
To cancel: Hold down the PAUSE/CANCEL button for 3 seconds until lock indicator on display goes off.
Preset function allows the oven to start up in a later time. Suppose you want to cook for 10 minute at 60% of microwave power now the clock running at 11:10 and you want the oven to start cooking at 11:30.
1.Press the MICROWAVE key several times or use the rotary knob to select power level (60%). Press the
START key.
2.Turn the knob to select time 10:00.
3.Press the CLOCK key.
4.Turn the knob to enter hour digit 11.
5.Press the CLOCK key.
6.Turn the knob to enter minute digit 30.
7.Press START key to start.
Press Eco button. The display will turn off and the microwave is in Eco mode which minimizes power usage. To cancel the Eco mode and turn on the display again, press any other button or open or close the door.
For regular cleaning of your oven the following procedure is recommended: Press the key and hold it for approximately 3 seconds.
Put in a glass of water – 200ml – and press START button. After program has finished, wait 2-3 minutes and then remove the glass and wipe the oven with soft cloth.
14

15. SETTING THE ALARM AND KEY SOUND
Use this function to set the loudness of the keys and other appliance sounds.
Press the ECO key and hold it for approximately 3 seconds.
»Vol« will appear on the display and sound will be turned off.
To turn on the sounds again, press the ECO key and hold it for approximately 3 seconds. “VOL” will appear on the display.
15

CARE OF YOUR MICROWAVE OVEN
|
1. |
Turn the oven off and remove the power plug from |
|
|
the wall socket before cleaning. |
|
2. |
Keep the inside of the oven clean. When food |
|
|
splatters of spilled liquids adhere to oven walls,wipe |
|
|
with a damp cloth. The use of harsh detergent or |
|
|
abrasives is not recommended. |
|
3. |
The outside oven surface should be cleaned with |
|
|
a damp colth. To prevent damage to the operating |
|
|
parts inside the oven, water should not be allowed to |
|
|
seep into the ventilation openings. |
|
4. |
Do not allow the Control Panel to become wet. Clean |
|
|
with a soft, damp cloth, Do not use detergents, |
|
|
abrasives or spray-on cleaners on the control Panel. |
|
5. |
If steam accumulates inside or around the outside |
|
|
of the oven door, wipe with a soft cloth.This may |
|
|
occur when the microwave oven is operated under |
|
|
high humidity conditions and in no way indicates |
|
|
malfunction of the unit. |
|
6. |
It is occasionally necessary to remove the glass tray |
|
|
for cleaning. Wash the tray in warm sudsy water or in |
|
|
a dishwasher. |
|
7. |
The roller ring and oven cavity floor should be |
|
|
cleaned regularly to avoid excessive noise. Simply |
|
|
wipe the bottom surface of the oven with mild |
|
|
detergent, water or window cleaner and dry. The |
|
|
roller ring may be washed in mild sudsy water or dish |
|
|
washer. Cooking vapours collect during repeated use |
|
|
but in no way affect the bottom surface or roller ring |
|
|
wheels. When removing the roller ring from cavity |
|
|
floor for cleaning, be sure to replace it in the proper |
|
|
position. |
|
8. |
Remove odors from your oven by combining a cup of |
|
|
water with the juice and skin of one lemon in a deep |
|
|
microwaveable bowl. Microwave for 5 minutes, wipe |
|
|
thoroughly and dry with a soft cloth. |
|
|
|
ENVIRONMENT |
Do not throw away the appliance with the normal |
|
|
household waste at the end of its life, but hand it in at an |
|
|
official collection point for recycling. By doing this, you |
|
|
help to preserve the environment. |
|
16

MOUNTING THE MICROWAVE OVEN
INSTALLATION |
1. |
Make sure all the packing materials are removed from |
|
|
|
the inside of the door. |
|
|
2. |
Inspect the oven after unpacking for any visual damage |
|
|
|
such as: |
|
|
|
– |
Misaligned Door |
|
|
– |
Damaged Door |
|
|
– Dents or Holes in Door Window and Screen |
|
|
|
– |
Dents in Cavity |
If any of the above are visible, DO NOT use the oven.
3.This Microwave Oven weighs 11,5 kg and must be placed on a horizontal surface strong enough to support this weight.
4.The oven must be placed away from high temperature and steam.
5.DO NOT place anything on top of the oven.
6.Keep the oven at least 20 cm away from both sidewalls and 30 cm away from rear wall to ensure the correct ventilation.
7.DO NOT remove the turn -table drive shaft.
8.As with any appliance, close supervision is necessary when used by children.
9.Make sure that the AC outlet is easily accessible so that the plug can be removed quickly in an emergency.
Otherwise, it should be possible to disconnect the device using a switch from the circuit. In this case, the existing provisions of the electrical safety standards are considered.
The product has to be correctly installed on earthed socket with a single-phase AC (230 V/50 Hz). WARNING! THIS APPLIANCE MUST BE EARTHED!
10.This oven requires 1.3 KVA for its input consultation with service engineer is suggested when installing the oven.
CAUTION: This oven is protected internally by a 250V, 8
Amp Fuse.
17

SPECIFICATIONS
MOUNTING
DIMENSIONS
RADIO INTERFERENCE
Power consumption.................................... |
220-240V~50Hz, 1280W |
Output power ...................................................................................... |
800W |
Grill heater ............................................................................................ |
1000W |
Operating Frequency................................................................. |
2450MHz |
Outside Dimensions........ |
451mm(W) x 257mm(H) x 343mm(D) |
Oven Capacity.................................................................................. |
20 litres |
Uncrated Weight ............................................................... |
Approx. 11,5 kg |
Noise level............................................................................. |
Lc < 58 dB (A) |
This appliance is marked according to the European directive 2012/19/EU on Waste Electrical and Electronic Equipment (WEEE).
This guideline is the frame of a European-wide validity of return and recycling on Waste Electrical and Electronic Equipment.
Microwave oven may cause interference to your radio, TV, or similar equipment. When interference occurs, it may be eliminated or reduced by the following procedures.
a)Clean the door and sealing surface of the oven.
b)Place the radio, TV, etc. as far away from your microwave oven as possible.
c)Use a properly installed antenna for your radio, TV, etc. to get a strong signal reception.
WE RESERVE THE RIGHT TO MAKE ANY CHANGES
THAT DO NOT AFFECT THE FUNCTIONALITY OF THE
APPLIANCE.
18
BEFORE YOU CALL FOR SERVICE
1.If the oven will not perform at all, the information on the display does not appear or the display disappeared:
a)Check to ensure that the oven is plugged in securely. If it is not, remove the plug from the outlet, wait 10 seconds and plug it in again securely.
b)Check the premises for a blown circuit fuse or a tripped main circuit breaker. If these seem to be operating properly, test the outlet with another appliance.
2.If the microwave power will not function:
a)Check to see whether the timer is set.
b)Check to make sure that the door is securely closed to engage the safety interlocks. Otherwise, the microwave energy will not flow into the oven.
If none of the above rectify the situation, then contact the nearest authorized service agent.
The appliance for household use for heating food and beverages using electromagnetic energy, for indoor use only.
GUARANTEE & SERVICE
If you need information or if you have a problem, please contact the Gorenje Customer Care Centre in your country
(you find its phone number in the worldwide guarantee leaflet). If there is no Customer Care Centre in your country, go to your local Gorenje dealer or contact the Service department of Gorenje domestic appliances.
For personal use only!
Additional recommendations for cooking with microwave and useful advices can be found on web side:
http://www.gorenje.com
WISHES YOU A LOT OF PLEASURE WHILE USING YOUR
APPLIANCE
19

|
MIKROWELLENGERÄT |
|
|
|
|
|||
|
|
|
D |
|
||||
|
|
|
|
|
|
|
|
|
|
|
|
|
|
|
|
|
|
|
SEHR GEEHRTER |
Wir bedanken uns für das Vertrauen, das Sie uns mit dem |
||||||
|
KUNDE |
Kauf unseres Geräts erwiesen haben. Beim Gebrauch |
|
|
||||
|
|
wünschen wir Ihnen viel Vergnügen. |
|
|
||||
|
|
Zum Verpacken unserer Produkte werden |
|
|
||||
|
|
umweltfreundliche Materialien verwendet, die ohne Gefahr |
||||||
|
|
für die Umwelt wiederverwertet (recycelt), entsorgt oder |
||||||
|
|
vernichtet werden können. |
|
|
||||
|
|
Hierzu sind die Verpackungsmaterialien entsprechend |
|
|
||||
|
|
gekennzeichnet. |
|
|
||||
|
|
|
|
Das Gerät ist ausschließlich zum Gebrauch |
|
|
||
|
|
|
|
im Haushalt bestimmt und zwar zum |
|
|
||
|
|
|
|
Erhitzen vonSpeisen und Getränken mit |
|
|
||
|
|
|
|
|
|
|||
|
|
|
|
elektromagnetischer Energie. |
|
|
||
|
|
|
|
Verwenden Sie das Gerät nur in geschlossenen |
||||
|
|
|
|
Räumen. |
|
|
||
|
|
|
|
|||||
|
BEDIENUNGS- |
Die Bedienungsanleitung ist für den Benutzer bestimmt. |
||||||
|
ANLEITUNG |
Sie beschreibt das Gerät und seine Bedienung. Sie gilt |
|
|
||||
|
|
für verschiedene Gerätetypen, deswegen kann sie auch |
||||||
Beschreibungen von Funktionen beinhalten, die Ihr Gerät nicht besitzt.
20
WICHTIGE SICHERHEITSHINWEISE
Berühren Sie niemals die Oberfl ächen von Heiz-oder Kochgeräte. Sie werden während des Betriebs heiß. Halten Sie Kinder in einem sicheren Abstand. Es kann die Gefahr von Leckstrahlung.
Mikrowellenenergie&Hochspannung! Entfernen Sie keine Abdeckung.
WARNUNG! Das Gerät und seine zugänglichen Teile werden im Betrieb heiß. Kontakt mit den Heizelementen sollte unbedingt vermieden werden.
Dieses Gerät kann von Kindern ab 8 Jahren sowie von Personen mit eingeschränkten körperlichen, sensorischen oder geistigen Fähigkeiten bzw. mit mangelnder Erfahrung verwendet werden, wenn sie unter Aufsicht stehen oder in die sichere Benutzung eingewiesen wurden und die damit verbundenen Gefahren verstehen. Kinder sind zu beaufsichtigen und sollten nicht mit dem Gerät spielen. Die Reinigung und Benutzerwartung darf nicht von Kindern ausgeführt werden, es sei denn, sie sind über
8 Jahre alt und stehen dabei unter Aufsicht.
•HINWEIS: Wenn das Gerät in der Betriebsart Kombi arbeitet, dürfen Kinder das Gerät wegen der sehr hohen Temperaturen nur unter sorgfältiger Aufsicht erwachsener Personen gebrauchen (gilt nur für Geräte mit Grillfunktion).
•HINWEIS: Bei Beschädigung der Gerätetür oder der
Türdichtungen darf das Mikrowellengerät so lange nicht benutzt werden, bis es von einem autorisierten Kundendienstfachmann instandgesetzt worden ist.
21

•HINWEIS: Jegliche Reparaturoder
Kundendienstarbeiten, bei welchen die Abdeckung des Geräts entfernt werden muß und die von nicht autorisierten Personen durchgeführt werden, ist gefährlich und riskant.
•HINWEIS: Keine Flüssigkeiten oder Nahrungsmittel in dicht verschlossenen Gefäßen oder Verpackungen erhitzen, da diese bersten können.
•Die Gerätefüße nicht entfernen und die Lüftungsöffnungen nicht bedecken.
•Verwenden Sie ausschließlich mikrowellentaugliches Geschirr und Zubehör.
•Beim Erhitzen von Speisen in Kunststoffoder
Papierverpackung bzw.
•Behältern, den Vorgang wegen Brandgefahr beaufsichtigen.
•Bei Auftreten von Rauch den Mikrowellenherd sofort abschalten, das Gerät vom elektrischen Versorgungsnetz trennen und die Gerätetür geschlossen lassen, um eventuelle Flammen zu ersticken.
•Wenn Sie im Mikrowellengerät Getränke erhitzen, kann das Getränk nach einer gewissen Zeit sieden und
überlaufen, deswegen immer besonders vorsichtig verfahren.
•Um Verbrühungen zu vermeiden, vor dem Verzehr den Inhalt von Babyfl aschen oder Babynahrung umrühren oder durchschütteln und die Temperatur des Inhalts überprüfen.
•Im Mikrowellenherd keine rohen oder gekochten Eier in
Schale erhitzen, da diese bersten können, auch nachdem das Erhitzen im Mikrowellengerät schon beendet ist.
•Verwenden Sie zum Reinigen der Gerätetür, der
22

Dichtungen und des Garraumes nur milde (keine abrasiven) Reinigungsmittel und tragen Sie diese mit einem Schwamm oder einem weichen Tuch auf.
•Reinigen Sie den Mikrowellenherd und entfernen Sie etwaige Speisereste regelmäßig.
•Wenn Sie das Mikrowellengerät nicht regelmäßig reinigen und instandhalten, kann es zum Verschleiß der Oberfl
ächen kommen, was sich negativ auf die Lebensdauer des Geräts auswirkt und die Risiken beim Gebrauch erhöht.
•Wenn das Anschlußkabel beschädigt ist, darf dieses nur vom Hersteller, einem autorisierten Kundendienstfachmann oder einem anderen,
entsprechend qualifi zierten Fachmann ausgetauscht werden, um Gefahren zu vermeiden.
•Darauf achten, dass die Netzsteckdose leicht erreichbar ist, damit der Stecker im Notfall schnell abgezogen werden kann. Andernfalls muss, das Gerät mithilfe eines Schalters vom Stromkreis zu trennen sein. Dabei sollten die geltenden Bestimmungen der elektrischen Sicherheitsnormen berücksichtigt werden.
•Auf keinen Fall versuchen, die Garraumlampe selbst auszuwechseln, sondern nur von einem autorisierten Kundendienst auswechseln lassen!
•Wenn die Garraumlampe ausfallen sollte, wenden Sie sich bitte an Ihren Elektrohändler oder an den GORENJE Werkskundendienst.
•VORSICHT: Zur reinigung dürfen keinesfalls kommerzielle Ofenreiniger, Dampfreiniger, scheuermittel, scharfe Reinigungsmittel, natriumhydroxid enthaltende Reinigungsmittel oder Scheuerschwämme verwendet werden. Dies gilt für alle Teile des Gerätes. Säubern sie die Mikrowelle in regelmässigen abständen.
23

ALLGEMEINE SICHERHEITSHINWEISE
Im nachfolgenden Text sind einige Regeln und Sicherheitsmaßnahmen aufgeführt, die ähnlich wie beim Gebrauch anderer elektrischer Geräte, eingehalten werden müssen, damit eine sichere und effiziente Funktion des Geräts gewährleistet wird:
1.Sorgen Sie dafür, dass während des Betriebs des Mikrowellenherdes der Glasunterteller, die
verbindungsstück und der Rollenring auf ihren Plätzen sind.
2.Verwenden Sie den Mikrowellenherd nur zum Zubereiten von Speisen und nicht zum Trocknen von Kleiderstücken, Papier oder anderen Gegenständen und auch nicht zum Sterilisieren.
3.Schalten Sie den Mikrowellenherd niemals ein, wenn der Garraum leer ist, da dadurch das Gerät beschädigt werden kann.
4.Bewahren Sie im Garraum keine Gegenstände auf, insbesondere keine Zeitschriften, Kochbücher, u.ä.
5.Garen Sie keine Lebensmittel, die mit einer Membran umgeben sind, wie z.B.: Eigelb, Kartoffeln, Hühnerleber, u.ä., ohne vorher die Membran an mehreren Stellen mit einer Gabel durchgestochen zu haben.
6.Stecken Sie keine Gegenstände in die Öffnungen an den Außenseiten des Mikrowellengeräts hinein.
7.Entfernen Sie niemals Geräteteile, z.B. Gerätefüße, Verriegelung, Schrauben, u.ä.
8.Garen Sie keine Speisen direkt auf dem Drehteller. Bevor Sie das Gargut in den Garraum stellen, legen Sie es in einen entsprechenden Behälter.
WICHTIG: Küchenzubehör, welches im
Mikrowellenherd nicht verwendet werden darf:
–Metallpfannen oder Kochtöpfe mit Metallgriffen, - Gefäße mit Metallrand,
–Geschirr aus Melamin, da es Stoffe enthält, welche die Mikrowellenenergie absorbieren. Das kann zum Springen oder Verbrennen des Geschirrs führen, außerdem wird der Erhitzungs-/Garvorgang verlangsamt.
–Verwenden Sie kein Geschirr ohne mikrowellengeeignete Beschichtung. Verwenden Sie ebenso keine geschlossenen Tassen mit Griffen.
–Bereiten Sie keine Speisen bzw. Getränke in Gefäßen mit verengter Öffnung (wie z.B. Flaschen) zu, da diese während des Erhitzungsvorgangs bersten kann.
–Verwenden Sie im Mikrowellenherd keine handelsüblichen Thermometer für Fleisch oder Süßspeisen. Sie dürfen nur Thermometer
verwenden, die zum Gebrauch im Mikrowellenherd geeignet sind.
24

9.Verwenden Sie Zubehör für den Mikrowellenherd nur unter Beachtung der Gebrauchsanweisung des Herstellers.
10.Verwenden Sie den Mikrowellenherd niemals zum Frittieren.
11.Beachten Sie, dass im Mikrowellenherd nur die Flüssigkeit im Gefäß erhitzt wird und nicht das Gefäß selbst. Deswegen ist es möglich, dass die Flüssigkeit nach Entfernung des Deckels im Gefäß Dampf abgibt oder aus diesem Tropfen spritzen, obwohl der Deckel selbst nicht heiß ist.
12.Überprüfen Sie vor dem Verzehr immer die Temperatur der Speise, insbesondere, wenn diese für Kinder bestimmt ist. Wir empfehlen Ihnen, Speisen/Getränke niemals unmittelbar nach dem Herausnehmen aus dem Mikrowellenherd zu verzehren, sondern ein paar Minuten abzuwarten und die Speise/das Getränk umzurühren, damit sich die Hitze gleichmäßig verteilen kann.
13.Lassen Sie Speisen, die Fett und Wasser enthalten, z.B. Suppe, nach dem Abschalten des Mikrowellenherdes ungefähr noch 30 bis 60
Sekunden im Garraum stehen. Dadurch kann sich die Speise stabilisieren und es wird Siedeverzug verhindert, wenn Sie in die Flüssigkeit einen Löffel stellen oder einen Suppenwürfel hinzufügen.
14.Beachten Sie, dass sich einige Speisen, z.B. Weihnachtspudding, Marmelade oder Hackfleisch, sehr schnell erhitzen. Verwenden Sie zum Erhitzen oder Garen von Speisen mit hohem Fettoder Zuckergehalt keine Kunststoffgefäße.
15.Zubehör, das Sie zur Zubereitung von Speisen im Mikrowellenherd benutzen, kann sich sehr stark erhitzen, da die Speise Wärme abgibt. Das gilt besonders für Gefäße, die mit einem Kunststoffdeckel zugedeckt sind und für Handgriffe aus Kunststoff. Verwenden Sie zum Herausnehmen der Gefäße wärmeisolierende Küchenhandschuhe.
16.Um die Brandgefahr im Garraum zu verringern:
a)die Speise nicht übermäßig lang garen. Kontrollieren Sie sorgfältig den Erhitzungsvorgang, wenn sich im Garraum Papier-, Kunststoffbehälter oder andere leicht entzündliche bzw. brennbare Materiale befinden.
b)Bevor Sie Tüten in den Garraum stellen, zuerst die Drahtklammern (Blitzbinder) entfernen.
c)Wenn sich ein Gegenstand im Garraum entzündet, lassen Sie die Gerätetür geschlossen, trennen
Sie das Gerät vom elektrischen Versorgungsnetz und schalten Sie die Hauptsicherung in ihrem
Sicherungskasten ab.
25
BEDIENFELD
DISPLAY
Auf dem Display werden die ausgewählten Funktionen und die Tageszeit angezeigt.
TASTEN
Mikrowellen / Grill / Kombination
Auftauen
Kurzzeitwecker / Uhr
Pause / Stopp
Start
Selbstreinigung – aquaclean
ECO Modus – Energiesparmodus
DREHKNEBEL
Zeitwahl
Automatische Programme
TASTE ZUM ÖFFNEN DER GERÄTETÜR
1. Sicherheitsverriegelung der Gerätetür
2. Sichtfenster
3. Rollenring
4.Glasteller
5.Bedienfeld
6. Wellenführung (bitte die Silikatplatte, welche die Wellenführung überdeckt, nicht abnehmen.
Der Grillrost kann entweder für die Grillfunktion oder für die kombinierte Betriebsart Grill +
Mikrowellen eingesetzt werden. Stellen Sie den
Grillrost immer auf den Glasteller.
26

BEDIENUNGSHINWEISE
1. UHR |
Der Mikrowellenherd ist mit einer Digitaluhr ausgerüstet. |
|
|
Wenn das Gerät im Stand-Bay Zustand ist, können Sie |
|
|
durch Drücken der Taste UHR die Zeit im 24-Stunden- |
|
|
Zyklus einstellen. |
|
|
Beispiel: Zeit auf 8:30 einstellen |
|
|
a) |
Wenn das Gerät im Stand-By Zustand ist, drücken Sie |
|
|
die Taste UHR. Die Anzeige auf dem Display beginnt zu |
|
|
blinken. Stellen Sie durch Drehen des Knebels zuerst |
|
|
die Stunden (08). |
|
b) |
Drücken Sie die Taste UHR. Stellen Sie darauf durch |
|
|
Drehen des Knebels die Minuten (30). |
|
c) |
Drücken sie die Taste UHR einmal, um die Einstellung |
|
|
zu bestätigen. |
|
HINWEIS: Während des Garvorgangs können Sie jederzeit |
|
|
die Tageszeit durch Drücken der Taste UHR aufrufen. Beim |
|
|
ersten Anschluss and das Stromnetz müssen Sie die Uhr |
|
|
einstellen. |
|
|
Diese Funktion bietet zwei Möglichkeiten: |
|
2. ERHITZEN MIT |
||
MIKROWELLEN |
a) |
Schnelles Erhitzen mit Mikrowellen (100% Leistung) |
|
|
Beispiel: Garen mit 100% Leistung, 5 Minuten lang |
|
|
1. Stellen Sie mit dem Drehknebel die Zeit 05:00 ein. |
|
|
2. Drücken Sie zum Starten des Garvorgangs die |
|
|
START-Taste. |
|
b) |
Erhitzen mit Mikrowellen – mit manueller |
|
|
Abschaltung |
|
|
Beispiel: Aufwarmen von Speisen mit der |
|
|
Leistungsstufe 60%, 10 Minuten lang. |
|
|
1. Drücken Sie die Taste MIKROWELLEN dreimal oder |
|
|
durch Drehen des Knebels die Leistungsstufe (60%) |
ein. Drücken sie die Taste START.
2. Stellen Sie mit dem Drehknebel die Zeit 10:00 ein.
3. Drucken Sie zum Starten des Programms die
START-Taste.
Sie konnen unter 5 Leistungsstufen wahlen 100%, 80%, 60%, 40%, 20%, die maximale Betriebszeit betragt 60 Minuten.
27

3. GRILL
4. KOMB-BETRIEB C-1
5. KOMB-BETRIEB C-2
Die Grillfunktion ist besonders gut zur Zubereitung von dünnen Fleischstücken, Schnitzeln, Koteletts, Spießen, Würsten oder Hähnchen geeignet. Die Grillfunktion
ist auch zur Zubereitung von warmen Sandwiches und gratinierten Speisen geeignet. Die maximal einstellbare Grillzeit beträgt 60 Minuten.
Beispiel: Zubereitung von Fleisch mit dem Grill, 12 Minuten.
1.Stellen Sie durch mehrmaliges Drücken der Taste MIKROWELLEN oder durch Drehen des Knebels die
Leistungsstufe GRILL ein.
2.Stellen Sie durch Drehen des Knebels die Zeit 12:00 ein.
3.Drücken Sie zum Starten des Programms die STARTTaste.
HINWEIS: Nach der Hälfte der Zubereitungszeit ertönen zwei Pfeiftöne. Diese sollen Sie daran erinnern, das Gefriergut zu wenden oder umzurühren. Schließen Sie nach dem Wenden bzw. Umrühren des Gefrierguts die Gerätetür und drücken Sie die START-Taste, um mit dem Programm fortzufahren. Wenn Sie das Gefriergut nicht wenden bzw. umrühren, wird der Vorgang automatisch fortgesetzt.
Der Mikrowellenherd arbeitet 30% der Zeit im Mikrowellenbetrieb und 70% der Zeit im Grillbetrieb. Diese Betriebsart ist zur Zubereitung von Pudding, Aufläufen, Omeletten, Bratkartoffeln und Geflügel geeignet. Die maximal einstellbare Zubereitungszeit beträgt 60 Minuten.
Beispiel: Kombi-Betrieb C-1 einstellen, 25 Minuten.
1.Stellen Sie durch mehrmaliges Drücken der Taste
MIKROWELLEN oder durch Drehen des Knebels die
Leistungsstufe C1 ein. Auf dem Display erscheint C-1.
2.Drucken sie die Taste START.
3.Stellen Sie durch Drehen des Knebels die Zeit 25:00 Minuten ein.
4.Drücken Sie zum Starten des Programms die START-
Taste.
Der Mikrowellenherd arbeitet 55% der Zeit im Mikrowellenbetrieb und 45% der Zeit im Grillbetrieb. Diese Betriebsart ist zur Zubereitung von Fisch oder gratinierten Speisen geeignet. Die maximal einstellbare Zubereitungszeit beträgt 60 Minuten.
Beispiel: Kombi-Betrieb C-2 einstellen, 25 Minuten.
1.Stellen Sie durch mehrmaliges Drücken der Taste
MIKROWELLEN oder durch Drehen des Knebels die
Leistungsstufe C2 ein. Auf dem Display erscheint C-2. Drucken sie die Taste START.
28

6. AUFTAUEN (AUTOMATISCH) DEF1
7. SCHNELLES AUFTAUEN DEF2
8. AUTO-MENÜ
2.Stellen Sie durch Drehen des Knebels die Zeit 25:00 Minuten ein.
3.Drücken Sie zum Starten des Programms die START-
Taste.
Der Mikrowellenherd ermöglicht das automatische Auftauen von Fleisch, Geflügel und Meeresfrüchten. Die Auftauzeit und die Leistungsstufe werden automatisch an das voreingestellte Gewicht angepasst. Sie können Gefriergut mit einem Gewicht zwischen 100 g und 2.000 g automatisch auftauen.
Beispiel: Auftauen von 600 g gefrorenen Fischen.
1.Drücken Sie die Taste AUFTAUEN
2.Stellen Sie durch Drehen des Knebels das Gewicht auf
600 g ein.
3.Drücken Sie zum Starten des Programms die START-
Taste.
Der Mikrowellenherd ermöglicht auch das schnelle Auftauen von gefrorenen Lebensmitteln.
Beispiel: Schnelles Auftauen von Brot.
1.Drücken Sie zweimal die Taste AUFTAUEN.
2.Stellen Sie durch Drehen des Knebels eine beliebige Zeit ein.
3.Drücken Sie zum Starten des Programms die START-
Taste.
Zum Auftauen von gefrorenen Lebensmitteln mit dem Auto-Menü, müssen Sie nur die Art und die Masse des Gefrierguts einstellen. Der Mikrowellenherd schlägt Ihnen die geeignete Leistungsstufe und Auftauzeit vor.
Beispiel:
1.Drücken Sie die Taste PAUSE/STOPP.
2.Drehen Sie den Knebel gegen den Uhrzeigersinn, um die Codenummer der Speise zu wählen. Sie können unter den Programmen A1 bis A8 auswählen. Drücken sie die Taste START.
3.Wahlen Sie durch Drehen des Knebels die Masse/
Einheit aus.
4.Drucken Sie zum Starten des Programms die START Taste.
29

9. GAREN IN
MEHREREN SCHRITTEN
Menü |
Masse/Einheit |
Leistungs-stufen |
|
|
|
|
|
A1 |
150, 300 g |
100% |
|
pizza |
|||
|
|
||
|
|
|
|
A2 |
100, 200, 300 ml |
100% |
|
Flüssigkeit |
|||
|
|
||
|
|
|
|
A3 |
100g |
100% |
|
Popcorn |
|||
|
|
||
|
|
|
|
A4 |
100, 200, 300 g |
100% |
|
Fleisch |
|||
|
|
||
|
|
|
|
A5 |
100, 200, 300 g |
100% |
|
Kartoffeln |
|||
|
|
||
|
|
|
|
A6 |
100, 200, 300 g |
100% |
|
Kartoffeln |
|||
|
|
||
|
|
|
|
A7 |
100, 200, 300 g |
100% |
|
Fisch |
|||
|
|
||
|
|
|
|
|
100 g (450 ml Wasser) |
|
|
A8 |
|
|
|
200 g (800 ml Wasser) |
100% |
||
Teigwaren |
|||
|
|
||
|
300 g (1200 ml Wasser) |
|
|
|
|
|
|
A9 |
100g |
30% + 10% |
|
langsames |
|
|
|
200, 300 g |
30% + 20% + 10% |
||
Auftauen |
|||
|
|
|
|
A10 |
1, 2, 6 pcs |
100% |
|
Tellerwärmer |
|||
|
|
||
|
|
|
|
A11 |
100, 200, 300 g |
80% + 60% + 80% |
|
Warmhalten |
|||
|
|
||
|
|
|
Der Mikrowellenherd ermöglicht das Garen in vier Schritten.
Beispiel: Sie möchten zuerst das gefrorene Fleisch auftauen und danach noch 5 Minuten mit der Leistungsstufe 60% garen.
1.Drücken Sie zweimal die Taste AUFTAUEN
2.Stellen Sie durch Drehen des Knebels die Zeit 10:00 ein und bestätigen Sie die Auswahl.
3.Drücken Sie die Taste MIKROWELLEN Stellen Sie durch Drehen des Knebels die Leistungsstufe 60% ein. Drucken sie die Taste START.
4.Stellen Sie mit dem Drehknebel die Zeit 05:00 ein.
5.Drucken Sie zum Starten des Programms die STARTTaste.
HINWEIS: Sie können die Auftaufunktion nur im ersten
Schritt benutzen. Das Auto-Menü kann kein Schritt des Garvorgangs in Schritten sein.
30
 Loading...