


USERS MANUAL REMOTE CONTROL
UPUTE ZA UPORABU DALJINSKI UPRAVLJAČ
UPUTE ZA UPORABU DALJINSKI UPRAVLJAČ
UPUTE ZA UPORABU DALJINSKI UPRAVLJAČ
ПУЛЬТ ДИСТАНЦІЙНОГО КЕРУВАННЯ – ІНСТРУКЦІЯ КОРИСТУВАЧА
ИНСТРУКЦИЯ ПО ЭКСПЛУАТАЦИИ ПУЛЬТА
FRANÇAIS NEDERLANDS
Thank you very much for purchasing this Air Conditioner. Please read this use and installation instructions carefully before installing and using this appliance and keep this manual for future reference.

REMOTE CONTROL – USER MANUAL
Thank you very much for purchasing this Air Conditioner. Please read this use and installation instructions carefully before installing and using this appliance and keep this manual for future reference.
FRANÇAISDEUTSCH NEDERLANDSЯЗЫК РУССКИЙ PORTUGUÊS ESPAÑOL ITALIANO
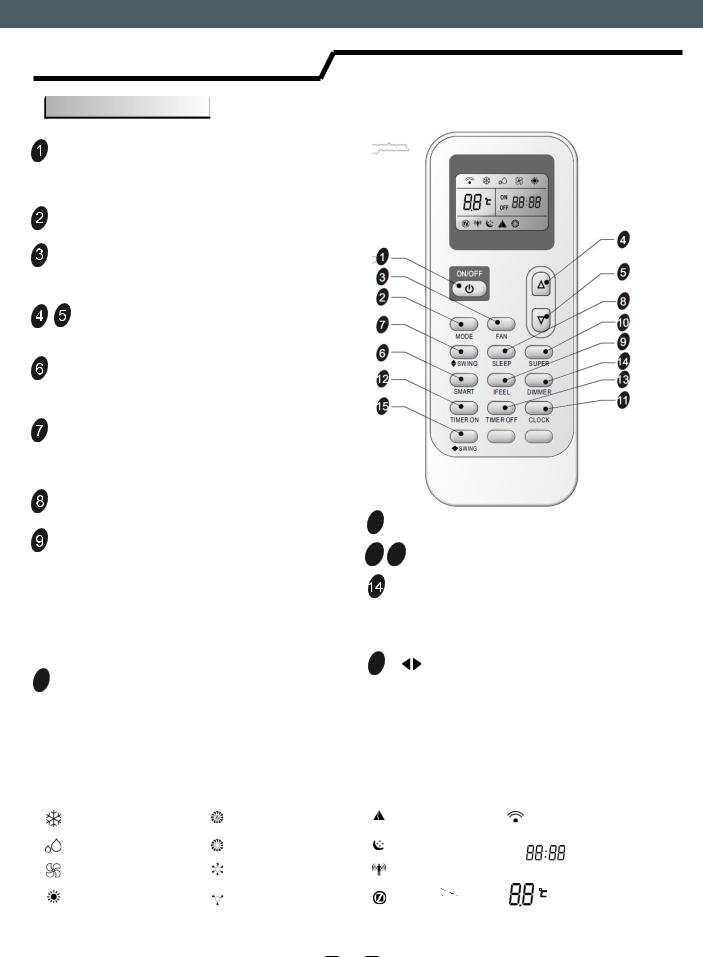
EN
Remote controller Instructions ( J series)
Remote controller |
1 |
Operation instructions |
2 |
Operation modes |
3 |
Airflow direction control |
4 |
Smart mode |
5 |
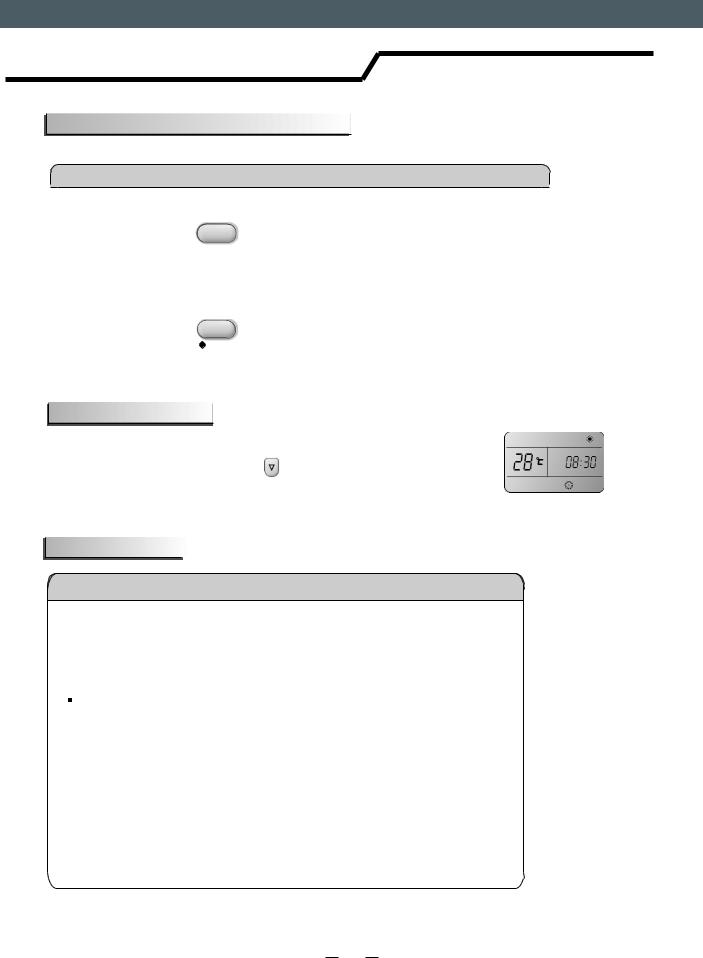
Clock button |
6 |
Super mode |
6 |
Timer mode |
7 |
Sleep mode |
8 |
EN
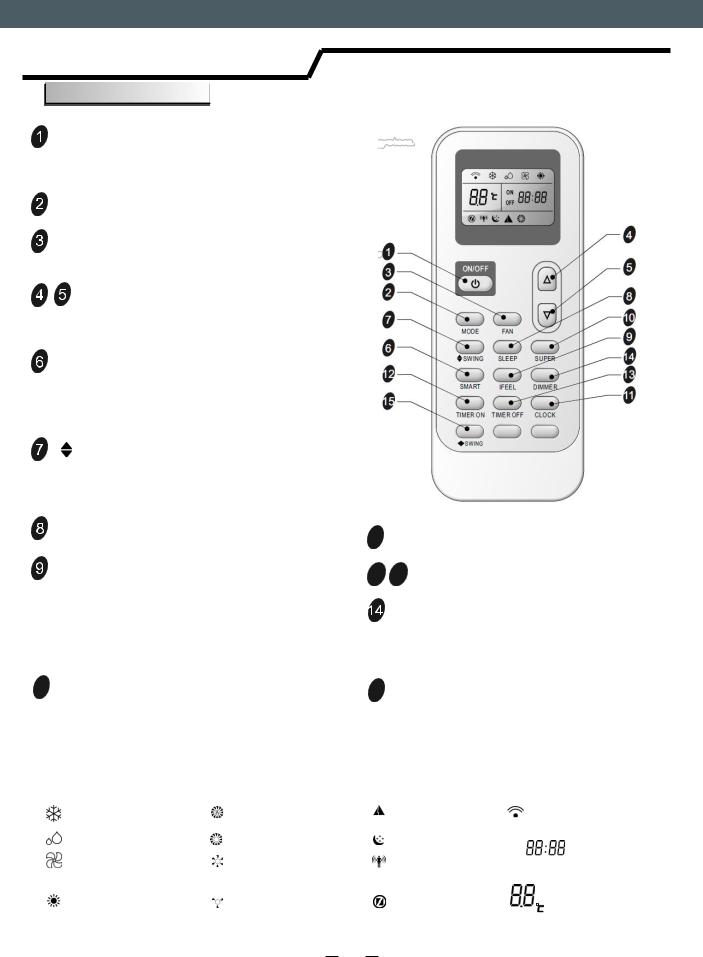
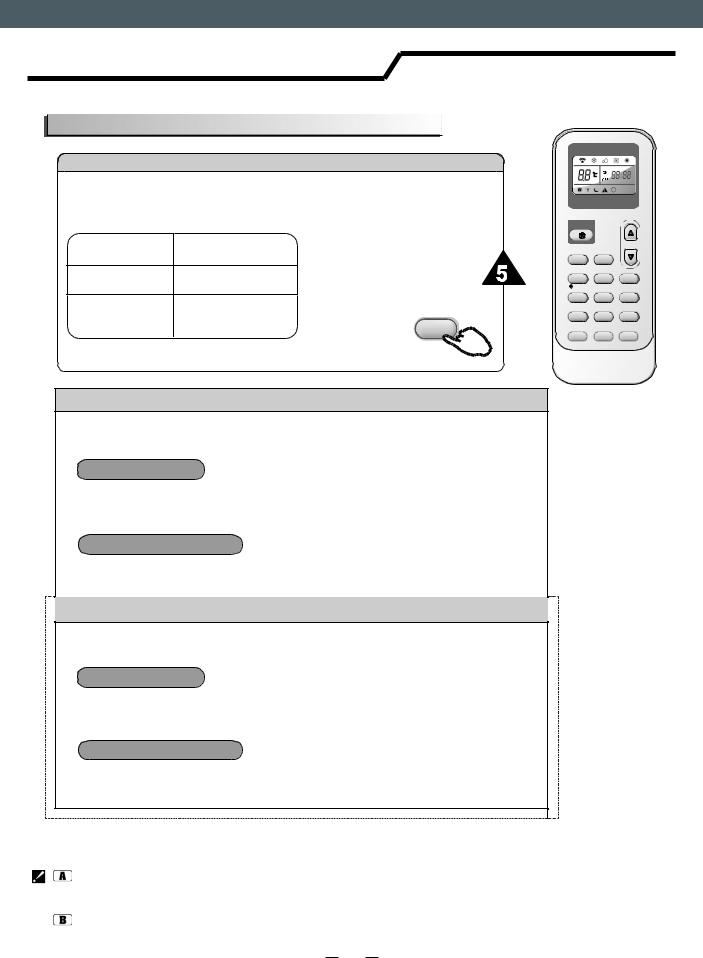
Remote controller
Remote controller
The remote controller transmits signals to the system. |
|
ON/OFF BUTTON |
4 |
The appliance will be started when it is energized or will be stopped when it is in operation, if you press this button.
MODE BUTTON
Press this button to select the operation mode.
FAN BUTTON |
3 |
|
Used to select fan speed in sequence |
2 |
|
auto, high, medium or low. |
||
|
||
ROOM TEMPERATURE |
7 |
|
SETTING BUTTONS |
|
|
Used to adjust the room temperature and |
6 |
the timer, also real time.
SMART BUTTON(invalid for some |
12 |
|
|
models) |
|
Used to enter fuzzy logic operation directly, |
|
regardless of the unit is on or off. |
|
SWING BUTTON(invalid for some |
|
models) |
|
Used to stop or start vertical adjustment |
|
louver swinging and set the desired up/down |
|
airflow direction. |
|
SLEEP BUTTON |
|
Used to set or cancel Sleep Mode operation. |
|
IFEEL BUTTON |
|
Used to set IFEEL mode operation. Press it once, the IFEEL function will be started. Press it again, the IFEEL function will be shut off. Advice to put the remote controller in the place where the indoor unit receive signal easily. Advice to cancel the IFEEL mode so as to save energy when stopping the air conditioner.
10 SUPER BUTTON
Used to start or stop the fast cooling/heating. (Fast cooling operates at high fan speed with 16 set temp automatically ; Fast heating operates at auto fan speed with 30 set temp automatically)
Indication symbols on LCD:
ON/OFF 5
8
9
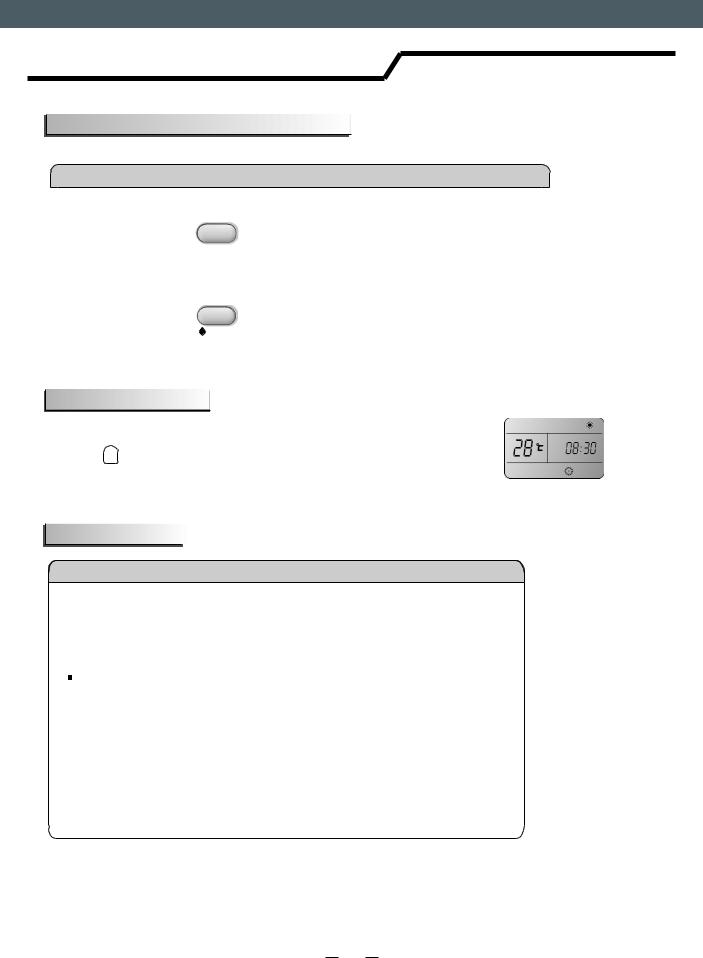
11 CLOCK BUTTON
Used to set the current time.
12 13TIMER ON/OFF BUTTON
Used to set or cancel the timer operation.
DIMMER BUTTON(invalid for
some models)
When you press this button, all the display of indoor unit will be closed. Press any button to resume display.
15 
 SWING BUTTON(invalid for
some models)
Used to stop or start Horizontal adjustment louver swinging and set the desired left/right airflow direction.
Cooling indicator |
Auto fan speed |
Smart |
indicator |
Dry indicator |
High fan speed |
Sleep |
ON |
Fan only indicator |
Medium fan speed |
Ifeel |
OFF |
|
Signal transmit
Display set timer
Display current time
Heating indicator |
Low fan speed |
Super indicator |
Display temperature |
Note: Each mode and relevant function will be further specified in following pages.
1
EN
Remote controller
Remote controller
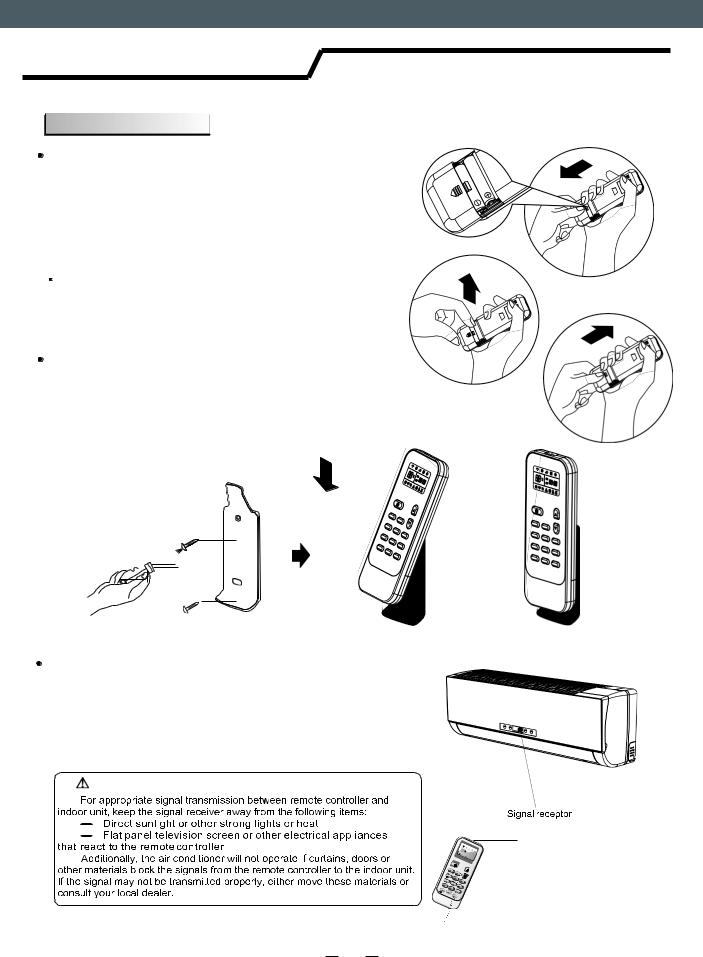
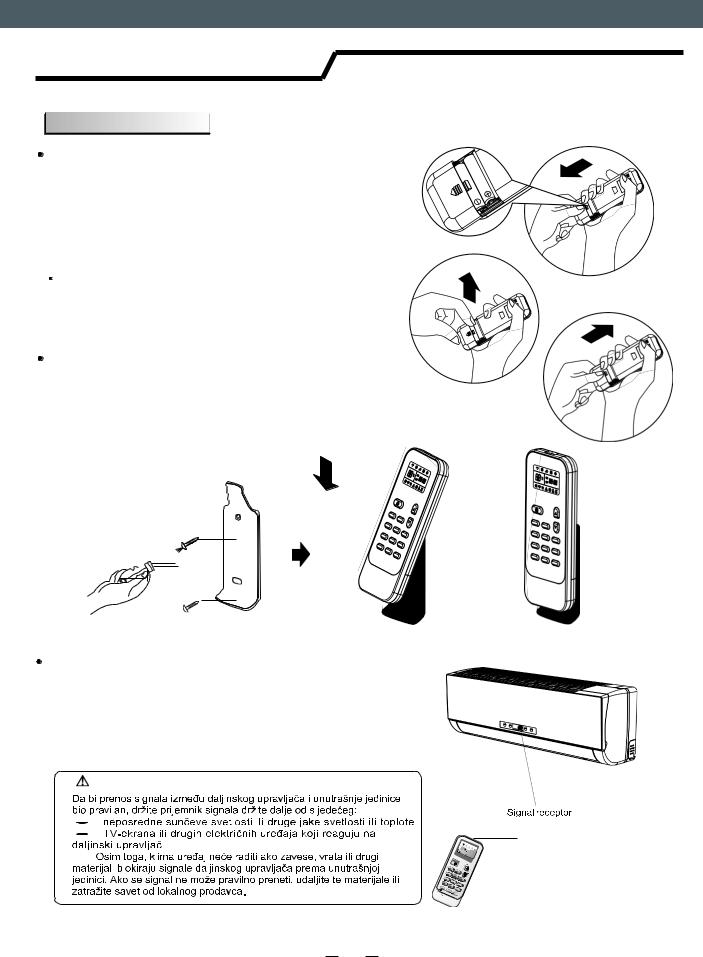
How to Insert the Batteries
Remove the battery cover according to the arrow direction.
Insert new batteries making sure that the (+) and (-) of battery are matched correctly.
Reattach the cover by sliding it back into position.
Note:
Use 2 LR03 AAA(1.5volt) batteries. Do not use rechargeable batteries. Replace batteries with new ones of the same type when the display becomes dim.
Storage and Tips for Using the Remote Controller
The remote controller may be stored mounted on a wall with a holder.
Note: The remote controller holder is an optional part.
How to Use
To operate the room air conditioner, aim the remote controller to the signal receptor. The remote controller will operate the air conditioner at a distance of up to 7m when pointing at signal receptor of indoor unit.
CAUTIONS
2
EN
Operation instructions
Operation modes
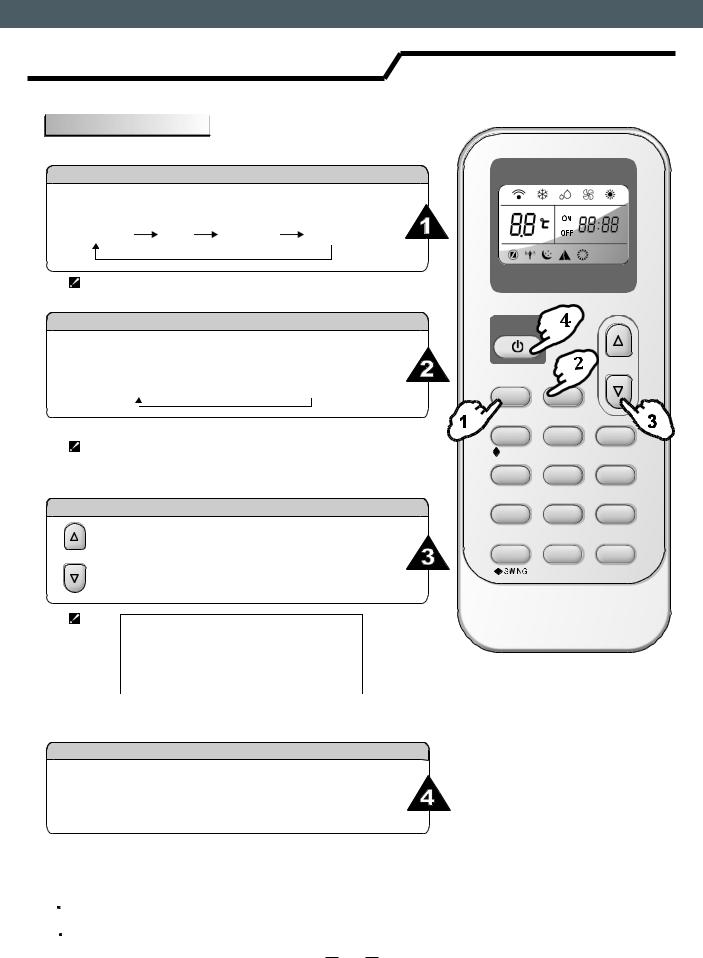
Selecting mode
Each time MODE button is pressed, the operation mode is changed in sequence:
COOLING DRY FAN ONLY HEATING
Heating mode is NOT available for cooling only air conditioner.
FAN mode
Each time the "FAN" button is pressed, the fan speed is changed in sequence:
Auto  High
High  Medium
  Low
Low
At "FAN ONLY" mode, only "High","Medium" and "Low" are available.
At "DRY" mode, Fan speed is set at "AUTO” automatically, "FAN" button is ineffective in this case.
Setting temperature
Press once to raise temperature setting by 1
Press once to lower temperature setting by 1
Range of available set temperature
*HEATING, COOLING |
16 ~30 |
|
|
DRY |
-7 ~ 7 |
|
|
FAN ONLY |
unable to set |
|
|
Note: Heating mode is NOT available for cooling only models.
Note: At “Dry” mode, the unit can decrease or rise 2 if you still feel uncomfortable.(For some models you can choose from -7 to 7.)
Turning on
ON/OFF
MODE |
FAN |
|
SWING |
SLEEP |
SUPER |
SMART |
IFEEL |
DIMMER |
TIMER ON |
TIMER OFF |
CLOCK |
Press  button, when the appliance receives the signal, the RUN indicator of the indoor unit lights up.
SWING, SMART, TIMER ON, TIMER OFF, CLOCK, SLEEP and SUPER operation modes will be specified in the following pages.

 Changing modes during operation, sometimes the unit does not response at once. Wait 3 minutes.
During heating operation, air flow is not discharged at the beginning. After 2 5 minutes, the air flow will be discharged
until temperature of indoor heat exchanger rises. Wait 3 minutes before restarting the appliance.
3
EN
Operation instructions
Airflow direction control (invalid for some models)
Airflow direction control
Vertical airflow(Horizontal airflow) is automatically adjusted to a certain angle in accordance with the operation mode after turning on the unit.
Operation mode |
Direction of airflow |
|
COOLING, DRY |
horizontal |
|
*HEATING, |
downward |
|
FAN ONLY |
||
|
The direction of airflow can be also adjusted to your own requirement by pressing the "SWING" button of the remote controller.
SWING
*Heating mode is only available for heat pump models.
Vertical airflow control (with the remote controller)
Using remote controller to set various angles of flow or specific angle as you like.
Swinging airflow
Pressing "  SWING" button once, the vertical adjustment louver will swing up and down automatically.
Desired direction airflow
Pressing the "  SWING" button again when the louvers swing to a suitable angle as desired.
Horizontal airflow control (with the remote controller)
Using remote controller to set various angles of flow or specific angle as you like.
Swinging airflow
Pressing "
 SWING" button once, the horizontal adjustment louver will swing left and right automatically.
Desired direction airflow
ON/OFF
MODE |
FAN |
SWING |
SLEEP SUPER |
SMART |
IFEEL DIMMER |
TIMER ON TIMER OFF CLOCK
 SWING
SWING
Pressing the "
 SWING" button again when the louvers swing to a suitable angle as desired.
NOTE:If the unit doesn’t have four ways airflow function, you can adjust horizontal airflow by yourself.(invalid for some models)
Do not turn the vertical adjustment louvers manually, otherwise malfunction may occur. If that happens, turn off the unit first and cut off the power supply, then restore power supply again.
It is better not to let the vertical adjustment louver tilt downward for a long time at COOLING or DRY mode to prevent condensed water from dripping.
4
EN
Operation instructions
SMART mode (invalid for some models)
Press the SMART button, the unit enters SMART mode(fuzzy logic operation) directly regardless of the unit is on or off. In this mode, temperature and fan speed are automatically set based on the actual room temperature.
For the split-type models, such as wall-mounted air conditioners and some floor-standing air conditioners, their operation mode and set temperature should be determined based on the indoor temperature.
Operation mode and temperature are determined by indoor temperature
Heat pump models
|
Indoor temperature |
Operation mode |
Target temperature |
|
|
|
|
|
21 or below |
HEATING |
22 |
|
|
|
|
|
21 -23 |
FAN ONLY |
|
|
|
|
Room temperature |
|
23 -26 |
DRY |
decrease 2 after |
|
|
|
operate for 3 minutes |
|
|
|
|
|
Over 26 |
COOLING |
26 |
|
|
|
|
Cooling only models |
|
|
|
|
|
|
|
|
Indoor temperature |
Operation mode |
Target temperature |
|
|
|
|
|
23 or below |
FAN ONLY |
|
|
|
|
|
|
|
|
Room temperature |
|
23 -26 |
DRY |
decrease 2 after |
|
|
|
operate for 3 minutes |
|
|
|
|
|
Over 26 |
COOLING |
26 |
|
|
|
|
For commercial air conditioner products, such as cassette type air conditioners, duct type air conditioners, ceiling & floor air conditioners and some floor-standing air conditioners, their operation mode should be determined based on the difference between the indoor temperature and set temperature.
The operation mode is determined by the difference between the indoor temperature and set temperature.
Heat pump models
|
Indoor temperature |
Operation mode |
Target temperature |
|
|
|
|
|
Below T-3 |
HEATING |
T |
|
|
|
|
|
T-3≤Tindoor ≤T+3 |
FAN ONLY |
T |
|
|
|
|
|
Over T+3 |
COOLING |
T |
|
|
|
|
Cooling only models |
|
|
|
|
|
|
|
|
Indoor temperature |
Operation mode |
Target temperature |
|
|
|
|
|
T+3 or below |
FAN ONLY |
T |
|
|
|
|
|
Over T+3 |
COOLING |
T |
|
|
|
|
SMART button is ineffective in SUPER mode. Press MODE button cancel SMATR mode.
Note: Temperature, airflow and direction are controlled automatically in SMART mode. However, For the on/off, you can choose from -2 to 2 (for some models you can choose from -7 to 7), for the inverter you can choose from -7 to 7. if you still feel uncomfortable.
5
EN
Operation instructions
SMART mode (invalid for some models)
|
What you can do in SMART mode |
||
Your feeling |
button |
adjustment procedure |
|
|
|
|
|
Uncomfortable |
|
Indoor fan speed alternates among |
|
because of |
|
||
|
High, Medium and Low each time this |
||
unsuitable air |
|
||
FAN |
button is pressed. |
||
flow volume. |
|||
|
|
||
|
|
|
|
Uncomfortable |
|
Press it once, the vertical adjustment |
|
|
louver swings to change vertical airflow |
||
because of |
|
||
|
direction. Press it again, swings stops. |
||
unsuitable flow |
|
||
SWING |
For horizontal airflow direction, please |
||
direction. |
|||
|
refer to the previous page for details. |
||
|
|
||
|
|
|
|
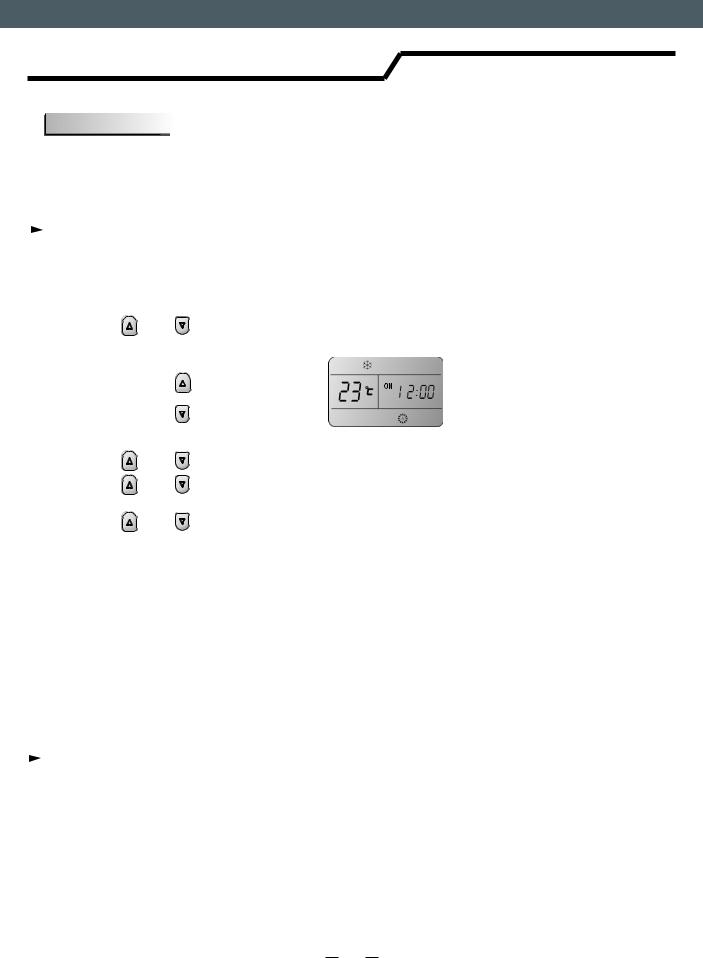
CLOCK button
You can adjust the real time by pressing CLOCK button, then using  and
and  buttons to get the correct time, press CLOCK button again the real time is set.
SUPER mode
SUPER mode
 SUPER mode is used to start or stop fast cooling or heating. In SUPER mode, the super indicator
  will display on LCD.
Fast cooling operates at high fan speed, changing the set temperature automatically to 16°C;Fast heating operates at auto fan speed, changing the set temperature automatically to 30 °C.
SUPER mode can be set when the appliance is in operation or energized.
 In SUPER mode, you can set temperature, airflow direction or timer.
If you want to escape from SUPER mode, press SUPER, MODE, FAN, ON/OFF or SLEEP button, the display will return to the original mode.
Note:
 SMART button is not available in SUPER mode.
 The Appliance will continue working in SUPER mode , if you don't escape from it by pressing any of the buttons mentioned above.
 Heating is NOT available for cooling only air conditioner.
 For the first generation of products, you can’t set temperature in super mode, but you can press TEMPERATURE SETTING button to escape super mode.
6
EN
Operation instructions
Timer mode
It is convenient to set the timer on with TIMER ON button when you go out in the morning to achieve a comfortable room temperature at the time you get home. You can also set timer off at night to enjoy a good sleep.
How to set TIMER ON
TIMER ON button can be used to set the timer programming as wished in order to switch on the appliance at your desired time.
i) Press TIMER ON button, "ON 12:00" flashes on the LCD, then you can
press the |
or |
buttons to select your desired time for appliance on. |
|
|
Increase |
|
|
Decrease |
Press the |
or |
button once to increase or decrease the time setting by 1 minute. |
Press the |
or |
button 2 seconds to increase or decrease the time setting |
|
|
by 10 minute. |
Press the |
or |
button for a longer time to increase or decrease the time by 1 hour. |
Note: If you don't set the time in 10 seconds after you press TIMER ON button, the remote controller will exit the TIMER ON mode automatically.
ii) When your desired time displayed on LCD, press the TIMER ON button and confirm it.
A "beep" can be heard. "ON" stops flashing.
The TIMER indicator on the indoor unit lights up.(invalid for some models)
iii)After the set timer displayed for 5 seconds the clock will be displayed on the LCD of the remote controller instead of set timer.
How to cancel TIMER ON
Press the TIMER ON button again, a "beep" can be heard and the indicator disappears, the TIMER ON mode has been canceled.
Note: It is similar to set TIMER OFF, you can make the appliance switch off automatically at your desired time.
7
EN
SLEEP mode
SLEEP mode
SLEEP mode can be set in COOLING, HEATING or DRYING operation mode. This function gives you a more comfortable environment for sleep.
In SLEEP mode,
 The appliance will stop operation automatically after operating for 8 hours.
 Fan speed is automatically set at low speed.
 *Set temperature will rise by 2 at most if the appliance operates in cooling mode for 2 hours constantly, then keeps steady.
 Set temperature will decrease by 2 at most if the appliance operates in heating mode for 2 hours constantly, then keeps steady.
*Note: In cooling mode, if room temperature is 26 or above, set temperature will not change(invalid for some models).
Note: Heating is NOT available for cooling only air conditioner.
Note: Press SUPER ,SMART, MODE,SLEEP or FAN button cancel SLEEP mode.
8

DALJINSKI UPRAVLJAČ – UPUTSTVO ZA UPOTREBU
Zahvaljujemo na kupovini ovog klima uređaja. Molimo da pre postavljanja i upotrebe uređaja pažljivo pročitate ovo uputstvo za postavljanje i upotrebu, kao i da ga sačuvate za buduću upotrebu.
DEUTSCHFRANÇAISЯЗЫК РУССКИЙNEDERLANDS PORTUGUÊS ESPAÑOL ITALIANO

HR
Uputstvo za upotrebu daljinskog upravljača
(serije J)
Daljinski upravljač |
1 |
Uputstvo za rad |
2 |
Režimi rada |
3 |
Upravljanje smera protoka vazduha |
4 |
Režim rada Smart |
5 |
Sat/časovnik |
6 |
Režim rada Super |
6 |
Tajmer |
7 |
Režim spavanja |
8 |
HR
Daljinski upravljač
Daljinski upravljač
Daljinski upravljač prenosi signale u sistem.
UKLJUČENJE/ISKLJUČENJE (ON/OFF)
Uređaj će se uključiti kad je pod |
|
naponom ili će se isključiti kad radi |
|
ako pritisnete ovaj taster. |
|
REŽIM RADA (MODE) |
|
Pritiskom na ovaj taster birate režim rada. 1 |
|
VENTILATOR (FAN) |
3 |
Biranje brzine ventilatora sledećim redosledom:
automatski, visoko, srednje ili nisko. |
2 |
|
PODEŠAVANJE TEMPERATURE 7
Taster za podešavanje sobne temperature i 6 tajmera, takođe u stvarnom vremenu.
FUNKCIJA SMART (određeni modeli)
Taster za neposrednu neizrazitu logičku operaciju, bez obzira da li je uređaj uključen ili isključen
 VERTIKALNA FUNKCIJA
KRILCA (SWING) (određeni modeli)
Taster za uključenje/isključenje vertikalnog podešavanja ljuljanja krilca I podešavanje smera protoka vazduha (gore/dole).
FUNKCIJA SPAVANJA
Uključenje/isključenje režima spavanja.
FUNKCIJA IFEEL
Taster za režim rada IFEEL. Pritisnite jednom i funkcija IFEEL se pokreće. Pritisnite ponovo i funkcija IFEEL se zaustavlja. Savetujemo da daljinski upravljač držite na mestu gde unutrašnja jedinica prima signale bez teškoća.
Savetujemo da poništite funkciju IFEEL da biste uštedeli energiju kad isključujete uređaj.
10 FUNKCIJA SUPER
Pokretanje ili zaustavljanje brzog hlađenja/grejanja. (brzo hlađenje radi na visokoj brzini ventilatora sa automatski podešenom temperaturom na 16 ; brzo grejanje radi na automatskoj brzini ventilatora sa automatski podešenom temperaturom na
30 )
Indikatori na displeju:
|
4 |
ON/OFF |
5 |
|
8 |
9
14 |
11 |
|
|
|
1 |
|
3 |
11 SAT (ČASOVNIK)
Taster za podešavanje vremena.
12 13 PROGRAMSKI SAT (TAJMER)
Taster za uključenje/isključenje tajmera.
TASTER ZATAMNJENJA
(određeni modeli)
Kad pritisnete ovaj taster, ceo displej unutrašnje jedinice se zatvara. Pritisnite bilo koji taster
da vratite displej.
15 HORIZONTALNA FUNKCIJA
KRILCA (SWING) (određeni modeli)
Taster za zaustavljanje ili pokretanje horizontalnog podešavanja ljuljanja krilaca i podešavanja smera protoka vazduha
(levo/desno.
indikator hlađenja |
Automatska brzina vent. |
Smart |
indikator razvlaživanja |
Visoka brzina |
Spavanje |
indikator Samo ventilator |
Srednja brzina |
Ifeel |
indikator grejanja |
Niska brzina |
Super indicator |
|
Prenos signalat |
ON |
Tajmer |
OFF |
Trenutno vreme |
|
|
|
Temperatura |
Napomena: svaki režim rada i odgovarajuće funkcije biće detaljno objašnjene u nastavku teksta.
1
HR
Daljinski upravljač
Daljinski upravljač
Stavljanje baterija
Skinite poklopac otvora za baterije u smeru strelice.
Stavite nove baterije tako da se (+) i (-) baterije pravilno slažu.
Vratite poklopac tako da ga gurnete nazad na položaj.
Napomena:
Koristite dve baterije LR03 AAA (1,5 volta). Nemojte da koristite baterije koje se pune. Zamenite stare baterije novim istog tipa kad displej zatamni.
Čuvanje daljinskog upravljača
Daljinski upravljač možete držati na nosaču montiranom na zid.
Napomena: držač daljinskog upravljača je opciona oprema.
Upotreba daljinskog upravljača
Za upravljanje sobnim klima uređajem, usmerite daljinski upravljač na signalni prijemnik. Daljinskim upravljačem upravljate klima uređaj na udaljenosti od 7 m dok je usmeren na signalni prijemnik unutrašnje jedinice.
MERE OPREZA
2
HR
Uputstvo za rad
Režimi rada
Biranje režima rada
Svakim pritiskom na taster REŽIM RADA menjate režim rada sledećim redosledom:
HLAĐENJE RAZVLAŽIVANJE |
VENTILATOR |
GREJANJE |
Režim rada grejanje NIJE na raspolaganju kod klima uređaja koji su namenjeni isključivo hlađenju.
VENTILATOR
Svakim pritiskom na taster "VENTILATOR" menja se brzina rada ventilara sledećim redosledom:
AUTOMATSKI VISOKO SREDNJE NISKO
U režimu "SAMO VENTILATOR"dostupne su samo brzine
"Visoko","Srednje" i "Nisko". U režim "RAZVLAŽIVANJE"brzina ventilatora je podešena na "AUTOMATSKI” i taster "VENTILATOR" nije
Podešavanje temperature
 Pritistnite jednom za povećanje podešene temp. za 1
 Pritistnite jednom za smanjenje podešene temp. za 1
Interval podešavanja temperature
*GREJANJE, HLAĐENJE |
16 ~30 |
|
|
RAZVLAŽIVANJE |
-7 ~ 7 |
SAMO VENTILATOR podešavanje nije moguće
Napomena: režim rada grejanja NIJE na raspolaganju za modele koji su namenjeni samo hlađenju.
Napomena: u režimu “Razvlaživanje” jedinica može smanjiti ili povećati temp. za 2 ako vam je tako prijatnije. (kod određenih
modela možete da birate od -7 do 7.)
Uključivanj
ON/OFF
MODE |
FAN |
|
SWING |
SLEEP |
SUPER |
SMART |
IFEEL |
DIMMER |
TIMER ON |
TIMER OFF |
CLOCK |
Pritis  i kad uređaj primi signal, pali se indikator RADA na unutrašnjoj jedinici.
Režimi rada: LJULJANJE, SMART, TAJMER UKLJ., TAJMER ISKLJ., SAT, SPAVANJE i SUPER detaljno su opisani u nastavku teksta.

 Uređaj ponekad ne reaguje smesta ako se menjaju režimi tokom rada. Sačekajte 3 minute. Tokom režima grejanja, na početku se ispušta vazduh. Nakon 2 5 minuta, vazduh se ispušta dok se ne poveća temperatura unurtašnjeg izmenjivača toplote.
 Sačekajte 3 minute pre nego što ponovo pokrenete uređaj.
3

HR
Uputstvo za rad
Nadzor smera protoka vazduha (određeni modeli)
Nadzor smera protoka vazduha
Vertikalni protok (horizontalni protok) se automatski podešava pod odgovarajućim uglom u skladu sa režimom rada nakon uključenje uređaja.
|
|
Smer protoka vazduha takođe |
|
||
Režim rada |
Smer protoka |
može da se podešava po želji |
5 |
||
pritiskom na taster |
"SWING" |
||||
|
|
||||
HLAĐENJE, |
horizontalno |
|
|
|
|
RAZVLAŽI. |
|
|
|
|
|
*GREJANJE, |
nadole |
|
SWING |
|
|
SAMO VENT. |
|
|
|||
|
|
|
|
||
*Režim grejanja je na raspol. za mod. topl. pumpe.
ON/OFF
MODE |
FAN |
SWING |
SLEEP SUPER |
SMART |
IFEEL DIMMER |
TIMER ON TIMER OFF CLOCK
 SWING
SWING
NAPOMENA: Ako jedinica nema četiri načina protoka vazduha, horizontalni protok možete da podesite sami. (određeni modeli)
Nemojte ručno da okrećete ventil za vertikalno podešavanje ručki, jer može da nastane kvar. Ako se to desi, prvo isključite uređaj i isključite napajanje, a zatim ponovo priključite napajanje.
Bolje je da se vertikalno podešena krilca ne pomeraju nadole u načinu HLAĐENE ili RAZVLAŽIVANJE da bi se sprečilo kapanje vode kondenzata.
4
HR
Uputstvo za rad
Režim SMART (određeni modeli)
Pritisnite taster SMART i jedinica neposredno prelazi u režim SMART (neizrazita logička operacija), bez obzira na to da li je jedinica uključena ili isključena. U ovom načinu se podešavaju temperatura i brzina ventilatora u odnosu na sobnu temperature.
Za modele tipa split, kao što su zidni klima uređaji i neki podni klima uređaji, potrebno je odrediti režim rada i podesiti temperaturu u odnosu na sobnu temperaturu.
Režim rada I temperature se određuju u odnosu na sobnu temperaturu
Modeli toplotne pumpe
|
Sobna temperatura |
Režim rada |
Zadana temperatura |
|
|
|
|
|
|
|
21 |
ili niža |
GREJANJE |
22 |
|
|
|
|
|
|
21 |
-23 |
SAMO VENTILATOR |
|
|
|
|
|
|
|
|
|
|
Sobna temperatura je |
|
23 |
-26 |
RAZVLAŽIVANJE |
viša za 2 nakon rada |
|
|
|
|
u trajanju 3 minute |
|
|
|
|
|
|
više od 26 |
HLAĐENJE |
26 |
|
|
|
|
|
|
Modeli za hlađenje |
|
|
||
|
|
|
|
|
|
Sobna temperatura |
Režim rada |
Zadana temperatura |
|
|
|
|
|
|
|
23 |
ili niže |
SAMO VENTILATOR |
|
|
|
|
|
|
|
|
|
|
Room temperature je |
|
23 |
-26 |
RAZVLAŽIVANJE |
viša za 2 nakon rada |
|
|
|
|
u trajanju 3 minute |
|
|
|
|
|
|
više od 26 |
HLAĐENJE |
26 |
|
|
|
|
|
|
Za komercijalne klima uređaje, kao što su klima uređaji tipa kaste, klima uređaji za kanale, plafonski i podni klima uređaji te neki nadplafonski klima uređaji, potrebno je odrediti režim rada u odnosu na razliku između sobne i podešene temperature.
Režim rada se određuje u odnosu na razliku između sobne I podešene temperature
Modeli toplotne pumpe
|
Sobna temperatura |
Režim rada |
Zadana temperatura |
|
|
|
|
|
niža od T-3 |
GREJANJE |
T |
|
|
|
|
|
T-3 ≤Tisobna ≤T+3 |
SAMO VENTIL. |
T |
|
Oviša od T+3 |
HLAĐENJE |
T |
|
|
|
|
Modeli za hlađenje |
|
|
|
|
|
|
|
|
Sobna temperatura |
Režim rada |
Zadana temperatura |
|
|
|
|
|
T+3 ili niža |
SAMO VENTIL. |
T |
|
|
|
|
|
viša od T+3 |
HLAĐENJE |
T |
|
|
|
|
 Taster SMART nije aktivan u režimu rada SUPER. Pritisnite taster REŽIM RADA i poništite režim rada SMART. Napomena: temperatura, protok i smer kontrolišu se automatski u režimu rada SMART. Pa ipak za uključenje/isključenje možete da birate od -2 do 2 (kod određenih modela od -7 do 7), a za inverter možete da birate od -7 do 7 ako se i dalje ne osećate prijatno.
5
HR
Uputstvo za rad
Režim rada SMART (određeni modeli)
|
|
šta vam je na raspolaganju u režimu SMART |
||
|
vaš osećaj |
taster |
postupak podešavanja |
|
|
|
|||
|
|
|
|
|
|
neprijatno |
|
brzina sobnog ventilatora može da se |
|
|
zbog neod- |
|
|
|
|
|
menja sa visoko, srednje ili nisko |
|
|
|
govarajućeg |
|
|
|
|
FAN |
pritiskom na taster |
|
|
|
protoka |
|
||
|
|
|
|
|
|
vazduha |
|
|
|
|
neprijatno |
|
pritisnite jednom da vertikalno |
|
|
|
podešena krilca zamene smer |
|
|
|
zbog neod- |
|
|
|
|
|
vertikalnog protoka. Pritisnite ponovo |
|
|
|
govarajućeg |
|
|
|
|
|
da se zaustave. Za horizontalni smer |
|
|
|
smera protoka |
SWING |
|
|
|
protora pratite sadržaj prethodne |
|
||
|
|
|
|
|
|
|
|
strane |
|
Taster CLOCK
Možete da podesite stvarno vreme pritiskom na taster CLOCK i podesiti vreme sa tasterom  i , a ponovnim pritiskom na taster CLOCK stvarno vreme je podešeno.
Režim SUPER
RežimRežimradaradaSUPER
 Režim rada SUPER se koristi za pokretanje ili zaustavljanje hlađenja ili grejanje. U režimu rada SUPER, indikator režima super se pojavljuje na LCD displeju.
Brzo hlađenje radi na visokoj brzini ventilatora i automatski menja temperaturu na 16 °C;Brzo grejanje radi na automatskoj brzini ventilatora i automatski menja podešenu temperaturu na 30 °C.
Režim rada SUPER može da se podesi kad je uređaj pod naponom i
 uključen. U režimu SUPER možete da podešavate temperaturu, smer
protoka vazduha ili tajmer.
Za izlaz iz režima SUPER pritisnite taster SUPER, REŽIM RADA, VENTILATOR, ON/OFF ili SPAVANJE i displej se vraća na početni režim.
 Napomena:
 Taster SMART nije na raspolaganju u režimu SUPER.
Uređaj nastavlja sa radom u režimu SUPER ako ne izađete pritiskom na neki od gore
 navedenih taster.
 Grejanje NIJE na raspolaganju za klima uređaja koje su samo za hlađenje.
6
 Loading...