


EN
DETAILED INSTRUCTIONS FOR USE OF UPRIGHT REFRIGERATOR AND FREEZER
www.gorenje.com
We thank you for the
confidence you have shown by purchasing our appliance.
We wish you find a lot of pleasure in its use.
The appliance is intended solely for household use.
Refrigerator freezer (hereinafter: the appliance) consists of two parts: the upper part is the refrigerator and the lower part is the freezer.
The refrigerator is intended for storing fresh food at temperatures above 0°C.
The freezer is intended for freezing fresh food and for long-term storage of frozen food (up to one year, depending on the type of food).
445489
2
TABLE OF CONTENTS
INTRODUCTION
4IMPORTANT NOTES AND WARNINGS
8ADVICE FOR SAVING POWER WITH REFRIGERATION APPLIANCES
10 |
APPLIANCE DESCRIPTION |
APPLIANCE |
|
DESCRIPTION |
|||
|
|
||
11 |
INSTALLATION AND CONNECTION |
|
|
13 |
CHANGING THE DIRECTION OF DOOR OPENING |
|
|
17 |
OPERATING THE APPLIANCE WITH MECHANIC CONTROLS |
|
|
19 |
APPLIANCE WITH ELECTRONIC CONTROL |
|
|
30 |
APPLIANCE INTERIOR EQUIPMENT |
|
|
35 |
RECOMMENDED DISTRIBUTION OF FOOD IN THE APPLIANCE |
|
|
|
|
|
36 STORING FOOD IN THE REFRIGERATOR |
STORING AND |
|
FREEZING FOOD |
||
|
37STORING FOOD IN THE FRESHZONE DRAWER
38STORING FOOD IN THE ZEROZONE DRAWER
40FREEZING AND STORING FROZEN FOOD
40Freezing process
41Important warnings on freezing fresh food
41Storage of industrially frozen food
42Frozen food storage time
42 Defrosting frozen food
43 |
DEFROSTING THE APPLIANCE |
DEFROSTING |
||
AND CLEANING |
||||
|
|
|
||
|
44 CLEANING THE APPLIANCE |
THE APPLIANCE |
||
|
|
|||
|
|
|
|
|
45 |
TROUBLESHOOTING |
OTHER |
||
|
||||
47 |
INFORMATION ABOUT APPLIANCE NOISE |
|
||
|
|
|
|
|
|
|
|
445489 |
|
3

IMPORTANT
NOTES AND WARNINGS
This appliance is not intended for use by persons (including children) with reduced physical,sensory or mental capabilities, or lack of experience and knowledge, unless they have been given supervision or instruction concerning use of the appliance by a person responsible for their safety.
Children should be supervised to ensure that they do not play with the appliance.
This appliance is intended to be used in household and similar applications such as
–staff kitchen areas in shops, offices and other working environments;
–farm houses and by clients in hotels, motels and other residential type environments;
–bed and breakfast type environments;
–catering and similar non-retail applications.
Before connecting the appliance to the power mains, please read carefully the instructions for use which describe the appliance and its correct and safe use. The instructions apply for several appliance types/models; thus, settings or equipment may be described herein which is not available in your appliance. The instruction manual includes the NO FROST version/model of
the freezer which is fitted with a fan and in which the defrosting process is automatic.
445489
4
Remove the packaging intended for protecting the appliance or particular parts during transport.
Spacers are fitted on the corners of the doors. Remove them and insert the supplied plugs into their slots (only in some models).
Before connecting the appliance to the power mains, let the appliance rest in a vertical position for approximately 2 hours. This will reduce the possibility
of operation faults due to the effect of transport on the cooling system.
The appliance must be connected to the power mains and grounded in compliance with the effective standards and regulations.
The appliance may not be used outdoors and it may not be exposed to rain.
Do not store explosive substances such as aerosol cans with a flammable propellant in this appliance.
Before cleaning the appliance, unplug the appliance from the power mains (unplug the power cord from the wall outlet).
If the supply cord is damaged, it must be replaced by the manufacturer, its service agent or similarly qualified persons in order to avoid a hazard.
445489
5
If the appliance will be out of use for a prolonged period of time, switch it off using the relevant button, and unplug the appliance from the power mains. Empty the appliance, defrost it, clean it, and leave the door ajar.
If LED lighting does not work, call a service technician. Do not attempt a repair of the LED lighting yourself, as there is danger of contact with high voltage!
To protect the environment, take the obsolete appliance to an authorized home appliance collection center.
Packaging is made of environmentally friendly materials that can be recycled, disposed of, or destroyed without any hazard to the environment.
Rating plate can be found in the appliance interior. If the language on the rating plate is not the language of your choice or the language of your country, replace it with the one supplied.
WARNING! Keep Ventilation openings in the appliance enclosure or in the built-in structure, clear of obstruction.
WARNING! Do not use any mechanical accessories when thawing the refrigerator, except for those explicitly recommended by the manufacturer.
WARNING! Do not damage the refrigerant circuit.
445489
6

WARNING! Do not use any electrical devices inside the appliance, except for those explicitly recommended by the manufacturer.
The symbol on the product or its packaging indicates that the product should not be treated as normal household waste. The product should be taken to an authorized collection center for waste electric and electronic equipment processing. Correct disposal of the product will help prevent any negative effects
on the environment and health of people which could occur in case of incorrect product removal. For detailed information on removal and processing of the product, please contact the relevant municipal body in charge of waste management, your waste disposal service, or the store where you bought the product.
Disposal
The environment and personal safety must be considered when disposing of this appliance.
Please ensure the appliance is taken to a recycle center for safe recycling. DO NOT dispose of the appliance in land fill as the insulation and refrigerant gas contained in these appliances are flammable.
445489
7

ADVICE FOR SAVING POWER WITH REFRIGERATION APPLIANCES
•Install the appliance as specified in the instruction manual.
•Do not open the door more often than necessary.
•Occasionally make sure air circulation underneath the appliance is unobstructed.
•Condenser unit on the rear wall should be kept clean (see chapter Cleaning the appliance).
•If the gasket is damaged or does not provide a perfect seal for other reasons, have it replaced as soon as possible.
•Store the food in tightly sealed containers or appropriate packaging.
•Before placing the food in the appliance, cool it to room temperature.
•Defrost frozen food in the refrigerator compartment.
•Remove some of the drawers from the freezer compartment as described in the instruction manual, in order to make use of the entire interior.
•Defrost your conventional freezer when an approximately 3-5 milimeter layer of of frost or ice has built up on the refrigerated surfaces.
•Make sure the layout of shelves in the compartment is uniform and that the food is placed so that the air can freely circulate in the appliance interior (observe the recommended placement of food as described in the instructions).
•In appliances with a fan, do not block the fan slots.
•If you do not need the fan or the ionizer, switch them off to reduce power consumption.
445489
8

R600a WARNINGS
NOTE: The model uses 0.057kg (model NRK6192TX) or 0.060kg (model NRK62JSY2-W &
NRK62JSY2-B) of R5600a flammable refrigerant in its sealed system.
The following must be observed for your safety:
R600a Refrigerant Warning
•This appliance contains a small quantity of R600a refrigerant which is environmentally friendly, but flammable. It does not damage the ozone layer, nor does it increase the greenhouse effect.
•During transportation and installation, ensure that the tubing of the refrigerant circuit is not damaged.
•Leaking refrigerant can ignite and may damage the eyes.
•In the event any damage does occur, avoid exposure to open fi res and any device which creates a spark. Disconnect the appliance from the mains power.
•Thoroughly ventilate the room in which the appliance is located for several minutes.
•Notify Customer Service for necessary action and advice.
•The room for installing the appliance must be at least 1 cubic metre per 8 grams of refrigerant.
The refrigerant quantity contained in this appliance is listed above in grams; it is also noted on the Rating Plate of the appliance.
It is hazardous for anyone other than an Authorised Service Person to carry out servicing or repairs to this appliance. In Queensland the authorized person must hold a
Gas Work Authorisation for hydrocarbon refrigerants, before carrying out servicing or repairs which involve the removal of covers.
445489
9
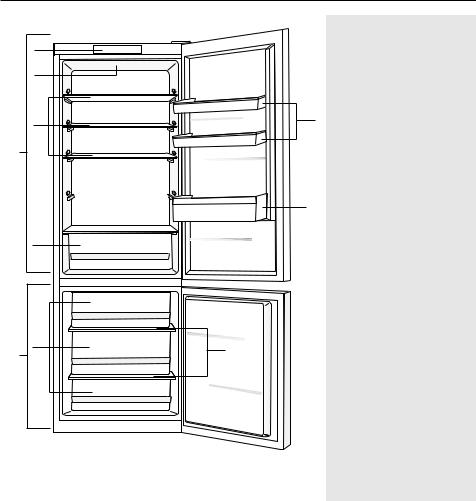
APPLIANCE DESCRIPTION
|
|
A |
Refrigerator |
1 |
|
1 |
Control unit |
|
|
2 |
LED lighting of refrigerator |
2 |
|
|
interior |
|
|
3 |
Pull-out glass shelf (height- |
|
|
|
adjustable) |
3 |
5 |
4 |
Crisper (fruit and vegetables |
|
|
drawer) |
|
|
|
|
|
A |
|
5 |
Height-adjustable door bin |
|
6 |
Bottle shelf |
|
|
|
||
|
|
B |
Freezer |
|
6 |
7 |
Freezer drawers |
|
|
8 |
Glass shelves |
4 |
|
|
|
7 |
8 |
|
|
B |
|
|
|
•The drawers are protected against pulling out. To remove a drawer from the appliance, pull it out as far as it will go, then lift at the front and pull out completely.
•Some models also feature a control unit on the door.
445489
10
INSTALLATION AND CONNECTION
SELECTING THE ROOM
•Install the appliance in a dry and well ventilated room. The appliance will operate correctly if the environment temperature is in the interval specified in the table. The appliance class is indicated on the rating plate / label with the basic information on the appliance.
Class |
Temperature |
SN (subnormal) |
from +10°C to +32°C |
N (normal) |
from +16°C to +32°C |
ST (subtropical) |
from +16°C to +38°C |
T (tropical) |
from +16°C to +43°C |
Warning: Make sure the room where the appliance is installed is large enough. There should be at least 1 m3 of space per 8 grams of refrigerant. Amount of refrigerant is stated on the rating plate in the appliance interior.
INSTALLING THE APPLIANCE
> 90°
max 30 mm
Appliance installation should be carried out by at least two persons to avoid any physical injury or damage to the appliance.
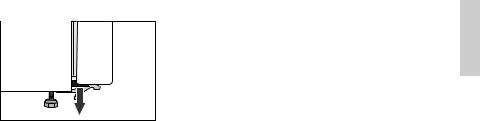
•The appliance must stand level or tilted slightly to the back, stable on a solid base. At the front, the appliance is fitted with two adjustable legs that can be used to level the appliance. At the rear side, casters allow for easier installation of the appliance (only with some models).
•There should be a clearance of at least 5 cm between the appliance and any cupboard installed above it, in order to allow adequate cooling of the condenser unit.
•The appliance is supplied with two spacers which should be installed on the lower part of the housing to prevent from pushing the appliance too close to the wall. Appliance may also be installed without the spacers; however, this may increase power consumption.
445489
11
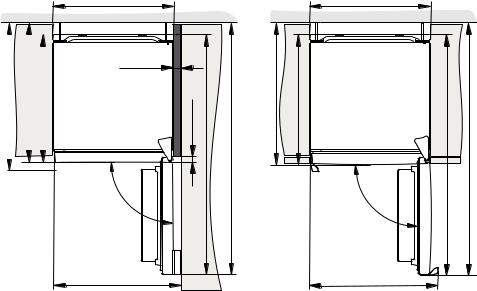
•Do not expose the appliance to direct sunlight and do not place it near any source of heat. If this cannot be avoided, install an insulation panel.
•The appliance may stand alone or it may be placed ext to a cupboard or a wall. Consider the clearance required to fully open the door in order to allow pulling out the drawers and shelves (see installation diagram).
max720mm |
680mm |
|
|
|
|
|
|
632mm |
|
|
|
|
|||
|
|
|
|
||||
|
|
|
|
|
|
|
|
|
|
|
|
|
|
|
|
600 mm |
600 mm |
min 42 mm
ORA IT O |
|
688mm |
640mm |
|
|
|
min30mm |
|
1201mm |
||
|
|
mm |
|
|
|
max |
1194mm |
1242 |
|
max |
1249mm |
90° |
|
|
|
|
|
|
|
|
|
90° |
|
640 mm |
644 mm |
Note: When placing the appliances side by side, the anti-dew (anti-condensation) set has to be purchased and installed!
Code for ordering the set:
–appliances with a height of 1850 mm: 576604.
–appliances with a height of 2000 mm: 576606.
CONNECTING THE APPLIANCE
•Connect the appliance to the power mains using a connection cable. The wall outlet should be fitted with a ground contact (safety socket). Nominal voltage and frequency are indicated on the rating plate/label with basic information on the appliance.
•The appliance must be connected to the power mains and grounded in compliance with the effective standards and regulations. The appliance will withstand short-term deviations from the nominal voltage, but not more than +/- 6%.
445489
12

CHANGING THE DIRECTION OF DOOR OPENING
VERSION I – CONTROLS IN THE APPLIANCE INTERIOR
Tools required: socket wrench No. 8, Phillips screwdriver, torx 25, flat screwdriver
The procedure to change the direction of door opening should be carried out by at least two persons.
1.Remove the upper hinge cover (A).
2.Unscrew the upper hinge (B) and remove the upper door (C).
3.Then remove the covering plugs (D), unscrew the mid hinge (E) and remove the lower door (F) from the lower hinge (G).
4.Tilt the appliance backwards (make sure you do not press against the condenser unit on the rear wall of the appliance as this may damage the cooling system), unscrew the lower hinge (G) and the foot (H) and move them to the opposite side. Make sure the washer is installed like it was before disassembly.
5.Move the door hinges (I) to the opposite side.
6.Place the Mid hinge (E) on the lower door (F) and place the lower door on the lower hinge (G). Fasten the mid hinge (the door should be open while you do this). Do not forget to place the washers (J) and covering plugs (M) as they were placed before the disassembly.
7.Place the upper door (C) over the middle hinge (E), remove the covering cap (K) and fasten the upper hinge (B).
8.Install the upper hinge cover (A) and the covering cap (K).
9.Changing the side of the handle (L): remove the covering plugs/caps, undo the screws and fasten the handle on the opposite side. Place the covering plugs/caps on the opposite side.
At ORA-ITO appliances alteration of door opening direction is not possible.
445489
13

1 |
|
2 |
|
|
|
|
|
|
|
|
|
|
|
|
|
|
C |
|
|
|
|
B |
|
3 |
|
|
|
4 |
|
|
|
|
|
G |
|
|
|
|
|
|
|
|
|
|
F |
H |
H |
|
|
|
|
||
|
E |
|
|
|
|
5 |
|
6 |
|
E |
|
I |
F |
J |
|
||
|
|
D |
|
|
|
|
|
|
|
|
M |
|
|
7 |
|
K |
|
|
|
|
|
|
|
|
|
|
|
B |
|
|
D |
C |
|
|
|
|
I |
|
|
|
|
8 |
|
|
9 |
|
|
|
A |
|
|
|
|
|
|
K |
|
|
|
|
|
|
|
|
L |
445489 |
|
|
|
|
|
14 |
|
|
|
|
|

VERSION II – CONTROLS ON THE DOOR
Tools required: socket wrench No. 8, Phillips screwdriver, torx 25, flat screwdriver
The procedure to change the direction of door opening should be carried out by at least two persons.
1.Remove the upper hinge cover (A) and the cover from the connector (B1).
2.Unplug the connector (C), unscrew the upper hinge (D) and remove the upper door (E).
3.Remove the side panels (F) and (G), then unscrew and remove the middle panel (H).
4.Move the upper hinge (A) and the connector and cable to the opposite side. Replace all three panels (F), (G), and (H). Make sure the cable runs through the grooves in the panels like it did before disassembly.
5.Then remove the covering plugs (I), unscrew the mid hinge (J) and remove the lower door (K) from the lower hinge (L).
6.Tilt the appliance backwards, undo the lower hinge (L) and the foot (M) and install them on the opposite side. Make sure the washer is installed like it was before disassembly.
7.Move the door bearings (N) and retainers (S) to the opposite side.
8.Place the Mid hinge (J) on the lower door (K) and place the lower door on the lower hinge (L). Fasten the mid hinge (the door should be open while you do this). Do not forget to place the washers (O) and covering plugs (I) as they were placed before the disassembly.
9.Place the upper door (E) on the middle hinge (J). Remove the covering plugs (P) and
(B2). Reconnect the connector (C) and fasten the upper hinge.
10.Install the over of the upper hinge (A), connector cap (B1), and covering caps (P) and
(B2).
11.Changing the side of the handle (R): remove the plugs/caps, undo the screws and fasten the handle on the opposite side.
Place the plugs/caps on the opposite side.
445489
15
 Loading...