


General ARHA12L, ARHA12LATN, AOHA12LACL, ARHA14L, ARHA14LATN User Manual
...OPERATING MANUAL BEDIENUNGSANLEITUNG MODE D’EMPLOI MANUAL DE FUNCIONAMIENTO MANUALE DI ISTRUZIONI
ΕΓ ΕΙΡΙ∆Ι ΛΕΙΤ ΥΡΓΙΑΣ
РУКОВОДСТВО ПО ЭКСПЛУАТАЦИИ
MANUAL DE INSTRUÇÕES
KEEP THIS MANUAL FOR FUTURE REFERENCE
BEWAHREN SIE DIESES HANDBUCH ZUM SPÄTEREN NACHSCHLAGEN AUF
CONSERVEZ CE MANUEL POUR RÉFÉRENCE ULTÉRIEURE
CONSERVE ESTE MANUAL PARA SU FUTURA CONSULTA
CONSERVARE IL PRESENTE MANUALE PER FUTURE CONSULTAZIONI
ΦΥΛΑ ΤΕ Τ ΕΓ ΕΙΡΙ∆Ι ΓΙΑ ΜΕΛΛ ΝΤΙΚΗ ΑΝΑΦ ΡΑ
СОХРАНИТЕ ДАННОЕ РУКОВОДСТВО ДЛЯ СПРАВОК В БУДУЩЕМ
GUARDE ESTE MANUAL PARA REFERÊNCIA FUTURA |
P/N9373329060 |
|
 Português Русский EλληvIkά Italiano Español Français Deutsch English

CONTENTS
SAFETY PRECAUTIONS................................................ |
1 |
NAME OF PARTS ........................................................... |
2 |
PREPARATORY OPERATION ......................................... |
3 |
OPERATION ................................................................... |
4 |
TIMER FUNCTIONS ....................................................... |
6 |
ON/OFF TIMER............................................................... |
6 |
WEEKLY TIMER ............................................................. |
7 |
TEMPERATURE SET BACK TIMER ............................... |
9 |
OPERATING TIPS ......................................................... |
10 |
ADJUSTING THE DIRECTION OF AIR CIRCULATION ......... |
11 |
FILTER LAMP RESET ................................................... |
11 |
SELF-DIAGNOSIS ........................................................ |
11 |
TROUBLESHOOTING .................................................. |
12 |
SAFETY PRECAUTIONS
●Before using the appliance, read these “SAFETY PRECAUTIONS” thoroughly and operate in the correct way.
●The instructions in this section all relate to safety; be sure to maintain safe operating conditions.
●“DANGER”, “WARNING” and “CAUTION” have the following meanings in these instructions:
WARNING!
CAUTION!
This mark indicates procedures which, if improperly performed, could lead to the death or serious injury of the user.
This mark indicates procedures which, if improperly performed, might possibly result in personal harm to the user, or damage to property.
 WARNING!
●Do not attempt to install this controller by yourself.
●This controller contains no user-serviceable parts. Always consult authorized service personnel for repairs.
●When moving, consult authorized service personnel for disconnection and installation of the controller.
●If a problem (burning smell, etc.) occurs, turn off the electrical breaker immediately to stop operation, and then consult authorized service personnel.
 CAUTION!
●Do not expose the controller directly to water.
●Do not operate the controller with wet hands.
●Do not touch the switches with sharp objects.
●Always turn off the electrical breaker whenever cleaning the air conditioner or changing the air filter.
●Check the condition of the installation stand for damage.
●Ensure that any electronic equipment is at least one metre away from the controller.
●Avoid installing the controller near a fireplace or other heating apparatus.
●When installing the controller, take precautions to prevent access by infants.
●Do not use inflammable gases near the controller.
En-1

NAME OF PARTS
Remote controller
|
I |
|
H |
|
G |
F |
J |
|
K |
|
E |
2 |
1 |
6 |
3 |
|
|
7 |
4 |
8 |
C |
9 |
B |
0 |
5 |
|
|
A |
D |
1 Start/Stop Button |
C Horizontal Airflow Direction |
||||||
2 Set Temperature Button |
and Swing Button |
||||||
3 Master Control Button |
D Filter Button |
||||||
4 Fan Control Button |
E Operation Lamp |
||||||
5 Economy Button |
F Timer and Clock Display |
||||||
6 Timer Mode (CLOCK ADJUST) |
G Operation Mode Display |
||||||
Button |
H Fan Speed Display |
||||||
7 DAY (DAY OFF) Button |
I Operation Lock Display |
||||||
8 SET BACK Button |
J Temperature Display |
||||||
9 Set Time Button |
K Function Display |
||||||
0 DELETE Button |
|
|
|
|
|
|
Defrost Display |
A SET Button |
|
|
|
|
|
|
Thermo Sensor Display |
B Vertical Airflow Direction and |
|
|
|
|
|
|
Economy Display |
Swing Button |
|
|
|
|
|
|
Vertical Swing Display |
|
|
|
|
|
|
|
Horizontal Swing Display |
|
|
|
|
|
|
|
Filter Display |
En-2
PREPARATORY OPERATION
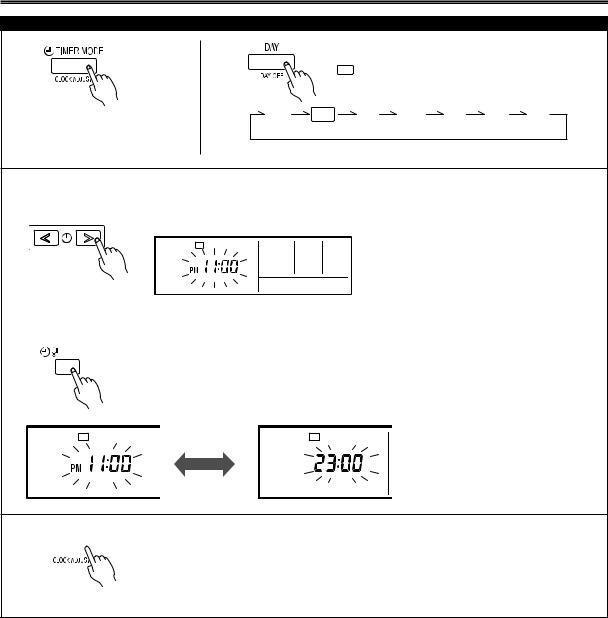
Set the current day and time
1 |
2 |
Press the DAY button and select the current day. |
|||||
A |
appears around the selected day. |
|
|||||
Press the timer mode (CLOCK |
SU |
MO |
TU |
WE |
TH |
FR |
SA |
ADJUST) button for 2 seconds |
|
|
|
|
|
|
|
or more. The time display on |
|
|
|
|
|
|
|
the remote controller will flash. |
|
|
|
|
|
|
|
Press the set time buttons to set the current time. 3 Press repeatedly to adjust the current time in 1- minute increments. Press and hold to adjust the
current time in 10-minute increments.
SU MO TU WE TH FR SA
|
|
ex. Monday PM11:00 |
|
|
|
4 |
SET BACK |
Press the SET BACK button to switch between the |
|
12and 24-hour time displays. |
SU MO TU WE TH FR SA |
SU MO TU WE TH FR SA |
|||||||||
|
|
|
|
|
|
|
|
|
|
|
|
|
|
|
|
|
|
|
|
|
|
|
|
|
|
|
|
|
|
|
|
|
|
|
|
|
|
|
|
|
|
|
|
|
|
|
|
|
|
|
|
|
|
|
|
|
|
|
|
|
|
|
|
|
|
|
|
|
|
|
|
|
|
|
|
|
5 


Press again to end.
En-3

OPERATION
Instructions relating to heating are applicable only to “HEAT & COOL MODEL” (Reverse Cycle).
To start/stop operation
Press the start/stop button.
Operation lamp
Air conditioner ON: Lit brightly
Air conditioner OFF: Not lit
To set the operation mode
● Operation mode setting
Press the master control button to set the operation mode. If DRY is selected, the fan speed will be set to AUTO.
AUTO |
COOL DRY |
FAN |
HEAT |
● Room temperature setting
Press the set temperature buttons to set the room temperature.
Temperature setting range |
|
AUTO ............................................... |
18 to 30 °C |
COOL/DRY ....................................... |
18 to 30 °C |
HEAT ................................................ |
16 to 30 °C |
Lower Rise
● Fan speed setting
Press the fan control button to set the fan speed.
AUTO |
HIGH |
MED |
LOW |
QUIET |
ECONOMY OPERATION
Press the ECONOMY button to start or stop ECONOMY OPERA-
TION.
For details on the function, refer to page 10.
En-4
 Loading...