


Food Waste Disposer
DISPOSALL®
SAFETY INFORMATION. . . . . . . . . .3
USING THE DISPOSER
Continuous Feed Models. . . . . . . . . . . . . . . .5
Batch Feed Models. . . . . . . . . . . . . . . . . . . . .5
CARE AND CLEANING . . . . . . . . . . . . .6
INSTALLATION INSTRUCTIONS
Preparation . . . . . . . . . . . . . . . . . . . . . . . . . . .7 Components and Installation . . . . . . . . . . . .8 Installation of Sink Flange . . . . . . . . . . . . . .8 Dishwasher Connection. . . . . . . . . . . . . . . . .9 Attach the Discharge Elbow. . . . . . . . . . . . .9 Connect Disposer to Sink Flange . . . . . . . 10 Dimensions . . . . . . . . . . . . . . . . . . . . . . . . . . 11 Some Typical Installations . . . . . . . . . . . . . 11
TROUBLESHOOTING. . . . . . . . . . . . 12
LIMITED WARRANTY . . . . . . . . . . . 15
CONSUMER SUPPORT . . . . . . . . . . 16
Write the model and serial numbers here:
Model #_________________
Serial # _________________
You can find them on a label on the bottom of the disposer.
OWNER’S MANUAL AND INSTALLATION INSTRUCTIONS
GFC320N
GFC325N
GFC520N
GFC525N
GFC530N
GFC535N
GFC720N
GFB760N
GFC1020N
ENGLISH/FRANÇAIS/
ESPAÑOL
GE is a trademark of the General Electric Company. Manufactured under trademark license.
49-5903-3 12-18 GEA

THANK YOU FOR MAKING GE APPLIANCES A PART OF YOUR HOME.
Whether you grew up with GE Appliances, or this is your first, we’re happy to have you in the family.
We take pride in the craftsmanship, innovation and design that goes into every GE Appliances product, and we think you will too. Among other things, registration of your appliance ensures that we can deliver important product information and warranty details when you need them.
Register your GE appliance now online. Helpful websites and phone numbers are available in the Consumer Support section of this Owner’s Manual. You may also mail in the pre-printed registration card included in the packing material.
2 |
|
49-5903-3 |

IMPORTANT SAFETY INFORMATION
READ ALL INSTRUCTIONS BEFORE USING THE APPLIANCE

 WARNING For your safety, the information in this manual must be followed to minimize the risk of fire, explosion, electric shock, and to prevent property damage, personal injury, or death.

 WARNING WHEN USING YOUR ELECTRICAL APPLIANCES, BASIC SAFETY PRECAUTIONS SHOULD BE FOLLOWED, INCLUDING THE FOLLOWING:
Ŷ 8VH WKLV DSSOLDQFH RQO\ IRU LWV LQWHQGHG SXUSRVH DV described in this Owner’s Manual.
Ŷ 5HDG DOO WKH LQVWUXFWLRQV EHIRUH XVLQJ WKH DSSOLDQFH
Ŷ 7R UHGXFH WKH ULVN RI LQMXU\ FORVH VXSHUYLVLRQ LV required when a disposer is used near children.
Ŷ 'R QRW SXW ILQJHUV RU KDQGV LQWR D ZDVWH GLVSRVHU
Ŷ 7XUQ WKH SRZHU VZLWFK WR WKH 2)) SRVLWLRQ EHIRUH
DWWHPSWLQJ WR FOHDU D MDP RU UHPRYH DQ REMHFW IURP the disposer.
Ŷ :KHQ DWWHPSWLQJ WR ORRVHQ D MDP LQ D ZDVWH
GLVSRVHU XVH D ORQJ ZRRGHQ REMHFW VXFK DV D wooden spoon or the wooden handle of a broom or mop.
Ŷ :KHQ DWWHPSWLQJ WR UHPRYH REMHFWV IURP D ZDVWH disposer, use long-handled tongs or pliers. If
the disposer is magnetically actuated, use only nonmagnetic tools.
Ŷ 7R UHGXFH WKH ULVN RI LQMXU\ E\ PDWHULDOV WKDW PD\ be expelled by a waste disposer, do not put the following into a disposer:
a.Clam or oyster shells
b.Caustic drain cleaners or similar products
c.Glass, china or plastic
d.Large whole bones
e.Metal, such as bottle caps, tin cans, utensils or aluminum foil
f.Hot grease or other hot liquids
g.Whole corn husks
Ŷ :KHQ QRW RSHUDWLQJ D GLVSRVHU OHDYH WKH GUDLQ
VWRSSHU LQ SODFH WR UHGXFH WKH ULVN RI REMHFWV IDOOLQJ into the disposer.
Ŷ )RU SURSHU JURXQGLQJ LQVWUXFWLRQV VHH WKH
CONNECTING ELECTRICITY portion of this manual.
CONNECTING ELECTRICITY
If you are not familiar with electrical power and procedures, call a qualified electrician.

 WARNING Improper connection of the equipment-grounding conductor can result in a risk of electric shock. Check with a qualified electrician or serviceman if you are in doubt as to whether the appliance is properly grounded. Do
not modify the plug provided with the appliance if it will not fit the outlet; have a proper outlet installed by a qualified electrician.
For Models Equipped with a Grounded Cord:
GROUNDING INSTRUCTIONS: 7KLV GLVSRVHU PXVW be grounded to reduce the risk of electric shock in the event of a malfunction or breakdown. Grounding provides a path of least resistance for electric current.
7KLV GLVSRVHU LV HTXLSSHG ZLWK D FRUG KDYLQJ DQ equipment-grounding conductor and a grounding
SOXJ 7KH SOXJ PXVW EH SOXJJHG LQWR DQ RXWOHW WKDW LV properly installed and grounded in accordance with all local codes and ordinances.
INFORMATION SAFETY
READ AND SAVE THESE INSTRUCTIONS
49-5903-3 |
3 |
SAFETY INFORMATION
IMPORTANT SAFETY INFORMATION
READ ALL INSTRUCTIONS BEFORE USING THE APPLIANCE
CONNECTING ELECTRICITY (Cont)
If you are not familiar with electrical power and procedures, call a qualified electrician.
7KH SRZHU FRUG DQG RU FRQQHFWLRQV PXVW FRPSO\ ZLWK
WKH 1DWLRQDO (OHFWULFDO &RGH 6HFWLRQ DQG RU ORFDO codes and ordinances.
For Models Not Equipped with a Cord:
If your disposer does not come equipped with a cord, you can connect it in two ways:
1.Attach a power cord, minimum 18” in length and
QRW WR H[FHHG ´ LQ OHQJWK 8VH *($ 3DUW 1XPEHU 30 ;
or
2. Wire the disposer directly into the house current.
To Attach a Power Cord:
GROUNDING INSTRUCTIONS: 7KLV GLVSRVHU PXVW be grounded to reduce the risk of electric shock in the event of a malfunction or breakdown. Grounding provides a path of least resistance for electric current.
7KLV GLVSRVHU LV HTXLSSHG ZLWK D FRUG KDYLQJ DQ equipment-grounding conductor and a grounding
SOXJ 7KH SOXJ PXVW EH SOXJJHG LQWR DQ RXWOHW WKDW LV properly installed and grounded in accordance with all local codes and ordinances.

 WARNING Improper connection of the equipment-grounding conductor can result in a risk of electric shock. Check with a qualified
electrician or serviceman if you are in doubt as to whether the appliance is properly grounded.
NOTE: 'LVFRQQHFW HOHFWULF SRZHU WR GLVSRVHU FLUFXLW
EHIRUH LQVWDOODWLRQ 7XUQ WKH FLUFXLW EUHDNHU WR WKH 2)) position or remove the fuse.
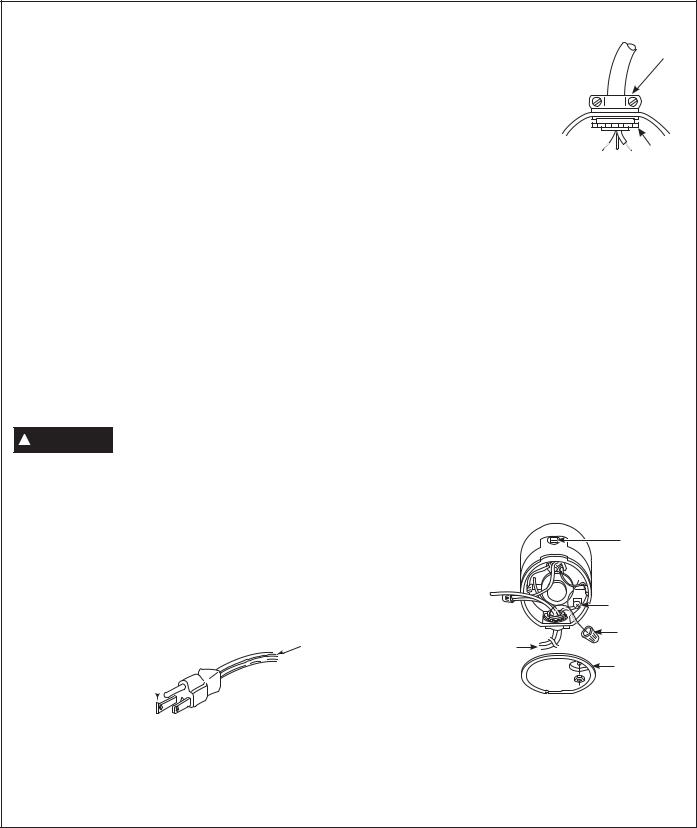
A.Connect the disposer to 110-120 Volt, 60 Hz AC current only.
B.If a plug-in cord is used, use
a three prong plug. Ground wire should be attached to the ground screw in the bottom of the disposer (end bell).
7UDFH OHDG FRQQHFWHG |
|
||
to this blade and attach |
|
||
that lead to white wire |
Ribbed |
||
on disposer |
|||
Side |
|||
|
|
||
|
|
|
|
NOTE: When viewing face of electrical plug with grounding pin at top, the larger left blade is connected to the identified wire.
& 8VH D FDEOH clamp strain relief connector where power cord enters the disposer.
Strain
Relief
Heyco Box Connectors
3DUW 1R
Nut
To Wire Your Disposer Directly into the House Current:
GROUNDING INSTRUCTIONS: 7KLV GLVSRVHU PXVW be connected to a grounded, metal, permanent wiring system; or an equipment-grounding conductor must be run with the circuit conductors and connected
to the equipment-grounding terminal or lead on the appliance.
$ ,I \RX XVH %; FDEOH7KHVH SURGXFWV DUH GHVLJQHG IRU KRXVHKROG XVH
2.Connect white wire to white lead of disposer with a wire nut. Connect black wire to black lead of disposer with a wire nut. Connect bare ground
ZLUH WR WKH JURXQG VFUHZ 7KH JURXQG ZLUH VKRXOG be clamped and held by a strain relief.
'R QRW XVH D ULJLG FRQGXLW IRU WKH ZLULQJ connection.
4.A dedicated acceptable motor switch, with the off position marked, shall be provided for this
GLVSRVHU DW WKH WLPH RI LQVWDOODWLRQ 7KH VZLWFK shall be mounted in sight of the disposer or the sink opening
for the disposer.
,I %; FDEOH LV QRW |
|
|
used, provide a |
|
|
separate ground |
|
Ground Screw |
wire to nearest |
7R +RXVH |
Wire Nuts |
reliable ground, |
||
using the screw in |
Current |
|
RU 3RZHU |
|
|
the end bell for the |
Cord |
Remove |
ground wire. |
|
Bottom Cap |
B.If your power %RWWRP RI WKH 'LVSRVHU HQG EHOO supply does not
include a ground wire, you must provide one unless metal cable is used. Attach a copper wire securely to disposer ground screw and attach other end of
ZLUH WR D UHOLDEOH JURXQG 8VH RQO\ 8/ DSSURYHG ground clamp. If plastic pipe is used in your home, a qualified electrician should install a proper ground.
READ AND SAVE THESE INSTRUCTIONS
4 |
49-5903-3 |

Using the Disposer
READ ALL SAFETY INSTRUCTIONS ON PAGES 3 AND 4 BEFORE USING THIS DISPOSER.
7KLV GLVSRVHU XVHV DQWL MDP VZLYHO LPSHOOHUV WKDW PDNH D FOLFNLQJ VRXQG DV WKH\ VZLQJ LQWR SODFH 7KLV LQGLFDWHV normal operation.
Continuous Feed Models
A.Remove the sink stopper and turn on a medium flow of cold water.
B. 7XUQ WKH VZLWFK WR 21
C. 6FUDSH LQ IRRG ZDVWH 7R VSHHG XS IRRG ZDVWH disposal, cut or break up large bones, rinds and cobs. Large bones and fibrous husks require considerable grinding time and are more easily
WKURZQ DZD\ ZLWK RWKHU WUDVK 'R QRW EH DODUPHG WKDW
WKH GLVSRVHU VORZV GRZQ ZKLOH JULQGLQJ 7KH GLVSRVHU is actually increasing torque (grinding power) and is operating under normal conditions.
D.Before turning the disposer off, let the water and
WKH GLVSRVHU UXQ IRU DSSUR[LPDWHO\ VHFRQGV
DIWHU VKUHGGLQJ VWRSV 7KLV DVVXUHV WKDW DOO ZDVWH LV thoroughly flushed through the trap and drain.
E.'R QRW XVH KRW ZDWHU ZKLOH UXQQLQJ WKH GLVSRVHU &ROG water will keep food waste and fats solid so they can be flushed down the drain.
Batch Feed Models
A.Remove the sink stopper and turn on a medium flow of cold water.
B. Scrape in food waste.
C. Inset the stopper to start the disposer. One
of the 2 small slots in the stopper base must line up with the switch plunger inside the neck
of the disposer.
NOTE: 7KH RYDO VKDSHG handle aligns with the 2
small slots in the stopper.
Push down firmly to start.
D. 5XQ WKH GLVSRVHU IRU seconds after shredding
VWRSV 7KLV DVVXUHV WKDW DOO waste is thoroughly flushed through the trap and drain.
Oval Handle
Small
Lift the stopper to shut the disposer off.
E. 7R ILOO WKH VLQN LQVHUW WKH VWRSSHU VR WKDW WKH ODUJHVW
VORW OLQHV XS ZLWK WKH VZLWFK SOXQJHU 7KH VWRSSHU can now be pushed down to seal the sink without starting the disposer. When the medium-sized slot in the stopper base is lined up with the switch plunger, water can drain, but tableware, etc., cannot be accidentally dropped into the disposer.
Large |
Medium |
Small |
|

 WARNING Do not tamper with stopper or use anything other than the supplied stopper to move the plunger that actuates the on/off switch inside the neck of the disposer.
Helpful Hints
A.Be sure the disposer is empty before using the dishwasher so it can drain properly.
B.You may want to leave the stopper in the drain when
QRW LQ XVH WR SUHYHQW XWHQVLOV DQG IRUHLJQ REMHFWV IURP falling into the disposer.
C.7KH GLVSRVHU LV UXJJHGO\ EXLOW WR JLYH \RX \HDUV DQG years of trouble-free service. It will handle all normal
IRRG ZDVWHV %87 LW ZLOO QRW JULQG DQG GLVSRVH VXFK items as tin cans, bottles and bottle caps, glass, china, leather, cloth, crockery, rubber, string, feathers,
RU FODP RU R\VWHU VKHOOV 7KHVH DUH ZDVWH PDWHULDOV and belong in the trash can or trash compactor.
D. 72 63((' 83 )22' :$67( ',6326$/ &XW RU break up large bones, melon rinds, grapefruit skins and corn cobs. Items such as large bones, fibrous husks like lima bean pods and corn husks, require
FRQVLGHUDEOH FXWWLQJ WLPH )RU WKLV UHDVRQ \RX may prefer to place them in the trash can or trash compactor.
DISPOSER THE USING
49-5903-3 |
|

CARE AND CLEANING
6
Installation Instructions Disposer
Questions? Call 800.GE.CARES (800.432.2737) or visit our Website at: GEAppliances.com In Canada, call 1.800.561.3344 or visit our Website at: GEAppliances.ca
 BEFORE YOU BEGIN
STOP Read these instructions completely and
carefully.
IMPORTANT – Observe all governing codes and ordinances.
•Save these instructions for local inspector’s use.
•Note to Installer – Be sure to leave these instructions with the Consumer.
•Note to Consumer – Keep these instructions for future reference.
•Skill level – Installation of this appliance requires basic mechanical skills.
•Completion time–1 hour
• 3URSHU LQVWDOODWLRQ LV WKH UHVSRQVLELOLW\ RI WKH installer.
• 3URGXFW IDLOXUH GXH WR LPSURSHU LQVWDOODWLRQ LV QRW covered under the Warranty.

 WARNING
•)25 3(5621$/ 6$)(7< 5HPRYH KRXVH fuse or open circuit breaker before beginning
LQVWDOODWLRQ 'R QRW XVH DQ H[WHQVLRQ FRUG RU adapter plug with this appliance.
•)25 3(5621$/ 6$)(7< :KLOH SHUIRUPLQJ installations described in this booklet, gloves and eye protection (safety glasses or equivalent) should be worn.
•)25 3(5621$/ 6$)(7< 'R QRW SRVLWLRQ \RXU head or body under disposer; unit could fall during removal or installation.
•7KH LPSURSHU FRQQHFWLRQ RI WKH HTXLSPHQW grounding conductor can result in a risk of electric shock. Check with a qualified electrician or service representative if you are in doubt that the appliance is properly grounded.
•If house wiring is not 2-wire with ground, a ground must be provided by the installer. When house
ZLULQJ LV DOXPLQXP EH VXUH WR XVH 8/ /LVWHG anti-oxidant compound and aluminum-to-copper connectors.
PREPARATION
'LVFRQQHFW HOHFWULFDO SRZHU VXSSO\ WR GLVSRVHU
2.Remove old disposer or sink flange assembly.
3.Inspect drain line. If it is heavily coated with hardened grease and accumulations, rout out with a plumber’s snake.
4.Remove old sealing materials and gasketing from sink opening, both top and bottom.
NOTE: 7RS DQG ERWWRP RI VLQN VXUIDFHV PXVW EH IUHH of any materials to prevent leaks.
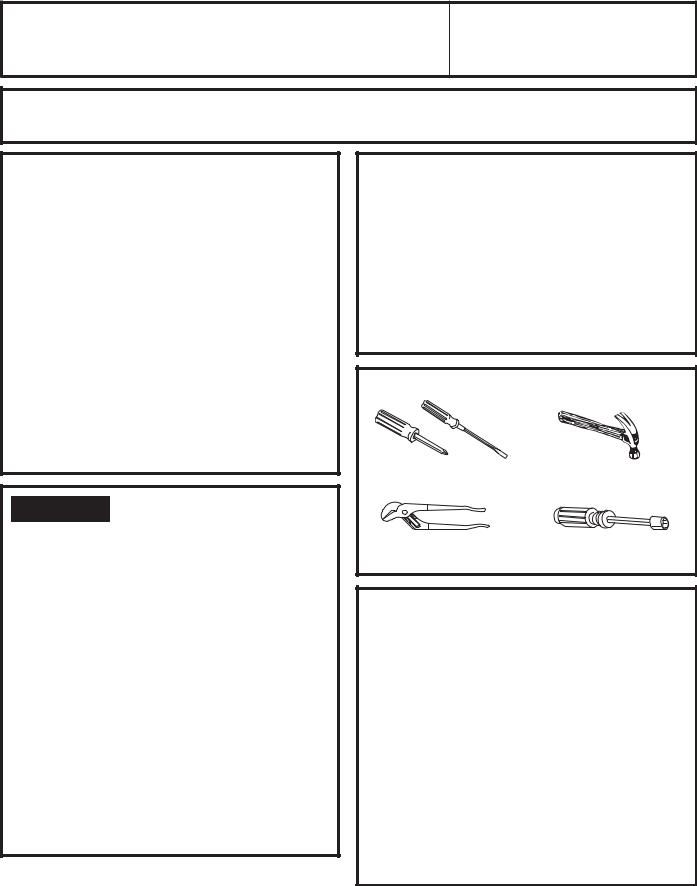
WHAT YOU WILL NEED
ƒ 3KLOOLSV DQG IODW EODGH ƒ +DPPHU screwdriver
ƒ &KDQQHO ORFN SOLHUV VOLS ƒ 1XW 'ULYHU MRLQW
ADDITIONAL MATERIALS YOU MAY NEED
ƒ 6WHHO SXQFK RU ZRRGHQ GRZHO
ƒ 3HWUROHXP MHOO\ RU OLTXLG VRDS
ƒ +RVH FODPS
ƒ 'LVKZDVKHU GUDLQ FRQQHFWRU ƒ $GMXVWDEOH SLSH ZUHQFK ƒ 3OXPEHU¶V SXWW\ IRU FDVW VLQNV ƒ 6WHSSHG UXEEHU GUDLQ DGDSWHU
ƒ :LUH QXWV
ƒ &DEOH FRQQHFWRU
ƒ )OH[LEOH GUDLQ SLSH
ƒ 3RZHU FRUG NLW 3DUW 1R 30 ;
INSTRUCTIONS INSTALLATION
49-5903-3 |
7 |

INSTALLATION INSTRUCTIONS
Installation Instructions
COMPONENTS AND INSTALLATION
COMPONENTS |
|
|
|
*Stopper |
|
|
*Removable |
|
|
Splash Guard |
|
|
6LQN )ODQJH |
|
|
Rubber Sink |
|
|
)ODQJH *DVNHW |
|
Sink |
|
|
)ODQJH |
|
|
Assembly |
Sink |
|
|
||
|
)LEHU *DVNHW |
|
|
Support Ring |
|
|
(Note Arrows |
|
|
,QGLFDWLQJ 8S |
|
|
Mounting Ring |
|
|
7LJKWHQLQJ |
|
|
Ears |
|
|
Cushion |
|
Groove |
Mount |
|
'LVKZDVKHU |
||
|
||
|
'LVFKDUJH ,QOHW |
|
Elbow Gasket |
||
|
|
Screws |
|
Hopper |
|
|
|
'LVSRVHU |
|
|
|
|
Elbow |
'LVFKDUJH |
|
|
)ODQJH |
||
End Bell |
|
Elbow |
|
Rating Label |
|||
(Electrical |
|||
Connections) |
in this Area |
|
|
*Not used with batch feed model
INSTALLATION OF SINK FLANGE
(Read completely before starting.)
Correctly Installed Sink Flange
6LQN )ODQJH |
Rubber Gasket |
|
)LEHU |
Sink |
|
|
||
Gasket |
Support |
|
Bottom Bead of |
Ring |
|
Sink |
||
Cushion Mount |
||
)ODQJH |
||
|
||
Open Area |
|
|
No Obstruction |
Mount Ring should be |
|
Groove |
free to move up and down |
|
Cushion |
||
Bottom |
||
Mount |
||
Bead |
|
(shown for proper orientation)
NOTE: 3D\ FORVH DWWHQWLRQ WR WKH RUGHU RI WKH VLQN flange parts, as they have been correctly assembled by the factory.
A. 'LVDVVHPEOH WKH VLQN IODQJH DVVHPEO\ IURP WKH disposer by turning the mount ring to the left (clockwise) and removing it.
B.Raise the mount ring toward the top of the sink flange. Remove the cushion mount and the mount ring. You may want to practice installing the cushion mount at this point before you are under the sink.
C. 8QVFUHZ WKH VXSSRUW ULQJ IURP WKH VLQN IODQJH DQG remove the fiber gasket. You are now left with the sink flange and the rubber gasket.
D.The rubber gasket is used instead of plumbers putty with stainless steel sinks. Some cast iron sinks will require putty.
E.If no putty is used, insert the sink flange through
WKH UXEEHU JDVNHW LQWR WKH VLQN RSHQLQJ 'R QRW turn the flange once it is seated.
F.If you use putty instead of the gasket, form a ring around the underside of the sink flange. Insert the flange into the sink opening, press down hard to
VTXHH]H RXW H[FHVV SXWW\ )RU XQGHU WKH VLQN WULP off excess putty flush with the bottom edge of the sink opening.
G. )URP XQGHUQHDWK WKH VLQN slip the fiber gasket onto the exposed sink flange. With arrows pointing up, screw the support ring onto the sink
flange and hand-tighten until the sink flange will not move.
At this point you may want to insert the stopper in the sink and fill with water to check the sink flange seal and insure there are no leaks.
H. 3ODFH WKH PRXQW ULQJ RYHU the sink flange and hold in place while installing the cushion mount (large side down). Make sure the groove on the inside of the cushion mount fits over the
lip on the sink flange, similar to putting the lid on a plastic container. Run your fingers around the entire cushion mount with slight pressure.
Cushion Mount Detail
7RS
'R QRW SUHVV WRR KDUG :KHQ the cushion mount is properly
seated, the mount ring can be pulled downward over the cushion mount and will be free to turn.
8 |
49-5903-3 |
Installation Instructions
DISHWASHER CONNECTION (IF REQUIRED)
If you are connecting to a dishwasher, complete the following step. If a dishwasher is not to be connected,
JR WR ³$WWDFKLQJ WKH 'LVFKDUJH (OERZ´ EHORZ
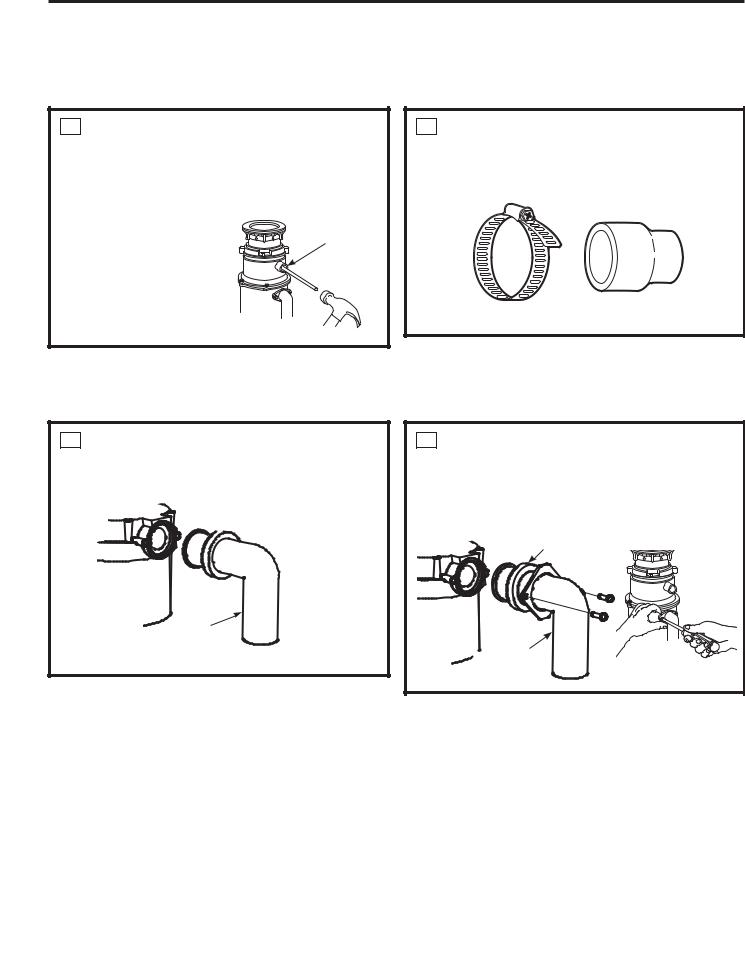
1 KNOCK OUT PLUG |
|
2 CONNECT HOSE |
8VLQJ D EOXQW LQVWUXPHQW VWHHO SXQFK RU ZRRGHQ |
Connect the dishwasher hose using a hose |
|
GRZHO NQRFN RXW WKH HQWLUH SOXJ 'R QRW XVH D |
clamp. If the hose size is different, you will need |
|
screwdriver or sharp instrument. When knockout |
a stepped rubber adapter. |
|
plug falls into disposer, you may remove it or |
|
|
simply grind it up when |
|
|
the disposer is used. |
Knock out |
|
7KLV ZLOO QRW GDPDJH |
plug |
|
the disposer in any |
|
|
way, but may take |
|
|
some time to grind, |
|
Stepped Rubber Adapter |
over the course of |
|
|
several uses. |
|
Hose Clamp |
|
|
|
ATTACH THE DISCHARGE ELBOW
1 ATTACH RUBBER GASKET
Slide rubber gasket over drain pipe.
Rubber


 Gasket
'LVFKDUJH
Elbow
2CONNECT DISCHARGE ELBOW*
Slide bracket over discharge elbow and connect to the disposer.** Make sure all plumbing connections are tight.
Rubber
Gasket


 'LVFKDUJH
Elbow
'LVFKDUJH HOERZ PXVW EH LQVWDOOHG E\ D SURIHVVLRQDO
**Some installations (see page 11 for example) may require the use of a flexible drain pipe.
INSTRUCTIONS INSTALLATION
49-5903-3 |
9 |
INSTALLATION INSTRUCTIONS
Installation Instructions
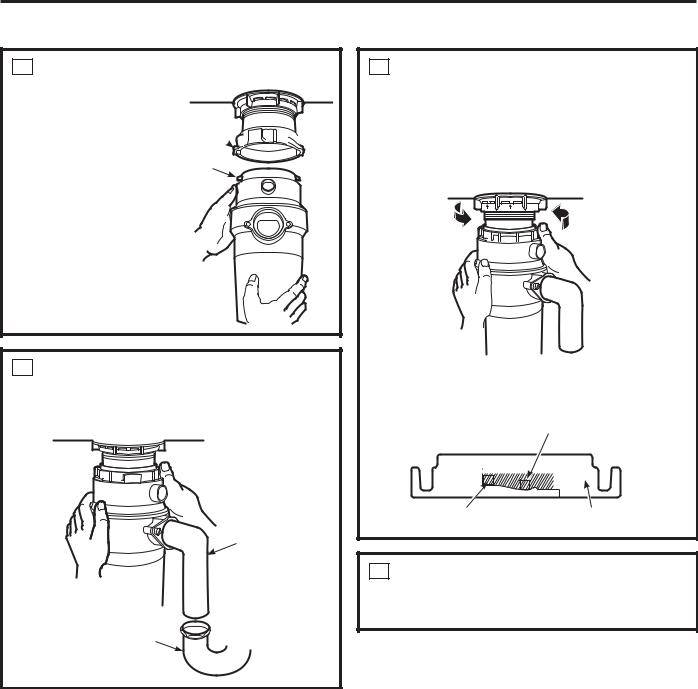
CONNECT DISPOSER TO SINK FLANGE
1 ATTACH TO SINK FLANGE
Line up the disposer under the sink flange. Guide the
KRSSHU SURMHFWLRQV into the mount
ULQJ VORWV 7XUQ WKH mount ring about
´ WR WKH ULJKW VR that the disposer is temporarily supported.
Mount Ring  Slot
Slot 


Hopper
3URMHFWLRQ
2 LINE UP WITH OUTLET PIPE
7XUQ WKH PRXQW ULQJ DQG WKH GLVSRVHU XQWLO WKH disposer discharge elbow lines up with the outlet pipe (see page 11).
'LVFKDUJH
Elbow
2XWHU 3LSH
3 LOCK MOUNT RING
7XUQ WKH PRXQW ULQJ WR WKH ULJKW XQWLO LW ORFNV XS
WLJKW +RSSHU SURMHFWLRQV PXVW EH WR WKH H[WUHPH left of the mounting slots. If the mount ring is hard to turn, you may add a small amount of
SHWUROHXP MHOO\ RU OLTXLG VRDS WR WKH KRSSHU SURMHFWLRQ 5XQ ZDWHU DQG FKHFN IRU OHDNV
Locking Detail
+RSSHU 3URMHFWLRQ LQ ³6XSSRUWHG´ 3RVLWLRQ
|
|
|
|
|
|
|
|
|
|
|
|
|
|
|
|
|
|
|
|
|
|
|
|
|
|
|
|
|
|
|
|
|
|
|
|
|
|
|
|
|
|
|
|
|
|
|
|
|
|
|
|
|
|
|
|
|
|
|
|
|
|
|
|
|
|
|
|
|
|
|
|
|
|
|
|
|
|
|
|
|
|
|
|
|
|
|
|
|
|
|
|
|
|
|
|
|
|
|
|
|
|
|
|
|
|
|
|
+RSSHU 3URMHFWLRQ LQ |
|
Mount Ring |
|||||||||||||||
³/RFNHG´ 3RVLWLRQ |
|
|
|
|
|
|
|
||||||||||
4 CHECK FOR LEAKS
Check the unit for leaks 24 hours after installation and first operation.
10 |
49-5903-3 |
Installation Instructions
DIMENSIONS
5-3/16" |
|
|
|
6-3/16" |
|
12-11/16" |
4-1/2" |
|
5-3/8" |
||
|
||
|
1-1/2" |
GFC320N
GFC325N
5-1/16" |
7-3/4" |
|
|
6-1/8" |
6-15/16" |
12-11/16" |
4-1/2" |
4-1/2" |
|
||
|
5-3/8" |
13-7/16" |
|
1-1/2" |
|
|
1-1/2" |
|
|
|
5-3/8" |
GFC520N
GFC525N GFC530N
GFC535N
8-1/2" |
8-1/2" |
8-1/2" |
|
7-1/4" |
9-3/8" |
7-1/4" |
|
4-1/2" |
|
|
4-1/2" |
16-1/6" |
4-1/2" |
14-1/2" |
1-1/2" |
16-5/8" |
|
1-1/2" |
||
|
|
|||||
|
|
1-1/2" |
|
5-9/16" |
||
|
5-9/16" |
|
5-9/16" |
|
||
|
|
|
|
|
||
|
|
|
|
|
|
GFC720N |
GFB760N |
GFC1020N |
|
|
Batch Feed Operation
SOME TYPICAL INSTALLATIONS
NOTE: It is essential for the proper operation of the |
SINGLE BOWL |
|
||||||||||
disposer that this dimension be 9”-12”, depending |
|
|
|
|
|
|
|
|
|
|
|
|
upon the models listed above, to avoid standing |
|
|
|
|
|
|
|
|
|
|
|
DOUBLE BOWL |
|
|
|
|
|
|
|
|
|
|
|
||
|
|
|
|
|
|
|
|
|
|
|
||
water in disposer motor housing. |
|
|
|
|
|
|
|
|
*Approx. |
CENTER OUTLET** |
||
|
|
|
|
|
|
|
||||||
|
|
|
|
|
|
|
|
|
|
|
|
|
)OH[LEOH GUDLQ SLSH PD\ EH QHFHVVDU\ IRU WKLV |
|
application. |
*Approx. |
|
DOUBLE BOWL
END OUTLET**
*Approx.
INSTRUCTIONS INSTALLATION
|
|
|
49-5903-3 |
11 |
|
TROUBLESHOOTING TIPS
Troubleshooting Tips... Before you call for service
Save time and money! Review the charts below first and you may not need to call for service.
SAFETY NOTE: Before investigating, you must disconnect the power supply.

 WARNING Before resetting, disconnect the power supply-please see SAFETY NOTE above. The overload control prevents the motor from operating should overloading occur. This feature protects your house wiring and your disposer. When overloaded, the motor will stop automatically.
Problem |
Possible Cause |
What To Do |
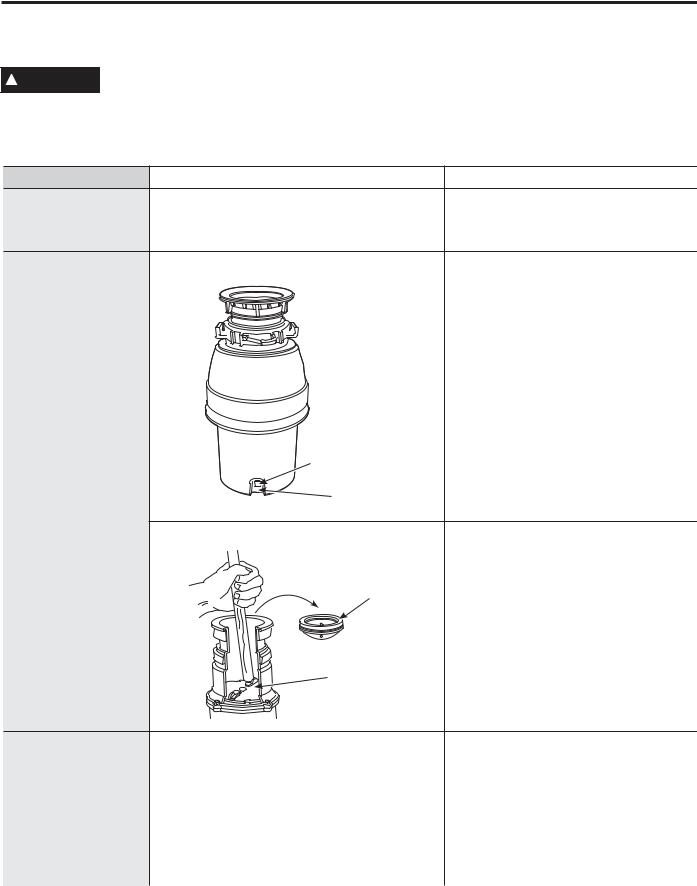
Loud noises (other |
Silverware, bottle cap or other foreign |
Remove the splash guard* and remove |
than those during |
object has fallen into the disposer |
WKH REMHFW ZLWK ORQJ KDQGOHG WRQJV |
grinding of bones |
|
Replace the splash guard*. |
and fruit pits) |
|
|
Disposer does not |
Reset button has been tripped |
With the splash guard* removed, check |
start |
|
to see if the turntable will move freely |
|
|
using a broom handle. If the turntable |
|
|
moves freely, replace the splash guard* |
|
|
and check the reset button to see if it |
|
|
KDV EHHQ WULSSHG 7KH UHVHW EXWWRQ LV |
|
|
red and located opposite the discharge |
|
|
elbow, near the bottom of the disposer. |
|
|
3XVK WKH EXWWRQ LQ XQWLO LW FOLFNV DQG |
|
|
remains depressed. If the reset button |
|
|
has not been tripped, check for a |
|
|
shorted or broken wire connecting to |
|
|
the disposer. Check the electrical power |
|
|
switch, fuse box or circuit breaker. |
|
Reset Button |
If wiring and electrical components |
|
|
are intact, the unit may have internal |
|
Serial No. |
problems that require service or |
|
|
replacement. |
|
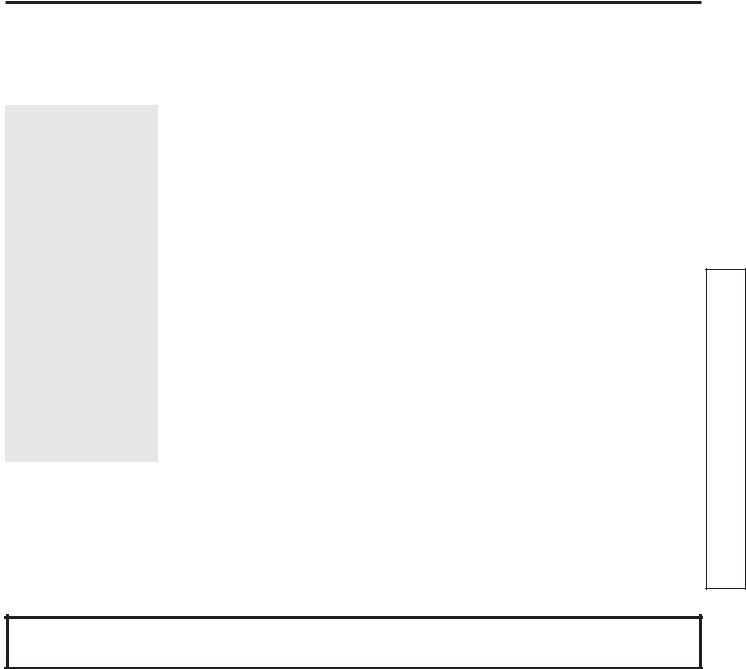
Turntable cannot rotate. |
If the turntable does not turn freely, |
|
|
FKHFN IRU DQ REMHFW ORGJHG EHWZHHQ WKH |
|
|
WXUQWDEOH DQG WKH JULQG ULQJ 'LVORGJH |
|
Remove |
WKH REMHFW E\ PRYLQJ WKH WXUQWDEOH ZLWK |
|
Splash Guard |
D EURRP KDQGOH 7KHQ UHPRYH WKH |
|
|
REMHFW |
|
|
,I QR IRUHLJQ REMHFW LV SUHVHQW WKHUH |
|
|
may be internal problems. |
|
7XUQWDEOH |
|
Disposer leaks |
If the leak is at the top, it may be caused |
|
|
by: |
|
|
1. |
Improper seating of sink flange (gasket |
|
|
choice, putty, or tightening. |
|
2. |
Support ring not tightened properly. |
|
3. |
Defective cushion mount. |
|
If the leak is at the discharge elbow, leak |
|
|
may be caused by improper tightening of |
|
|
elbow flange screws. |
|
%DWFK )HHG GRHV QRW LQFOXGH VSODVK JXDUG
12 |
49-5903-3 |

Notes
NOTES
49-5903-3 |
13 |

NOTES
Notes
14 |
49-5903-3 |
GE Appliances Disposer Limited Warranty
GEAppliances.com
$OO ZDUUDQW\ VHUYLFH LV SURYLGHG E\ RXU )DFWRU\ 6HUYLFH &HQWHUV RU DQ DXWKRUL]HG &XVWRPHU &DUH® WHFKQLFLDQ 7R VFKHGXOH service online, visit us at geappliances.com/service_and_support/, or call GE Appliances at 800.GE.CARES
3OHDVH KDYH \RXU VHULDO QXPEHU DQG \RXU PRGHO QXPEHU DYDLODEOH ZKHQ FDOOLQJ IRU VHUYLFH
For the period of |
GE Appliances will replace |
One Year |
7KH HQWLUH GLVSRVHU LI WKHUH LV D GHIHFW LQ PDWHULDOV RU ZRUNPDQVKLS UHODWLQJ WR IXQFWLRQDO |
)URP WKH GDWH RI WKH |
SDUWV RQO\ DSSHDUDQFH SDUWV DUH H[FOXGHG 'XULQJ WKLV limited one-year warranty, |
original purchase |
GE Appliances will also provide, free of charge, all labor charges related to replacing the |
|
original disposer along with the replacement disposer within the first year. |
Additional One Year |
0RGHOV *)& 1 *)& 1 ,I WKHUH LV D GHIHFW LQ PDWHULDOV RU ZRUNPDQVKLS UHODWLQJ WR |
)URP WKH GDWH RI WKH |
IXQFWLRQDO SDUWV RQO\ DSSHDUDQFH SDUWV DUH H[FOXGHG 'XULQJ WKH one-year extended |
original purchase |
limited warranty period, you will be responsible for all installation charges relating to the |
|
replacement disposer. |
Additional Two Years |
0RGHOV *)& 1 *)& 1 ,I WKHUH LV D GHIHFW LQ PDWHULDOV RU ZRUNPDQVKLS UHODWLQJ WR |
)URP WKH GDWH RI WKH |
IXQFWLRQDO SDUWV RQO\ DSSHDUDQFH SDUWV DUH H[FOXGHG 'XULQJ WKLV Wwo-year extended |
original purchase |
limited warranty period, you will be responsible for all installation charges relating to the |
|
replacement disposer. |
Additional Four Years |
0RGHOV *)& 1 *)% 1 ,I WKHUH LV D GHIHFW LQ PDWHULDOV RU ZRUNPDQVKLS UHODWLQJ WR |
from the date of the |
IXQFWLRQDO SDUWV RQO\ DSSHDUDQFH SDUWV DUH H[FOXGHG 'XULQJ WKLV four-year extended |
original purchase |
limited warranty period, you will be responsible for all installation charges relating to the |
|
replacement disposer. |
Additional Six Years |
0RGHO *)& 1 ,I WKHUH LV D GHIHFW LQ PDWHULDOV RU ZRUNPDQVKLS UHODWLQJ WR IXQFWLRQDO |
)URP WKH GDWH RI WKH |
SDUWV RQO\ DSSHDUDQFH SDUWV DUH H[FOXGHG 'XULQJ WKLV six-year extended limited |
original purchase |
warranty period, you will be responsible for all installation charges relating to the |
|
replacement disposer. |
What GE Appliances will not cover:
ŶService trips to your home to teach you how to use the product.
ŶImproper installation or maintenance.
Ŷ)DLOXUH RI WKH SURGXFW LI LW LV DEXVHG PLVXVHG RU XVHG IRU other than the intended purpose or used commercially.
ŶReplacement of house fuses or resetting of circuit breakers.
Ŷ'DPDJH WR WKH SURGXFW FDXVHG E\ DFFLGHQW ILUH floods, or acts of God.
ŶIncidental or consequential damage caused by possible defects with this appliance.
Ŷ3URGXFW QRW DFFHVVLEOH WR SURYLGH UHTXLUHG VHUYLFH
EXCLUSION OF IMPLIED WARRANTIES
Your sole and exclusive remedy is product repair as provided in this Limited Warranty. Any implied warranties, including the implied warranties of merchantability or fitness for a particular purpose, are limited to one year or the shortest period allowed by law.
7KLV OLPLWHG ZDUUDQW\ LV H[WHQGHG WR WKH RULJLQDO SXUFKDVHU DQG DQ\ VXFFHHGLQJ RZQHU IRU SURGXFWV SXUFKDVHG IRU KRPH XVH ZLWKLQ
WKH 86$ ,I WKH SURGXFW LV ORFDWHG LQ DQ DUHD ZKHUH VHUYLFH E\ D *( $SSOLDQFHV $XWKRUL]HG 6HUYLFHU LV QRW DYDLODEOH \RX PD\ EH responsible for a trip charge or you may be required to bring the product to an Authorized GE Appliances Service location for service. In Alaska, the limited warranty excludes the cost of shipping or service calls to your home.
6RPH VWDWHV GR QRW DOORZ WKH H[FOXVLRQ RU OLPLWDWLRQ RI LQFLGHQWDO RU FRQVHTXHQWLDO GDPDJHV 7KLV OLPLWHG ZDUUDQW\ JLYHV \RX
VSHFLILF OHJDO ULJKWV DQG \RX PD\ DOVR KDYH RWKHU ULJKWV ZKLFK YDU\ IURP VWDWH WR VWDWH 7R NQRZ ZKDW \RXU OHJDO ULJKWV DUH FRQVXOW your local or state consumer affairs office or your state’s Attorney General.
Warrantor: GE Appliances, a Haier company
Louisville, KY 40225
SXUFKDVHRULJLQDOWKHRI3URRIKHUHUHFHLSW\RXU6WDSOH WARRANTY LIMITED .warranty the under service obtain to needed is date
49-5903-3 |
|
 Loading...