


GDT550HSD2SS
GE GDT550HSD2SS, GDT550HSD1SS, GDT550HSD0SS, GDT550HGD2WW, GDT550HGD2BB Owner’s Manual
...
0
GEAppliances.corn
Safety Instructions ............. 2-s
Operating Instructions
Care and Cleaning .................. 11
Getting Started ..................... 4-5
Loading and Place Settings ......... 8-9
Loading the silverware baskets ...... 10
Using the Dishwasher ............... 6-7
Troubleshooting Tips ......... t2-t4
Consumer Support
Consumer Support .................... 16
Warranty ............................ 15
Dishwashers
ADT520 Series
GDF£10-540 Series
GDT£30-550 Series
Lave-vaisselle
(] la page 17La section fran(_aise commence
Lavaplatos
La secci6n en espafiol empieza en la p6gina 33
Printed in the United States
FRONT CONTROL MODELS TOP CONTROL MODELS
Write the model and serial
numbers here:
Model #
Serial #
Youcan find them on the tub wall
just insidethe door.
49-55082-6 07-13 GE
IMPORTANT SAFETY INFORMATION
READ ALL INSTRUCTIONS BEFORE USING-
SAVE THESE INSTRUCTIONS
WARNING!
For your safety, the information in this manual must be followed to minimize the risk of fire,
explosion, electric shock, and to prevent property damage, personal injury, or death.
WARNING! WATER HEATER SAFETY
Under certainconditions,hydrogen gasmay be produced in a water heater that hasnot beenused for two or
more weeks.HYDROGENGASISEXPLOSIVE.
Ifthe hot water has not been usedfor two or more weeks,prevent the possibilityof damage or injury by turning
on all hot water faucets and allow them to run for several minutes. Dothis before usingany electrical appliance
connected to the hot water system.Thissimple procedure will allow any built-up hydrogen gas to escape.Since
the gas isflammable, donot smoke, usean open flame, or use the appliance during thisprocess.
%
...A WARNING! When using your dishwasher, follow basic precautions.
[] Usethis applianceonly for its intended purpose
asdescribed inthisOwner's Manual.
[] Donot operate your dishwasherunlessall enclosure
panelsare properly in place.
[] Donot store or usecombustible materials,including
gasolineor other flammable liquidsor vapors in the
vicinity ofthis or any other appliance.
including the following:
[] Donot abuse,sit on orstand on the door or dish rack
of the dishwasher.
[] Donot tamper with controls.
[] Donot wash plasticitems unlessmarked
dishwasher safeor the equivalent. Forplastic
items not so marked, checkthe manufacturer's
recommendations.
WARNING! PROPER INSTALLATION AND MAINTENANCE
This dishwasher must beproperly installed and located in accordance with the Installation Instructions
before it is used.Ifyou did not receive an Installation Instructions sheet with your dishwasher, you can
receive one by visiting our Website at GEAppliances.com. In Canada, visit www.GEAppliances.ca.
[] Connectthe dishwasher/appliance to agrounded
metal, permanent wiring system;or run an
equipment-grounding conductor with the circuit
conductors and connect to the equipment-
grounding terminal or leadof the appliance.
[] Improper connection of the equipment-grounding
conductor can result in a risk of electricshock.Check
with a qualified electrician orservicerepresentative
ifyou are in doubt whether the appliance isproperly
grounded.
[] Disposeof discarded appliances and shipping
or packing material properly.
Donot attempt to repair or replaceany part
ofyour dishwasher unlessit is specifically
recommended inthis manual.All other servicing
should bereferredto a qualifiedtechnician.
To minimizethe possibilityof electricshock,
disconnect this appliance from the power supply
beforeattempting any maintenance.
NOTE:Turning the dishwasher off does not
disconnect the appliance from the power supply. We
recommend having a qualified technician service
your appliance.
IMPORTANT SAFETY INFORMATION
READ ALL INSTRUCTIONS BEFORE USING-
SAVE THESE INSTRUCTIONS
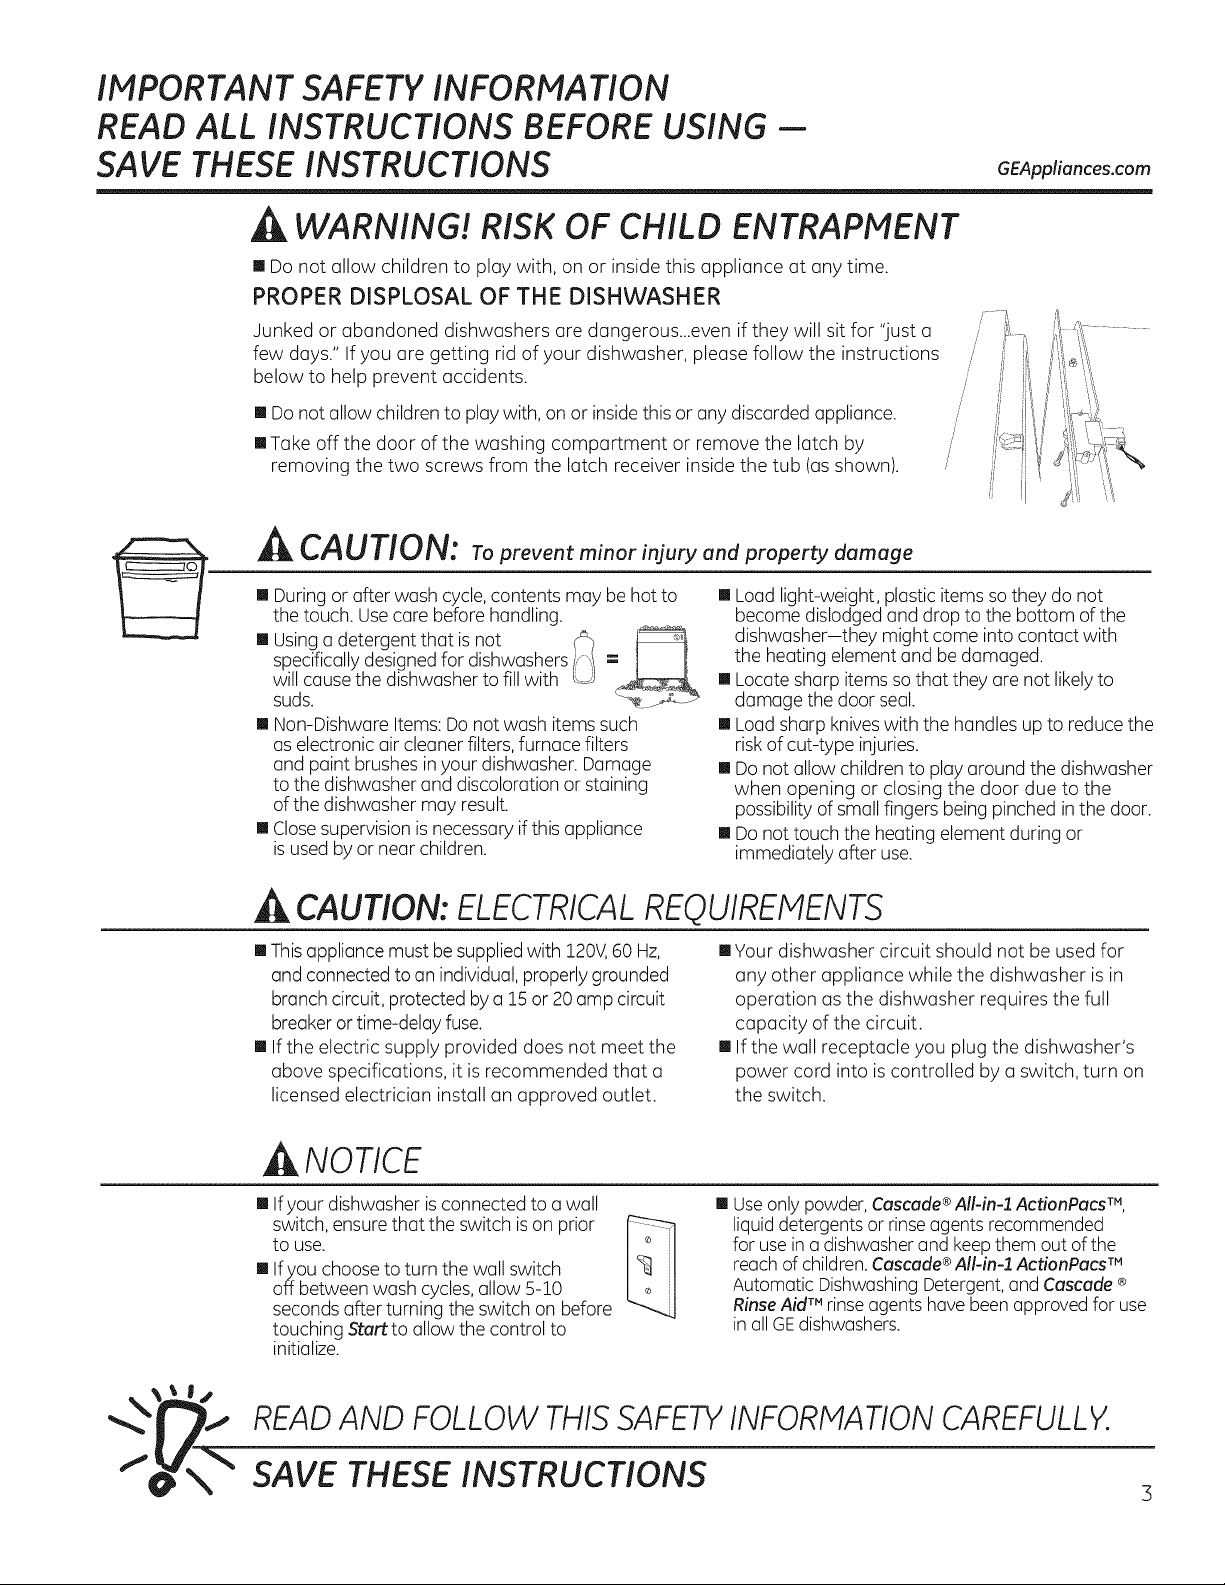
,tk WARNING! RISK OF CHILD ENTRAPMENT
[] Do not allow children to play with, on or insidethis appliance at any time.
PROPER DISPLOSAL OF THE DISHWASHER
Junked or abandoned dishwashers are dangerous...even if they will sit for "just a
few days." If you are getting rid of your dishwasher, please follow the instructions
below to help prevent accidents.
[] Donot allow children to playwith, on or insidethisor any discarded appliance.
[] Take off the door of the washing compartment or remove the latch by
removing the two screws from the latch receiver inside the tub (as shown).
CAUTION: To prevent minor injury and property damage
[] Duringor after wash cycle,contents may behot to
the touch. Usecare before handling.
[] Usinga detergent that isnot f_
specifically designedfor dishwashers
will causethe dishwasher to fill with
suds.
[] Non-Dishware Items:Donot wash items such
as electronic air cleanerfilters, furnace filters
and paint brushesin your dishwasher. Damage
to the dishwasher and discoloration or staining
of the dishwasher may result.
[] Closesupervision isnecessary ifthis appliance
isused by or near children.
U
tM
GEAppliances.com
i'
/i
/
/
/i
/
[] Load light-weight, plastic items sothey do not
become dislodged and drop to the bottom of the
dishwasher-they might come into contact with
the heating element and bedamaged.
[] Locate sharp items sothat they are not likelyto
damage the door seal.
[] Load sharp kniveswith the handles up to reducethe
risk of cut-type injuries.
[] Do not allow children to play around the dishwasher
when opening or closing the door due to the
possibility of small fingers being pinched in the door.
[] Do not touch the heating element during or
immediately after use.
CAUTION: ELECTRICALREQUIREMENTS
[] Thisappliance must besuppliedwith 120V,60 Hz,
and connected to an individual,properlygrounded
branch circuit,protected bya 15or 20 amp circuit
breakeror time-delay fuse.
[] If the electric supply provided does not meet the
above specifications, it isrecommended that a
licensed electrician install an approved outlet.
[] Your dishwasher circuit should not be used for
any other appliance while the dishwasher is in
operation as the dishwasher requires the full
capacity of the circuit.
[] If the wall receptacle you plug the dishwasher's
power cord into is controlled by a switch, turn on
the switch.
_NOTICE
[] Ifyour dishwasherisconnected to awall
switch, ensurethat the switch ison prior
to use.
[] Ifyou chooseto turn the wall switch
off between wash cycles,allow 5-10
seconds afterturning the switch on before
touching Start to allow the control to
initialize.
[] Use only powder, Cascade ®All-in-1 ActionPocs m,
liquid detergents or rinse agents recommended
for use in a dishwasher and keep them out of the
reach of child ren. Cascade ®All-in-1 ActionPocs m
Automatic Dishwashing Detergent, and Cascade ®
Rinse Aidm rinse agents have been approved for use
in all GE dishwashers.
READAND FOLLOW THISSAFETYINFORMATIONCAREFULLY.
SAVE THESE INSTRUCTIONS
Getting started!
Features and appearance will vary throughout this manual
Load Dishwasher
B
For best dishwashing results, follow the rack loading guidelines found inthe Loading the dishwasher rocks section. No pre-rinsing of
normal food soil is required. Scrape off hard soils, including bones, toothpicks, skins, and seeds. Remove leafy vegetables, meat trimmings,
and excessiveamounts of grease or oil. Removeacidic food soilsthat can discolor stainless steel.
Add Detergent
E
Add needed amount of detergent to the detergent dispenser. Use a detergent such as Cascade Complete All-in-1 ActionPacs TM. See Detergent
Dispenser in the Using the dishwasher section.
Add Rinse Agent
Add Rinse Agent to the rinse agent dispenser. See Use a Rinse Agent such as Cascade ®Rinse Aid TM in the Using the dishwasher section.
Select Cycle
El
Press the Select Cycle pad for the desired wash cycle.The lightnext to the Select Cycle pad wiltbe on to indicate which wash cycle has been
selected.
The cycle may be selected with the door inthe open position. The cycle wilt not start until after the door is closed and Start selected.
AutoSense
(onsome models)
Heavy This cycle is meant for heavily soiled dishes, cookware, pots, or pans with dried-on or baked-on soils.
Normal This cycle is meant for normal everyday soil levels and is designed to conserve both water and energy.
Light This cycle is for light to medium soiled dishes. It is safe for china and crystal.
Rinse For rinsing partial loads that will be washed laten Do not use detergent. Detergent is not dispensed during the
(onsome models) rinsecycle.
Thiscycleautomatically sensesthe soil leveland adjuststhe wash cycleaccordingly.
Everyday dishes are safe to be used in this cycle.
NOTE:Normal was used to rate the energy efficiency of this dishwasheE
Select Options
The light by the selected pad will be ON to indicate which Option has been selected.
Wash Tern p
Boost
(onsome models
Wash Temp
Sani
(onsome models
Heated Dry
Off
Heated Dry
On
This option increases the temperature to help clean heavily soiled dishes and may increase the overall cycle time.
Option may be turned On or Off duringthe wash cycle.
This option raises the water temperature in the final rinse to sanitize your dishware. The cycle length will
vary depending on the temperature of your inlet water.
NOTE:This option is monitored for sanitization requirements. If the cycle is interrupted during or after the main
wash portion or if the incoming water temperature is so low that adequate water heating cannot be achieved,
the sanitizing conditions may not be met. In these cases, the Sanitized light will not illuminate at the end of the
cycle. Utilizing this option will modify the cycle to meet the requirements of Section 6, NSF18/4for soil removal
and sanitization efficacy.
NOTE:NSFcertified residential dishwashers are not intended for licensed food establishments.
Shuts off the heat drying option. Dishes air dry naturally and energy is saved. Open the dishwasher door to
speed drying.
Turns on the heater for faster drying. This cycle may extend the time to your wash cycle up to 6/4minutes. This
option is not available with the Rinse cycle.
GEAppliances.com
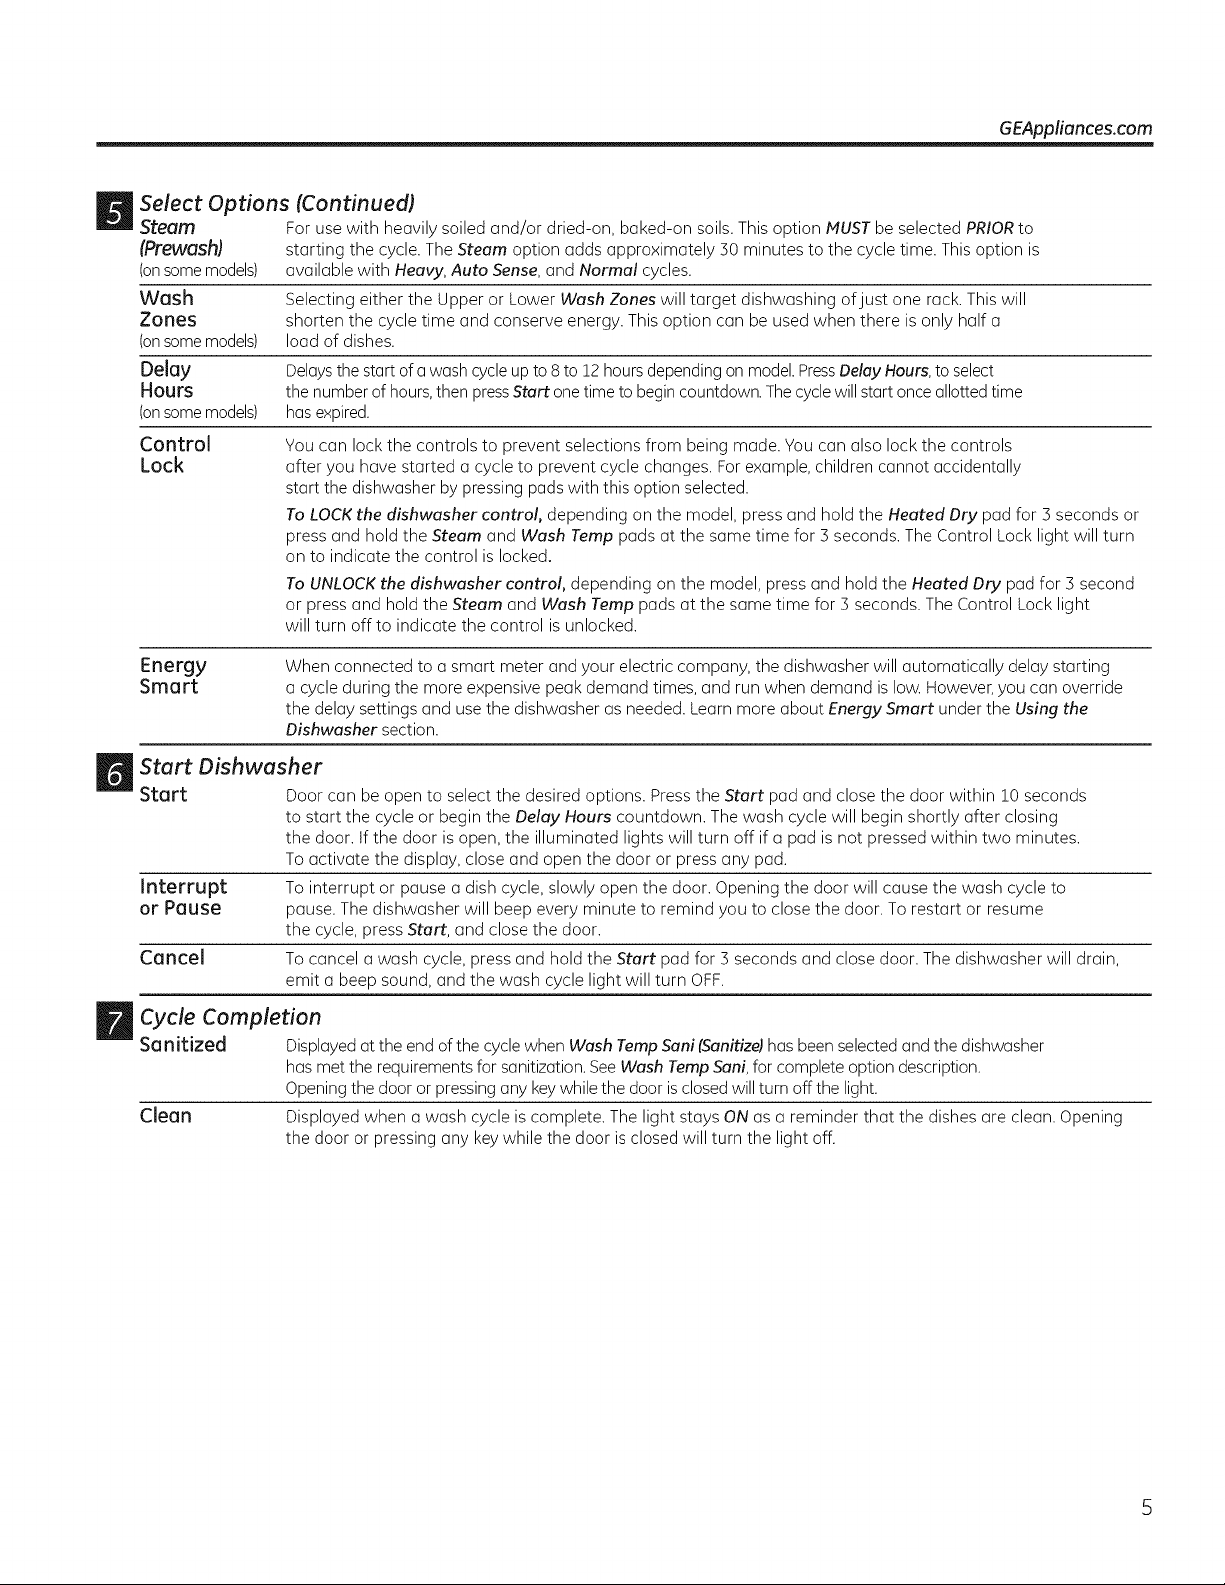
Select Options (Continued)
Steam
(Prewash)
(onsome models)
Wash
Zones
(onsomemodels)
For use with heavily soiled and/or dried-on, baked-on soils.This option lUST be selected PRIORto
starting the cycle. The Steam option adds approximately 50 minutes to the cycle time. Thisoption is
available with Heavy, Auto Sense,and Normal cycles.
Selecting either the Upper or Lower Wash Zones will target dishwashing of just one rack. This will
shorten the cycle time and conserve energy. This option can be used when there is only half a
load of dishes.
Delay Delaysthe start of a wash cycleup to 8 to 12hours dependingon model.PressDelay Hours, to select
Hours the number of hours,then pressStart one time to begincountdown. Thecycle will start onceallotted time
(onsomemodels) hasexpired.
Control You can lock the controls to prevent selections from being made. Youcan also lock the controls
Lock after you have started a cycle to prevent cycle changes. For example, children cannot accidentally
start the dishwasher by pressing padswith this option selected.
To LOCKthe dishwasher control, depending on the model, press and hold the Heated Dry pad for 5 seconds or
press and hold the Steam and Wash Tamp pads at the same time for 5 seconds. The Control Lock light will turn
on to indicate the control is locked.
To UNLOCKthe dishwasher control, depending on the model, press and hold the Heated Dry pad for 5 second
or press and hold the Steam and Wash Tamp pads at the same time for 5 seconds. The Control Lock light
will turn off to indicate the control is unlocked.
Energy
Smart
When connected to a smart meter and your electric company, the dishwasher will automatically delay starting
a cycle during the more expensive peak demand times, and run when demand is low. However, you can override
the delay settings and usethe dishwasher as needed. Learn more about Energy Smart under the Using the
Dishwasher section.
_ Start Dishwasher
Start Door can be open to select the desired options. Pressthe Start pad and close the door within !0 seconds
to start the cycle or begin the Delay Hours countdown. The wash cycle will begin shortly after closing
the door. If the door is open, the illuminated lights will turn off if a pad is not pressed within two minutes.
To activate the display, close and open the door or press any pod.
Interrupt To interrupt or pause a dish cycle, slowly open the door. Opening the door will cause the wash cycle to
or Pause pause. The dishwasher will beep every minute to remind you to close the door. To restart or resume
the cycle, press Start, and close the door.
Cancel To cancel a wash cycle, press and hold the Start pad for 5 seconds and close door. The dishwasher will drain,
emit a beep sound, and the wash cycle light will turn OFF.
_ Cycle Completion
Sanitized Displayedat the end of the cycle when Wash Temp Sani (Sanitize)has been selected and the dishwasher
has met the requirements for sanitization. See Wash TampSani,for complete option description.
Opening the door or pressing any keywhile the door is closed will turn offthe light.
Clean Displayed when a wash cycle is complete. The light stays ON as a reminder that the dishes are clean. Opening
the door or pressing any keywhile the door is closed will turn the light off.

Using the dishwasher.
Check the Water Temperature
Theenteringwatershouldbeatleast120°F(49°C)and
notmorethan 150°F(66°C)foreffectivecleaningandto
preventdishdamage.Checkthewatertemperaturewitha
candyormeatthermometer.Turnonthehotwaterfaucet
nearestthedishwasher,placethethermometerina glass
andletthe waterrun continuouslyintotheglassuntilthe
temperaturestopsrising.
Energy Smart
EnergySmartenablesyourdishwasherto reduceenergy
consumptionduringperiodsof highenergycosts.Ifyouare
inanareawhereyour electricityproviderchargesvariable
ratesatdifferenttimesof theday,yourdishwasherwill
informyouofthosetimeswhenyou arepayingthehighest
rate.Youcantheneitherdelaystartingyourdishwasher
untilthe rategoesdown;oryou canoverridethefeature
and runyourdishwasherat yourconvenience.
Use a Rinse Agent such as Cascade®Rinse Aid TM
Rinseagents,such asCascade®RinseAidTM are designed for great drying action and protect against spots
and film build-up onyour dishes,glasses,flatware, cookware, and plastic.
Filling the Dispenser
The rinse agent dispenser holds 3.5 oz. (!00 ml)of rinse agent. Under normal
conditions, this will lost approximately one month.
03 Makesure the dishwasher door isfullyopen.
[_ Open the RINSEAiDdispenser door.
[_ Slowlyadd rinse agent untilthe fillcup isfull.May need to pause several timesto ......
allowrinseaid to settle.
What you will need:
r_ SmartMeterthat will communicatewith
dishwasher.Consultyour localelectricityproviderto
determineifthetechnologyisavailableinyourarea.
r_ AnEnergySmartdishwashermodel(GDF520,GDF540,
GDT530or GDT550).
r_ AnApplianceCommunicationModule(ACM).Please
visit,gebrillion.corntoorderthecommunicationdevice
that willneedtobeinstalledinthe dishwasher.
your
Indicator
[_ Clean up any spilledrinse agent witha damp cloth.
E] Closethe RINSEAiDdispenser door.
Rinse Aid Setting
Theamount of rinse agent releasedinto the final wash can beadjusted.The
factory setting isat the midpoint. Ifhard water spots appear on dishes,try a
higher setting. Ifyou seefoam in the dishwasher,move the indicator to a lower
setting.
Toadjust the setting
Open the RINSEAIDdispenser door; then turn the adjuster clockwise to
increasethe amount ofrinseagent, counterclockwise to reduce the amount of rinse agent.
6
.Rinse
agent
adjuster
GEAppliances.com
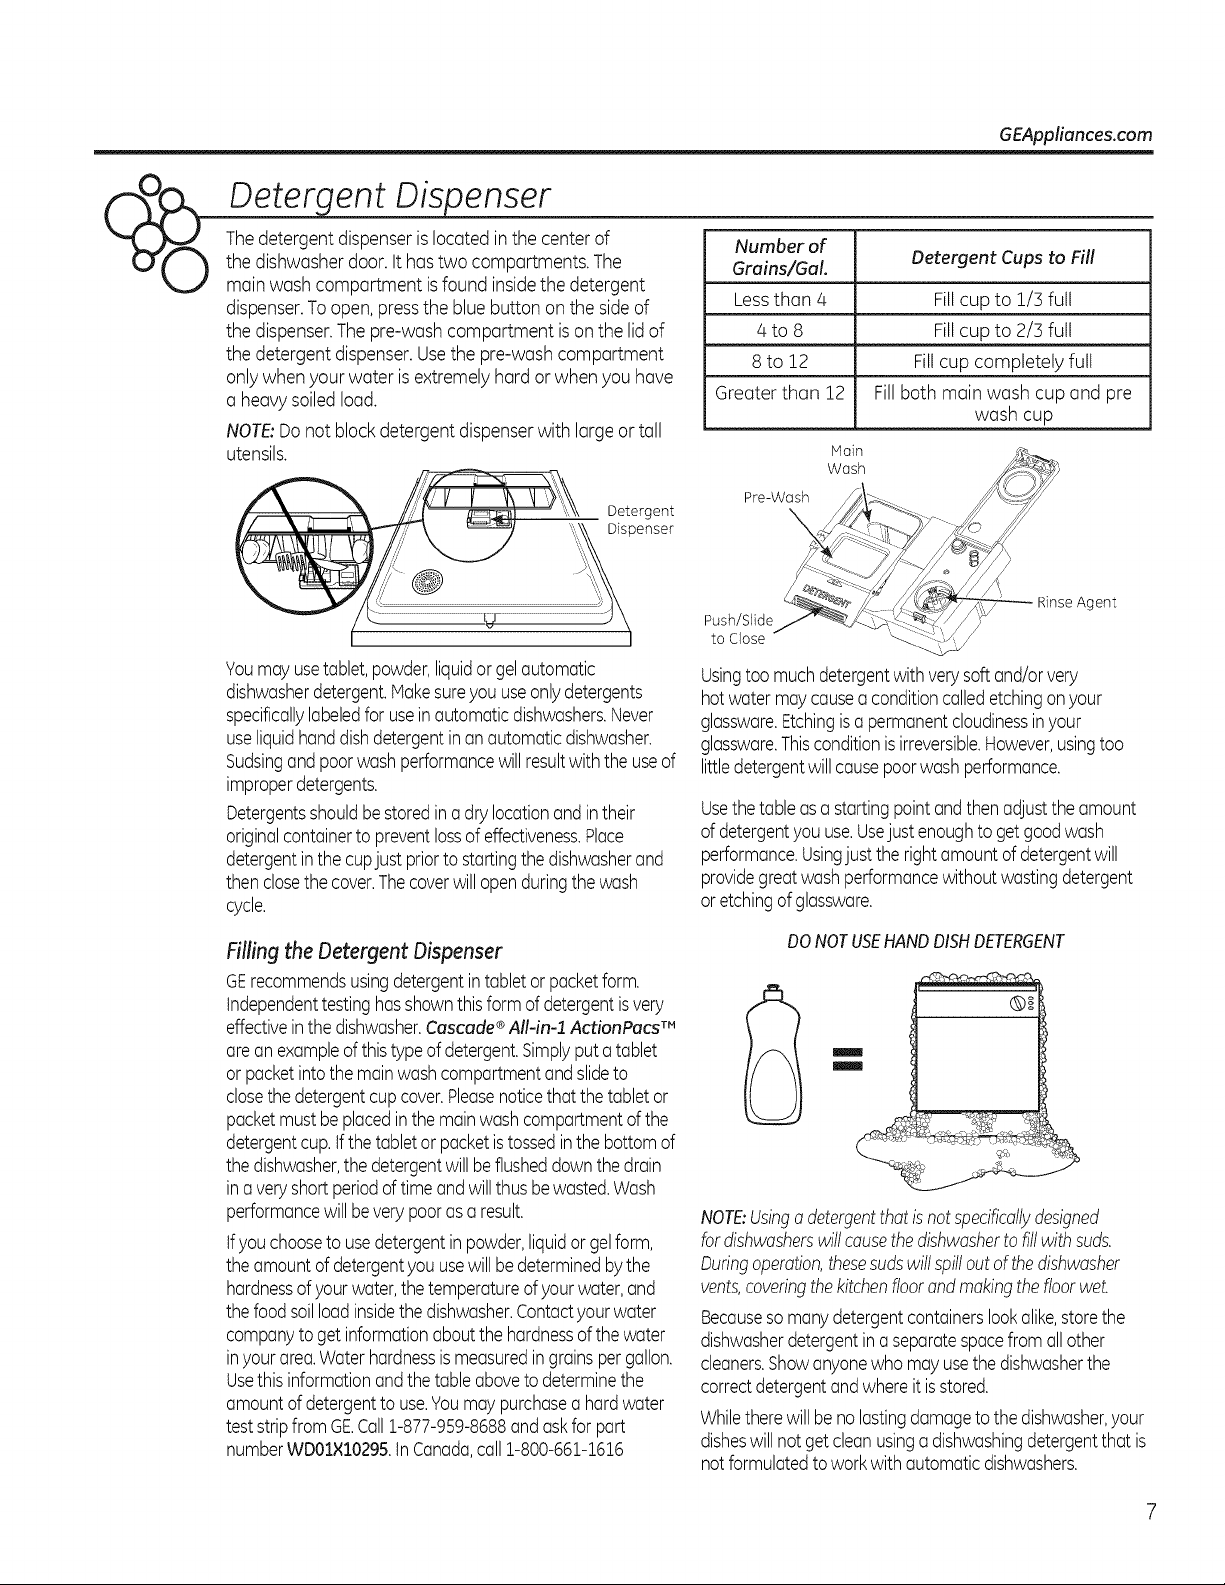
Thede!ergent dispenserislocated inthe center of
0_ thedishwasherdoor.It hastwo compartments. The
mainwash compartment is found insidethe detergent
dispenser.Toopen,pressthe blue buttonon the sideof
thedispenser.Thepre-washcompartment isonthe lid of
thedetergent dispenser.Usethe pre-washcompartment
onlywhen your water isextremelyhard or when you have
a heavysoiledload.
NOTE:Donot block detergentdispenserwith large ortall
utensils.
Detergent
Dispenser
Youmayusetablet,powder,liquidorgelautomatic
dishwasherdetergent.Makesureyouuseonlydetergents
specificallylabeledforuseinautomaticdishwashers.Never
useliquidhanddishdetergentinanautomaticdishwasher.
Sudsingand poorwashperformancewillresultwiththe useof
improperdetergents.
Detergentsshouldbestoredinadrylocationandintheir
originalcontainerto preventlossof effectiveness.Place
detergentinthecupjust priorto startingthedishwasherand
thenclosethecover.Thecoverwillopenduringthewash
cycle.
Filling the Detergent Dispenser
GErecommends usingdetergent intablet orpocket form.
independent testing has shown this form of detergent isvery
effectiveinthe dishwasher.Cascade®All-in-1 ActionPacsTM
areanexampleofthistypeofdetergent.Simplyputatablet
or packetintothemainwashcompartmentandslideto
closethedetergentcupcover.Pleasenoticethatthetabletor
packetmustbeplacedinthe mainwashcompartmentof the
detergentcup.ifthetabletor packetistossedinthebottomof
thedishwasher,the detergentwill beflusheddownthedrain
ina veryshortperiodoftimeandwillthusbewasted.Wash
performancewillbeverypoorasa result.
tfyou chooseto usedetergentinpowder,liquidorgelform,
theamountof detergentyou usewillbedeterminedbythe
hardnessofyourwater,thetemperatureofyourwater,and
thefood soilloadinsidethe dishwasher.Contactyourwater
companytogetinformationaboutthe hardnessof thewater
inyourarea.Waterhardnessismeasuredingrainspergallon.
Usethis informationandthetableaboveto determinethe
amountofdetergenttouse.Youmay purchaseahardwater
teststripfrom GE.Call1-877-959-8688andaskfor part
numberWDOIX10295.tnCanada,call1-800-661-1616
Number of
Grains/Gel. Detergent Cups to Fill
Lessthan 4 Fillcup to 1/3 full
/4to 8 Fillcup to 2/3full
8 to 12 Fillcup completely full
Greater than 12 Fillboth mainwash cup and pre
wash cup
Main
Wash
Pre-Wash
\
Rinse Agent
Push/Slide /
to Close _ /
Usingtoomuchdetergentwithverysoftand/orvery
hotwatermaycauseaconditioncalledetchingonyour
glassware.Etchingisapermanentcloudinessinyour
glassware.Thisconditionisirreversible.However,usingtoo
littledetergentwillcausepoorwashperformance.
Usethetableas a startingpointandthenadjusttheamount
ofdetergentyouuse.Usejustenoughto getgoodwash
performance.Usingjust therightamountof detergentwill
providegreatwashperformancewithout wastingdetergent
oretchingofglassware.
DO NOTUSEHAND DISHDETERGENT
m
m
NOTE:Usinga detergent that isnot specificallydesigned
fordishwasherswill causethedishwasherto fillwithsuds.
Duringoperation,thesesudswillspilloutofthedishwasher
vents,coveringthekitchenfloorandmakingthefloorwet.
Becausesomanydetergentcontainerslookalike,storethe
dishwasherdetergentina separatespacefrom allother
cleaners.Showanyonewhomayusethedishwasherthe
correctdetergentandwhereitisstored.
Whiletherewillbenolastingdamagetothe dishwasher,your
disheswillnotget cleanusingadishwashingdetergentthat is
notformulatedtoworkwithautomaticdishwashers.
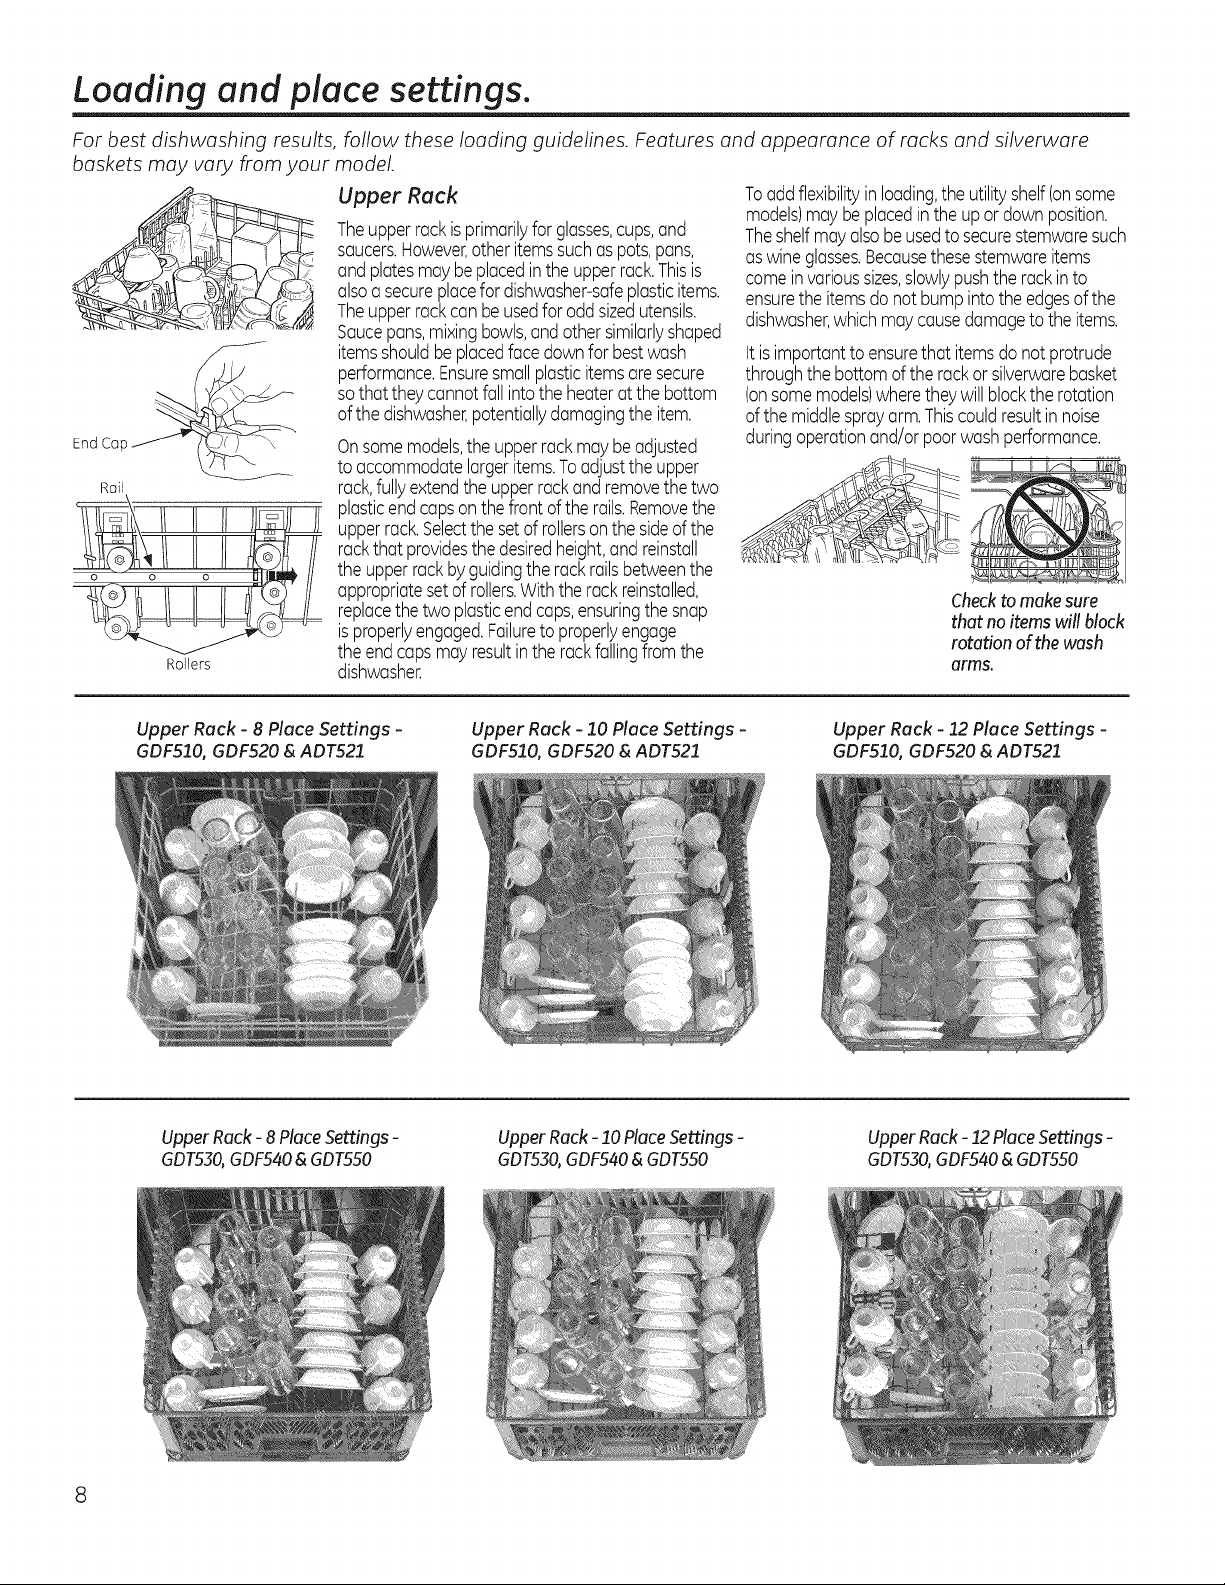
Loading and place settings.
For best dishwashing results,
follow these loading guidelines. Features and appearance of racks and silverware
baskets may vary from your model.
Upper Rack
Theupperrackisprimarilyfor glasses,cups,and
saucers.However,other itemssuchaspots,pans,
and platesmaybeplacedintheupperrack.Thisis
alsoa secureplacefor dishwasher-safeplasticitems.
Theupperrackcanbe usedfor oddsizedutensils.
Saucepans,mixingbowls,andothersimilarlyshaped
itemsshouldbeplacedfacedownforbestwash
performance.Ensuresmallplasticitemsaresecure
sothattheycannotfall intotheheaterat the bottom
ofthe dishwasher,potentiallydamagingtheitem.
End Cap
Onsomemodels,theupperrackmaybeadjusted
to accommodatelargeritems.Toadjusttheupper
Rail
rack,fullyextendtheupperrackandremovethetwo
plasticendcapsonthe frontoftherails.Removethe
upperrack.Selectthesetof rollersonthesideofthe
rackthat providesthe desiredheight,and reinstall
the upperrackbyguidingtherackrailsbetweenthe
appropriatesetof rollers.Withthe rackreinstalled,
replacethetwo plasticendcaps,ensuringthesnap
isproperlyengaged.Failureto properlyengage
Rollers
theendcapsmayresultinthe rackfallingfromthe
dishwasher.
Toaddflexibilityinloading,theutilityshelfIonsome
models)may beplacedintheupor downposition.
Theshelfmayalsobeusedto securestemwaresuch
aswineglasses.Becausethesestemwareitems
comeinvarioussizes,slowlypushthe rackinto
ensuretheitemsdonot bumpintotheedgesofthe
dishwasher,whichmaycausedamagetotheitems.
tt isimportantto ensurethatitemsdonot protrude
throughthe bottomoftherackorsilverwarebasket
(onsomemodels)wheretheywillblocktherotation
ofthe middlesprayarm.Thiscouldresultinnoise
duringoperationand/orpoorwashperformance.
Checktomakesure
that no items will block
rotation of thewash
arms.
Upper Rack - 8 Place Settings -
GDF510, GDF520 & ADT521
UpperRack- 8 PlaceSettings-
GDT530,GDF540&GDT550
Upper Rack - 10 Place Settings -
GDF510, GDF520 &ADT521
Upper Rack - 10 Place Settings -
GDT530,GDF540 & GDT550
Upper Rack - 12 Place Settings -
GDF510, GDF520 & ADT521
UpperRack- 12PlaceSettings-
GDT530,GDF540&GDT550
8
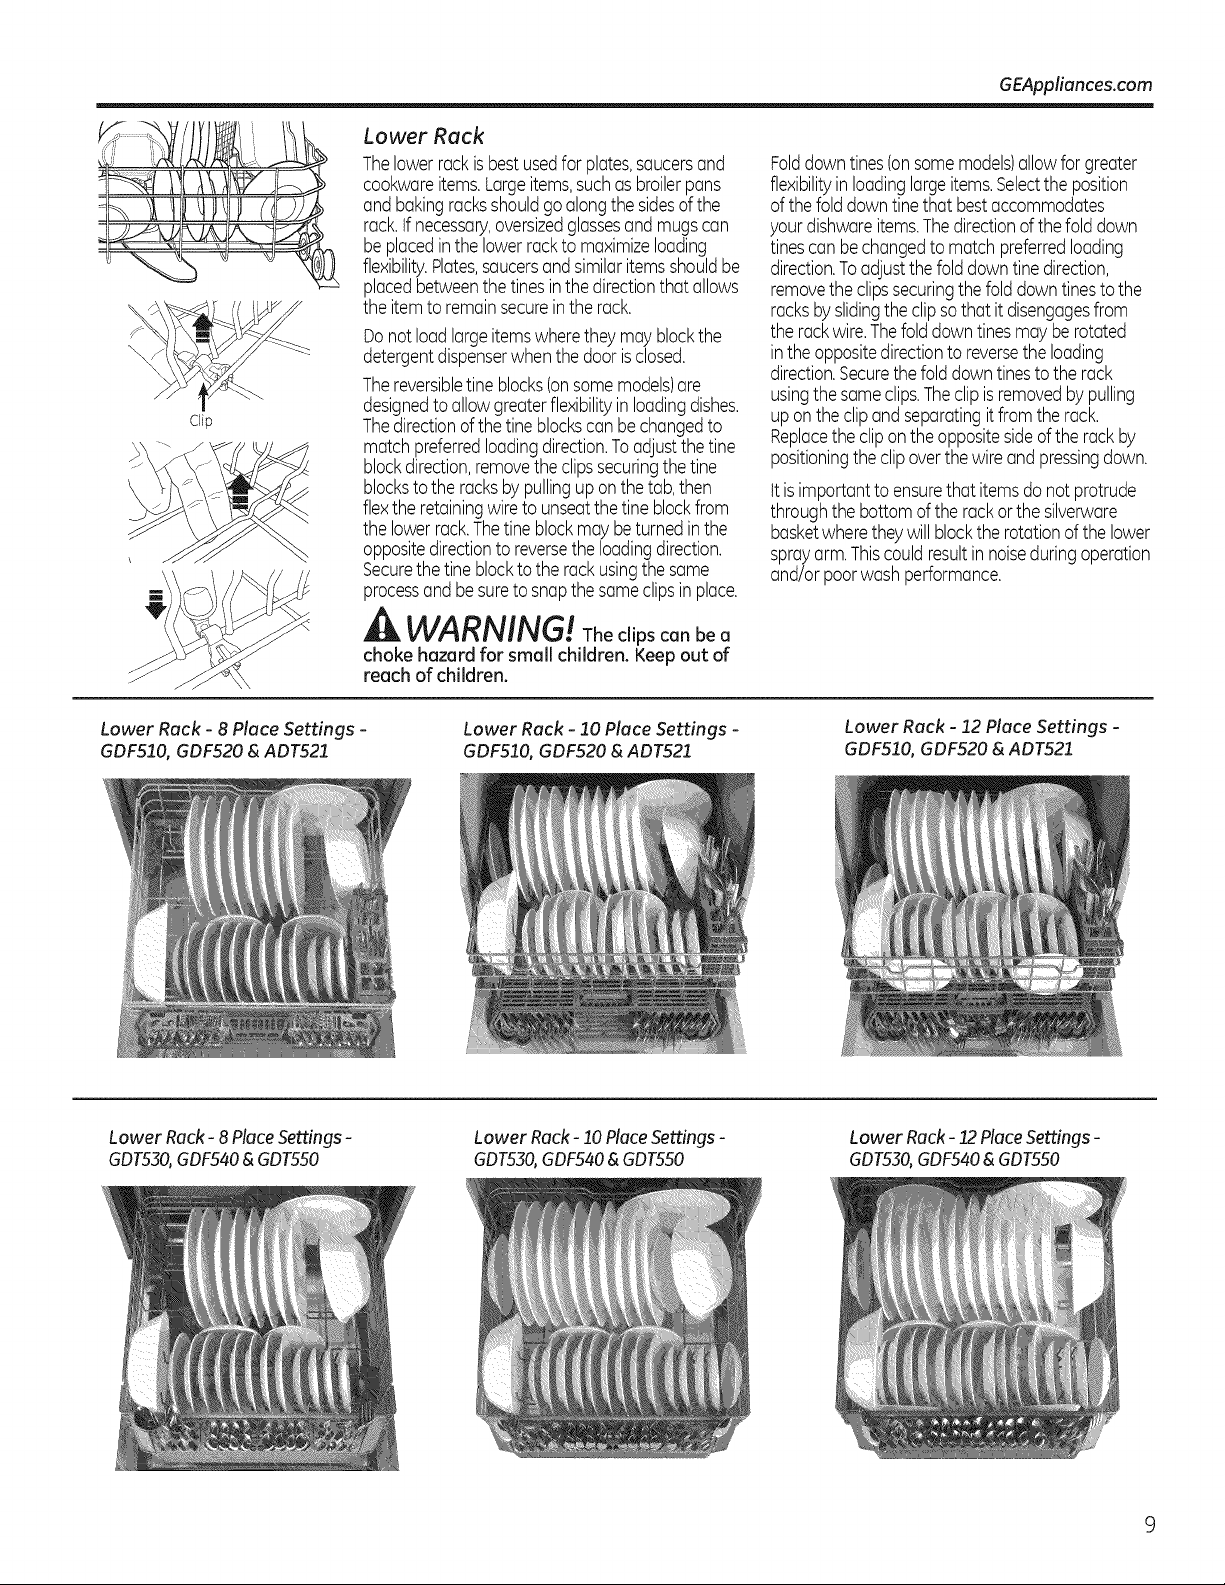
CJip
Lower Rack
Thelowerrackisbestusedfor plates,saucersand
cookwareitems.Largeitems,suchasbroilerpans
and bakingracksshouldgoalongthesidesofthe
rack.Ifnecessary,oversizedglassesandmugscan
%
be placedinthelowerrackto maximizeloading
flexibility.Plates,saucersandsimilaritemsshouldbe
placedbetweenthetinesinthedirectionthatallows
theitemto remainsecureintherack.
Donot loadlargeitemswherethey mayblockthe
detergentdispenserwhenthedoorisclosed.
Thereversibletine blocks(onsomemodels)are
designedtoallowgreaterflexibilityinloadingdishes.
Thedirectionofthetine blockscanbechangedto
matchpreferredloadingdirection.Toadjustthe tine
blockdirection,removetheclipssecuringthetine
blockstotheracksbypullinguponthetab,then
flextheretainingwireto unseatthetineblockfrom
thelowerrack.Thetineblockmaybeturnedinthe
oppositedirectionto reversethe loadingdirection.
Securethetineblocktothe rackusingthesame
processandbesuretosnapthe sameclipsin place.
Ik WARNING! The clipscanbe a
choke hazard for small children. Keep out of
reach of children.
GEAppliances.com
FolddowntinesIonsomemodels)allowfor greater
flexibilityin loadinglargeitems.Selectthe position
ofthefolddowntinethat bestaccommodates
yourdishwareitems.Thedirectionofthefold down
tinescanbechangedto matchpreferredloading
direction.Toadjustthefolddowntine direction,
removetheclipssecuringthefolddowntinestothe
racksbyslidingtheclipsothat it disengagesfrom
the rackwire.Thefolddowntinesmayberotated
intheoppositedirectionto reversethe loading
direction.Securethefolddown tinesto therack
usingthesameclips.Theclipisremovedbypulling
upontheclipandseparatingitfromthe rack.
Replacetheclipontheoppositesideofthe rackby
positioningtheclipoverthewire andpressingdown.
ttisimportantto ensurethat itemsdonot protrude
throughthe bottomofthe rackorthe silverware
basketwheretheywillblockthe rotationofthe lower
sprayarm.Thiscouldresultinnoiseduringoperation
and/orpoorwashperformance.
Lower Rack - 8 Place Settings -
GDF510, GDF520 & ADT521
Lower Rack- 8 Place Settings -
GDT530,GDF540 & GDT550
Lower Rack - 10 Place Settings -
GDF510, GDF520 & ADT521
Lower Rack- 10PlaceSettings-
GDT530,GDF540&GDT550
Lower Rack - 12 Place Settings -
GDF510, GDF520 & ADT521
Lower Rack-12PlaceSettings-
GDT530,GDF540&GDT550
Loading the silverware baskets...
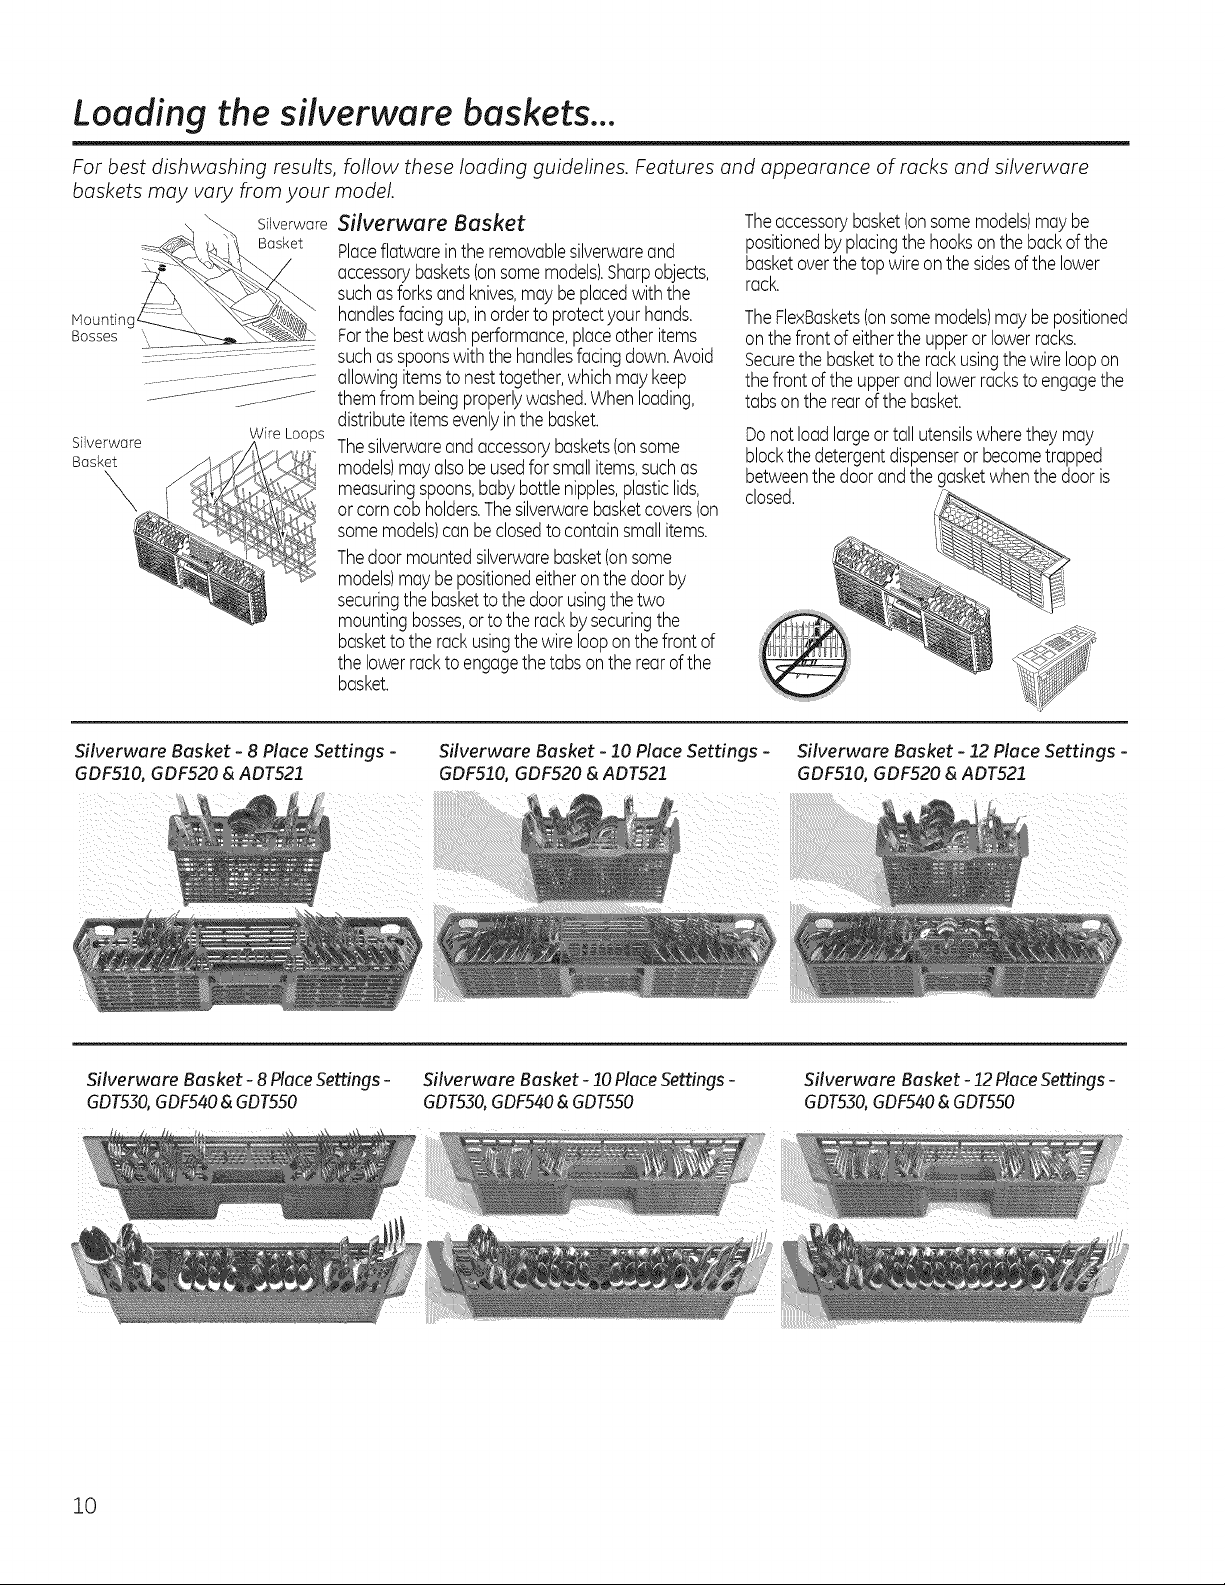
For best dishwashing results, follow these loading guidelines. Features and appearance of racks and silverware
baskets may vary from your model.
_k t_ i_:_ Basket
Bosses '__7
Silverware
Basket
\
_% Silverware
WireLoops
Silverware Basket
Placeflatwareintheremovablesilverwareand
accessorybaskets(onsomemodels).Sharpobjects,
suchasforksandknives,maybeplacedwiththe
handlesfacingup,inorderto protectyourhands.
Forthebestwashperformance,placeotheritems
suchasspoonswiththe handlesfacingdown.Avoid
allowingitemsto nesttogether,whichmaykeep
themfrom beingproperlywashed.Whenloading,
distributeitemsevenlyinthe basket.
Thesilverwareand accessorybaskets(onsome
models)mayalsobeusedforsmallitems,suchas
measuringspoons,babybottlenipples,plasticlids,
or corncobholders.Thesilverwarebasketcovers(on
somemodels)canbeclosedto containsmallitems.
Thedoormountedsilverwarebasket(onsome
models)maybepositionedeitheronthedoorby
securingthebaskettothedoorusingthetwo
mountingbosses,ortothe rackbysecuringthe
basketto the rackusingthewirelooponthefront of
the lowerrackto engagethe tabsonthe rearofthe
basket.
Theaccessorybasket(onsomemodels)maybe
positionedbyplacingthe hooksonthebackof the
basketoverthetop wireonthesidesof thelower
rack.
TheFlexBaskets(onsomemodels)maybepositioned
onthefrontof eithertheupperor lowerracks.
Securethebasketto the rackusingthewireloopon
thefrontof theupperand lowerracksto engagethe
tabsontherearof thebasket.
Donot loadlargeor tall utensilswheretheymay
blockthedetergentdispenseror becometrapped
betweenthedoorandthegasketwhenthedooris
closed.
Silverware Basket - 8 Place Settings -
GDF510,GDF520 &ADT521
Silverware Basket - 8 Place Settings -
GDT530, GDF540 & GDT550
Silverware Basket - 10 Place Settings -
GDF510, GDF520 & ADT521
Silverware Basket - 10 Place Settings -
GDT530,GDF540 & GDT550
Silverware Basket - 12 Place Settings -
GDF510, GDF520 & ADT521
Silverware Basket - 12 Place Settings -
GDT530, GDF540 &GDT550
10
Care and cleaning. GEAppliances.com
Cleaning the Exterior Door Panel
Beforecleaning the front panel, make sure you know
what type of panelyou have. Referto the lust two
letters of your model number. You can locateyour
model number on the left-hand tub walljust inside
the door. If your model number endswith BB,CC,
WW, SAor ESthen you hove a painted door panel. If
your model number ends with SS,then you have a
StainlessSteel Doorpanel. Ifyour model number ends
with II,then you have an Integrated door panel.
Followthe instructions below for cleaningthe door
panel for your specificmodel.
Painted Door Panel (model numbers ending in BB-
black, CC-bisque, WW-white, SA-silver or ES-slate)
Use a clean, soft, lightly dampened cloth, then dry
thoroughly. You may also use a good appliance wax
or polish.
Cleaning the Control Panel
To clean the control panel, use a lightly dampened soft
cloth. Then dry thoroughly.
Stainless Steel Inner Door
The stainless steel used to make the dishwasher tub
and inner door provides the highest reliability available
in a GEdishwasher.
Stainless Steel Door Panel (model numbers ending in
SS)
The stainless steel panels can be cleaned with
StainlessSteelMagic or a similarproduct using a clean,
soft cloth. Do not use appliance wax, polish, bleach or
products containing chlorine on StainlessSteeldoors.
You can order StainlessSteelMagic #WX! 0X29
through GEPartsby calling 877.959.8688.In Canada,
call 1-800-66!-!6!6.
Integrated Door Panel (model numbers ending in II)
This is a custom installed door panel, and you
will need to refer to the cabinet manufacturers
recommendations for proper cleaning.
Do not use scouring pads or powered cleaners
because these products can scratch the finish.
If the dishwasher tub or inner door should be
scratched or dented during normal use, they will
not rust or corrode. These surface blemishes will
not affect their function or durability.
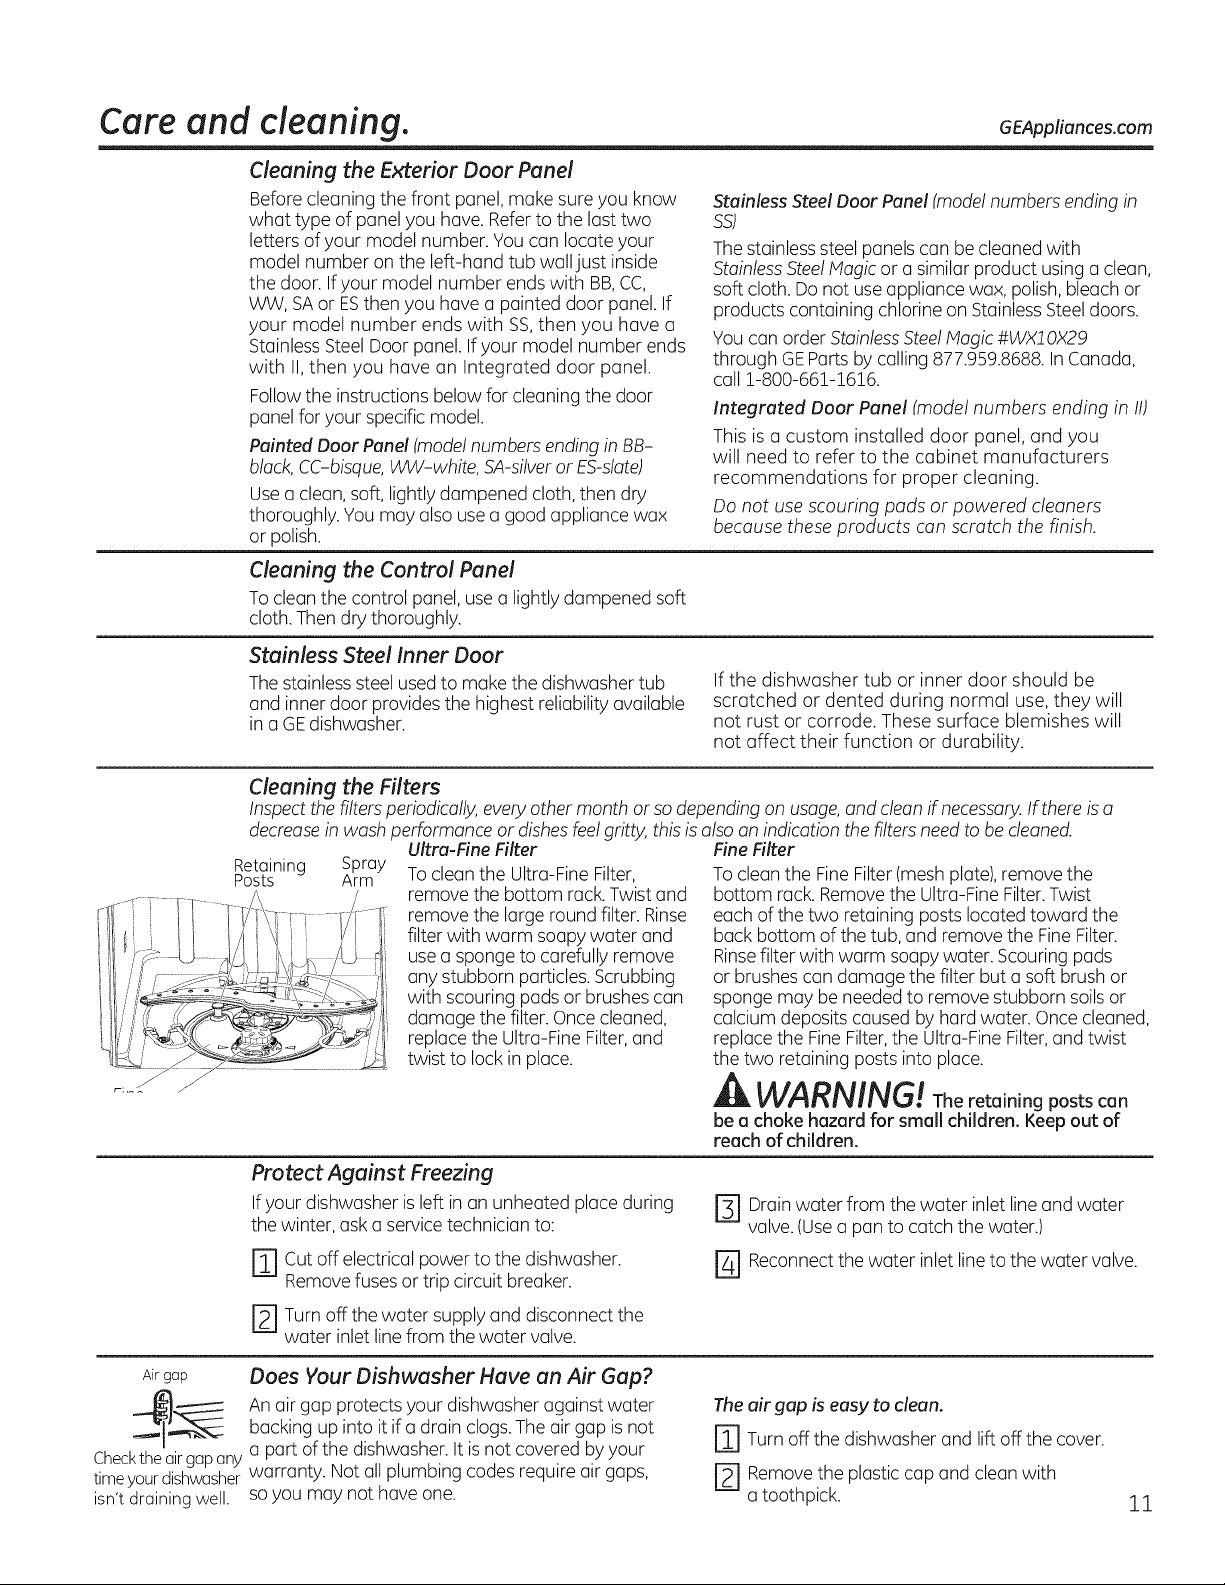
Cleaning the Filters
Inspect the filters periodically, every other month or so depending on usage, and clean if necessary. If there isa
decrease in wash performance or dishes feelgritty, this is also an indication the filters need to be cleaned.
Retaining Spray
Posts Arm
Ultra-Fine Filter
To clean the Ultra-Fine Filter,
remove the bottom rack. Twist and
remove the large round filter. Rinse
filter with warm soapy water and
use a sponge to carefully remove
any stubborn particles. Scrubbing
with scouring pads or brushes can
damage the filter.Once cleaned,
replace the Ultra-Fine Filter,and
twist to lockin place.
Fine Filter
To clean the Fine Filter (mesh plate), remove the
bottom rack. Remove the Ultra-Fine Filter.Twist
each of the two retaining posts located toward the
back bottom of the tub, and remove the Fine Filter.
Rinsefilter with warm soapy water. Scouring pads
or brushes can damage the filter but a soft brush or
sponge may be needed to remove stubborn soils or
calcium deposits caused by hard water. Once cleaned,
replace the Fine Filter,the Ultra-Fine Filter, and twist
the two retaining posts into place.
WARNING! Theretoiningpostscan
be e choke hezerd for smell children. Keepout of
reech of children.
Protect Against Freezing
Ifyour dishwasher is left in an unheated place during
the winter, ask aservice technician to:
r_cut off electrical power to the dishwasher.
Removefuses or trip circuit breaker.
E] Turn off the water supply and disconnectthe
water inlet linefrom the water valve.
r31 Drainwater from thewater inletline and water
valve.(Usea panto catch the water.)
j_l Reconnectthe water inlet lineto the water valve.
Airgap
Checktheairgapany
timeyourdishwasher
isn'tdraining well.
Does Your Dishwasher Have an Air Gap?
An air gap protects your dishwasher against water
backing up into it ifa drain clogs. The air gap is not
a part of the dishwasher. It is not covered by your
warranty. Not all plumbing codes require air gaps,
so you may not have one.
The air gap is easy to clean.
E] Turn offthe dishwasher and liftoff the cover.
Remove the plastic cap and clean with
E]a toothpick.
11
Before you call for service...
Troubleshooting Tips
Save time and manes Review the charts on the following pages, or visit GEAppliances.com.
_ ln Canada visit www.GEAppfiances.ca. Vou may not need to call for service.
Problem Possible Causes What To Do
Start Status Thedoorwasopenedorthe • PresstheStart padonceto startthedishwasher.Pressthe
indicatorlight flashing cyclewas interrupted. Startpada secondtimewhenthedishwasherisrunningonlyifyou
wish to cancelthe cycle.
DishwasherBEEPS This isa reminder that your • PressStart andclosethedoor.
onceeveryminute dishwasher door has beenleft
open during operation. It will
continue beepinguntil you press
Start and closethe door.
Beepingat the end This is normal. Thedishwasher • Toturnoffthe doublebeepindicator(orre-activateit if itwaspreviously
of the cycle will beeptwice at the end of the turned off),pressthe HeatedDry pad5 times within 3 seconds.
(onsomemodels) cycle. Atriple beepwill soundto indicatethe end-of-cyclebeepoption
Dishesandflatware Ultrafineor fine filter isclogged • SeetheCareandcleaningsection.
notclean Lowinletwater temperature • Hakesureinletwatertemperatureiscorrect(seethe Usingthedishwasher
Water pressureis temporarilylow • Turnona faucet,iswatercomingout moreslowlythan usual?tfso,wait
Airgap or disposeris clogged • Cleantheairgapor flushthe disposer.
Improperrackloading • Hakesurelargedishwaredoesnot blockthe detergentdispenserorthe
Poorperformingdetergent • UseahighlyrateddetergentsuchasCascadeComplete®All-in-1ActionPacsTM.
Spotsandfilming Extremelyhard water • UserinseagentssuchasCascade®RinseAidTM to removespots
onglassesand andpreventnewfilmbuildup.
flatware • tfwaterisextremelyhard,a softenermayberequired.
Lowinlet water temperature • Hakesurewatertemperatureisat least120°F.
Overloadingorimproper • LoaddishwasherasshownintheLoadingPlaceSettingssection.
loadingofthe dishwasher
Oldor damppowderdetergent • Hakesuredetergentisfresh.
Rinseagentdispenserempty • Refillwith rinseagentsuchas Cascade®RinseAidTM.
Toolittle or lowperforming • Hakesureyouusethe properamountof highlyrateddetergent.
detergent
hasbeenturned on or off.
section).Turnonthe hotwaterfaucetnearestthedishwasher,letrununtil
thewatertemperaturestopsrising.Thenstartthe dishwasherand turn
offthe faucet.Thisensurestheenteringwaterishot.SelectWashTempBoostif
available.
untilpressureis normalbeforeusingyourdishwasher.
washarms.SeetheLoadingthedishwasherrackssection.
Whenlargeutensilsareplacedinthesilverwarebasket,donot mountthebasket
onthedoor(onsomemodels),instead,mountbasketonthe lowerrack.
12
GEAppliances.com
Problem Possible Causes What To Do
Cloudinesson Combinationof softwater and • Thisiscalledetchingandis permanent.Topreventthisfromhappening,
glassware too muchdetergent uselessdetergentifyouhavesoftwater.Washglasswareintheshortest
cyclethatwill getitclean.
Lowperforming phosphate • SeeAwhite film onglassware,dishwareandtheinterior inthis
freedetergent Troubleshootingsection.
Watertemperatureentering the • Thiscouldbeetching.Lowerthewater heatertemperature.
dishwasherexceeds150°F(66°C}
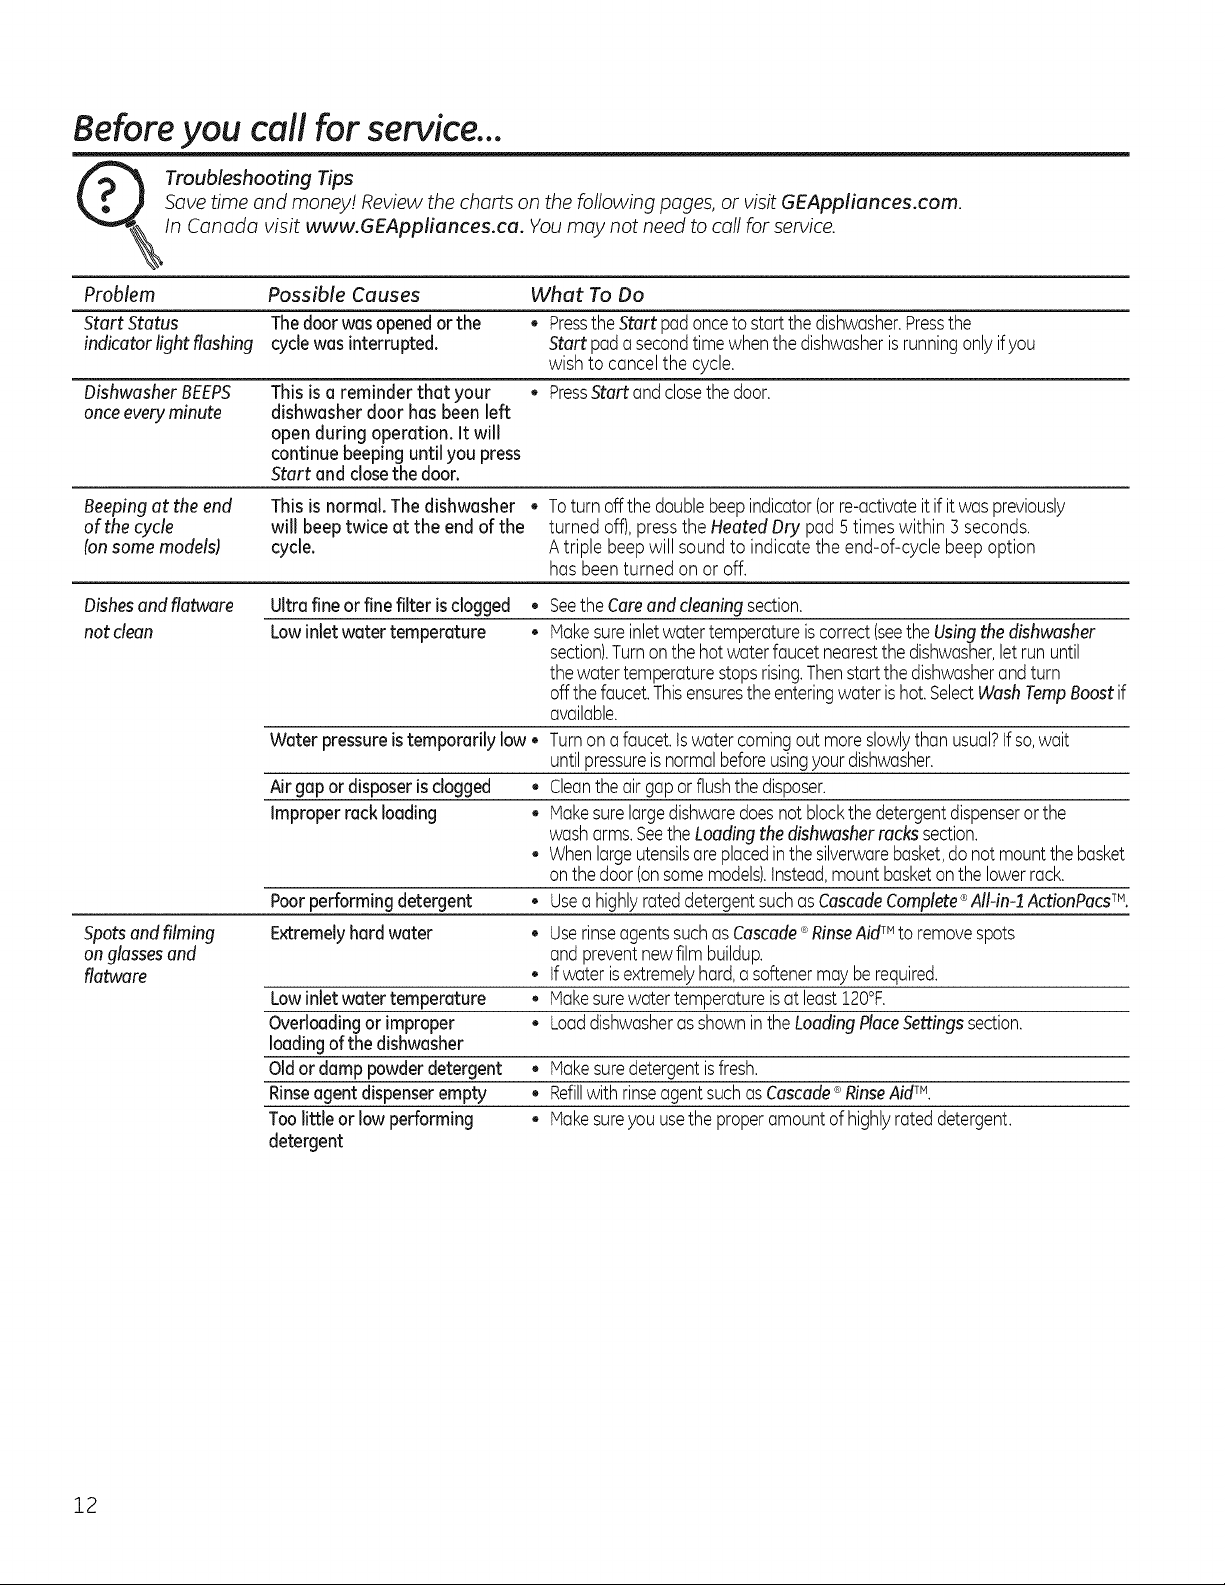
Sudsinthe tub Correctdetergent • Useonlyautomaticdishwasherdetergentsto avoidsudsing.Cascade®
wasn't used AutomaticDishwashingDetergentshavebeenapprovedforuseinall
Rinseagentwasspilled
Detergent left in
dispensercups
Blackor gray
marksondishes
Dishesdon'tdry
ControlpanelrespondedDoormaynot becompletely
toinputsbutdishwasherclosed
neverfilled with water
Stainedtub interior
Dishesor utensils are blocking •
the detergent cup
Aluminumutensilshave
rubbedagainst dishes
Lowinlet water temperature
Rinseagentdispenserisempty
Water valvemay beturned off
Sometomato-basedfoodscan
causereddishstains
Teaor coffeestains
GEdishwashers.
• Toremovesudsfrom thetub,openthedishwasherandletsudsdissipate.
Pumpoutwater bypressingStart andclosethedoor.WaitS0seconds.
Openthedoor,pressand holdStartfor Sseconds,andclosethedoor.
Repeatifnecessary.
Alwayswipeup rinseagentspillsimmediately.
Repositionthe dishes,sothe water from the lower spray arm canflush
the detergentcup.SeetheLoading thedishwasher racks section.
o
Repositionthe tall utensilsorheavysilverwarethat maybe keepingthe
dispensercup doorfrom opening.Seethe Loadingthesilverwarebasket
section.
Removemarkswith a mild,abrasivecleaner.
• Hakesureinletwatertemperatureisat least120°F.
• SelectHeatedDry.
• UseWashTempBoostoption.
• Selectahighercycle,suchasWashTemp Sani (Sanitize)orHeavy.
• Checktherinseagentdispenserandfillas required.
Hakesurethedoor isfirmlyclosed.
• Hakesurewatervalve(usuallylocatedunderthesink)isturnedon.
• UseoftheSteamcycle(onsomemodels)afteraddingthedishtothe load
candecreasethelevelofstaining.
Removethe stainbyhand,usingasolutionof1/2 cupbleachand
Scupswarmwater.NOTE:Donot usebleachon stainlesssteel
tub orinnerdoor.
A CAUTION!
Beforecleaninginterior,waitat least20minutesafteracycleforthe
heatingelementstocooldown.Failureto dosocan resultin burns.
Anoverallyellowor brownfilm can •
becausedbyirondepositsinwater
White film on insidesurface- •
hardwater minerals
Dishwasherwon'trun Fuseisblownor circuit breaker • Replacefuseorresetcircuitbreaker.Removeanyotherappliancesfrom
istripped thecircuit.
Poweristurnedoff • tnsomeinstallations,the powertothedishwasherisprovidedthrougha
Controlpanelislocked • Unlockcontrolpanel.SeetheGettingstarted section.
Aspecialfilterinthewatersupplylineisthe onlywayto correct
thisproblem.Contacta watersoftenercompany.
GErecommendsCascade®RinseAidTM to helppreventhardwater
mineraldepositsfrom forming.
Rundishwasherwithcitricacidtoremovemineraldeposits.Citricacid
(Partnumber:WD35X151)canbeorderedthroughGEParts.Seeback
coverfororderinginformation.
wallswitch,oftenlocatednexttothedisposerswitch.Hakesureitison.
13
Before you call for service...
Problem Possible Causes What To Do
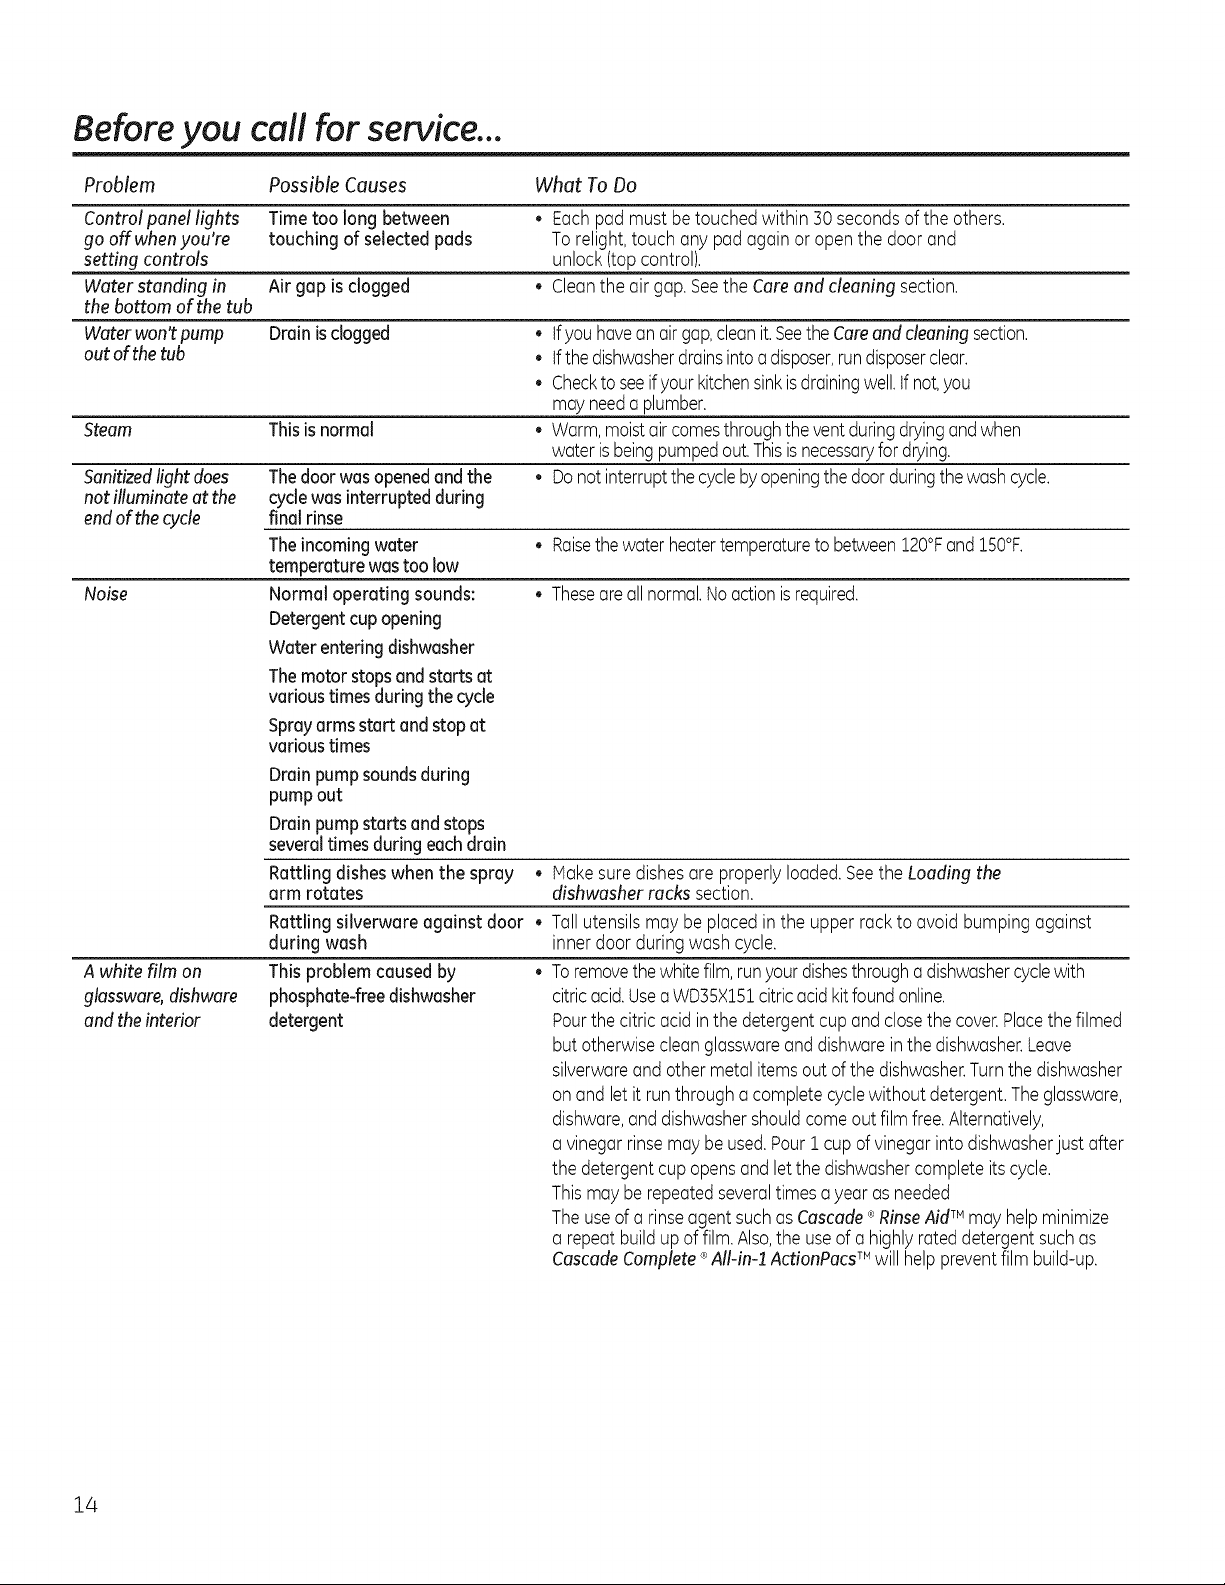
Control panel lights Time too long between • Eachpad must betouchedwithin 30 secondsofthe others.
go offwhen you're touching of selectedpads To relight,touch any pad again or openthe door and
setting controls unlock(topcontrol).
Water standing in Airgap is clogged • Cleanthe airgap.Seethe Careand cleaning section.
the bottom of the tub
Waterwon't pump Drain isclogged • tfyou haveanairgap,cleanit.SeetheCareand cleaningsection.
outof thetub • tfthe dishwasherdrainsintoa disposer,rundisposerclear.
• Checktoseeif yourkitchensinkis drainingwell.tfnot,you
mayneeda plumber.
Steam Thisis normal • Warm,moistaircomesthroughthe ventduringdryingandwhen
waterisbeingpumpedout.Thisisnecessaryfor drying.
Sanitizedlightdoes Thedoorwasopenedand the • Donotinterruptthe cyclebyopeningthedoorduringthewashcycle.
notilluminate at the cyclewasinterruptedduring
endof thecycle final rinse
Theincomingwater • Raisethewaterheatertemperatureto between120°Fand150°F.
temperaturewastoo low
Noise Normal operating sounds: • Theseareallnormal.Noactionisrequired.
Detergentcup opening
Water enteringdishwasher
Themotor stopsand starts at
varioustimesduringthe cycle
Sprayarmsstart and stopat
varioustimes
Drainpump soundsduring
pumpout
Drainpump starts and stops
severaltimesduring eachdrain
A white film on
glassware,dishware
andtheinterior
Rattling disheswhen the spray
arm rotates
Rattling silverware against door •
during wash
This problemcausedby
phosphate-freedishwasher
detergent
Makesuredishesare properlyloaded.Seethe Loadingthe
dishwasherracks section.
Tallutensilsmay be placed in the upperrack to avoidbumpingagainst
innerdoor duringwash cycle.
Toremovethewhitefilm,runyour dishesthrougha dishwashercyclewith
citricacid.UseaWD35X15:lcitricacidkitfoundonline.
Pourthecitric acidinthe detergentcupand closethe cover.Placethe filmed
butotherwisecleanglasswareanddishwarein thedishwasher.Leave
silverwareandother metalitemsoutof the dishwasher.Turnthe dishwasher
on and let it runthrougha completecyclewithoutdetergent.Theglassware,
dishware,anddishwashershouldcomeout film free.Alternatively,
a vinegarrinsemay beused.Pour1cup of vinegarinto dishwasherjust after
thedetergentcup opensandletthe dishwashercompleteitscycle.
Thismay berepeatedseveraltimesayear asneeded
Theuseofa rinseagentsuchasCascade®RinseAidTM mayhelpminimize
a repeatbuildupof film.Also,the useof a highlyrateddetergentsuchas
CascadeComplete®All-in-1ActionPacsTM willhelp preventfilmbuild-up.
14
GE Dishwasher Warranty. GEAppliances.com
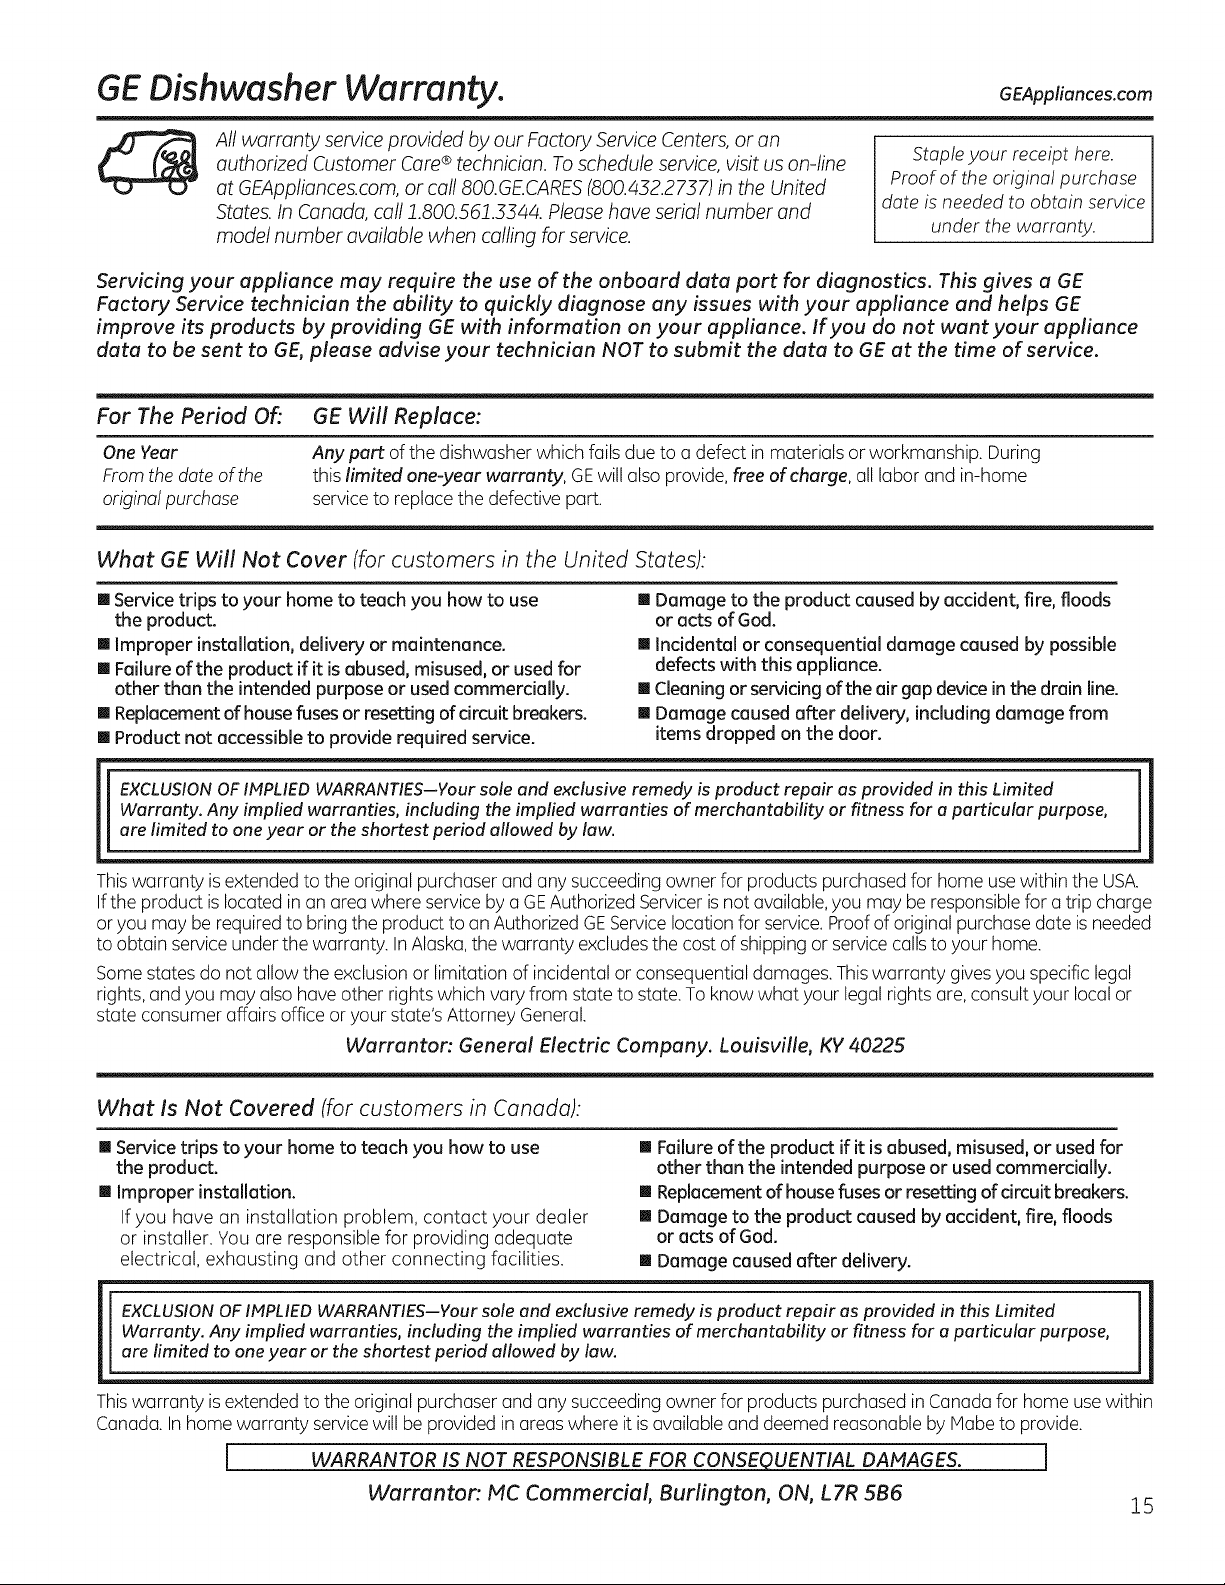
All warranty service provided by our Factory Service Centers, or an
authorized Customer Care®technician. Toschedule service, visit us on-line
at GEAppliances.com, or call 800.GECARES(800.432.2737) in the United
States. In Canada, call 1.800.561.3344. Please have serial number and
model number available when calling for service.
Stapleyour receipt here.
Proof of the original purchase
date is needed to obtain service
under the warranty.
Servicing your appliance may require the use of the onboard data port for diagnostics. This gives a GE
Factory Service technician the ability to quickly diagnose any issues with your appliance and helps GE
improve its products by providing GE with information on your appliance. If you do not want your appliance
data to be sent to GE, please advise your technician NOT to submit the data to GE at the time of service.
For The Period Of: GE Will Replace:
One Year
From the date of the
original purchase
Any pert of the dishwasher which failsdue to a defect in materials or workmanship. During
this limited one:veer warranty, GEwill also provide, free of charge, all labor and in-home
serviceto replacethe defectivepart.
What GE Will Not Cover (for customers in the United States):
[] Service trips to your home to teach you how to use
the product.
[] Improper installation, delivery or maintenance.
[] Failure of the product if it is abused, misused, or usedfor
other than the intended purpose or used commercially.
[] Replacement of housefuses or resetting of circuit breakers.
[] Product not accessible to provide required service.
[] Damage to the product caused by accident, fire, floods
or acts of God.
[] Inddental or consequential damage caused by possible
defects with this appliance.
[] Cleaning or servicing of the air gap device in the drain line.
[] Damage caused after delivery, including damage from
items dropped on the door.
Warranty. Any implied warranties, including the implied warranties of merchantability or fitness for u particular purpose,
ii EXCLUSIONOFIMPLIEDWARRANTIES--Yoursole end exclusive remedy is product repair us provided in this Limited
are limited to oneyear or the shortest period allowed by law.
Thiswarranty isextended to the original purchaser andany succeedingowner for products purchasedfor home usewithin the USA.
If the product islocated inan area where serviceby aGEAuthorized Servicerisnot available,you may be responsiblefor a trip charge
or you may be required to bring the product to anAuthorized GEServicelocation for service.Proofof original purchase date is needed
to obtain service under the warranty. InAlaska,the warranty excludesthe costof shippingor servicecalls to your home.
Somestates do not allow the exclusionor limitation of incidental or consequential damages. Thiswarranty givesyou specific legal
rights,and you may also have other rightswhich vary from state to state. To know what your legalrights are,consult your local or
state consumer affairs office or your state's Attorney General.
Warranton General Electric Company. Louisville, KY 40225
What Is Not Covered (for customers in Canada):
[] Service trips to your home to teach you how to use
the product.
[] Improper installation.
If you have an installation problem, contact your dealer
or installer. Youare responsible for providing adequate
electrical, exhausting and other connecting facilities.
EXCLUSION OF INPLIED WARRANTIES--Your sole and exclusive remedy is product repair as provided in this Limited
Warronty. Any implied warranties, including the implied warranties of merchantability or fitness for u particular purpose,
are limited to one year or the shortest period allowed by law.
[] Failure of the product if it is abused, misused,or used for
other than the intended purpose or used commercially.
[] Replacementof housefuses or resetting of circuit breakers.
[] Damage to the product caused by accident, fire, floods
ar acts of God.
[] Damage caused after delivery.
Thiswarranty isextended to the original purchaser andany succeedingowner for products purchasedin Canadafor home use within
Canada. Inhome warranty service will be provided in areaswhere it isavailableand deemed reasonable by Habe to provide.
[ WARRANTOR IS NOT RESPONSIBLE FOR CONSEQUENTIAL DAMAGES. ]
Warrantor'. MC Commercial, Burlington, ON, L7R 5B6 15
 Loading...