

Page 1

Contents
Using Your DVD Alternatives . . . . . . . . . . . . . . . . . . . . . . . . . . . . . . . . . 3
Identifying your DVD alternatives . . . . . . . . . . . . . . . . . . . . . . 3
Using your EZ-DVD PC Card . . . . . . . . . . . . . . . . . . . . . . . . . . 4
Using your DVD player . . . . . . . . . . . . . . . . . . . . . . . . . . . . . . . 5
Using the DVD Control Panel . . . . . . . . . . . . . . . . . . . . . . . . . . . . . . . . . . 6
DVD region coding . . . . . . . . . . . . . . . . . . . . . . . . . . . . . . . . . 14
Care and Maintenance . . . . . . . . . . . . . . . . . . . . . . . . . . . . . . . . . . . . . . 15
System care . . . . . . . . . . . . . . . . . . . . . . . . . . . . . . . . . . . . . . . 15
Disc care . . . . . . . . . . . . . . . . . . . . . . . . . . . . . . . . . . . . . . . . . 15
Troubleshooting . . . . . . . . . . . . . . . . . . . . . . . . . . . . . . . . . . . . . . . . . . . . 16
The disc won’t play . . . . . . . . . . . . . . . . . . . . . . . . . . . . . . . . . 17
Video is jerky and dropping frames . . . . . . . . . . . . . . . . . . . . . 17
Screen resolution looks bad . . . . . . . . . . . . . . . . . . . . . . . . . . . 18
There is no picture . . . . . . . . . . . . . . . . . . . . . . . . . . . . . . . . . . 19
Language, Angle, Title Buttons, and Subtitles won’t work . . . 19
No audio or audio is low . . . . . . . . . . . . . . . . . . . . . . . . . . . . . 19
Installing the DVD software . . . . . . . . . . . . . . . . . . . . . . . . . . 21
Uninstalling the DVD software . . . . . . . . . . . . . . . . . . . . . . . . 22
Notices . . . . . . . . . . . . . . . . . . . . . . . . . . . . . . . . . . . . . . . . . . . . . . . . . . . 23
Regulatory Compliance Statements . . . . . . . . . . . . . . . . . . . . . . . . . . . . 25
1
Page 2

Please check out our eBay auctions for more great
deals on Factory Service Manuals:
Page 3

2 Using Your DVD Player
Page 4
Using Your DVD Alternatives
Your DVD alternatives from Gateway include either the video
hardware already in your notebook or a PC Card version. Both
alternatives use similar software controls. (See “Using the DVD
Control Panel” on Page 6.)
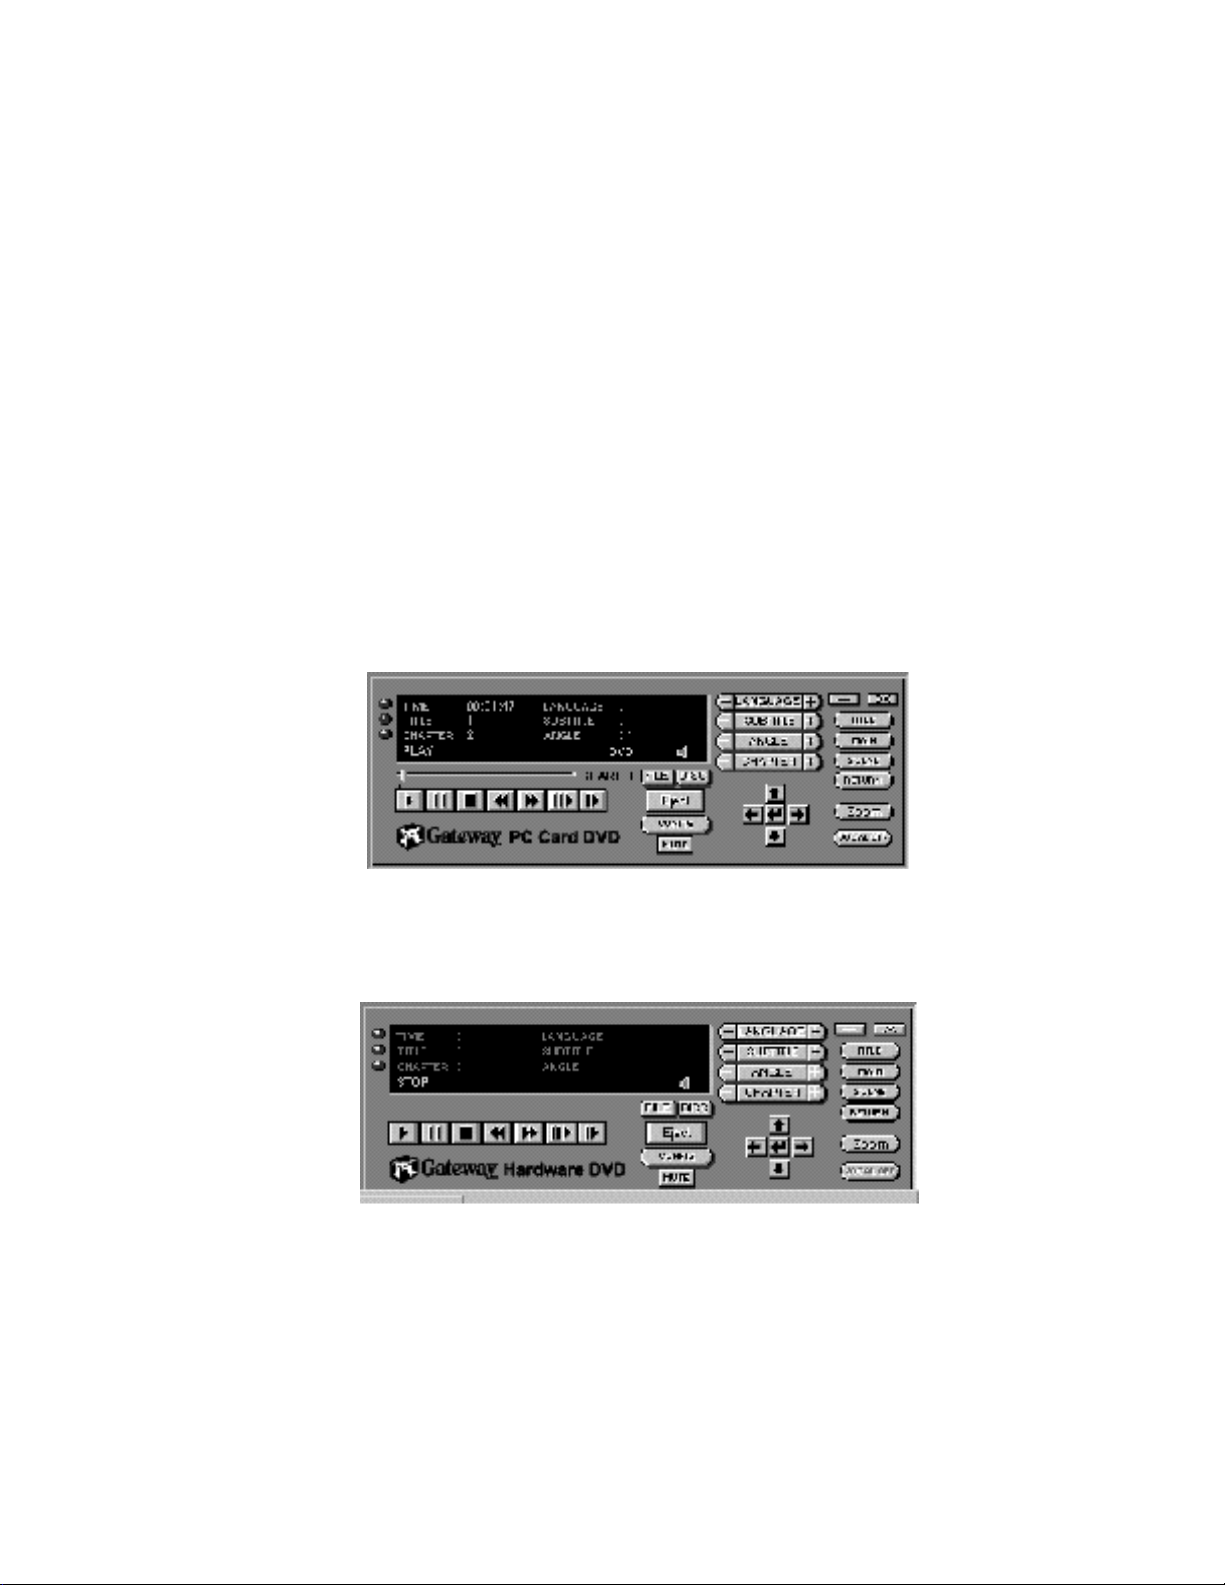
Identifying your DVD alternatives
If you have the EZ-DVD PC Card version (initial screen shown
below), follow the instructions in “Using your EZ-DVD PC Card”
on Page 4.
Otherwise, if the initial screen is similar to the one shown below,
follow the instructions in “Using your DVD player” on Page 5.
Using Your DVD Alternatives 3
Page 5
Using your EZ-DVD PC Card
Your EZ-DVD PC Card supports hot insertion, which means you
put the card in the Zoom Video (ZV-enabled) slot of your notebook
when it is running, then the system automatically adjusts the drivers
and allocates resources. See your user’s guide for the location of a
ZV-enabled slot (usually the bottom slot) on your notebook.
If you purchased the PC Card at the same time you purchased your
notebook from Gateway, the software is already loaded on your
notebook. Should you need to reinstall the software, see the
instructions in “Installing the DVD software” on Page 21.
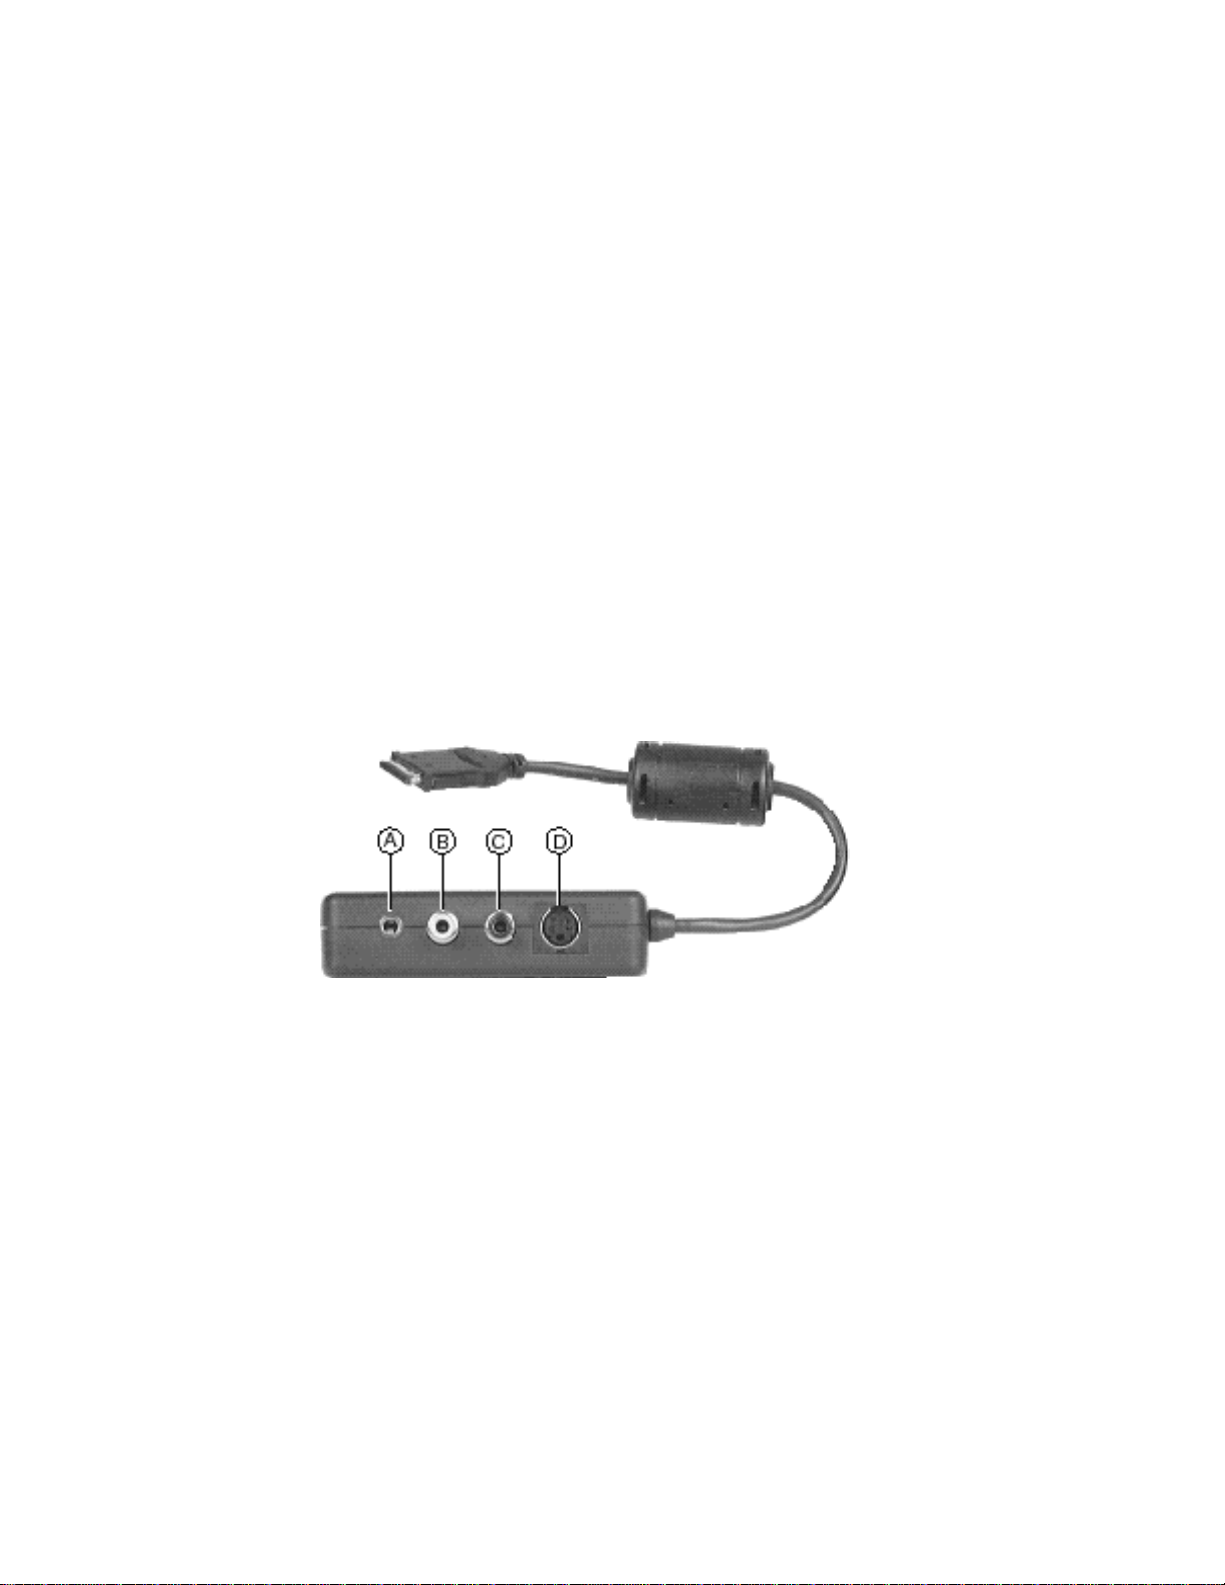
Connecting the media cable
The optional PC Card media cable (attached to the end of the PC
Card) provides four output connections:
A. Audio output is for earphones only. An external amplifier
is required to drive speakers.
B. Composite Video output can be used to connect to a
standard television.
C. SPDIF (Dolby Digital) output can be connected to an
external Dolby Digital (AC-3) decoder.
D. S-Video output can be used to connect to a television with
S-Video input.
4 Using Your DVD Player
Page 6

Using your DVD player
The DVD Player contains the controls necessary to play DVD discs
and change the DVD display. Some notebooks (such as the Solo
9100) require you to change the video source to DVD before
playing a DVD disc.
To make DVD your video source:
1. Press the FN key and the VIDEO SOURCE key (F7 on the Solo
9100) simultaneously. The video source menu opens.
2. Continue to press the key combination until the option “DVD”
appears. The popup menu closes.
To play a DVD disc:
1. Click Start, Programs, DVDPlay, and then Dvdplay to open the
DVD Player application.
Important:
The DVD Player application must be running to play a DVD
disc. If the Active Movie window is not a solid black window,
change the video source to “DVD” using the
SOURCE key combination.
FN+VIDEO
2. Press the Eject button on the front of the DVD-ROM drive or
click the
Eject button on the DVD Player control panel. It will
take a few seconds for the tray to open.
3. Place the disc in the disc tray.
4. Gently push the tray to close it. Give the system a few seconds
to recognize the disc.
5. Click Play.
Using Your DVD Alternatives 5
Page 7
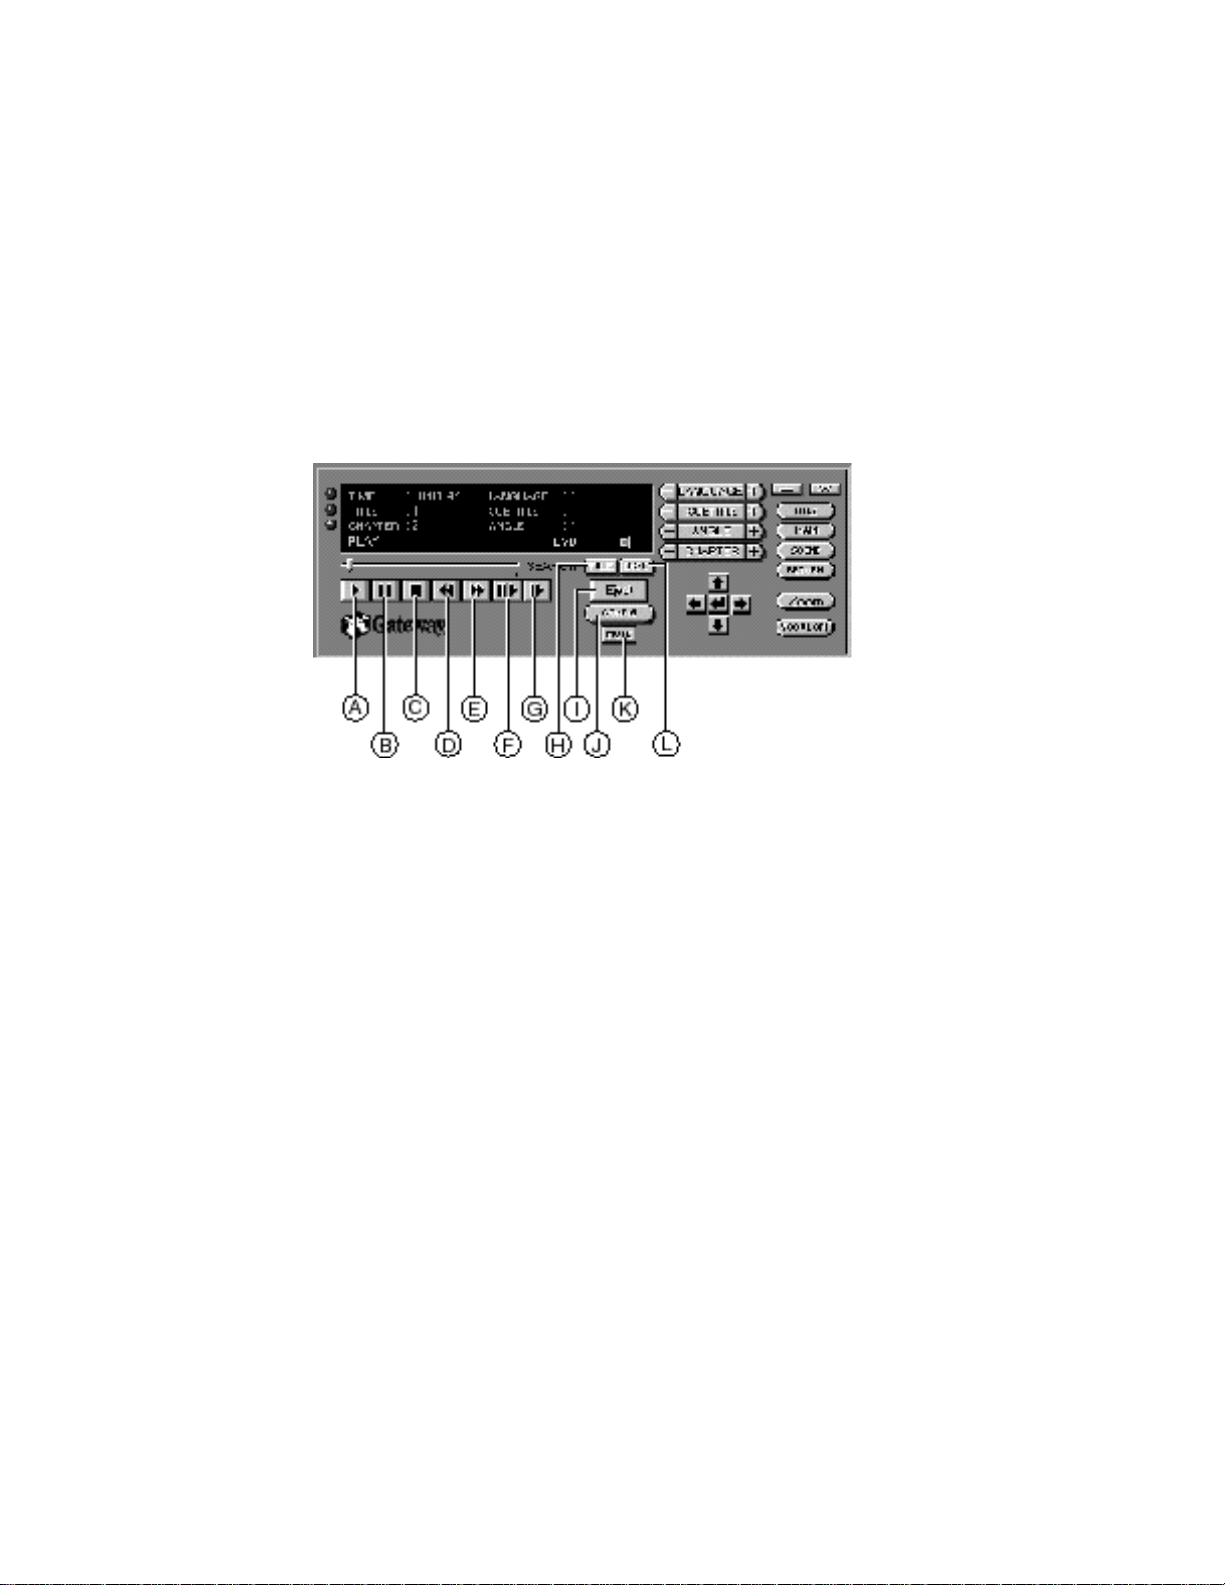
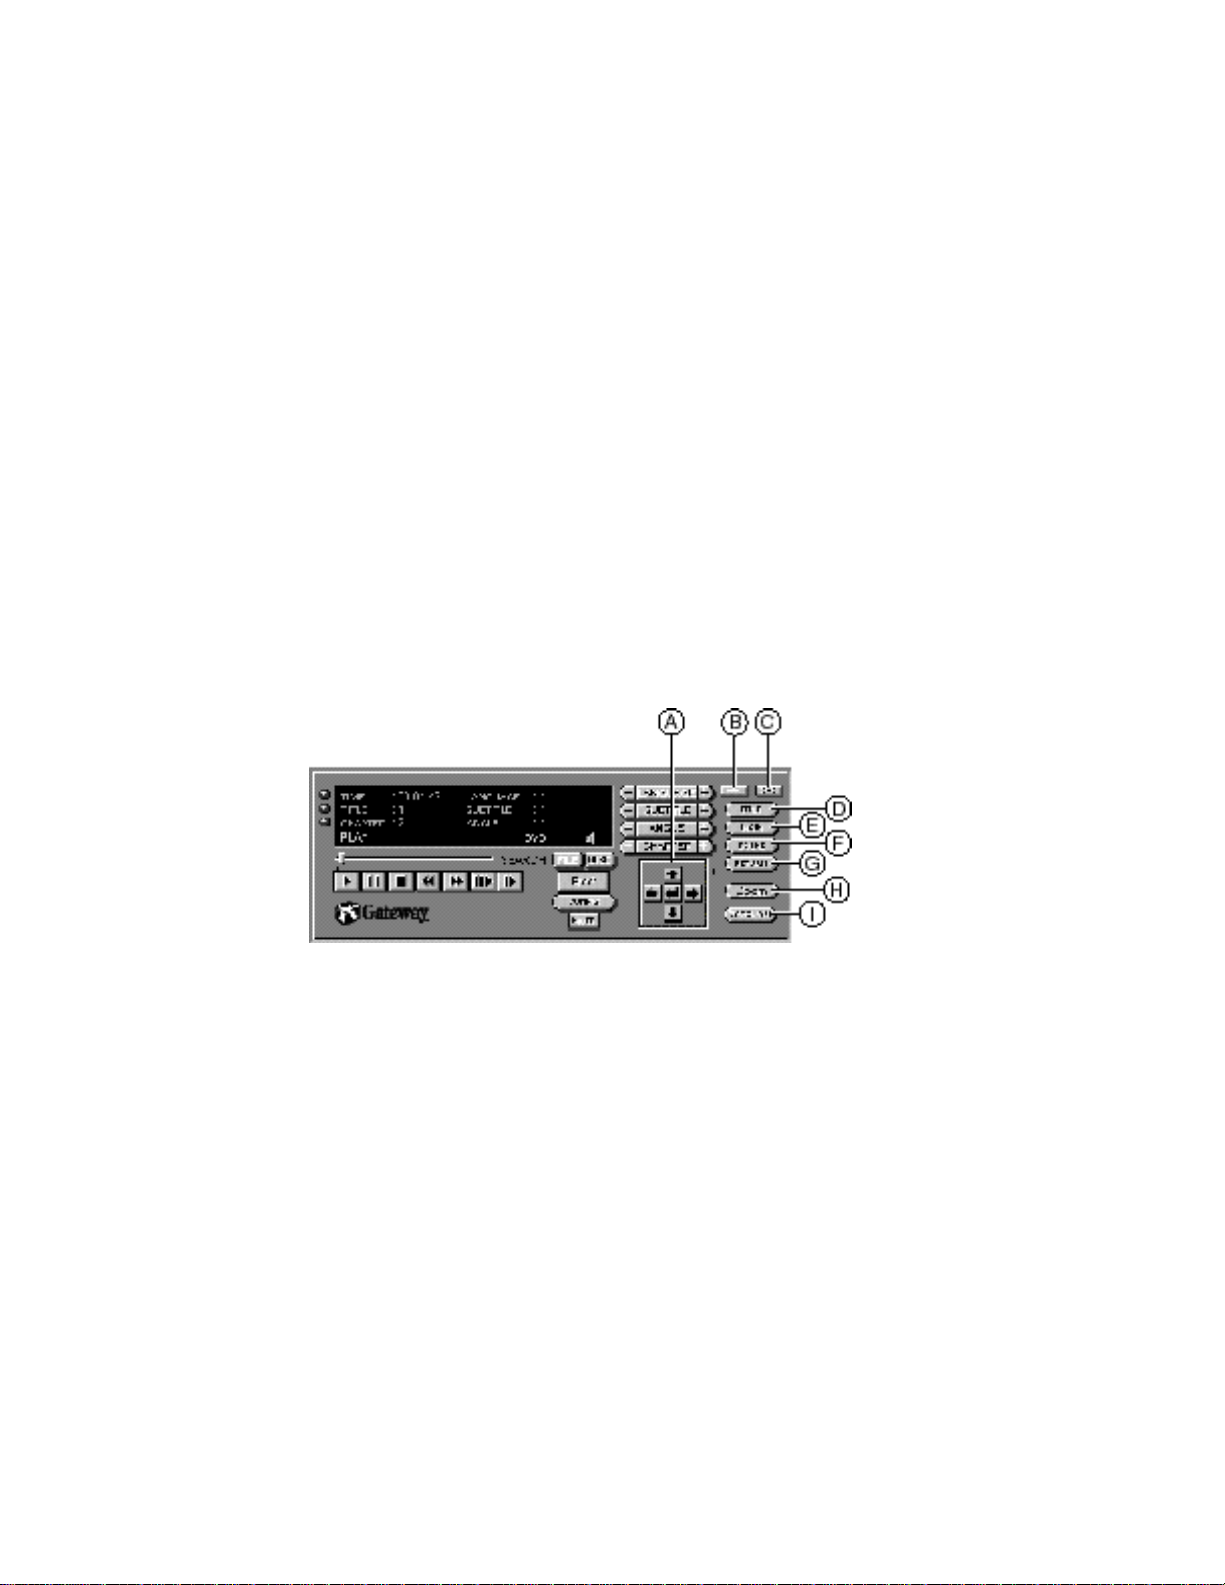
Using the DVD Control Panel
The following illustration shows the DVD control panel, and the list
below the illustration describes the buttons on the control panel.
A. Begins the playback of DVD, Video CD, or MPEG files.
B. Pauses the video. Click the play button to continue.
C. Stops playing the video. Click the play button to start
playing at the beginning of the DVD title.
D. Runs the video backward. When you click this button, the
backwards scan continues until you click the play or stop
buttons.
E. Runs the video forward. When you click this button, the
forward scan continues until you click the play or stop
buttons.
F. Plays the video in slow motion.
G. Advances the video by one frame each time you click it.
H. File opens a file on the disc.
I. Eject opens the disc tray.
J. Config opens the setup screens so you can adjust audio,
6 Using Your DVD Player
Page 8
video, and parental control settings. See the
“Configuration dialog box” section for details.
K. Mute turns off the volume completely. To restore the sound,
click the
L. Disc resets the disc to play from the beginning.
Mute button again.
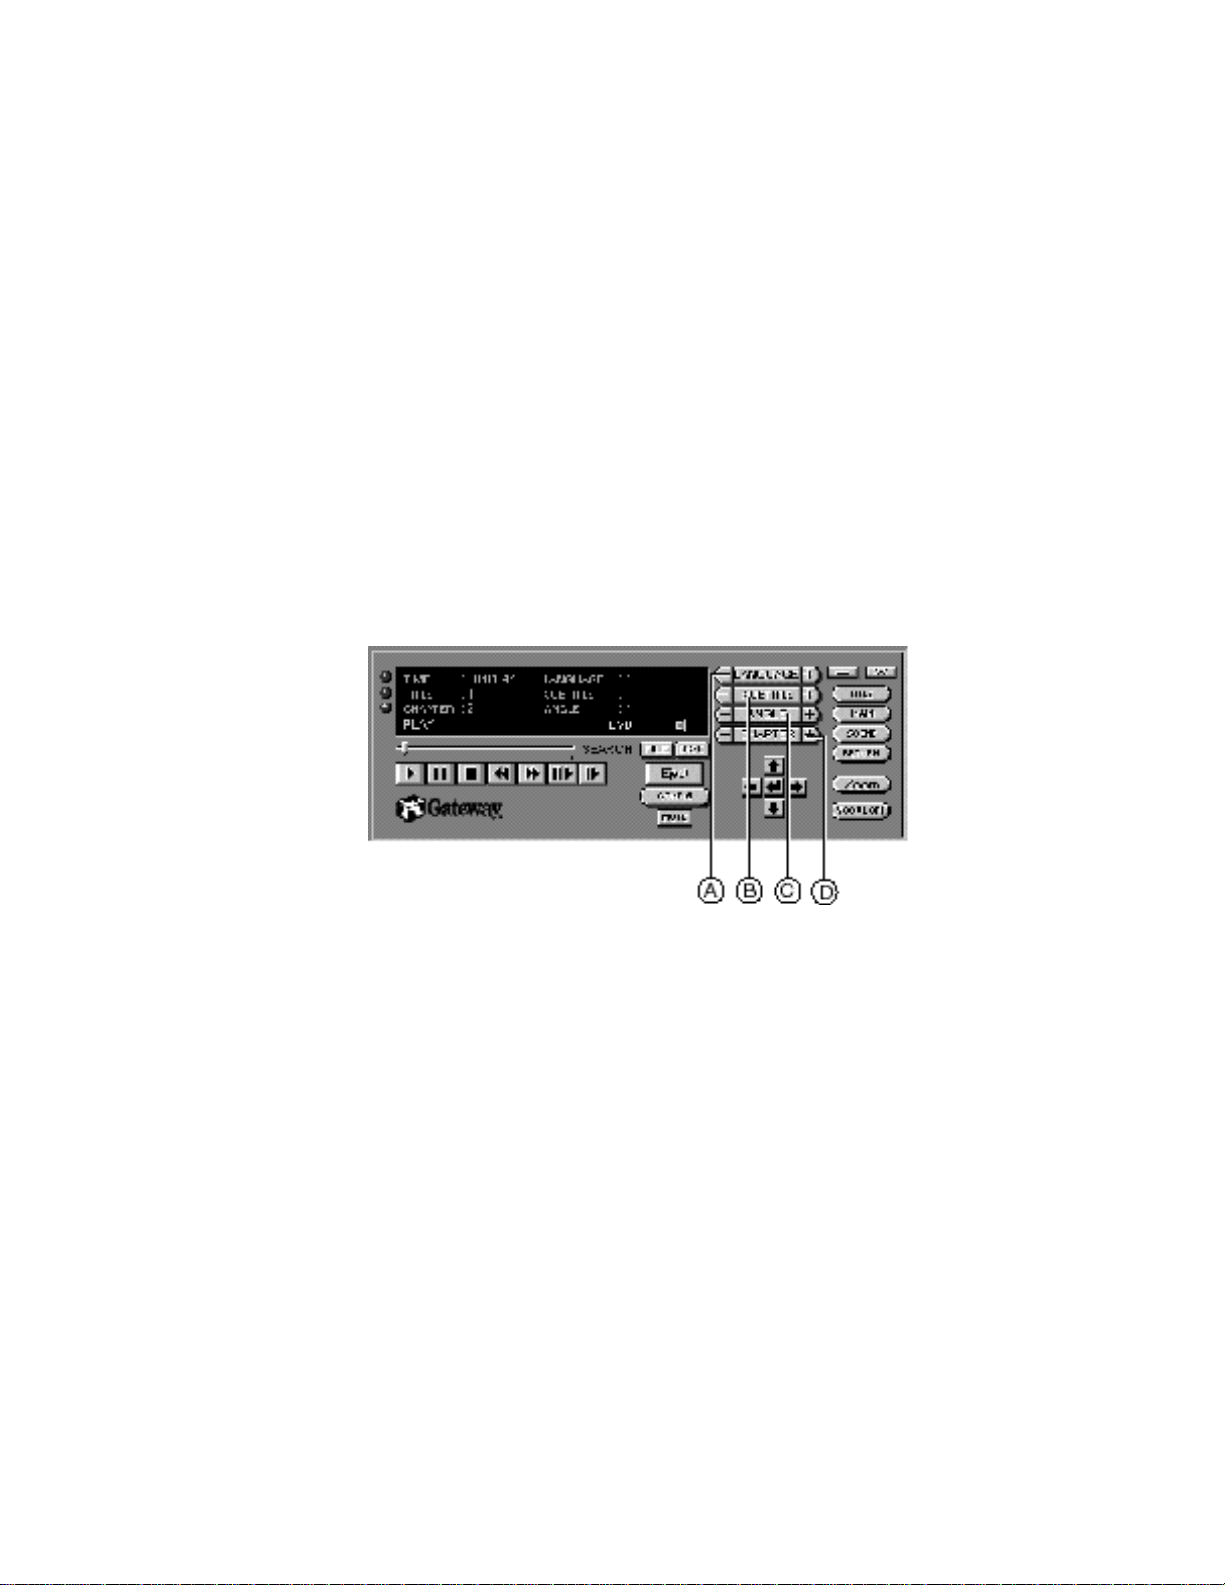
DVD menu language controls
The number of languages and angles available in the following
options varies from disc to disc, as determined by the disc
manufacturer. Refer to the DVD disc packaging for details.
A. Language changes the audio language. Click the + and –
buttons to scroll through the audio languages, or click the
center button to open a menu of languages. Click the
language you want to hear and the change is shown in the
status display dialog box.
You can switch languages while the disc is playing.
B. Subtitle changes the language of the subtitles. Click the +
and
– buttons to scroll through the subtitle languages or
click the center button to open a menu of languages. Click
the language you want to see.
You can switch languages while the disc is playing.
Using the DVD Control Panel 7
Page 9
C. Angle changes the camera position. This option, when
available, may last only a few seconds or a few chapters at
a time. Click the
+ and – buttons to scroll through the
camera angles, or click the center button to open a menu of
camera angles.
Click
Return on the control panel to return to the title.
D. Chapter lets you skip to a different chapter. Click the + and
– buttons to play the next or previous chapter, or click the
center button to open a menu of chapters. Click the number
of the chapter you want to watch.
DVD chapters are like chapters in a book or tracks on an
audio CD, but not all discs contain chapters.
DVD menu navigation controls
A. Scroll through menu choices in the Title, Main, and Scene
menus.
Menu select (the center arrow) shows the currently-
selected menu choice.
B. Decreases the size of the control panel and places it in the
Taskbar. To restore the control panel, click
application
C. Stops the video and exits the DVD Player.
D. Title displays the titles on the disc. Titles are divided into
in the Taskbar.
Gateway DVD
chapters. Not all discs have this option, however. To select
an title, click the title directly, click the DVD arrow and
8 Using Your DVD Player
Page 10

ENTER keys, or press an arrow key on the keyboard.
Click
Return to return to the control panel. This option is
only available while a DVD disc is playing.
E. Main opens a menu that provides a variety of information
about the titles on the disc. To select an item, click the item
directly, click the DVD arrow and
ENTER keys, or press an
arrow key on the keyboard.
Click
Return to return to the control panel. This option is
only available while a DVD disc is playing.
F. Scene displays the scenes for the disc. To select an item,
click the item directly, click the DVD arrow and
ENTER
keys, or press an arrow key on the keyboard.
Click
Return to return to the control panel. This option is
only available while a DVD disc is playing.
G. Return returns to the control panel from the Title, Main, and
Scene menus and restarts playback.
H. Zoom (when available) provides a close-up view of an area
of the video screen. The
change the
Scrolling Factor.
I. Vocal Off turns off the vocal track of karaoke discs so that
Zoom Factor, the Initial Zoom Position, and the
Zoom Setting Dialog lets you
only the instrumental tracks are heard.
DVD button controls
A. Time search opens a dialog box to let you enter a specific
time (in hours, minutes, or seconds) to start playback
Using the DVD Control Panel 9
Page 11

(measured from the start of the movie).
B. Title search opens a dialog box that lists titles by number.
Click
Apply to go to the title you want, or Cancel to close
the dialog box.
C. Chapter search opens a dialog box that lists chapter
numbers. Click the number of the chapter you want.
Configuration dialog box
Open the Configuration dialog box by clicking the Config button in
the control panel. There are two or four tabs in the dialog box. (The
Parental Control and the Initial Setup Configuration Dialog tabs
appear only if you click the
Config button before playing a disc.)
The
Initial Setup Configuration Dialog displays the country code, the
default menu language, and the video standard.
Click the
10 Using Your DVD Player
View Format tab to change the size of the image.
Page 12

To undo changes to settings on one tab, click the Cancel button on
the tab. Any changes you made on the other tabs are not affected.
To undo changes to settings on all the tabs, click the
Cancel button
at the bottom of the dialog box.
Click the
Video Format tab to change the aspect ratio (width-to-
height ratio). Aspect ratio changes can be made only if that option
is supported by the disc manufacturer.
Using the DVD Control Panel 11
Page 13
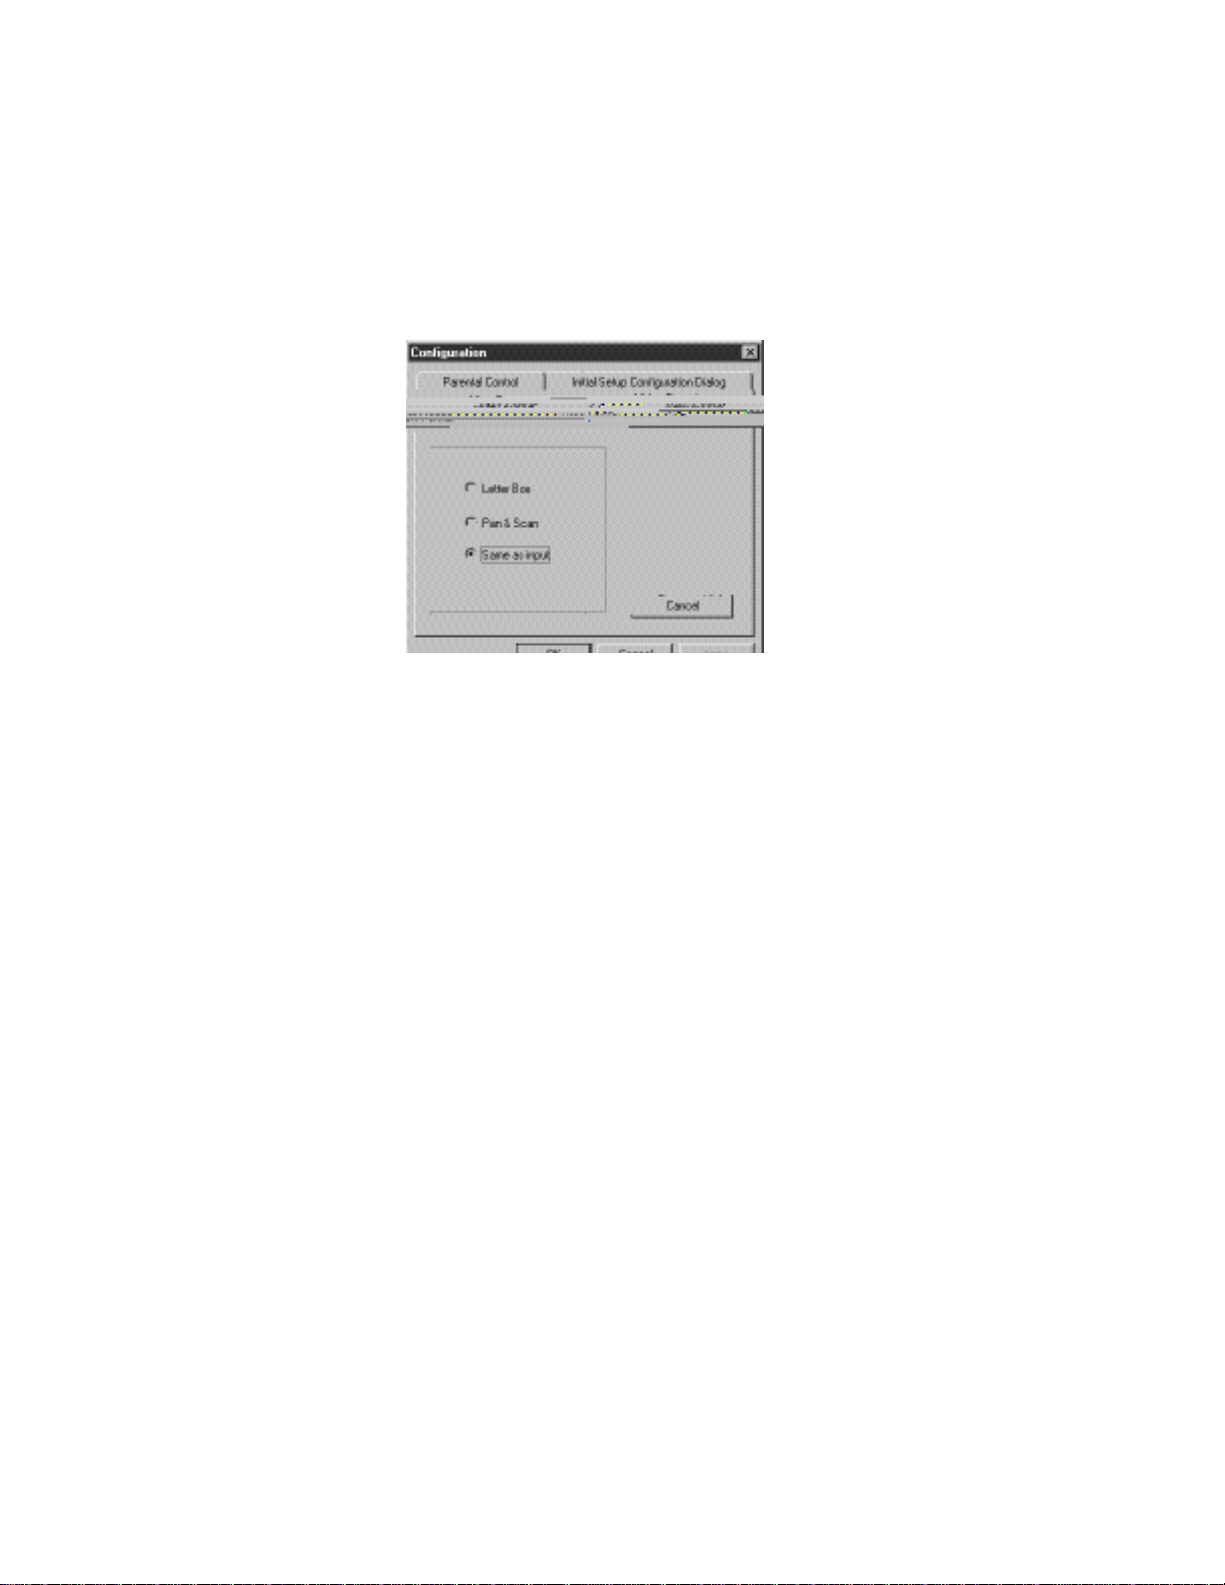
Letter Box mode displays theatrical-type images masked on the top
and bottom.
Pan & Scan mode displays images cropped left and right.
Same as input mode displays the format from the disc
(recommended setting).
12 Using Your DVD Player
Page 14

Click the Parental Control tab (visible only before a disc is playing)
to restrict the viewing of discs or to use the password, provided
restriction codes or ratings have been encoded on the disc.
To set the parental control settings:
1. In the DVD Player control panel, click Config and Parental
. The Parental Control Setting dialog box opens.
Control
2. Click the highest movie rating level you want to allow without
a password (level G is the lowest, and level NC-17 is the
highest). A dialog box prompts you to enter your password.
Important:
The DVD Player is shipped with the default password
welcome. Enter this password the first time you open this
dialog box, then set your own password.
3. Enter your password. The DVD Player checks all the levels
lower than the one you checked and removes checks from any
higher levels.
Using the DVD Control Panel 13
Page 15

4. To change the password, click Change Password. The Password
dialog box opens.
Important:
The only way to clear a forgotten Parental Control password is
to uninstall, then reinstall your DVD software.
5. Type in a password, then retype it to confirm the password.
6. Click OK. A message opens stating that any changes made will
go into effect after the movie is restarted.
7. Click OK.
8. Click the Disc button to reset the player, then restart the movie.
Some movies do not have restriction codes or ratings encoded
on the disc. If the disc does support restriction codes or ratings and
the disc exceeds the established viewing criteria, the next dialog box
opens requesting your password. Type in the password, then click
Ignore Level and the movie will start.
DVD region coding
Region coding is built into DVD discs and the system hardware. If
the region code of the DVD disc does not match that of your system,
the disc will not play. The region code is set at the factory and
cannot be changed.
The region code of the system is determined by the delivery
address. The region code for the disc is on the disc, disc
documentation, or packaging.
14 Using Your DVD Player
Page 16

Care and Maintenance
There are a few things that you can do to help keep your system
clean and trouble-free.
System care
◆ See your user’s guide for general system maintenance.
◆ Avoid heat, cold, condensation, dust, and humidity.
◆ Do not block system ventilation.
◆ Clean the exterior of the system with a soft, slightly damp
cloth. Do not use thinner, benzine, or other commercial
solvents.
◆ Do not play cracked or warped discs. They could damage the
DVD-ROM drive.
Disc care
◆ Do not touch the playing surfaces of the disc. Fingerprints can
affect picture and audio playback.
◆ Clean with a soft dry cloth. You can use a diluted neutral
cleaning solution (if necessary). Do not use thinner, benzine,
or any commercial solvents. Wipe gently from the inner edge
towards the outer edge of the disc. Do not wipe in a circular
direction.
◆ Store discs in their cases in an upright position.
◆ Keep discs away from moisture, dust, and excessive heat.
Care and Maintenance 15
Page 17

Troubleshooting
Your system is designed for trouble-free operation, but if you do
encounter difficulties, you can try a few simple things before calling
client support.
◆ Make sure the video source is set to DVD by pressing the FN
and
VIDEO SOURCE keys simultaneously.
◆ Make sure there is power to your notebook.
◆ Make sure all of the required drivers are loaded.
◆ Check for hardware conflicts.
To check for hardware conflicts:
1. Click Start, Settings, Control Panel, and double-click the System
icon. The System Properties dialog box opens.
2. Click the Device Manager tab. There will be a yellow circle with
an exclamation point over any device that has a conflict.
3. Double-click the device that is marked with the exclamation
point. The properties dialog box for that device opens.
4. Click the Resources tab, Set Configuration Manually, then
Change Settings.
5. Click the options under Resource type one at a time until you
see a message stating that no conflicts are found in the
Conflicting device list area of the dialog box.
6. Click OK. The System Settings Change dialog box opens telling
you that you need to restart your system for the changes to take
effect.
7. Click Yes to restart the system.
16 Using Your DVD Player
Page 18

The disc won’t play
◆ Make sure the DVD Player application is open.
◆ Make sure the video source is set to DVD.
◆ Make sure the disc is inserted correctly.
◆ Make sure the disc is not warped or damaged.
◆ Make sure the disc has the correct regional restriction code for
your area.
◆ Try another disc.
Video is jerky and dropping frames
◆ Make sure that the disc is clean.
◆ Make sure that the disc is not warped or damaged.
◆ Make sure that the DMA option is enabled (as explained
below).
To verify that DMA is enabled:
1. Click Start, Settings, Control Panel, and double-click the System
icon. The System Properties dialog box opens.
2. Click the Device Manager tab.
3. Double-click the CD-ROM icon, then the (Manufacturer) DVD-
icon. The (Manufacturer) DVD-ROM Properties dialog
ROM
box opens.
4. Click the Settings tab. The DMA option should be enabled (the
check box is selected
5. If it was not enabled, select the check box next to DMA to
þ
).
enable the option.
6. Click OK.
Troubleshooting 17
Page 19

7. Close the System Properties and Control Panel dialog boxes.
8. Click Start, Shut Down, Restart the computer?, then Yes. The
system restarts.
Screen resolution looks bad
◆ The screen resolution has changed. For best performance we
suggest you set the screen resolution to the recommendation in
your notebook’s documentation.
To change screen resolution:
1. If your system has the QuickRes option, click in the status
area of the taskbar. A menu appears.
2. Click the desired setting. You do not need to restart the system.
- OR -
1. Click Start, Settings, Control Panel, and double-click the
Display icon. The Display Properties dialog box opens.
2. Click the Settings tab.
18 Using Your DVD Player
Page 20

3. Verify the Color palette settings. Click the down arrow to view
options. Click and highlight an option to set it.
4. Verify the Desktop area settings. Click and drag the slider to set
screen resolution.
There is no picture
◆ Make sure the DVD Player application is open.
◆ Make sure the video source is set to DVD.
Language, Angle, Title Buttons, and Subtitles
won’t work
◆ This is normal in some titles.
No audio or audio is low
◆ Make sure the MUTE button in the DVD Player control panel
has not been activated.
Troubleshooting 19
Page 21

◆ Adjust the volume control wheel on your notebook.
◆ Adjust the control panel Volume buttons, speaker volume, or
Windows95 and Windows98 volume controls.
20 Using Your DVD Player
Page 22

Installing the DVD software
If you need to install the DVD software, first remove any previously
installed DVD software to prevent any possible conflicts, then
follow the instructions under “Uninstalling the DVD software” on
Page 22.
To install the PC Card software:
1. With Windows95 or Windows98 running, insert the PC Card
in the ZV-enabled slot. The Windows Plug and Play process
asks for the device driver.
2. Insert Disk 1 in the diskette drive.
3. At the prompt type
A:
and press
4. Click Start, select Run, and then type
ENTER.
A:\setup.exe
and press
5. Follow any on-screen instructions to complete the installation.
6. Remove the diskette from the diskette drive.
ENTER.
Troubleshooting 21
Page 23

Uninstalling the DVD software
You may need to uninstall the DVD software under some
circumstances such as when you want to update drivers. Deleting
the directory does not remove all traces of the software on your
system. You need to use a uninstall program (available at your local
computer software store) to completely remove the software.
To remove the DVD software
1. Click Start, Settings, Control Panel, then double-click on the
Add/Remove Programs icon. The Add/Remove Programs
Properties dialog box opens.
2. Select DVD Player.
3. Click Add/Remove. A dialog box opens.
4. Click Yes, then OK. The Add/Remove Programs Properties
dialog box opens when the program is removed.
5. Click OK.
6. Click Start, Shut Down, Restart the computer?, then Yes. The
system restarts. The DVD Player is no longer installed.
If the DVD decoder card and DVD-ROM drive are still installed in
the system, when you restart the system a dialog box will open
stating that new hardware has been found.
22 Using Your DVD Player
Page 24

Notices
Copyright © 1998 Gateway 2000, Inc. All Rights Reserved
610 Gateway Drive, N. Sioux City, SD 57049 USA
All Rights Reserved
This publication is protected by copyright and all rights are reserved. No
part of it may be reproduced or transmitted by any means or in any form,
without prior consent in writing from Gateway 2000.
The information in this manual has been carefully checked and is believed
to be accurate. However, changes are made periodically. These changes are
incorporated in newer publication editions. Gateway 2000 may improve
and/or change products described in this publication at any time. Due to
continuing system improvements, Gateway 2000 is not responsible for
inaccurate information which may appear in this manual. For the latest
product updates, consult the Gateway 2000 web site at
www.gateway.com. In no event will Gateway 2000 be liable for direct,
indirect, special, exemplary, incidental, or consequential damages
resulting from any defect or omission in this manual, even if advised of the
possibility of such damages.
In the interest of continued product development, Gateway 2000 reserves
the right to make improvements in this manual and the products it
describes at any time, without notices or obligation.
Trademark Acknowledgments
AnyKey, black-and-white spot design, CrystalScan, Destination, EZ Pad,
EZ Point, Field Mouse, Solo, TelePath, Vivitron, stylized “G” design, and
“You’ve got a friend in the business” slogan are registered trademarks and
GATEWAY, Gateway Solo, green stylized GATEWAY, green stylized
Gateway logo, and the black-and-white spotted box logo are trademarks of
Gateway 2000, Inc. Intel, Intel Inside logo, and Pentium are registered
trademarks and MMX is a trademark of Intel Corporation. Microsoft, MS,
MS-DOS, and Windows are trademarks or registered trademarks of
Microsoft Corporation. All other product names mentioned herein are
used for identification purposes only, and may be the trademarks or
registered trademarks of their respective companies.
Notices 23
Page 25

Manufactured under license from Dolby Laboratories. “Dolby” and
the double-D symbol are trademarks of Dolby Laboratories.
Copyright 1992 Dolby Laboratories, Inc.
This product has been tested and found to comply with the Dolby
laboratories Inc’s requirements in the Dolby Digital function and is
entitled to bear the Dolby Digital mark.
Copyright © 1998 Advanced Logic Research, Inc. (ALR)
All Rights Reserved
9401 Jeronimo Irvine, CA 92618 USA
All Rights Reserved
This publication is protected by copyright and all rights are reserved. No
part of it may be reproduced or transmitted by any means or in any form,
without prior consent in writing from ALR.
The information in this manual has been carefully checked and is believed
to be accurate. However, changes are made periodically. These changes are
incorporated in newer publication editions. ALR may improve and/or
change products described in this publication at any time. Due to
continuing system improvements, ALR is not responsible for inaccurate
information which may appear in this manual. For the latest product
updates, consult the ALR web site at www.alr.com. In no event will ALR
be liable for direct, indirect, special, exemplary, incidental, or
consequential damages resulting from any defect or omission in this
manual, even if advised of the possibility of such damages.
In the interest of continued product development, ALR reserves the right
to make improvements in this manual and the products it describes at any
time, without notices or obligation.
Trademark Acknowledgments
ALR is a registered trademark of Advanced Logic Research, Inc. All other
product names mentioned herein are used for identification purposes only,
and may be the trademarks or registered trademarks of their respective
companies.
24 Using Your DVD Player
Page 26

Regulatory Compliance Statements
American Users:
This device has been tested and found to comply with
the limits for a Class B digital device, pursuant to
Part 15 of the FCC rules. These limits are designed
to provide reasonable protection against harmful interference in a
residential installation. This equipment generates, uses and can radiate
radio frequency energy and, if not installed and used in accordance with
the instructions, may cause harmful interference to radio or television
reception. However, there is no guarantee that interference will not occur
in a particular installation. If this equipment does cause interference to
radio and television reception, which can be determined by turning the
equipment off and on, the user is encouraged to try to correct the
interference by one or more of the following measures:
• Reorient or relocate the receiving antenna
• Increase the separation between the equipment and receiver
• Connect the equipment into an outlet on a circuit different
from that to which the receiver is connected
• Consult the dealer or an experienced radio/TV technician for
help.
Warning!
This equipment has been tested and found to comply with the
limits of a Class B digital device. The accessory associated with
this equipment is a shielded power cord.
This accessory is required to be used in order to ensure
compliance with FCC rules.
Changes or modifications not expressly approved by the
manufacturer could void the user’s authority to operate the
equipment.
Regulatory Compliance Statements 25
Page 27

Caution!
Since the laser beam used in this DVD-ROM drive unit is
harmful to the eyes, do not attempt to disassemble the cabinet.
Refer servicing to qualified personnel only. Use of controls or
adjustments or performance of procedures other than those
specified herein may result in hazardous radiation exposure.
Canadian Users:
This digital apparatus does not exceed the Class B
limits for radio noise emissions from digital
apparatus as set out in the radio interference
regulations of Industry Canada.
Le présent appareil numérique n’émet pas de bruits radioélectriques
dépassant les limites applicables aux appareils numériques de Classe B
prescrites dans le règlement sur le brouillage radioélectrique édicté par
Industrie Canada.
European Users:
This Information Technology Equipment has been
tested and found to comply with the following
European directives:
[i] EMC Directive 89/336/EEC amending directive 92/31/EEC & 93/68
EEC as per
- EN 50081-1:1992 according to
EN 55022:1995 Class B
EN 61000-3-2:1995 or EN 60555-2:1986
EN 61000-3-3: 1995
- EN50082-1:1992 according to
EN 61000-4-2:1995 or IEC 801-2:1984
ENV 50140:1994 or IEC 801-3:1984
EN 61000-4-4:1988 or IEC 801-4:1998
[ii] Low Voltage Directive (Safety) 73/23/EEC as per EN 60950: 1992
26 Using Your DVD Player
Page 28
Japanese Users:
This equipment is in the Class 2 category
(Information Technology Equipment to be used in
a residential area or an adjacent area thereto) and
conforms to the standards set by the Voluntary Control Council for
Interference by Information Technology Equipment aimed at preventing
radio interference in such residential area.
When used near a radio or TV receiver, it may become the cause of radio
interference. Read instructions for correct handling.
Australian and New Zealand Users:
This device has been tested and found to comply
with the limits for a Class B digital device, pursuant
to the Australian/New Zealand standard AS/NZS
3548 set out by the Spectrum Management Agency.
Compact Disc Information.
This DVD-ROM drive is classified
as a Class 1 LASER product. The
Class 1 LASER PRODUCT label is
located on the top of the drive unit.
This unit uses compact discs with the following marks:
Regulatory Compliance Statements 27
Page 29

28 Using Your DVD Player
 Loading...