

Page 1
EIDOS Interactive warrants to the original purchaser
that this Eidos Interactive disc is free from defects
in materials and workmanship for a period of
ninety (90) days from the date of purchase.This
EIDOS Interactive disc is sold “as is”without
expressed or implied warranty of any kind, and
EIDOS Interactive is not liable for any losses or
damages of any kind resulting from use of this
program. EIDOS Interactive agrees for a period
of ninety (90) days to either repair or replace,at
its option, free of charge,any EIDOS Interactive
disc,postage paid, with proof of date of purchase,
at its Factory Service Center.
This limited warranty is not applicable to
normal wear and tear.This limited warranty
shall not be applicable and shall be void if
the defect in the EIDOS Interactive disc has
arisen through abuse,unreasonable use,
mistreatment or neglect.This limited warranty
is in lieu of all other warranties and no other
representations or claims of any nature shall be
binding on or obligate EIDOS Interactive.Any
implied warranties of merchantability and
fitness for a particular purpose,are limited
to the ninety (90) day period described
above.In no event will EIDOS
Interactive be liable for any special,
incidental, or consequential damages
resulting from possession, use or
malfunction of this disc.
Some states do not allow limitation as
to how long an implied warranty lasts
and/or exclusions or limitations or incidental or
consequential damages so the above limitations
and/or exclusions of liability may not apply to you.
This warranty gives you specific rights, and you may
also have other rights which vary from state to state.
For assistance with gameplay or strategies,please call the
Eidos Hint Line at 1-900-77-EIDOS (773-4367). Cost of the
call is $0.95/minute/Must be 18 years old or have parent’s
permission.Touch-Tone phone required.Our customer service
number is 415-547-1244. Customer service is available Monday
through Friday,9:00am to 5:00pm Pacific Time.
Eidos Interactive Limited Warranty Table of Contents
Getting Started . . . . . . . . . . . . . . . . . . . . . . . . . . . . . . . . . . . . . . . . . . . . . . . . . . . . . . . . . . . . . . . . . . . . . . . . . . . . . . .4
Installation of Final Fantasy VII . . . . . . . . . . . . . . . . . . . . . . . . . . . . . . . . . . . . . . . . . . . . . . . .5-6
Playing Final Fantasy VII . . . . . . . . . . . . . . . . . . . . . . . . . . . . . . . . . . . . . . . . . . . . . . . . . . . . . . . . . . . .7-8
Controls . . . . . . . . . . . . . . . . . . . . . . . . . . . . . . . . . . . . . . . . . . . . . . . . . . . . . . . . . . . . . . . . . . . .9-11
The Characters . . . . . . . . . . . . . . . . . . . . . . . . . . . . . . . . . . . . . . . . . . . . . . . . . . . . . . . . . . .12-16
Field Controls . . . . . . . . . . . . . . . . . . . . . . . . . . . . . . . . . . . . . . . . . . . . . . . . . . . . . . . . . . . . . . . . . . . . . . . . . .17
Shops,Inns, Etc . . . . . . . . . . . . . . . . . . . . . . . . . . . . . . . . . . . . . . . . . . . . . . . . . . . . . . . . . . . . . . . . . .18
The Battle Screen . . . . . . . . . . . . . . . . . . . . . . . . . . . . . . . . . . . . . . . . . . . . . . . . . .19-24
Menu Screens . . . . . . . . . . . . . . . . . . . . . . . . . . . . . . . . . . . . . . . . . . . .25-37
Items . . . . . . . . . . . . . . . . . . . . . . . . . . . . . . . . . . . . . . . . . . . . . . . . . . . . . . . . . . . . . . . .26
Magic . . . . . . . . . . . . . . . . . . . . . . . . . . . . . . . . . . . . . . . . . . . . . . . . . . . . . . . . . . . . . . . . . . . . . . . . . . . . . . . . . . . . . .27
Materia . . . . . . . . . . . . . . . . . . . . . . . . . . . . . . . . . . . . . . . . . . . . . . . . . . . . . . . . . . . . . . . . . . . . . . . . . . . . . .27-29
Equip . . . . . . . . . . . . . . . . . . . . . . . . . . . . . . . . . . . . . . . . . . . . . . . . . . . . . . . . . . . . . . . . . . . . . . . . . . . . . . . . . . . . . .30
Status . . . . . . . . . . . . . . . . . . . . . . . . . . . . . . . . . . . . . . . . . . . . . . . . . . . . . . . . . . . . . . . . . . . . . . . . . . . . . . . . . .31-32
Order . . . . . . . . . . . . . . . . . . . . . . . . . . . . . . . . . . . . . . . . . . . . . . . . . . . . . . . . . . . . . . . . . . . . . . . . . . . . . . . . . . . . . .33
Limit . . . . . . . . . . . . . . . . . . . . . . . . . . . . . . . . . . . . . . . . . . . . . . . . . . . . . . . . . . . . . . . . . . . . . . . . . . . . . . . . . .33-34
Configuration . . . . . . . . . . . . . . . . . . . . . . . . . . . . . . . . . . . . . . . . . . . . . . . . . . . . . . . . . . . . . . . . . . .34-36
PHS . . . . . . . . . . . . . . . . . . . . . . . . . . . . . . . . . . . . . . . . . . . . . . . . . . . . . . . . . . . . . . . . . . . . . . . . . . . . . . . . . . . . . . . . .36
Save . . . . . . . . . . . . . . . . . . . . . . . . . . . . . . . . . . . . . . . . . . . . . . . . . . . . . . . . . . . . . . . . . . . . . . . . . . . . . . . . . . .36-37
Credits . . . . . . . . . . . . . . . . . . . . . . . . . . . . . . . . . . . . . . . . . . . . . . . . . . . . . . . . . . . . . . . . . . . . . . . . . . . . . . . . . . . . . . . . . . .39
Page 2
4
5
System Requirements
Computer
Final Fantasy VII requires an IBM PC or 100% compatible computer. The
minimum CPU speed required is a Pentium 166MHz without a 3D accelerator or
a Pentium 133MHz with a recommended 3D accelerator. Your computer must
have at least 32MB of RAM.
Operating System
You must have Windows 95 installed in your system.
Drives
Final Fantasy VII can be installed with a Standard or a Maximum install. The
Standard install requires 260MB of free uncompressed hard drive space on your
computer. The Maximum install requires 460 MB of free uncompressed hard
drive space on your computer. You must also have a Quad-Speed or faster CDROM drive to play Final Fantasy VII.
Controls
Final Fantasy VII supports Keyboard and/or Joystick controls. Your Joystick must
be calibrated and configured through DirectX5 “Game Controller”settings in
your Windows control panel.
Video
Final Fantasy VII requires a SVGA DirectX5 compatible video card. DirectX5 is
included on your installation CD. You can enhance your gaming experience by
utilizing a recommended 3D accelerator.
Audio
Final Fantasy VII will work on any DirectX5 compatible sound card. Your card
must be configured to playback digital and MIDI audio.
Getting Started
Place the CD labeled “Install Disc”into
your computer’s CD-ROM drive. If
your computer is “Autorun”enabled
the setup screen will appear on your
screen momentarily. If the setup screen
does not appear you must open the
“My Computer” icon on your desktop,
click on your CD-ROM drive,then
Double-click on the “Setup.exe” icon.
You will see the Final Fantasy VII setup
screen with 5 options to choose from.
The 5 options to choose from are:
Install
Click on the INSTALL to begin installation of Final Fantasy VII. The “Welcome”
screen will appear,please read through the text and select either “Next”to
continue or “Cancel”to exit without installing. After continuing you will see the
“Select Components” screen. If you are unsure or do not have DirectX5 and
DirectShow on your system, leave those 2 components checked. If your sound
card does not play back high quality MIDI instruments you may want to check
the Yamaha box. The Yamaha S-YXG70 software MIDI synthesizer will play
back the MIDI music in Final Fantasy VII with proper MIDI instruments
simulated in software. If your sound card only supports FM synthesis for MIDI
playback it is highly recommended that you install and use the Yamaha S-YXG70
driver. After selecting the components select “Next”to continue on to the setup
type selection. The “Standard” installation requires 260MB of free uncompressed
hard drive space and the “Maximum”installation requires 460 MB of free
uncompressed hard drive space. The “Maximum” setting will offer slightly faster
loading times during game play. You will then be prompted for a destination
location for where you want Final Fantasy VII installed on your hard drive. The
default location is “C:\Program Files\Square Soft, Inc.\Final Fantasy VII”.If you
want to install Final Fantasy VII in a different location click on “Browse”and
change the default setting to your desired location. Next you will choose a
Program Folder for Final Fantasy VII. You should continue on with the default
unless you want to select a different Program Folder. Final Fantasy VII will now
be installed onto your computer.
Installation of Final Fantasy VII
Page 3
6
7
Install DirectX5
Final Fantasy VII requires the installation of DirectX5 to your computer system.
If your system does not have DirectX5 or if you are using any previous versions
of DirectX click on INSTALL DIRECTX5 to install or reinstall DirectX5.
Your computer hardware will be analyzed for a few moments then follow the
onscreen prompts to finish the installation. See the Readme file if you have any
problems with DirectX5.
Install Movie Player
Final Fantasy VII requires the installation of DirectShow to play the fantastic
movie sequences in Final Fantasy VII. Click on INSTALL MOVIE PLAYER
and DirectShow will automatically be installed onto your system.
Install Yamaha Software Synthesizer
The Yamaha S-YXG70 software MIDI synthesizer will play back the MIDI
music in Final Fantasy VII with proper MIDI instruments simulated in software.
If your sound card only supports FM synthesis for MIDI playback it is highly
recommended that you install and use the Yamaha S-YXG70 driver. Click on
INSTALL YAMAHA SOFTWARE SYNTHESIZER to install the S-YXG70
driver,follow the onscreen prompts to continue the installation. At the end of
the installation you will have to restart your system for the new Yamaha drive
to take effect.
Exit
Click on EXIT to quit the Final Fantasy VII setup screen.
Installation of Final Fantasy VII
Starting or Continuing
Final Fantasy VII
After installation you must insert “DISC 1”
in your CD-ROM drive before starting or if
you are continuing a previously played
game. If you are continuing a game from
disc 2 or 3 you will be prompted to insert
the correct disc before continuing. To start
playing go to the program group containing
Final Fantasy VII in the Windows 95 start
menu and select “Final Fantasy VII”. The intro screens will begin to play, and
then the floating credit screen will appear. Press [OK] to skip to the start
screen. At the start screen you will have two options:
New Game - Starts a new Final Fantasy VII game. You must have Disc 1 in your
CD-ROM before starting a new game.
Continue? - This option will let you continue from your previously played game.
Press [OK] to enter to the Save File list. Select the correct Save File from 1-10
and press [OK]. Go to the Save Game you want to continue and press [OK] to
continue. You will be prompted to insert Disc 1, 2,or 3 if the correct disc is not
in the CD-ROM drive.
Final Fantasy VII Configuration
When you first start Final Fantasy VII you
will see the “Configuration”screen. This
menu screen will detail your current
graphic and sound settings. You can change
the settings anytime after by selecting it
from the Final Fantasy VII program groups
in the Windows 95 start menu. Here you
will find four tabs to choose from. The four
tabs are:
Current Settings
Shows the current settings Final Fantasy VII will run for your game.
Playing Final Fantasy VII
Page 4

8
9
Graphics
You can configure your desired graphic setup here. There is a tab labeled
“Display”, click on it to choose either your recommended 3D accelerator or
Primary Display Driver. The other tab you may choose is “Renderer”, click on
it to choose either Software Renderer or 3D Hardware Acceleration,select the
one that complements your “Display”setting. You may also select the Display
resolution with 3 options. If you are using the software renderer, select 320X240
(Full Screen), 640x480 (Quarter Screen) or 640x480 (Full Screen). If you are
using a recommended 3D accelerator,select one of the two 640X480 settings.
The Quarter Screen option will run slightly faster than the Full Screen option
but you trade off by having a smaller viewing area. The area on the right shows
the Direct3D features that your PC supports. Do not be alarmed if your
settings do not support all the 3D features. You can still play Final Fantasy VII
fine without some features. See the Readme file for 3D card troubleshooting.
Sound
The sound driver setting should be automatically configured to your sound card.
Press the test button to hear if your sound card is working properly. If you do
not hear anything,change your sound driver to match your sound card. If your
sound card supports stereo sound you can reverse the left and right channels by
checking the “Reverse Speakers”box.
MIDI
Your MIDI driver should be automatically configured. If you want to change
the driver,select the one the matches your computer’s MIDI setting. Your
MIDI data should be automatically set as well. Your MIDI data should match
your MIDI driver. General MIDI is for all wavetable synthesis cards or any
sound card in general. General MIDI is also for use with the Yamaha S-YXG70
software synthesizer.Soundfont MIDI is for Creative Labs AWE sound cards.
Yamaha XG MIDI is for Yamaha SG MIDI compatible sound cards.
Playing Final Fantasy VII Continued
You can play Final Fantasy VII with the keyboard or a game controller
supported by DirectX 5.0. The default keyboard commands all revolve around
your Numeric Keypad. The commands are:
NumPad 2-4-6-8 Directional Movement
Field screen 1)Moves the characters in the Field screen or in the World
Map screen.
2)Selects messages.
3)Selects weapons,armor, items,etc. in shops.
Menu screen 1)Moves the cursor and selects commands.
Battle screen 1)Moves the cursor and selects commands.
NumPad Enter [OK]
Field screen 1)Talk to other characters.
2)Pick up items or examine treasure chests.
3)When pressed in front of a ladder,allows character to climb
up and down.
4)Confirms the selection of weapons,armor, items, etc. to sell
or buy in shops.
5)Activates switches on various items (ex. elevators).
Menu screen 1)Confirms the selected command.
Battle screen 1)Confirms the selected command.
NumPad 0 [CANCEL]
Field screen 1)When the character is moving in the field,the character
starts running.
2)Cancels the selection of weapons,armor, items etc. to sell
or buy at shops.
Menu screen 1)Closes the Menu screen.
2)Cancels the selected command.
Battle screen 1)Cancels the selected command.
NumPad + [MENU]
Field screen 1)Displays the Menu screen
Menu screen 1)Removes Materia equipped on a weapon or armor.
Battle screen 1)Defers action (enter command) to other characters.
NumPad . [SWITCH]
Field screen N/A
Menu screen 1)Switches between the Materia menu and the Equip menu.
Battle screen 1)While held down,closes the Command window and
displays the Barrier and Magic Barrier (MBarrier) gauges.
Controls
Page 5
10
11
NumPad 9 [PAGEUP]
Field screen 1)When the character is moving,this turns the character left.
If held down, the character keeps turning to the left.
2) When the character is moving on the World Map, this turns
the character left.
3) When the character is stopped in the World Map, you may
view the surroundings by turning left.
Menu screen 1)Selects characters in the same order as they are lined up in
the party.
2)Moves the scroll bar up when selecting items and magic.
Battle screen 1)Hold down simultaneously with the [PAGEDOWN] button
to escape from battles.
NumPad 3 [PAGEDOWN]
Field screen 1)When the character is moving,this turns the character
right. If held down,the character keeps turning to
the right.
2)When the character is moving in the World Map, this turns
the character right.
3)When the character is stopped in the World Map, you may
view the surroundings by turning right.
Menu screen 1)Selects characters in the same order as they are lined up in
the party.
2)Moves scroll bar down when selecting items and magic.
Battle screen 1)Hold down simultaneously with the [PAGEUP] key to
escape from battles.
2)Switches between multiple and single targets.
NumPad 7 [CAMERA]
Field screen 1)Switches views in the World Map.
Menu screen N/A
Battle screen N/A
NumPad 1 [TARGET]
Field screen 1)Changes view of the World Map.
Menu screen N/A
Battle screen 1)Toggles the target cursor on and off.
Controls continued
NumPad 5 [START]
Field screen 1)Switches map displays on the World Map screen.
Menu screen N/A
Battle screen 1)Pauses or resumes battle.
Numpad - [ASSIST]
Field screen 1)Brings up a pointer which shows your position and displays
colored [triangle] marks,indicating possible doors and exits
in your area. Press the [ASSIST] button again to hide
indicators. May not work in all areas.
Menu screen N/A
Battle screen 1)Displays help window.
You can also use the keyboard letters to type in names of characters joining
your party. The default settings can only be changed while in the Menu screen
in the game.
Gamepad/Joystick controls
Final Fantasy VII supports any controller that is supported through DirectX 5.0
game controller’s settings. You must calibrate your controller before you start
playing Final Fantasy VII. See the Readme file for game controller
troubleshooting.
Controls continued
Page 6

12
13
During the game,you will encounter friends and other important characters in
the story. However,depending on how you play, you may not be able to
befriend some of the characters. The following are the main
characters in the game.
Cloud Strife
Job: Mercenary (ex-member
of SOLDIER)
Age: 21
Weapon: Sword
Height: 5’7”
Birthdate: August 19
Birthplace: Nibelheim
Blood Type: AB
The main character in Final Fantasy VII. Originally a
member of SOLDIER, he is now a mercenary who will
take any job. After being hired by AVALANCHE, he
gradually gets caught up in a massive struggle for the life of
the planet. His enormous sword can cut almost anything
into two.
The Characters
Tifa Lockheart
Job: Bar Hostess,AVALANCHE member
Age: 20
Weapon: Glove
Height: 5’4”
Birthdate: May 3
Birthplace: Nibelheim
Blood Type: B
Bright and optimistic,Tifa always cheers up the others when
they’re down. But don’t let her looks fool you, she can decimate
almost any enemy with her fists. She is one of the main members
of AVALANCHE. She and Cloud were childhood friends, and
although she has strong feelings for him, she would never
admit it.
Barret Wallace
Job: Leader of AVALANCHE
Age: 35
Weapon: Gun-arm
Height: 6’4”
Birthdate: December 15
Birthplace: Corel Village
Blood Type: O
Head of the underground resistance
movement,AVALANCHE, Barret is
fighting the mega-conglomerate
Shinra, Inc. which has monopolized
Mako energy by building special
reactors to suck it out of the planet.
Barret depends on brute strength and his
“Gun-arm” to see him through. His wife died
in an accident several years ago,and he
now lives with his daughter Marlene.
The Characters continued
Young, beautiful,and
somewhat mysterious,
Aeris met Cloud while
selling flowers on the
streets of Midgar. She
decided to join him
soon after. Her unusual
abilities allow her to heal the
party, but she seems more
interested in the deepening
love triangle between herself,
Cloud and Tifa.
Aeris Gainsborough
Job: Flower Merchant
Age: 22
Weapon: Rod
Height: 5’3”
Birthdate: February 7
Birthplace: Unknown
Blood Type: O
Page 7

14
15
Red XIII
Job: Research Specimen
Age: 48
Weapon: Headdress
Height: 3’9”
Birthdate: Unknown
Birthplace: Cosmo Canyon
Blood Type: Unknown
Just as his name implies, he is an
animal with fire-red fur. But
under his fierce exterior is an
intelligence surpassing that of any human’s.
His sharp claws and fangs make him good at close-range fighting,but other than
that, not much is known about him. It’s not even certain that “Red XIII” is his
real name. A real enigma.
Cid Highwind
Job: Pilot
Age: 32
Weapon: Spear
Height: 5’8”
Birthdate: February 22
Birthplace: Unknown
Blood Type: B
Cid is a tough-talking,warm-hearted old
pilot who hasn’t forgotten his dreams.
There’s no better pilot by air or sea. He
believes that someday he’ll be the first man
in space. With his handmade spear and
knowledge of machinery, he throws himself
into any attack regardless of the danger.
The Characters continued
Sephiroth
Job: Top ranking SOLDIER officer
Age: Unknown
Weapon: Long Sword
Height: 6’1”
Birthdate: Unknown
Birthplace: Unknown
Blood Type: Unknown
Even amongst the elite troops of SOLDIER,
Sephiroth is known to be the best. His past is locked
away in a confidential file held by Shinra, Inc. His
giant sword, which only he can handle,has extremely
destructive power. Said to have disappeared in
a battle years ago,his current whereabouts
are unknown.
Yuffie Kisaragi
Job: Materia Hunter,Ninja
Age: 16
Weapon: Knife,boomerang, and origami
(for throwing)
Height: 5’2”
Birthdate: November 20
Birthplace: Wutai
Blood Type: A
Although you’d never know it by looking at her, Yuffie comes
from a long line of Ninja. She forced herself into the group just
to get a “certain something”. She’s sneaky, arrogant and “way”
selfish. But with her super shuriken and her special skills, there
isn’t anyone else you’d rather have on your side in a fight.
The Characters continued
Page 8
16
17
Cait Sith
Job: Toysaurus
Age: Unknown
Weapon: Megaphone
Height: 3’2”
Birthdate: Unknown
Birthplace: Unknown
Blood Type: Unknown
Cait Sith rides around on the back of a
huge stuffed Mog he magically brought to
life. Megaphone in hand, he’s always
shouting orders and creating dopey attacks.
When his slot machine attack works,the
enemy lines look like an overturned toy box.
His hobby is fortune telling,but like his
personality, it’s pretty unreliable.
Vincent Valentine
Job: Unemployed
Age: 27
Weapon: Gun
Height: 6’0”
Birthdate: October 13
Birthplace: Unknown
Blood Type: A
A mystical man, stern and upright while at the same time
dark and mysterious. His past connection with Shinra, Inc.
is what made him join Cloud and the others. He may
seem frail at first glance,but hidden inside his body lurks
a fearsome power.
The Characters continued
In Final Fantasy VII, you can experience a 3D Field,for the first time ever in the
Final Fantasy series. Since you can explore this enormous world in all
directions,you will feel as if you are actually in the world, moving around.
Dynamic scene cuts and variations in camera angels provide a cinematic
experience. Once in the Field, you can enter names,talk with various people in
the cities,and play Event Games.
VIEWING THE WORLD MAP
As you proceed in the game,you will come
across the World Map screen, as shown
here. At the bottom right corner of the
screen, a reduced World Map is displayed.
In this map,a broad yellow light beam
indicates the direction your character is
facing and the character’s current location.
Dots scattered around the map represent
towns,and villages. If you press the
[START] button while the reduced World
Map is displayed, it will switch to the enlarged World Map screen. Press
[START] again, and the World Map will disappear from the screen. To display
the reduced World Map, press [START] again.
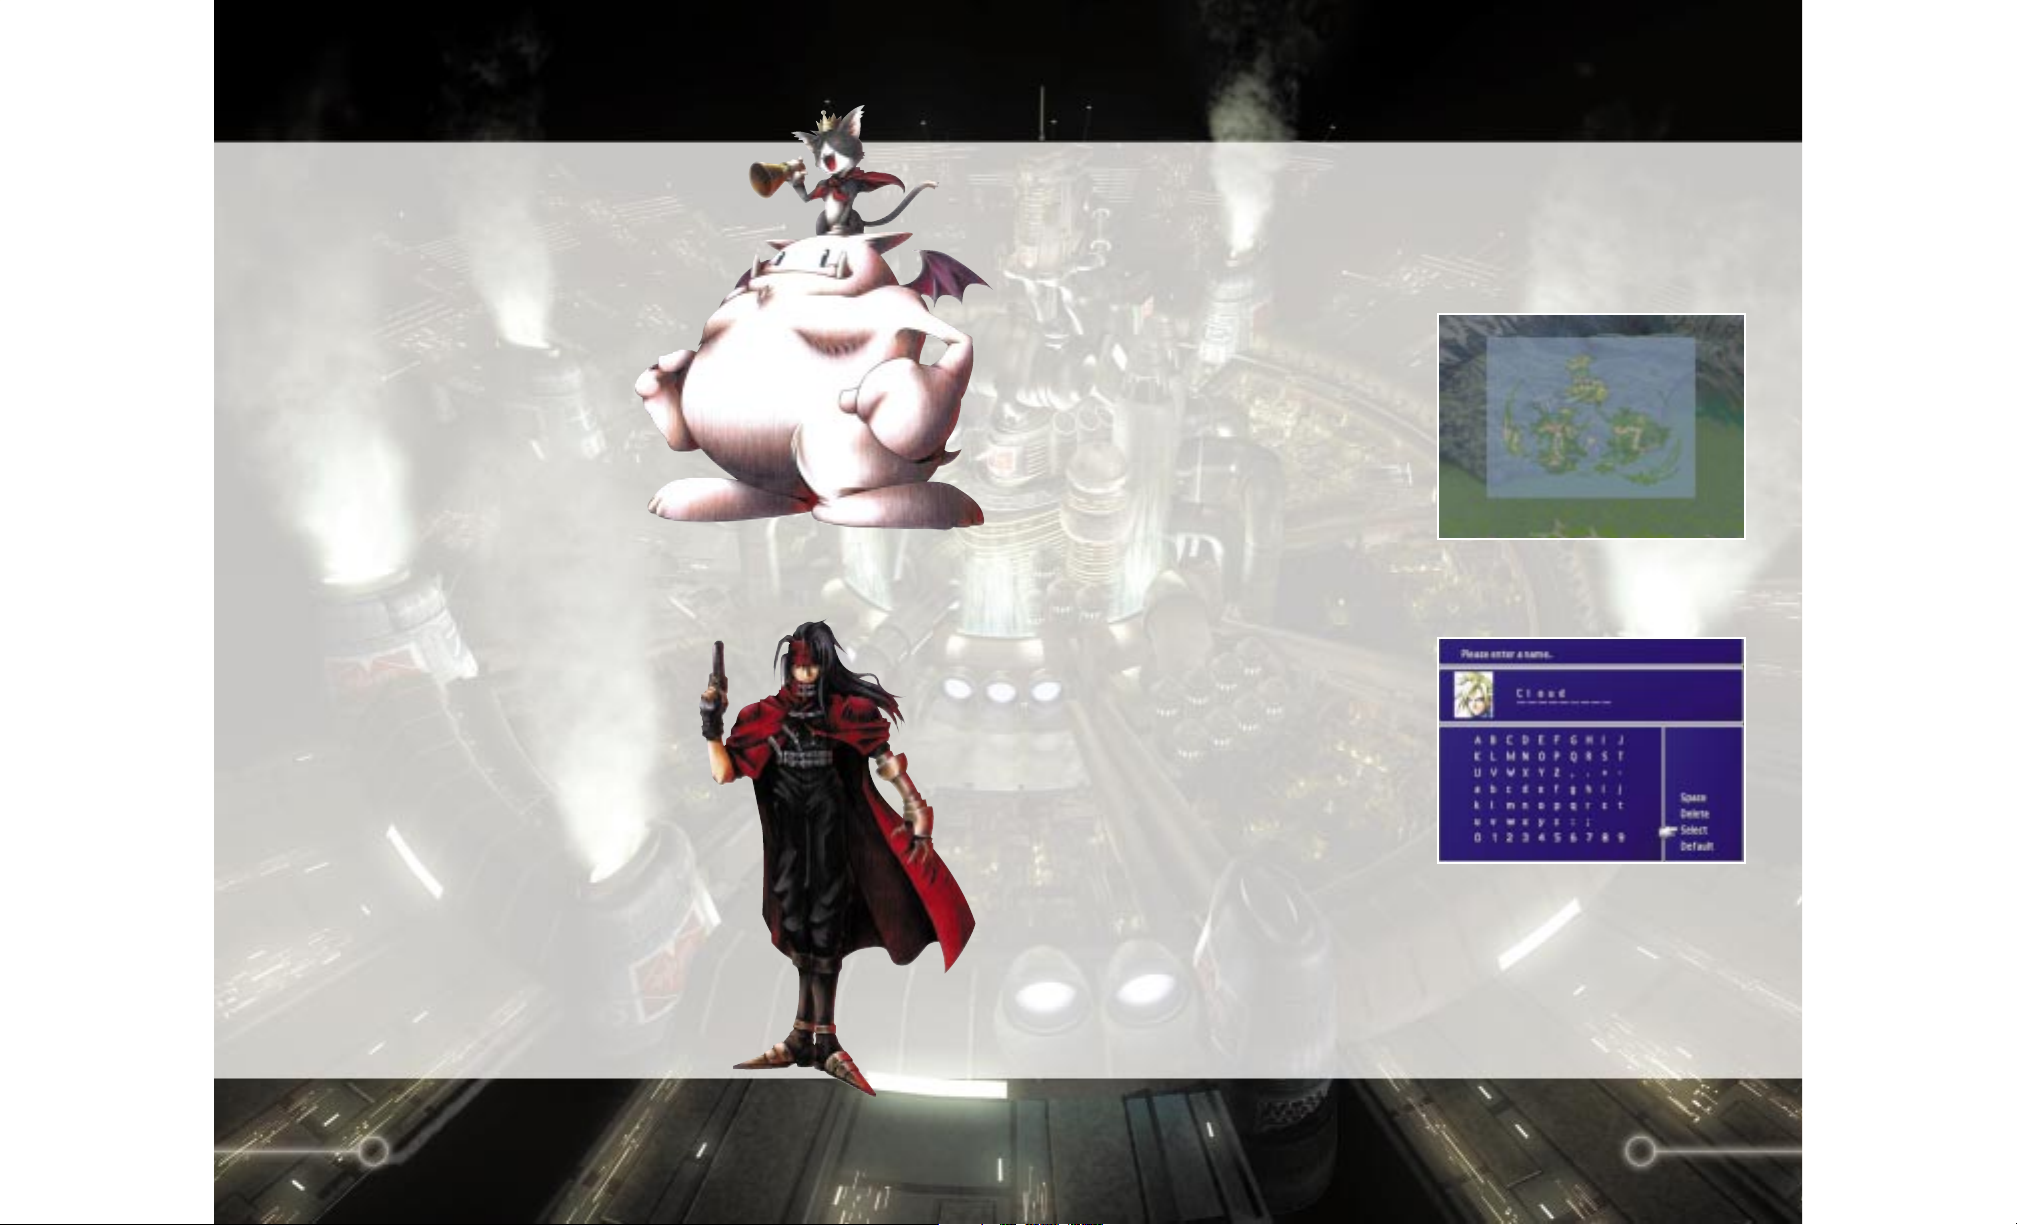
ENTERING NAMES
As you encounter each character,you will
be able to customize their name using up to
nine letters. If the default name is
acceptable,press the [START] button to
move the cursor to “Select”and push the
[OK] button. To change a character’s
name,select a letter using the Directional
Buttons and enter each letter using the
[OK] button or type in the name using the
keyboard. After a name is entered, select
“Select”. If you want to change back to the default name, select “Default”.
Press the [CANCEL] button to backspace and erase letters.
SELECTING MESSAGES
You can occasionally select a response or reaction when you are talking with
other characters in the game. Select the response or reaction by using the Up or
Down Directional Buttons,then press the [OK] button.
Field Controls
Page 9

18
19
There are various shops, inns,etc. throughout the world, where you can buy
things you need for your next adventure and rest. You can sell extra weapons
or items at any shop,except for inns. The following are some descriptions of
these establishments.
INNS
If you rest one night at most of the inns,the HP and MP of all party members
will be completely restored. Also,any abnormal status caused during battles
will be reversed. The cost depends on the inn.
WEAPON SHOP
Weapons and armor are available. Weapons are specific to each character.
(For instance, Gun-arms may only be equipped on Barret.) Armor may be
equipped on any character.
ITEM SHOP
A number of items with various effects,such as curative and offensive, are
available.
ACCESSORY SHOP
Various accessories are available. Once equipped,they will have various
special effects.
MATERIA SHOP
Materia are magic orbs that have a number of positive effects if equipped in
weapons or armor. Purchasing Materia is the same as purchasing other goods
in other shops; however, it cannot be purchased in bulk like items or weapons.
BEGINNER’S HALL
Located above the Weapon shop in the Sector 7 Slums near AVALANCHE
headquarters. It is not a shop,but if you talk to people at the Hall (and listen
to Cloud), you will learn many helpful things about playing the game.
EVENT GAMES
Some of the events that take place during your adventure require different
controller functions. For instance,there is an event in which you throw barrels
at enemies below you. There are other events where you compete,relying on
your amount of stamina. Tips may be hidden in messages and screens, so look
for them carefully before starting an event. In some cases you will have to
complete an event within a certain time limit. If you have to discontinue an
Event Game,you can finish the game after saving, or press the [START]
button during an Event Game to pause.
Shops, Inns, Etc.
A typical Battle screen looks like this:
1) Messages during battle are displayed here.
2) Graphics of the party members. The mark above a character’s head
indicates that you can now control that character.
3) Graphics of the enemy characters.
4) Press the [ASSIST] button to display the help window during battle.
Descriptions for the selected commands,monster names, etc. are displayed.
5) The names of the party members, with the Barrier gauge and the MBarrier
gauge are displayed. If the gauge is hidden behind the Command window,
you can bring it to the front by pressing the [SWITCH] button. At the
beginning of the battle,the Barrier and MBarrier gauges are empty,but if
you equip a Materia called “Barrier”,a magic that reduces the damage
sustained by half can be cast. You can fill up the upper Barrier gauge and
the lower MBarrier gauge by casting the Magic Spell only once,and the
defensive effect will last until the gauges reach zero. “Barrier”works as a
defense against the enemy’s physical attacks,while “MBarrier”works as a
defense against magic attacks. The “MBarrier”is recommended when you
fight boss-level enemies.
6) Commands that can be used during the battle. Depending on which
Materia is equipped, different commands can be used.
7) The status window shows the current status of the party members. Reading
from the left side of the window, you will see: current HP, maximum HP,
remaining MP, the Limit gauge and the Time gauge.
During battle,numbers will appear above your characters and enemies. White
numbers indicate damage,while green numbers indicate recovered HP or MP.
The Battle Screen
1
2
3
4
5
6
7
Page 10

20
21
Under each character’s HP and MP, there are gauges by which you can
immediately find the balance of HP and MP. The gauges will change from
their standard full color to red as they become depleted.
BATTLE FORMATIONS
In addition to the normal battle formations,enemies may also appear in the
following arrangements. Both your characters and enemies can receive twice
as much damage if attacked from behind.
Pre-emptive Attack
Allows you to enter commands prior to the enemy’s attack. This formation is
favorable to your characters.
Back Attack
An attack from behind your front defense and your rear defense will be
reversed. Furthermore, you will always be pre-empted. A real disadvantage
for your characters.
Side Attack
Enemies appear between your characters,allowing you to attack them from
both sides. Though you cannot change formations of your characters by using
the “Change”command, this formation is advantageous to your characters.
Attack from Both Sides
Your characters are caught in the enemies’ Side Attack. The enemies will
always preempt you, and you won’t be able to escape. You won’t be able to
attack all enemies with one magic spell, nor can you change formations using
the “Change”command. In this formation,your characters are at a great
disadvantage.
ATB (ACTIVE TIME BATTLE)
For battles in Final Fantasy VII,the ATB (Active Time Battle) system is
introduced. Whether ally or enemy, the character whose Time gauge fills up
first is given priority for entering commands. Choose commands in order to
best attack or to defend yourself from the enemy.
The Battle Screen continued
BATTLE COMMANDS
The following commands, displayed in the command window, change as you
proceed through the game,depending on the characters in your party.
ATTACK
You attack with equipped weapons. You can also fight your allies by selecting
them as attack targets. The same applies to the “Magic”command.
LIMIT
The Limit gauge starts filling up with each enemy attack. When the gauge is
full, it blinks,indicating Limit Break status. At this point,the “Fight”command
changes to the “Limit”command. By selecting the Limit command,the
character will be able to perform his or her unique attack called a Limit Break.
If the battle ends without using the Limit Break, you can carry it over to the
next battle. In this case, the Fight command will remain as the Limit
command. The more damage you sustain from the enemy, the faster the Limit
gauge fills up.
MAGIC
When you equip magic Materia on weapons or armor,the “Magic” command
becomes available and is displayed in the window. Select the magic you want,
and select who you want to cast it on. For instance, if it is attack magic, select
the enemy to attack, and if it is curative magic, select one of your allies. The
amount of MP consumed is the same whether it is magic that uses the Materia
effect of “All” on multiple enemies or a single enemy. (Magic effective on all
enemies is indicated by a red arrow next to the name of the Spell.) If magic
cannot be cast due to reasons such as insufficient MP, the name of the magic
will be displayed in gray.
ITEMS
Items that affect attacks and recovery can be used in battles. Select an item
and decide who will use it or against whom it will be used. If it is an attack
item, select the enemy. If it is a recovery item, select one of your allies.
CHANGE
This command will appear if you press the left Directional Button at the left
edge of the battle command window. With this command,you can change the
position of your characters from the front line to the rear. Characters at the
rear will incur less damage from the enemy, but their damage to the enemy
when attacking will be less. Placed at the front, the effect will be reversed. The
changed status will not be carried over to the next battle.
The Battle Screen continued
Page 11

22
23
DEFEND
This command will appear if you press the right Directional Button at the right
edge of the battle command window. If you use this command, damage
incurred will be reduced by half until the Time gauge fills up.
ESCAPE
If you hold down the [PAGEUP] and [PAGEDOWN] buttons simultaneously,
you may be able to escape from battle. Depending on your enemy and battle
formations,it is not always possible to escape.
OTHER COMMANDS
As you proceed, you will obtain many Materia. Among them are Materia that
will add commands that you can use during battle. For example,there is the
“Summon” command, the “Sense” command, and the “Enemy Skill” command.
Only characters equipped with the appropriate Materia can use these
commands.
END OF BATTLE
Battles end when you have destroyed all your enemies or when all enemies or
your characters have escaped. If you win the battle, Gil,items,experience
points (EXP), or ability points (AP) which affect Materia growth will be
awarded. Their values will vary depending on the type and number of enemies
destroyed.
GAME OVER
If all your party members are critically injured or are turned to stone,the game
is over. When the game ends,press [OK], and you will return to the opening
credit screen. Press [OK] again and you will go to the “NEW GAME/
CONTINUE?” screen. If you have saved data before, you can choose the
appropriate file to reload and continue the game. However, the data reverts to
what it was before the Game Over screen appears (including Gil, EXP, and
items obtained.)
The Battle Screen continued
STATUS CHANGES
If a character is attacked, his/her status may fall into “abnormal”status,such as
these listed below. In many cases,abnormal status can be cured during battles
using Materia like “Heal”or items like “Hyper”. Also,abnormal status will
normally disappear after a battle ends. However,“Critical”, “Death”,“Fury”, or
“Sadness” can only be cured using appropriate magic or items. Any abnormal
status can be cured if the character rests at an inn. In addition to the following,
there are other status conditions that can occur during battles.
The Battle Screen continued
Status Condition Cure
Sleep You cannot enter commands Magic “Esuna”,or enemy or
until the character wakes up. ally’s attack on the affected
character
Poison HP decreases every turn. Item “Antidote” or Magic
“Esuna”
Fury Doubles the damage incurred Item “Tranquilizer”
and causes the Limit gauge to
fill faster.Hit rate against
enemies is decreased.
Sadness Decreases the damage Item “Hyper”
incurred and causes the
Limit gauge to fill up slower.
Petrify The character is turned into Item “Soft”or Magic “Esuna”
stone,and commands cannot
be entered. If all characters in
your party are turned to stone,
the party is destroyed.
Confusion The character becomes Magic “Esuna”,or enemy or
confused and attacks allies ally’s attack on the
as well as enemies. affected character
Silence The character becomes Item “Echo Screen”or
unable to cast magic. Magic “Esuna”
Page 12

24
The Battle Screen continued
Status Condition Cure
Paralyzed The character becomes Magic “Esuna”
paralyzed and commands
cannot be entered.
Darkness Character’s vision is Item “Eye Drop” or Magic
obscured, and hit rate against “Esuna”
enemies is decreased.
Frog Character turns into a frog Item “Maiden’s Kiss”or
and the ability to attack and Magic “Transform”
defend is decreased. Magic
other than “Transform”
cannot be cast.
Small The character’s size is reduced Item “Cornucopia” or
and the ability to attack and Magic “Frog”
defend is decreased.
Critical HP levels are dangerously low. Item “Potion” types or
Magic “Cure” types
Death HP drops to zero and the Item “Phoenix Down” or
character is unable to do Magic “Life”types
anything.If all characters fall or Summon “Phoenix”
into this status,the party is
destroyed.
Slow Numb The character’s body Item “Soft”or Magic “Esuna”
gradually turns to stone,
after each turn.
Death Sentence A countdown begins,and at You must end the battle
zero the character becomes before count reaches zero
disabled.
Berserk Commands cannot be Magic “Esuna”
entered and the character
keeps continuously attacking
the enemy.
25
HOW TO VIEW MENU SCREENS
Menu screens can be displayed by pushing
the [MENU] button in the Field screen;
they contain the following information.
1) Current status of each party member.
Reading from the left: the character’s
image (face), name,level, current
HP/maximum HP, and current
MP/maximum MP are displayed. The
two gauges to the right indicate what is required to reach the next level or to
perform a Limit Break attack.
2) Commands available to you. However,some of the them, such as “PHS” or
“Save”, can only be used at certain locations. Also,“PHS” and “Materia”
commands can be used only after you obtain items “PHS”and “Materia”.
3) Total gameplay time and the total sum of Gil the party has.
4) The location of the party.
MENU SCREEN COMMANDS
Ten commands are available on the Menu screen; each explained below. To select
commands,use the Up and Down Directional buttons, and confirm by pressing
the [OK] button.
Menu Screens
1
2
3
4
Page 13

26
27
1. ITEMS
This command enables you to use items
mainly for recovery and cure,such as
“Potion”or “Phoenix Down”. If you select
this command, the screen shown on the
right will appear. If you want to use
commands other than “Use”,press the
[CANCEL] button,and select the
appropriate command.
Use
Choose this command to use items you possess. After selecting the item,select
the character on whom the item will be used. Any items that cannot be used
will be displayed in gray. Press the [PAGEUP] or [PAGEDOWN] button to
scroll up and down the list of items.
Arrange
Choose this command to arrange items. Items can be arranged according to
the following criteria:
Field - Items that can be used in the field are listed here first.
Battle - Items that can be used during battle will be listed here first.
Throw - Items that can be thrown in battle will be listed here first.
Type - Arrange by item types,such as weapons, armor, etc.
Name - In alphabetical order.
Most - Arrange by the number of items in the player’s possession,
greatest first.
Least - Arrange by the number of items in the player’s possession,
fewest first.
Key Items
Displays important items you currently possess,which will affect your progress
in the game.
Menu Screens continued
2. MAGIC
While you are in the Menu screen,you can
cast magic for recovery, cure,and check
magic like “Summon” or “Enemy Skill”.
When this command is selected,the screen
shown on the right will appear. If you press
the [PAGEUP] or [PAGEDOWN] button
before you select one of the three
commands listed below, other party
members can be selected without going
back to the menu screen. This applies to other commands, including “Materia”,
“Equip”,“Status”, and “Limit”.
Magic
Choose this command to use magic. After selecting the magic,decide upon
whom the magic will be cast. Magic Spells available to you are displayed in
white while those that cannot be used are displayed in gray. In order to cast
each magic,Materia must be equipped on the character’s weapons or armor.
Press the [PAGEUP] or [PAGEDOWN] button to scroll up and down the list.
Summon
Displays the available Summon magic (summon monsters) and their effects. In
order to cast the Summon Magic,Summon Materia must be attached to the
character’s weapons or armor.
Enemy Skill
Displays the current enemys attacks and their effects. In order to learn enemys
attacks,a Materia called “Enemy Skill” must be attached to the character’s
weapons or armor.
Extra Abilities
If special abilities have been gained by equipping Materia such as “All”, its
effects are displayed.
3. MATERIA
If Materia orbs are inserted into slots in weapons or armor,various abilities
become available. Select this command in order to equip Materia or to see its
abilities. To equip the Materia, move the finger cursor to the slot in the
weapon or armor,and press the [OK] button. Materia not equipped by other
Menu Screens continued
Page 14

29
28
characters are available,so choose the one
you want to use and press the [OK] button.
To remove Materia, select the slot where it
is equipped, and press the [MENU] button.
1) The number of slots available in the
weapons and armor currently equipped
on the characters are displayed here.
2) The ability of the Materia equipped in
the slot is shown.
3) Information on the equipped Materia,including the name of the Materia,
the level, the AP (Ability Point), the required AP to reach the next level,
future abilities,and the effects of the Materia.
Ability List
Abilities given to the character by equipping the Materia are displayed.
Available abilities are shown in white. Abilities shown in gray are not yet
available.
Equip Effects
By equipping certain Materia, a character’s Strength, Magic, MAX HP
(maximum HP), or MAX MP (maximum MP), may change. If any of these
values increase,the increased value will be shown in yellow. If they decrease,
the decreased value will be displayed in red.
AP (Ability Point)
The APs (Ability Points) gained up to now for that Materia. APs are gained if
you win battles. Materia that is not equipped on weapons or armor (that is,if
you just possess it), will not obtain APs. If the AP exceeds the value of “to the
next level” shown on the right, the Materia level goes up, and the number of
available abilities increases and the effects will be stronger. Most Materia can
go up to level 5.
Move the finger cursor to “Check”and press the [OK] button. Commands and
Magic available to the character during the battle due to the equipped Materia
will be listed.
Menu Screens continued
By using “Arrange”, un-equipped Materia can be arranged, or all equipped
Materia can be removed at once. Also,any excess Materia can be disposed of.
Use “Exchange”to switch Materia between all party members, whether they
are present or not.
Move the finger cursor to the slot for Materia and push the [OK] button.
Materia in your possession (not equipped) and their effects when equipped are
displayed.
MATERIA TYPES
Various types of Materia appear in the game. Materia can be divided into five
groups based on their abilities.
Independent Materia
Purple Materia. This enhances the character’s Status, such as maximum HP
and strength.
Support Materia
Blue Materia. This Materia,such as “All” or “Elemental”,shows full effect
when used in conjunction with other Materia. Make sure you insert this
Materia in linked slots (either slot is OK) when equipping this Materia in a
weapon or armor. Insert Command Materia or Magic Materia in the other
slot. The effects of these Materia will be enhanced with Support Materia.
Command Materia
Yellow Materia. This will increase the number of commands that can be used
during battle,such as “Steal” and “Throw”.
Magic Materia
Green Materia. This will enable you to use Spell Magic and Curative Magic.
Summon Materia
Red Materia. This will enable you to cast Summon Magic during battle,in
order to call a Summon Monster.
Menu Screens continued
Page 15

30
31
4. EQUIP
This command equips characters with
weapons,armor, and accessories. Even if
weapons or armor have been acquired, they
will not become effective unless equipped.
Weapons
Once a character has equipped weapons,their Attack Power and Attack %
Status will change. (To view the Status, choose the weapon currently equipped
and press the [OK] button.) If you have other weapons available to equip,
they will be displayed in the lower right box. Select the weapon to equip, and
press the [OK] button. The Status change is shown in two columns in the
lower box. The left value indicates the Status of the equipped weapon,while
the right indicates the Status of the one you want to equip. Yellow numbers
mean that the Status will increase,and red numbers mean that they will
decrease. To remove the equipped weapon, select that weapon and press the
[OK] button.
Armor
When a character is equipped with armor,the Defense, Magic Defense, and
their percentages will change. Armor equips in the same fashion as weapons.
Materia slots
The number of Materia slots in corresponding weapons or armor is indicated
here. The linked slots are for using Support Materia and other types of
Materia in conjunction to increase the power of abilities.
Materia Growth
The growth speed of Materia is indicated. The speed varies depending on the
weapons and armor. “Normal” does not change the speed, but “Double”
doubles the APs obtained. On some weapons and armor, Materia does not
grow at all.
Accessories
Various effects can be gained by wearing accessories. Some accessories change
the character’s Status. Accessories equip in the same fashion as weapons and
armor.
Menu Screens continued
5. STATUS
The current Status of the character is
displayed. Press the [OK] button to display
current properties.
1) The current condition of each party
member is displayed. Reading from the left
are: the character’s image (face), name,
level, current HP/maximum HP, current
MP/maximum MP, and total EXP. Also,
there are gauges that indicate required EXP to reach the next level and
required Limits to perform Limit Break attacks.
2) Each party member’s current Status values are shown here. Reading from
the top are: Strength, Dexterity,Vitality, Magic, Spirit,Luck,Attack, Attack %,
Defense,Defense %, Magic Attack,Magic Defense, and Magic Defense %.
3) A window listing battle commands available to the character is displayed.
Weapons equipped on the character, number of Materia slots,types (colors) of
Materia equipped, and accessories equipped on the character are displayed.
1) ELEMENTS
By equipping certain weapons,armor, or accessories, each character can gain
special Elemental Abilities useful for both offense and defense. When the
character obtains these Elements,the name of each Element is shown in white.
The nine Elements are Fire,Ice, Lightning, Earth, Poison,Gravity,Water, Wind,
and Holy.
Attack
When you attack enemies who have certain Elements as their weak points,you
will cause twice as much damage. On the other hand, if the enemy is resistant
to those Elements,you will cause only half as much damage, or in the worst
case,the damage may become void or absorbed.
Menu Screens continued
Page 16

32
33
Attack Effects of Each Element
Fire - Effects of fire. Effective against beasts and ice enemies.
Ice - Effects of ice. Effective against enemies weak against cold,
or fire enemies.
Lightning - Effects of lightning. Effective against mechanical enemies.
Earth - Attacks utilizing the power of the earth. Not effective
against flying enemies.
Poison - Poisons opponents. Not effective against poisonous enemies.
Gravity - Attacks utilizing power of gravity.
Water - Calls on the power of water. Effective against fire enemies.
Wind - Calls on the power of wind. Effective against flying enemies.
Holy - Calls on the power of the planet. Effective against the
creatures of darkness.
Half reduction - When attacked by enemies with certain Elements, the
damage incurred will be reduced to one half.
Void
When attacked by enemies with certain Elements,no damage will be incurred.
Absorb
When attacked by enemies with certain Elements,the damage will be absorbed
and added as your own character’s HP.
2) EFFECT
Certain weapons and armor provide enemies with abnormal status,or protect
you from those abnormal status. If any of the weapons or armor currently
equipped has such effects,the name of the abnormal status will be displayed in
white.
Attack
When attacking the enemy, in addition to inflicting the usual damage,you can
also inflict an abnormal status effect (for example,Poison, Sleep).
Defense
When the enemy tries to cause abnormal status to the character,the attack by
the abnormal status effect can be avoided (for example,Poison, Sleep).
Menu Screens continued
6. ORDER
This command is used to change the
characters’ positions or to move them to
the front or the rear of the ranks. Select
the character,and choose the location to
move the character (or choose the
character to switch places with). To change
the character from the front line to the
rear,move the finger cursor to the
character and double-click the [OK]
button.
Front
By moving your character to the front,Attack Power will increase,and
Defense will decrease. Attack Power and Defense against Magic doesn’t
change.
Rear
By moving your character to the rear,Defense will increase,and Attack Power
will decrease. Attack Power and Defense against Magic doesn’t change.
7. LIMIT
By using this command, you can perform
Limit Break attacks when your character
reaches Limit Breaks during battles. You
can also find out the effects of the attacks.
Limit gauges are displayed at the upper
right corner,which shows the progress
towards the next Limit Break.
Initially, you can only use Level 1 attacks,but as you go through a number of
battles,the characters will learn higher level attacks. To select an attack to
perform, move the finger cursor to “Set”and press the [OK] button. Then
select the “Break Level”shown in white at the bottom of the screen. You will
be asked whether you want to change the Break Level. If you want to change
it, choose “Yes”, and the limit gauge will return to zero; if not, choose “No.”
Menu Screens continued
Page 17

34
35
To find the effects of the Limit Break attacks, move the finger cursor to
“Check” in the screen, and press the [OK] button. Select the level of the
attack you want to check, then select the attack’s name.
When Your Status is “Fury” or “Sadness”
If your status becomes “Fury”,the Limit gauge fills up faster and is shown in
red. If your status becomes “Sadness”, the limit gauge fills up slower and is
shown in blue. Abnormal conditions such as Fury or Sadness can be cured
with the appropriate items or magic.
8. CONFIGURATION
By using this command, you can change the
game system according to your preference.
Use the Directional Buttons to select
various options,then press the [OK] button
to confirm.
Window Color
Mixing the three colors,RED,GREEN,and BLUE can change the colors of
the window background. Press the [OK] button in order to move the finger
cursor to the right window. Use Directional Buttons to select the corner of the
box you wish to change,then press the [OK] button. Change colors using the
Right and Left Directional Buttons,and press the [CANCEL] button. When
you have finished changing colors of all four corners,press the [CANCEL]
button again.
Sound
You can adjust the sound and music volume by pressing [OK] and then the
Right and Left Directional Buttons at either the music or sound volume bar.
When you have finished adjusting the volumes,press the [CANCEL] button.
Menu Screens continued
Controller
The controller settings can be changed to
Normal or Customize. To choose
Customize,press the [OK] button to display
the window, then press the [START]
button. The finger cursor will appear to the
left of the buttons in the box. There will be
a keyboard column and a controller
column, choose the column that matches
your control scheme. Select the button
command you want to change by using the
Up and Down Directional Buttons. Press [OK] to change the button, then
press the keyboard key or controller button you want assigned to that function.
Note: If you are using a control pad or joystick, it must be calibrated and
configured through DirectX 5.0 game controllers settings. You may not have
all the button commands available if you do not have enough buttons on your
controller. When you finish customizing your button settings,press the
[CANCEL] button to exit.
Cursor
Even after you close the window, the last position of the finger cursor can be
stored.
ATB
You can set the time flow during battles to one of the following three options:
Active - For skilled players. Time passes even while you are
selecting commands such as Magic and Items.
Recommended - For moderately skilled players. Time stops while the
screen effects are displayed when using Magic and Items.
Wait- For beginners. Time stops while you are selecting
commands such as Magic and Items.
Battle Speed
Speed of time flow during battles can be changed.
Battle Message
Message speed during battles can be changed.
Field Message
Message speed in the Field screen can be changed.
Menu Screens continued
Page 18

36
37
Camera Angle
Screen angles during battles can be changed.
Auto- The camera angle (view) changes constantly,making the
battle exciting and realistic.
Fixed - The camera angle is fixed to a specific angle when you
encounter enemies. The battle continues at this fixed angle.
Magic Order
When selecting Magic to cast during battles,you can choose between six types
(No.1 through No. 6) of sequences for listing Magic in the window.
9. PHS
Once you have more than three members in your party, two members besides
Cloud must be chosen. To do this,an Item called “PHS” is required (except for
certain Events). This Item will become available to you during the game.
However,members can be switched only in the World Map screen and at Save
Points. Switch party members as follows:
Select the character you want to remove from your party. Move the finger
cursor to the character,and press the [OK] button. (If you press the [OK]
button again, details on that character will be displayed. However,information
on Cloud will not be available.)
Move the finger cursor to the other characters. Select the character you want
to add to the party, and press the [OK] button. (If you move the finger cursor
to a character and press the [OK] button twice,details on that character will be
displayed.)
10. SAVE
Execute this command at a Save point to save your game contents up to that
point to your computer’s hard drive. In the World Map screen, regardless of
your location, you can save the game by pressing the [MENU] button and
opening the Menu screen.
In order to save the game in the Field screen,move the character to a Save
point. A window explaining ways of saving will appear. Close the window by
pressing the [CANCEL] button,and open the Menu screen by pressing the
[MENU] button. Select the “Save” command by using the Directional buttons
Menu Screens continued
and press the [OK] button. Select from Save File 1-10. Use the Up and Down
Directional buttons to select the file in which you want to store the saved data
and press the [OK] button. Though only three files appear on the screen,other
Save Games will appear if you press the Up and Down Directional buttons.
Up to 15 Save Games can be stored in each Save File for a total of 150
individual save games.
You can easily e-mail your Save Files to friends by attaching the save file(s) to
an e-mail. The Save Files are all located in a separate directory on your hard
drive where you installed Final Fantasy VII. For example, if you installed Final
Fantasy VII to the “C:\Program Files\Square Soft,Inc.\Final Fantasy VII”
directory, your Save Files will be located in the “C:\Program Files\Square Soft,
Inc.\Final Fantasy VII\Save”directory. The Save Files are named
“SAVE00.FF7” to “SAVE09.FF7,”which correspond to Save Files 1-10. So, if
you want to send your Save File 1 to someone,simply attach “SAVE00.FF7” to
your e-mail and send it!
QUIT
Select and press [OK] at this option if you
want to quit playing Final Fantasy VII. You
can also quit during the game by pressing
CTRL+Q in the Field Map,World Map or
Battle System. You will be prompted with
a “Yes or No” option. Choose “Yes” to quit
or “No”to play on.
VEHICLES & MACHINES
As you proceed in the adventure,you will be able to travel in a variety of
vehicles. By using these vehicles,places not accessible by foot can be reached.
Many different vehicles and machines will become available during the game.
Instructions on using each vehicle will appear as you use it for the first time.
Menu Screens continued
Page 19

38
39
SQUARE CO. LTD.
Producer
Hironobu Sakaguchi
Director
Yoshinori Kitase
Music Composer
Nobuo Uematsu
Main Programmer
Ken Narita
Character Design & Battle
Visual Director
Tetsuya Nomura
Art Director
Yusuke Naora
Image Illustrator
Yoshitaka Amano
CG Supervisor
Kazuyuki Hashimoto
Movie Director
Motonori Sakakibara
Character Modeling
Director
Tomohiro Kayano
Battle Effect Director
Hirokatsu Sasaki
Special Magic Effect
Director
Shintaro Takai
Battle Stage Director
Akira Fujii
Outside Contractor
Coordinator
Hiroyoshi Hamada
Graphic Outside
Contractor
Art Director
Hitoshi Sasaki
Animation Director
Hidetoshi Omori
Battle Plan Director
Yasushi Matsumura
Map Plan Director
Hidetoshi Kezuka
Map Plan Co-Directors
Takeshi Endo
Motoharu Tanaka
Masato Yagi
Main Character Modeler
Hiroshi Arai
Battle Programmer
Hiroshi Harata
Character Programmer
Hiroshi Kawai
CD & Movie Programmer
Shun Moriya
Sound Programmer
Minoru Akao
Sound Engineer
Eiji Nakamura
MA & Recording
Engineer
Kenji Nagashima
Story by
Kazushige Nojima
Yoshinori Kitase
Based on the story by
Hironobu Sakaguchi
Tetsuya Nomura
Executive Producers
Tetsuo Mizuno
Tomoyuki Takechi
SQUARE SOFT, INC.
Senior Vice President
Yoshi-Hiro Maruyama
Executive Producers
Masahiro Nakajima
Randall Fujimoto
Vice President,Marketing
Jun Iwasaki
Senior Software Engineers
Anthony Ignacio
Son Ton
Software Engineers
“William”Feng Chen
Scott Coventon
Jay Fong
Kazumasa Fuseya
Akintunde Omitowoju
Rajiv Patel
Yoshinori “Goro”Uenishi
Graphic Artist
Jason Greenberg
Production Manager
Yumi Yoshida
Associate Producer
Akihito Kozu
Localization
Michael Baskett
Technical Translation
Aiko Ito
David Jones
Marketing
Kenji Mimura
Kyoko Yamashita
Lisa Ahern
Business Development
Elaine DiIorio
Network Administration
Sami Zuhuruddin
Customer Service
Rick Thompson
Fernando Bustamante
Quality Assurance
Manager
Jonathan Williams
Lead QA Analysts
Richard Amtower IV
Clayton S.Chan
Tymothi V. Loving
Quality Assurance
Sean Camanyag
Sissie Chang
Mike Givens
Stephen A. Holder
Andy Hsu
Terry Y. Jung
Kirk Lambert
Vangthonhoua Moua
Stanford Ng
Robert Smith
Takahiro So
Jamie Wiggs
EIDOS
INTERACTIVE (U.S.)
Producer
Frank Hom
Director of Development
James Poole
Quality Assurance
Manager
Mike McHale
Lead QA Analysts
Corey Fong
Quality Assurance
Clayton Palma
Eric Adams
Jeremy Hunter
John Arvay
Matt Miller
Mike Gilmartin
Mike Schmitt
Rudy Ellis
Timothy Moore
Tom Marx
VP of Marketing
Paul Baldwin
Product Manager
Gary Keith
Creative Services Director
Sutton Trout
Public Relations
Gary Keith
Tricia Gray
Production Manager
Jo Kathryn Reavis
Manual Design
Moore & Price
Frank Hom
Special Thanks
Charles Cornwall
Dave Cox
Keith Boesky
Mike McGarvey
Phil Campbell
SQUARE SOFT, INC.
EIDOS (EUROPE)
Associate-Producer
John Ng
Director of Development
Steve Hickman
Localization Manager
Flavia Timiani
Marketing Managers
Cindy Church - England
Sebastien Salinie - France
Christian Zoch - Germany
Mercedes Rey ñ Spain
French Text Localization
Corinne Racineux
Celine Bellini
German Text Localization
Tetsuhiko Hara
Elke Kleinofen
Spanish Text Localization
David Carillo
Public Relations
Steve Starvis - England
Sascha Green-Kaiser Germany
Priscille Demoly - France
INTERMETRICS, INC.
Yoji Takenaka
Jeff E.England
Joseph Alemanni
PÂl-Kristian Engstad
Michael Kelleghen
YAMAHA
CORPORATION
Susumu Kawashima
Naoyuki Makinose
Toshiaki Kaburagi
Tad Aoyama
Yasunori Ogawa
SPECIAL THANKS
3Dfx Interactive,Inc.
Intel Corporation/Intel
K.K.
Microsoft
Corporation/Microsoft
K.K.
The Duck Corporation
NEC Electronics Inc.
ATI Technologies Inc.
NVIDIA Corporation
Rendition, Inc.
3DLabs,Inc.
Creative Labs,Inc.
Diamond Multimedia
Systems,Inc.
Matrox Graphics Inc.
S3 Inc.
BradyGames
CHOCOBO
If you have a Materia called “Chocobo
Lure”, you can catch a Chocobo in certain
areas in the World Map screen by walking
on the Chocobo’s tracks. Chocobos can
move around areas you cannot reach by
foot, such as rivers,seas,and mountains
(different Chocobos have different
abilities).
You can get off a Chocobo by pressing the
[CANCEL] button,once you do the Chocobo will run away. You cannot ride
the same Chocobo more than once. In order to ride another Chocobo, you
must catch one again. Riding a Chocobo is the same as walking except for the
use of the [CANCEL] button.
Are you stuck?
Call the Eidos Hint Line at: 1-900-773-4367
Menu Screens continued
Credits
Page 20

40
41
The “Tips for First Timers” section lists lots of helpful bits of information that
every gamer should know.Don’t worry though—the tips don’t give away anything
that could spoil the game for you.
Presented by
Written by
David Cassady
FIN AL FANTASY
®
VII:
M
INI STRATEGY GUIDE
INTRODUCTION
Are you ready to take your first step into Midgar?
If not, then take a moment to peruse our “Tips for First Timers.”If you’re really
stuck and don’t know what to do,check out our “Mini Walkthrough.”
You may even want to take a quick
look at the “Mini Walkthrough.”
This is just a short,hand-holding
walkthrough of Cloud’s first
mission with Avalanche.
It’s very important to
note,however,
that this section
gives away
everything about
Avalanche’s
assault on
Shinra’s North
Mako Reactor.
TABLE OF CONTENTS PG.
TIPS FOR FIRST TIMERS..................42-44
GENERAL TIPS ......................................42
ITEMS .....................................................42
WEAPONS & ARMOR............................42
MATERIA & SPELLS..............................43
BATTLE ..................................................44
WALKTHROUGH:
ASSAULT ON REACTOR NO. 1......46-50
So,if you
don’t want
to know,
don’t look!
The “Mini
Walkthrough”also helps
you become accustomed to
Final Fantasy VII’s gameplay
and provides a lot of useful tips
that will come in handy later in
the game.If you enjoy this
section, make sure you check
out the ad in the manual
on how you can order
the BradyGAMES
Official Guide to
Final Fantasy VII.
Page 21

42
43
• You don’t need to purchase each new weapon and piece of armor you find. You should
keep your main party outfitted in the latest gear,but only buy for inactive characters if
you have an overabundance of Gil.
• Your armor and accessories can seriously effect the outcome of a battle. For example,an
enemy that uses nothing but water-based attacks will have trouble injuring someone
equipped with the Water Ring.
• Items like the Water Ring enable your party to use normally harmful spells for healing
purposes.
Materia & Spells
• Over the course of your adventure you’ll have the opportunity to buy lots of Materia.
Although you can find most of it just lying around, you may want to buy a second Materia
crystal for essential spells like Cure and Life.
• All is one of the most valuable Materia for eliminating multiple enemies.But it can also
be teamed up with a Materia that gives the entire party bonuses,like Restore or Time.
• Each Materia gives the equipped character certain bonuses and penalties. Avoid
overloading characters with Materia that have heavy penalties or you may seriously
decrease the character’s effectiveness.
• Summon Materia is sometimes difficult to find.You should search everything and
everywhere as you explore.If you can’t enter an area now,return later and the path may
have opened.
• Some of the most valuable spells cause no damage at all and are commonly overlooked.
If you want to master Final Fantasy VII, you must learn how to effectively use Materia
like Time and Mystify.
Tips for First Timers
Is this your first Final Fantasy adventure? If so, then the following tips are especially
for you.While you’re playing,keep in mind that even “veterans”of the Final
Fantasy series may find the following information useful for brushing up on their
adventuring skills.
There are certain truths that are universal to the worlds of Final Fantasy. Knowing
these truths will make your quest less frustrating and considerably more enjoyable.
So before you charge into Midgar,take a few moments to arm yourself with the
ultimate weapon: Knowledge!
General Tips
• Save often—you never know what lies around the next turn.
• Talk to everyone—several times. Some characters won’t spill their guts the first time you
speak to them; however,they’ll tell you everything the second and third times around.
• Major events in the game often change what some characters say and do.If something
earth-shattering occurs,revisit nearby villages to see if anything has changed.
• After acquiring a vehicle,leave it in a place where you can easily retrieve it. Otherwise, you
can easily get completely cut off from your transportation.
• Riding Chocobos is a fun way to get around quickly, but it’s not always the best choice. The
random battles that occur while traveling between towns are critical for raising your levels
and fattening your wallet.
Items
• Carry lots of Potions,Ethers, and Phoenix Downs. These items help the most during battles
where your magic runs dry.
• Most status effects—either good or bad—only last until the end of a battle.You should
carry a few of the items that cure such effects (four or five tops) just to be safe.However,
don’t waste Gil loading yourself down with a ton of useless supplies.
• Look for special items like Power Source and Guard Source to give your characters a
boost. Each “Source” permanently increases one of your character’s statistics by a point.
Weapons & Armor
• Always equip new armor and weapons when you obtain them.You should occasionally
check your inventory to make sure you didn’t miss the addition of a new item to your
inventory.
• The strongest weapon is not always the best choice.Always take into account how much
Materia a weapon can store and what kind of effect it has on the Materia’s growth rate.
Tips for First Timers
Page 22

44
45
Battle
• Characters equipped with short-range weapons (swords,staffs,etc.) cause less damage
while standing in the back rank. Even if they’re in the front ranks,they still cause less
damage if they’re forced to attack an opponent’s back ranks.
• Characters equipped with long-range weapons can attack from the front or back rank
without weakening their attacks.They can also attack an opponent’s back rank without a
loss of power.
• You can only hit some enemies (mainly Bosses) with long-range weapons. Even if your
character’s best weapon is best suited for close-range attacks,make sure you keep a longrange weapon in your inventory just in case.
• Each player will progress through the game at a different speed.Depending on how
quickly you find your way around, you may occasionally need to “build”your levels or fill
your pockets with Gil.To accomplish this, roam around near a town and fight the local
hordes of enemies,resting at an Inn when necessary.
• After becoming familiar with the enemies in an area,take a few moments to re-equip
your team. For example, if you’re facing ice beasts,equip lots of Fire Materia and
accessories that protect you from ice attacks.
Tips for First Timers
WARNING!!!
The following section is a handholding walkthrough of Cloud’s first
encounter with the rebel group
Avalanche.In the walkthrough,many
things are revealed,which may spoil
some of the surprise.If you’re
feeling totally lost and don’t know
what to do,refer to this section
for advice.If,on the other hand,
you have a good grasp on what
to do,play through the area
first before consulting the
walkthrough.
Page 23

46
47
After meeting several members of the rebel group known
as Avalanche, Cloud joins their effort to bomb Shinra’s
Mako Reactor No.1. Shinra’s forces heavily guard the
plant, so the group hijacks a train bound for the adjacent
slums.
The guards at the station are easily overpowered as the mission quickly gets
underway.Cloud exits the train and must follow the rest of the team off the
platform. Make sure you check the downed guards to collect two Potions. Before
Cloud can reach the end of the platform, two MPs initiate combat with Cloud.
But don’t worry, this is one of the few times Cloud has to
fight alone.Even so, the MPs aren’t much of a threat.Cloud
and his companions are more than a match for most of the
enemies you’ll face in the Mako reactor.After the battle,
follow Cloud’s companions to the reactor gate and then into
the reactor itself.
Two security doors block the only passage in or out of the
Mako reactor (A). Speak with Biggs and Jessie and they’ll
open the gates.Don’t enter the elevator just ahead until
after you’ve picked up the Phoenix Down (B) in the
control room to the right.
Battle Tip: In most of the early battles,you’ll only use your
characters’ normal attacks.You can cut down the selection
time by holding [OK] as a character’s Time Bar finishes
filling.This automatically selects your normal attack and the
closest enemy.
Despite the rebel band’s doubt surrounding Cloud’s allegiance,the team quickly
infiltrates the reactor.The ever-cynical Barret explains the reason for Avalanche’s
existence: It seems Shinra’s Mako reactors are depleting the planet’s Mako energy.
If Shinra isn’t stopped,the whole planet may die.Because so few people
understand the Mako,Avalanche may be the only hope of saving the lives of
millions.
In true mercenary fashion, Cloud makes it clear that his
interests lie elsewhere.At this point, Barret joins Cloud for
the rest of the mission.
B
A
Assault on Mako Reactor No. 1 Assault on Mako Reactor No. 1
Page 24

48
49
Follow Jessie out of the elevator (C) and into the
reactor (D).After giving you a quick lesson on using
ladders,she steps aside as you continue deeper into the
reactor.Make sure you grab the Potion resting just in front of
Jessie’s sentry position.
Note: The party will find many useful items
like Potions lying around different areas of
the game.Keep your eyes
open or Cloud may run
right past one.
After traveling a little further,
the party encounters tougher
enemies,plus you get your first
chance to save the game.Step
on the Save Point,access the
Menu,and then choose Save.
You should also use this
opportunity to heal the party
before moving onward.
D
C
As Cloud approaches the Mako reactor,he finds a “Restore” Materia on the floor—
unfortunately he can’t do anything with it right now. You’ll
often find some Materia lying on the ground;however,
others will be less obvious.
When you approach the reactor,Barret makes Cloud plant
the charges.After the attempted intervention of a
mysterious voice,Cloud happily obliges.Unfortunately,
their actions trigger an alarm that alerts Shinra’s forces to their presence.
Assault on Mako Reactor No. 1 Assault on Mako Reactor No. 1
Battle Tip: Some enemies have a weakness
or immunity to at least one type of
element.For example,Ice-based creatures
falter against fire,but are healed by any type
of ice-based attack.In this area of the game,
you’ll run into several mechanical enemies,
like the Sweeper.You can short-circuit these
motored menaces with the Bolt spell.
Boss Fight: Guard Scorpion
Although the Guard Scorpion has some deadly attacks,Cloud
and Barret’s combined strength should be more than enough
to punch its ticket.
Start the battle by having Cloud pummel the Scorpion
(another mechanical creature) with constant Bolt spells while
Barret uses his normal attack.
Battle Tip: Keep your eye on Cloud and Barret’s hit points
(HP). If either falls below 100, use Potions to heal them.
After several attacks,the Guard Scorpion raises its tail and begins
to shake violently, at which point Cloud warns Barret to be
careful.When this occurs,stop your attacks.Attacking the Boss
during this time causes it to counterattack with its super weapon,
the Tail Laser.This move causes close
to 75 points of damage to both
characters.When the Boss returns to
its normal stance,continue your
regular attack pattern.
Page 25

50
51
As Cloud makes his way through the pipes and support
structures,he finds Jessie stuck where he had left her.Help
Jessie release her foot and then follow her to the exit.If
you fail to rescue Jessie,you won’t be able to open the
security doors above.
When you reach the security doors,speak with Jessie and
Biggs again.They’ll release the locks for you.If you made it to this location
quickly—and the party is still in good health—use this time to fight some enemies
in the area.This is a great opportunity for the characters to easily gain a level. In
addition, they will be fully healed when they get outside.When you’re ready, run
Cloud out of the area and watch Mako Reactor No.1 burn.
Congratulations on your first successful mission!
However,the fight against Shinra has only just
begun.There are numerous Mako reactors and
AVALANCHE’s forces are sparse.This will be a
battle not easily won.
Includes detailed
walkthrough of the game,
level maps,
bestiary,
and the locations
of all Materia.
Plus lots of other surprises!
ORDER THE OFFICIAL STRATEGY GUIDE
FOR THE MOST ANTICIPATED
RPG EVER!
O
RDER THE OFFICIAL STRATEGY GUIDE
FOR THE MOST ANTICIPATED
RPG EVER!
To Order: Call T oll
Free 1-800-428-5331 or
visit your local book or
game retailer.
ISBN: 1-56686-782-7
To Order: Call T oll
Free 1-800-428-5331 or
visit your local book or
game retailer.
ISBN: 1-56686-782-7
Assault on Mako Reactor No. 1
Only
$
19
99 US
Only
$
19
99 US
The Guard Scorpion is easily destroyed.Now Cloud has only 10 minutes to
evacuate the Mako reactor before the bomb explodes.
Before running for the exit, quickly equip Barret with the Assault Gun that gets
left behind by the Boss.You may want to save your game on your way out just in
case something unexpected occurs.
Note: The timer runs continuously,
so you need to quickly finish your
battles.If time is short, you can
run from your enemies by
pressing [PAGE UP] and [PAGE
DOWN] simultaneously.
 Loading...