


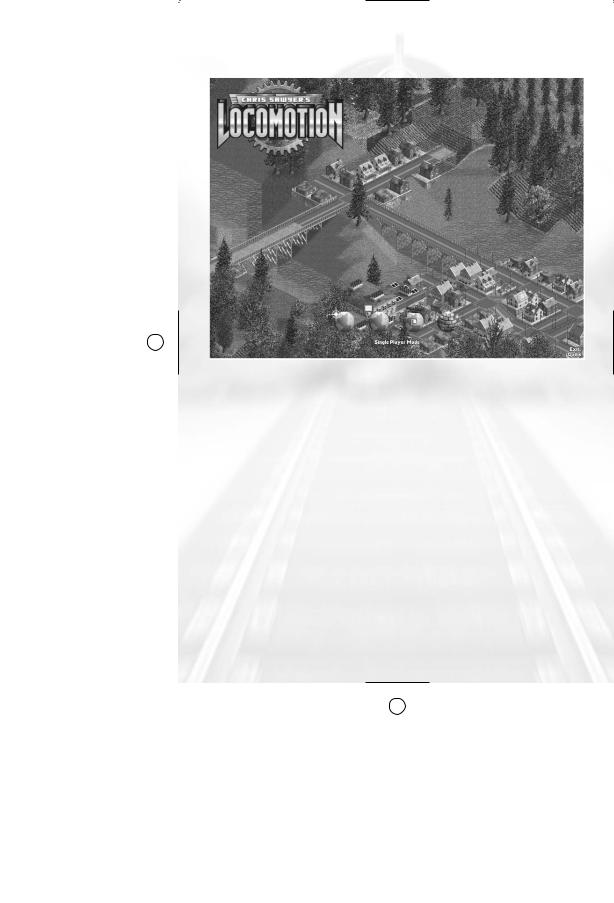
2

INTRODUCTION
One of the most common questions people ask me is, “How many are there in your development team?” Most expect an answer of at least five, maybe 10, even 15 people or more — like most, if not all, other games development teams. They are usually stunned to learn that I create my games with only the help of a freelance graphic artist and a musician. I do all the design, programming, project management and research myself. Does this mean my games can’t be as good as those developed by large teams? Not at all. In fact, I think many game designs suffer from having too many people working on them, losing their individual character and becoming games that look and play like so many others. Of course, the amount of work involved in creating a modern game is immense, and when you don’t have a large team it can take a long time.
Chris Sawyer’s Locomotion™ started life in 1999 after I completed RollerCoaster Tycoon®, but has much earlier roots. In the early 1990s, I created the game Transport Tycoon, which was a tremendous success. In 1996, I wanted to start from scratch on a sequel to Transport Tycoon, and put a lot of work into it, but then something came along and distracted me — roller coasters! So, the whole project was gradually re-shaped into what we now know as RollerCoaster Tycoon, one of the best-selling PC games of all time. In 1999, I resumed work on the Transport Tycoon sequel, but once again I postponed the project while creating RollerCoaster Tycoon 2. In fact, RollerCoaster Tycoon 2 was created using large parts of the programming intended for this game. Once RollerCoaster Tycoon 2 was complete, the sequel got my full attention again, and after two more years of work, the game is at last completed.
In some ways, Chris Sawyer’s Locomotion is a very simple game. The concept is very basic: just transport cargo and passengers from a location that produces them to a location that wants them. But the game is vast in scale and depth, where you can play the game in your own particular style and get drawn into the world you are building in, getting personally attached to your handiwork. It isn’t the perfect game, but then I don’t see that as being the aim of my job — a perfect game would have no flaws, no character, no individuality. I try to create games that are unique and different in style, games from which the player can achieve satisfaction through construction rather than destruction, games with ongoing gameplay rather than a limited script or only a single definition of success. People are still playing Transport Tycoon 10 years after it was published — I hope that 10 years from now people are still playing Chris Sawyer’s Locomotion!
Chris Sawyer
3


TABLE OF CONTENTS
INTRODUCTION |
3 |
CHRIS SAWYER’S |
|
|
|
LOCOMOTION BASICS |
25 |
TROUBLESHOOTING |
4 |
THE OBJECT OF THE GAME |
25 |
|
|
FIRST STEPS |
25 |
WELCOME TO CHRIS |
|
Status Window |
26 |
SAWYER’S LOCOMOTION |
8 |
Company Owner |
|
|
|
and Status |
26 |
GETTING STARTED |
8 |
SURVEY THE LANDSCAPE |
29 |
THE README FILE |
8 |
Mini-Map |
29 |
INSTRUCTION MANUAL |
9 |
Supply and Demand |
31 |
SETUP AND INSTALLATION |
9 |
INDUSTRY |
32 |
Installation of DirectX |
9 |
The Industry List |
32 |
MAIN MENU |
10 |
The Industry Status Window |
33 |
|
|
MANIPULATING THE |
|
TAKE CONTROL |
11 |
LANDSCAPE |
34 |
CONTROLLING THE VIEW |
14 |
Clear Area |
34 |
GAME OPTIONS |
14 |
Adjust Land |
35 |
Game Options Window |
15 |
Adjust Water |
36 |
Display Options |
15 |
Plant Trees |
37 |
Sound Options |
16 |
BUILDING ROADS |
37 |
Music Options |
16 |
The Stations Tab |
39 |
Regional Options |
17 |
BUILDING RAILROADS |
40 |
Control Options |
18 |
Build Tracks Window |
41 |
Miscellaneous Options |
18 |
Signal Construction |
43 |
SOUND MENU |
18 |
BUILDING VEHICLES |
44 |
VIEW MENU |
19 |
Vehicle Information |
|
STATUS DISPLAY |
19 |
Window |
45 |
TIME DISPLAY |
20 |
Vehicle Status Window |
50 |
SINGLE-PLAYER GAME |
20 |
MESSAGES |
51 |
TWO-PLAYER GAME |
21 |
Show Recent Messages |
51 |
Starting A Multiplayer Game |
21 |
Message Options |
51 |
Host A Game |
22 |
|
|
Join A Game |
22 |
RUNNING YOUR |
|
Start New Game/ |
|
TRANSPORTATION EMPIRE |
53 |
Load Game |
22 |
STATIONS |
53 |
Connecting Through |
|
Station List Window |
53 |
A Firewall |
23 |
Building a Station |
54 |
Playing the |
|
Station Catchment Area |
55 |
Two-Player Game |
23 |
Road Stations |
55 |
6
Rail Stations |
56 |
EFFECTIVE TRACK DESIGN |
78 |
|||
Airports |
57 |
|
Basic Loop |
78 |
||
Docks |
58 |
|
Basic Double Track Line |
80 |
||
The Station Window |
58 |
|
Enhanced Double Track Line |
81 |
||
TOWNS AND CITIES |
60 |
|
Complex Double |
|
||
Towns List |
60 |
|
Track Layout |
82 |
||
Town Information Window |
60 |
|
Junctions in Double |
|
||
Local Authority Rating |
61 |
|
Track Layouts |
83 |
||
AVAILABILITY AND |
|
INDUSTRIES |
85 |
|||
OBSOLESCENCE |
62 |
|
Interfering With |
|
||
FINANCIAL MATTERS |
62 |
|
Industry Output |
85 |
||
Loans |
62 |
|
Funding New Industries |
85 |
||
Optimizing Your Finances |
63 |
|
|
|
|
|
The Companies List |
64 |
SCENARIO EDITOR |
87 |
|||
Rival Owner Characteristics |
65 |
SCENARIO MAIN SCREEN |
87 |
|||
MONITORING YOUR |
|
|
Editor Options Menu |
87 |
||
PROGRESS |
66 |
|
Sound Menu |
88 |
||
Company Value |
66 |
|
Objects Window |
88 |
||
Performance Index |
66 |
CREATING A SCENARIO |
|
|||
|
|
— STEP-BY-STEP |
88 |
|||
ADVANCED STRATEGIES |
68 |
|
Step 1: Object Selection |
88 |
||
ADVANCED VEHICLE |
|
|
Step 2: Landscape |
|
||
CONCEPTS |
68 |
|
Generation |
91 |
||
Adding To Existing Vehicles |
68 |
|
Step 3: Scenario Options |
94 |
||
Refitting a Vehicle |
69 |
|
Step 4: Save Scenario |
95 |
||
Vehicle Reliability |
69 |
|
Step 5: You’re Done! |
95 |
||
Planning Vehicle Routes |
|
|
|
|
|
|
and Stops |
70 |
|
|
|
SUOMI |
96 |
|
|
|
||||
BUILDING ON |
|
|
|
|
||
DIFFICULT TERRAIN |
72 |
|
|
|
SVENSKA |
98 |
|
|
|
||||
Slopes |
72 |
|
|
|
||
Bridges |
73 |
|
|
|
PORTUGUESE |
100 |
|
|
|
||||
Tunnels |
74 |
|
|
|
||
STATION MANAGEMENT |
75 |
|
|
|
|
|
WORKING ON |
|
CREDITS |
102 |
|||
THE RAILROAD |
76 |
TECHNICAL SUPPORT |
106 |
|||
Locomotive Power |
76 |
KEYBOARD SHORTCUTS |
107 |
|||
Building Junctions |
77 |
|
|
|
|
|
Signals |
78 |
|
|
|
|
|
7
WELCOME TO CHRIS SAWYER’S LOCOMOTION
Everything needs to get somewhere: iron ore to the steel mill, steel to the factory, goods to the city, and passengers and mail across town or across the country. The world needs transport. Your challenge is to build and run the transport networks to keep the world moving — to provide the locomotion!
Of course. you’re not in the transport business just to keep the world moving... you’re in it for the money. Design and build efficient networks, and you’ll be raking it in and extending your routes before you know it. While you’re doing this, the world is changing: wellserved towns grow, industries close down as new ones start up, and transport technology advances with faster and more efficient vehicles.
But not everything will be smooth sailing -- resources will run dry, vehicles will break down and, worst of all, you probably won't be the only company competing for items to carry.
Your opponents might be ruthless and aggressive, building stations right next door to yours to compete for passengers and cargo, running better services to attract more cargo, and generally getting in your way. But with careful planning and good management you can beat them at their own game and build a dominant transport company worth millions.
GETTING STARTED
THE README FILE
The Chris Sawyer’s Locomotion CD-ROM game has a ReadMe file that includes the License Agreement and up-to-date information about the game. We strongly encourage you to take the time to read this file in order to benefit from changes made after this manual went to print.
To view the ReadMe file, double-click on the ReadMe.txt icon on the Chris Sawyer’s Locomotion directory found on your hard disk (usually C:\Program Files\Atari\Locomotion). You can also view the ReadMe file by clicking on the Start button on your Windows® taskbar, and then select Programs>Atari>Locomotion, and click on ReadMe.
8

INSTRUCTION MANUAL
Included on this product’s game disc is an electronic version of the game’s Instruction Manual in .pdf format, Adobe Acrobat Reader 6 (which enables you to view the manual in .pdf format).
SETUP AND INSTALLATION
1.Start Windows® 98/Me/2000/XP.
2.Insert the Chris Sawyer’s Locomotion game disc into your CD-ROM drive.
3.If AutoPlay is enabled, a title screen should appear. If AutoPlay is not enabled, or the installation does not start automatically, click on the Start button on your Windows® taskbar, then on Run. Type D:\Setup and click on OK. Note: If your CD-ROM drive is assigned to a letter other than D, substitute that letter.
4.Follow the remainder of the on-screen instructions to finish installing Chris Sawyer’s Locomotion.
5.Once installation is complete, click on the Start button on the Windows® taskbar and choose Programs/Atari/ Locomotion/Locomotion to start the game. You can also click on the Locomotion icon on your Windows® desktop to start the game.
Note: You must have the Chris Sawyer’s Locomotion game disc in your CD-ROM drive to play.
Installation of DirectX®
The Chris Sawyer’s Locomotion game requires DirectX® 9.0b or higher in order to run. If you do not have DirectX® 9.0b or higher installed on your computer, click “Yes” to accept the DirectX® 9.0b License Agreement. This will then launch the DirectX® 9.0b Install.
9
MAIN MENU
The Main Menu opens automatically when you start the game:
•Start New Game: Start a new single-player game of Chris Sawyer’s Locomotion.
•Load Saved Game: Load a previously saved game. To load a game, click the Load Saved Game icon and click on the name of the saved game.
•Show Tutorial: Click the Show Tutorial icon to display a list of available tutorials. Click the name of a tutorial to view it.
•Scenario Editor: Open the game editor, which allows you to create your own Chris Sawyer’s Locomotion scenarios.
•Single-Player/Two Player Mode Toggle: Switch between singleplayer mode (see page 20) and two-player mode (see page 21).
•Exit Game: Close Chris Sawyer’s Locomotion and return to the Windows desktop.
10
TAKE CONTROL
In order to get the best experience while learning to play Chris Sawyer’s Locomotion, we recommend that you start with the in-game tutorials and read the following overview of the game interface first before you dive into the scenarios.
The game screen contains a number of basic control and display elements, which are described in detail later in this manual. The icons along the top of the screen (1-13) provide access to drop down menus.
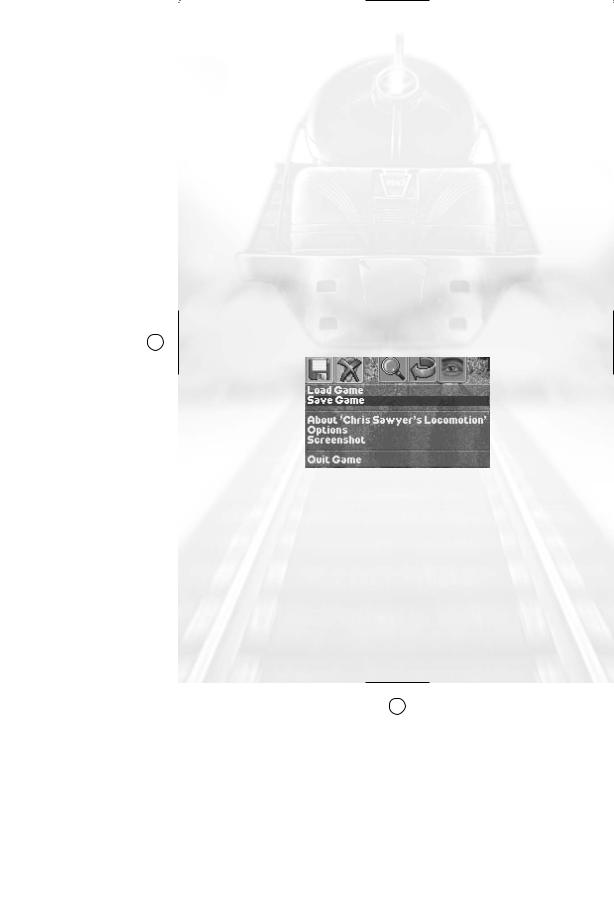
Game Options Menu: Access general game functions, including saving and loading, and game options (see “Game Options” on page 14).
Sound Menu: Adjust sound and music options (see “Sound Menu” on page 18).
Zoom Menu: Zoom in and out on the game screen, and access the Mini-Map. You can also spin the mouse wheel to zoom in and out.
Rotate Menu: Rotate the game screen clockwise or counterclockwise. Holding down the right mouse button and spinning the mouse wheel also rotates the game view. You can also rotate the landscape clockwise by pressing the Enter key.
View Menu: Change game screen view options (see “View Menu” on page 19).
Landscape Menu: Change the height of the land, plant trees, and so on (see “Manipulating the Landscape” on page 34).
Tracks Menu: Build train and tram tracks (see “Building Railroads” on page 40).
Roads Menu: Build roads and bridges (see “Building Roads” on page 37).
Port Menu: Build airports and docks (see "Airports" on page 57 and "Docks" on page 58).
11
Vehicle Construction Menu: Buy and upgrade vehicles (see “Building Vehicles” on page 44).
Vehicle Status Menu: Access information about your vehicles (see “Vehicle Status” on page 50).
Stations Menu: Access information about your stations (see “Stations” on page 53).
Town/Industry Menu: Display information about towns and industries (see “Industries” on page 85 and “Towns and Cities” on page 60).
Status Display: View financial information and approval ratings for all companies (see “Financial Matters” on page 62).
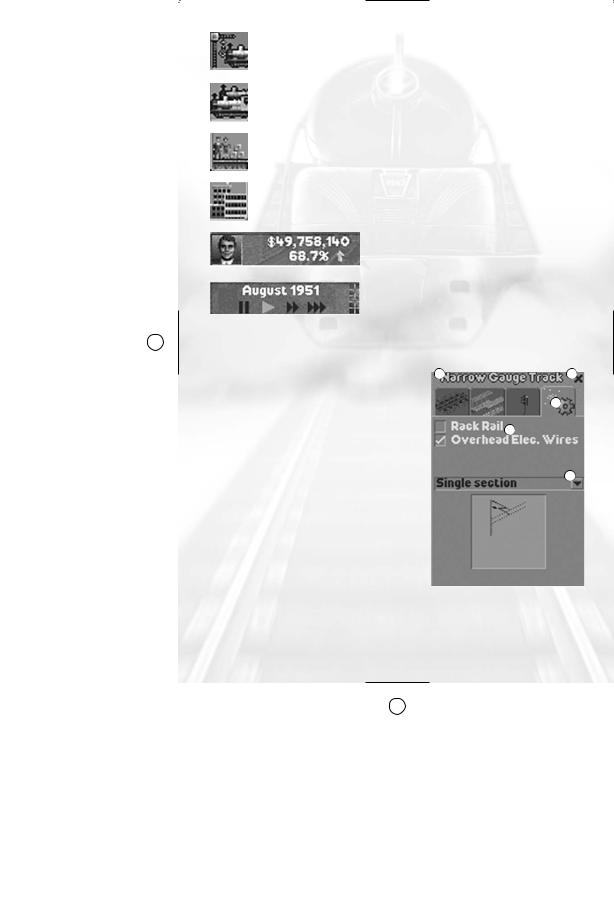
Time Display: View the current date, control the game speed, access the Messages window and open the MiniMap (see “Mini-Map” on page 29).
Information and Control |
1 |
2 |
Windows
3
All windows in the game share
common interface and display
4
elements:
1. Title Bar: Shows the name of the
window, station, vehicle, and so on. 5 Click on the title bar of a vehicle or
station you own to change its name. You can reposition a window by clicking on its title bar and dragging it.
2.Close Button: Click to close the window. You can also press Backspace to close the topmost
window. Pressing Shift + Backspace closes all open windows.
12

3.Tabs: Many windows include multiple panes of information, which you can access by clicking the tabs at the top of the window.
4.Drop-Down Menus: Some windows include drop-down menus.
5.Checkboxes: Some windows include options with checkboxes.
Information Displays: Many windows include information displays. See the descriptions of specific control windows later in this manual for details.
Resize Handle: Most windows are resizable. To resize a window, click and drag the resize handle in the lower-right corner.
Sorting Window Information
Some windows include scrolling lists with multiple columns of information. You can sort the information in these lists by clicking at the top of a column.
For example, the Industries window contains the Industry, Status, and Production Transported columns. By default, industries are ordered alphabetically by name (Industry). If you click on the Status column header, the industry list is resorted by the type of cargo produced.
Pop-up Help
Most tabs and buttons have “floating help text” that identifies their function. To see this text, hold the mouse cursor over the tab or button for a few seconds. For example, if you select a bridge type while building a track and hold your mouse button over it, a box pops up showing the type of bridge, maximum height, and maximum speed.
Opening Multiple Windows
You can open up to seven windows at a time. If you attempt to open more, the game automatically closes one of the open windows.
13
CONTROLLING THE VIEW
Chris Sawyer’s Locomotion uses an overhead isometric view. To rotate the view in 90-degree increments, use the Rotate Menu (see page 11) or press the Enter key. You can zoom in and out of the main view by either pressing the Page Up / Page Down keys or by using the
mouse wheel.
The main view will automatically move when you scroll the mouse to any edge of the screen, if you have this option checked (see “Control Options” on page 18). You can also scroll the main view by using the arrow keys, or by right-clicking and dragging on the landscape.
Most objects in the game will display context-sensitive information that can be activated by the mouse. For example, when you move the mouse pointer over a a station, you can see what goods or people are waiting there. Left-clicking on an object generally opens the window associated with that particular object. Right-clicking on a road or track allows you to edit it in that location. Right-clicking an object such as a station or train displays the general status window associated with that type of object.
GAME OPTIONS
The Game Options menu provides access to a number of basic ingame functions:
•Load Game: Load a previously saved game.
•Save Game: Save your current game. Enter a name in the Save Game dialog and click Save. By default, single-player saved games are saved in the Single Player Saved Games folder in the Chris Sawyer’s Locomotion directory, and two-player games are saved in the Two Player Saved Games folder, but you can save in any folder you choose. You can also open the Save Game dialog by clicking the Game Options Menu icon.
14
•About Chris Sawyer’s Locomotion: View the game credits.
•Options: Open the Game Options window (see below).
•Screenshot: Save a BMP-format screenshot of the game in progress. You can also save a screenshot at any time by pressing Ctrl-S. Screenshots are automatically saved in the Chris Sawyer’s Locomotion game folder.
•Quit Game: Quit the game in progress and return to the
Main Menu.
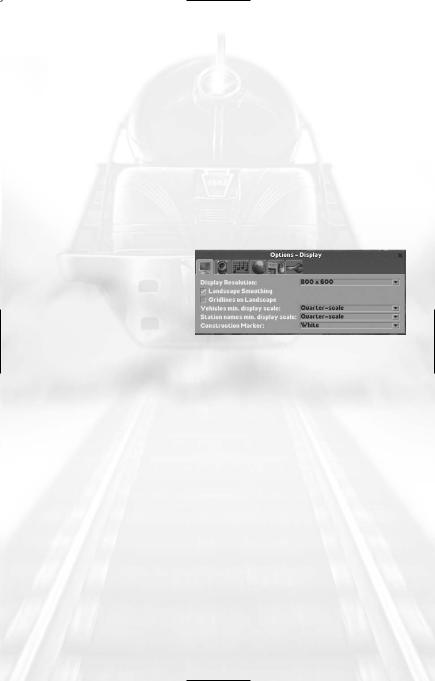
Game Options Window
The Game Options window provides access to various basic game play options, including video, sound, music, and game controls and preferences.
Display Options
•Display Resolution: Set the graphic resolution for Chris Sawyer’s Locomotion. The default resolution is generally one step below
your current desktop resolution. (So, if your desktop is set to 1024x768, the game’s default display resolution is 800x600.) Higher resolutions may cause performance issues on slower machines.
•Landscape Smoothing: When this option is checked, the edges of the landscape tiles on the main view are smoothed. By default, this option is ON.
•Gridlines on Landscape: When this option is checked, the landscape grid is visible. By default, this option is OFF, however landscape gridlines appear when you are building tracks and roads.
•Vehicles min. display scale: Determines the smallest size at which vehicles appear in the game when you zoom in and out. The default selection is Quarter-scale.
•Station names min. display scale: Determines the smallest size at which the text for station names appears. The default selection is Quarter-scale.
•Construction Marker: Toggles the colour of the cursor used for constructing roads, tracks, and so on between white (default) and translucent.
15
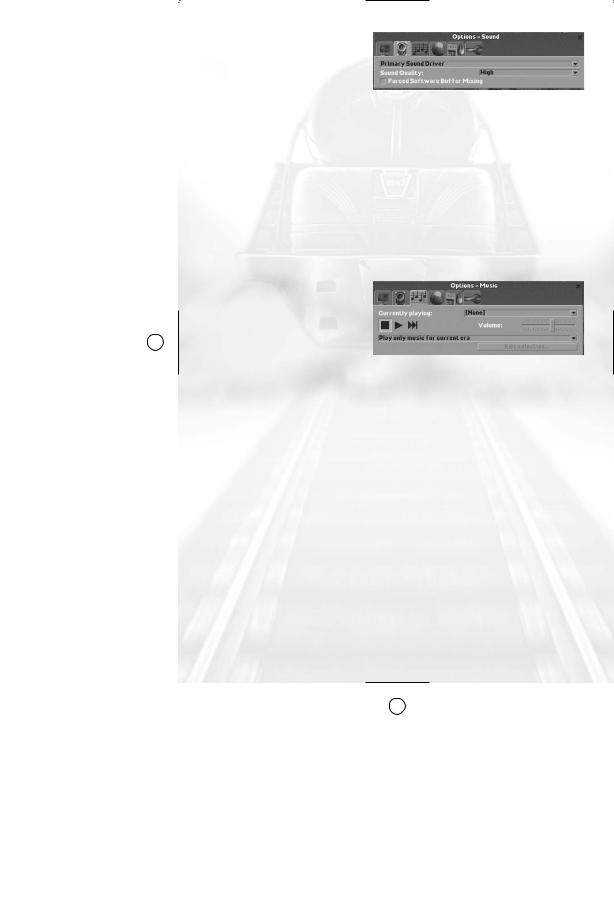
Sound Options
•Sound Driver: Chris Sawyer’s Locomotion automatically selects an
appropriate sound driver when the game is installed. To change to a different sound driver, select it from the drop-down menu.
•Sound Quality: The game automatically selects the most appropriate sound-quality setting (low, medium, or high) upon installation. You can change this setting here.
•Forced Software Buffer Mixing: Some computer/sound card combinations can cause compatibility issues with Chris Sawyer’s Locomotion. If you experience a crackling in the sound or the game hesitates when sound effects play, toggle this option to its opposite setting to alleviate the problem. If you do not experience sound problems, you do not need to change this option.
Music Options
•Currently Playing: Shows the name of the music track currently playing. To select a different music track, select it from the list.
•Music Player Controls: Controls the music playback. From left to right the controls are: Stop (stop music playback); Play (start playback of Currently Playing music track); and Next Track (skip to the next music track on the Currently Playing list).
•Volume: Controls the playback volume of the music.
The drop-down menu below the volume slider allows you to select the music tracks you want played in the game. You have three choices:
•Play only music for current era: Select this option to play only music associated with the current game year (or time period).
•Play all music: Select this option to allow all music tracks to play throughout the game.
•Play customized selection of music: Select this option to play only the music tracks selected (checked) on the Edit Music Selection menu.
16
When “Play customized selection of music” is selected, click on “Edit selection…” at the bottom of the window to create your own list of music tracks. The Edit Music Selection window will open, listing the names of all music available in the game. Check music tracks to select them. When you finish making your choices, close the window to save your changes.
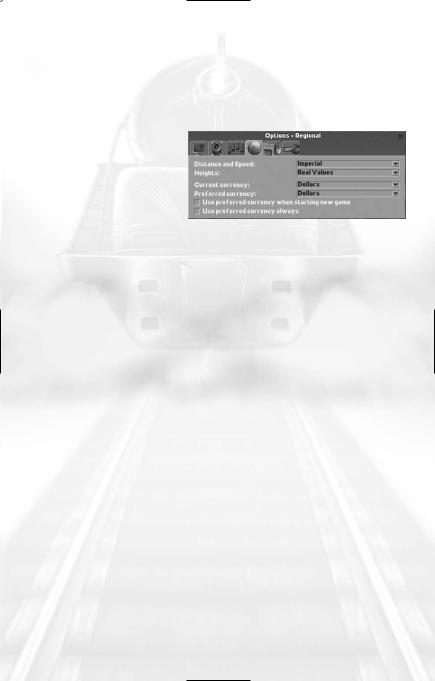
Regional Options
•Distance and Speed:
Toggle the distance and speed measurements between Imperial (miles, miles-per-hour) and Metric (kilometers, kilometers-per-hour).
•Heights: Toggle the height marker displayed when the Show Height Marks on Land option is selected on the View menu. Options are: Real Values (feet, meters) and Units (a positive or negative number that shows the land height in units relation to sea level: +1, -5, and so on).
•Current Currency: Selects the type of currency (dollars, Euros, yen, and so on) used in the current scenario. Current Currency defaults to the currency defined by the scenario.
•Preferred Currency: Set the default currency. This setting has no effect unless you click one or both of the checkboxes described below.
•Use preferred currency when starting a new game: Select this option to use the currency type displayed in the Preferred Currency menu each time you start a new game. When you load a saved game that specifies a type of currency other than the preferred currency, that specified currency is used.
•Use preferred currency always: Select this option to use the currency type displayed in the Preferred Currency menu
at all times.
17
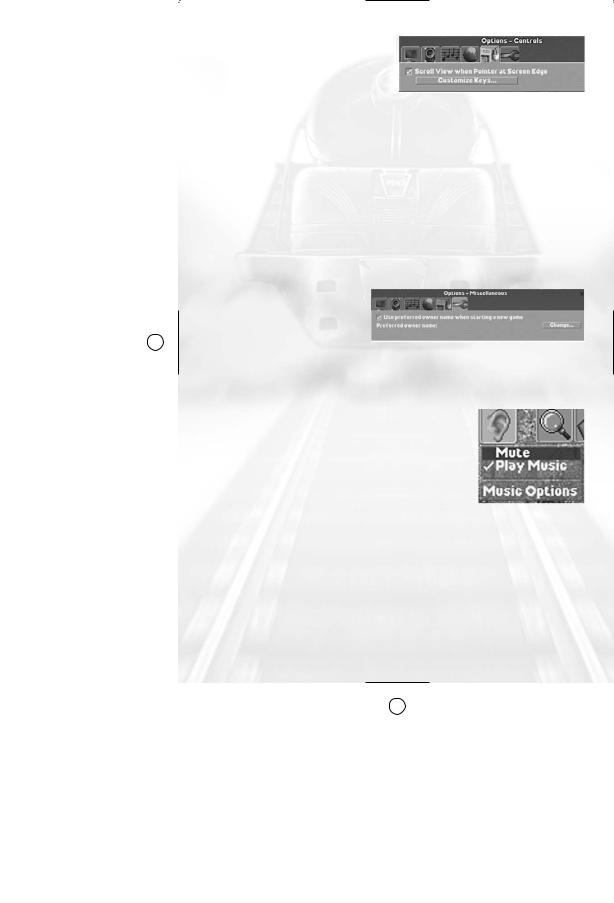
Control Options
•Scroll View when Pointer at Screen Edge: When this option is checked, the view
automatically scrolls when you move your mouse pointer to the edge of the screen. (You can also scroll the view by holding down the right mouse button and dragging the mouse in the direction you want to scroll, or by pressing the arrow keys.)
•Customize Keys: Set keyboard commands to suit your style of play. To change a keyboard shortcut, click the command on the list and then press the key to which you want to map the control. If you select a key that is already used for an existing shortcut, the newly selected shortcut replaces the old one. Click on Reset Keys to reset the keyboard shortcuts to their default values. Close the Keyboard Shortcuts window to save the settings. (See “Keyboard Commands” on page 107 for a list of default keyboard shortcuts.)
Miscellaneous Options
The miscellaneous options group allows you to set a default owner name. To
change the preferred owner name, click on Change. Check the “Use preferred owner name when starting a new game” option to use this name every time you start a new scenario.
SOUND MENU
•Mute: Toggle all game sounds and music ON and OFF. When Mute is selected, the Sound Menu icon has a red X through it. You can also toggle mute mode by clicking the Sound Menu icon.
•Play Music: Toggles the music ON and OFF.
•Music Options: Opens the Music Options section of the Game Options window. (See “Music Options” on page 16 for details.)
18
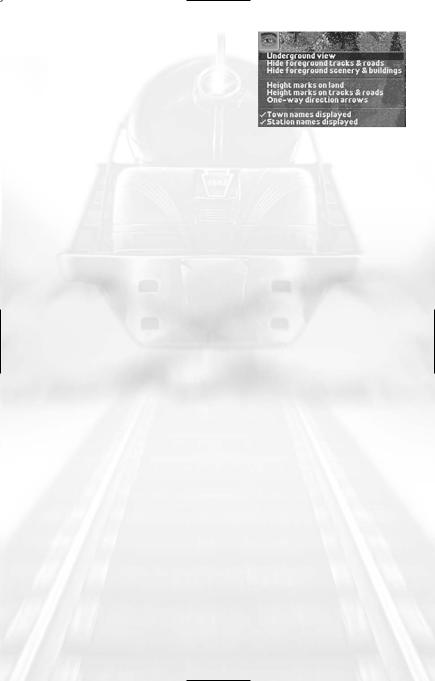
VIEW MENU
•Underground view: Renders the ground transparent so you can see tunnels and other underground features.
•Hide foreground tracks & roads: Hide roads, railroads, airports and docks in the lower half of the screen.
•Hide foreground scenery & buildings: Hide terrain objects (such as trees) and buildings in the lower half of the screen.
•Height marks on land: Display the height of every land square not occupied by a road or railroad. These marks are only visible in the closest zoom mode.
•Height marks on tracks and roads: Display terrain height marks on all roads and tracks.
•One-way direction arrows: Display one-way arrows on roads and tracks.
•Town names displayed: Display town names.
•Station names displayed: Display station and passenger stop names.
STATUS DISPLAY
The Status Display in the lower-left corner provides access to information about all of the transport companies in the game. This display shows company treasuries (the amount of cash on hand) and Performance Indexes. (See “Performance Index” on Page 66 for more information.)
The face icon on the left side of the display is your owner image. Click this image to open your company’s Status window. (See “Status Window” on page 26 for details.)
Move the cursor over the face icon to display the Owners menu, which lists all of the companies competing in the current scenario and their current standing in the game from highest-ranked (top) to lowest-ranked (bottom). To open a competitor’s Status window, click that company name.
Click the Companies List option to open the Companies List window, which contains a number of graphs and displays that compare your company’s progress to those of your competitors. (See “Companies List” on page 64.)
19

TIME DISPLAY
•Pause: While paused, you can look at status menus and
displays, but you cannot manipulate any objects on the landscape. Doing so starts play again at normal speed. To manually resume play, click on Pause again, or click one of the three Play controls. You can also pause the game by pressing the Pause key.
•Play Normal Speed: Play at normal speed. This is the default time rate.
•Fast Forward: Play at three times the normal rate.
•Extra Fast Forward: Play at nine times the normal rate.
Click the icon on the right side of the Time Display to open the Mini-Map (see “Mini-Map” on page 29 for details).
Note: The fast-forward play options are not available in two-player games.
The Time Display also shows scrolling ticker-tape messages. Click this display to open the Message window. (See “Message” on page 51.)
SINGLE-PLAYER GAME
There are over 40 single player scenarios available in Chris Sawyer’s Locomotion, each one challenging your transport management skills in unique ways.
TIP
Start with the Beginner scenarios, and move on to greater challenges as you gain familiarity with the game.
New Game
Click the Start New Game icon on the Main Menu to open the Select Scenario window.
20
The scenarios are divided into five levels of difficulty:
•Beginner
•Easy
•Medium
•Challenging
•Expert
Select a tab on the Select Scenario window to display a list of scenarios. Move the cursor over a scenario to display a thumbnail image of the game map, a description of the highlighted scenario and the following statistics:
•Challenge: The goal or goals you must achieve.
•Start Date: The starting year of the scenario.
•Competing Companies: The maximum number of competing companies and the time at which each one enters the game.
Click the scenario name to play that scenario.
TWO-PLAYER GAME
Chris Sawyer’s Locomotion allows you to engage in fiscal combat with the most unpredictable and potentially cunning rival on the planet: another human player.
In terms of speed and reliability, two-player mode is ideally suited to local area network (LAN) play. The game will play on dial-up connections, but might be prohibitively sluggish.
Chris Sawyer’s Locomotion supports only the TCP/IP network protocol for LAN and Internet play.
Starting a Multiplayer
Game
To start a two-player game, click the Single Player Mode/Two-Player Mode toggle on the Main Menu. This opens the Two Player Game window, which has two tabs:
21

•Two Player Game: The left tab has two options: Host and Join.
•Two Player Game — Options: The time-out value sets the amount of time the game will wait for expected data from the other computer while playing. The games will disconnect if this timeout value is exceeded. The second option, “Share additional companies/owner faces”, allows you to share owner images that you import from an external faces editor (not yet available) with your opponent. Select this option to automatically copy your custom companies and faces to your opponent’s machine when you connect over the LAN or Internet.
Host A Game
To host a game, click “Set this computer up as host” on the Two Player Game window. The game will wait for another player to join. Click Cancel to exit Host mode before another machine connects.
Join a Game
To join a game hosted by another player, click “Connect to host” on the Two Player Game window. This opens the Enter Host Address dialogue.
The next step varies for Internet and LAN play:
•Internet Games: To join an Internet game, type the IP address of the host machine in the text field and click OK. You must know the host IP address in order to play over the Internet.
•LAN Games: To join a game on a local area network, type the IP address or the name of the host computer in the prompt and click OK. To search for any valid host machine, leave the dialog box blank and click OK.
If the host computer isn’t located, an error message appears. Click OK on the error prompt to return to the Two Player Game window.
Start New Game/Load Game
Once two machines are connected, both players see a message in the Two Player Game window that indicates a successful connection and identifies the computer to which they are connected. At this point, the Main Menu updates and displays new controls:
22
•Start New Game: Start a new two-player game. This opens the Select Scenario window, from which you can choose any available scenario.
•Load Saved Game: Load a previously saved game. You can only load two-player saved games when in two-player mode. Either player can start or load a game.
A Chat (red telephone) icon appears on the updated Main Menu. Click this icon to send text messages to your opponent during the setup mode. Just type your message and press ENTER to send.
Click Disconnect on the Two Player Game window to return to the Main Menu before the game begins.
Connecting Through a Firewall
When attempting to play a two-player game on a computer that uses a software or hardware firewall, you might have to change some settings in order to connect.
Some firewalls automatically prompt you when an attempt is made to send data from a program that the firewall doesn’t recognize. If the connection fails, you might need to manually configure your firewall to open the following ports:
•6073
•2032 through 2400
If you are attempting to use an Internet connection through a network router with NAT, you must configure the router’s Port Forwarding to forward the above-listed ports to your local computer’s IP address.
If you are unfamiliar with changing your firewall settings, consult your firewall’s documentation.
Playing the Two-Player Game
Once you and your opponent are connected, the two-player version of Chris Sawyer’s Locomotion plays nearly identically to the singleplayer game, with a few exceptions:
•Human opponents are not bound by the time restrictions for entry of new companies — both human-controlled companies are present from the moment the game starts.
23

•The game’s only speed-related controls are Play and Pause. When either player pauses in a two-player game, the game pauses for both players.
•Above the Time Display, there is a Send Message control. Click this to send text messages to your opponent. Type a message in the prompt and press ENTER to send it. Messages from your opponent appear in a pop-up window tagged with the opponent’s image.
All single-player scenarios are available in the two-player version. Two-player saved games are stored in a folder separate from singleplayer saves. You cannot load a two-player saved game in singleplayer mode (or vice-versa).
The game automatically disconnects when either player quits the game.
24

CHRIS SAWYER’S LOCOMOTION BASICS
THE OBJECT OF THE GAME
Your company starts with a modest bank loan and a simple survey map. Where you go from there is, well, your business.
Your underlying mission in Chris Sawyer’s Locomotion is always the same: deliver cargo and passengers from one place that produces them to another place that requires them. You must provide necessary services to the towns and industries in the areas you serve. If you do a good job, you are rewarded with a burgeoning bank account and a high Performance Index. If you are unable to meet the transportation needs of the people, your Performance Index drops… along with your profits.
In order to complete each scenario, you must successfully reach defined goals. Your first few Chris Sawyer’s Locomotion games might seem a bit overwhelming — there can be a lot to think about at once, especially once rival companies enter the scene. However, if you understand the basic game systems and take a measured approach to planning and building transport lines, you’ll soon be at the top of your own transport empire.
FIRST STEPS
Each scenario begins with a view of the game world. Pause the game and take some time to scroll around the landscape and check out the terrain features, towns, and industries. Once you’ve done an initial survey, it’s time to set up your company.
Unless you set a preferred owner name in the Miscellaneous Options section of the Game Options menu (see “Game Options Menu” on page 14 for details), entering your name is the first task. There are a number of additional company-related tasks that you need to attend to before you get started. All of these initial options are set on the
Status window.
25
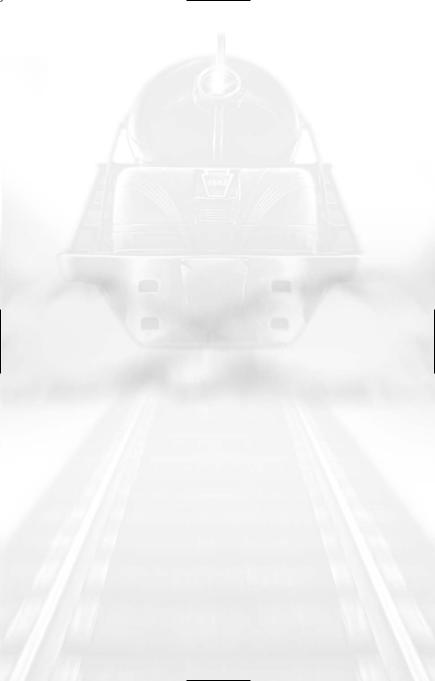
Status Window
The Status window automatically opens when you start a new game. To open the Status window while playing, click the owner icon on the
Status Display. There are six tabs on this window:
Company Owner and Status
•Status View: Shows the viewpoint of the company owner. The Status View is most useful for “spying” on other company owners, to see where they are building, or what they have their sights on next. Click the cluster of arrows in the lower-right corner of the Status View to centre the game screen on the area shown.
•Owner Image: The owner image is randomly selected at the start of each scenario. Click your owner image to select a new one.
•Owner Name: The owner name appears below the owner image. Click on the name to change it. You can also click on the title bar of the window to change the name.
TIP
Use the Status View to keep an eye on your opponents. If they’re surveying the landscape, chances are they’re about to build in that location.
Details
The Details section tab shows basic company performance statistics and allows you to construct and view the company headquarters.
26
•Company started: The year the company was founded.
•Performance index: The company’s current Performance Index.
•Owner: The owner’s name.
When viewing a computer-controlled opponent’s Status window, the owner’s Intelligence, Aggressiveness, and Competitiveness ratings appear below his or her name. (See “Rival Owner Characteristics” on page 65 for details about competing owners and companies.)
The image on the right side of this display shows the company’s headquarters (if one exists). Click the icon on the right edge of the window to construct your headquarters. Select a spot on the landscape and click to construct the building. Construction is completed after a short time.
To move your headquarters to a different location, click the construction icon and then click the new headquarters location. When construction begins on your new headquarters building, the old one is automatically destroyed.
You can operate your company successfully without a headquarters, but building this structure is quite inexpensive, and its growth and changes in style (or lack thereof) over the course of the game serves as a visual symbol of your success.
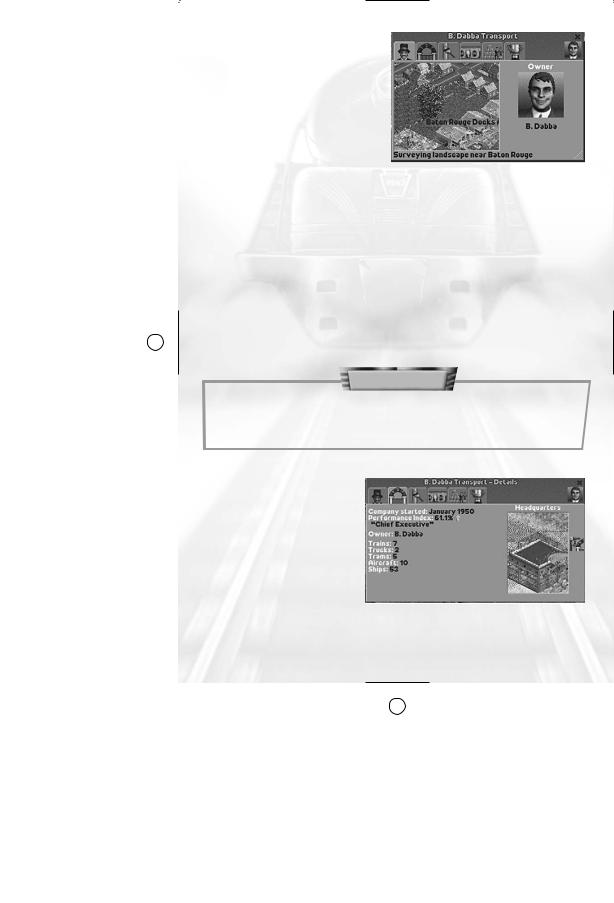
Colour Scheme
The Colour Scheme tab allows you to specify colours for your company displays, structures, and vehicles. You can set both an overall colour scheme for your company and a specific colour scheme for every vehicle type.
•Main colour scheme: Defines the background hue of your window title bars and the colours used on your
buildings. The two coloured squares show the currently selected colours. To pick a new colour, click on a square to open the palette of available colours and then click on a new colour.
•Special colour schemes used for: Defines the colours for individual vehicle types. Click checkbox beside the vehicle type to display the vehicle type’s current colour scheme. Change the colours as described above.
27
Finances
The Finances tab shows a breakdown of the company’s income and expenditures, company value and current profits, and provides an interface for applying for and paying off loans.
•Expenditure/Income: Shows the company’s profit and loss for each year.
•Loan: Shows the total amount of money owed to the bank. Click the up arrow to the right of the loan amount to borrow more money, and click the down arrow to pay down your loan.
TIP
If you run out of cash and need some more, be sure to check with the bank to see if they’ll loan you more money. Banks continue to raise your credit rating as you progress in the game.
•Cash: The current amount of cash available.
•Profit from Vehicles: The monthly profit or loss you are incurring from vehicle operations.
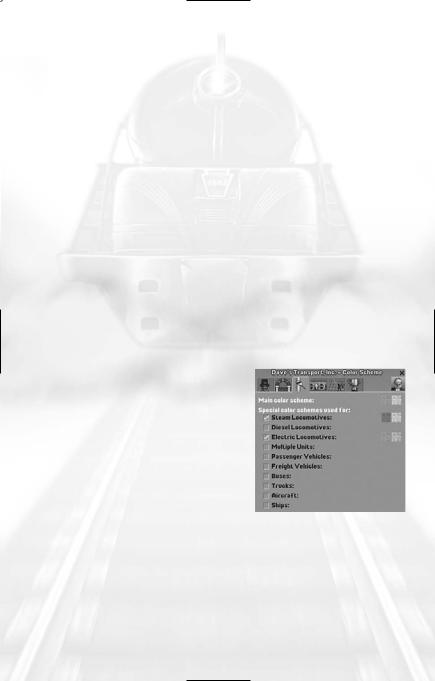
Cargo Delivered
This tab provides information on cargo successfully transported and delivered.
28
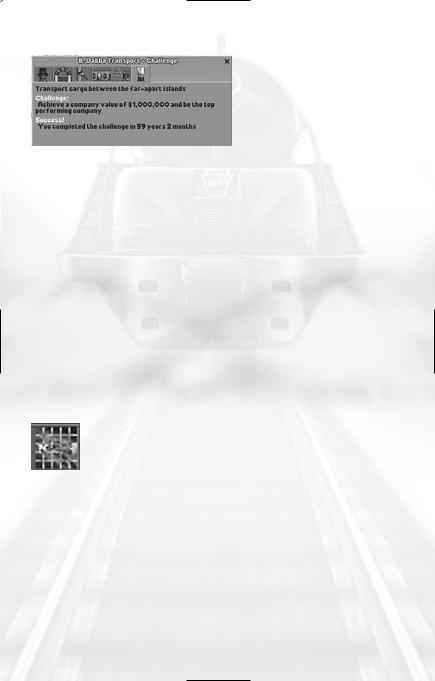
Challenge
The Challenge tab provides an overview of your goals in the current scenario, including a summary of your progress, and, if the scenario has a time limit, the time remaining to achieve these goals.
SURVEY THE LANDSCAPE
After naming your new company and double-checking your objectives, you need to determine your first transportation task. Should you haul grain with trucks, build a railroad and carry coal to a steel mill, set up a bus line in the biggest town? The choices are usually many, but not all of them make sense as your first venture.
You generally start a new game with enough cash to build a modest transportation network. Once that starts to turn a profit, you are able to afford more expensive vehicles and more ambitious routes.
One of the best resources for surveying the landscape is the MiniMap. You can examine the landscape, towns and industries with the game paused, which is usually a good idea at the beginning of the game. Click Pause on the Time Display (or press the Pause key) and then open the Mini-Map.
Mini-Map
The Mini-Map provides a strategic overview of the territory covered in the scenario. To open the Mini-Map, click Map on the Zoom menu or click the Mini-Map icon on the Time Display.
Click a spot on the Mini-Map to centre the main game view on that area. The black dashed-line rectangle defines the area that is currently displayed on the main view.
On the right side of the window is a list of items, each of which is represented by a different colour on the Mini-Map. Moving the mouse cursor over an item causes every object of that type to flash on the Mini-Map for easy identification. This Mini-Map has five tabs:
29
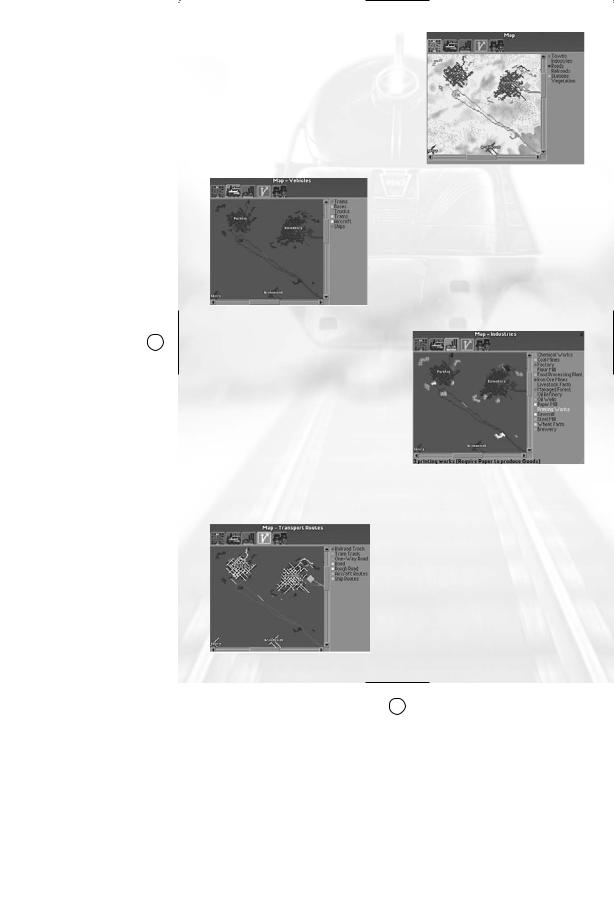
Default View
The default Mini-Map view provides a basic overview of the scenario landscape. It shows the locations of towns, industries, roads, railroads, stations and vegetation.
Vehicles View
The Vehicles view shows the locations of all vehicles in the game. Holding your cursor over a vehicle type on the right causes the corresponding objects to flash on the map and show the number of vehicles of that type currently deployed.
Industries View
The Industries view shows all of the industries currently in the scenario, and is probably the most important Mini-Map tab early in the game.
The total number of industries is shown in the space just below the map. When you place the mouse cursor over an industry on the list,
this number changes to show how many facilities of that type exist. The supplies or demands of that industry type are shown in parentheses next to the industry type.
Transport Routes View
The Transport Routes view displays all of the land, air, and sea routes that are currently operational. The routes are broken down by type for easy identification.
30
 Loading...