


TABLE OF CONTENTS
INTRODUCTION ........................................................................ |
4 |
KEY FEATURES . . . . . . . . . . . . . . . . . . . . . . . . . . . . . . . . . . . . . . . . .4 GETTING STARTED . . . . . . . . . . . . . . . . . . . . . . . . . . . . . . . . . . . . . .5 CONVENTIONS OF THE TOOL . . . . . . . . . . . . . . . . . . . . . . . . . . . . .5 BEGINNING MAP DESIGNERS . . . . . . . . . . . . . . . . . . . . . . . . . . . . .6 ADVANCED MAP DESIGNERS . . . . . . . . . . . . . . . . . . . . . . . . . . . . . .6
GETTING STARTED ................................................................ |
7 |
ELEMENTS OF A MAP . . . . . . . . . . . . . . . . . . . . . . . . . . . . . . . . . . . . |
8 |
MAP ENVIRONMENTAL SETTINGS . . . . . . . . . . . . . . . . . . . . . . . . |
.8 |
GLOBAL LIGHTING . . . . . . . . . . . . . . . . . . . . . . . . . . . . . . . . . . . . |
.9 |
THE DESKTOP . . . . . . . . . . . . . . . . . . . . . . . . . . . . . . . . . . . . . . . . .10
A NOTE ABOUT 3D DIRECTIONS . . . . . . . . . . . . . . . . . . . . . . . . .10 MAP SETTINGS . . . . . . . . . . . . . . . . . . . . . . . . . . . . . . . . . . . . . . . .10 CAMERA SETTINGS . . . . . . . . . . . . . . . . . . . . . . . . . . . . . . . . . . . .11 MOUSE FUNCTIONS . . . . . . . . . . . . . . . . . . . . . . . . . . . . . . . . . . . .11 QUITTING THE PROGRAM . . . . . . . . . . . . . . . . . . . . . . . . . . . . . . .12
WORKING WITH MAP FILES . . . . . . . . . . . . . . . . . . . . . . . . . . . . .12
CREATING A NEW MAP . . . . . . . . . . . . . . . . . . . . . . . . . . . . . . . . . .12 SAVING YOUR WORK . . . . . . . . . . . . . . . . . . . . . . . . . . . . . . . . . . . .12 LOADING A MAP . . . . . . . . . . . . . . . . . . . . . . . . . . . . . . . . . . . . . . .12 ERASING YOUR WORK . . . . . . . . . . . . . . . . . . . . . . . . . . . . . . . . . .13 MAKING MAPS AVAILABLE TO THE GAME . . . . . . . . . . . . . . . . . .13
COMMAND REFERENCE........................................................ |
14 |
MENUS . . . . . . . . . . . . . . . . . . . . . . . . . . . . . . . . . . . . . . . . . . . . . . . |
.14 |
FILE MENU . . . . . . . . . . . . . . . . . . . . . . . . . . . . . . . . . . . . . . . . . . |
.14 |
EDIT MENU . . . . . . . . . . . . . . . . . . . . . . . . . . . . . . . . . . . . . . . . . . |
.16 |
VIEW MENU . . . . . . . . . . . . . . . . . . . . . . . . . . . . . . . . . . . . . . . . . . |
.18 |
WINDOW MENU . . . . . . . . . . . . . . . . . . . . . . . . . . . . . . . . . . . . . . . . |
.20 |
TEXTURE SIZING MENU . . . . . . . . . . . . . . . . . . . . . . . . . . . . . . . |
.20 |
VALIDATION MENU . . . . . . . . . . . . . . . . . . . . . . . . . . . . . . . . . . . |
.21 |
HELP MENU . . . . . . . . . . . . . . . . . . . . . . . . . . . . . . . . . . . . . . . . . . |
.21 |
TOOLBAR . . . . . . . . . . . . . . . . . . . . . . . . . . . . . . . . . . . . . . . . . . . . |
.22 |
FILE TOOLS . . . . . . . . . . . . . . . . . . . . . . . . . . . . . . . . . . . . . . . . . .22 EDIT TOOLS . . . . . . . . . . . . . . . . . . . . . . . . . . . . . . . . . . . . . . . . . .22 TERRAIN TOOLS . . . . . . . . . . . . . . . . . . . . . . . . . . . . . . . . . . . . . . .22 TEXTURE TOOLS . . . . . . . . . . . . . . . . . . . . . . . . . . . . . . . . . . . . . .24 OBJECT TOOLS . . . . . . . . . . . . . . . . . . . . . . . . . . . . . . . . . . . . . . . .25 LINE TOOLS . . . . . . . . . . . . . . . . . . . . . . . . . . . . . . . . . . . . . . . . . .26 OTHER TOOLS . . . . . . . . . . . . . . . . . . . . . . . . . . . . . . . . . . . . . . . . .26
STATUS BAR . . . . . . . . . . . . . . . . . . . . . . . . . . . . . . . . . . . . . . . . . . |
27 |
LAYERS LIST . . . . . . . . . . . . . . . . . . . . . . . . . . . . . . . . . . . . . . . . . |
27 |
OBJECT PROPERTIES . . . . . . . . . . . . . . . . . . . . . . . . . . . . . . . . . . |
28 |

LAYING OUT A MAP.............................................................. |
30 |
BASIC DESIGN DECISIONS . . . . . . . . . . . . . . . . . . . . . . . . . . . . .30
SINGLE-PLAYER OR MULTIPLAYER . . . . . . . . . . . . . . . . . . . . . .30 DRAMA VS. REALISM . . . . . . . . . . . . . . . . . . . . . . . . . . . . . . . . . . .30 THINK SPACE . . . . . . . . . . . . . . . . . . . . . . . . . . . . . . . . . . . . . . . . .30 GEOGRAPHIC LOCATION, AND TIME OF DAY . . . . . . . . . . . . . . .31 DEGREE OF DIFFICULTY . . . . . . . . . . . . . . . . . . . . . . . . . . . . . . .31 MAKE A SKETCH . . . . . . . . . . . . . . . . . . . . . . . . . . . . . . . . . . . . . . .32
MAP DESIGN ISSUES . . . . . . . . . . . . . . . . . . . . . . . . . . . . . . . . . . .32 GAME BALANCE: THE FUN FACTOR . . . . . . . . . . . . . . . . . . . . . . . .32
ACCOMMODATING VARYING STYLES OF PLAY . . . . . . . . . . . . .33
LAYOUT DO’S AND DON’TS . . . . . . . . . . . . . . . . . . . . . . . . . . . . . . .34
DON’T . . . . . . . . . . . . . . . . . . . . . . . . . . . . . . . . . . . . . . . . . . . . . . . |
.34 |
DO . . . . . . . . . . . . . . . . . . . . . . . . . . . . . . . . . . . . . . . . . . . . . . . . . . |
.35 |
EIGHTEEN STEPS TO CREATING A |
|
MULTIPLAYER MAP ........................................................ |
36 |
CARDINAL RULES FOR MULTIPLAYER MAPS . . . . . . . . . . . . . . .36 EIGHTEEN STEPS FOR MULTIPLAYER MAPS . . . . . . . . . . . . . . .36
A FEW EXTRA STEPS FOR SKIRMISH MAPS |
........40 |
BUILDING SINGLE-PLAYER MAPS............................ |
42 |
TUTORIAL: HOW TO .............................................................. |
43 |
HOW TO BUILD A HILL . . . . . . . . . . . . . . . . . . . . . . . . . . . . . . . . .43 HOW TO BUILD A VALLEY . . . . . . . . . . . . . . . . . . . . . . . . . . . . . . .43 HOW TO BUILD A RAMP . . . . . . . . . . . . . . . . . . . . . . . . . . . . . . . . .43 HOW TO BUILD AN AREA FOR A BASE . . . . . . . . . . . . . . . . . . . . .44 HOW TO PAINT TEXTURES . . . . . . . . . . . . . . . . . . . . . . . . . . . . . .45 HOW TO BLEND TEXTURES . . . . . . . . . . . . . . . . . . . . . . . . . . . . . .45 HOW TO COPY TEXTURES . . . . . . . . . . . . . . . . . . . . . . . . . . . . . . .45 HOW TO PAINT PASSABLE AND IMPASSABLE TERRAIN . . . . .46 HOW TO PLACE OBJECTS FROM THE OBJECT LIBRARY . . . . . .47 HOW TO ROTATE AN OBJECT . . . . . . . . . . . . . . . . . . . . . . . . . . . . .47 HOW TO REPOSITION AN OBJECT . . . . . . . . . . . . . . . . . . . . . . . .47 HOW TO COPY AND PASTE AN OBJECT . . . . . . . . . . . . . . . . . . . .47 HOW TO ADD ANY STRUCTURE ON YOUR TEAM . . . . . . . . . . . . . .47 HOW TO ADD AIRCRAFT . . . . . . . . . . . . . . . . . . . . . . . . . . . . . . . . .48 HOW TO BUILD A WAYPOINT PATH . . . . . . . . . . . . . . . . . . . . . . .48 HOW TO BUILD A FENCE . . . . . . . . . . . . . . . . . . . . . . . . . . . . . . . .49 HOW TO BUILD A ROAD . . . . . . . . . . . . . . . . . . . . . . . . . . . . . . . . .49 HOW TO ADD A SIDEWALK . . . . . . . . . . . . . . . . . . . . . . . . . . . . . . .50 HOW TO BUILD A RAILROAD . . . . . . . . . . . . . . . . . . . . . . . . . . . . .50 HOW TO BUILD A BRIDGE . . . . . . . . . . . . . . . . . . . . . . . . . . . . . . .51 HOW TO BUILD A GROVE OF TREES . . . . . . . . . . . . . . . . . . . . . . .52 HOW TO BUILD A LAKE USING THE DEFAULT WATER PLANE .52 HOW TO BUILD A LAKE USING WATER POLYGONS . . . . . . . . . .53
1

HOW TO BUILD A RIVER . . . . . . . . . . . . . . . . . . . . . . . . . . . . . . . .53 HOW TO BUILD A MAP PERIMETER . . . . . . . . . . . . . . . . . . . . . . .54 HOW TO CHANGE THE TIME OF DAY . . . . . . . . . . . . . . . . . . . . . . .54 HOW TO MAKE A MAP AVAILABLE TO THE GAME . . . . . . . . . . . .54 HOW TO BUILD A DAM . . . . . . . . . . . . . . . . . . . . . . . . . . . . . . . . . .54
PLAYERS, TEAMS, AND THE BUILD LIST.............. |
55 |
PLAYER LIST . . . . . . . . . . . . . . . . . . . . . . . . . . . . . . . . . . . . . . . . .55 BUILDING TEAMS . . . . . . . . . . . . . . . . . . . . . . . . . . . . . . . . . . . . . .56
TEAMS WINDOW . . . . . . . . . . . . . . . . . . . . . . . . . . . . . . . . . . . . . . . .56 CREATING A TEAM . . . . . . . . . . . . . . . . . . . . . . . . . . . . . . . . . . . . .56 TEAM BUILDING TIPS . . . . . . . . . . . . . . . . . . . . . . . . . . . . . . . . .58
BUILD LIST . . . . . . . . . . . . . . . . . . . . . . . . . . . . . . . . . . . . . . . . . |
.59 |
RE-ORDERING THE BUILD LIST . . . . . . . . . . . . . . . . . . . . . . . . |
.60 |
BUILD LIST PROPERTIES . . . . . . . . . . . . . . . . . . . . . . . . . . . . . |
.60 |
SCRIPTS .................................................................................... |
61 |
CREATING AND EDITING SCRIPTS . . . . . . . . . . . . . . . . . . . . . .61
TO CREATE A NEW SCRIPT . . . . . . . . . . . . . . . . . . . . . . . . . . . . . .61 MAP TOOLS FOR SCRIPTING . . . . . . . . . . . . . . . . . . . . . . . . . . . .62 MISSION INTROS . . . . . . . . . . . . . . . . . . . . . . . . . . . . . . . . . . . . .62 RAMPING DIFFICULTY . . . . . . . . . . . . . . . . . . . . . . . . . . . . . . . . .63
ORGANIZING YOUR SCRIPTS . . . . . . . . . . . . . . . . . . . . . . . . . . . .63
SCRIPT FOLDERS . . . . . . . . . . . . . . . . . . . . . . . . . . . . . . . . . . . . . |
63 |
COPYING AND DELETING SCRIPTS . . . . . . . . . . . . . . . . . . . . . . |
63 |
IMPORT AND EXPORT . . . . . . . . . . . . . . . . . . . . . . . . . . . . . . . . . . |
64 |
SCRIPTING VARIABLES . . . . . . . . . . . . . . . . . . . . . . . . . . . . . . . .64
FLAGS . . . . . . . . . . . . . . . . . . . . . . . . . . . . . . . . . . . . . . . . . . . . . . . |
64 |
COUNTERS . . . . . . . . . . . . . . . . . . . . . . . . . . . . . . . . . . . . . . . . . . . . |
64 |
TIMERS . . . . . . . . . . . . . . . . . . . . . . . . . . . . . . . . . . . . . . . . . . . . . . |
65 |
CONDITIONALS . . . . . . . . . . . . . . . . . . . . . . . . . . . . . . . . . . . . . . . |
65 |
TRIGGER AREAS . . . . . . . . . . . . . . . . . . . . . . . . . . . . . . . . . . . . . . . |
66 |
SCRIPTING TUTORIAL . . . . . . . . . . . . . . . . . . . . . . . . . . . . . . . . .67
HOW TO ACTIVATE THE SCRIPT DEBUGGER . . . . . . . . . . . . . . .67 HOW TO SET WIN CONDITIONS . . . . . . . . . . . . . . . . . . . . . . . . . .67 HOW TO SET LOSS CONDITIONS . . . . . . . . . . . . . . . . . . . . . . . . .67 HOW TO CREATE SUBROUTINES . . . . . . . . . . . . . . . . . . . . . . . . . .68 HOW TO CREATE SEQUENTIAL SCRIPTS . . . . . . . . . . . . . . . . . .68 HOW TO SET DIFFICULTY LEVELS . . . . . . . . . . . . . . . . . . . . . . .68 HOW TO SPAWN OBJECTS . . . . . . . . . . . . . . . . . . . . . . . . . . . . . . . .69 HOW TO SCRIPT RE-INFORCEMENT TEAMS . . . . . . . . . . . . . . . .69 HOW TO SPAWN TEAMS . . . . . . . . . . . . . . . . . . . . . . . . . . . . . . . . . .70 HOW TO MOVE A TEAM TO A NEW LOCATION . . . . . . . . . . . . . . . .70 HOW TO SCRIPT ACTIONS FOR AI TEAMS . . . . . . . . . . . . . . . . .71 HOW TO CREATE OBJECT LISTS . . . . . . . . . . . . . . . . . . . . . . . . .71 HOW TO CONFIGURE AND EXECUTE PRIORITY
LISTS FOR THE AI . . . . . . . . . . . . . . . . . . . . . . . . . . . . . . . . . . .72
2

HOW TO GET THE AI TO ATTACK . . . . . . . . . . . . . . . . . . . . . . . . .72 HOW TO CONFIGURE THE AVAILABLE TECHNOLOGY TREE . . .73 HOW TO CHANGE THE MAP SIZE DURING A MISSION . . . . . . . .73 HOW TO TRIGGER AUDIO . . . . . . . . . . . . . . . . . . . . . . . . . . . . . . . .74
DEBUGGING .............................................................................. |
75 |
DEBUGGING OBJECTS . . . . . . . . . . . . . . . . . . . . . . . . . . . . . . . . . .75
SELECTING DUPLICATE OBJECTS . . . . . . . . . . . . . . . . . . . . . . .75 FINDING LOST OBJECTS . . . . . . . . . . . . . . . . . . . . . . . . . . . . . . .75
FIXING TEAMS . . . . . . . . . . . . . . . . . . . . . . . . . . . . . . . . . . . . . . . .75 REPAIRING TEXTURE ERRORS . . . . . . . . . . . . . . . . . . . . . . . . . .76
HARD TEXTURE EDGES . . . . . . . . . . . . . . . . . . . . . . . . . . . . . . . . .76 BLENDS IN THE MIDDLE OF A TEXTURE FIELD . . . . . . . . . . .76 THREE-WAY BLENDS . . . . . . . . . . . . . . . . . . . . . . . . . . . . . . . . . . .76 STRETCHED CLIFF TEXTURES . . . . . . . . . . . . . . . . . . . . . . . . . .77
SCRIPT DEBUGGER . . . . . . . . . . . . . . . . . . . . . . . . . . . . . . . . . . . .77
ACTIVATING THE SCRIPT DEBUGGER . . . . . . . . . . . . . . . . . . . .77 SCRIPT DEBUGGER SCREEN . . . . . . . . . . . . . . . . . . . . . . . . . . . . .77
OPTIMIZING YOUR MAP.................................................... |
78 |
ELEMENTS TO OPTIMIZE . . . . . . . . . . . . . . . . . . . . . . . . . . . . . . |
.78 |
OBJECT COUNTS . . . . . . . . . . . . . . . . . . . . . . . . . . . . . . . . . . . . . . |
.78 |
STEEP SLOPES . . . . . . . . . . . . . . . . . . . . . . . . . . . . . . . . . . . . . . . |
.78 |
BLENDED TEXTURES . . . . . . . . . . . . . . . . . . . . . . . . . . . . . . . . . . |
.78 |
MAP SIZE . . . . . . . . . . . . . . . . . . . . . . . . . . . . . . . . . . . . . . . . . . . |
.79 |
MAP PERIMETER . . . . . . . . . . . . . . . . . . . . . . . . . . . . . . . . . . . . . . |
.79 |
TRIGGER AREA POLYGONS . . . . . . . . . . . . . . . . . . . . . . . . . . . . . |
.79 |
SUFFICIENT SPACE . . . . . . . . . . . . . . . . . . . . . . . . . . . . . . . . . . |
.79 |
OBJECT PLACEMENT . . . . . . . . . . . . . . . . . . . . . . . . . . . . . . . . . . |
.79 |
BODIES OF WATER . . . . . . . . . . . . . . . . . . . . . . . . . . . . . . . . . . . . |
.80 |
RESOURCE COUNTS . . . . . . . . . . . . . . . . . . . . . . . . . . . . . . . . . . . |
.80 |
WAYPOINT PATHS . . . . . . . . . . . . . . . . . . . . . . . . . . . . . . . . . . . . |
.80 |
SCRIPT MANAGEMENT . . . . . . . . . . . . . . . . . . . . . . . . . . . . . . . . . |
.80 |
SELECT OBJECTS . . . . . . . . . . . . . . . . . . . . . . . . . . . . . . . . . . . . |
.80 |
IMPROVING PERFORMANCE IN WORLD BUILDER . . . . . . . . . . |
.81 |
GLOSSARY.................................................................................. |
82 |
APPENDIX A: A GOOD INITIAL SKETCH .............. |
85 |
3

INTRODUCTION
NOTE: The Command & Conquer™ Generals World Builder tool is provided on an “as-is” basis. It is not supported by Electronic Arts Technical Support. Please see the EA Tools End User License on boot-up for details.
Welcome to Command & Conquer Generals World Builder. This development tool is used by Electronic Arts designers to create single-player missions and multiplayer maps for Command & Conquer™ titles, and now it’s available to you. The full-featured 3D environment gives you unprecedented visual controls and a wide array of tools to get the details of your maps exactly as you want them. Building game maps is easier than ever, as the World Builder’s suite of tools lets you rapidly prototype your creations and then jump directly into the game to play them.
KEY FEATURES
Step-by-step process to build multiplayer maps. Follow the steps listed in this document to get up to speed building multiplayer maps ( p. 36) for up to eight players. With a few extra steps, you can turn your finished multiplayer map into a Skirmish map ( p. 40).
Designed like an art tool. The menus, tools, and their uses are derived from desktop art tools. If you’re familiar with traditional art software programs, World Builder will feel very comfortable.
What You See Is What You Get. Interact with your maps through the same engine as the game. Visual toggles and camera options in World Builder allow you to position the camera anywhere over the map and to view some or all of its components at any time.
Urban objects and textures. The enormous library of 3D objects includes detailed touches to create realistic cities from all over the world. You can build dense Asian cityscapes, Middle Eastern villages, or modern American sprawl. Objects and textures are included for roads, highways, bridges, and railroads, too.
Many environmental settings. Use textures and settings to place your map in a wide range of geographic locations at any time of day.
Small output. Created maps are small enough to email to your Command & Conquer friends.
4

BEFORE YOU BEGIN
Prior to starting World Builder, set your display to 800 x 600 or higher in the Display control panel. For information on how to set it, see your Windows® Help file.
To get up and running in World Builder, you should do the following:
World Builder supports the use of dual monitors. You can design on one monitor and test your designs in the game on the other one.
1.To create a new map, select NEW from the File menu. As you read through this document, you can test out what you learn inside World Builder.
2.To get familiar with the components of a Command & Conquer Generals map, Elements of a Map on p. 8.
3.For explanations of the different elements of the desktop of World Builder, The Desktop on p. 10.
4.For explanations about the individual menu items and toolbar controls, Command Reference on p. 14.
5.Follow the step-by-step instructions to build your first multiplayer map. For more information, Eighteen Steps to Creating a Multiplayer Map on p. 36. With a few more steps, you can turn your multiplayer map into a Skirmish map. For more information, A Few Extra Steps for Skirmish Maps on p. 40.
To learn more about how to build specific features in your maps, Tutorial: How To on p. 43.
6.After you feel comfortable building multiplayer maps, you may want to try to create single-player maps. Since behaviors for CPU-controlled armies must be scripted, single-player maps are more difficult to create. For more information, Building Single-Player Maps on p. 42.
CONVENTIONS OF THE TOOL
Length and width distances are measured in feet. To assist in measurement, you can toggle display of the map grid. Each square of the grid measures 10 scaled feet on a side.
To toggle display of the map grid, select SHOW GRID from the View menu.
The most commonly used tools are placed in the toolbar above the Work window. There are many more editing, viewing, and global tools in the menu system. For more information, Command Reference on p. 14.
Depending on the command or object that you have selected, a window appears to the right of the Work window. Change the parameters in this window to alter the properties of the selected item or items.
To select an object on the map, left-click on it. To rotate that object, click and drag the pointer at the end of the object’s icon.
To dolly the camera, right-click and drag the mouse to the edge of the screen. Release the mouse-button to stop the camera movement.
If possible, use a mouse with a mouse wheel, which can be used to zoom and pivot the camera.
5

BEGINNING MAP DESIGNERS
After installing World Builder and reading this Introduction, beginning map designers should read the Getting Started ( p. 7) chapter to learn the basic elements of the application. In the Laying Out a Map ( p. 30) chapter, some fundamental concepts in designing maps are presented.
Start building a very simple multiplayer map by following the Eighteen Steps to Creating a Multiplayer Map
( p. 36). If you have questions during the process, you can refer to the Tutorial: How To ( p. 43) section, which describes in simple steps how to build individual terrain, texture, and object features of a map.
Skirmish maps are made by adding a few more things to a multiplayer map. If you design a good multiplayer map, you can produce a good Skirmish map easily. For more information, A Few Extra Steps for Skirmish Maps on p. 40.
When you have completed your map, be sure to test it in the game.
Since you must script unit, team, and player strategies in single-player maps, they are more challenging to create. It is recommended that you wait until you have some skill in creating multiplayer maps before you start building single-player missions.
ADVANCED MAP DESIGNERS
World Builder is a graphical tool whose design is based on industry-standard graphics applications. If you are familiar with common art packages, the tools of World Builder should be fairly intuitive.
As you learn, you may want to review the Command Reference ( p. 14) section, which outlines every toolbar tool and menu item in some detail.
It is highly recommended that all designers become familiar with the Eighteen Steps to Creating a Multiplayer Map ( p. 36) and A Few Extra Steps for Skirmish Maps ( p. 40) materials. These sections present a general, step-by-step approach to developing maps. When you’re ready to build the more complicated maps for single-player games, Eighteen Steps to Creating a Multiplayer Map on p. 36.
Additionally, the Tutorial: How To ( p. 43) provides simple instructions for creating rudimentary features of maps.
For definitions of terminology used in World Builder, Glossary on p. 82.
6

GETTING STARTED
Because the tools of World Builder are easy to use, you can begin building usable, multiplayer maps immediately. This chapter discusses how to develop multiplayer and single-player maps in World Builder.
Since single-player maps require behavior scripting of CPU-controlled opposition, you should begin by building multiplayer maps.
At the conclusion of this chapter, you should have enough information to begin development of your own project and references to other parts of the documentation to explore topics in depth.
Prior to starting World Builder, you should set your display to 800 x 600 or higher in the Display control panel. For information on how to set it, see your Windows Help file.
To start World Builder, double-click World Builder icon or use the Windows Start menu. The program opens. To begin building a new map, select NEW from the File menu.
Note: World Builder requires significant computational and system resources to update the map and your computer screen. If it seems that your computer is updating too slowly, you can adjust the display settings in World Builder to improve performance. For more information,
Improving Performance in World Builder on p. 81.
Each designer discovers his or her own strategy for designing in World Builder. Before you begin designing, you must decide whether your map is a single-player mission or multiplayer/Skirmish design. Multiplayer maps should be more open in design, while single-player maps can be more constrained to create a satisfying flow to the game.
After answering the above question, consider the following ones. What is the basic shape of the map? Is there a dominating terrain feature? Is there a slope to it? Where in the world is the map located? Where are the best locations to build a base? These questions can affect the concept that you begin to implement. For more information on beginning your designs, Laying Out a Map on p. 30.
As you build your map, you are likely to need to reposition the camera and change the scale of the display. For more information, Camera Settings on p. 11.
When you want to test your work in the game, you can save your map for use in the game. For more information, Making Maps Available to the Game on p. 13.
The following sections provide further details on getting started.
Elements of a Map. Defines the basic components of a map.
The Desktop. Describes the windows, tools, and status information that is displayed in the application desktop.
Working with Map Files. How to accomplish the basic tasks of loading, saving, erasing, and exporting your work.
7
ELEMENTS OF A MAP
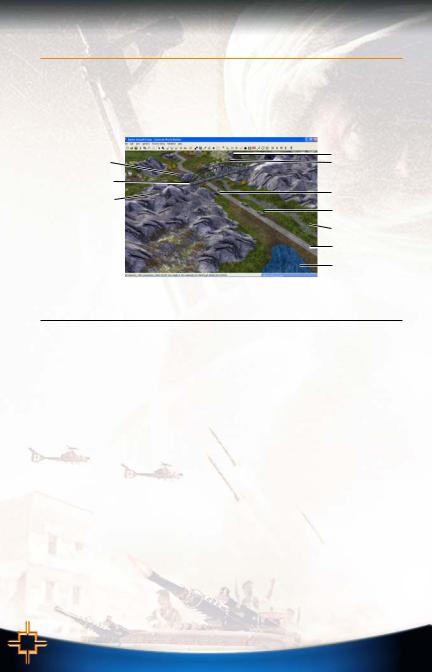
All Command & Conquer maps are composed of three basic components: terrain, textures, and objects which are generally developed in that order. Using the tools of World Builder, you can add, remove, raise, lower, and shape the terrain to describe the land forms of your map. On top of the terrain, you layer textures that give the appearance of grasslands, desert, snow, asphalt, or any other earthly surface. Finally, objects such as military structures, neutral buildings, civilians, trees, and vehicles are placed around your map for strategic purposes or for a natural appearance.
Military Structure |
|
Neutral Structure |
|
Aircraft |
|
Bridge |
|
|
Railroad |
|
Infantry |
|
|
|
|
|
Land Vehicle |
|
|
Texture |
|
|
Road |
|
|
Lake |
|
|
|
The table identifies the components of a map and provides basic definitions. Following the table, you can read about the global parameters that you can set for your map.
For more definitions, Glossary on p. 82.
Terrain |
Terrain is the mesh underneath the surface that describes the shape of |
|
the hills and valleys of the map. |
Textures |
Textures cover the surface of the map and give the visual appearance of |
|
the varying land forms. |
Military Structures |
Each side has structures with specific military purposes. |
Neutral Structures |
Neutral buildings on your map can add a strong sense of place and are |
|
useful gameplay elements. They can be occupied, commandeered, or |
|
just blown up. |
Infantry |
Each side has multiple types of foot soldier. |
Land Vehicles |
The land war is usually won with jeeps, tanks, troop carriers, and other |
|
military vehicles. |
Aircraft |
The USA and China sides can develop air capabilities. Map designers |
|
should not forget the gameplay effects of aircraft. |
Roads |
These visual effects of the urban landscape are actually objects. In the |
|
game, they become textures. |
Bridges |
In almost any battle, a bridge becomes a key tactical objective. Bridges |
|
can be destroyed and repaired at the end points. Taller bridges require |
|
vulnerable support beams. |
Railroads |
Railroads are specialized road textures with supporting structures like |
|
stations, crossings, and tunnels. |
Bodies of Water |
Lakes and rivers are combinations of specialized shapes and textures. No |
|
land vehicle can cross a body of water. |
Ambient Sound |
You can apply ambient sound to areas of your map such as city streets, |
|
markets, and farms. Sounds are placed like other objects. You should |
|
have no more than three ambient sounds in any displayed map area. |
8
Trigger Areas |
You can define trigger areas as polygons to be referenced in scripts. |
|
These areas are invisible to the user but visible to every unit in the game. |
|
Through scripts, units can take actions based on activities inside and |
|
outside of trigger areas. |
Waypoints |
A waypoint is a marker that you place on the map. Through scripts, you |
|
can reference the waypoint as a location on the map. There are a |
|
number of specially named waypoints, which are mentioned throughout |
|
this document. |
Waypoint Paths |
A string of connected waypoints becomes a waypoint path, which can |
|
be referenced through scripts. Units and teams of units can be |
|
instructed to move along waypoint paths. |
Other Map Elements |
World Builder comes with a full library of miscellaneous man-made and |
|
natural objects to spice up your maps. |
MAP ENVIRONMENTAL SETTINGS
Map Perimeter. Around the edge of your map, you need to define a map perimeter, which indicates the edge of the map for AI-controlled objects.
To set your map perimeter, click the Border tool in the toolbar. For more information, Border Tool on p. 26.
Default Water Plane. If you scroll to the edge of a newly created map, you can see a blue rectangle. This rectangle is the default water plane for your map. Use this water plane to shape the largest body of water on your map, as its cost on system resources is low. For more information on creating bodies of water, Water Tool on p. 23.
GLOBAL LIGHTING
After you establish the time of day in your map, you can tweak the global lighting for terrain and objects.To change your global lighting settings, select GLOBAL LIGHT OPTIONS from the Edit menu.
Although they are expensive in terms of performance, you can create custom shadows over individual objects. For more information, Edit Shadows on p. 17.
In the Global Light Options, you can modify the light source over the map.
Ambient: Ambient light comes from no single source. Enter RGB values for the ambient lighting. The new color is displayed in the square.
Sun: Set the angle of the sun and its 360-degree location around the map. Changes to these positions affect the lighting on the terrain. Set RGB values to change the color of the sun.
Accent 1: Define an accent light source using the same controls as Sun placement. An accent is an additional lighting source to highlight a specific area of the map.
Accent 2: Define a second light accent source using the same controls as Sun placement.
Lighting Applies To: Apply the lighting settings to selected elements of the map. In rare cases, you may want to light the terrain and the objects differently for mood, but keep the position of the light source consistent.
To restore defaults, click RESTORE TO DEFAULT. To close the Global Lighting Options window, click the X in the corner.
9
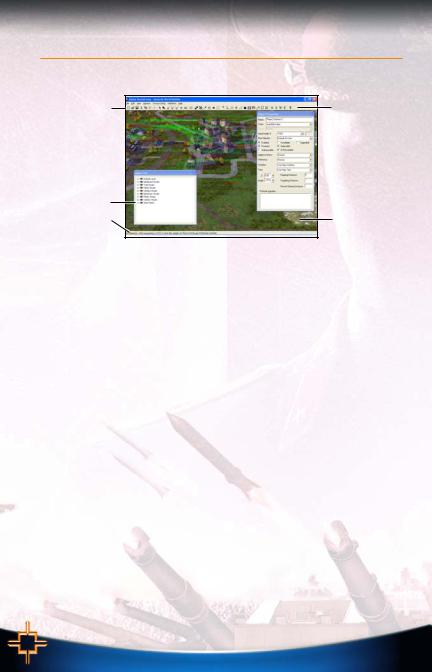
THE DESKTOP
Read this section to learn more about elements found on the desktop of the Command & Conquer Generals World Builder.
Menus |
Toolbar |
 Object Properties
window
Layers window |
|
Status Bar |
Work window |
Work window – The main window in the application, the Work window is where all terrain, textures, and objects are placed and manipulated.
Toolbar – Across the top of the Work window, the most commonly used tools are available as clickable icons. For more information, Toolbar on p. 22.
Context windows – Depending on what tool is selected, a window appears in which you configure the settings of the tool or the object that you are placing.
Menus – From the menu system, you can select commands to edit and view your map or change the textures and windows of it. For more information, Menus on p. 14.
Status Bar – At the bottom of the screen, the Status Bar displays current cursor positional and color information. For more information, Status Bar on p. 27.
Layers List – You can organize objects into visual layers for display purposes. Layers are listed and manipulated in the Layers List. For more information, Layers List on p. 27.
A NOTE ABOUT 3D DIRECTIONS
Movements in three-dimensional space can be described in three directions. Stand up from your computer. Let’s call the position where you are located, “Point A.”
The X-direction refers to steps to the left or right of Point A. The Y-direction refers to steps forward or backward of Point A.
The Z-direction refers to changes in elevation from Point A. From where you’re standing, movements in the Z-direction require you to jump into the air or dig into the ground.
As a convention, the direction towards the top of the screen when you first load a new map is considered North.
MAP SETTINGS
Through the Map Settings window, you can name and describe your map, as well as set the time of day. The name and description of your map appear in the game.
To change your map settings, select EDIT MAP SETTINGS from the Edit menu. In the window, enter a name and a description in the spaces provided. Select time of day settings from the drop-down. To accept the changes, click OK.
10

RESIZING YOUR MAP
To your map, you can add more space or subtract terrain to trim off the unused pieces. It’s best to resize your map before you have added many objects or waypoints.
You should have at least an extra 70 tiles (700 feet) on each side of your map as additional workspace.
To resize your map, select RESIZE from the File menu. For more information on creating bodies of water,
Resize Map on p. 15.
MAP GRID
You can toggle display of a grid to assist in the placement of objects and the measurement of distances between them. The grid actually displays the 3D wireframe underlying the terrain that you shape.
To toggle display of the 3D wireframe, select SHOW WIREFRAME 3D VIEW from the View menu.
To force placed objects to align with the underlying grid, select SNAP TO GRID from the View menu. Snapping to the grid facilitates placement, alignment, and spacing of objects.
For measurement of distances between objects, you can switch your view to a top-down orientation.To switch to a top-down view, select SHOW FROM TOP DOWN VIEW in the View menu.
Each grid square is 10 scaled feet on a side. Distances can be measured by counting squares, or you can move the cursor over the two points and compare the locations displayed in the Status Bar. A calculator may help.
To change the number of grid squares displayed on-screen at any time, select PARTIAL MAP SIZE from the View menu. In the sub-menu, select the grid size to display.
CAMERA SETTINGS
You can place the camera over any location on the map and vary its pitch and distance from the terrain. For more information on repositioning the camera, Mouse Functions below.
To change the pitch of the camera, select CAMERA OPTIONS from the Edit menu. For more information, Camera Options on p. 17.
To look in a specific compass direction, use the directional icons in the toolbar. For more information,
Other Tools on p. 26.
For information on changing the size of the Work window, Window Menu on p. 20.
VIEW TOGGLES
To simplify your view of the map and to improve performance in World Builder, you can toggle the display of various elements on your map.
To toggle display of map components, use the commands under the View menu. For more information,
View Menu on p. 18.
For more information on improving the performance of World Builder, Improving Performance in World Builder on p. 81.
MOUSE FUNCTIONS
Your primary device for manipulating terrain and textures and placing objects is the mouse. By moving the mouse, you move the cursor over the section of map displayed in the Work window. When using the mouse in conjunction with its buttons, you change the view of the window over your map.
To select an item, click the Select and Move tool in the toolbar. Then, move the mouse over the item and click the left mouse button. To select multiple items, click and drag a selection rectangle over the desired items. All items inside the rectangle are selected and can be manipulated together.
To dolly the camera across the map, click the right mouse button and drag until you are over the desired location.
If possible, use a mouse with a wheel device in World Builder. The wheel can be used to zoom in or out of the map and to rotate the camera.
To rotate the camera, click the mouse wheel (if available) and drag the mouse.
To change the height of the camera, roll the mouse wheel (if available).
11
QUITTING THE PROGRAM
To safely exit the program, select EXIT from the File menu.If prompted, save your work, or unsaved changes are be lost.
WORKING WITH MAP FILES
This section covers the basic file functions of making maps—from creating a new one to distributing a completed one to your Command & Conquer Generals friends.
CREATING A NEW MAP
To create a new map, select NEW from the File menu. In the dialog box, enter the X and Y size of the map, as well as the initial height of the terrain. Click OK.
SAVING YOUR WORK
World Builder maps are stored as data, along with references to all of the art that they use. This storage method means that completed maps are usually less than 1.5MB.
To save your map, select SAVE from the File menu.
The default directory for saved maps is inside your My Documents folder. You can choose to save in any directory.
To save a version under a different name or in a different location, select SAVE AS… from the File menu. To save the maps so that it is usable in the game, click USER MAPS. Save the map in that directory.
The Save As feature is useful if you are engaged in major changes to your map or if you want to experiment without committing to the change.
LOADING A MAP
To load your map, you load World Builder file. These files end with the .MAP extension.
To load a map, select OPEN from the File menu. Navigate to the folder where you saved your map. Select the .MAP file and press OPEN. Your map opens.
World Builder files contain all of the data necessary to describe the contents of your map. They do not contain the object and texture libraries; in a World Builder .MAP file, objects and textures are stored as references to the libraries that are automatically loaded when you load the World Builder file.
EARLIER VERSIONS OF COMMAND & CONQUER
World Builder does not support the loading, saving, or design of maps from earlier Command & Conquer titles.
12

ERASING YOUR WORK
In World Builder, a few mouse clicks can undo or erase your worst blunders.
UNDO/REDO
If you make a simple mistake, undo it.
To undo the last action, select UNDO from the Edit menu, or press v + Z.
The last 10 operations can be undone. Changes to your view of the map cannot be undone.
To redo an undone action, select REDO from the Edit menu, or press q + v + Z.
DELETING OBJECTS
To delete one or more objects, select the objects in the Work window. Then, press y.
DELETING TEXTURES
To delete a texture, repaint it with a new one.
To revert to the macrotexture, select the macrotexture with the Eyedropper ( Eyedropper on p. 24). You can fill in a texture field using the Flood Fill tool ( Flood Fill on p. 24).
DELETING TERRAIN CHANGES
To undo a terrain change after you have completed it, press v + Z.
To flatten the terrain to height of the surrounding terrain, use the Height Brush tool, configured to the base height of the terrain. For more information, Height Brush on p. 23.
DELETING MAPS FROM YOUR COMPUTER
To delete a map from your computer, navigate the directory tree of your hard drive to the directory where you have saved your maps. Your map and its support files are contained in a directory named for the map. Click and drag the directory to the Recycling Bin on your Windows desktop.
MAKING MAPS AVAILABLE TO THE GAME
At any time, you can check out your map in the game.
To load your map in the game, select JUMP TO GAME from the File menu, or press v + J.
For debugging purposes, you can dump all of the naming, positional and scripting information for the objects in your map to a text file.
To dump your map to a text file, select DUMP MAP TO FILE from the File menu.
You can share completed maps with friends by sending the file as an email attachment. A completed map should be less than 1.5MB in size.
In online multiplayer games, if the host selects a user-created map, that map is automatically transferred from his computer to all of the players in the game. Single-player maps must be manually transferred to other players.
13

COMMAND REFERENCE
The Command Reference contains all of the menu and toolbar commands available from the desktop. Additionally, you can learn more about useful displays such as the Layers List and the Object Properties window.
Menus can be accessed from the menu bar at the top of the screen.
The toolbar appears on-screen, and its display can be toggled in the View menu. For more information,
Toolbar on p. 22.
The status bar appears along the bottom of the application window. For more information, Status Bar on p. 27.
The Layers List allows you to organize the elements of your map into visual layers whose display can be toggled. For more information, Layers List on p. 27.
The Object Properties window lists the properties for any selected object. For more information,
Object Properties on p. 28.
MENUS
FILE MENU
NEW
Create a new map. In the window, enter the dimensions, the basic height, and the background texture to be applied.
Keyboard Shortcut: v + N
Suggested dimensions:
Single-player: no larger than 350 x 350 tiles.
2-player: 250 x 250 tiles.
4- to 6-player: 350 x 350 tiles.
8-player: 450 x 450 tiles. If you’re creating a map over 400 x 400 tiles, you should have clear reasons to do so. For online games, you may not be able to find seven other players that can play such a large map effectively.
Suggested border:
70 tiles (700 feet) on each side.
Suggested initial height:
16, if terrain has very mild depressions. Use a setting of 50 if the terrain changes are more drastic.
OPEN
Open an existing map. In the dialog, navigate the directory tree to find the map. Then, click OPEN.
Keyboard Shortcut: v + O
CLOSE
Close World Builder and exit to the desktop. You are prompted to save any unsaved work.
14

SAVE
Save changes made to an existing project. If the current project is new, then you must enter a filename.
Keyboard Shortcut: v + S
SAVE AS…
Save the current map under a new file name.
JUMP TO GAME
Save the current map, exit World Builder, and load the map in the game.
Keyboard Shortcut: v + J
NOTE: If your system is capable, you can have World Builder and the game open at the same time and thus do not need to use this command.
RESIZE MAP
Add or subtract area on your map. In the window, the current size is displayed. Enter new dimensions for your map. In the Anchor area, click the square where you want to locate the current map inside of the new map. To resize the map, click OK.
NOTE: Resizing the map can change the location of waypoints, waypoint paths, and area polygons. After resizing the map, double-check the location of all of the elements.
PRINT…
Print the current map.
Keyboard Shortcut: v + P
NOTE: This feature is disabled in the beta release of World Builder. It may be available in a subsequent version.
PRINT PREVIEW
NOTE: This feature is disabled in the beta release of World Builder. It may be available in a subsequent version.
Preview the printout of your map on-screen.
PRINT SETUP…
Windows-based print setup screen.
DUMP MAP TO FILE
Dump name, position, team, and scripting information of every object into a text file. The dumped file is useful for debugging purposes. For example, you can search for objects or waypoints that you can’t find onscreen in World Builder.
RECENT FILES
List the last four maps opened in the editor. To open a recent map file, select it in the menu.
EXIT
Quit World Builder. You are prompted to save any unsaved work.
15

EDIT MENU
UNDO
Remove the last operation performed on your map.
The last 10 operations can be undone. Changes to your view of the map cannot be undone.
Keyboard Shortcut: v + Z
REDO
Perform again the last map operation that was undone.
Keyboard Shortcut: q + v + Z
CUT
Remove all selected objects and place them on the clipboard.
Keyboard Shortcut: v + X
COPY
Duplicate all selected objects and place them on the clipboard.
Keyboard Shortcut: v + C
PASTE
Place the contents of the clipboard at the selected location.
Keyboard Shortcut: v + V
NOTE: Pasting objects can produce unexpected results. For more information, Select Duplicate Objects below.
DELETE
Remove selected elements from the map.
Keyboard Shortcut: y
SELECT DUPLICATE OBJECTS
Select all objects that are located on top of another object. When you use the Paste command, objects are pasted directly on top of the originals so that they look like a single item. You should periodically search for duplicate objects.
Don’t place objects on top of each other; use this feature often.
SELECT BAD TEAM OBJECTS
When a created team is deleted, any objects remaining on the map from that team have no team association and can cause problems in the game. Periodically, use this feature to see if any objects have no team.
SELECT SIMILAR
NOTE: Pasting objects can produce unexpected results. For more information, Select Duplicate Objects above.
When you select an object, the Select Similar command selects all objects of the same type on the map.Select Similar is most commonly used to change properties of object types.
Keyboard Shortcut: v + M
16

SELECT MACROTEXTURE…
Note: This feature is disabled in the beta release of World Builder. It may be available in a subsequent version.
Select the background texture of the map.
REPLACE SELECTED…
Replace all instances of the selected object with another object. In the object library, navigate the object tree to find the object to replace. To make the replacement, click OK.
Object properties are inherited by the replacement objects.
PICK CONSTRAINT
When you choose a constraint, all selection tools in World Builder select only objects of that type. For example, you can use Pick Constraint to click and drag a rectangle over an area to select all buildings in it.
To return to the default selection mode, select ANYTHING from the Pick Constraint sub-menu.Use the keyboard shortcuts to pick constraints.
SCRIPTS…
Open the Scripts window ( Scripts on p. 61).
GLOBAL LIGHT OPTIONS…
Open the Global Lighting window ( Global Lighting on p. 9).
CAMERA OPTIONS…
You can set camera positioning for use during development. Use this information when developing cinematic scripts.
To set the angle of the camera, enter a new figure in the Pitch textbox.
EDIT SHADOWS…
Set the color (in RGB values) and the opacity of shadows on your map. Raising the default intensity creates harsher shadows.
EDIT MAP SETTINGS…
Open the Map Settings window. Edit the name and description of the map that appear in the game. Select a time of day. To apply the changes, click OK.
NOTE: When you change the time of day and conditions, you may have to re-texture some elements and replace some objects with choices more appropriate for the new environment.
EDIT PLAYER LIST…
Open the Player List ( p. 55).
EDIT TEAMS…
Open the Teams window ( Building Teams on p. 56).
17

VIEW MENU
SHOW GRID
NOTE: This feature is disabled in the beta release of World Builder. It may be available in a subsequent version.
Keyboard Shortcut: v + G
SHOW TEXTURE
NOTE: This feature is disabled in the beta release of World Builder. It may be available in a subsequent version.
Keyboard Shortcut: v + T
SHOW TERRAIN
Toggle display of terrain changes on the map.
SHOW OBJECT ICONS
Toggle display of colored icons beneath objects to assist in selecting and manipulating them.
Keyboard Shortcut: v + B
SHOW WAYPOINTS
Toggle display of all waypoints.
SHOW TRIGGER AREAS
Toggle display of trigger areas created with the Polygon Tool ( p. 26).
SHOW SHADOWS
Toggle display of object shadows. Terrain shadows remain on and are determined by Global Lighting ( p. 9) settings.
Object shadows impact performance in World Builder, so leave them OFF if possible.
SHOW LABELS
Toggle display of identifying labels for sounds and waypoints.
SHOW OBJECTS
Toggle display of objects.
SHOW GARRISONED
Toggle display of flags over buildings controlled by a side.
SHOW MAP BOUNDARIES
Toggle display of the map perimeter.
SHOW SOUND FLAGS
Toggle display of flags used to indicate the position of ambient sounds.
SHOW IMPASSABLE AREAS
Toggle highlighting of areas that cannot be crossed by land vehicles. Use this toggle frequently during development.
Impassable areas should be identified with consistent texturing.
Keyboard Shortcut: v + I
IMPASSABLE AREA OPTIONS
In the window, you can enter, preview, and set the angle at which terrain becomes impassable.
EA TIP: You can set this tool at any angle to show slopes that are steeper than a desired angle. You can highlight slopes too steep for vehicles to climb or imperfections in base areas and other mesas. Use this tool in combination with the Smooth Height tool to polish your maps.
18
To change the angle of impassability, enter a number from 0 to 90 in the Angle textbox.
To preview the effects, click PREVIEW. The changes are displayed in the map.
To accept the changes, click OK. To cancel and exit without changing the angle, click CANCEL.
SHOW ALL OF 3D MAP
Toggle display of the entire map. Use this toggle to see how your work in a local area fits into the entire map.This feature can impact performance, so keep it OFF when you don’t need it.
Keyboard Shortcut: v + A
PARTIAL MAP SIZE
Change the displayed area of the map in the Work window to one of the available selections.If you are experiencing performance problems, keep this setting at the smallest grid size.
SHOW WIREFRAME 3D VIEW
Toggle display of the 3D wireframe that describes the terrain.
Keyboard Shortcut: v + W
SHOW FROM TOP DOWN VIEW
Toggle view of the map from a top-down perspective.
EA TIP: Use this feature with the 3D wireframe view to position objects and features relative to each other. If Snap to Grid is ON, then you can use all three tools for careful placement and alignment of buildings, roads, and sidewalks.
Keyboard Shortcut: v + F
SHOW 3-WAY BLENDS IN WHITE
When textures are blended with the Auto Edge Out ( p. 24) tool, more than two textures can be affected. Three-way texture blends can cause performance slow-downs in the game, so you should try to find and repair three-way blends. Limit their count to 300 in your map. For more information, Three-Way Blends on p. 76.
SHOW CLOUDS
Toggle display of clouds. In World Builder, clouds pass in front of the light source off-screen to create the sense of cloud cover. Showing clouds can affect performance in World Builder.
Keyboard Shortcut: v + U
SHOW SOFT WATER
Toggle display of a softer edge between water and land in World Builder. Turn it OFF to improve performance.
SHOW MACROTEXTURE
Toggle display of the background texture. Turn it off to improve performance.
CHANGE TIME OF DAY
Toggle between the four time of day settings: DAY, DUSK, NIGHT and DAWN. Each of the basic settings can be tweaked with custom Global Lighting ( p. 9) settings.
NOTE: Not all objects can be used during settings such as night. If an object does not have a “Night” image, it disappears from view yet still exists on the map. In the game, players may crash into objects that they cannot see. If you switch the time of day in the middle of development, be sure to double-check the existence of invisible objects.
Keyboard Shortcut: v + D
SNAP TO GRID
Toggle automatic snapping of any selected objects to align with the terrain mesh grid.
Use this command when the 3D wireframe is visible. It’s very useful for city layouts, road layouts, and sidewalks next to them.
Keyboard Shortcut: v + q + G
19

SHOW BRUSH FEEDBACK
Toggle display of the texture or terrain brush passing over the map.
RELOAD TEXTURES
Terrain, object and texture manipulations can cause textures to disappear or to get scrambled. Select RELOAD TEXTURES to reload the textures of your map.
TOOLBAR
Toggle display of the Toolbar ( p. 22). Some tools are available only through the toolbar.
STATUS BAR
Toggle display of the Status Bar ( p. 27) at the bottom of the screen.
LAYERS LIST
Toggle display of the Layers List ( p. 27) window.
WINDOW MENU
In the Window menu, you can set the resolution for the World Builder window.
800 x 600 is the default setting. Higher resolutions impact system performance.
To reset the resolution and window positions to their default settings, select RESET WINDOW POSITIONS.
TEXTURE SIZING MENU
MAP CLIFF TEXTURES
When textures are stretched across cliffs over 80 feet in height, they can look stretched. To do a special mapping for a cliff surface, click the texture that is stretched, and then select this command. Textures are shrunk to their maximum height without distortion, leaving black areas above and below, which you can fill in with other textures.
REMOVE CLIFF TEXTURES
To remove all special texturing applied to cliffs, select this command.
EA TIP: If you have created a very tall cliff and cannot get textures to look nice on it, smooth the cliff into multiple slopes using the Smooth Height tool.
OPTIMIZE TILE USAGE
During development, you may create twoand three-way blended textures. These can slow down your machine. By optimizing textures, you allow World Builder to look at your blended textures to see if it can find similarities between them. Similar blended textures are replaced by a single texture. Optimize tiles before releasing a final version of your map.
REMAP TEXTURES…
Remap Textures lets you replace each texture of your map with a new selection. You may have to remap textures if you change the time of day, geographic location, or conditions.
To replace a texture, navigate the texture tree in the window to find a replacement and click OK.
To skip that texture, click CANCEL. You can now choose to replace the next texture in your map.After you have remapped textures, you should check your blended textures again.
20

TEXTURE SIZING INFO…
Display the amount of space and its percentage of the total available occupied by regular and blended textures.
Each map can contain up to 4MB of texture space for regular and blended tiles. You are unlikely to reach the maximum limit for blended textures, but you should check your usage for regular tiles.
When you are selecting textures in the Terrain Materials Options window, a percentage is listed before each texture name. This percentage indicates the amount of space for regular textures occupied by the texture. Textures that have a 0% indicator are 128 x 128; although they repeat frequently, you are unlikely to run out of space for them. The 4% textures occupy more space, repeat less frequently, and are therefore more suitable for wide-open spaces on your map.
TILE 4 X 4
NOTE: This feature is disabled in the beta release of World Builder. It may be available in a subsequent version.
Set the texture brush size to 4 tiles x 4 tiles.
TILE 6 X 6
NOTE: This feature is disabled in the beta release of World Builder. It may be available in a subsequent version.
Set the texture brush size to 6 tiles x 6 tiles.
TILE 8 X 8
NOTE: This feature is disabled in the beta release of World Builder. It may be available in a subsequent version.
Set the texture brush size to 8 tiles x 8 tiles.
VALIDATION MENU
GENERATE REPORT
NOTE: This feature is disabled in the beta release of World Builder. It may be available in a subsequent version.
FIX TEAMS
If you have units on your map that are not assigned to a team, you can use this command to place those objects in the first team listed in the Teams window. However, it usually makes better sense to fix them manually. For more information, Fixing Teams on p. 75.
HELP MENU
ABOUT WORLD BUILDER…
Learn more about World Builder.
21
TOOLBAR
The most important tools for shaping the terrain, painting textures, placing objects, and adding waypoints and trigger areas to your maps are located in the toolbar above the main application window for easy access.
To activate a tool, click its icon in the toolbar.
To learn the name of a tool, move the mouse cursor over its icon in the toolbar.
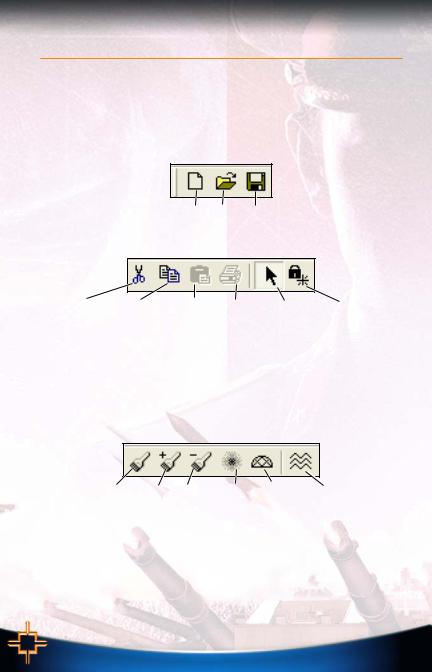
FILE TOOLS
All of the File tools in the toolbar are available from the File menu as well.
New Open Save
EDIT TOOLS
Edit tools that are not available in the Edit menu are described below.
Cut ( p. 16) Copy ( p. 16) Paste ( p. 16) Print ( p. 15) Select and Move Lock Angle
SELECT AND MOVE
The default tool, the Select and Move tool lets you select, adjust, and move objects. When using this tool, each mouse button has a separate function. For more information, Mouse Functions on p. 11.
LOCK ANGLE
Toggle the locking angle for all selection and placement functions. When the angle is locked, all textures and objects are angled in the same direction, which is useful for urban development.
You can use the 3D wireframe of the terrain as a guide. For more information, Show Wireframe 3D View on p. 19.
TERRAIN TOOLS
Height Brush Mound Dig Smooth Height Mesh Mold Tool Water Tool
When shaping the terrain of your map, it is best to shape the largest elements first and then to work on the finer details. The Terrain tools can scale to accomplish both tasks.
The Terrain tools in the toolbar allow you to raise, lower, and flatten terrain in large and small brushstrokes. When you select a terrain tool, you can configure the settings of your brush in the Terrain Brush Options window. With the Ramp tool, you can create pre-fabricated forms in the terrain with a smoothness and finish that is difficult to achieve by hand.
After manipulating terrain, double-check the placement of all objects located on the changed terrain. Some objects do not conform to the terrain.
After you dig out an area, the Water tool lets you fill the area with water and give it a current like a river or an undulating tide like a lake or sea.
22

TERRAIN BRUSH OPTIONS
In the Terrain Brush Options window, you can configure the options for the terrain brush used in the Height Brush, Mound, and Dig tools.
Brush Width. The diameter in cells and feet that is affected by the Brush Height setting.
Brush Feather Width. Distance beyond the center circle in which the changed terrain is blended into the surrounding terrain.
Brush Height. The height by which each application of the tool raises or lowers the terrain.
HEIGHT BRUSH
The Height Brush raises or lowers the selected terrain to the height defined in the window. Set the height, width, and feathering circumference from the center point. Then, click on map locations to change the height. The Height Brush is useful for building base areas, cities, and riverbeds.
MOUND
The Mound tool piles more terrain onto the selected location.
DIG
The Dig tool removes terrain from the map based on the settings in the Terrain Brush Options window.
SMOOTH HEIGHT
The Smooth Height tool smoothes the terrain between the edges of the terrain brush. Use the Smooth Height tool to remove impassable areas and odd edges that can be created with the other terrain tools.
Brush Width. Brush diameter in cells or feet.
Filter Radius. The area beyond the brush width into which the tool attempts to smooth. Large values create more smoothing and more dramatic effects.
Feather Rate. The rate at which smoothing takes place. Low values require scrubbing with the tool over an area to get the desired effect.
EA TIP: In many cases, the Feather Rate should be turned up to the highest settings.
MESH MOLD TOOL
NOTE: This feature is disabled in the beta release of World Builder. It may be available in a subsequent version.
Instead of forcing you to create common terrain shapes by hand each time, the Mesh Mold tool lets you apply pre-defined shapes into the terrain. The Curved Ramp and Ramp options are useful for creating inclines and declines suitable for roads.
Scale %. Scales the mold applied to the terrain as a percentage of the displayed mold.
Height. The elevation at the center point of the mold.
Angle. The angle of the mold relative to the plane of the map.
Adjust Heights. The Adjust Heights options let you adjust the heights of the surrounding terrain to meet the terrain surface of the applied mesh mold.
Preview. Check this box to see a preview of the mold applied to the terrain.
To apply the defined mold to the terrain, click APPLY.
WATER TOOL
The Water tool lets you fill an area with water to create lakes and rivers.
EA TIP: Bodies of water can be very costly on system resources. Where possible, use the default water plane that is part of any new map. For more information, New on p. 12.
For more information on how to build lakes and rivers, How to Build a Lake on p. 52 or How to Build a River on p. 53.
23
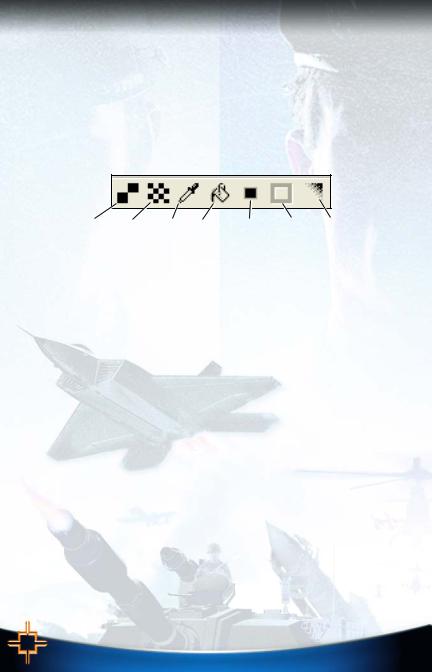
TEXTURE TOOLS
When painting textures, you should follow a large-to-small approach as you do for defining terrain. Start with the Large Tile brush or Flood Fill tool to paint terrain over large areas that have few distinctive features. Then, you can use the Single Tile tool to get to the nitty-gritty.
In the Terrain Material Options window, you can select the texture to apply. A sample is then displayed. Behind it is displayed the texture that most closely blends the selected texture to the background macrotexture.
To paint a texture, select it in the texture tree. Then, click on the location in the map to paint. A texture is painted.
You can paint textures as passable or impassable for moving units. For more information, How to Paint Passable and Impassable Terrain on p. 46.
Single Tile Large Tile Eyedropper Flood Fill Auto Edge Out Auto Edge In; Blend Single Edge
SINGLE TILE
Switch brushes to painting textures on individual tiles.
LARGE TILE
Switch brushes to painting textures across multiple tiles. Large tile sizes are set in the Texture Sizing Menu ( p. 20).
EYEDROPPER
To select a texture already on the map, click the Eyedropper in the toolbar. Then, click the texture in the map. You can now paint this texture with the other texture tools.
You cannot select and apply blended textures. Use the source textures and recreate the blend.
FLOOD FILL
To fill an area with a single texture, select the texture. Then, click the Flood Fill tool in the toolbar. Then, click the area to fill.
AUTO EDGE OUT
This very important tool lets you blend one texture outward into the surrounding textures to create more natural effects. The Auto Edge Out tool blends a selected texture outward and into the surrounding textures.
To blend one texture into another, click the Auto Edge Out tool in the toolbar. Then, click the texture to blend outward.
NOTE: In some cases, blending may not produce desirable results. You may have to repaint initial textures again before you blend them. Do not apply blends on top of blends.
It is possible to apply three-way blends, but they can impact performance in World Builder and the game.
AUTO EDGE IN
NOTE: This feature is disabled in the beta release of World Builder. It may be available in a subsequent version.
BLEND SINGLE EDGE
This tool lets you blend a single edge of a texture tile inward. Use it for detailed work towards the end of your development process.
24
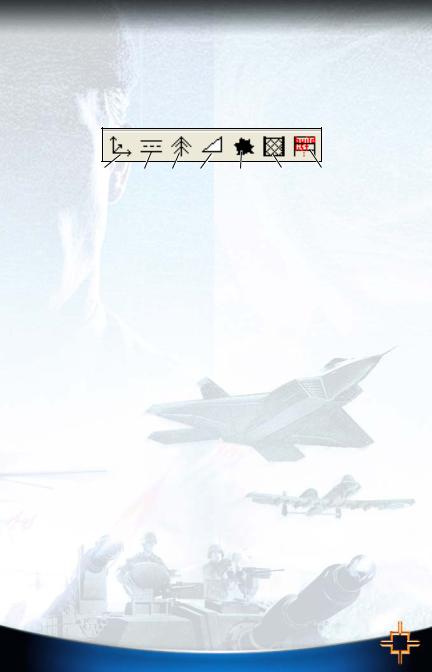
OBJECT TOOLS
The Object tools on the toolbar assist in the placement of single objects and sets of objects on your map. Using the Place Object tool, you can place single object types one or more times on your map. For specialized objects like roads, fences, and scorchmarks, individual tools let you get the right look. To place natural-looking groves of trees, use the Grove tool.
In single-player maps, each CPU-controlled faction must be directed to build its structures in a specific order through the Build List tool.
Place Object Road Grove Ramp Add Scorchmarks Fence Build List
PLACE OBJECT
The Place Object tool is used to place any object in the library on your map. For more information, How to Place Objects from the Object Library on p. 47.
ROAD
Roads, bridges, railroads, and sidewalks are specialized textures that you can paint on your map. To create finished versions of these map elements, you should add other objects around them for polish.
For more information, How to Build a Road on p. 49.
GROVE
The Grove tool can be used to create random, natural-looking groves of trees.For more information, How to Build a Grove of Trees on p. 52.
RAMP
Use the Ramp tool to place ramps in the terrain.
To create a ramp, select the Ramp tool. Click and drag the length of the ramp in the map. In the Ramp Options window, enter a width for the ramp. Then, click PLACE RAMP.
For more information, How to Build a Ramp on p. 43.
FENCE
Use the Fence tool to place fences of all kinds. These fences lack defensive strength.For more information, How to Build a Fence on p. 49.
ADD SCORCHMARKS
The Add Scorchmarks tool lets you add scorchmarks to the terrain to create battlefield effects. You can change the size and the type of scorchmark in the Scorch Options window.
Like roads, scorchmarks are objects that get baked into the terrain during the game.
BUILD LIST TOOL
The Build List tool allows you to set the order in which CPU-controlled sides build their structures. For more information, Build List on p. 59.
25
 Loading...