


DARK REIGN 2

TABLE OF CONTENTS
Diary of Sprawl Council Leader Ren Ordic . . . . . . . . 1
Minimum System Requirements . . . . . . . . . . . . . . 2
Installing Dark Reign 2 . . . . . . . . . . . . . . . . . . . . . 3
Install Directions . . . . . . . . . . . . . . . . . . . . . . 3
AutoPlay . . . . . . . . . . . . . . . . . . . . . . . . . . . . 3
DirectX 7a® . . . . . . . . . . . . . . . . . . . . . . . . . . . 4
Story . . . . . . . . . . . . . . . . . . . . . . . . . . . . . . . . . . 7
Gameplay . . . . . . . . . . . . . . . . . . . . . . . . . . . . . . . 9
Copy Protection . . . . . . . . . . . . . . . . . . . . . . . 9
Main Menu . . . . . . . . . . . . . . . . . . . . . . . . . . 9
Game Controls . . . . . . . . . . . . . . . . . . . . . . . . . . . 13
Interface . . . . . . . . . . . . . . . . . . . . . . . . . . . . 13
The Game Window . . . . . . . . . . . . . . . . . . . . . 13
Moving around the world . . . . . . . . . . . . . 13
Selecting and Moving Units . . . . . . . . . . . 13
Targeting and Attacking . . . . . . . . . . . . . . 13
Grouping Units . . . . . . . . . . . . . . . . . . . . . 14
Unit Status . . . . . . . . . . . . . . . . . . . . . . . 14
Line of Sight and the Fog of War . . . . . . . . 14
Minimap . . . . . . . . . . . . . . . . . . . . . . . . . . . . 15
Infogroup Window . . . . . . . . . . . . . . . . . . . . . 15
Squad Manager . . . . . . . . . . . . . . . . . . . . . . . 16
Building Manager . . . . . . . . . . . . . . . . . . . . . . 17
Unit/Building Context Menu . . . . . . . . . . . . . . 17
Comms Menu . . . . . . . . . . . . . . . . . . . . . . . . . 19
Orders Menu . . . . . . . . . . . . . . . . . . . . . . . . . 19
Options Menu . . . . . . . . . . . . . . . . . . . . . . . . 20
Playing Dark Reign 2 . . . . . . . . . . . . . . . . . . . . . . 23
Building Structures . . . . . . . . . . . . . . . . . . . . . 23
Building Units . . . . . . . . . . . . . . . . . . . . . . . . 23
Power . . . . . . . . . . . . . . . . . . . . . . . . . . . . . . 24
Funding your War Machine . . . . . . . . . . . . . . . 24
Unit Status and Repairing: . . . . . . . . . . . . . . . 25
Recycling Buildings . . . . . . . . . . . . . . . . . . . . 25
Power Up/ Power Down . . . . . . . . . . . . . . . . . . 25
Upgrading Buildings . . . . . . . . . . . . . . . . . . . . 26
Unit Limit . . . . . . . . . . . . . . . . . . . . . . . . . . . . 26
Advanced Features . . . . . . . . . . . . . . . . . . . . . . . . 27
Rally Points . . . . . . . . . . . . . . . . . . . . . . . . . . 27
Rearming . . . . . . . . . . . . . . . . . . . . . . . . . . . . 27
The Spies . . . . . . . . . . . . . . . . . . . . . . . . . . . . 27
Cloaking . . . . . . . . . . . . . . . . . . . . . . . . . . . . 28
Anti-Clandestine . . . . . . . . . . . . . . . . . . . . . . 28
Self Destruct . . . . . . . . . . . . . . . . . . . . . . . . . 28
Special Attacks and Maneuvers . . . . . . . . . . . . 28
Waypoints . . . . . . . . . . . . . . . . . . . . . . . . . . . 29
Unit Behaviors . . . . . . . . . . . . . . . . . . . . . . . . 29
Auto Repair . . . . . . . . . . . . . . . . . . . . . . . . . . 30
Guard . . . . . . . . . . . . . . . . . . . . . . . . . . . . . . 30
Explore . . . . . . . . . . . . . . . . . . . . . . . . . . . . . 31
Traps . . . . . . . . . . . . . . . . . . . . . . . . . . . . . . . 31
Mojos and Air Strikes . . . . . . . . . . . . . . . . . . . 32
Telepad . . . . . . . . . . . . . . . . . . . . . . . . . . . . . 33
Mouse and Keyboard Commands . . . . . . . . . . . . . . 34
Using the Camera . . . . . . . . . . . . . . . . . . . . . . 36
Multiplayer . . . . . . . . . . . . . . . . . . . . . . . . . . . . . 37
Internet (WON) . . . . . . . . . . . . . . . . . . . . . . . 37
Network (LAN) . . . . . . . . . . . . . . . . . . . . . . . . 37
Game Setup . . . . . . . . . . . . . . . . . . . . . . . . . . 38
Player Setup Control . . . . . . . . . . . . . . . . . . . . 38
Host Setup . . . . . . . . . . . . . . . . . . . . . . . . . . . 38
Map Selection . . . . . . . . . . . . . . . . . . . . . 38
Type Filters . . . . . . . . . . . . . . . . . . . . . . . 39
Start Locations . . . . . . . . . . . . . . . . . . . . . 39
Starting Credits . . . . . . . . . . . . . . . . . . . . 39
Rule Set . . . . . . . . . . . . . . . . . . . . . . . . . 39
Kick Player . . . . . . . . . . . . . . . . . . . . . . . 39
Launch . . . . . . . . . . . . . . . . . . . . . . . . . . 39
Add AI . . . . . . . . . . . . . . . . . . . . . . . . . . . 39
Earth . . . . . . . . . . . . . . . . . . . . . . . . . . . . 39
Lock . . . . . . . . . . . . . . . . . . . . . . . . . . . . 39
Unit Limit . . . . . . . . . . . . . . . . . . . . . . . . 40
Unit Filter . . . . . . . . . . . . . . . . . . . . . . . . 40
Map Transfer . . . . . . . . . . . . . . . . . . . . . . . . . 40
Multi-Player in Game Features . . . . . . . . . . . . 40
Multi-Player Mods and Rulesets . . . . . . . . . . . 40
Multi-Player Mods . . . . . . . . . . . . . . . . . . 41
Multi-Player Rulesets . . . . . . . . . . . . . . . 42
Units . . . . . . . . . . . . . . . . . . . . . . . . . . . . . . . . . . 43
Jovian Detention Authority . . . . . . . . . . . . . . . 43
Guardian . . . . . . . . . . . . . . . . . . . . . . . . . 43
Enforcer . . . . . . . . . . . . . . . . . . . . . . . . . 44
Castigar . . . . . . . . . . . . . . . . . . . . . . . . . . 44
PsiTech . . . . . . . . . . . . . . . . . . . . . . . . . . 45

...but I knew that the seal was set by Togra himself - just before he left the earth,
just before the hopes for a new age of unity for all people were buried under the
boot of oppression. And now in these dark times we discover ourselves divided -
by war, by hunger, and by the grasping fists of the JDA, which pull us ever deeper
into a rising tide of blood. We need a sign from Togra - a banner around which we
can unite...
- Diary of Sprawl Council Leader Ren Ordic
1
Shadowhand . . . . . . . . . . . . . . . . . . . . . . 45
Watchman . . . . . . . . . . . . . . . . . . . . . . . . 46
Blackstar . . . . . . . . . . . . . . . . . . . . . . . . . 46
Striker . . . . . . . . . . . . . . . . . . . . . . . . . . . 47
Warden . . . . . . . . . . . . . . . . . . . . . . . . . . 47
Rover . . . . . . . . . . . . . . . . . . . . . . . . . . . 48
Bulldog . . . . . . . . . . . . . . . . . . . . . . . . . . 48
Growler . . . . . . . . . . . . . . . . . . . . . . . . . . 49
Mastiff . . . . . . . . . . . . . . . . . . . . . . . . . . 49
Collector . . . . . . . . . . . . . . . . . . . . . . . . . 50
Hover Collector . . . . . . . . . . . . . . . . . . . . 50
Contstruction Rig . . . . . . . . . . . . . . . . . . . 51
Patrol Cruiser . . . . . . . . . . . . . . . . . . . . . . 51
Dreadnaught . . . . . . . . . . . . . . . . . . . . . . 52
Tech Boat . . . . . . . . . . . . . . . . . . . . . . . . . 52
Sky Fortress . . . . . . . . . . . . . . . . . . . . . . 53
Sprawlers . . . . . . . . . . . . . . . . . . . . . . . . . . . . 54
Rumbler . . . . . . . . . . . . . . . . . . . . . . . . . 54
Fiend . . . . . . . . . . . . . . . . . . . . . . . . . . . 54
Banshee . . . . . . . . . . . . . . . . . . . . . . . . . 55
Skulk . . . . . . . . . . . . . . . . . . . . . . . . . . . . 55
Judas . . . . . . . . . . . . . . . . . . . . . . . . . . . . 56
Infiltrator . . . . . . . . . . . . . . . . . . . . . . . . 56
Voodun . . . . . . . . . . . . . . . . . . . . . . . . . . 57
Scaver . . . . . . . . . . . . . . . . . . . . . . . . . . . 57
GoGo . . . . . . . . . . . . . . . . . . . . . . . . . . . . 58
Scorpion Tank . . . . . . . . . . . . . . . . . . . . . 58
Thunder Cannon . . . . . . . . . . . . . . . . . . . . 59
Collector . . . . . . . . . . . . . . . . . . . . . . . . . 59
Hover Collector . . . . . . . . . . . . . . . . . . . . 60
Contstruction Rig . . . . . . . . . . . . . . . . . . . 60
Vulture . . . . . . . . . . . . . . . . . . . . . . . . . . 61
Air Barge . . . . . . . . . . . . . . . . . . . . . . . . . 61
Disruptor . . . . . . . . . . . . . . . . . . . . . . . . . 62
Hydrofoil . . . . . . . . . . . . . . . . . . . . . . . . . 62
Stasis Boat . . . . . . . . . . . . . . . . . . . . . . . 63
Leviathan . . . . . . . . . . . . . . . . . . . . . . . . 63
Juggernaut . . . . . . . . . . . . . . . . . . . . . . . 64
Buildings . . . . . . . . . . . . . . . . . . . . . . . . . . . . . . . 65
Jovian Detention Authority . . . . . . . . . . . . . . . 65
Command Center . . . . . . . . . . . . . . . . . . . 65
Precinct . . . . . . . . . . . . . . . . . . . . . . . . . . 65
Motorpool . . . . . . . . . . . . . . . . . . . . . . . . 65
Refinery . . . . . . . . . . . . . . . . . . . . . . . . . 65
Dock . . . . . . . . . . . . . . . . . . . . . . . . . . . . 66
Solar Array . . . . . . . . . . . . . . . . . . . . . . . 66
Atomic Generator . . . . . . . . . . . . . . . . . . . 66
Restoration Facility . . . . . . . . . . . . . . . . . 66
Air Control . . . . . . . . . . . . . . . . . . . . . . . . 67
Radome . . . . . . . . . . . . . . . . . . . . . . . . . . 67
Sentinel Gun . . . . . . . . . . . . . . . . . . . . . . 67
Defense Tower . . . . . . . . . . . . . . . . . . . . . 67
Lightning Tower . . . . . . . . . . . . . . . . . . . . 68
Force Field Emitter . . . . . . . . . . . . . . . . . . 68
Camera Tower . . . . . . . . . . . . . . . . . . . . . 68
Telepad . . . . . . . . . . . . . . . . . . . . . . . . . . 68
Sky Fortress Facility . . . . . . . . . . . . . . . . . 68
Sprawlers . . . . . . . . . . . . . . . . . . . . . . . . . . . . 69
Command Center . . . . . . . . . . . . . . . . . . . 69
Barracks . . . . . . . . . . . . . . . . . . . . . . . . . 69
Garage . . . . . . . . . . . . . . . . . . . . . . . . . . 69
Refinery . . . . . . . . . . . . . . . . . . . . . . . . . 69
Scaver Hut . . . . . . . . . . . . . . . . . . . . . . . . 70
Sarcology . . . . . . . . . . . . . . . . . . . . . . . . 70
Shrine . . . . . . . . . . . . . . . . . . . . . . . . . . . 70
Aerodrome . . . . . . . . . . . . . . . . . . . . . . . 71
Wharf . . . . . . . . . . . . . . . . . . . . . . . . . . . 71
Solar Array . . . . . . . . . . . . . . . . . . . . . . . 71
Atomic Power Plant . . . . . . . . . . . . . . . . . 71
Gun Post . . . . . . . . . . . . . . . . . . . . . . . . . 72
Ravager Turret . . . . . . . . . . . . . . . . . . . . . 72
Camera Tower . . . . . . . . . . . . . . . . . . . . . 72
Fence Post . . . . . . . . . . . . . . . . . . . . . . . . 72
Sky Sweeper . . . . . . . . . . . . . . . . . . . . . . 73
Juggernaut Factory . . . . . . . . . . . . . . . . . 73
JDA Build Tree . . . . . . . . . . . . . . . . . . . . . . . . 74
Sprawlers Build Tree . . . . . . . . . . . . . . . . . . . . 75
Unit Effectiveness Chart . . . . . . . . . . . . . . . . . 76
Customer Support . . . . . . . . . . . . . . . . . . . . . . . . . 77
Credits . . . . . . . . . . . . . . . . . . . . . . . . . . . . . . . . . 78
Software License Agreement . . . . . . . . . . . . . . . . . 82
2 3
INSTALLING DARK REIGN 2
GENERAL MINIMUM SYSTEM REQUIREMENTS
INSTALL DIRECTIONS
• To install Dark Reign 2, insert the game CD into your CD-ROM drive.
• If AutoPlay is enabled, the installer splash screen should appear.
• When the installer splash screen appears, click on the Install Dark Reign 2 button.
• For online help, click the Help button. For Electronic Registration, previews, and extras, click the
More button.
• Reinstall Dark Reign 2 Button – Should your copy of Dark Reign 2 be accidentally deleted from your
hard drive, the "Install Dark Reign 2" option will remain grayed out in the installer splash screen. In
this case, you can reinstall using this option.
• Uninstall Dark Reign 2 Shortcut – If you wish to remove Dark Reign 2 from your hard drive, you should
always use this shortcut from the Start Menu. This option will remove all game files except your saved
games, screen shots, and personal settings.
Note: You can return to the splash screen any time without affecting your installed game.
AUTOPLAY
If the Dark Reign 2 splash screen does not appear, try performing the following steps:
1. Double-click on the My Computer icon on your desktop, or right-click on the icon and choose the Open
option.
2. Select the Refresh option located in the View pull-down menu.
3. Double-click on the Dark Reign 2 CD icon in the window or right-click on the icon and choose the
AutoPlay option.
4. After the Dark Reign 2 title screen appears, click on the Install button.
If the AutoPlay feature does not function, please check the following:
1. Make sure the CD is clean and properly placed in the CD-ROM drive.
2. Your CD-ROM driver may not be optimized for use with Windows 95/98. To verify this, perform the
following steps:
a. Open the Windows 95/98 Control Panel folder and double-click on the System icon.
b. Click on the Performance tab. If any of your hardware drivers are not fully optimized for use with
Windows 95/98, they will be listed here with an explanation of the exact problem and suggestions
on how to fix it.
OS: US English Language version of Windows
®
95 or Windows®98
Direct X: DirectX 7.0A required (included)
CPU: Pentium
®
II 233
RAM: 64 MB
Hard Drive Space: 550 MB plus 100 MB for Windows Swap File
2D Video: 100% DX7a compliant 4 MB 2D card (or 2D capable 3D card*) and Drivers
3D Video: 100% DX7a compliant 3D card and Drivers **
Sound: 100% DX7a compliant true 16 bit sound card and Drivers
CD-ROM: 100% Windows 95/98-compatible Quad Speed
(600 K/sec sustained transfer rate) and Drivers
Input: 100% Windows 95/98-compatible mouse or trackball and drivers
100% Windows 95/98-compatible keyboard
MULTIPLAYER
MINIMUM SYSTEM REQUIREMENTS
Connection Type: Internet (TCP/IP) and LAN (TCP/IP) play supported
MODEM: Internet play requires a 100% Windows 95/98-
compatible 28.8 Kbps (or faster) modem and drivers
Network Interface
Card: LAN play (and high-speed Internet play over DSL and cable modems) requires a 100%
Windows 95/98-compatible network interface card and drivers
Supported Chipsets for Windows 95/98:***
3DFx Banshee 3DFx Voodoo 3 Matrox G200 NVIDIA TnT NVIDIA GeForce
3DFx Voodoo 2 ATI Rage 128 Matrox G400 NVIDIA TnT2 NVIDIA GeForce 2
* Some 3D cards do not have refined 2D capabilities. Your 3D card may meet this requirement without the need for
additional hardware. Please contact your 3D card manufacturer for further information on your card's capabilities.
** 3D Accelerator Card Required. A 100% DirectX 7.0a (or higher) compliant 3D video card and driver with z-buffering
capability is Required to play Dark Reign 2. Dark Reign 2 uses Microsoft's Direct 3D to support 3D hardware
acceleration. It has been tested on many, but not all of the major cards incorporating the chipsets listed above. Some
3D accelerator card brands utilizing the chipsets whose names appear on this box may not be fully compatible with the
3D acceleration features utilized by Dark Reign 2. For a list of cards and drivers that have been tested, please visit
http://www.activision.com
*** Some, but not all of the cards with the chipsets listed above have been tested on Windows 2000. For Windows
2000 3D Support, please refer to your hardware manufacturer for 100% Direct X 7.0a (Direct 3D) compliant Windows
2000 drivers.

4
Q. I already have other Windows 95/98 games installed on my computer. Will the Microsoft DirectX Installer
change my DirectX files?
A. If you already have other Windows 95/98 games on your computer, chances are you already have the
initial version of DirectX installed. In this case, the Microsoft installer will detect and overwrite any
previous versions with DirectX 7a. At that point, you will need to restart your computer for the changes
to take effect.
If, however, you already have DirectX 7a installed on your computer, the Microsoft DirectX 7a installer
will detect it and not overwrite any DirectX 7a files. You may not need to restart your computer after
installation in order to run Dark Reign 2.
5
3. Windows 95/98 may not be setup to autoplay CDs. To check, perform the following steps:
a. Open the Windows 95/98 Control Panel folder and double-click on the System icon.
b. Click on the Device Manager tab. Click on the plus sign next to CDROM, select your CD-ROM and
choose Properties.
c. Click on the Settings tab. Insert a check mark in the box to the left of the Auto Insert Notification
and select OK.
4. If autoplay still does not work, please try the following:
a. Double-click on Setup.exe at the root level of the CD, or
b. Go to Run… in your Start menu and type d:\Setup.exe (substitute your CD-ROM’s drive letter if
different from "d:")
DIRECTX 7A
During the Dark Reign 2 setup, the install process will determine if Microsoft DirectX needs to be installed
on your computer. If so, the Microsoft DirectX setup program will install the appropriate files on your
computer. See the online Dark Reign 2 Technical Help file for additional information.
Q. What is DirectX 7a and why do I need it?
A. Microsoft’s DirectX 7a is a set of functions which gives Windows 95/98 games and other applications
their power. Using these functions allows applications to perform advanced functions in networking,
graphics, sound, and input beyond what’s possible on other operating systems and accounts for many
of the performance gains associated with Windows 95 games.
Q. If I don’t install DirectX 7a when I install the game, can I install it later?
A. Yes. You will need to manually install it. To do so, use the following instructions:
1. Place the disc in the CD-ROM drive and exit from any autoplay screens.
2. Double-click on My Computer.
3. Right-click on your CD-ROM drive and choose Install DirectX.
4. Follow the installation process. When DirectX installation finishes, you will need to restart your
computer for the new drivers to work.

6
I have always been here. And I watch.
Once I had a name, but I cannot remember it now—the way of things, perhaps, when one spends years,
decades, in silence, without the company of one’s fellow man. If one can call him that.
Once I too was a man. A man of strength, of honor. A leader of other men. I cast a long shadow in the harsh
glare of the searing sun, my body girded with iron and steel, my mind bathed in pride, the shape of an
eagle etched in silver on my chest. I seemed to other eyes as a walking god, and so I saw myself. After a
time. For a time.
Once I believed, and I listened, and I obeyed. I was told I was a soldier for truth and order, and so I saw
myself. I watched those who were weaker flee in fear as I approached, and I told myself it was my very
righteousness they feared. And I believed, and they obeyed, or they died. I told myself it was justice.
And then a day came when I was given a new directive... Ah, well; this was many, many years ago—ancient
history, one might say. And, in all honesty, these days I view my remembrances as through a smoky glass.
The details fade into the distance. The greater truth remains, undimmed. Accusing me. Always accusing
me.
We make our choices, and we must accept the consequences. I think it was Togra who said that.
As regards my own choices, I struggled for a time to redeem them... and then, when the time came, I
vanished, to live out my waning days in self-imposed exile. I wished to complete my penance in solitude. I
also suspected I would be more potent as a myth than as a man. I was right.
Garvey. That was my name. Now I remember. Though—later on—they called me Judas. A mark that I handed
down to my brothers, and to my sons. Judas. Betrayer...
And so I disappeared into the mountains, to watch from afar while my ancient warrior bones slowly
crumbled. But as it turns out, my expectations of imminent mortality were wickedly subverted: weary
though I may be, my mortal coil shows few signs of being shuffled off any time soon.
But do not be deceived. Once I was a man—a god, perhaps—but now I am only a ghost, in all but name.
Nothing more. Each moment stretches into the next, and reaches back to the last; there are no endings, nor
beginnings, but only a single time, indivisible, unborn and undying.
I have always been here. And I watch.
I have watched as the Earth, this home I love, has been ravaged. Ravaged by war. Ravaged by unchecked
population growth. Ravaged by squanderous waste of the few precious natural resources she has left to
give, by governments, corporations, and consumers who devour her and spit out her bones. Ravaged—this
above all—by power-mad governmental mandarins who take the work of terraforming scientists and
attempt to use it to redress the terrible damage to the Earth which their own policies have wrought.
7
Memory and expectation—past and future, that which was and that which yet may
be—these things are not diametrically opposed, either in concept or in reality, as
we often believe them to be. They are but two faces of a single coin, one whose
mold is forever unfixed. The past is no more certain than the future; each yields
to the vagaries of perception. And so never doubt: that which will be had its
genesis in that which was... and vice versa.
- Alpheus Togra
Meditations from First Principles, 2381
STORY

8
And just to be certain, the JDA has stamped its bootprint on the Sprawls. Divided them up into Precincts,
and established Command Centers, and generally made a show of acting as if it actually controls them. And
every so often JDA troops are ordered down into the Sprawls to get their gloves muddy on Roundup detail,
flushing out subversives and agitators and snot-nosed children and anyone else they can find. The
malefactors are funneled into holding vehicles, taken to detention camps, beaten, interrogated, and then
piled into the cargo hold of an interplanetary projectile, injected with drugs and put into narco-freeze, to
be re-animated on landing and ushered into one of the JDA’s plush incarceration facilities on the beautiful
moons of Jupiter. If they are fortunate, they will eventually be impressed into service in the Exploratory
Corps, in which case they go back into the cargo hold for more narco-sleep, and next stop Alpha Centauri;
if not, they can look forward to a long life of work on Io or Ganymede, on underground mining crews in
sub-zero conditions—assuming, that is, that the guards or the gangs or the malnutrition or the climate do
not end their pitiful existence sooner rather than later. Which they usually do. Either way, a Sprawler, once
taken, is never seen again.
Yes, I have watched the Sprawls. And, time and time again, I have seen them sabotage their own potential
strength through bickering, through fear, through the ephemeral amnesia of drink and drugs intended not
to free the senses but to numb them. I have watched the Sprawls, and I know that their most potent foes
are themselves. If united, they could be a force the likes of which this weary planet has never seen. If.
I have watched my own sons and brothers, the Judas, cast-out Castigars, errant knights in quest of
redemption, as they have taken to the thin cover of Bone Valley, to lick their wounds and ponder just how
to reconcile the warring impulses within them. I empathize. I was their Abraham—and their Moses too,
knowing full well that I would never in my lifetime see that land to which I hoped to lead them.
And—perhaps most intriguingly—I have watched the followers of Alpheus Togra, who turned the pain of their
abandonment into a religious and scientific quest of astounding depth and commitment. They revere the
research data their vanished avatar left behind, even as they cannot comprehend it; they guard his two
laboratories, the labyrinth beneath Deyssa Sprawl and the mountain shrine which Togra himself is said to
have sealed shut forever. They pray fervently for the portentous events, no doubt of galaxy-shaking
magnitude, which they are so certain will follow a successful attempt to enter the sealed mountain lab—an
obsession which has only convinced Dalen and the JDA that the shrine must be concealing some
technological marvel. I know nothing of any such secret. I know only that the fervor of the Tograns
surpasses any allegiance I have ever witnessed—that of JDA soldiers most certainly included. Misguided
they may be; irrelevant they most certainly are not. Were I Edward Dalen, I would be very, very concerned.
9
How could Terra require terraforming? Who could conceive such a thing?
Certainly not the Exploratory Corps, miscreants with suspended sentences who were taught which buttons
to push and hurled off to the cosmic frontier. (They taught themselves more—much more—during their
compulsory voyages of colonization.) And not the learned men of science who gave them the technology
they needed to succeed: the machines, the enormous geo-sonic verberators which caused spontaneous
eruptions of the new silicon-based isotope they called Taelon. No. The men who made the choice—to pound
this cheap new energy source out of the Earth’s crust with no thought of what such a seismic trauma might
do to their own biosphere—these were the same men who always make such myopic, fateful choices.
The bureaucrats.
I have watched a collection of glorified prison guards transform itself into the mightiest and most feared
law enforcement and ruling body this system has ever known. The Jovian Detention Authority. Success
story of the third millennium. Don’t speak to me of the Global Commonwealth; those gray-haired fools
have long since surrendered all authority to their power-mad creation. They are puppets, and nowadays
hardly even that. The servant is the master now.
I have watched the JDA spearhead the building of the Domes—shining, hemispherical refutations of
thousands of years of painstaking social progress. (Or, to a more cynical eye, the confirmation of the lack
thereof.) You are wealthy, beautiful, powerful? Enter the enclave and enjoy the fruits of your innate
superiority. You are poor, unfed, unhoused, undesirable? Consider yourself consigned to Hell on Earth. And
beyond it; never believe for a moment that the colonization missions of the Exploratory Corps have been
anything but a search for haven worlds to which the Terran elite can escape, ultimately to leave the scum of
the Earth to their own, filthy, self-destructive devices. Ah, the irony of it: prisoners sent to find a life of
eternal luxury for their jailers—a life which the prisoners themselves are never to know. Brilliant. Edward
Dalen is a genius.
And what of the Sprawls, you say—what of the teeming, unwashed masses whom Dalen would leave behind?
Surely there are more, many more, outside the Domes than inside. Why have the Sprawlers not risen up
and shaken off the shackles of their would-be masters? Why have they not taken what is rightfully theirs?
Have you ever seen two Sprawlers agree on anything?
Yes, the Sprawlers outnumber those inside the Domes by a factor of several hundred. But historically they
have been anything but cohesive. Rumblers, Go-Go’s, Fiends, Voodun... Countless gang factions, far too
busy scuffling with each other to even contemplate standing together against Dalen. And never forget,
Dalen has the JDA: Guardians, Enforcers, Castigars, a virtually limitless supply of warships and weapons.
He sees Sprawlers as animals, incapable of working in concert. For all I know, he may be right. I have seen
little evidence to the contrary, their stumbling attempts at a “Sprawl Council” notwithstanding.
10 11
COPY PROTECTION
The first time you run Dark Reign 2, you will be prompted to enter your CD-key. The number is located on
your game’s CD jewel case. You must enter this Key before you can play Dark Reign 2. For your own
protection, do not give out your CD-key to anyone.
In addition, you must have the game CD in your CD-Rom drive to:
Play campaigns
Play Instant Action
Host a LAN game
You do NOT need the game CD in your drive to:
Host a WON game
Join a WON game
Join a LAN game
MAIN MENU
LOGIN SCREEN
This is where you create your player profiles. Click on “Create”
to make a profile. Highlight the name you wish to log in under,
then click “Login.” “Delete” will delete a user profile. “Quit”
will exit the game.
CAMPAIGN
Choose this option to play the Single Player campaigns in Dark
Reign 2. You will have the option of starting a new campaign
as either the JDA or the Sprawlers.
MULTI-PLAYER
Choose this option to play Dark Reign 2 over a Local Area Network or on the Internet. For more information
on Dark Reign 2 multiplayer see page 37.
INSTANT ACTION
Choose this option if you would like to play against up to seven computer opponents. You have the ability
to select the difficulty and the personality of all of the computer opponents. The setup for an Instant
Action game works the same as for a multiplayer game except that you will not need to be connected to a
LAN or the Internet in order to play.
Which way the wind will finally blow in the coming storm—whose resolve will crumble, whose grip will prove
the strongest—that I cannot guess. I would be a fool to try. And though I once did have a name, the day is
long since past when its mention caused a Rumbler’s voice to silence or a Guardian’s mouth to go dry. I
cannot influence events now, even were I to wish it so. Which, in candor, I do not.
But one thing I can do—I want to do. Call it a guilty man’s final act of penance.
I can bear witness. I will see all that which yet is to unfold, and mark it, in my mind if nowhere else.
I have always been here.
And I watch.
GAMEPLAY
13
INTERFACE
The Dark Reign 2 interface is composed of several elements: the Game Window, the Minimap, the
Infogroup, the Squad Manager, the Building Manager, the Unit/Building Context Menu, and the Options
Menu.
THE GAME WINDOW
The Game Window is your view on the world of Dark Reign 2.
Within this window you can control all of your units, telling
them where to go and what to do.
MOVING AROUND THE WORLD
Assuming no unit or building has been selected, you will see a
standard arrow cursor. This is your “Selection” cursor. If you
move the cursor to any edge of the screen your window’s field
of view will scroll in that direction as well.
You can move around the world more quickly using either of two options. Holding the right mouse button
down as you move the mouse will allow you to turbo-scroll around the terrain at super-speed. To be
“transported” to another place instantly, find the place you’d like to go to on the Minimap, and left-click
on it (be sure you have no units currently selected). Also, during a battle you can be transported to the
battle scene instantly by pressing the space bar.
SELECTING AND MOVING UNITS
When you place the cursor over a unit, the cursor will highlight and the unit’s status bar will appear below
the unit. Left-click on the unit to select it.
With a unit selected, move the cursor around the Game Window; you will see a “Move” cursor over areas
that the unit can move to. Choose a spot, then left-click; the unit will report that your orders were received
and then hurry over to that spot. If you mouse over an area the unit can’t access (a steep hill, for instance),
the cursor will become a “Can’t Move” cursor. (If you are uncertain of a unit’s identity, simply place the
cursor over the unit for a moment; a label will appear above the unit, indicating its type.)
To deselect a unit or group of units, right-click anywhere on the screen.
TARGETING AND ATTACKING
In addition, just above the Minimap, you will notice three small buttons. From left to right, they are
Attack, Move and Attack, and Stop. You can use these to further control your units. Clicking Attack and then
a target will force the selected unit to attack that target, whether it is friend or foe. Units on Move and
Attack orders will travel to the designated location. If they encounter enemy units, they will stop and
GAME CONTROLS
LOAD MISSION
Choose this option to load a previously saved game.
OPTIONS
Choose this option to set up your video, sound, and gameplay options.
CREDITS
Choose this option to see all the fine people who brought you Dark Reign 2.
LOGOUT
Choose this option to Logout the current user and return to the Login Screen.
QUIT
Select this option if you would like to leave Dark Reign 2 and return to Windows. Choose wisely.
12
14
MINIMAP
The Minimap is your battle map and provides a miniature view of the
entire battlefield. It appears in the bottom right of the screen as long
as you have a functioning Command Center and a sufficient power
supply. This allows you to move efficiently to control your forces
once your domain has expanded beyond the area seen within the
Game Window, and to simultaneously track the movement of your
units and those of your opponent in far-flung areas of the battlefield.
You will see a small representation of the current camera position on
the Minimap at all times; the glowing green area next to it represents
the area currently visible in your Game Window, as well as which direction the camera is facing. The
locations of your buildings and units, and your opponents’ buildings and units, are displayed on the
Minimap as dots and triangles of the appropriate colors.
With no units selected, left-click on any point on the Minimap and your Game Window view will shift to
that location. To move units or groups of units using the Minimap, select them and then left-click on the
desired destination on the Minimap.
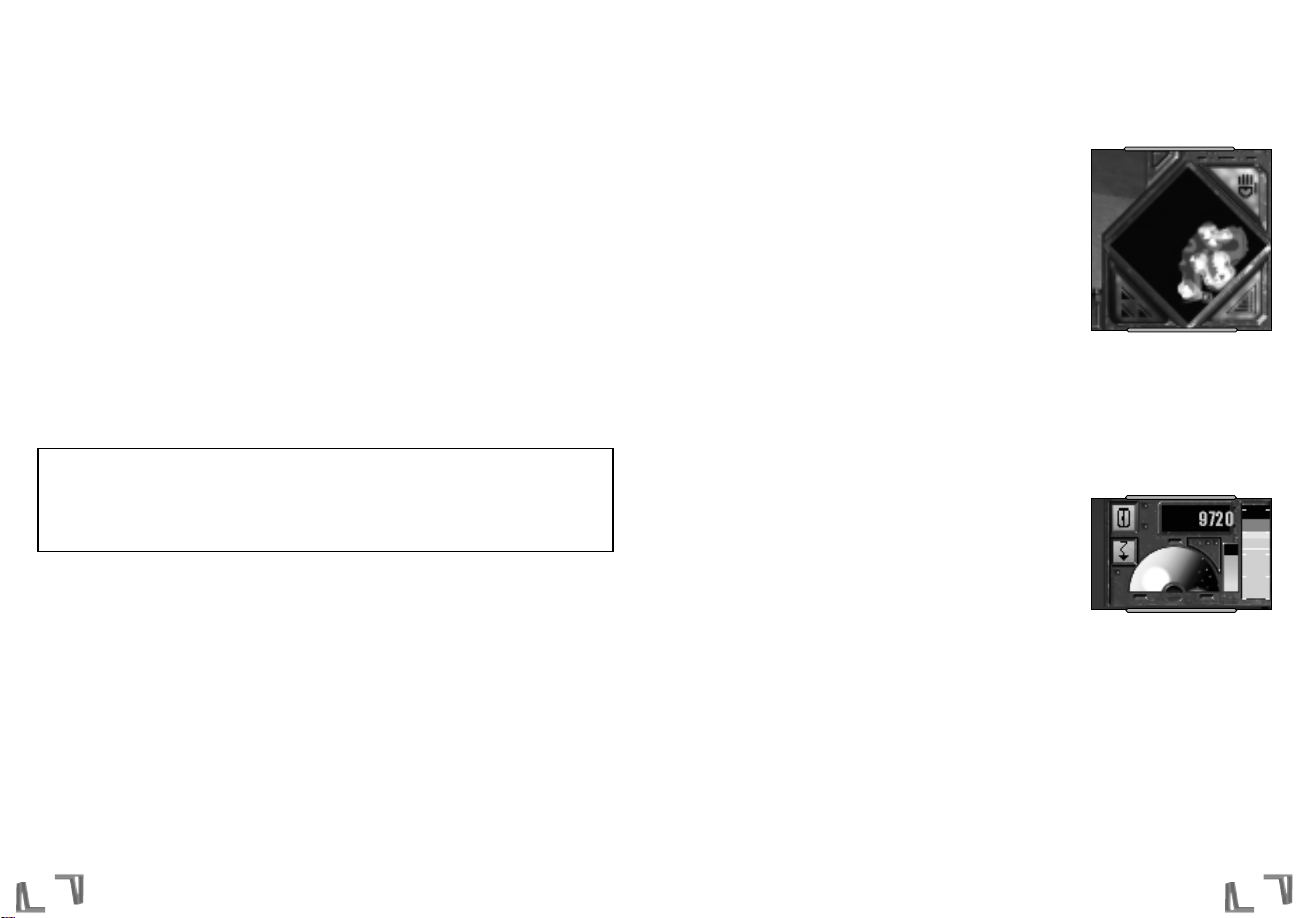
INFOGROUP WINDOW
This window is located in the top right corner of your screen, and
tracks important information about your current status. Along the
right side is a slider bar which represents your current power output
(see Power for a description of how this slider works in relationship to
your current output and usage).
Just to the left of the power indicator is a small vertical bar. This
represents your unit limit. As you build, the bar will rise. When the bar becomes full you have reached the
unit limit and will be unable to build anything more. See the section titled “Unit Limit” for more
information.
To the left of the unit limit indicator is a semicircular window which shows the current Time of Day. Full sun
equals midday, and full darkness means midnight; a split indicates dawn or dusk. This window is inactive if
Time of Day is unimportant in a mission (for example, an indoor mission).
Above the Time of Day window is the Taelon window, which shows the current amount of Taelon you have
collected. Taelon is an energy source about whose origins more can be found in the story (page 7) and in
Dark Reign. See the Resources section of this manual to see how Taelon is collected and used.
15
engage them and then resume their course to their original destination. Stop will make the selected units
stop immediately.
GROUPING UNITS
Often you may find you want to select more than one unit at a time. To do this, left-click next to a group of
units and, while holding down the left mouse button, move the cursor diagonally to draw around the box
around them. Release the button, and the units are selected. All units in that group will then respond to
any move or attack command you give.
You can keep units grouped for quick and easy selection by using the Squad Manager. For more
information, see “Squad Manager” on page 16.
UNIT STATUS
The physical condition of each unit is measured by its health status bar. To check on the status of a
particular unit, left-click on the unit; the health status bar will appear below it. A green status bar means
the unit is in good health. As the unit is damaged, its status bar decreases in size and changes color from
green to yellow to red.
Note: Several JDA units have a blue health bar, indicating that the unit has regenerating armor.
Regenerating armor will take any damage first and will slowly build back up to full health when not
under attack. As the armor is taking damage you will see the bar shrink and the color go from a
light blue to a dark blue. If the bar shrinks too far, the armor is destroyed; at that point the unit
itself will begin to take damage.
LINE OF SIGHT, SHROUD, AND THE FOG OF WAR
Each unit can only see a limited area in its own immediate vicinity. This area is called “line of sight.” A
unit’s line of sight is affected by the elevation of the terrain around it and any object (for instance,
buildings) that may be in its way. As a general rule, the higher a unit’s elevation is, the more of the
surrounding terrain it will be able to see.
When you start a mission, you will only be able to see a portion of the map. Unexplored regions will appear
black. This is called the “shroud.” As you send units out to explore, the areas of the map into which they
move will become visible, both in your window and on the Minimap (see next section).
Regions that have been explored but are not currently in the line of sight of any unit will appear grayed out
both in your window and on the Minimap. This is known as the “fog of war.” Any terrain features will
continue to appear as they did when they were last in a unit’s line of sight, but you will not be able to see
any objects or enemy units.
16
BUILDING MANAGER
The Building Manager is a visual
representation of all buildings that can
construct other units or buildings. For
example, a Command Center has the
ability to build new Construction Rigs—
so once you have built a Command Center,
the Command Center icon will appear on the Building Manager.
Along the top of each building’s icon on the Building Manager is a bar which displays the current health
status of the building. The Building Manager will also show you if a building is currently at work
constructing units, and, if so, how many units are in the queue awaiting construction.
You can select any building by left-clicking once on its icon in the Building Manager. This will bring up the
building’s Build Menu. By doing this you can order a specific building to begin constructing a unit without
having to go back to the building itself.
If you double-click on a building icon in the Building Manager, your Game Window’s field of view will shift
to center on the building you have clicked on.
TIP: Use the Building Manager to set rally points and then build up troops without having to move back to the base.
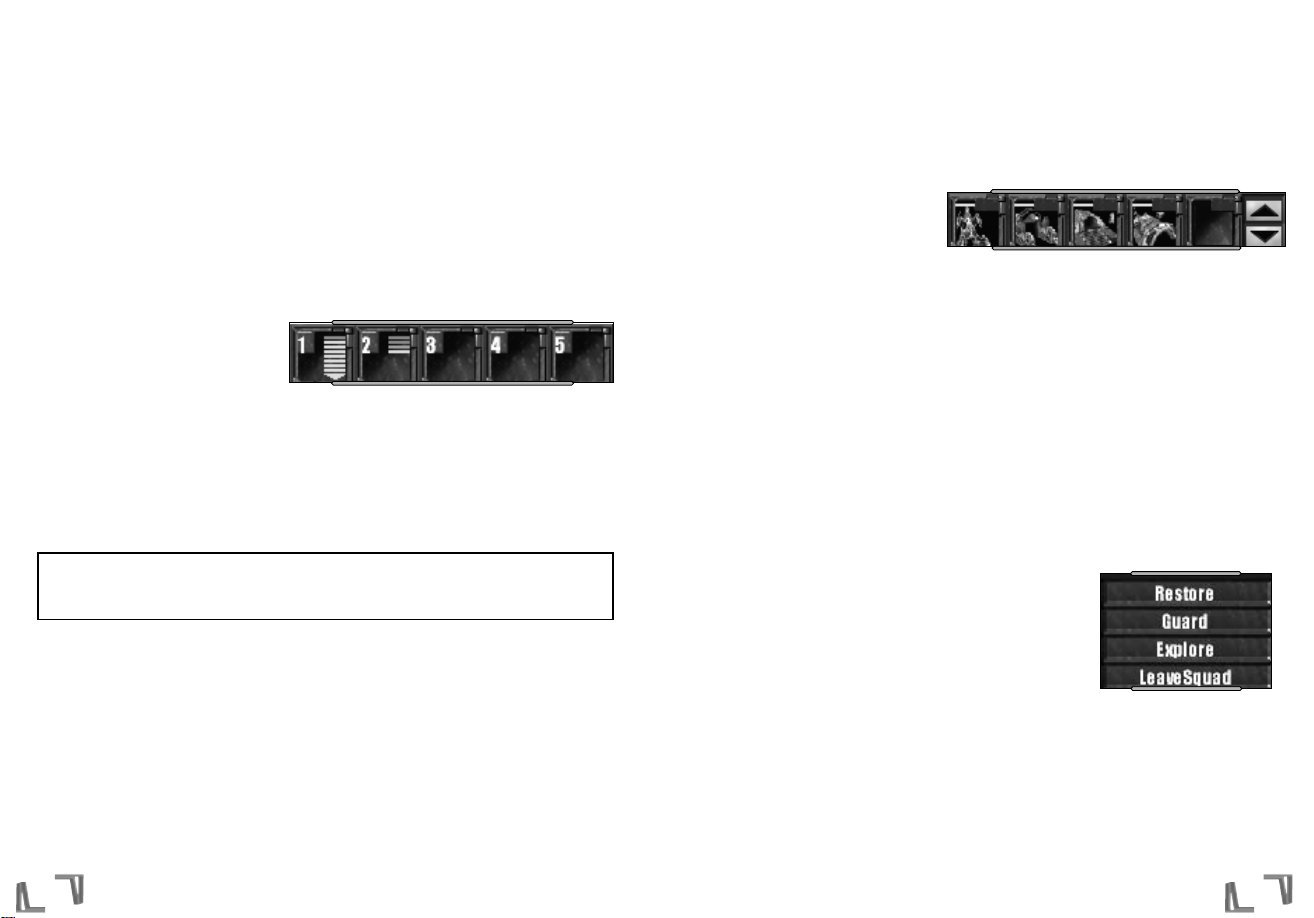
UNIT/BUILDING CONTEXT MENU
Whenever you select a unit or structure, a menu will appear just above
the Minimap which lists the options currently available to that unit.
These options will vary but could include:
FOR UNITS:
Collect Resource — This will enable you to order a Collector to a specific
patch of Taelon. This option will only appear when you have a Collector
selected.
Explore — This will order your unit or units to explore the map. This
option will appear with any unit selected.
Guard — This will order your units to follow and protect a selected unit (or building). First select any unit or
units you want to be the guards, click on the guard button, then select the unit, or building, you want them
to safeguard. This option will appear with any unit selected.
Leave Squad — This will kick out the selected unit or units from one of your squads. This option will appear
with any unit selected.
17
To the left of the Time of Day window is an icon for the Waypoints Menu. Clicking on this icon will bring up
the Waypoints Menu, along with any waypoints currently placed in the world. For more information on how
to use waypoints see the Waypoints section in this manual on page 29.
To the left of the Infogroup window is the Objectives window. During the single player campaigns, this
window will always display your current objectives in the mission. To toggle the window, click the small
button in the upper-left corner of the Infogroup window. You can also press the “O” key on your keyboard.
SQUAD MANAGER
Along the bottom right-hand corner of
your screen you will see a row of icons.
This is your Squad Manager. The Squad
Manager is a visual representation of any
squads you have created in the game.
You can keep units grouped for quick and easy selection as follows: select the group as outlined above,
hold down the Control key, then press a number, 1-5. The selected units will be grouped under that
number—and their “squad” will be shown on the Squad Manager bar (lower-right corner of your screen).
Once you have formed a squad, you can re-select it at any time by left-single-clicking on its icon on the
Squad Manager bar (in your Game Window, you will see all its units highlight and show their health status
bars). Left-double-clicking the icon will not only select the squad, but also shift the field of view to center
on the squad itself.
Note: You may group your units into 10 squads using the 1-0 keys, but only squads 1-5 will be
available through the Squad Manager. To access squads 6-0, simply press the corresponding
number key on your keyboard.
The Squad Manager contains five large squad icons, each representing one of your first five potential
squads. In each squad icon, the row of small bars on the right side shows the number of units in the squad
(the color of each bar indicates that unit’s health). This only indicates one through eight units, or greater
than eight as in squad one in the image above. On the left side is another, smaller icon which represents
the squad’s current action (idle, moving, or attacking). Thus, by glancing at the Squad Manager you can
quickly check the status of all your squads.
Units in a squad will always try to stay together, and will communicate with each other to work as a team.

COMMS MENU
This menu relates to multiplayer functions and is only
available during a multiplayer game. Access the
Comms Menu by pressing the button to the lower-left
of the Minimap.
In this menu you can:
• View a list of players in the game.
• Chat with those in the game.
• Set the default chat channel.
• Give an ally units and Taelon.
• Set map markers.
To chat with other players, type your message in the message window at the bottom of the Comms Menu
and press enter. You can select who receives the message by clicking on the box to the left of the message
window. You can select All (everyone will see the message), Team (only teammates will see the message),
or Allies (all allies will see the message). After you choose a chat channel it will remain on that channel
until you change it.
To give an ally units, select the units you wish to give, then open the Comms Menu. Select the person you
wish to give the units to (you will see a pull-down box). Then press “Give Units.”
To give an ally Taelon, open the Comms Menu. You will see a box with a “0” in it. Type in the amount you
wish to give. Select the player you wish to give the Taelon to from the pull-down box. Select “Give
Resource.”
To set a field flag marker, open the Comms Menu. Click the SelectFlag (SetF) button. Then click on the
terrain where you wish to place a marker. All teammates and allies will be able to see the marker. You may
only lay one marker at a time. To clear the marker open the Comms Menu and click the ClearFlag (ClrF)
button.
ORDERS MENU
Access the Orders Menu by pressing the hand button on the upper-right side of
the Minimap. Here you can set the behaviors of individual units. To change a
unit’s settings, select the unit (or units), then open the Orders Menu. You can
select the following behavior types: Scout, Defender, Skirmisher, Warrior, and
Terminator (see “Unit Behaviors” for more info).
19
Restore — If a unit is damaged or expends ammunition (air units), you will see the button to 'Restore.' This
will enable you to order your units to return to the nearest repair or air tower. It is only active when an
appropriate station is available. This option will appear any time a damaged unit or a unit needing ammo is
selected.
Self Destruct — This will enable you to blow up a unit and possibly damage other friends or foes in the area.
Only Collectors and the Juggernaut have this option when selected.
Store Resource — This will enable you to order a Collector to deliver Taelon to a Refinery. This option will
only appear when you have a Collector selected.
Unload Cargo — This will enable you to order a transport or teleport to release your units. This will only
appear for selected Air Barge and Telepads with stored infantry.
FOR STRUCTURES:
Eject Spy — If a spy unit has infiltrated a selected building, this option will enable you to kick them out.
This option will only appear for infiltrated structures.
Pause — This option will halt the building or upgrading of a facility. This will only appear when the selected
building is being constructed.
Power Down — This will enable you to save energy by turning off the power to inactive buildings. This
option will appear for any structure that is receiving energy.
Power Up — This will enable you to re-activate a building you have powered down. This option will appear
for any structure that is not receiving energy.
Recycle — This will enable you to sell a building. You will only receive a portion of what it originally cost.
This option will appear for any selected building.
Set Rally — This will enable you to order your newly constructed units to a specific point. You could select a
barracks and then set a rally point to a spot near a large battle. Until the rally point is changed, any new
units built by the barracks will run to that point. This option will appear for any selected building that
constructs units.
Unpause — This option will resume construction of a paused building (see above). This option will appear
for any paused selected building.
Upgrade — This option will appear for any building that has the potential to be upgraded. The button will
not be active until all the prerequisites for the upgrade have been completed.
If you click on a Construction Rig or on a building that can build (such as a Precinct or a Motorpool), a Build
Menu will appear on the left side of your screen. For more information on base building and unit
construction see this section on page 21 of this manual.
18
Resolution Window
Allows you to set the display resolution based on your video card
Detail Settings
Allows you to change the level of graphical details in the game
You may toggle other display features (such as mirrored water) as well. Hold your mouse cursor over a
button to display a tool tip explanation of each feature. These settings are saved when you exit the menu.
You may also run Dark Reign 2 in windowed mode from this menu. To return to full-screen, click off the
"Win" button in this menu.
AUDIO
The volume levels for Dark Reign 2’s glorious sounds are set in the Audio options menu.
Digital Master Volume
Sets the volume of sound effects
Speech Volume
Sets the volume of game messages
CD Music Volume
Sets the volume of CD music
Enable CD Audio
Plays music from a CD in your CD-ROM drive
MULTIPLAYER
Although most users will not need to alter the defaults, advanced users may modify them if they wish to
host games from behind firewalls or connection sharing mechanisms. Refer to the Technical help readme
file for more information.
ADDONS
Dark Reign 2 supports additional mods and add-on's created by other players. Please consult the
readme.txt file for more information on this. Neither Pandemic Studios, LLC, nor Activision support these
addons.
Available Addons
Displays any available addons
Current Addons
Displays any addons currently in use
2120
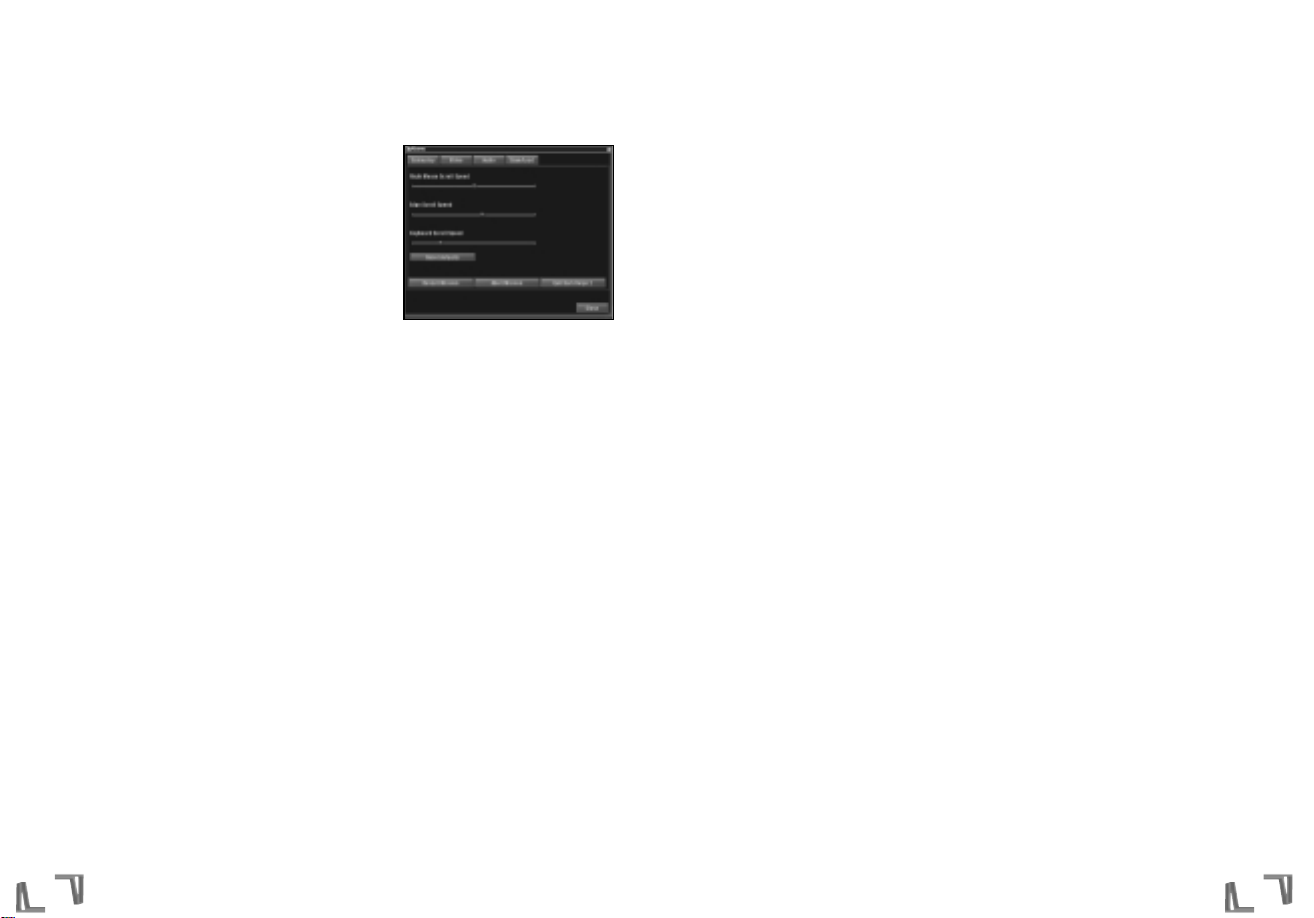
OPTIONS MENU
While playing the game you can access the Options Menu by
clicking on the triangular button with lines to the lower-right of
the Minimap, or by hitting the Escape key. This will bring up an
Options Menu which allows you to load/save your game, set
gameplay/video/audio options, restart a mission, abort a
mission and return to the main shell or exit Dark Reign 2 and
return to Windows.
GAMEPLAY
The Gameplay options menu allows you to adjust the rate at
which your camera moves about in the world. In the unfortunate event that you must stop playing Dark
Reign 2 and return to the real world, you may also exit from this screen. Any settings you make here are
saved when you exit.
Right Mouse Scroll Speed
Sets the speed at which the camera moves when right mouse scrolling
Edge Scroll Speed
Sets the speed at which the camera moves when edge scrolling
Keyboard Scroll Speed
Sets the speed at which the camera moves when arrow-key scrolling
Reset Defaults
Sets the defaults to their state when you first installed Dark Reign 2.
Restart Mission
This allows you to turn back time and begin a mission again.
Abort Mission
This allows you to return to the shell to access other portions of Dark Reign 2.
Quit Dark Reign 2
Something you will never want to press!
VIDEO
The Video options allow you to adjust the graphical settings of the game. The most commonly used
functions are:
Video Card
Selects your primary video card from those available.
22 23
PLAYING
DARK REIGN 2
This section outlines many features of Dark Reign 2, including building your base, collecting resources,
and setting individual behavior settings for each of your units.
BUILDING STRUCTURES
In most missions, you will want to build a base to support and protect your war machine. Structures are
built by individual Construction Rigs. To start the building process, left-click on a Construction Rig unit on
the map; the buildings available for construction will be shown in the Build Menu above the Building
Manager. (Building types that are not yet available will be shaded over in red.) If you hold the mouse
cursor over one, a text cue will appear informing you what prerequisite structures must be completed
before this building can be constructed (for instance, in the JDA campaign to build a Motorpool you must
first build a Command Center).
To select the available building type you wish to construct, left-click on that structure in the Build Menu.
An image of the building will now appear on your cursor as you scroll back over the Game Window. You may
designate any flat, unobstructed area of the map as your building site by left-clicking on the desired spot
(areas unsuitable for building include sloping hillsides or over terrain features such as trees or boulders;
when you scroll over these with your building cursor, it will turn red). You may use the
<
and > keys to
rotate the orientation of the building. This must be done before you actually click on the terrain to give the
order.
Once you have left-clicked on the desired spot, the selected Construction Rig will confirm your choice
verbally, move to the site, and begin building. Once given, you may cancel a construction order before
building begins by selecting the Rig and left-clicking anywhere on the map. Buildings are not operational
until they are completed. Left-clicking on the building under construction brings up a status bar indicating
the progress of the job. You may pause a building’s construction by selecting that building, and then
selecting “Pause” from the Building Context Menu, which will appear above the Minimap. When you wish
construction to resume, select the building again, and then select “Unpause” from the Building Context
Menu.
BUILDING UNITS
Once you have constructed one or two basic buildings, you can begin to manufacture units and wage war
against your opponent. The first thing to build is a Command Center; with this you can make Construction
Rigs, which can in turn construct other buildings.
To generate infantry you will want to then build a Barracks (Sprawlers) or a Precinct (JDA). (Keep in mind
that some specialized units won’t become available until you “upgrade” these buildings; see below.) Once
your Barracks or Precinct is complete, left-click on the structure; the units available for building will
appear in the context menu above the Building Manager. To build a unit, simply left-click on that unit’s
image in the context menu. (Again, Construction Rigs will emerge from the Command Center, while

You can change the destination of your Collectors by selecting one and then clicking on a Refinery and/or
Taelon field. The Collector will then travel between those two points until the Taelon field is exhausted or
you change its destination.
HINT: Control as many Taelon fields as possible. A well-funded army is a strong army.
UNIT STATUS AND REPAIRING
As discussed above, the physical condition of each unit and building is measured as “health status.” To
check the health status of a particular unit or building, left-click on its image on the map; a status bar will
appear below it. The bar will display green as long as the unit/building’s health is good, yellow if it is
marginal, and red if it is poor.
There are several ways to raise the health status of a unit or building. Damaged vehicles can retreat to their
repair bay, or find (or be found by) a Scaver (Sprawlers) or Psitech (JDA). As long as they are in contact
with the Scaver/Psitech or on the pad at the Scaver Hut/Restoration Facility, they will then be repaired at a
steady rate. You can order a group of vehicles into the repair bay, and they will enter and exit one by one
as they are repaired. Infantry units are healed in the same way by their own special units or by entering
their hospital. Group healing works the same way as group repair.
To repair a building, you will need to use a Scaver or a Psitech. Select the unit and mouse over the damaged
building; your cursor will switch to the heal cursor. Left-click on the building, and the unit will move over
to it and begin the repair job. The building will be repaired at a steady rate until it has regained full health.
RECYCLING BUILDINGS
There will be times when you will want to ‘recycle’ structures that you have built. Left-click on a building;
its context menu will appear above the Minimap, and one of the items on the menu will be Recycle. Leftclick on Recycle; the selected building will then “de-construct,” and you will receive (in credits) a portion
of what you paid to build it.
Like the building process, the deconstruction process is not instantaneous but will take some time.
Therefore, if you are planning to get some value out of a building that is under attack and unsalvageable,
you may want to start the deconstruction process early.
POWER UP/POWER DOWN
If you are running low on power, you may wish to turn off the power to one or more of your buildings and
so lighten your energy load. To do this, left-click on the building you would like to power down. On the
Building Context Menu you will see a Power Up/Down button; click this button and the building will power
down. To restore power to buildings you have temporarily shut down, simply repeat the process. Buildings
that are powered down will not function or provide line of sight.
2524
infantry will emerge from the Barracks or Precinct.) To build multiple units— one after the other—click on
the desired unit’s image multiple times or on a different unit’s image. You can also preselect units so that
as soon as the unit is available, it will be built.
To build vehicles, you will first need to construct a Garage or Motorpool. Once these structures are
complete, left-click on the structure; the units available for building will appear in the context menu above
the Building Manager. To build a vehicle, simply left-click on the unit’s image in the context menu; the
vehicle will emerge from the Garage or Motorpool.
HINT: Building speed can be severely reduced if you are low on power,
so always make sure that you have enough power plants.
POWER
Another of the first structures you should build when setting up your base is a power plant, because all of
your buildings need power to function.
There are two types of plants available. The first is solar, which is inexpensive but generates a very limited
supply of power. When the sun goes down this production is reduced even further. (You can see how much
extra power you are getting from the sun by checking the light green bar on the power bar in the interface.
When the sun sets, this light green bar will disappear.)
The second type of plant is nuclear and generates a potent, constant source of energy. Though powerful, it
is expensive to build.
When power is low, building production will slow down and force field walls may turn off. When power is
critical, building production becomes very slow, and gun turrets will not fire.
HINT: Take out your opponent’s power before attacking the rest of his base—
you’ll weaken his ability to quickly re-build.
FUNDING YOUR WAR MACHINE
In order to build your base and units, you will need to locate and harvest Taelon. To do this, construct a
Refinery and send out your Collector to find a patch of Taelon. Once located, he will begin harvesting it
until he has reached his full capacity, at which point he will return to the Refinery to empty his load.
Note that as you harvest Taelon at a given location, the supply there will shrink and eventually disappear,
forcing you to move on and look for new sources. However, some Taelon deposits will regenerate as the
game progresses, so from time to time you may want to return to areas you may have already harvested, to
see if the Taelon has regrown.
 Loading...