


 Loading...
OWNER’S MANUAL

CONTENTS |
|
FEATURES ............................................................................... |
2 |
PART NAMES ........................................................................... |
3 |
Liquid Crystal Display ............................................................. |
6 |
Viewfinder ............................................................................... |
7 |
1. PRELIMINARY STEPS |
|
ATTACHING THE STRAP ........................................................ |
8 |
INSERTING THE BATTERY .................................................... |
9 |
TURNING ON YOUR CAMERA ............................................. |
11 |
CHECKING YOUR BATTERY ................................................ |
12 |
SETTING THE DATE |
|
(YEAR-MONTH-DAY/HOUR-MINUTE) .................................. |
13 |
SELECTING THE DATE MODE ............................................. |
16 |
2. USING YOUR CAMERA |
|
LOADING THE CAMERA ....................................................... |
17 |
USING YOUR CAMERA ......................................................... |
21 |
USING THE AUTO-FOCUS LOCK ........................................ |
26 |
UNLOADING THE FILM OR REMOVING |
|
FILM IN MID-ROLL ................................................................. |
28 |
3. ADVANCED TECHNIQUES |
|
SELECTING THE EXPOSURE MODE .................................. |
31 |
2 Effective flash range ............................................................. |
33 |
USING THE SELF-TIMER ...................................................... |
39 |
USING THE REMOTE CONTROLLER |
|
(on the Zoom Date 115SR only) ............................................. |
41 |
TROUBLE SHOOTING ........................................................... |
44 |
COMMON SENSE CAMERA CARE ...................................... |
46 |
SPECIFICATIONS .................................................................. |
47 |
IMPORTANT SAFETY NOTICE ............................................. |
49 |
FEATURES
•Fujinon 38-115mm Auto Focus Zoom Lens
•Sure-loading System with Automatic Pre-winding
•Automatic Exposure and Automatic Flash Operation
•Date/Time Imprinting
•Red-Eye Reduction Flash
The “CE” mark certifies that this product satisfies the requirements of the EU (European Union) regarding safety, public health, environment and consumer protection.(“CE” is the abbreviation of Conformité Européenne.)
This product is in conformity with Directive 89/336/EEC.
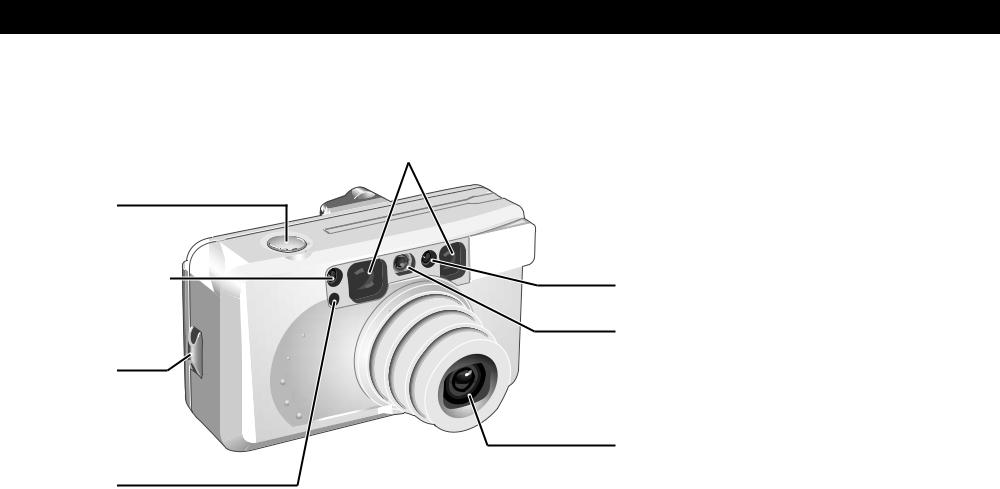
PART NAMES
1 (→p.23)
2(→p.34,40,42)
3 (→p.8)
4 (→p.42)
5

 6 (→p.31)
7
8
9 (→p.11)
1 Shutter Release Button
2Red-eye Reduction/ Self-Timer/Remote
LampController
3 Strap Lug
4Remote Controller Sensor
5 AF (Auto-Focus) Window
6 Flash
7 AE Light Sensor
8 Viewfinder Window
9 Fujinon Lens/ Lens Cover
: on the Zoom Date 115SR |
|
only |
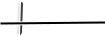
3 |
0 (→p.23) |
F (→p.18) |
A (→p.7) |
|
|
G |
B (→p.19) |
|
C (→p.19) |
H (→p.18,28) |
|
D |
I (→p.9) |
|
J (→p.9) |
||
E |
||
|
0 AF Lamp (green)
A Viewfinder Eye-piece
B Film Take-up Spool
C FILM TIP Mark
D Tripod Socket
E Film Chamber
F Film Confirmation
Window
G Film Pressure Plate
H Camera Back
IBattery Compartment Cover Release Knob
JBattery Compartment Cover
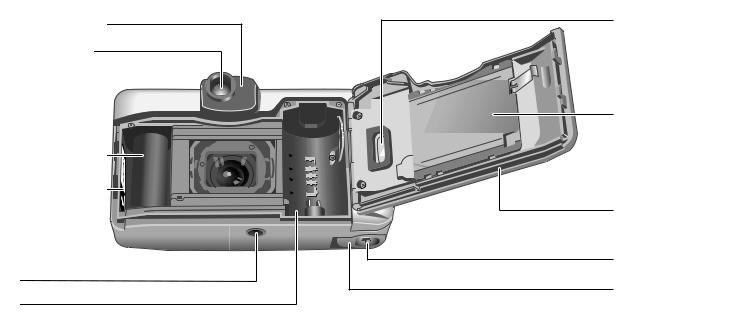
4
K (→p.23)
L (→p.7)
M (→p.6)
N (→p.18,28) 
O (→p.29)
P (→p.31)


 Q (→p.22)
 R (→p.18)
S (→p.11)
T (→p.13,16)
U (→p.39,41,13)
K AF Lamp (green)
L Viewfinder Eye-piece
M Liquid Crystal Display
N Camera Back Lock
O Mid-Roll Rewind Button
P Exposure Mode Button
Q Zoom Button
RFilm Confirmation Window
S Power Button
TDATE/SEL (Date Select) Button
USelf-timer/Remote Control /SET (Date Set) Button
: on the Zoom Date 115SR |
|
only |
5 |
Liquid Crystal Display
V (→p.34) |
|
|
|
|
[ (→p.37) |
|
|
|
|
||
|
|
|
|
\ (→p.20,39) |
|
|
|
|
|
|
|
W (→p.36,23) |
|
|
|
|
|
|
|
|
|
|
|
|
|
|
|
|
|
X (→p.38) |
] (→p.39) |
|
|
|
|
Y (→p.41) |
|
|
Z (→p.12) |
|
^ (→p.13,16) |
|
||
|
||
|
|
|
6
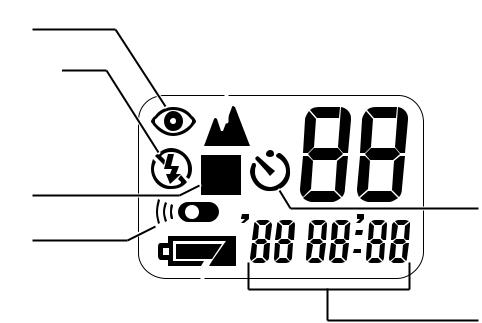
VRed-eye Reduction Flash Mode
W  Back Light Compensa-
tion Flash Mode/
 Flash-off Mode/
 Flash Charging
X Night Portrait (Slow Sync)
Mode
Y Remote Control Mode
Z Battery Status
[ Landscape Mode
\Exposure Counter/Selftimer Count
] Self-timer Mode
^ Date Display
: on the Zoom Date 115SR only
Viewfinder
C
A
B
A : Framing area
Compose the image within this area.
B : AF (Auto-focus) spot
Position this spot over the main subject in your picture.
C : Parallax correction guides
When taking pictures at close distances (Closer than 1.5 m/4.9 ft.), use these indicators as a guide when composing your picture. (→p.24)
7
1 |
2 |
8
1. PRELIMINARY STEPS
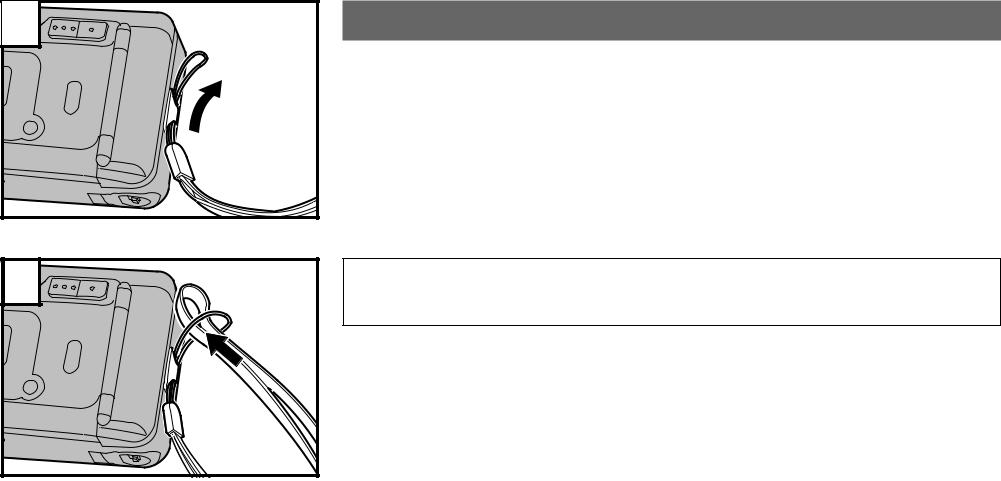
ATTACHING THE STRAP
Slip the thin cord on the carrying strap through the strap lug on the side of the camera leaving a loop. Slide the thick part of the strap through this loop and pull tight. Take up any slack to make sure the strap is securely attached to the camera.
Do not use a strap made for cellular phones or similar electronic products. These straps are usually too light or weak to hold your camera securely. For safety, use only straps designed for cameras.
1 |
2 |
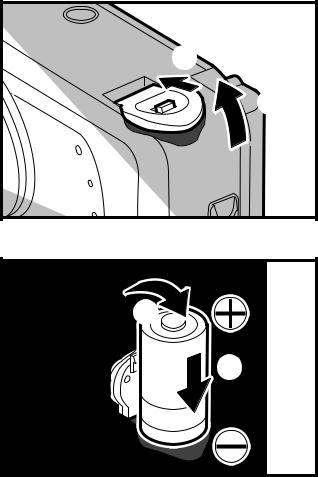
INSERTING THE BATTERY
Your camera requires one 3V lithium battery, type CR123A/DL 123A.
To insert the battery:
1 Move the battery compartment cover release knob in the direction of the arrow. 2 Flip open the battery compartment cover.
4 |
3 |
3Insert the battery following the instructions shown in the diagram on the inside of the battery compartment cover. Important: Pay careful attention to the polarity of the battery as indicated by the ,and .markings on the battery. The battery must be inserted the correct way or the camera will not function.
4When the battery has been inserted correctly, close the battery compartment cover by pressing it until it snaps into place. If it does not snap into place, do not force it but recheck the position of the battery to make sure it fits properly.
9
Do not apply excessive force when opening or closing the battery compartment cover.
One new lithium battery should be sufficient for approx. 350 exposures (based on our test conditions).
When traveling, take extra batteries to provide power for extra exposures. This is particularly important if you visit areas where new batteries may be difficult to obtain.
Check the battery capacity symbol before using your camera. (→p.12)
After changing the battery, reset the date to assure accurate date/time recording. (→p.13)
10
TURNING ON YOUR CAMERA
Before you can use your camera, you must turn the power on. First press the power button which turns on the power. Pressing this button a second time will turn the power off.
When you turn your camera on, the lens cover will open and the initial display will appear on the LCD.
When you are finished using your camera, turn the power off to conserve your battery. If the power supply is left on for more than 7 minutes without the camera being used, the camera will automatically turn itself off.
Before you turn the camera on, make sure that the lens is not blocked to prevent any interference with the lens movement as it extends into its picture-taking position.
11
1 |
CHECKING YOUR BATTERY |
|||
To determine the condition of the battery in your camera, turn the camera on and |
||||
|
check the battery capacity indicator on the LCD panel. |
|||
|
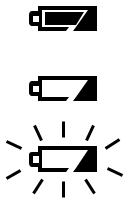
1 Lit |
: Battery capacity is OK. |
||
2 |
2 Lit |
: Battery capacity is low. Replace with a new battery. |
||
3 Blinks: Shutter cannot be released because battery is exhausted. Replace with |
||||
|
||||
|
|
|
a new battery. |
|
3 |
Check the battery capacity before you using your camera. |
|||
|
The battery can be replaced even while there is a partially-exposed film in the camera. |
|||
|
||||
|
|
|
|
|
12
1 |
SETTING THE DATE (YEAR-MONTH-DAY/ HOUR-MINUTE)
Setting the date
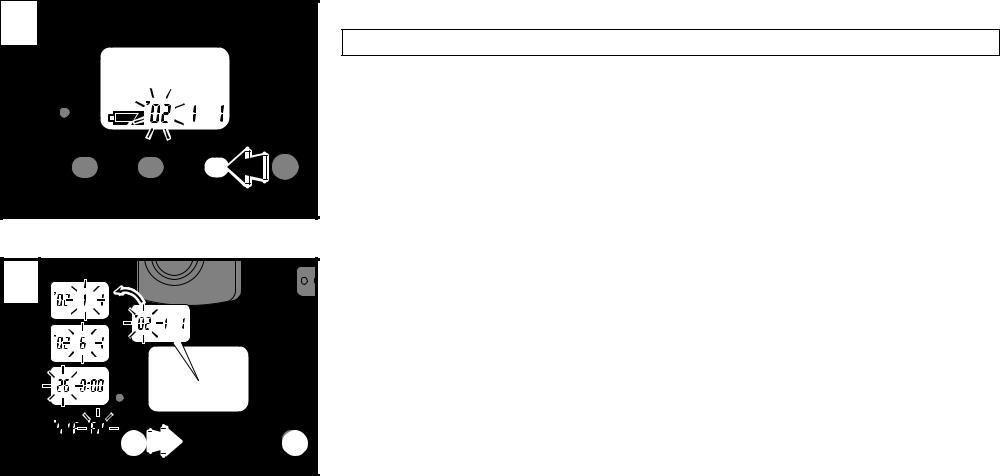
Turn the camera on and then press the DATE button.
The “Year” blinks and the camera will enter the date/time setting mode. You can set:
Year : ’02 to ’32 (2002 to 2032) Month : 1 to 12 Day : 1 to 31
Time : 0 to 23 hours; 00 to 59 minutes
2 |
 1
1


 2
2
1 Press the SET button to change the blinking setting.
2 Press the SEL button to select the next part of the date/time information.
Each press of the SEL button selects a different element in the date/time information in the
following order: Year→Month→Day→Hours→Minutes
13

3 |
To cancel the date/time setting mode, press the DATE/SEL button after changing the “Minutes”.
To set the time (hour or minute) by the radio, press in the DATE/SEL button when the time
|
signal indicates zero. |
The year, month, and day will change together with the hour and minute. |
14
1 |
2 |
 1
1


 2
2
Changing the date
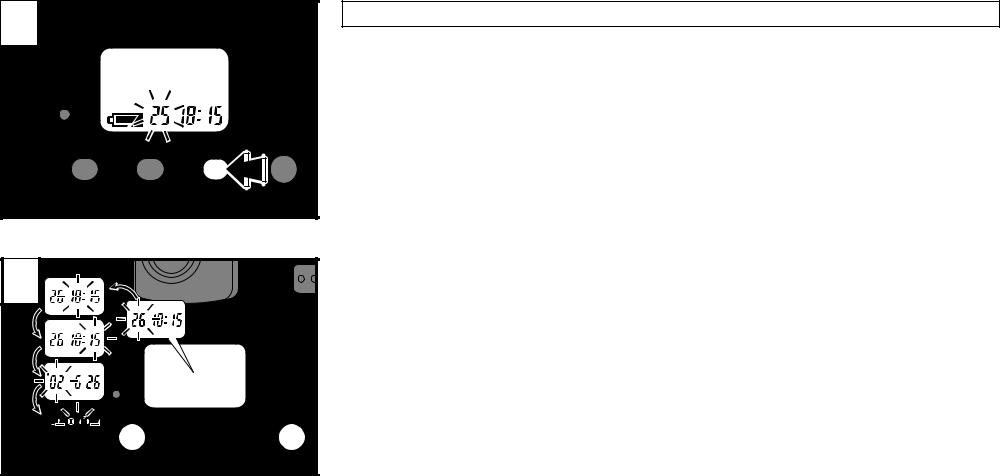
Turn the camera on and then hold down the DATE button for at least 2 seconds or longer.
The “Day” blinks and the date change mode is entered.
Using the procedure described in steps 2 1 to 2 on page 13, set the date with the SET and SEL buttons.
Each press of the SEL button selects a different element in the date/time information in the
following order: Day→Hours→Minutes→Year→Month
Press the DATE/SEL button after changing the “Month”.
15
SELECTING THE DATE MODE
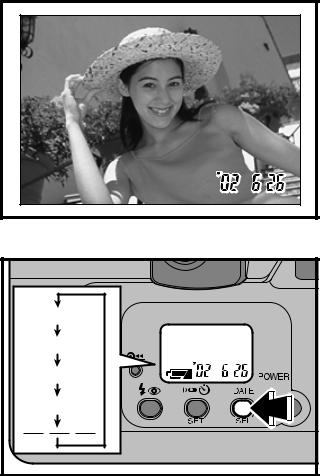
The date and time (year-month-day/ hour-minute) will be imprinted at the lower right of the photograph.
The date display printed on the front of the picture may not be clearly visible against a dark background.
Y M D |
M D Y |
D M Y |
D T |
16 |
Y : Year M : Month D : Day T : Time
Turn the camera on, and then press the DATE button to enter date/time mode. The date/time mode changes in the order shown in the illustration.
If “- - - - - -” is chosen, no date will appear on the photograph.
Loading...