

Page 1
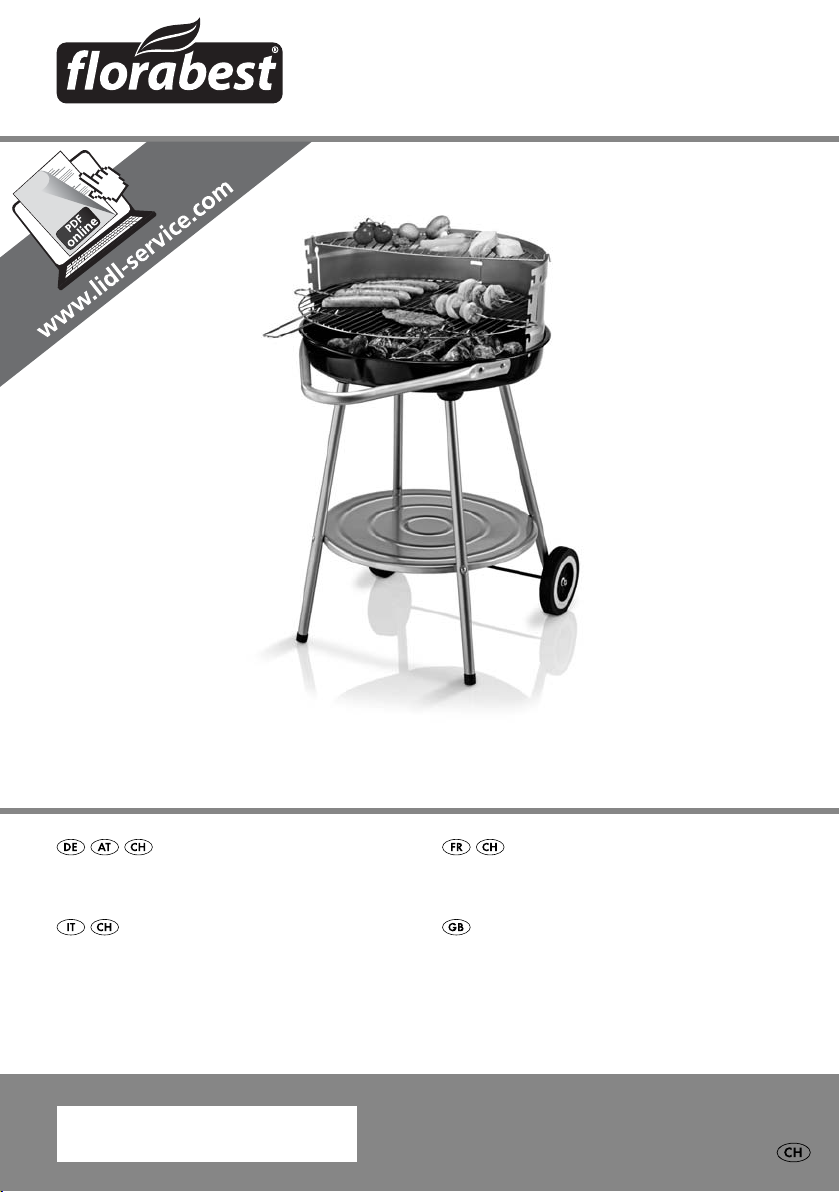
RUNDGRILL FRG 45 A1
RUNDGRILL
Bedienungsanleitung
BARBECUE ROTONDO
Istruzioni per l’uso
IAN 86019
BARBECUE ROND
Mode d’emploi
ROUND BARBECUE
Operating instructions
Page 2

Klappen Sie vor dem Lesen die Seite mit den Abbildungen aus und machen Sie sich anschließend mit allen
Funktionen des Gerätes vertraut.
Avant de lire le mode d‘emploi, ouvrez la page contenant les illustrations et familiarisez-vous ensuite avec
toutes les fonctions de l‘appareil.
Prima di leggere aprire la pagina con le immagini e prendere confi denza con le diverse funzioni
dell’apparecchio.
Before reading, unfold the page containing the illustrations and familiarise yourself with all functions of
the device.
DE / AT / CH Bedienungsanleitung Seite 1
FR / CH Mode d’emploi Page 13
IT / CH Istruzioni per l’uso Pagina 25
GB Operating instructions Page 37
Page 3
9
2
1
3
q
4
0
8
7
6
5
Page 4

Inhaltsverzeichnis
Einführung . . . . . . . . . . . . . . . . . . . . . . . . . . . . . . . . . . . . . . . . . . . . . . . . . . . . 2
Informationen zu dieser Bedienungsanleitung . . . . . . . . . . . . . . . . . . . . . . . . . . . . . . . . . . . 2
Urheberrecht . . . . . . . . . . . . . . . . . . . . . . . . . . . . . . . . . . . . . . . . . . . . . . . . . . . . . . . . . . . . 2
Bestimmungsgemäße Verwendung . . . . . . . . . . . . . . . . . . . . . . . . . . . . . . . . . . . . . . . . . . . 2
Sicherheit . . . . . . . . . . . . . . . . . . . . . . . . . . . . . . . . . . . . . . . . . . . . . . . . . . . . . 3
Grundlegende Sicherheitshinweise . . . . . . . . . . . . . . . . . . . . . . . . . . . . . . . . . . . . . . . . . . . 3
Lieferumfang . . . . . . . . . . . . . . . . . . . . . . . . . . . . . . . . . . . . . . . . . . . . . . . . . . 4
Verbindungselemente . . . . . . . . . . . . . . . . . . . . . . . . . . . . . . . . . . . . . . . . . . . . . . . . . . . . . 4
Montage . . . . . . . . . . . . . . . . . . . . . . . . . . . . . . . . . . . . . . . . . . . . . . . . . . . . . 4
Montage vorbereiten . . . . . . . . . . . . . . . . . . . . . . . . . . . . . . . . . . . . . . . . . . . . . . . . . . . . . . 4
Benötigtes Montagematerial . . . . . . . . . . . . . . . . . . . . . . . . . . . . . . . . . . . . . . . . . . . . . . . . 5
Inbetriebnahme . . . . . . . . . . . . . . . . . . . . . . . . . . . . . . . . . . . . . . . . . . . . . . 10
Reinigung und Pfl ege . . . . . . . . . . . . . . . . . . . . . . . . . . . . . . . . . . . . . . . . . . 10
Entsorgung. . . . . . . . . . . . . . . . . . . . . . . . . . . . . . . . . . . . . . . . . . . . . . . . . . . 11
Technische Daten . . . . . . . . . . . . . . . . . . . . . . . . . . . . . . . . . . . . . . . . . . . . . . 11
Anhang . . . . . . . . . . . . . . . . . . . . . . . . . . . . . . . . . . . . . . . . . . . . . . . . . . . . . 12
Garantie . . . . . . . . . . . . . . . . . . . . . . . . . . . . . . . . . . . . . . . . . . . . . . . . . . . . . . . . . . . . . . 12
Service . . . . . . . . . . . . . . . . . . . . . . . . . . . . . . . . . . . . . . . . . . . . . . . . . . . . . . . . . . . . . . . . 12
Importeur . . . . . . . . . . . . . . . . . . . . . . . . . . . . . . . . . . . . . . . . . . . . . . . . . . . . . . . . . . . . . . 12
DE
AT
CH
FRG 45 A1
1
Page 5

Einführung
DE
AT
CH
Einführung
Informationen zu dieser Bedienungsanleitung
Herzlichen Glückwunsch!
Mit Ihrem Kauf haben Sie sich für ein hochwertiges Produkt entschieden. Machen
Sie sich vor der Montage und der ersten Inbetriebnahme mit dem Produkt vertraut.
Lesen Sie hierzu aufmerksam die nachfolgende Montageanleitung und die Sicherheitshinweise. Benutzen Sie das Produkt nur wie beschrieben und für die angegebenen
Einsatzbereiche. Bewahren Sie diese Montageanleitung gut auf. Händigen Sie
alle Unterlagen bei Weitergabe des Produkts an Dritte ebenfalls mit aus.
Urheberrecht
Diese Dokumentation ist urheberrechtlich geschützt.
Jede Vervielfältigung, bzw. jeder Nachdruck, auch auszugsweise, sowie die
Wiedergabe der Abbildungen, auch im veränderten Zustand, ist nur mit schriftlicher
Zustimmung des Herstellers gestattet.
Bestimmungsgemäße Verwendung
Der Grill ist ausschließlich für die Zubereitung von grillbaren Speisen bestimmt. Er
ist ausschließlich zur Verwendung im Freien geeignet. Dieser Grill ist nur für den
privaten Gebrauch und nicht für gewerbliche Zwecke bestimmt.
Für Schäden die von missbräuchlicher oder unsachgemäßer Behandlung, von
Gewaltanwendung oder unautorisierter Modifi kation herrühren, wird keine
Haftung übernommen.
WARNUNG
Gefahr durch nicht bestimmungsgemäße Verwendung!
Von dem Gerät können bei nicht bestimmungsgemäßer Verwendung und/
oder andersartiger Nutzung Gefahren ausgehen.
► Das Gerät ausschließlich bestimmungsgemäß verwenden.
► Die in dieser Bedienungsanleitung beschriebenen Vorgehensweisen
einhalten.
Ansprüche jeglicher Art wegen Schäden aus nicht bestimmungsgemäßer Verwendung, unsachgemäßen Reparaturen, unerlaubt vorgenommenen Veränderungen
oder Verwendung nicht zugelassener Ersatzteile sind ausgeschlossen.
Das Risiko trägt allein der Benutzer.
2
FRG 45 A1
Page 6

Sicherheit
Sicherheit
In diesem Kapitel erhalten Sie wichtige Sicherheitshinweise im Umgang mit dem Gerät.
Dieses Gerät entspricht den vorgeschriebenen Sicherheitsbestimmungen.
Ein unsachgemäßer Gebrauch kann zu Personen- und Sachschäden führen.
Grundlegende Sicherheitshinweise
WARNUNG
Warnung vor Verbrennungen!
1. Stellen Sie den Grill während des Betriebs auf einen sicheren, ebenen und
festen Untergrund, da er sonst umkippen kann.
2. VORSICHT! Zum Anzünden oder Wiederanzünden keinen Spiritus oder Benzin
verwenden! Nur Anzündhilfen entsprechend EN 1860-3 verwenden. Es kann
sonst durch Verpuff ungen zu unkontrollierbaren Hitzeentwicklungen kommen.
3. ACHTUNG! Der Grill wird sehr heiß und darf während des Betriebes nicht
bewegt werden, da er sonst umkippen kann.
4. ACHTUNG! Kinder und Haustiere fernhalten!
5. Tragen Sie beim Grillen entsprechende Grillhandschuhe und benutzen Sie
eine Grillzange.
6. Lassen Sie den heißen Grill niemals unbeaufsichtigt.
7. Lassen Sie den Grill vor der Reinigung vollständig abkühlen.
8. Verwenden Sie niemals Wasser zum Löschen der Holzkohle.
DE
AT
CH
FRG 45 A1
WARNUNG
Warnung vor Erstickung!
► Verwenden Sie den Grill nur im Freien!
► Betreiben Sie den Grill nicht in geschlossenen Räumen oder auf
überdachten Flächen.
3
Page 7
Lieferumfang/Montage
DE
AT
CH
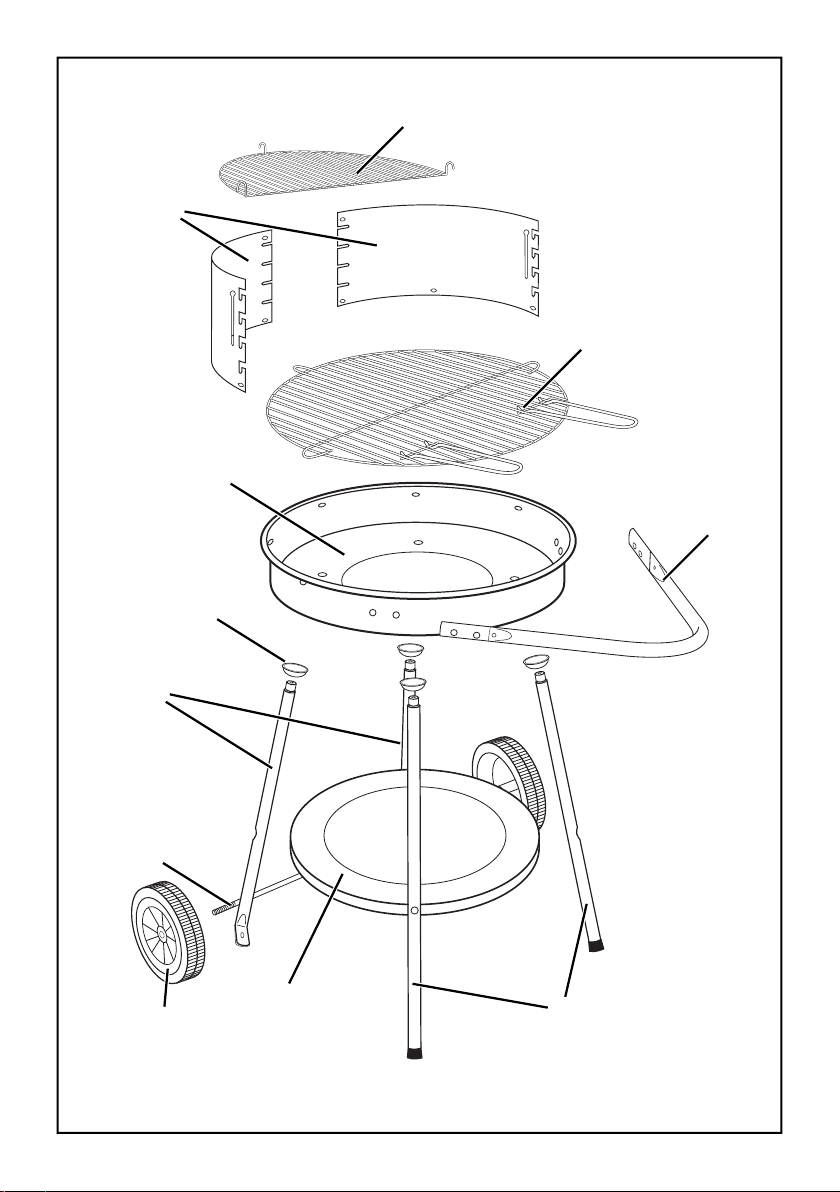
Lieferumfang
2 x Windschutz-Bleche
2
1 x Warmhalterost
3
1 x Grillrost (inkl. 2 x Handgriff e)
4
1 x Handgriff
5
2 x Bein (lang)
6
1 x Bodenablage
7
2 x Rad
8
1 x Achse
9
2 x Bein (kurz)
10
4 x Beinkappe
11
1 x Kohleschüssel
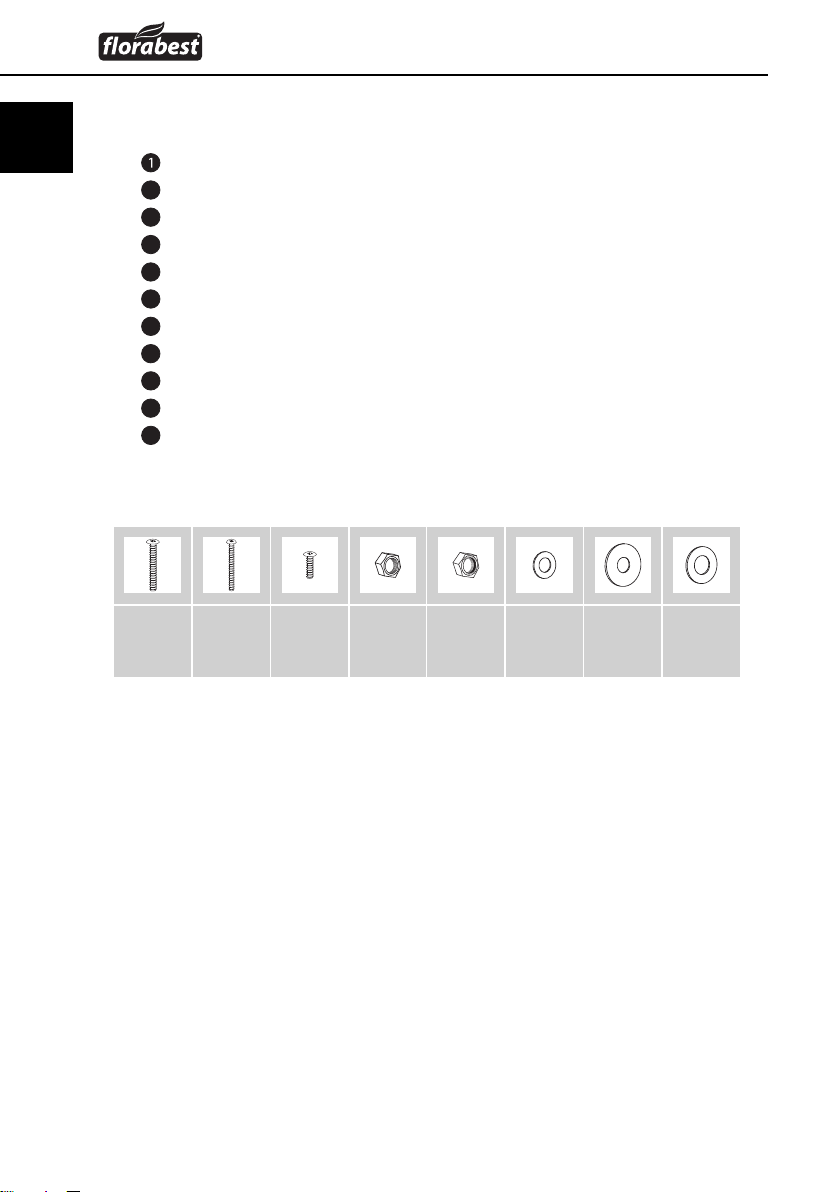
Verbindungselemente
M6x304xM5x304xM5x12
10x
M5
14x
M8
2x
Ø6
10x
Ø6
4x
Ø8
2x
Montage
Montage vorbereiten
Nehmen Sie sich ausreichend Zeit für den Zusammenbau des Grills. Schaff en Sie
sich eine ebene Arbeitsfl äche von etwa zwei bis drei Quadratmetern. Entnehmen Sie
die Einzelteile der Verpackung und legen Sie die Teile in Griff nähe bereit.
Überprüfen Sie den Lieferumfang auf Vollständigkeit und evtl. Beschädigungen.
4
FRG 45 A1
Page 8
Montage
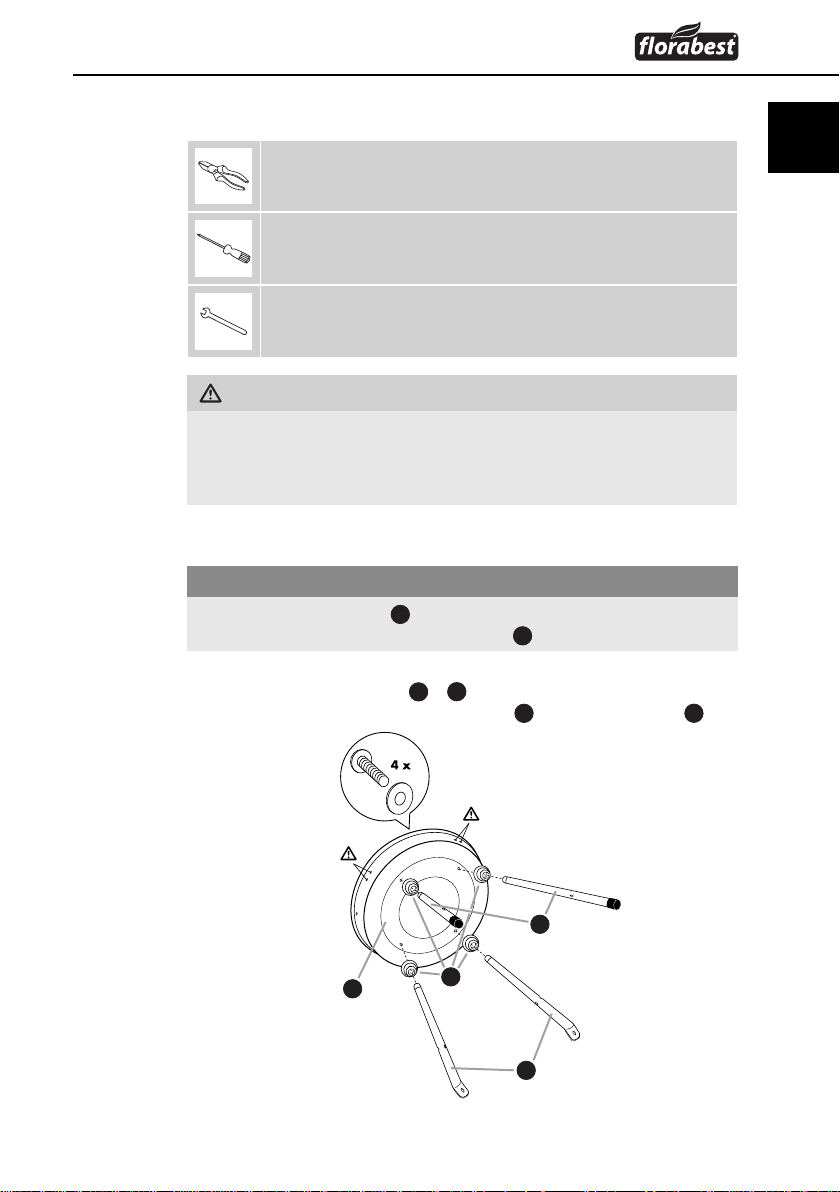
Benötigtes Montagematerial
Zange
Kreuzschlitzschraubendreher
Maulschlüssel SW 8 mm / SW 13 mm
WARNUNG
► Die Schraubenköpfe sollten zu Ihrer Sicherheit immer nach außen zeigen,
um Verletzungen zu vermeiden. Ziehen Sie erst nach Beendigung der Montage alle Schraubverbindungen fest an, sonst kommt es zu unerwünschten
Materialspannungen.
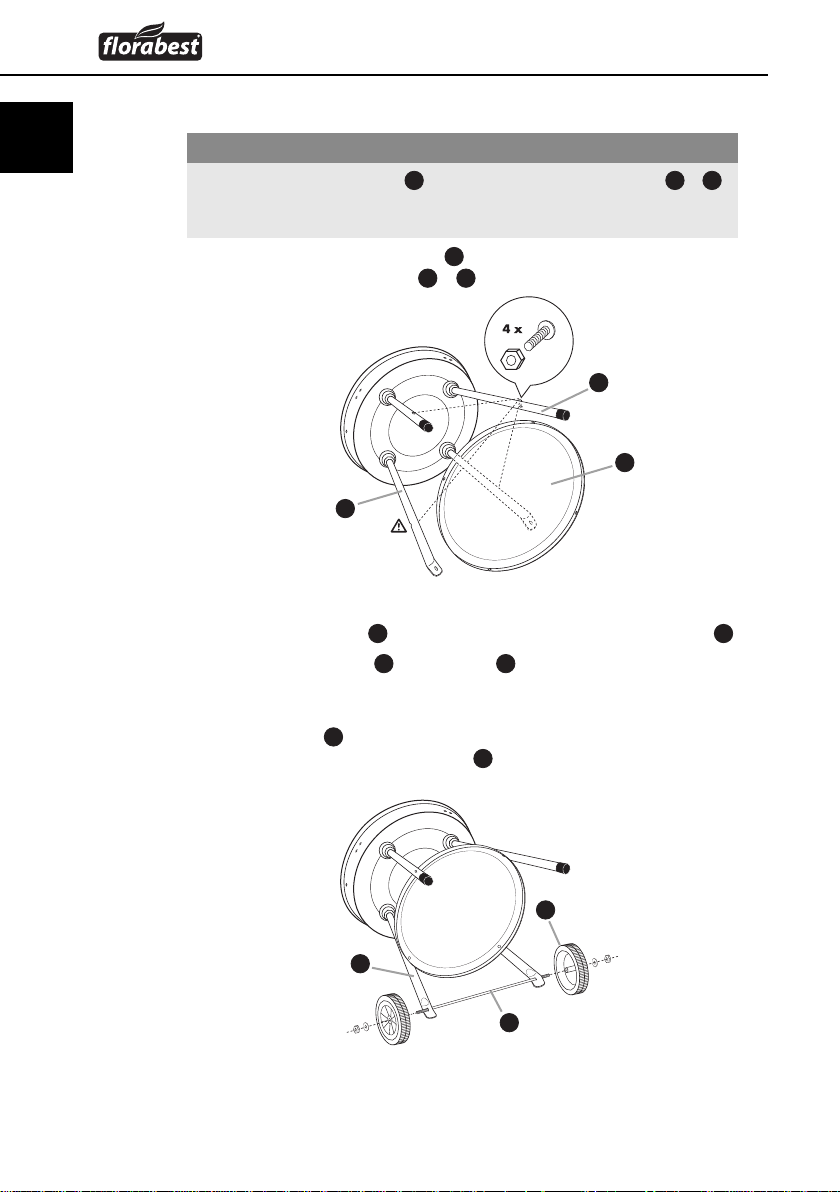
Schritt 1
ACHTUNG
► Die beiden langen Beine 5 müssen auf der Seite montiert werden, an der
sich die Doppellöcher in der Kohleschüssel 11 befi nden.
♦ Montieren Sie die 4 Beine (5 + 9) mit je 1 Schraube M6 x 30, einer
Unterlegscheibe Ø 6 und einer Beinkappe 10 an die Kohleschüssel 11.
DE
AT
CH
FRG 45 A1
11
5
10
9
5
Page 9
Montage
DE
AT
CH
Schritt 2
ACHTUNG
►
Der Rand der Bodenablage 6 muss nach unten zeigen. Die Beine (5 + 9)
müssen so gedreht werden, dass die Einbuchtungen der Bohrungen nach
außen zeigen, um die Schraubenköpfe darin aufnehmen zu können.
♦ Montieren Sie die Bodenablage 6 mithilfe von 4 Schrauben M5 x 30 und
Muttern M5 an die 4 Beine (5 + 9).
5
6
9
Schritt 3
♦ Führen Sie die Achse 8 durch die unteren Bohrungen der kurzen Beine 9.
♦ Stecken Sie die Räder 7 auf die Achse 8 und sichern Sie diese mit jeweils
einer Unterlegscheibe Ø 8 und einer selbstsichernden Mutter M8.
♦ Ziehen Sie die Muttern mit einem Maulschlüssel SW 13 mm an. Halten Sie
ggf. die Achse 8 mit einer Zange fest. Legen Sie zum Schutz vor Kratzern
ein Tuch zwischen Zange und Achse 8.
7
9
8
6
FRG 45 A1
Page 10
Montage
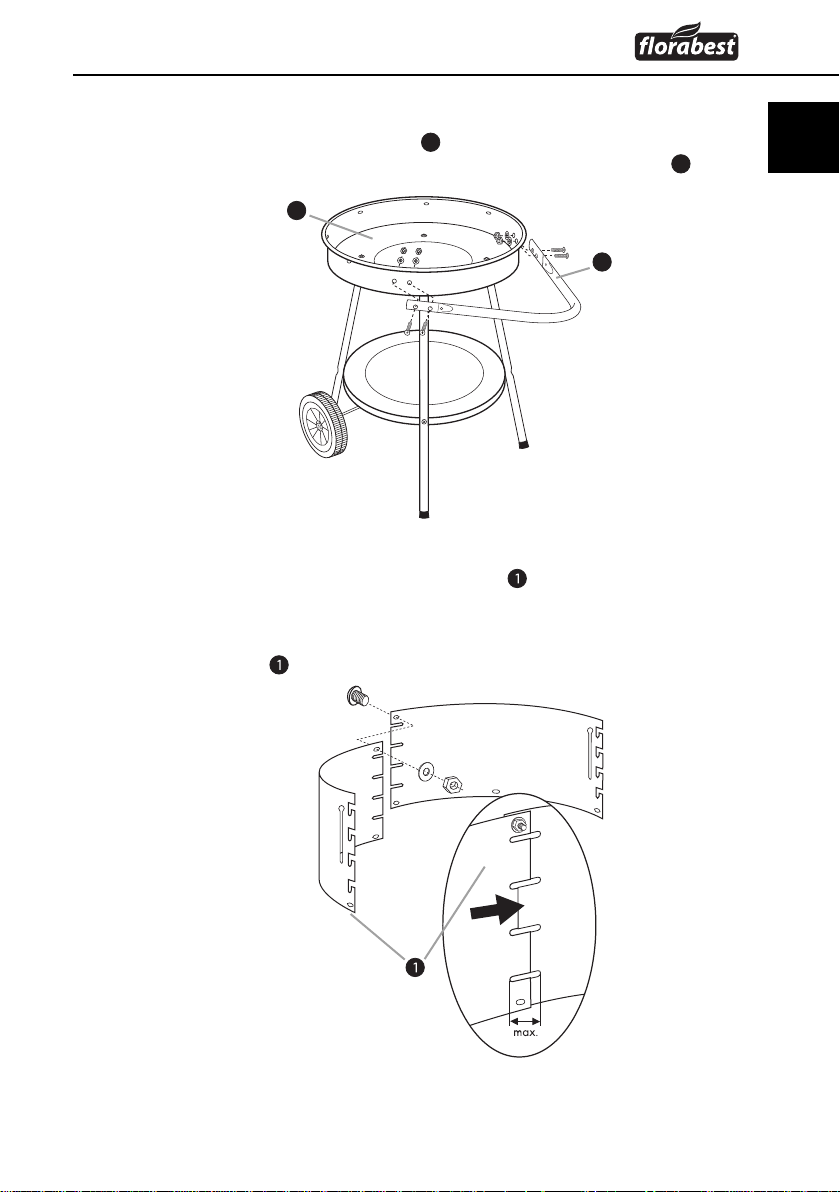
Schritt 4
♦ Montieren Sie den Handgriff 4 mithilfe von 4 Schrauben M5 x 12,
4 Unterlegscheiben Ø 6 und 4 Muttern M5 an der Kohleschüssel
11
4
11
.
Schritt 5
♦ Stecken Sie die beiden Windschutz-Bleche ineinander und schrauben Sie
sie mithilfe einer Schraube M5 x 12, einer Unterlegscheibe Ø 6 und einer
Mutter M5 zusammen. Nutzen Sie dabei den maximalen Abstand zwischen
den Blechen aus, damit das Grillrost zwischen den Schlitzen der WindschutzBleche
passt.
DE
AT
CH
FRG 45 A1
7
Page 11
Montage
DE
AT
CH
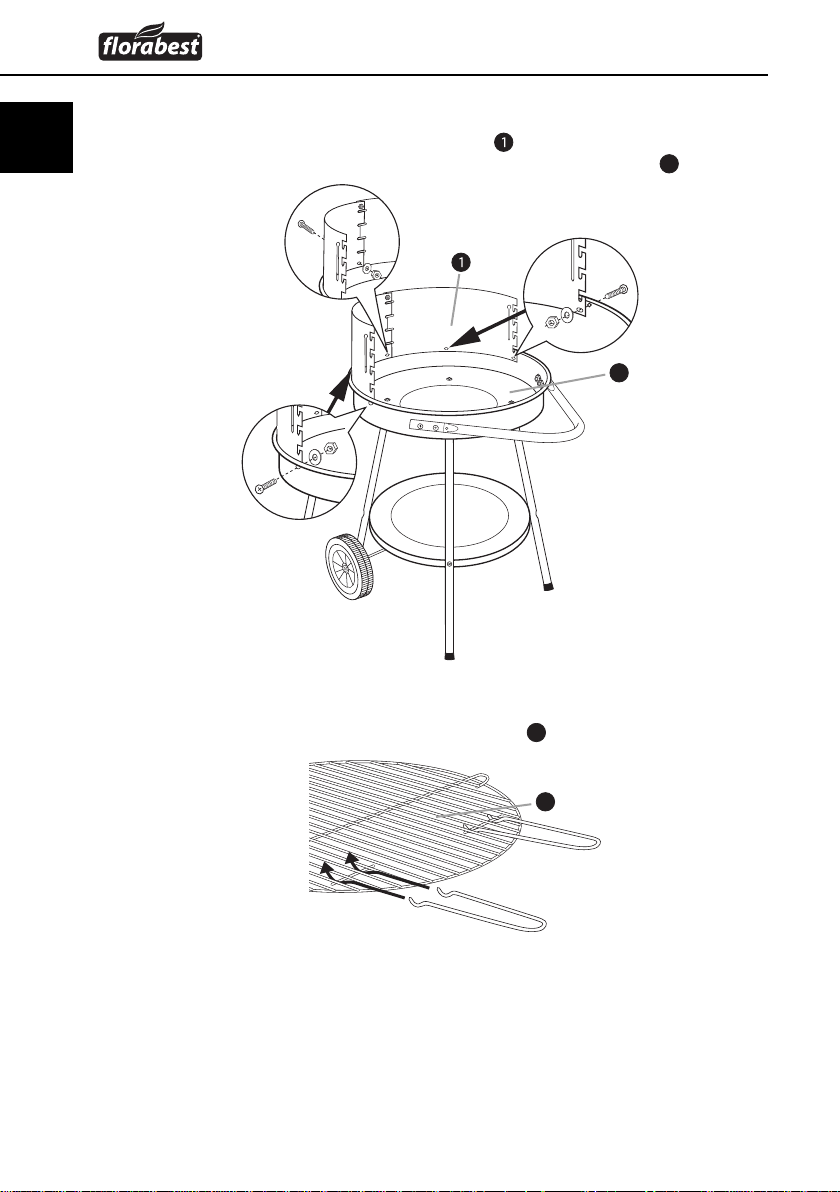
Schritt 6
♦ Schrauben Sie den montierten Windschutz mithilfe von 5 Schrauben M5 x 12,
5 Unterlegscheiben Ø 6 und 5 Muttern M5 an der Kohleschüssel
11
11
fest.
Schritt 7
♦ Haken Sie die beiden Handgriff e am Grillrost 3 ein.
3
8
FRG 45 A1
Page 12
Montage
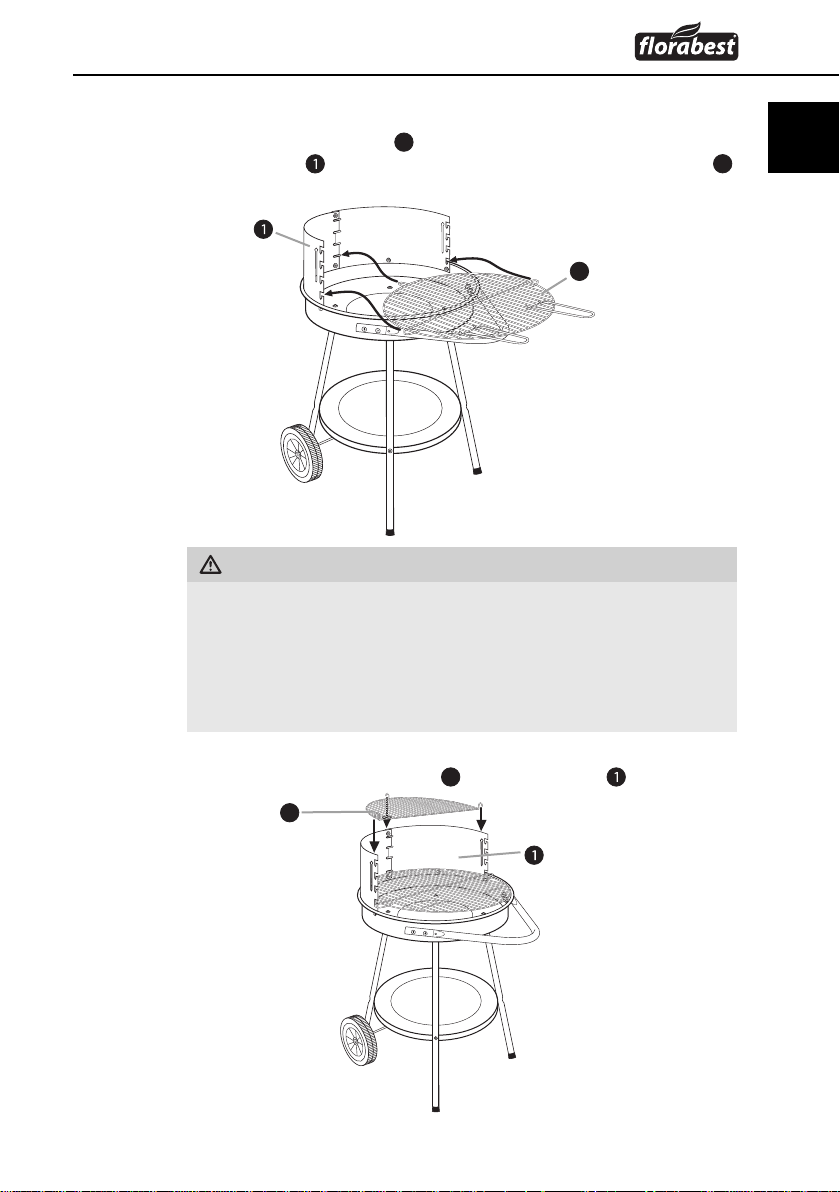
Schritt 8
♦ Hängen Sie den Grillrost 3 an der gewünschten Stelle in den
Windschutz
lösen, damit diese beim Grillen nicht stören.
WARNUNG
Warnung vor Verbrennungen!
Die beiden seitlichen im Grillrost integrierten Bügel sind keine Griff e und
werden im Betrieb heiß!
► Fassen Sie die Bügel nicht mit bloßen Händen an. Verwenden Sie zum
Einhängen oder zur Höhenverstellung des Grillrosts ausschließlich die
mitgelieferten Handgriff e.
ein. Sie können nun die Handgriff e wieder vom Grillrost 3
3
Schritt 9
♦ Hängen Sie den Warmhalterost 2 auf den Windschutz .
2
DE
AT
CH
FRG 45 A1
9
Page 13

Inbetriebnahme/Reinigung und Pfl ege
DE
AT
CH
Inbetriebnahme
HINWEIS
Vor dem ersten Gebrauch muss der Grill mindestens 30 Minuten
►
aufgeheizt werden.
WARNUNG
Warnung vor Verbrennungen!
VORSICHT! Zum Anzünden oder Wiederanzünden keinen Spiritus oder Benzin
verwenden! Nur Anzündhilfen entsprechend EN 1860-3 verwenden. Es kann
sonst durch Verpuff ungen zu unkontrollierbaren Hitzeentwicklungen kommen.
■ Schichten Sie einen Teil der Holzkohle in der Kohleschüssel auf.
■ Legen Sie ein bis zwei Feststoff anzünder auf die vorhandene Schicht Holzkohle
und zünden Sie die Feststoff anzünder mit einem Streichholz bzw. Feuerzeug an.
■ Lassen Sie die Feststoff anzünder 2 bis 4 Minuten brennen. Füllen Sie danach
die Kohleschüssel langsam mit Holzkohle auf.
■ Nach ca. 20 Minuten zeigt sich auf der Holzkohle eine weiße Ascheschicht.
Der optimale Glutzustand ist nun erreicht.
■ Verteilen Sie die Holzkohle, mit einem geeigneten Metallwerkzeug, gleich-
mäßig in der Kohleschüssel.
■ Hängen Sie den Grillrost ein und beginnen Sie mit dem Grillen.
Reinigung und Pfl ege
WARNUNG
Warnung vor Verbrennungen!
► Lassen Sie den Grill vor dem Reinigen oder Aufbewahren vollständig
abkühlen. Verwenden Sie niemals Wasser zum Löschen der Holzkohle.
Warnung vor Sachschäden!
► Verwenden Sie keine Scheuer- oder aggressive Reinigungsmittel, da diese
die Oberfl äche angreifen können.
Für die normale Reinigung verwenden Sie ein Spültuch und Wasser mit einem
handelsüblichen Spülmittel.
Bei stärkeren Verschmutzungen der emaillierten Teile, verwenden Sie einen
handelsüblichen Emaille Reiniger. Beachten Sie die Anweisungen des Herstellers
des anzuwendenden Reinigungsmittels. Reinigen Sie den Grillrost mit Spülmittel
und einem Haushaltsschwamm.
10
FRG 45 A1
Page 14
Entsorgung/Technische Daten
Entsorgung
Entsorgen Sie den Brennstoff vorsichtig und umweltgerecht. Entsorgen Sie
den Restabfall grundsätzlich nur in dafür vorgesehene Gefäße aus Metall
bzw. nicht brennbaren Materialien.
Entsorgen Sie den Grill über einen zugelassenen Entsorgungsbetrieb oder über
Ihre kommunale Entsorgungseinrichtung. Beachten Sie die geltenden Vorschriften.
Setzen Sie sich im Zweifelsfall mit Ihrer Entsorgungseinrichtung in Verbindung.
Führen Sie alle Verpackungsmaterialien einer umweltgerechten Entsorgung zu.
Technische Daten
Maße (montiert) ca. 82 x 52 x 69 cm
Grillrost Ø 47 cm
Gewicht ca. 6 kg
Brennstoff Holzkohle
Fassungsvermögen Kohleschüssel max. 1,5 kg
DE
AT
CH
FRG 45 A1
11
Page 15
Anhang
DE
AT
CH
Anhang
Garantie
Sie erhalten auf dieses Gerät 3 Jahre Garantie ab Kaufdatum. Das Gerät wurde
sorgfältig produziert und vor Anlieferung gewissenhaft geprüft.
Bitte bewahren Sie den Kassenbon als Nachweis für den Kauf auf. Bitte setzen
Sie sich im Garantiefall mit Ihrer Servicestelle telefonisch in Verbindung. Nur so
kann eine kostenlose Einsendung Ihrer Ware gewährleistet werden.
Das Produkt ist lediglich für den privaten und nicht für den gewerblichen
Gebrauch bestimmt. Bei missbräuchlicher und unsachgemäßer Behandlung,
Gewaltanwendung und bei Eingriff en, die nicht von unserer autorisierten ServiceNiederlassung vorgenommen wurden, erlischt die Garantie.
Ihre gesetzlichen Rechte werden durch diese Garantie nicht eingeschränkt.
Die Garantiezeit wird durch die Gewährleistung nicht verlängert. Dies gilt auch
für ersetzte und reparierte Teile.
Eventuell schon beim Kauf vorhandene Schäden und Mängel müssen sofort nach
dem Auspacken gemeldet werden, spätestens aber zwei Tage nach Kaufdatum.
Nach Ablauf der Garantiezeit anfallende Reparaturen sind kostenpfl ichtig.
Service
Service Deutschland
Tel.: 01805 772 033 (0,14 EUR/Min. aus dem dt. Festnetz,
Mobilfunk max. 0,42 EUR/Min.)
E-Mail: kompernass@lidl.de
Service Österreich
Tel.: 0820 201 222 (0,15 EUR/Min.)
E-Mail: kompernass@lidl.at
Service Schweiz
Tel.: 0842 665566 (0,08 CHF/Min., Mobilfunk max. 0,40 CHF/Min.)
E-Mail: kompernass@lidl.ch
HINWEIS
Die Garantieleistung gilt nur für Material- oder Fabrikationsfehler, nicht
►
aber für Transportschäden, Verschleißteile oder für Beschädigungen an
zerbrechlichen Teilen, z. B. Schalter.
IAN 86019
IAN 86019
IAN 86019
Importeur
12
KOMPERNASS GMBH
BURGSTRASSE 21
D-44867 BOCHUM
www.kompernass.com
FRG 45 A1
Page 16

Sommaire
Introduction . . . . . . . . . . . . . . . . . . . . . . . . . . . . . . . . . . . . . . . . . . . . . . . . . . 14
Informations relatives à ce mode d’emploi . . . . . . . . . . . . . . . . . . . . . . . . . . . . . . . . . . . . 14
Droits d’auteur . . . . . . . . . . . . . . . . . . . . . . . . . . . . . . . . . . . . . . . . . . . . . . . . . . . . . . . . . . 14
Utilisation conforme . . . . . . . . . . . . . . . . . . . . . . . . . . . . . . . . . . . . . . . . . . . . . . . . . . . . . . 14
Sécurité . . . . . . . . . . . . . . . . . . . . . . . . . . . . . . . . . . . . . . . . . . . . . . . . . . . . .15
Consignes de sécurité fondamentales . . . . . . . . . . . . . . . . . . . . . . . . . . . . . . . . . . . . . . . . 15
Accessoires fournis . . . . . . . . . . . . . . . . . . . . . . . . . . . . . . . . . . . . . . . . . . . . 16
Eléments de liaison . . . . . . . . . . . . . . . . . . . . . . . . . . . . . . . . . . . . . . . . . . . . . . . . . . . . . . 16
Montage . . . . . . . . . . . . . . . . . . . . . . . . . . . . . . . . . . . . . . . . . . . . . . . . . . . . 16
Préparation du montage . . . . . . . . . . . . . . . . . . . . . . . . . . . . . . . . . . . . . . . . . . . . . . . . . . 16
Matériel de montage requis . . . . . . . . . . . . . . . . . . . . . . . . . . . . . . . . . . . . . . . . . . . . . . . 17
Mise en service . . . . . . . . . . . . . . . . . . . . . . . . . . . . . . . . . . . . . . . . . . . . . . . 22
Nettoyage et entretien . . . . . . . . . . . . . . . . . . . . . . . . . . . . . . . . . . . . . . . . . 22
Mise au rebut . . . . . . . . . . . . . . . . . . . . . . . . . . . . . . . . . . . . . . . . . . . . . . . . 23
Caractéristiques techniques . . . . . . . . . . . . . . . . . . . . . . . . . . . . . . . . . . . . . 23
FR
CH
Annexe . . . . . . . . . . . . . . . . . . . . . . . . . . . . . . . . . . . . . . . . . . . . . . . . . . . . . . 24
Garantie . . . . . . . . . . . . . . . . . . . . . . . . . . . . . . . . . . . . . . . . . . . . . . . . . . . . . . . . . . . . . . 24
Service après-vente . . . . . . . . . . . . . . . . . . . . . . . . . . . . . . . . . . . . . . . . . . . . . . . . . . . . . . 24
Importateur . . . . . . . . . . . . . . . . . . . . . . . . . . . . . . . . . . . . . . . . . . . . . . . . . . . . . . . . . . . . 24
FRG 45 A1
13
Page 17

Introduction
Introduction
FR
CH
Informations relatives à ce mode d'emploi
Toutes nos félicitations !
Avec votre achat, vous avez opté pour un produit de grande qualité. Familiarisez-
vous avec le produit avant le montage et la première mise en service. A cette fi n,
lisez attentivement les instructions de montage suivantes ainsi que les consignes
de sécurité. N'utilisez le produit que conformément aux consignes et pour les
domaines d'utilisation prévus. Conservez soigneusement ces instructions. En cas
de transfert du produit à un tiers, remettez-lui également tous les documents.
Droits d'auteur
Cette documentation est protégée par les droits d'auteur.
Toute reproduction, ou toute réimpression, même sous forme d'extraits ainsi que
la reproduction de photos, même dans un état modifi é est uniquement autorisée
avec l'accord écrit du fabricant.
Utilisation conforme
Le barbecue est exclusivement destiné à la préparation de grillades. Il est exclusivement destiné à être utilisé à l'extérieur. Ce barbecue est uniquement destiné
à l'usage privé et non aux fi ns commerciales. Aucune garantie n'est assurée pour
les dommages résultant d'un traitement abusif ou non conforme, du recours à la
force et d'une modifi cation non autorisée.
AVERTISSEMENT
Danger par l'usage non conforme !
L'appareil peut présenter un danger en cas d'usage non conforme et/ou
d'usage divergent.
► Utiliser l'appareil exclusivement de manière conforme à sa destination.
► Respecter les procédures décrites dans ce mode d'emploi.
Les prétentions de toute nature pour dommages résultant d'un usage non conforme,
de réparations non conformes, de modifi cations eff ectuées sans autorisation
préalable ou de l'usage de pièces de rechange non autorisées sont exclues.
L'opérateur est seul à assumer le risque.
14
FRG 45 A1
Page 18

Sécurité
Sécurité
Ce chapitre contient des consignes de sécurité importantes se rapportant à la
manipulation de l'appareil.
Cet appareil est conforme aux consignes de sécurité prescrites. Tout usage non
conforme peut entraîner des blessures ou des dommages matériels.
Consignes de sécurité fondamentales
AVERTISSEMENT
Attention aux risques de brûlure !
1. En cours d'opération, placez le barbecue sur une surface sûre, stable et
solide pour éviter qu'il ne bascule.
2. ATTENTION ! N'utilisez pas d'alcool ou d'essence pour allumer ou rallumer
le barbecue ! Utilisez uniquement des aides à l'allumage conformes à la
norme EN 1860-3. Un développement de chaleur incontrôlable peut en
eff et résulter de défl agrations.
3. ATTENTION ! Le barbecue devient très chaud et ne doit pas être déplacé
en cours d'opération, car il risque de basculer.
4. ATTENTION ! Tenir hors de portée des enfants et des animaux domestiques !
5. Portez des gants appropriés lorsque vous travaillez sur le barbecue et
utilisez une pince à barbecue.
6. Ne laissez jamais le barbecue chaud sans surveillance.
7. Laissez entièrement refroidir le barbecue avant de le nettoyer.
8. N'utilisez jamais d'eau pour éteindre le charbon de bois.
FR
CH
FRG 45 A1
AVERTISSEMENT
Risque d'étouff ement !
► Utilisez le barbecue uniquement à l'extérieur !
► N'utilisez pas le barbecue dans des pièces fermées, ou dans des espaces
recouverts d'une toiture.
15
Page 19

FR
CH
Accessoires fournis/Montage
Accessoires fournis
2 x tôles pare-vent
2
1 x grille de maintien au chaud
3
1 x grille (y compris 2x poignées)
4
1 x poignée
5
2 x pied (longs)
6
1 x tablette
7
2 x roues
8
1 x essieu
9
2 x pieds (courts)
10
4 x embout de pied
11
1 x cuve à charbon
Eléments de liaison
M6x304xM5x304xM5x12
10x
Montage
Préparation du montage
Prévoyez suffi samment de temps pour eff ectuer l'assemblage du barbecue.
Aménagez une surface de travail plane s'étendant sur deux à trois mètres carré.
Retirez les pièces individuelles de l'emballage et placez-les à portée de main.
Assurez-vous que le produit est livré complet et sans dommages.
16
M5
14x
M8
2x
Ø6
10x
Ø6
4x
Ø8
2x
FRG 45 A1
Page 20

Montage
Matériel de montage requis
Pince
Tournevis cruciforme
Clé à fourche simple 8 mm + 13 mm
AVERTISSEMENT
► Pour assurer votre sécurité, les têtes de vis doivent toujours être orientées
vers l'extérieur, pour éviter des accidents. Attendez que le montage soit
terminé pour serrer fermement toutes les vis, sinon il peut en résulter des
tensions indésirables au niveau des matériaux.
Etape 1
ATTENTION
► Les deux pieds longs 5 doivent être montés sur le côté, sur le pied où se
situent les trous doubles dans la cuve à charbon
11
FR
CH
.
FRG 45 A1
♦ Montez les 4 pieds (5 + 9) avec respectivement 1 vis M6 x 30, une
rondelle Ø 6 et un embout de pied 10 sur la cuve à charbon 11.
5
11
10
9
17
Page 21

FR
CH
Montage
Etape 2
ATTENTION
►
Le bord de la tablette 6 doit indiquer vers le bas. Les pieds (5 + 9)
doivent être tournés de telle manière que les indentations des perforations
doivent être tournées vers l'extérieur, pour y loger les têtes de vis.
♦ Montez la tablette 6 à l'aide de 4 vis M5 x 30 et écrous M5 sur les
4 pieds (5 + 9).
5
6
9
Etape 3
♦ Introduisez l'essieu 8 à travers les perforations inférieures des pieds courts 9.
♦ Insérez les roues 7 sur l'essieu 8 et sécurisez-les à l'aide d'une rondelle
Ø 8 et d‘un écrou auto-bloquant M8.
♦ Serrez les écrous avec un clé à fourche simple 13 mm. Si besoin, tenez
l‘essieu 8 à l‘aide d‘une pince. Pour éviter de rayer la surface, placez un
chiff on entre la pince et l‘essieu 8.
18
7
9
8
FRG 45 A1
Page 22

Montage
Etape 4
♦ Montez la poignée 4 à l'aide de 4 vis M5 x 12, 4 rondelles Ø 6 et
4 écrous M5 sur la cuve à charbon
11
11
.
4
Etape 5
♦ Insérez les deux tôles pare-vent l'une dans l'autre et vissez-les à l'aide
d'une vis M5 x 12, d‘une rondelle Ø 6 et d‘un écrou M5. Pour ce faire,
utilisez l‘écart maximal entre les tôles, afi n que la grille s‘insère entre les
fentes des tôles pare-vent
.
FR
CH
FRG 45 A1
19
Page 23

FR
CH
Montage
Etape 6
♦ Vissez le pare-vent à l’aide de 5 vis M5 x 12, 5 rondelles Ø 6 et
5 écrous M5 sur la cuve à charbon
11
.
11
20
Etape 7
♦ Accrochez les deux poignées sur la grille 3.
3
FRG 45 A1
Page 24

Montage
AVERTISSEMENT
Attention aux brûlures !
Les deux étriers intégrés dans la grille ne sont pas des poignées et
s'échauff ent en cours d'opération !
Etape 8
♦ Insérez la grille 3 à l'endroit souhaité dans le pare-vent . Vous pouvez
seulement démonter à nouveau les poignées de la grille
poignées ne gênent pas au moment de faire un barbecue.
► Ne touchez pas les étriers à mains nues. Utilisez exclusivement les
poignées fournies pour suspendre ou régler en hauteur la grille.
3
3
pour que les
FR
CH
FRG 45 A1
Etape 9
♦ Accrochez la grille de maintien au chaud 2 sur le pare-vent .
2
21
Page 25

FR
CH
Mise en service/Nettoyage et entretien
Mise en service
REMARQUE
Avant le premier usage, le barbecue doit être préchauff é pendant au moins
►
30 minutes.
AVERTISSEMENT
Attention aux risques de brûlure !
Attention !N'utilisez pas d'alcool ou d'essence pour allumer ou rallumer le
barbecue ! Utilisez exclusivement les aides à l'allumage conformes à la norme
EN 1860-3. Des défl agrations peuvent en eff et entraîner des développements
de chaleur incontrôlables.
■ Empilez une partie du charbon de bois dans la cuve à charbon.
■ Placez un à deux combustibles solides sur la couche existante de charbon
de bois et allumez les combustibles à l'aide d'une allumette ou d'un briquet.
■ Laissez brûler les combustibles solides pendant 2 à 4 minutes. Remplissez
ensuite lentement la cuve de charbon de bois.
■ Après env. 20 minutes, le charbon de bois présente une couche de cendre
blanche. L'état optimal des charbons ardents est maintenant atteint.
■ Répartissez le charbon de bois, à l'aide d'un instrument en métal adapté, de
façon homogène dans la cuve à charbon.
■ Accrochez la grille : vous pouvez commencer à confectionner vos grillades.
Nettoyage et entretien
AVERTISSEMENT
Attention aux risques de brûlure !
► Laissez entièrement refroidir le barbecue avant de le nettoyer ou de le
ranger. N'utilisez jamais d'eau pour éteindre le charbon de bois.
Attention aux dommages matériels !
► N'utilisez pas de produits de nettoyage abrasifs ou agressifs, car ils peuvent
endommager la surface.
Pour le nettoyage normal, utilisez un chiff on de vaisselle et de l'eau additionné
de votre produit détergent habituel.
En cas de souillures prononcées des pièces émaillées, utilisez un produit nettoyant
d'émail spécifi que disponible dans le commerce. Respectez les consignes du
fabricant se rapportant au produit de nettoyage que vous avez choisi.
Nettoyez la grille à l'aide d'un produit vaisselle et d'une éponge de ménage.
22
FRG 45 A1
Page 26

Mise au rebut/Caractéristiques techniques
Mise au rebut
Recyclez le combustible avec précaution et dans le respect de l'environnement. Recyclez les déchets uniquement dans les conteneurs en métal
prévus à cet eff et ou les matériaux non combustibles.
Mettez le barbecue au rebut par le biais d'une entreprise de collecte des déchets
agréée ou par votre centre communal d'élimination des déchets. Respectez les
consignes en vigueur. En cas de doute, veuillez contacter l'organisme d'élimination
des déchets.
Veuillez éliminer tous les matériaux d'emballage d'une manière respectueuse de
l'environnement.
Caractéristiques techniques
Dimensions (état monté) env. 82 x 52 x 69 cm
Grille Ø 47 cm
Poids env. 6 kg
Combustible Charbon de bois
Capacité de la cuve à charbon max. 1,5 kg
FR
CH
FRG 45 A1
23
Page 27

FR
CH
Annexe
Garantie
Vous bénéfi ciez d'une garantie de 3 ans sur cet appareil après la date d'achat.
L'appareil a été fabriqué avec le plus grand soin et a fait l'objet de contrôles
consciencieux avant la livraison.
Veuillez conserver le ticket de caisse en guise de preuve d'achat. Veuillez contacter
votre point de service par téléphone si vous souhaitez profi ter de la garantie.
C'est en eff et la condition préalable à l'envoi gratuit de votre marchandise.
Le produit est exclusivement destiné à un usage privé et non commercial. La
garantie prend fi n en cas de manipulation abusive et non conforme, de recours
à la force et d'interventions qui n'ont pas été réalisées par notre succursale de
service après-vente agréée.
Cette garantie ne constitue pas une restriction de vos droits légaux. La période
sous garantie n'est pas prolongée par la garantie du fabricant. Ceci s'applique
également aux pièces remplacées et réparées.
Les dommages et défauts éventuellement présents à l'achat doivent être notifi és
directement après le déballage, mais au plus tard deux jours après la date d'achat.
Toutes réparations devant être eff ectuées après expiration de la période sous
garantie seront payantes.
Annexe
REMARQUE
La prestation de garantie s'applique uniquement aux vices de matériaux ou
►
aux erreurs de fabrication, mais pas aux dommages de transport, pièces
d'usure ou dommages sur les pièces fragiles, par ex. les interrupteurs.
Service après-vente
Service France
Tel.: 0800 919270
E-Mail: kompernass@lidl.fr
IAN 86019
Service Suisse
Tel.: 0842 665566 (0,08 CHF/Min.,
mobile max. 0,40 CHF/Min.)
E-Mail: kompernass@lidl.ch
IAN 86019
Importateur
KOMPERNASS GMBH
BURGSTRASSE 21
44867 BOCHUM, GERMANY
www.kompernass.com
24
FRG 45 A1
Page 28

Indice
Introduzione . . . . . . . . . . . . . . . . . . . . . . . . . . . . . . . . . . . . . . . . . . . . . . . . . 26
Informazioni sul presente manuale di istruzioni . . . . . . . . . . . . . . . . . . . . . . . . . . . . . . . . . 26
Diritto d'autore . . . . . . . . . . . . . . . . . . . . . . . . . . . . . . . . . . . . . . . . . . . . . . . . . . . . . . . . . . 26
Uso conforme . . . . . . . . . . . . . . . . . . . . . . . . . . . . . . . . . . . . . . . . . . . . . . . . . . . . . . . . . . 26
Sicurezza . . . . . . . . . . . . . . . . . . . . . . . . . . . . . . . . . . . . . . . . . . . . . . . . . . . . 27
Avvertenze di sicurezza di base . . . . . . . . . . . . . . . . . . . . . . . . . . . . . . . . . . . . . . . . . . . . 27
Volume della fornitura . . . . . . . . . . . . . . . . . . . . . . . . . . . . . . . . . . . . . . . . . 28
Elementi di connessione . . . . . . . . . . . . . . . . . . . . . . . . . . . . . . . . . . . . . . . . . . . . . . . . . . . 28
Montaggio . . . . . . . . . . . . . . . . . . . . . . . . . . . . . . . . . . . . . . . . . . . . . . . . . . . 28
Preparazione del montaggio . . . . . . . . . . . . . . . . . . . . . . . . . . . . . . . . . . . . . . . . . . . . . . . 28
Materiale di montaggio necessario . . . . . . . . . . . . . . . . . . . . . . . . . . . . . . . . . . . . . . . . . . 29
Messa in funzione . . . . . . . . . . . . . . . . . . . . . . . . . . . . . . . . . . . . . . . . . . . . . 34
Pulizia e cura . . . . . . . . . . . . . . . . . . . . . . . . . . . . . . . . . . . . . . . . . . . . . . . . . 34
Smaltimento . . . . . . . . . . . . . . . . . . . . . . . . . . . . . . . . . . . . . . . . . . . . . . . . . 35
Dati tecnici . . . . . . . . . . . . . . . . . . . . . . . . . . . . . . . . . . . . . . . . . . . . . . . . . . . 35
IT
CH
Appendice . . . . . . . . . . . . . . . . . . . . . . . . . . . . . . . . . . . . . . . . . . . . . . . . . . . 36
Garanzia . . . . . . . . . . . . . . . . . . . . . . . . . . . . . . . . . . . . . . . . . . . . . . . . . . . . . . . . . . . . . . 36
Assistenza . . . . . . . . . . . . . . . . . . . . . . . . . . . . . . . . . . . . . . . . . . . . . . . . . . . . . . . . . . . . . 36
Importatore . . . . . . . . . . . . . . . . . . . . . . . . . . . . . . . . . . . . . . . . . . . . . . . . . . . . . . . . . . . . 36
FRG 45 A1
25
Page 29

IT
CH
Introduzione
Introduzione
Informazioni sul presente manuale di istruzioni
Congratulazioni!
Con il suo acquisto, ha scelto un prodotto di alta qualità. Si familiarizzi con il
prodotto prima del montaggio e della messa in funzione. A tale scopo, le consigliamo di leggere attentamente le seguenti istruzioni di montaggio e avvertenze
di sicurezza. Utilizzi il prodotto solo come descritto e per i campi di impiego
indicati. Conservi con cura il manuale. In caso di cessione del prodotto a terzi,
consegni anche tutta la documentazione relativa.
Diritto d'autore
La presente documentazione è tutelata dal diritto d'autore.
La diff usione o ristampa di qualsiasi genere, anche se parziale, nonché la
riproduzione delle illustrazioni, anche se modifi cate, è consentita solo previa
autorizzazione scritta del produttore.
Uso conforme
Il barbecue è destinato esclusivamente alla preparazione di alimenti da arrostire.
Esso è destinato esclusivamente all'impiego all'aperto. Il presente barbecue è destinato all'uso privato e non a scopi commerciali. Non si assume alcuna responsabilità per i danni derivanti dall'abuso e uso non conforme, dall'uso di violenza o
modifi che non autorizzate.
26
AVVISO
Pericolo derivante da uso non conforme!
In caso di uso non conforme o diverso da quello previsto, possono verifi carsi
situazioni di pericolo.
► Utilizzare l'apparecchio esclusivamente in conformità alla sua destinazione.
► Attenersi alle procedure descritte nel presente manuale di istruzioni.
Si esclude qualsiasi rivendicazione collegata a danni derivanti da uso non conforme,
riparazioni non eseguite a regola d'arte, modifi che non consentite o impiego di
parti di ricambio non omologate.
Il rischio è esclusivamente a carico dell‘utente.
FRG 45 A1
Page 30

Sicurezza
Sicurezza
In questo capitolo sono riportate importanti indicazioni di sicurezza per l'uso
dell'apparecchio.
Questo apparecchio corrisponde alle disposizioni di sicurezza prescritte.
L'uso non conforme può comportare danni a persone e a cose.
Avvertenze di sicurezza di base
AVVISO
Avviso relativo al pericolo di ustioni!
1. Collocare il grill su un sottofondo stabile, piano e solido durante l‘uso,
altrimenti potrebbe ribaltarsi.
2. ATTENZIONE! Non utilizzare alcol o benzina per accendere o riaccendere il fuoco! Utilizzare solo ausili di accensione conformi a EN 1860-3. Il
ritorno di fi amma può creare uno sviluppo di calore incontrollabile.
3. ATTENZIONE! Il grill si surriscalda e non dev‘essere spostato durante l‘uso,
altrimenti potrebbe ribaltarsi.
4. ATTENZIONE! Tenere lontani i bambini e gli animali domestici!
5. Durante la cottura, indossare guanti idonei e utilizzare le apposite pinze.
6. Non lasciare mai il grill rovente incustodito.
7. Prima della pulizia, fare raff reddare completamente il grill.
8. Non utilizzare mai acqua per spegnere la brace.
IT
CH
FRG 45 A1
AVVISO
Avviso relativo al pericolo di soff ocamento!
► Utilizzare il grill solo all’aperto!
► Non utilizzare il grill in ambienti chiusi o su superfi ci coperte.
27
Page 31

IT
CH
Volume della fornitura/Montaggio
Volume della fornitura
2 x pannelli paravento
2
1 x ripiano per tenere in caldo il cibo
3
1 x griglia di cottura (incl. 2 x maniglie)
4
1 x maniglia
5
2 x gambe (lunghe)
6
1 x superfi cie di appoggio
7
2 x ruote
8
1 x asse
9
2 x gambe (corte)
10
4 x cappucci per gambe
11
1 x conca per la brace
Elementi di connessione
M6x304xM5x304xM5x12
10x
Montaggio
Preparazione del montaggio
Prevedere tempo a suffi cienza per il montaggio del barbecue. Destinare una
superfi cie di lavoro di circa 2-3 metri quadrati. Rimuovere i singoli pezzi dalla
confezione e collocarli a portata di mano. Controllare l'integrità della fornitura
e la presenza di eventuali danni.
28
M5
14x
M8
2x
Ø6
10x
Ø6
4x
Ø8
2x
FRG 45 A1
Page 32

Montaggio
Materiale di montaggio necessario
Pinza
Cacciavite a stella
Chiave fi ssa SW 8 mm / SW 13 mm
AVVISO
► Le teste delle viti, per la sicurezza dell’utente, devono essere orientate
sempre verso l’esterno, al fi ne di evitare lesioni. Serrare tutte le viti solo al
termine del montaggio, per evitare tensioni errate del materiale.
Passaggio 1
ATTENZIONE
► Entrambe le gambe lunghe 5 devono essere montate sui lati in cui si
trovano i fori doppi nella conca per la brace
♦ Montare le 4 gambe (5 + 9) utilizzando per ognuna 1 vite M6 x 30,
una rondella Ø 6 e un cappuccio per gambe 10 al contenitore per il
carbone 11.
11
.
IT
CH
FRG 45 A1
11
5
10
9
29
Page 33

IT
CH
Montaggio
Passaggio 2
ATTENZIONE
►
Il margine della superfi cie di appoggio 6 deve puntare verso il basso.
Le gambe (5 + 9) devono essere ruotate in modo tale che le insenature
dei fori puntino verso l'esterno, al fi ne di potervi inserire le teste delle viti.
♦ Montare la superfi cie di appoggio 6 con l'ausilio di 4 viti M5 x 30 e dadi
M5 alle 4 gambe (5 + 9).
5
6
9
Passaggio 3
♦ Inserire gli assi 8 attraverso i fori inferiori delle gambe corte 9.
♦ Inserire le ruote 7 sull'asse 8 e fi ssarle con una rondella Ø 8 e un dado
autobloccante M8 per ogni ruota.
♦ Serrare i dadi con una chiave fi ssa SW 13 mm. Se necessario, tenere fermi
gli assi 8 con una pinza. Per evitare graffi , collocare un panno fra la pinza
e l'asse 8.
30
7
9
8
FRG 45 A1
Page 34

Montaggio
Passaggio 4
♦ Montare la maniglia 4 con l'ausilio di 4 viti M5 x 12, 4 rondelle Ø 6 e 4
dadi M5 alla conca per la brace
11
11
.
4
Passaggio 5
♦ Inserire i due pannelli paravento l'uno nell'altro e avvitarli con l'ausilio
di una vite M5 x 12, una rondella Ø 6 e un dado M5. Utilizzare la distanza
massima possibile fra i pannelli per consentire l'inserimento della griglia fra
gli intagli dei pannelli
.
IT
CH
FRG 45 A1
31
Page 35

IT
CH
Montaggio
Passaggio 6
♦ Avvitare il pannello paravento montato con l'ausilio di 5 viti M5 x 12,
5 rondelle Ø 6 e 5 dadi M5 alla conca per la brace
11
.
11
32
Passaggio 7
♦ Agganciare le due maniglie alla griglia 3.
3
FRG 45 A1
Page 36

Montaggio
Passaggio 8
♦ Inserire la griglia 3 sul punto desiderato entro il pannello paravento .
Rimuovere le maniglie dalla griglia
la cottura.
3
affi nché non diano fastidio durante
3
AVVISO
Pericoo di ustioni!
Le due staff e integrate nella griglia non sono maniglie e si surriscaldano
durante il funzionamento!
► Non aff errare le staff e con le mani nude. Per sospendere o regolare in
altezza la griglia utilizzare esclusivamente le maniglie accluse.
Passaggio 9
♦ Appendere il ripiano per tenere in caldo il cibo 2 al pannello paravento .
2
IT
CH
FRG 45 A1
33
Page 37

Messa in funzione/Pulizia e cura
Messa in funzione
AVVERTENZA
Prima del primo impiego è necessario riscaldare il barbecue per almeno
►
30 minuti.
IT
CH
AVVISO
Avviso relativo al pericolo di ustioni!
Attenzione! Non utilizzare alcol o benzina per accendere o riaccendere il
fuoco! Utilizzare solo ausili di combustione conformi a EN1860-3. Il ritorno
di fi amma può creare uno sviluppo di calore incontrollabile.
■ Collocare uno strato di carbone nel vassoio portacarbone.
■ Collocare uno o due tavolette di combustibile solido sullo strato presente di
carbonella e accenderle con un fi ammifero o un accendino.
■ Fare bruciare le tavolette di combustibile solido per 2 - 4 minuti. Riempire
quindi lentamente il vassoio portacarbone con altro carbone.
■ Dopo circa 20 minuti, sul carbone si creerà uno strato bianco di cenere.
Ciò indica il raggiungimento di uno stato di combustione ideale.
■ Distribuire il carbone uniformemente nel vassoio portacarbone tramite un
utensile di metallo idoneo.
■ Sospendere la griglia di cottura e cominciare ad arrostire.
Pulizia e cura
AVVISO
Avviso relativo al pericolo di ustioni!
► Prima della pulizia o della conservazione, fare raff reddare completamente
il barbecue. Non utilizzare mai acqua per spegnere la brace.
Avviso su possibili danni materiali!
► Non utilizzare agenti abrasivi o detergenti aggressivi, che possono attaccare
la superfi cie.
Per la normale pulizia, utilizzare una spugnetta e acqua con aggiunta di un
detergente comunemente reperibile in commercio.
In caso di sporco eccessivo sulle parti smaltate, utilizzare un detergente per parti
smaltate comunemente reperibile in commercio. Seguire le indicazioni del produttore del detergente da utilizzare. Pulire la griglia di cottura con un detergente
e una spugnetta per uso domestico.
34
FRG 45 A1
Page 38

Smaltimento/Dati tecnici
Smaltimento
Smaltire il combustibile con cautela e in modo ecologico. Smaltire i
residui della combustione accuratamente, solo nei recipienti appositamente previsti in metallo o in materiali non infi ammabili.
Smaltire il barbecue tramite un'azienda di smaltimento autorizzata o tramite
l'ente di smaltimento comunale competente. Rispettare le norme attualmente in
vigore. In caso di dubbi mettersi in contatto con l'ente di smaltimento competente.
Smaltire tutti i materiali dell'imballaggio in modo ecologicamente conforme.
Dati tecnici
Dimensioni (montato) ca. 82 x 52 x 69 mm
Griglia di cottura Ø 47 cm
Peso ca. 6 kg
Combustibile Carbone di legna
Capacità della conca per la
brace
IT
CH
max. 1,5 kg
FRG 45 A1
35
Page 39

IT
CH
Appendice
Garanzia
Questo apparecchio è garantito per tre anni a partire dalla data di acquisto.
L'apparecchio è stato prodotto con cura e debitamente collaudato prima della
consegna.
Conservare lo scontrino come prova d'acquisto. Nei casi contemplati dalla
garanzia, mettersi in comunicazione telefonicamente con il centro di assistenza
più vicino. Solo in tal modo è possibile garantire un invio gratuito della merce.
AVVERTENZA
La garanzia vale solo per i difetti relativi al materiale o alla fabbricazione,
►
ma non per i danni da trasporto, danni alle parti soggette a usura o alle
parti fragili, come ad es. interruttori.
Il prodotto è destinato esclusivamente all'uso domestico e non a quello commerciale. La garanzia decade in caso di impiego improprio o manomissione, uso
della forza e interventi non eseguiti dalla nostra fi liale di assistenza autorizzata.
Questa garanzia non costituisce alcun limite ai diritti legali del consumatore.
Il periodo di garanzia non viene prolungato da interventi in garanzia. Ciò vale
anche per le parti sostituite e riparate.
I danni e i difetti eventualmente presenti già all'atto dell'acquisto devono essere
segnalati immediatamente dopo il disimballaggio, e comunque non oltre due
giorni dalla data di acquisto.
Le riparazioni eff ettuate dopo la scadenza del periodo di garanzia sono a
pagamento.
Appendice
Assistenza
Importatore
36
Assistenza Italia
Tel.: 02 36003201
E-Mail: kompernass@lidl.it
IAN 86019
Assistenza Svizzera
Tel.: 0842 665566 (0,08 CHF/Min., telefonia mobile max. 0,40 CHF/Min.)
E-Mail: kompernass@lidl.ch
IAN 86019
KOMPERNASS GMBH
BURGSTRASSE 21
44867 BOCHUM, GERMANY
www.kompernass.com
FRG 45 A1
Page 40

Index
Introduction . . . . . . . . . . . . . . . . . . . . . . . . . . . . . . . . . . . . . . . . . . . . . . . . . . 38
Information for these operating instructions . . . . . . . . . . . . . . . . . . . . . . . . . . . . . . . . . . . . 38
Copyright . . . . . . . . . . . . . . . . . . . . . . . . . . . . . . . . . . . . . . . . . . . . . . . . . . . . . . . . . . . . . . 38
Intended use . . . . . . . . . . . . . . . . . . . . . . . . . . . . . . . . . . . . . . . . . . . . . . . . . . . . . . . . . . . 38
Safety. . . . . . . . . . . . . . . . . . . . . . . . . . . . . . . . . . . . . . . . . . . . . . . . . . . . . . . 39
Basic Safety Instructions. . . . . . . . . . . . . . . . . . . . . . . . . . . . . . . . . . . . . . . . . . . . . . . . . . . 39
Items supplied . . . . . . . . . . . . . . . . . . . . . . . . . . . . . . . . . . . . . . . . . . . . . . .40
Connection elements . . . . . . . . . . . . . . . . . . . . . . . . . . . . . . . . . . . . . . . . . . . . . . . . . . . . . 40
Assembly . . . . . . . . . . . . . . . . . . . . . . . . . . . . . . . . . . . . . . . . . . . . . . . . . . . .40
Preparing for assembly . . . . . . . . . . . . . . . . . . . . . . . . . . . . . . . . . . . . . . . . . . . . . . . . . . . 40
Required assembly material . . . . . . . . . . . . . . . . . . . . . . . . . . . . . . . . . . . . . . . . . . . . . . . . 41
Commissioning . . . . . . . . . . . . . . . . . . . . . . . . . . . . . . . . . . . . . . . . . . . . . . .46
Cleaning and Care . . . . . . . . . . . . . . . . . . . . . . . . . . . . . . . . . . . . . . . . . . . . 46
Disposal . . . . . . . . . . . . . . . . . . . . . . . . . . . . . . . . . . . . . . . . . . . . . . . . . . . . .47
Technical data . . . . . . . . . . . . . . . . . . . . . . . . . . . . . . . . . . . . . . . . . . . . . . . . 47
Appendix . . . . . . . . . . . . . . . . . . . . . . . . . . . . . . . . . . . . . . . . . . . . . . . . . . . . 48
Warranty . . . . . . . . . . . . . . . . . . . . . . . . . . . . . . . . . . . . . . . . . . . . . . . . . . . . . . . . . . . . . . 48
Service . . . . . . . . . . . . . . . . . . . . . . . . . . . . . . . . . . . . . . . . . . . . . . . . . . . . . . . . . . . . . . . . 48
Importer . . . . . . . . . . . . . . . . . . . . . . . . . . . . . . . . . . . . . . . . . . . . . . . . . . . . . . . . . . . . . . . 48
GB
FRG 45 A1
37
Page 41

GB
Introduction
Introduction
Information for these operating instructions
Congratulations!
With your purchase you have decided in favour of a quality product. Familiarise
yourself with the product before installation and before taking it into use for the
fi rst time. In this regard, please read the following assembly instructions and safety
notices attentively. Use the product only as described and only for the specifi ed
areas of application. Retain these instructions for future reference. In addition,
pass these documents on, together with the product, to any future owner.
Copyright
This documentation is copyright protected.
All reproductions or duplications, also as extracts, as well as representations
of the illustrations, even in an altered state, are only permitted with the written
approval of the manufacturer.
Intended use
This round barbecue is intended exclusively for the preparation of grilled foods.
It is suitable only for use outdoors. This round barbecue is intended for use only
in domestic environments, not for commercial applications. No liability will be
accepted for damage resulting from incorrect or improper usage, the application
of force or unauthorised modifi cations.
38
WARNING
Risks from unintended use!
Risks can be engendered if the appliance is used for unintended purposes
and/or other types of use.
► Use the appliance exclusively for its intended purposes.
► Observe the procedures described in these operating instructions.
The manufacturer assumes no responsibility for damage caused by improper use,
inappropriate repairs, making unauthorised changes or for using unapproved
replacement parts.
The user alone bears liability.
FRG 45 A1
Page 42

Safety
Safety
In this chapter you will receive important safety information regarding the handling
of the appliance.
This appliance complies with the statutory safety regulations.
Incorrect usage can lead to personal injury and property damage.
Basic Safety Instructions
WARNING
Warnings about burns!
1. During use, place the grill on a secure, level and fi rm surface, otherwise it
could tip over.
2. CAUTION! For igniting and reigniting, do NOT use spiritus or petrol!
Use only ignition aids complying with EN 1860-3. The defl agration could
cause an uncontrollable development of heat.
3. ATTENTION! During use the grill will become very hot and therefore may
not be moved, otherwise it could tip over.
4. ATTENTION! Keep children and pets well away from it!
5. When grilling, wear appropriate grilling gloves and use grilling tongs.
6. NEVER leave a heated up grill unsupervised.
7. Allow the grill to cool down completely before cleaning it.
8. NEVER use water to extinguish the glowing charcoal.
GB
FRG 45 A1
WARNING
Warning in regard to suff ocation!
► Use the grill ONLY outdoors!
► Do NOT operate the grill in enclosed spaces or roofed-over areas.
39
Page 43

GB
Items supplied
2 x Wind protector sheets
2
1 x Keep-warm grate
3
1 x Grill grate (including 2 handles)
4
1 x Handle
5
2 x Legs (long)
6
1 x Bottom shelf
7
2 x Wheels
8
1 x Axle
9
2 x Legs (short)
10
4 x Leg Caps
11
1 x Firebowl
Connection elements
Items supplied/Assembly
M6x304xM5x304xM5x12
Assembly
Preparing for assembly
Allow yourself plenty of time for the assembly of the round barbecue. Secure a
level workplace of about two to three square meters. Remove all individual items
from the packaging and place them where they are conveniently handy. Check
the items to ensure that they are all present and without any damage.
40
10x
M5
14x
M8
2x
Ø6
10x
Ø6
4x
Ø8
2x
FRG 45 A1
Page 44

Assembly
Required assembly material
Pliers
Philips head screwdriver
Open-jawed spanner 8 mm / 13 mm
WARNING
► To avoid possible injury, the screw heads should always face outwards.
First tighten all screw connections down when the assembly is complete,
this will help avoid undesirable material tensions.
Step 1
IMPORTANT
► The two long legs 5 must be assembled on the side where the double
holes in the fi rebowl
11
are located.
GB
FRG 45 A1
♦ Assemble the 4 legs (5 + 9), each with 1 screw M6 x 30, a washer Ø 6
and a leg cap 10, onto the fi rebowl 11.
5
11
10
9
41
Page 45

GB
Assembly
Step 2
IMPORTANT
►
The edge of the bottom shelf 6 must face downwards. The legs (5 + 9)
must be rotated such that the indentations of the boreholes face outwards,
thereby enabling the screwheads to be accommodated within them.
♦ Assemble and secure the bottom shelf 6, using 4 M5 x 30 screws plus
M5 nuts, to the 4 legs (5 + 9).
5
6
9
Step 3
♦ Guide the axle 8 through the lower boreholes on the short legs 9.
♦ Place the wheels 7 on the axle 8 and secure both of them, each with a
Ø 8 washer and an M8 self-securing nut.
♦ Tighten the nuts with an 13 mm open-jawed spanner. If necessary, hold
the axle 8 with the pliers. To prevent scratches, place a cloth between the
pliers and the axle 8.
42
7
9
8
FRG 45 A1
Page 46

Assembly
Step 4
♦ Assemble and secure the handle 4, using 4 M5 x 12 screws,
4 Ø 6 washers and 4 M5 nuts, to the fi rebowl
11
11
.
4
Step 5
♦ Align the two wind-protector sheets with each other and fasten them
together using an M5 x 12 screw, a Ø 6 washer and an M5 nut. Thereby,
make use of the maximum distance between the sheets, so that the grill
grate fi ts between the slots of the wind-protector sheets
.
GB
FRG 45 A1
43
Page 47

GB
Assembly
Step 6
♦ Firmly secure the wind protector sheets , using 5 M5 x 12 screws,
5 Ø 6 washer and 5 M5 nuts, to the fi rebowl
11
.
11
44
Step 7
♦ Hook the two handles onto the cooking grill 3.
3
FRG 45 A1
Page 48

Assembly
WARNING
Warning on the risk of burns!
The two brackets fi tted on the sides of the grill grate are not handles and will
become hot when it is in use!
Step 8
♦ Attach the grill grate 3 at the desired location in the wind protector .
You can now remove the handles from cooking grill
disturb when you are grilling.
► Do NOT grasp these brackets with your bare hands. To insert or adjust the
height of the grill grate, use exclusively the supplied handles.
3
, so that they do not
3
GB
FRG 45 A1
Step 9
♦ Attach the keep-warm grate 2 to the wind protector .
2
45
Page 49

GB
Commissioning/Cleaning and Care
Commissioning
NOTICE
Before the fi rst use, the grill must be warmed up for at least 30 minutes.
►
WARNING
Warnings about burns!
Warning! For igniting and reigniting, do not use spiritus or petrol! Use only
ignition aids complying with EN 1860-3. The defl agration could cause an
uncontrollable development of heat.
■ Build up a small pile of charcoal in the fi rebowl.
■ Place one or two solid fi relighters on the existing layer of charcoal and ignite
the solid fi relighters with a match or lighter.
■ Allow the fi relighters to burn for 2 to 4 minutes. Then slowly start fi lling the
fi rebowl with charcoal.
■ After about 20 minutes the charcoal will display a white coating of ash.
The optimal burning temperature has now been reached.
■ Distribute the charcoal, using a suitable metallic implement, evenly in the
fi rebowl.
■ Insert the grill grate and start the barbecue.
Cleaning and Care
WARNING
Warnings about burns!
► Before cleaning it or putting it into storage, allow the round barbecue to cool
down completely. NEVER use water to extinguish the glowing charcoal.
Warning in regard to property damage!
► Do not use abrasive or aggressive cleaning agents, they can damage the
enamelled surfaces.
For normal cleaning, use a cloth and water with standard detergent.
For heavy soiling on the enamelled parts, use a standard commercial enamel
cleaner. Pay heed to the instructions supplied by the manufacturer of the cleaning
agent being employed. Clean the grill grate with detergent and a household
sponge.
46
FRG 45 A1
Page 50

Disposal/Technical data
Disposal
Dispose of fl ammable materials carefully and with regard to the
environment. Fundamentally, dispose of such remaining waste ONLY
into containers made of metal and intended for this purpose or those
made of non-fl ammable materials.
Dispose of the Round Barbecue through an approved disposal centre or at your
community waste facility. Observe the currently applicable regulations. In case
of doubt, please contact your waste disposal centre.
Dispose of all packaging materials in an environmentally friendly manner.
Technical data
Dimensions (assembled) approx. 82 x 52 x 69 cm
Grill grate Ø 47 cm
Weight approx. 6 kg
Fuel Charcoal
Firebowl capacity max. 1.5 kg
GB
FRG 45 A1
47
Page 51

Appendix
Warranty
You receive a 3-year warranty for this appliance as of the purchase date. This
appliance has been manufactured with care and meticulously examined before
delivery.
Please retain your receipt as proof of purchase. In the case of a warranty claim,
please make contact by telephone with your Service Centre. Only in this way
can a post-free despatch for your goods be assured.
Appendix
GB
Service
Importer
NOTICE
The warranty covers only claims for material and manufacturing defects,
►
not for transport damages, wearing parts or for damage to fragile compo-
nents, e.g. switches.
This product is for private use only and is not intended for commercial use. The
warranty becomes void in cases of abusive and improper handling, use of force
and modifi cations not carried out by our authorized Service Centre.
Your statutory rights are not restricted in any way by this warranty. The warranty
period is not extended by repairs eff ected under warranty. This applies also to
replaced and repaired parts.
Damages and defects discovered on purchase are to be reported directly after
unpacking, at the latest by two days after the date of purchase.
On the lapse of the warranty period, all repairs carried out are liable to charges.
Service Great Britain
Tel.: 0871 5000 720 (£ 0.10/Min.)
E-Mail: kompernass@lidl.co.uk
IAN 86019
KOMPERNASS GMBH
BURGSTRASSE 21
44867 BOCHUM, GERMANY
www.kompernass.com
48
FRG 45 A1
Page 52

KOMPERNASS GMBH
Burgstraße 21
D-44867 Bochum
www.kompernass.com
Stand der Informationen · Version des informations
Versione delle informazioni · Last Information Update:
12 / 2012 · Ident.-No.: FRG45A1102012-2
IAN 86019
1
 Loading...