

Page 1

5
Barbacoa redonda FRG 45 A1
Barbecue rotondo
KOMPERNASS GMBH · BURGSTRASSE 21 · D - 44867 BOCHUM
www.kompernass.com
ID-Nr.: FRG 45 A1-10/11-V2
IAN: 71245
Barbacoa redonda
Instrucciones de uso y de montaje
Barbecue rotondo
Montaggio e istruzioni per l’uso
Grelhador redondo
Manual de montagem e de operação
Round Barbecue
Assembly and Operating Instructions
Rundgrill
Montage- und Bedienungsanleitung
Page 2
FRG 45 A1
1
2
3
q
4
0
9
8
7
6
5
Page 3

Índice
Introducción . . . . . . . . . . . . . . . . . . . . . . . . . . . . . . . . . . . . . . . . . . . . . . . . . . . 2
Información sobre estas instrucciones de uso . . . . . . . . . . . . . . . . . . . . . . . . . . . . . . . . . . . 2
Derechos de autor . . . . . . . . . . . . . . . . . . . . . . . . . . . . . . . . . . . . . . . . . . . . . . . . . . . . . . . . 2
Finalidad de uso . . . . . . . . . . . . . . . . . . . . . . . . . . . . . . . . . . . . . . . . . . . . . . . . . . . . . . . . . 2
Seguridad . . . . . . . . . . . . . . . . . . . . . . . . . . . . . . . . . . . . . . . . . . . . . . . . . . . . 3
Advertencias de seguridad básicas . . . . . . . . . . . . . . . . . . . . . . . . . . . . . . . . . . . . . . . . . . . 3
Volumen de suministro . . . . . . . . . . . . . . . . . . . . . . . . . . . . . . . . . . . . . . . . . . 4
Elementos de unión . . . . . . . . . . . . . . . . . . . . . . . . . . . . . . . . . . . . . . . . . . . . . . . . . . . . . . . 4
Montaje . . . . . . . . . . . . . . . . . . . . . . . . . . . . . . . . . . . . . . . . . . . . . . . . . . . . . . 4
Preparación del montaje . . . . . . . . . . . . . . . . . . . . . . . . . . . . . . . . . . . . . . . . . . . . . . . . . . . 4
Material de montaje necesario . . . . . . . . . . . . . . . . . . . . . . . . . . . . . . . . . . . . . . . . . . . . . . 5
Puesta en servicio . . . . . . . . . . . . . . . . . . . . . . . . . . . . . . . . . . . . . . . . . . . . .10
Limpieza y cuidado . . . . . . . . . . . . . . . . . . . . . . . . . . . . . . . . . . . . . . . . . . . . 10
Evacuación . . . . . . . . . . . . . . . . . . . . . . . . . . . . . . . . . . . . . . . . . . . . . . . . . . . 11
Características técnicas . . . . . . . . . . . . . . . . . . . . . . . . . . . . . . . . . . . . . . . . . 11
Anexo. . . . . . . . . . . . . . . . . . . . . . . . . . . . . . . . . . . . . . . . . . . . . . . . . . . . . . .12
Garantía . . . . . . . . . . . . . . . . . . . . . . . . . . . . . . . . . . . . . . . . . . . . . . . . . . . . . . . . . . . . . . 12
Asistencia técnica . . . . . . . . . . . . . . . . . . . . . . . . . . . . . . . . . . . . . . . . . . . . . . . . . . . . . . . 12
Importador . . . . . . . . . . . . . . . . . . . . . . . . . . . . . . . . . . . . . . . . . . . . . . . . . . . . . . . . . . . . . 12
ES
FRG 45 A1
1
Page 4
Introducción
ES
Introducción
Información sobre estas instrucciones de uso
Estas instrucciones de uso forman parte de la barbacoa circular FRG 45 A1
(denominada en adelante "el aparato" o "la barbacoa") y proporcionan información
importante para el uso conforme a lo previsto, la seguridad, el montaje y el
manejo del aparato.
Estas instrucciones de uso deben estar disponibles siempre cerca del aparato.
Deberán leerlas y aplicarlas todas las personas que utilicen el aparato.
Conserve estas instrucciones de uso y entréguelas junto con el aparato a cualquier
posible propietario futuro.
Derechos de autor
Esta documentación está protegida por derechos de autor.
La reproducción o impresión, incluso de secciones, así como la reproducción
de las imágenes, incluso en estado modifi cado, únicamente se permite previo
consentimiento por escrito del fabricante.
Finalidad de uso
La barbacoa se ha diseñado exclusivamente para la preparación de alimentos a
la parrilla. Está exclusivamente indicada para el uso al aire libre. Esta barbacoa
solamente está destinada al uso doméstico y no para propósitos profesionales.
No nos hacemos responsables de los daños derivados de un uso incorrecto o
indebido, del uso de la fuerza excesiva o de las modifi caciones no autorizadas.
ADVERTENCIA
¡Peligro debido al uso contrario a lo dispuesto!
El aparato puede ser una fuente de peligros en caso de uso contrario a lo
dispuesto y/o para una fi nalidad diferente.
Usar el aparato exclusivamente según lo previsto. ►
Deben seguirse los procedimientos descritos en estas instrucciones de uso. ►
Se rechaza cualquier posibilidad de reclamación de cualquier tipo por daños
debidos a un uso no conforme a lo pr
caciones no autorizadas o uso de recambios no autorizados.
El riesgo será responsabilidad exclusiva del usuario.
2
eparaciones inadecuadas, modifi -
evisto, r
FRG 45 A1
Page 5
Seguridad
Seguridad
En este capítulo obtendrá indicaciones de seguridad importantes para manejar
el aparato.
Este aparato cumple las normas de seguridad prescritas.
Sin embargo, el uso inadecuado puede causar daños personales y materiales.
Advertencias de seguridad básicas
ADVERTENCIA
¡Advertencia de quemaduras!
1. Cuando la barbacoa esté encendida, colóquela sobre una base estable y
sólida, ya que de lo contrario podría volcar.
2. ¡PRECAUCIÓN! ¡No utilice alcohol ni gasolina para encender el fuego ni
avivarlo! Usar medios de encendido auxiliares conforme a la EN 1860-3.
En caso contrario, podrían producirse explosiones y podría perder el
control sobre el fuego.
3. ¡ATENCIÓN! La barbacoa móvil se calienta mucho y no debe moverse
cuando está encendida, ya que de lo contrario podría volcar.
4. ¡ATENCIÓN! ¡Mantener a los niños y a los animales domésticos alejados!
5. Cuando cocine, utilice unas manoplas apropiadas y utilice unas pinzas.
6. Nunca deje la barbacoa caliente sin vigilancia.
7. Antes de limpiar la barbacoa, deje que se enfríe completamente.
8. No utilice nunca agua para apagar el carbón vegetal.
ES
FRG 45 A1
ADVERTENCIA
¡Advertencia de asfi xia!
¡Utilice la barbacoa solamente al aire libre! ►
No encienda la barbacoa en lugares cerrados o bajo superfi cies con techo. ►
3
Page 6
Volumen de suministro/Montaje
ES
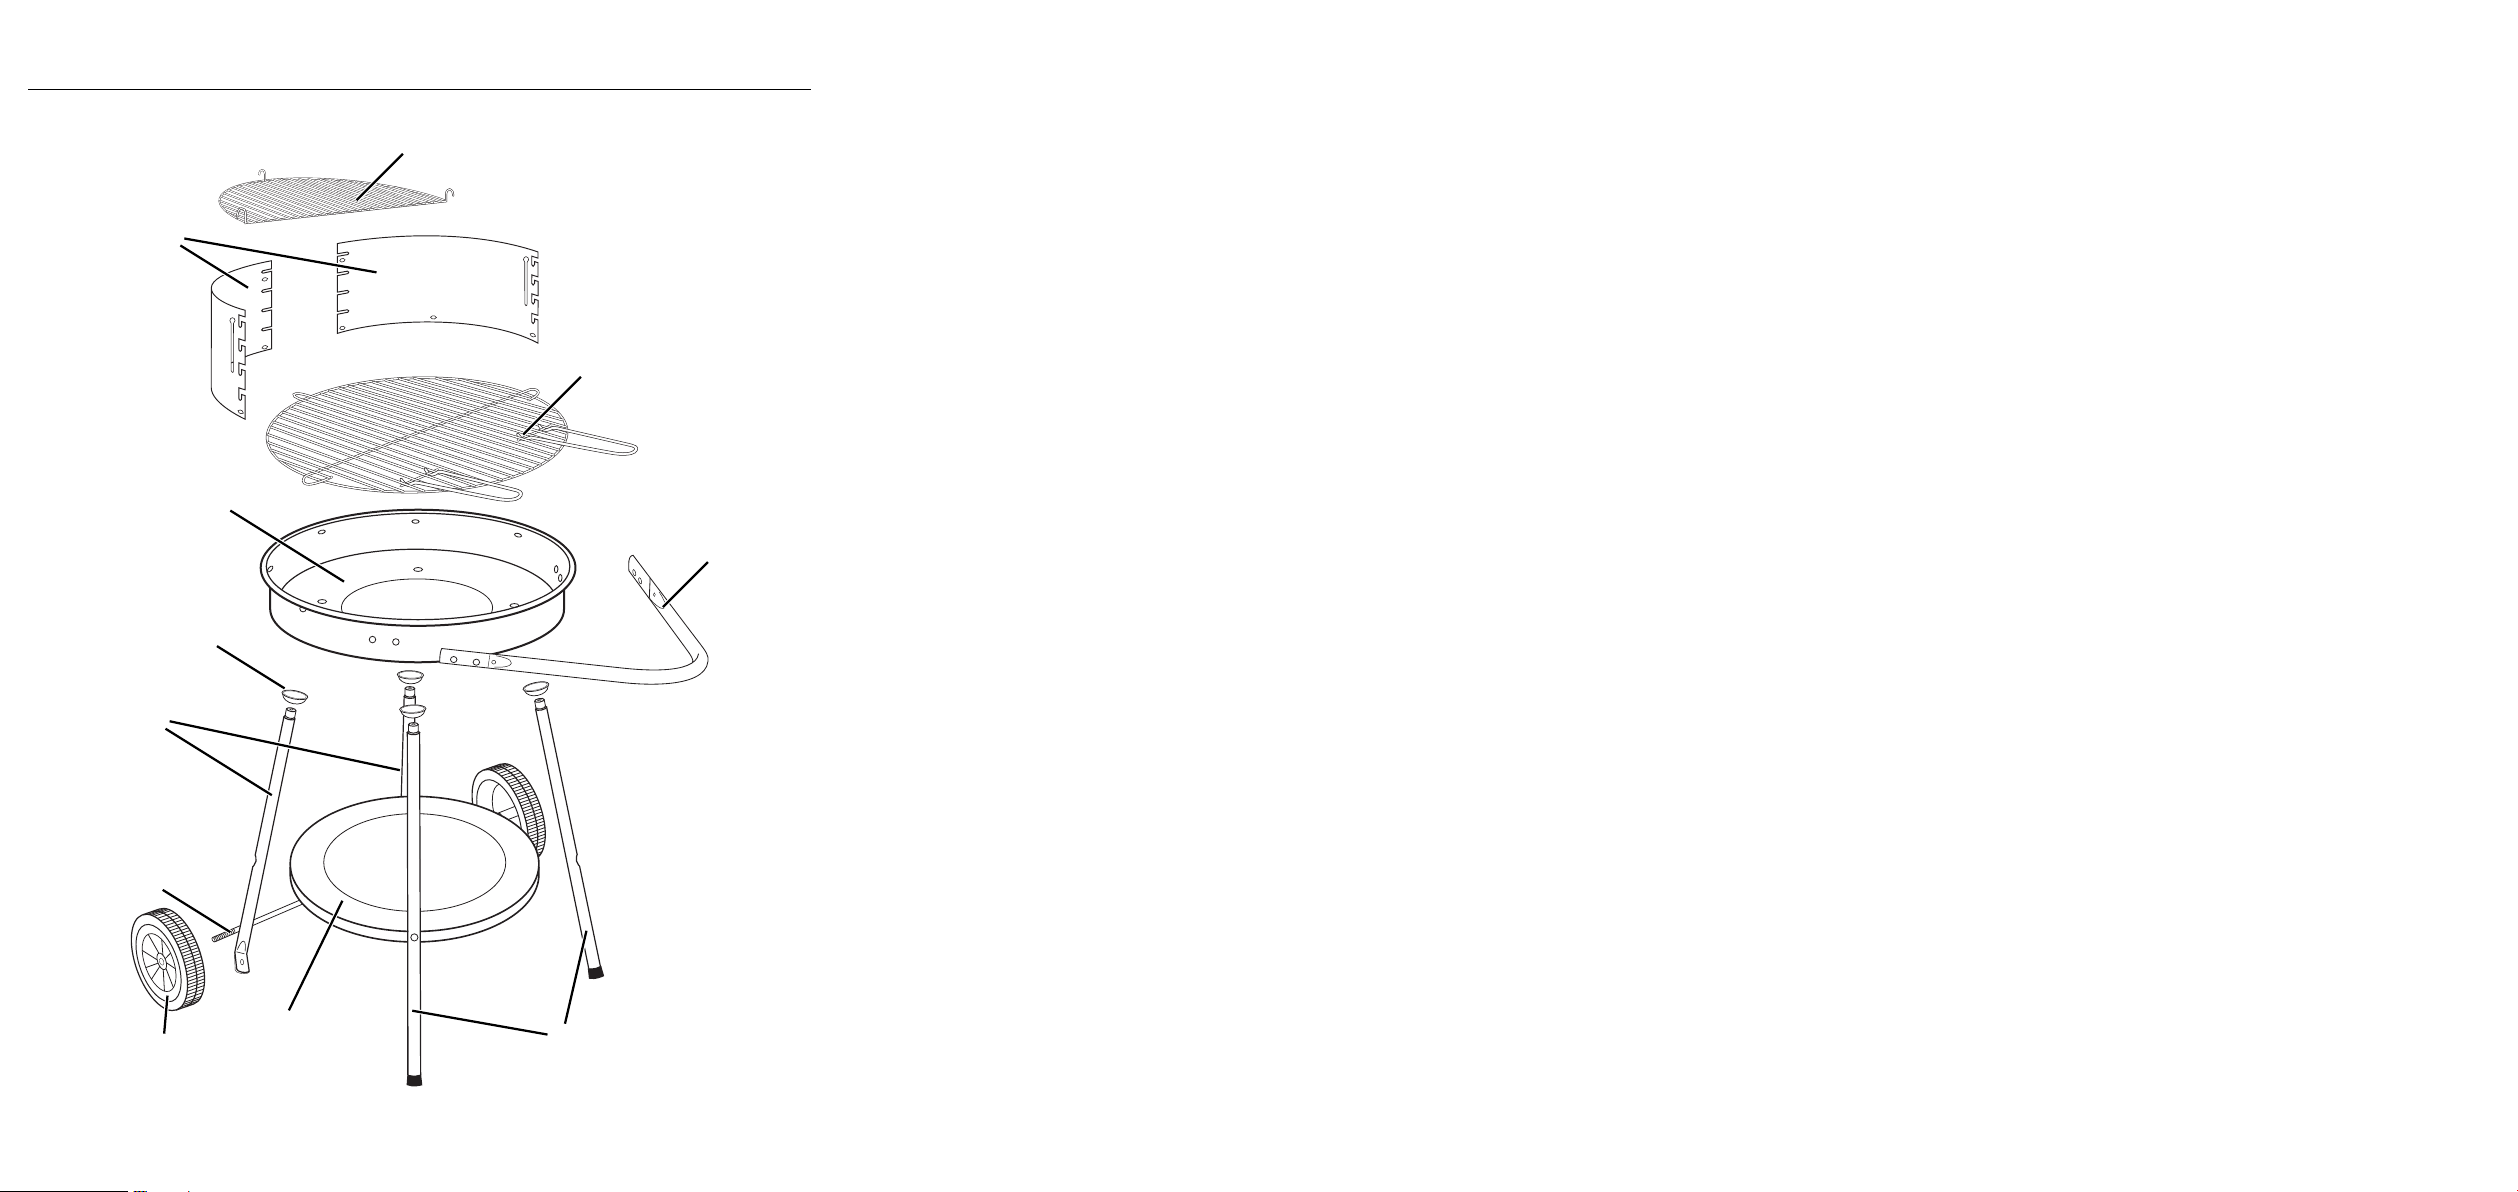
Volumen de suministro
2 pantallas paravientos
2
1 parrilla de mantenimiento en caliente
3
1 parrilla (incl. 2 asas)
4
1 asa
5
2 patas (largas)
6
1 bandeja
7
2 ruedas
8
1 eje
9
2 patas (cortas)
10
4 cubiertas para patas
11
1 bandeja para carbón
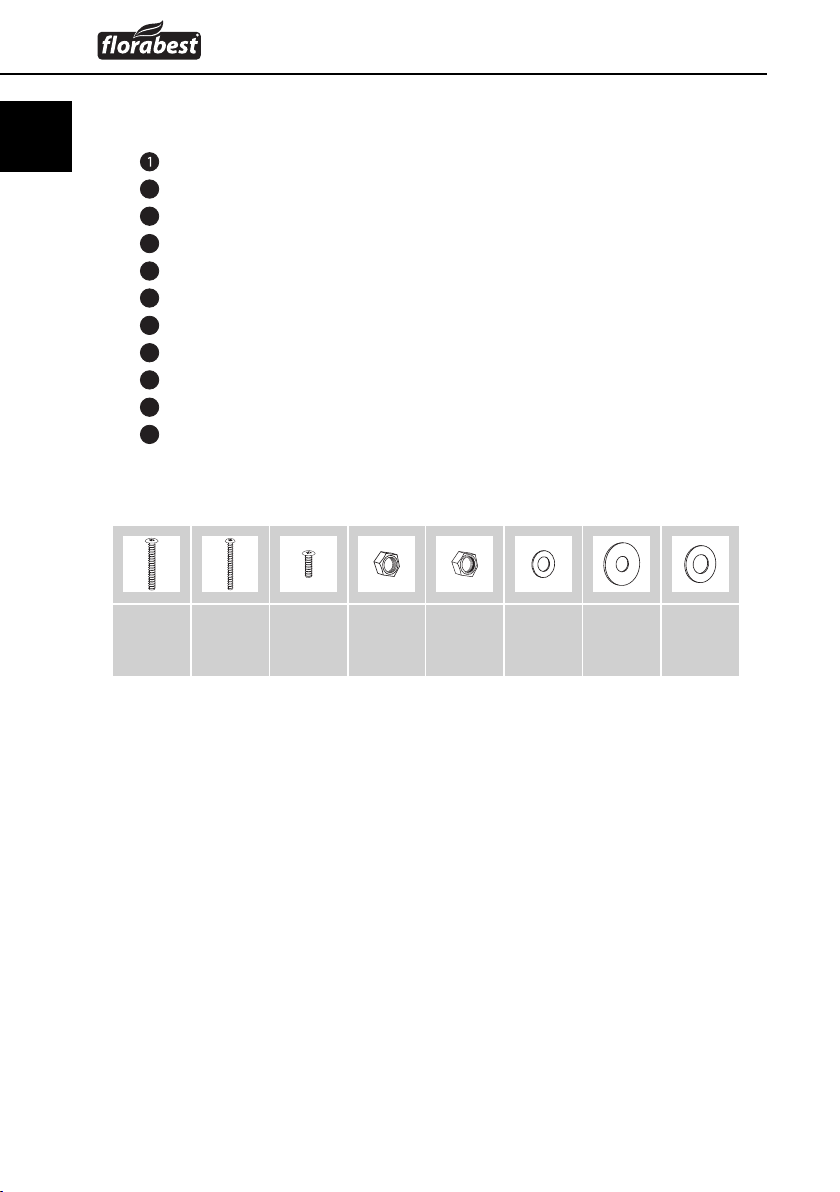
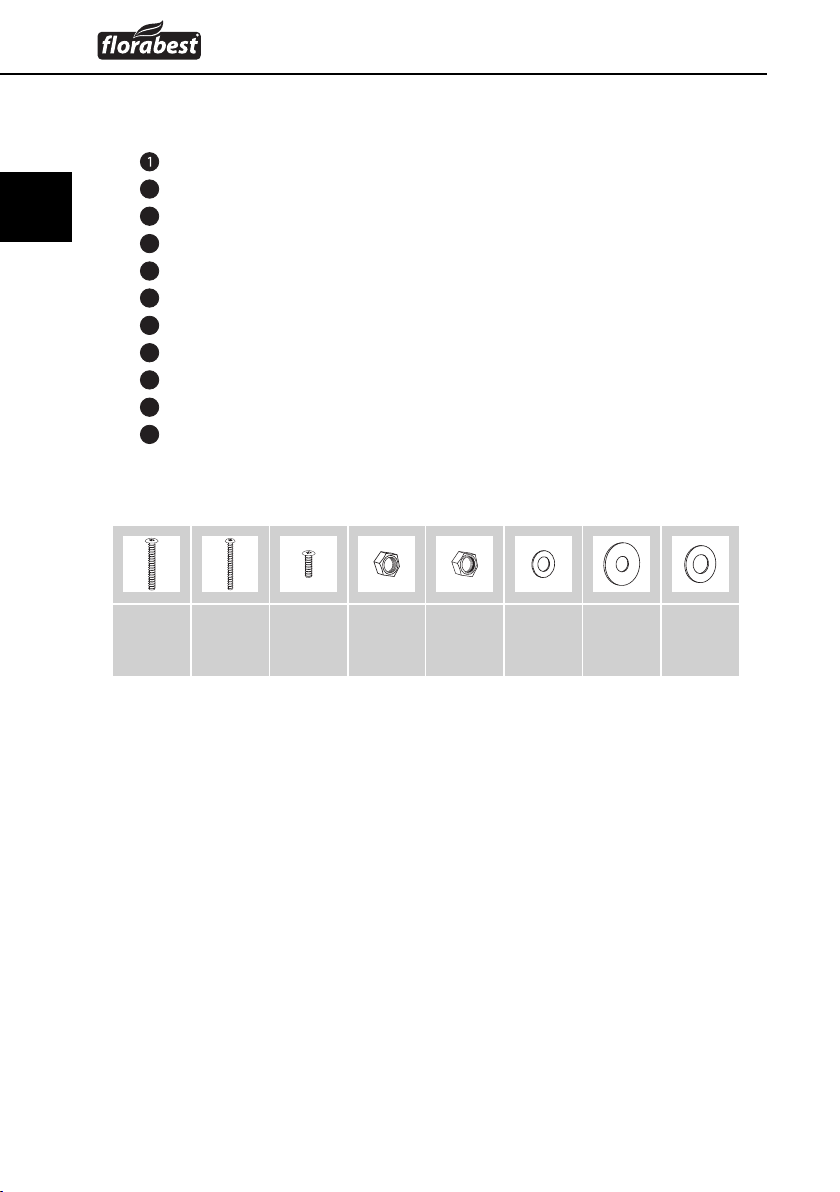
Elementos de unión
M6x304xM5x304xM5x12
10x
M5
14x
M8
2x
Ø6
10x
Ø6
4x
Ø8
2x
Montaje
Preparación del montaje
Dedique tiempo sufi ciente al montaje de la barbacoa. Prepare una superfi cie de
trabajo plana de aproximadamente dos a tres centímetros cuadrados. Extraiga
las piezas de la caja y deposítelas en un lugar donde sean fácilmente accesibles.
Compruebe que el volumen de suministro se encuentre completo y la existencia
de posibles daños.
4
FRG 45 A1
Page 7
Montaje
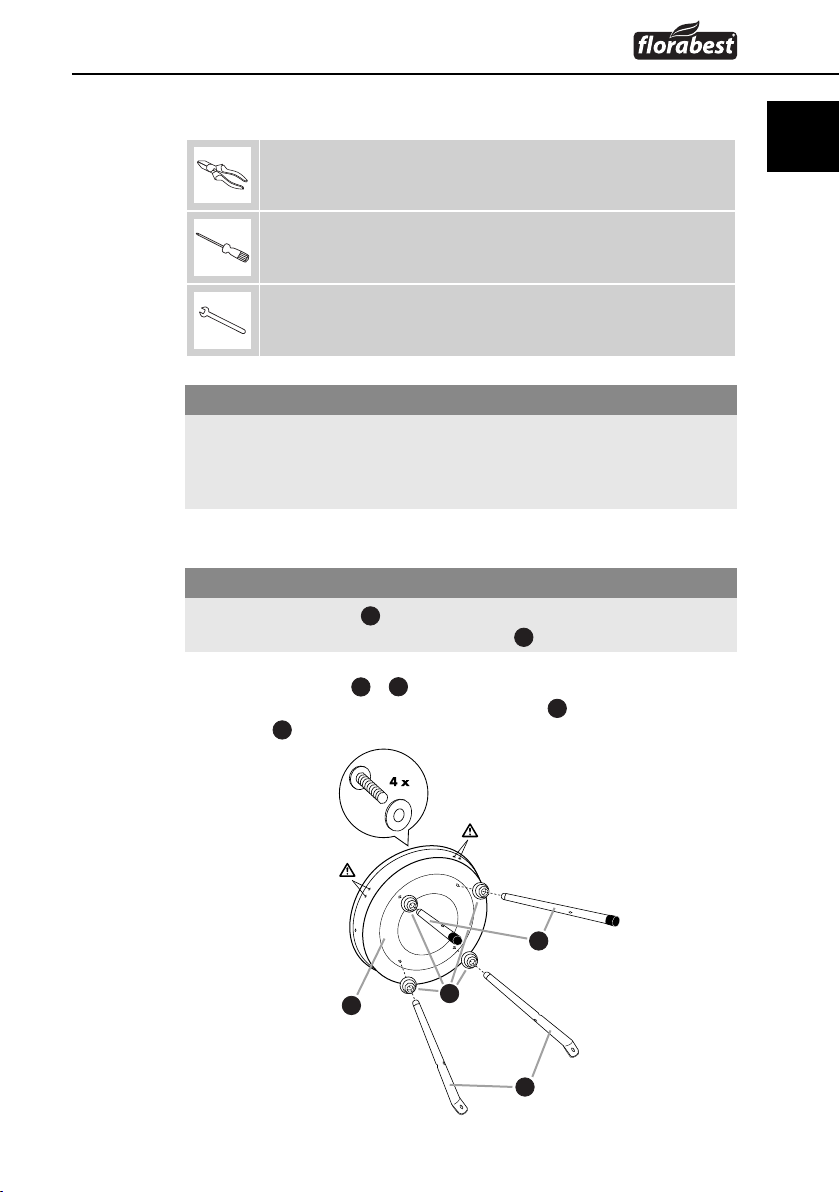
Material de montaje necesario
Tenazas
Destornillador de estrella
Llave de boca, entrecaras 8 mm / 13 mm
ATENCIÓN
En aras de su seguridad y a fi n de prevenir posibles daños, las cabezas ►
de los tornillos deben estar orientadas siempre hacia fuera. No apriete
las uniones atornilladas hasta fi nalizar el montaje, par
materiales sufran tensiones innecesarias.
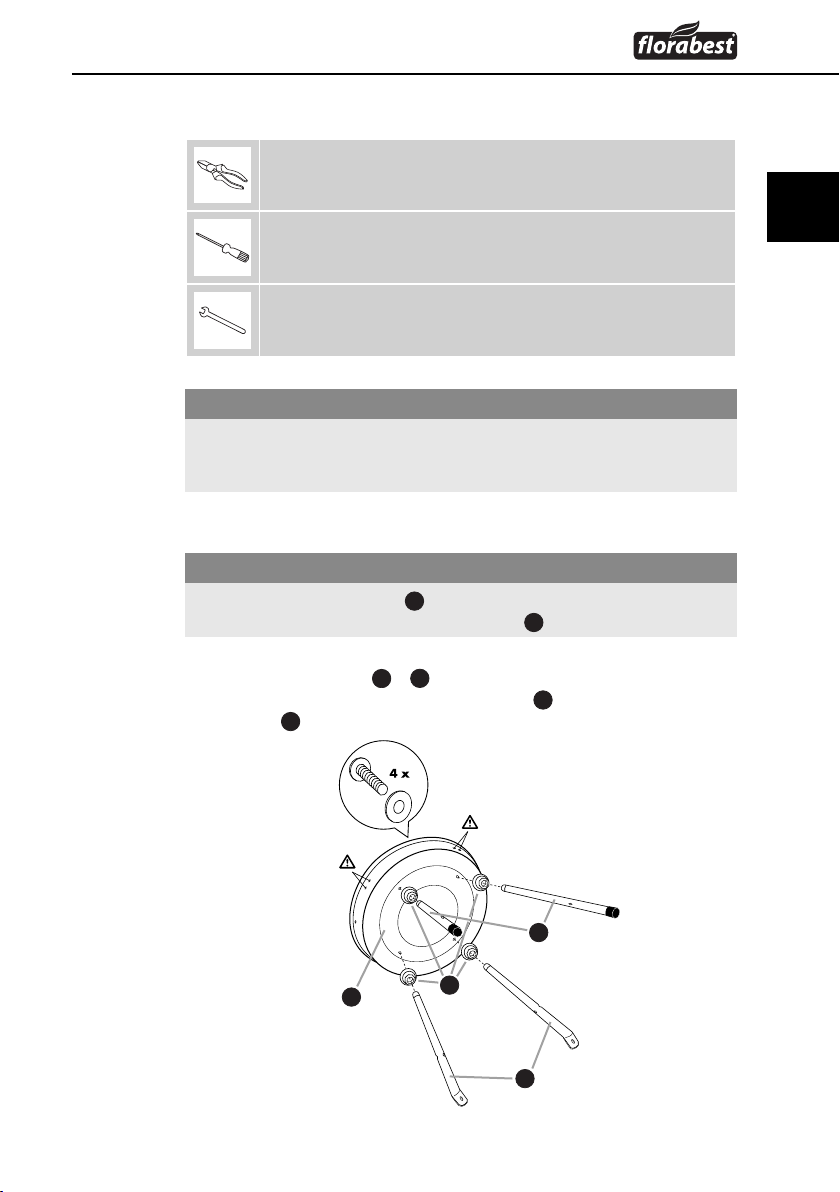
Paso 1
ATENCIÓN
Las dos patas largas ►
orifi cios dobles en la bandeja para carbón 11.
5
ES
a impedir que los
se han de montar en el lado que incorpora los
FRG 45 A1
5
Monte las 4 patas ( ♦
una arandela de Ø 6 y una cubierta para pata
carbón 11.
+ 9) utilizando respectivamente 1 tornillo M6 x 30,
11
10
9
10
en la bandeja para
5
5
Page 8
ES
Montaje
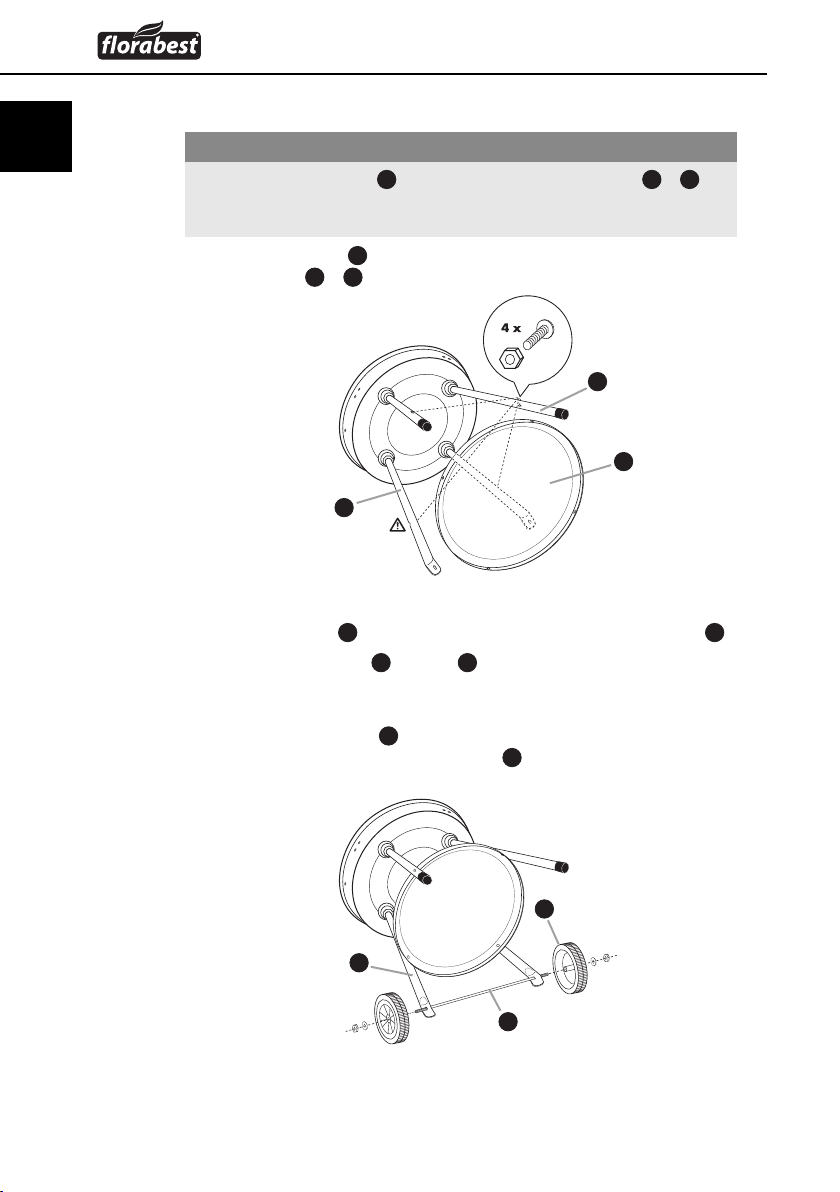
Paso 2
ATENCIÓN
El borde de la bandeja ►
han de girar de tal manera que las hendiduras de los orifi cios se muestren
hacia fuera para poder encajar las cabezas de los tornillos.
Monte la bandeja ♦
las 4 patas (5 + 9).
Paso 3
Introduzca el eje ♦
Introduzca las ruedas ♦
una arandela de Ø 8 y una tuerca autofi jadora M8.
Apriete las tuercas con una llave de boca, entrecaras 13 mm. En caso ♦
necesario, sujete el eje
tenazas y el eje para evitar los arañazos 8.
6
debe mirar hacia abajo. Las patas (5 + 9) se
6
con ayuda de 4 tornillos M5 x 30 y tuercas M5 en
5
6
9
8
a través de los orifi cios inferiores de la pata corta 9.
7
en el eje 8 y asegúrelas respectivamente con
8
con unas tenazas. Coloque un paño entre las
7
9
8
6
FRG 45 A1
Page 9
Montaje
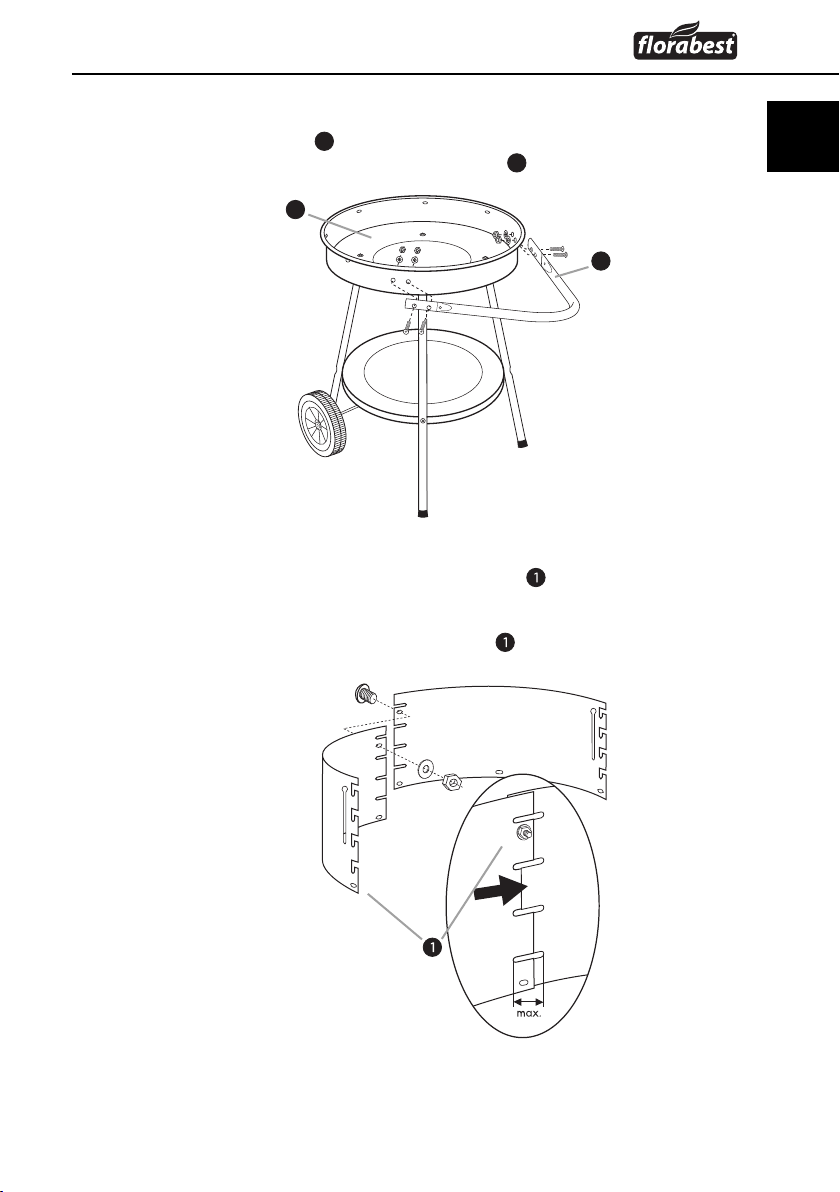
Paso 4
Monte el asa ♦
4 tuercas M5 en la bandeja para carbón 11.
4
con ayuda de 4 tornillos M5 x 12, 4 arandelas de Ø 6 y
11
4
Paso 5
Encaje entre sí las dos pantallas paravientos ♦ y atorníllelas con ayuda de
un tornillo M5 x 12, una arandela de Ø 6 y una tuerca M5. Aproveche la
distancia máxima entre las dos pantallas, para que la parrilla encaje entre
las ranuras de las pantallas paravientos .
ES
FRG 45 A1
7
Page 10
ES
Montaje
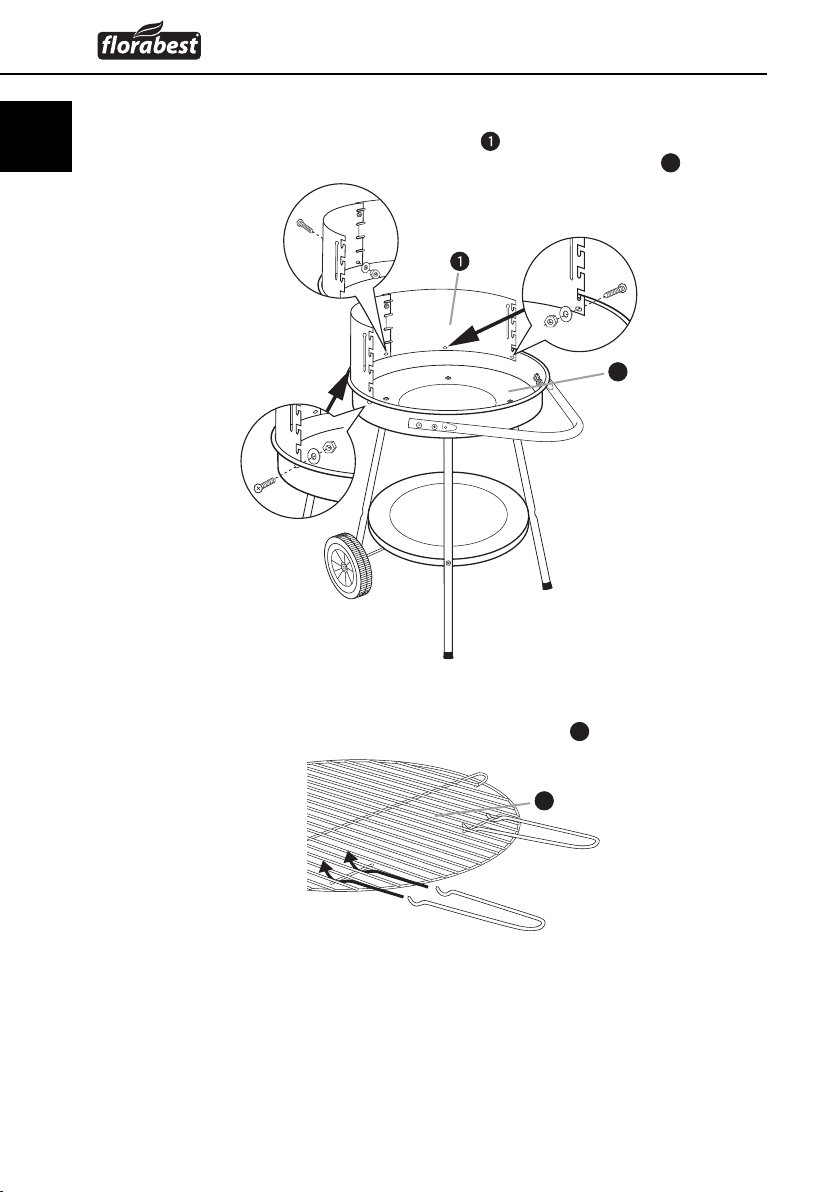
Paso 6
Atornille bien el paravientos montado ♦ con ayuda de 5 tornillos M5 x 12,
5 arandelas de Ø 6 y 5 tuercas M5 en la bandeja para carbón 11.
11
Paso 7
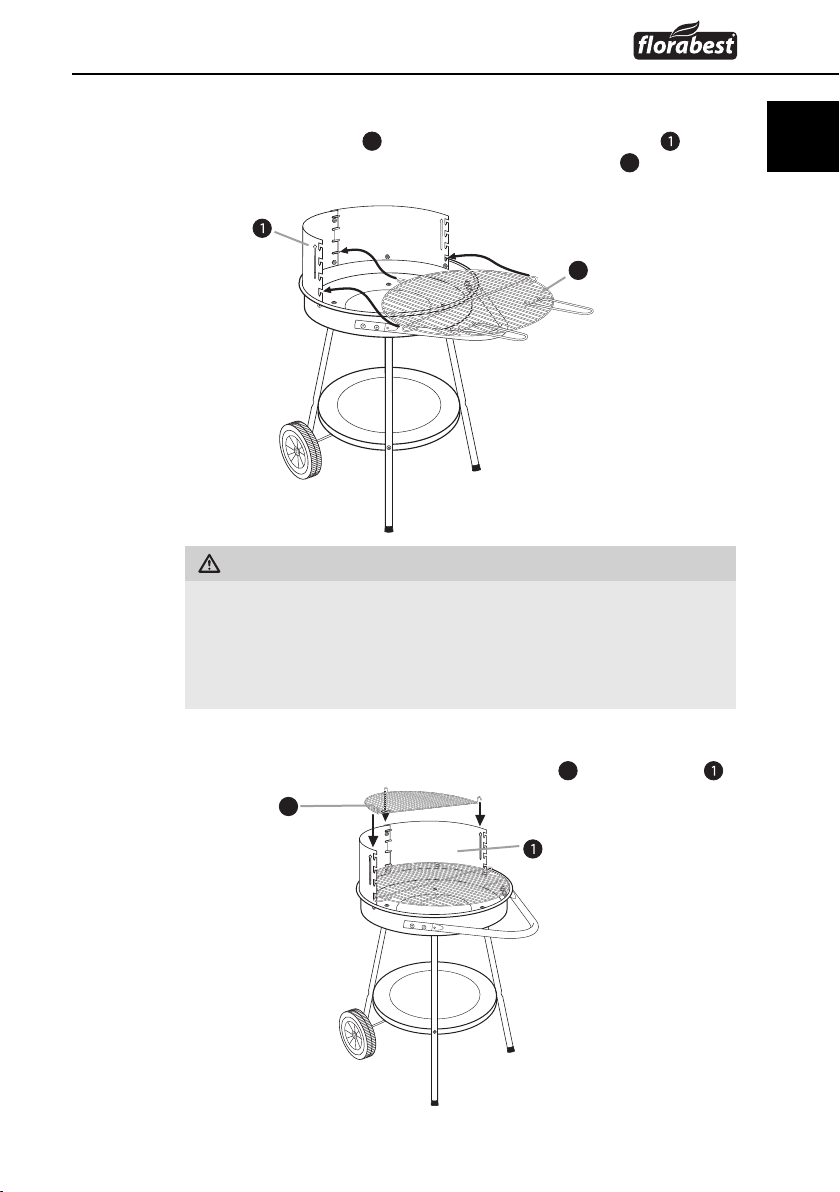
Enganche ambas asas en la rejilla de la barbacoa ♦
8
3
.
3
FRG 45 A1
Page 11
Montaje
Paso 8
Enganche la parrilla ♦
puede volver a soltar las asas de la rejilla de la barbacoa 3, de modo
que no obstaculicen durante el uso de la barbacoa.
ADVERTENCIA
¡Advertencia ante quemaduras!
¡Los dos estribos integrados en los laterales de la barbacoa no son asas y se
calientan durante el funcionamiento de la barbacoa!
No toque los estribos directamente con las manos. Utilice para colgar o ►
regular en altura la parrilla sólo las asas suministradas.
3
en la posición deseada del paravientos . Ahora
3
ES
FRG 45 A1
Paso 9
Coloque la parrilla de mantenimiento en caliente ♦
2
en el paravientos .
2
9
Page 12
Puesta en servicio/Limpieza y cuidado
ES
Puesta en servicio
ADVERTENCIA
Antes de utilizar el aparato por primera vez, la barbacoa debe dejarse ►
calentar durante 30 minutos como mínimo.
ADVERTENCIA
¡Advertencia de quemaduras!
¡CUIDADO! ¡No utilice alcohol ni gasolina para encender el fuego ni avivarlo!
Utilice únicamente elementos para facilitar el encendido según la norma
EN 1860-3. En caso contrario, podrían producirse explosiones y podría
perder el control sobre el fuego.
Esparza una parte del carbón vegetal en la bandeja para carbón formando ■
una capa.
■
Coloque una o dos pastillas de encendido sobr
y enciéndalas con una cerilla o bien un mechero.
Deje que las pastillas de encendido quemen entre 2 y 4 minutos. Acto seguido,
■
llene lentamente la bandeja para carbón con carbón vegetal.
Después de aproximadamente 20 minutos, apar
blanca sobre el carbón vegetal. Esta circunstancia indica el estado de
brasas óptimo.
ta el carbón vegetal uniformemente en la bandeja para carbón utili- ■
Repar
zando un utensilio de metal apropiado.
Enganche la parrilla y empiece a cocinar
e la capa de carbón vegetal
ecerá una capa de ceniza ■
. ■
Limpieza y cuidado
ADVERTENCIA
¡Advertencia de quemaduras!
Antes de limpiar y guardar la barbacoa, deje que se enfríe completamente. ►
No utilice nunca agua para apagar el carbón vegetal.
¡Advert
Para los tr
detergente convencional.
Si encuentra suciedad incrustada en las piezas esmaltadas, utilice un limpiador de
esmalte convencional. Observe las instrucciones del fabricante del producto de
limpieza que utilice. Lave la parrilla con detergente y una esponja.
10
encia de daños materiales!
No utilice productos de limpieza abrasivos o agresivos, pues pueden ►
dañar la superfi cie.
abajos de limpieza normales, utilice un paño de limpieza y agua con
FRG 45 A1
Page 13
Evacuación/Características técnicas
Evacuación
Elimine los materiales combustibles con cuidado y respetando el medio
ambiente. Elimine los restos utilizando únicamente recipientes apropiados
hechos de metal u otros materiales no infl amables.
Elimine la barbacoa en un centro de eliminación autorizado o bien a través de
las instalaciones de eliminación municipales. Preste atención a las normas en
vigor. En caso de dudas póngase en contacto con su centro de eliminación.
El material de embalaje debe desecharse de forma respetuosa con el medio
ambiente.
Características técnicas
Dimensiones (montada) aprox. 82 x 52 x 69 cm
Parrilla Ø 47 cm
Peso aprox. 6 kg
Combustible Carbón vegetal
Capacidad de la bandeja para
carbón
ES
máx. 2 kg
FRG 45 A1
11
Page 14
Anexo
ES
Anexo
Garantía
Este aparato tiene 3 años de garantía desde la fecha de compra. El aparato ha
sido fabricado cuidadosamente y ha sido probado antes de su entrega.
Guarde el comprobante de caja como justifi cante de compra. Si necesitara
hacer uso de la garantía, póngase en contacto por teléfono con su punto de
servicio habitual. Este es el único modo de garantizar un envío gratuito.
ADVERTENCIA
La garantía cubre los defectos de fabricación o del material, pero no los ►
daños de transporte, las piezas sujetas a desgaste ni los daños sufridos
por las piezas frágiles (p. ej. interruptores).
oducto ha sido diseñado exclusivamente para el uso particular y no
Este pr
para el uso industrial. En caso de manipulación indebida e incorrecta, uso de
la fuerza y en caso de abrir el aparato personas ajenas a nuestros centros de
asistencia técnica autorizados, la garantía pierde su validez.
Sus derechos legales no se ven limitados por esta garantía. El tiempo de garantía
no se prolonga debido a prestaciones de garantía. Esto es válido también para
piezas sustituidas y reparadas.
Los posibles defectos o daños detectados al desembalar el aparato se han de
notifi car de inmediato o como muy tarde 2 días desde la fecha de compra.
Fuera del periodo de garantía, las reparaciones tienen un coste económico.
Asistencia técnica
Servicio España
Tel.: 902 59 99 22
(0,08 EUR/Min. + 0,11 EUR/llamada (tarifa normal))
(0,05 EUR/Min. + 0,11 EUR/llamada (tarifa reducida))
E-Mail: kompernass@lidl.es
IAN 71245
Importador
12
KOMPERNASS GMBH
BURGSTRASSE 21
44867 BOCHUM, GERMANY
www.kompernass.com
FRG 45 A1
Page 15

Indice
Introduzione . . . . . . . . . . . . . . . . . . . . . . . . . . . . . . . . . . . . . . . . . . . . . . . . . 14
Informazioni sul presente manuale di istruzioni . . . . . . . . . . . . . . . . . . . . . . . . . . . . . . . . . 14
Diritto d’autore . . . . . . . . . . . . . . . . . . . . . . . . . . . . . . . . . . . . . . . . . . . . . . . . . . . . . . . . . . 14
Uso conforme . . . . . . . . . . . . . . . . . . . . . . . . . . . . . . . . . . . . . . . . . . . . . . . . . . . . . . . . . . 14
Sicurezza . . . . . . . . . . . . . . . . . . . . . . . . . . . . . . . . . . . . . . . . . . . . . . . . . . . . 15
Avvertenze di sicurezza di base . . . . . . . . . . . . . . . . . . . . . . . . . . . . . . . . . . . . . . . . . . . . 15
Volume della fornitura . . . . . . . . . . . . . . . . . . . . . . . . . . . . . . . . . . . . . . . . . 16
Elementi di connessione . . . . . . . . . . . . . . . . . . . . . . . . . . . . . . . . . . . . . . . . . . . . . . . . . . . 16
Montaggio . . . . . . . . . . . . . . . . . . . . . . . . . . . . . . . . . . . . . . . . . . . . . . . . . . . 16
Preparazione del montaggio . . . . . . . . . . . . . . . . . . . . . . . . . . . . . . . . . . . . . . . . . . . . . . . 16
Materiale di montaggio necessario . . . . . . . . . . . . . . . . . . . . . . . . . . . . . . . . . . . . . . . . . . 17
Messa in funzione . . . . . . . . . . . . . . . . . . . . . . . . . . . . . . . . . . . . . . . . . . . . . 22
Pulizia e cura . . . . . . . . . . . . . . . . . . . . . . . . . . . . . . . . . . . . . . . . . . . . . . . . . 22
Smaltimento . . . . . . . . . . . . . . . . . . . . . . . . . . . . . . . . . . . . . . . . . . . . . . . . . 23
Dati tecnici . . . . . . . . . . . . . . . . . . . . . . . . . . . . . . . . . . . . . . . . . . . . . . . . . . . 23
IT
MT
Appendice . . . . . . . . . . . . . . . . . . . . . . . . . . . . . . . . . . . . . . . . . . . . . . . . . . . 24
Garanzia . . . . . . . . . . . . . . . . . . . . . . . . . . . . . . . . . . . . . . . . . . . . . . . . . . . . . . . . . . . . . . 24
Assistenza . . . . . . . . . . . . . . . . . . . . . . . . . . . . . . . . . . . . . . . . . . . . . . . . . . . . . . . . . . . . . 24
Importatore . . . . . . . . . . . . . . . . . . . . . . . . . . . . . . . . . . . . . . . . . . . . . . . . . . . . . . . . . . . . 24
FRG 45 A1
13
Page 16
Introduzione
Introduzione
IT
MT
Informazioni sul presente manuale di istruzioni
Il presente manuale di istruzioni è parte integrante del barbecue rotondo FRG 45 A1
(di seguito denominato l’apparecchio o barbecue) e fornisce informazioni importanti per l’uso conforme, la sicurezza, il montaggio e il collegamento nonché l’uso
dell’apparecchio.
Il manuale di istruzioni dev’essere sempre disponibile nelle vicinanze dell’apparecchio. Esso dev’essere letto e seguito da ogni persona che utilizza l’apparecchio.
Conservare il presente manuale di istruzioni e consegnarlo insieme all’apparecchio
in caso di cessione dello stesso a terzi.
Diritto d’autore
La presente documentazione è tutelata dal diritto d’autore.
La diff usione o ristampa di qualsiasi genere, anche se parziale, nonché la
riproduzione delle illustrazioni, anche se modifi cate, è consentita solo previa
autorizzazione scritta del produttore.
Uso conforme
Il barbecue è destinato esclusivamente alla preparazione di alimenti da arrostire.
Esso è destinato esclusivamente all’impiego all’aperto. Il presente barbecue è destinato all’uso privato e non a scopi commerciali. Non si assume alcuna responsabilità per i danni derivanti dall’abuso e uso non conforme, dall’uso di violenza o
modifi che non autorizzate.
AVVISO
Pericolo derivante da uso non conforme!
In caso di uso non conforme o diverso da quello previsto, possono verifi carsi
situazioni di pericolo.
Utilizzare l'apparecchio esclusivamente in conformità alla sua destinazione. ►
Attenersi alle procedure descritte nel presente manuale di istruzioni. ►
Si esclude qualsiasi rivendicazione collegata a danni derivanti da uso non conforme,
ripar
azioni non eseguite a regola d’ar
parti di ricambio non omologate.
Il rischio è esclusivamente a carico dell‘utente.
te, modifi che non consentite o impiego di
14
FRG 45 A1
Page 17
Sicurezza
Sicurezza
In questo capitolo sono riportate importanti indicazioni di sicurezza per l’uso
dell’apparecchio.
Questo apparecchio corrisponde alle disposizioni di sicurezza prescritte.
L’uso non conforme può comportare danni a persone e a cose.
Avvertenze di sicurezza di base
AVVISO
Avviso relativo al pericolo di ustioni!
1. Collocare il grill su un sottofondo stabile, piano e solido durante l‘uso,
altrimenti potrebbe ribaltarsi.
2. ATTENZIONE! Non utilizzare alcol o benzina per accendere o riaccendere il fuoco! Utilizzare solo ausili di accensione conformi a EN 1860-3. Il
ritorno di fi amma può creare uno sviluppo di calore incontrollabile.
3. ATTENZIONE! Il grill si surriscalda e non dev‘essere spostato durante l‘uso,
altrimenti potrebbe ribaltarsi.
4. ATTENZIONE! Tenere lontani i bambini e gli animali domestici!
5. Durante la cottura, indossare guanti idonei e utilizzare le apposite pinze.
6. Non lasciare mai il grill rovente incustodito.
7. Prima della pulizia, fare raff reddare completamente il grill.
8. Non utilizzare mai acqua per spegnere la brace.
IT
MT
FRG 45 A1
AVVISO
Avviso relativo al pericolo di soff ocamento!
Utilizzare il grill solo all’aperto! ►
Non utilizzare il grill in ambienti chiusi o su superfi ci coperte. ►
15
Page 18
IT
MT
Volume della fornitura/Montaggio
Volume della fornitura
2 x pannelli paravento
2
1 x ripiano per tenere in caldo il cibo
3
1 x griglia di cottura (incl. 2 x maniglie)
4
1 x maniglia
5
2 x gambe (lunghe)
6
1 x superfi cie di appoggio
7
2 x ruote
8
1 x asse
9
2 x gambe (corte)
10
4 x cappucci per gambe
11
1 x conca per la brace
Elementi di connessione
M6x304xM5x304xM5x12
10x
Montaggio
Preparazione del montaggio
Prevedere tempo a suffi cienza per il montaggio del barbecue. Destinare una
superfi cie di lavoro di circa 2-3 metri quadrati. Rimuovere i singoli pezzi dalla
confezione e collocarli a portata di mano. Controllare l’integrità della fornitura
e la presenza di eventuali danni.
16
M5
14x
M8
2x
Ø6
10x
Ø6
4x
Ø8
2x
FRG 45 A1
Page 19
Montaggio
Materiale di montaggio necessario
Pinza
Cacciavite a stella
Chiave fi ssa SW 8 mm / SW 13 mm
ATTENZIONE
Le teste delle viti, per la sicurezza dell’utente, devono essere orientate ►
sempre verso l’esterno, al fi ne di evitare lesioni. Serrare tutte le viti solo al
termine del montaggio, per evitare tensioni err
Passaggio 1
ATTENZIONE
Entrambe le gambe lunghe ►
trovano i fori doppi nella conca per la brace 11.
5
IT
MT
ate del materiale.
devono essere montate sui lati in cui si
FRG 45 A1
Montare le 4 gambe ( ♦
una rondella Ø 6 e un cappuccio per gambe 10 al contenitore per il
carbone 11.
5
+ 9) utilizzando per ognuna 1 vite M6 x 30,
5
11
10
9
17
Page 20

IT
MT
Montaggio
Passaggio 2
ATTENZIONE
Il margine della superfi cie di appoggio ►
Le gambe (
dei fori puntino verso l'esterno, al fi ne di potervi inserire le teste delle viti.
Montare la superfi cie di appoggio ♦
M5 alle 4 gambe (5 + 9).
5
+ 9) devono essere ruotate in modo tale che le insenature
9
Passaggio 3
Inserire gli assi ♦
Inserire le ruote ♦
autobloccante M8 per ogni ruota.
Serrare i dadi con una chiave fi ssa SW 13 mm. Se necessario, tenere fermi ♦
gli assi
e l‘asse 8.
8
attraverso i fori inferiori delle gambe corte 9.
7
sull’asse 8 e fi ssarle con una rondella Ø 8 e un dado
8
con una pinza. Per evitare graffi , collocare un panno fra la pinza
6
deve puntare verso il basso.
6
con l’ausilio di 4 viti M5 x 30 e dadi
5
6
18
7
9
8
FRG 45 A1
Page 21

Montaggio
Passaggio 4
Montare la maniglia ♦
dadi M5 alla conca per la brace 11.
Passaggio 5
Inserire i due pannelli paravento ♦ l’uno nell’altro e avvitarli con l’ausilio
di una vite M5 x 12, una rondella Ø 6 e un dado M5. Utilizzare la distanza
massima possibile fra i pannelli per consentire l’inserimento della griglia fra
gli intagli dei pannelli .
11
4
con l’ausilio di 4 viti M5 x 12, 4 rondelle Ø 6 e 4
4
IT
MT
FRG 45 A1
19
Page 22

IT
MT
Montaggio
Passaggio 6
Avvitare il pannello paravento montato ♦ con l’ausilio di 5 viti M5 x 12,
5 rondelle Ø 6 e 5 dadi M5 alla conca per la brace 11.
11
20
Passaggio 7
Agganciare le due maniglie alla griglia ♦
3
.
3
FRG 45 A1
Page 23

Montaggio
Passaggio 8
Inserire la griglia ♦
Rimuovere le maniglie dalla griglia 3 affi nché non diano fastidio durante
la cottura.
AVVISO
Pericoo di ustioni!
Le due staff e integrate nella griglia non sono maniglie e si surriscaldano
durante il funzionamento!
Non aff errare le staff e con le mani nude. Per sospendere o regolare in ►
altezza la griglia utilizzare esclusivamente le maniglie accluse.
3
sul punto desiderato entro il pannello paravento .
3
IT
MT
FRG 45 A1
Passaggio 9
Appendere il ripiano per tenere in caldo il cibo ♦
2
2
al pannello paravento .
21
Page 24

IT
MT
Messa in funzione/Pulizia e cura
Messa in funzione
AVVERTENZA
Prima del primo impiego è necessario riscaldare il barbecue per almeno ►
30 minuti.
AVVISO
Avviso relativo al pericolo di ustioni!
Attenzione! Non utilizzare alcol o benzina per accendere o riaccendere il
fuoco! Utilizzare solo ausili di combustione conformi a EN1860-3. Il ritorno
di fi amma può creare uno sviluppo di calore incontrollabile.
Collocare uno strato di carbone nel vassoio portacarbone. ■
Collocare uno o due tavolette di combustibile solido sullo strato presente di ■
carbonella e accenderle con un fi ammifero o un accendino.
F
are bruciar
quindi lentamente il vassoio portacarbone con altro carbone.
Dopo circa 20 minuti, sul carbone si creer
Ciò indica il raggiungimento di uno stato di combustione ideale.
Distribuire il carbone uniformemente nel vassoio por
utensile di metallo idoneo.
Sospendere la griglia di cottura e cominciar
e le tavolette di combustibile solido per 2 - 4 minuti. Riempire ■
à uno strato bianco di cenere. ■
tacarbone tramite un ■
e ad arrostire. ■
Pulizia e cura
AVVISO
Avviso relativo al pericolo di ustioni!
Avviso su possibili danni materiali!
Per la normale pulizia, utilizzare una spugnetta e acqua con aggiunta di un
deter
In caso di sporco eccessivo sulle parti smaltate, utilizzare un detergente per parti
smaltate comunemente reperibile in commercio. Seguire le indicazioni del produttore del detergente da utilizzare. Pulire la griglia di cottura con un detergente
e una spugnetta per uso domestico.
22
Prima della pulizia o della conservazione, fare raff reddare completamente ►
il barbecue. Non utilizzare mai acqua per spegnere la brace.
Non utilizzar
la superfi cie.
gente comunemente reperibile in commercio.
e agenti abrasivi o detergenti aggressivi, che possono attaccare ►
FRG 45 A1
Page 25

Smaltimento/Dati tecnici
Smaltimento
Smaltire il combustibile con cautela e in modo ecologico. Smaltire i
residui della combustione accuratamente, solo nei recipienti appositamente previsti in metallo o in materiali non infi ammabili.
Smaltire il barbecue tramite un’azienda di smaltimento autorizzata o tramite
l’ente di smaltimento comunale competente. Rispettare le norme attualmente in
vigore. In caso di dubbi mettersi in contatto con l’ente di smaltimento competente.
Smaltire tutti i materiali dell’imballaggio in modo ecologicamente conforme.
Dati tecnici
Dimensioni (montato) ca. 82 x 52 x 69 mm
Griglia di cottura Ø 47 cm
Peso ca. 6 kg
Combustibile Carbone di legna
Capacità della conca per la
brace
IT
MT
max. 2 kg
FRG 45 A1
23
Page 26

IT
MT
Appendice
Garanzia
Questo apparecchio è garantito per tre anni a partire dalla data di acquisto.
L’apparecchio è stato prodotto con cura e debitamente collaudato prima della
consegna.
Conservare lo scontrino come prova d’acquisto. Nei casi contemplati dalla
garanzia, mettersi in comunicazione telefonicamente con il centro di assistenza
più vicino. Solo in tal modo è possibile garantire un invio gratuito della merce.
AVVERTENZA
La garanzia vale solo per i difetti relativi al materiale o alla fabbricazione, ►
ma non per i danni da trasporto, danni alle parti soggette a usura o alle
parti fragili, come ad es. interruttori.
odotto è destinato esclusivamente all’uso domestico e non a quello commer-
Il pr
ciale. La garanzia decade in caso di impiego improprio o manomissione, uso
della forza e interventi non eseguiti dalla nostra fi liale di assistenza autorizzata.
Questa garanzia non costituisce alcun limite ai diritti legali del consumatore.
Il periodo di garanzia non viene prolungato da interventi in garanzia. Ciò vale
anche per le parti sostituite e riparate.
I danni e i difetti eventualmente presenti già all’atto dell’acquisto devono essere
segnalati immediatamente dopo il disimballaggio, e comunque non oltre due
giorni dalla data di acquisto.
Le riparazioni eff ettuate dopo la scadenza del periodo di garanzia sono a
pagamento.
Appendice
Assistenza
Importatore
24
Assistenza Italia
Tel.: 02 36003201
E-Mail: kompernass@lidl.it
IAN 71245
Assistenza Malta
Tel.: 80062230
E-Mail: kompernass@lidl.com.mt
IAN 71245
KOMPERNASS GMBH
BURGSTRASSE 21
44867 BOCHUM, GERMANY
www.kompernass.com
FRG 45 A1
Page 27

Índice
Introdução . . . . . . . . . . . . . . . . . . . . . . . . . . . . . . . . . . . . . . . . . . . . . . . . . . . 26
Informações acerca deste manual de instruções . . . . . . . . . . . . . . . . . . . . . . . . . . . . . . . . 26
Direitos de autor . . . . . . . . . . . . . . . . . . . . . . . . . . . . . . . . . . . . . . . . . . . . . . . . . . . . . . . . 26
Utilização correcta . . . . . . . . . . . . . . . . . . . . . . . . . . . . . . . . . . . . . . . . . . . . . . . . . . . . . . 26
Segurança . . . . . . . . . . . . . . . . . . . . . . . . . . . . . . . . . . . . . . . . . . . . . . . . . . . 27
Indicações importantes de segurança . . . . . . . . . . . . . . . . . . . . . . . . . . . . . . . . . . . . . . . . 27
Volume de fornecimento . . . . . . . . . . . . . . . . . . . . . . . . . . . . . . . . . . . . . . . 28
Elementos de ligação . . . . . . . . . . . . . . . . . . . . . . . . . . . . . . . . . . . . . . . . . . . . . . . . . . . . 28
Montagem . . . . . . . . . . . . . . . . . . . . . . . . . . . . . . . . . . . . . . . . . . . . . . . . . . . 28
Preparação da montagem . . . . . . . . . . . . . . . . . . . . . . . . . . . . . . . . . . . . . . . . . . . . . . . . . 28
Material de montagem necessário . . . . . . . . . . . . . . . . . . . . . . . . . . . . . . . . . . . . . . . . . . 29
Colocação em funcionamento . . . . . . . . . . . . . . . . . . . . . . . . . . . . . . . . . . . 34
Limpeza e conservação . . . . . . . . . . . . . . . . . . . . . . . . . . . . . . . . . . . . . . . . 34
Eliminação . . . . . . . . . . . . . . . . . . . . . . . . . . . . . . . . . . . . . . . . . . . . . . . . . . . 35
Dados técnicos . . . . . . . . . . . . . . . . . . . . . . . . . . . . . . . . . . . . . . . . . . . . . . . . 35
PT
Anexo. . . . . . . . . . . . . . . . . . . . . . . . . . . . . . . . . . . . . . . . . . . . . . . . . . . . . . .36
Garantia . . . . . . . . . . . . . . . . . . . . . . . . . . . . . . . . . . . . . . . . . . . . . . . . . . . . . . . . . . . . . . 36
Assistência técnica . . . . . . . . . . . . . . . . . . . . . . . . . . . . . . . . . . . . . . . . . . . . . . . . . . . . . . . 36
Importador . . . . . . . . . . . . . . . . . . . . . . . . . . . . . . . . . . . . . . . . . . . . . . . . . . . . . . . . . . . . . 36
FRG 45 A1
25
Page 28

PT
Introdução
Introdução
Informações acerca deste manual de instruções
Este manual de instruções é parte integrante do grelhador redondo FRG 45 A1
(a seguir designado como aparelho ou grelhador) e fornece-lhe indicações
importantes para uma utilização correcta, segurança, montagem e operação do
aparelho.
O manual de instruções deve estar sempre junto do aparelho. Qualquer pessoa
que opere com o aparelho deverá ler e utilizá-lo.
Conserve o manual de instruções e entregue-o a terceiros juntamente com o
aparelho.
Direitos de autor
Esta documentação está protegida por direitos de autor.
Só é possível a duplicação ou a impressão total ou parcial, assim como a repro-
dução de imagens, mesmo que modifi cadas, com a autorização do fabricante
por escrito.
Utilização correcta
O grelhador foi concebido exclusivamente para grelhar alimentos. Está indicado
exclusivamente para a utilização no exterior. Este grelhador foi concebido
apenas para uso privado e não para uso comercial. Não é assumida qualquer
responsabilidade por danos resultantes de um manuseamento incorrecto ou
inadequado, de uma utilização violenta ou de modifi cações não autorizadas.
26
AVISO
Perigo devido a uma utilização incorrecta!
Podem surgir riscos resultantes de uma utilização incorrecta e/ou não
adequada do aparelho.
O aparelho deve ser utilizado apenas para a fi nalidade descrita. ►
Cumprir os procedimentos descritos neste manual de instruções. ►
Reclamações de qualquer tipo por danos resultantes de uma utilização incorr
ecta, repar
peças de reposição não permitidas não serão consideradas.
O risco é da responsabilidade do utilizador.
ações indevidas, alterações não autorizadas ou uma utilização de
FRG 45 A1
Page 29

Segurança
Segurança
Este capítulo contém indicações de segurança importantes para o manuseamento
do aparelho.
Este aparelho está em conformidade com as normas de segurança em vigor.
Um uso incorrecto pode provocar danos materiais ou ferimentos.
Indicações importantes de segurança
AVISO
Aviso relativo a queimaduras!
Aviso relativo a queimaduras!
1. Durante o funcionamento, coloque o grelhador numa base estável, plana e
segura, caso contrário este pode virar.
2. CUIDADO! Para acender ou reacender, não utilizar álcool ou gasolina!
Utilizar apenas agentes auxiliares de acordo com a EN 1860-3. Caso
contrário, pode ocorrer uma formação excessiva de calor devido a defl agrações.
3. ATENÇÃO! O grelhador atinge temperaturas elevadas e não pode ser
deslocado durante o funcionamento, pois pode virar.
4. ATENÇÃO! Manter longe do alcance de crianças e animais domésticos!
5. Ao grelhar use luvas adequadas e utilize uma tenaz. Nunca abandone o
grelhador enquanto ainda estiver quente.
7. Deixe o grelhador arrefecer por completo antes da limpeza.
8. Nunca utilize água para apagar carvão.
AVISO
Aviso relativo a asfi xia!
Utilize o grelhador apenas ao ar livre! ►
Não utilize o grelhador em espaços fechados nem em superfícies cobertas. ►
PT
FRG 45 A1
27
Page 30

PT
Volume de fornecimento/Montagem
Volume de fornecimento
2 x chapas corta-ventos
2
1 x grelha para aquecer
3
1 x grelha (incl. 2 pegas)
4
1 x pega
5
2 x pernas (compridas)
6
1 x base
7
2 x rodas
8
1 x eixo
9
2 x pernas (curtas)
10
4 x tampões para as pernas
11
1 x bandeja para carvão
Elementos de ligação
M6x304xM5x304xM5x12
10x
Montagem
Preparação da montagem
Certifi que-se de que possui tempo sufi ciente para a montagem do grelhador.
Obtenha uma superfície de trabalho plana de cerca de dois a três metros quadrados. Retire cada uma das peças da embalagem e coloque-as ao seu alcance.
Verifi que o volume de fornecimento quanto a integridade e eventuais danos.
28
M5
14x
M8
2x
Ø6
10x
Ø6
4x
Ø8
2x
FRG 45 A1
Page 31

Montagem
Material de montagem necessário
Alicate
Chave Philips
Chave inglesa SW 8 mm / SW 13 mm
ATENÇÃO
Por motivos de segurança, as cabeças dos parafusos devem estar sempre ►
voltadas para fora, a fi m de evitar ferimentos. Aperte todas as uniões roscadas depois de concluída a montagem, caso contrário, podem ocorrer
indesejadas tensões do material.
Passo 1
ATENÇÃO
Ambas as pernas compridas ►
encontram os orifícios duplos na bandeja para carvão 11.
5
devem ser montadas no lado em que se
PT
FRG 45 A1
Monte as 4 pernas ( ♦
plana Ø 6 e um tampão para cada perna 10 na bandeja para o carvão 11.
5
+ 9) com 1 parafuso M6 x 30 cada, uma arruela
5
11
10
9
29
Page 32

PT
Montagem
Passo 2
ATENÇÃO
A borda da base ►
devem ser rodadas de modo a que as cavidades dos orifícios apontem
para o exterior para poder inserir as cabeças dos parafusos.
Monte a base ♦
4 pernas (5 + 9).
Passo 3
Desloque o eixo ♦
Encaixe as rodas ♦
uma porca autoblocante M8.
Aperte as porcas com uma chave inglesa SW 13 mm. Se necessário, fi xe o ♦
8
eixo
com um alicate. Para proteger contra riscos, coloque um pano entre
o alicate e o eixo 8.
6
deve apontar para baixo. As pernas (5 + 9)
6
com 4 ajuda parafusos M5 x 30 e porcas M5 nas
5
6
9
8
pelos orifícios inferiores das pernas curtas 9.
7
no eixo 8 e fi xe-as com uma arruela plana Ø 8 e
30
7
9
8
FRG 45 A1
Page 33

Montagem
Passo 4
Monte a pega ♦
4 porcas M5 na bandeja para carvão 11.
4
com 4 parafusos M5 x 12, 4 arruelas planas Ø 6 e
11
4
Passo 5
Encaixe ambas as chapas corta-ventos ♦ entre si e aparafuse-as com um
parafuso M5 x 12, uma arruela plana Ø 6 e uma porca M5. Utilize a
distância máxima entre as chapas para encaixar a grelha entre as fendas
das chapas corta-ventos .
PT
FRG 45 A1
31
Page 34

PT
Montagem
Passo 6
Aparafuse o corta-ventos montado ♦ com 5 parafusos M5 x 12, 5 arruelas
planas Ø 6 e 5 porcas M5 na bandeja para carvão 11.
11
32
Passo 7
Engate ambas as pegas na grelha ♦
3
.
3
FRG 45 A1
Page 35

Montagem
Passo 8
Coloque a grelha ♦
ra voltar a soltar as pegas da grelha 3 para que estas não incomodem
durante o processo de preparação dos alimentos.
3
no corta-ventos na posição pretendida . Pode ago-
3
AVISO
Perigo de queimaduras!
Os dois arcos laterais integrados na grelha não são pegas e fi cam quentes
durante o funcionamento!
Não toque nos arcos com as mãos desprotegidas. Para encaixar ou ►
regular a altura da grelha utilize apenas as pegas fornecidas.
Passo 9
Coloque a grelha para aquecer ♦
2
2
no corta-ventos .
PT
FRG 45 A1
33
Page 36

Colocação em funcionamento/Limpeza …
Colocação em funcionamento
NOTA
Antes da primeira utilização, pré-aquecer o grelhador durante, pelo ►
menos, 30 minutos.
PT
AVISO
Aviso relativo a queimaduras!
CUIDADO! Para acender ou reacender não utilize álcool ou gasolina! Utilizar
apenas meios para acender de acordo com EN 1860-3. Caso contrário,
pode ocorrer uma formação excessiva de calor devido a defl agrações.
Coloque uma parte de carvão de madeira na bandeja para carvão. ■
Coloque uma a duas acendalhas sobre a camada de carvão de madeira ■
existente e as acendalhas com um fósforo ou isqueiro.
Deix
e as acendalhas a arder dur
lentamente a bandeja com carvão de madeira.
Após 20 minutos, forma-se uma camada branca de cinzas sobre o car
de madeira. As condições ideais para grelhar foram agora alcançadas.
Distribua o carvão uniformemente na bandeja com uma ferr
adequada.
Coloque a grelha e inicie os grelhados.
■
Limpeza e conservação
AVISO
Aviso relativo a queimaduras!
Antes de limpar ou guardar o grelhador, deixe-o arrefecer totalmente. ►
Nunca utilize água para apagar carvão de madeira.
Aviso relativ
Não utilize produtos de limpeza abrasivos ou agressivos, uma vez que ►
estes podem danifi car a superfície.
Para a limpeza normal, utiliz
convencional.
Em caso de sujidade profunda nas peças esmaltadas, utilize um produto de limpeza de esmaltes convencional. Tenha em atenção as indicações do fabricante
do produto de limpeza a utilizar. Limpe a grelha com detergente e uma esponja
doméstica.
o a danos materiais!
e um pano de limpeza e água com um detergente
ante 2 a 4 minutos. De seguida, encha ■
vão ■
amenta de metal ■
34
FRG 45 A1
Page 37

Eliminação/Dados técnicos
Eliminação
Elimine o combustível de forma prudente e ecológica. Elimine os resíduos
apenas nos recipientes em metal ou em materiais não infl amáveis,
previstos para tal.
Elimine o grelhador através de uma instituição de recolha de resíduos autorizada
ou através da instituição de recolha do seu município. Tenha em consideração
os regulamentos actualmente em vigor. Em caso de dúvida, entre em contacto
com a sua entidade de eliminação.
Elimine todos os materiais da embalagem de forma ecológica.
Dados técnicos
Dimensões (montado) aprox. 82 x 52 x 69 cm
Grelha Ø 47 cm
Peso aprox. 6 kg
Combustível Carvão
Capacidade da bandeja para
carvão
PT
máx. 2 kg
FRG 45 A1
35
Page 38

PT
Anexo
Anexo
Garantia
Este aparelho tem 3 anos de garantia a partir da data de compra. Este aparelho
foi fabricado com o maior cuidado e testado escrupulosamente antes da sua
distribuição.
Guarde o talão de compra como comprovativo da compra. No caso de reivindicação da garantia, entre em contacto com o seu ponto de assistência técnica, via
telefone. Apenas deste modo pode ser garantido um envio gratuito do seu produto.
NOTA
A garantia abrange apenas defeitos de material e de fabrico, mas não as ►
peças de desgaste ou danos em peças frágeis, por ex. interruptores.
O produto foi concebido apenas para uso priv
A garantia extingue-se no caso de utilização incorrecta e de intervenções que
não foram efectuadas pela nossa fi lial de assistência técnica autorizada.
Os seus direitos legais não são limitados por esta garantia. O período de garantia
não é prolongado pela prestação da garantia. Isto aplica-se igualmente a peças
substituídas e reparadas.
Danos ou falhas já existentes no momento da compra devem ser comunicados
imediatamente após retirar o aparelho da embalagem, o mais tardar dois dias
após a data de compra.
Após o fi m do período de garantia, todas as reparações serão cobradas.
Assistência técnica
Assistência Portugal
Tel.: 70778 0005 (0,12 EUR/Min.)
E-Mail: kompernass@lidl.pt
IAN 71245
Importador
KOMPERNASS GMBH
BURGSTRASSE 21
44867 BOCHUM, GERMANY
www.kompernass.com
ado e não para uso comercial.
36
FRG 45 A1
Page 39

Index
Introduction . . . . . . . . . . . . . . . . . . . . . . . . . . . . . . . . . . . . . . . . . . . . . . . . . . 38
Information for these operating instructions . . . . . . . . . . . . . . . . . . . . . . . . . . . . . . . . . . . . 38
Copyright . . . . . . . . . . . . . . . . . . . . . . . . . . . . . . . . . . . . . . . . . . . . . . . . . . . . . . . . . . . . . . 38
Intended use . . . . . . . . . . . . . . . . . . . . . . . . . . . . . . . . . . . . . . . . . . . . . . . . . . . . . . . . . . . 38
Safety. . . . . . . . . . . . . . . . . . . . . . . . . . . . . . . . . . . . . . . . . . . . . . . . . . . . . . . 39
Basic Safety Instructions. . . . . . . . . . . . . . . . . . . . . . . . . . . . . . . . . . . . . . . . . . . . . . . . . . . 39
Items supplied . . . . . . . . . . . . . . . . . . . . . . . . . . . . . . . . . . . . . . . . . . . . . . . 40
Connection elements . . . . . . . . . . . . . . . . . . . . . . . . . . . . . . . . . . . . . . . . . . . . . . . . . . . . . 40
Assembly . . . . . . . . . . . . . . . . . . . . . . . . . . . . . . . . . . . . . . . . . . . . . . . . . . . .40
Preparing for assembly . . . . . . . . . . . . . . . . . . . . . . . . . . . . . . . . . . . . . . . . . . . . . . . . . . . 40
Required assembly material . . . . . . . . . . . . . . . . . . . . . . . . . . . . . . . . . . . . . . . . . . . . . . . . 41
Commissioning . . . . . . . . . . . . . . . . . . . . . . . . . . . . . . . . . . . . . . . . . . . . . . .46
Cleaning and Care . . . . . . . . . . . . . . . . . . . . . . . . . . . . . . . . . . . . . . . . . . . . 46
Disposal . . . . . . . . . . . . . . . . . . . . . . . . . . . . . . . . . . . . . . . . . . . . . . . . . . . . .47
Technical data . . . . . . . . . . . . . . . . . . . . . . . . . . . . . . . . . . . . . . . . . . . . . . . . 47
GB
MT
Appendix . . . . . . . . . . . . . . . . . . . . . . . . . . . . . . . . . . . . . . . . . . . . . . . . . . . . 48
Warranty . . . . . . . . . . . . . . . . . . . . . . . . . . . . . . . . . . . . . . . . . . . . . . . . . . . . . . . . . . . . . . 48
Service . . . . . . . . . . . . . . . . . . . . . . . . . . . . . . . . . . . . . . . . . . . . . . . . . . . . . . . . . . . . . . . . 48
Importer . . . . . . . . . . . . . . . . . . . . . . . . . . . . . . . . . . . . . . . . . . . . . . . . . . . . . . . . . . . . . . . 48
FRG 45 A1
37
Page 40

GB
MT
Introduction
Introduction
Information for these operating instructions
These operating instructions are a component of the Round Barbecue FRG 45 A1
(hereafter designated as the barbecue) and they supply you with important
information about the intended use, safety and assembly as well as operation
of the appliance.
These operating instructions must constantly be kept available close to the appliance.
They are to be read and applied by everyone occupied with operating the appliance.
Retain these operating instructions and pass them on, with the appliance, to any
future owner.
Copyright
This documentation is copyright protected.
All reproductions or duplications, also as extracts, as well as representations
of the illustrations, even in an altered state, are only permitted with the written
approval of the manufacturer.
Intended use
This round barbecue is intended exclusively for the preparation of grilled foods.
It is suitable only for use outdoors. This round barbecue is intended for use only
in domestic environments, not for commercial applications. No liability will be
accepted for damage resulting from incorrect or improper usage, the application
of force or unauthorised modifi cations.
38
WARNING
Risks from unintended use!
Risks can be engendered if the appliance is used for unintended purposes
and/or other types of use.
Use the appliance exclusively for its intended purposes. ►
Observe the procedures described in these operating instructions. ►
The manufacturer assumes no responsibility for damage caused by improper use,
inappr
opriate repair
replacement parts.
The user alone bears liability.
s, making unauthorised changes or for using unapproved
FRG 45 A1
Page 41

Safety
Safety
In this chapter you will receive important safety information regarding the handling
of the appliance.
This appliance complies with the statutory safety regulations.
Incorrect usage can lead to personal injury and property damage.
Basic Safety Instructions
WARNING
Warnings about burns!
1. During use, place the grill on a secure, level and fi rm surface, otherwise it
could tip over.
2. CAUTION! For igniting and reigniting, do NOT use spiritus oder benzine!
Use only ignition aids complying with EN 1860-3. The defl agration could
cause an uncontrollable development of heat.
3. ATTENTION! During use the grill will become very hot and therefore may
not be moved, otherwise it could tip over.
4. ATTENTION! Keep children and pets well away from it!
5. When grilling, wear appropriate grilling gloves and use grilling tongs.
6. NEVER leave a heated up grill unsupervised.
7. Allow the grill to cool down completely before cleaning it..
8. NEVER use water to extinguish the glowing charcoal.
WARNING
Warning in regard to suff ocation!!
Use the grill ONLY outdoors! ►
Do NOT operate the grill in enclosed spaces or roofed-over areas. ►
GB
MT
FRG 45 A1
39
Page 42

GB
MT
Items supplied
2 x Wind protector sheets
2
1 x Keep-warm grate
3
1 x Grill grate (including 2 handles)
4
1 x Handle
5
2 x Legs (long)
6
1 x Bottom shelf
7
2 x Wheels
8
1 x Axle
9
2 x Legs (short)
10
4 x Leg Caps
11
1 x Firebowl
Connection elements
Items supplied/Assembly
M6x304xM5x304xM5x12
Assembly
Preparing for assembly
Allow yourself plenty of time for the assembly of the round barbecue. Secure a
level workplace of about two to three square meters. Remove all individual items
from the packaging and place them where they are conveniently handy. Check
the items to ensure that that they are all present and without any damage.
40
10x
M5
14x
M8
2x
Ø6
10x
Ø6
4x
Ø8
2x
FRG 45 A1
Page 43

Assembly
Required assembly material
Pliers
Philips head screwdriver
Open-jawed spanner 8 mm / 13 mm
IMPORTANT
To avoid possible injury, the screw heads should always face outwards. ►
First tighten all screw connections down when the assembly is complete,
this will help avoid undesirable material tensions.
Step 1
IMPORTANT
The two long legs ►
holes in the fi rebowl 11 are located.
Assemble the 4 legs ( ♦
and a leg cap 10, onto the fi rebowl 11.
5
must be assembled on the side where the double
5
+ 9), each with 1 screw M6 x 30, a washer Ø 6
GB
MT
FRG 45 A1
11
5
10
9
41
Page 44

GB
MT
Assembly
Step 2
IMPORTANT
The edge of the bottom shelf ►
must be rotated such that the indentations of the boreholes face outwards,
thereby enabling the screwheads to be accommodated within them.
Assemble and secure the bottom shelf ♦
M5 nuts, to the 4 legs (5 + 9).
9
Step 3
Guide the axle ♦
Place the wheels ♦
Ø 8 washer and an M8 self-securing nut.
Tighten the nuts with an 13 mm open-jawed spanner. If necessary, hold ♦
the axle
pliers and the axle 8.
8
through the lower boreholes on the short legs 9.
7
on the axle 8 and secure both of them, each with a
8
with the pliers. To prevent scratches, place a cloth between the
6
must face downwards. The legs (5 + 9)
6
, using 4 M5 x 30 screws plus
5
6
42
7
9
8
FRG 45 A1
Page 45

Assembly
Step 4
Assemble and secure the handle ♦
4 Ø 6 washers and 4 M5 nuts, to the fi rebowl 11.
11
4
, using 4 M5 x 12 screws,
4
Step 5
Align the two wind-protector sheets ♦ with each other and fasten them
together using an M5 x 12 screw, a Ø 6 washer and an M5 nut. Thereby,
make use of the maximum distance between the sheets, so that the grill
grate fi ts between the slots of the wind-protector sheets .
GB
MT
FRG 45 A1
43
Page 46

GB
MT
Assembly
Step 6
Firmly secure the wind protector sheets ♦ , using 5 M5 x 12 screws,
5 Ø 6 washer and 5 M5 nuts, to the fi rebowl 11.
11
44
Step 7
Hook the two handles onto the cooking grill ♦
3
.
3
FRG 45 A1
Page 47

Commissioning
Step 8
Attach the grill grate ♦
You can now remove the handles from cooking grill 3, so that they do not
disturb when you are grilling.
WARNING
Warning on the risk of burns!
The two brackets fi tted on the sides of the grill grate are not handles and will
become hot when it is in use!
Do NOT grasp these brackets with your bare hands. To insert or adjust the ►
height of the grill grate, use exclusively the supplied handles.
3
at the desired location in the wind protector .
3
GB
MT
FRG 45 A1
Step 9
Attach the keep-warm grate ♦
2
to the wind protector .
45
Page 48

GB
MT
Commissioning/Cleaning and Care
Commissioning
NOTICE
Before the fi rst use, the grill must be warmed up for at least 30 minutes. ►
WARNING
Warnings about burns!
Warning! For igniting and reigniting, do not use spiritus or petrol! Use only
ignition aids complying with EN 1860-3. The defl agration could cause an
uncontrollable development of heat.
Build up a small pile of charcoal in the fi rebowl. ■
Place one or two solid fi relighters on the existing layer of charcoal and ignite ■
the solid fi relighters with a match or lighter.
Allo
fi rebowl with charcoal.
After about 20 minutes the charcoal will display a white coating of ash.
■
The optimal burning temperature has now been reached.
Distribute the charcoal, using a suitable metallic implement, ev
fi rebowl.
Insert the grill grate and star
w the fi
relighters to burn for 2 to 4 minutes. Then slowly start fi lling the ■
t the barbecue. ■
enly in the ■
Cleaning and Care
WARNING
Warnings about burns!
Before cleaning it or putting it into storage, allow the round barbecue to cool ►
down completely. NEVER use water to extinguish the glowing charcoal.
Warning in reg
Do not use abrasive or aggressive cleaning agents, they can damage the ►
enamelled surfaces.
For normal cleaning, use a cloth and water with standard detergent.
For heavy soiling on the enamelled parts, use a standard commercial enamel
cleaner. Pay heed to the instructions supplied by the manufacturer of the cleaning
agent being employed. Clean the grill grate with detergent and a household
sponge.
46
ard to property damage!
FRG 45 A1
Page 49

Disposal/Technical data
Disposal
Dispose of fl ammable materials carefully and with regard to the
environment. Fundamentally, dispose of such remaining waste ONLY
into containers made of metal and intended for this purpose or those
made of non-fl ammable materials.
Dispose of the Round Barbecue through an approved disposal centre or at your
community waste facility. Observe the currently applicable regulations. In case
of doubt, please contact your waste disposal centre.
Dispose of all packaging materials in an environmentally friendly manner.
Technical data
Dimensions (assembled) approx. 82 x 52 x 69 cm
Grill grate Ø 47 cm
Weight approx. 6 kg
Fuel Charcoal
Firebowl capacity max. 2 kg
GB
MT
FRG 45 A1
47
Page 50

Appendix
Warranty
You receive a 3-year warranty for this appliance as of the purchase date. This
appliance has been manufactured with care and meticulously examined before
delivery.
Please retain your receipt as proof of purchase. In the case of a warranty claim,
please make contact by telephone with your Service Centre. Only in this way
can a post-free despatch for your goods be assured.
Appendix
GB
MT
Service
NOTICE
The warranty covers only claims for material and manufacturing defects, ►
not for transport damages, wearing parts or for damage to fragile compo-
nents, e.g. switches.
This product is for private use only and is not intended for commer
warranty becomes void in cases of abusive and improper handling, use of force
and modifi cations not carried out by our authorized Service Centre.
Your statutory rights are not restricted in any way by this warranty. The warranty
period is not extended by repairs eff ected under warranty. This applies also to
replaced and repaired parts.
Damages and defects discovered on purchase are to be reported directly after
unpacking, at the latest by two days after the date of purchase.
On the lapse of the warranty period, all repairs carried out are liable to charges.
Service Great Britain
Tel.: 0871 5000 720 (£ 0.10/Min.)
E-Mail: kompernass@lidl.co.uk
IAN 71245
Service Malta
Tel.: 80062230
E-Mail: kompernass@lidl.com.mt
IAN 71245
cial use. The
Importer
48
KOMPERNASS GMBH
BURGSTRASSE 21
44867 BOCHUM, GERMANY
www.kompernass.com
FRG 45 A1
Page 51

Inhaltsverzeichnis
Einführung . . . . . . . . . . . . . . . . . . . . . . . . . . . . . . . . . . . . . . . . . . . . . . . . . . . 50
Informationen zu dieser Bedienungsanleitung . . . . . . . . . . . . . . . . . . . . . . . . . . . . . . . . . . 50
Urheberrecht . . . . . . . . . . . . . . . . . . . . . . . . . . . . . . . . . . . . . . . . . . . . . . . . . . . . . . . . . . . 50
Bestimmungsgemäße Verwendung . . . . . . . . . . . . . . . . . . . . . . . . . . . . . . . . . . . . . . . . . . 50
Sicherheit . . . . . . . . . . . . . . . . . . . . . . . . . . . . . . . . . . . . . . . . . . . . . . . . . . . . 51
Grundlegende Sicherheitshinweise . . . . . . . . . . . . . . . . . . . . . . . . . . . . . . . . . . . . . . . . . . 51
Lieferumfang . . . . . . . . . . . . . . . . . . . . . . . . . . . . . . . . . . . . . . . . . . . . . . . . .52
Verbindungselemente . . . . . . . . . . . . . . . . . . . . . . . . . . . . . . . . . . . . . . . . . . . . . . . . . . . . 52
Montage . . . . . . . . . . . . . . . . . . . . . . . . . . . . . . . . . . . . . . . . . . . . . . . . . . . . 52
Montage vorbereiten . . . . . . . . . . . . . . . . . . . . . . . . . . . . . . . . . . . . . . . . . . . . . . . . . . . . . 52
Benötigtes Montagematerial . . . . . . . . . . . . . . . . . . . . . . . . . . . . . . . . . . . . . . . . . . . . . . . 53
Inbetriebnahme . . . . . . . . . . . . . . . . . . . . . . . . . . . . . . . . . . . . . . . . . . . . . . 58
Reinigung und Pfl ege . . . . . . . . . . . . . . . . . . . . . . . . . . . . . . . . . . . . . . . . . . 58
Entsorgung. . . . . . . . . . . . . . . . . . . . . . . . . . . . . . . . . . . . . . . . . . . . . . . . . . . 59
Technische Daten . . . . . . . . . . . . . . . . . . . . . . . . . . . . . . . . . . . . . . . . . . . . . . 59
DE
AT
CH
Anhang . . . . . . . . . . . . . . . . . . . . . . . . . . . . . . . . . . . . . . . . . . . . . . . . . . . . . 60
Garantie . . . . . . . . . . . . . . . . . . . . . . . . . . . . . . . . . . . . . . . . . . . . . . . . . . . . . . . . . . . . . . 60
Service . . . . . . . . . . . . . . . . . . . . . . . . . . . . . . . . . . . . . . . . . . . . . . . . . . . . . . . . . . . . . . . . 60
Importeur . . . . . . . . . . . . . . . . . . . . . . . . . . . . . . . . . . . . . . . . . . . . . . . . . . . . . . . . . . . . . . 60
FRG 45 A1
49
Page 52

DE
AT
CH
Einführung
Einführung
Informationen zu dieser Bedienungsanleitung
Diese Bedienungsanleitung ist Bestandteil des Rundgrills FRG 45 A1
(nachfolgend als Gerät oder Grill bezeichnet) und gibt Ihnen wichtige Hinweise
für den bestimmungsgemäßen Gebrauch, die Sicherheit, den Aufbau sowie die
Bedienung des Gerätes.
Die Bedienungsanleitung muss ständig in der Nähe des Gerätes verfügbar sein.
Sie ist von jeder Person zu lesen und anzuwenden, die mit der Bedienung des
Gerätes beschäftigt ist.
Bewahren Sie diese Bedienungsanleitung auf und geben Sie diese mit dem
Gerät an Nachbesitzer weiter.
Urheberrecht
Diese Dokumentation ist urheberrechtlich geschützt.
Jede Vervielfältigung, bzw. jeder Nachdruck, auch auszugsweise, sowie die
Wiedergabe der Abbildungen, auch im veränderten Zustand ist nur mit schriftlicher
Zustimmung des Herstellers gestattet.
Bestimmungsgemäße Verwendung
Der Grill ist ausschließlich für die Zubereitung von grillbaren Speisen bestimmt. Er
ist ausschließlich zur Verwendung im Freien geeignet. Dieser Grill ist nur für den
privaten Gebrauch und nicht für gewerbliche Zwecke bestimmt.
Für Schäden die von missbräuchlicher oder unsachgemäßer Behandlung, von
Gewaltanwendung oder unautorisierter Modifi kation herrühren, wird keine
Haftung übernommen.
50
WARNUNG
Gefahr durch nicht bestimmungsgemäße Verwendung!
Von dem Gerät können bei nicht bestimmungsgemäßer Verwendung und/
oder andersartiger Nutzung Gefahren ausgehen.
Das Gerät ausschließlich bestimmungsgemäß verwenden. ►
Die in dieser Bedienungsanleitung beschriebenen Vorgehensweisen ►
einhalten.
Ansprüche jeglicher Art wegen Schäden aus nicht bestimmungsgemäßer V
dung, unsachgemäßen Reparaturen, unerlaubt vorgenommenen Veränderungen
oder Verwendung nicht zugelassener Ersatzteile sind ausgeschlossen.
Das Risiko trägt allein der Benutzer.
erwen-
FRG 45 A1
Page 53

Sicherheit
Sicherheit
In diesem Kapitel erhalten Sie wichtige Sicherheitshinweise im Umgang mit dem Gerät.
Dieses Gerät entspricht den vorgeschriebenen Sicherheitsbestimmungen.
Ein unsachgemäßer Gebrauch kann zu Personen- und Sachschäden führen.
Grundlegende Sicherheitshinweise
WARNUNG
Warnung vor Verbrennungen!
1. Stellen Sie den Grill während des Betriebs auf einem sicheren, ebenen und
festen Untergrund, da er sonst umkippen kann.
2. VORSICHT! Zum Anzünden oder Wiederanzünden keinen Spiritus oder Benzin
verwenden! Nur Anzündehilfen entsprechend EN 1860-3 verwenden. Es kann
sonst durch Verpuff ungen zu unkontrollierbaren Hitzeentwicklungen kommen.
3. ACHTUNG! Der Grill wird sehr heiß und darf während des Betriebes nicht
bewegt werden, da er sonst umkippen kann.
4. ACHTUNG! Kinder und Haustiere fernhalten!
5. Tragen Sie beim Grillen entsprechende Grillhandschuhe und benutzen Sie
eine Grillzange.
6. Lassen Sie den heißen Grill niemals unbeaufsichtigt.
7. Lassen Sie den Grill vor der Reinigung vollständig abkühlen.
8. Verwenden Sie niemals Wasser zum Löschen der Holzkohle.
DE
AT
CH
FRG 45 A1
WARNUNG
Warnung vor Erstickung!
Verwenden Sie den Grill nur im Freien! ►
Betreiben Sie den Grill nicht in geschlossenen Räumen, oder auf überdach- ►
ten Flächen.
51
Page 54

DE
AT
CH
Lieferumfang
2 x Windschutz-Bleche
2
1 x Warmhalterost
3
1 x Grillrost (inkl. 2 x Handgriff e)
4
1 x Handgriff
5
2 x Bein (lang)
6
1 x Bodenablage
7
2 x Rad
8
1 x Achse
9
2 x Bein (kurz)
10
4 x Beinkappe
11
1 x Kohleschüssel
Verbindungselemente
Lieferumfang/Montage
M6x304xM5x304xM5x12
Montage
Montage vorbereiten
Nehmen Sie sich ausreichend Zeit für den Zusammenbau des Grills. Schaff en Sie
sich eine ebene Arbeitsfl äche von etwa zwei bis drei Quadratmetern. Entnehmen Sie
die Einzelteile der Verpackung und legen Sie die Teile in Griff nähe bereit.
Überprüfen Sie den Lieferumfang auf Vollständigkeit und evtl. Beschädigungen.
52
10x
M5
14x
M8
2x
Ø6
10x
Ø6
4x
Ø8
2x
FRG 45 A1
Page 55

Montage
Benötigtes Montagematerial
Zange
Kreuzschlitzschraubendreher
Maulschlüssel SW 8 mm / SW 13 mm
WARNUNG
Die Schraubenköpfe sollten zu Ihrer Sicherheit immer nach außen zeigen, ►
um Verletzungen zu vermeiden. Ziehen Sie erst nach Beendigung der Montage alle Schraubv
Materialspannungen.
erbindungen fest an, sonst kommt es zu unerwünschten
Schritt 1
ACHTUNG
11
5
müssen auf der Seite montiert werden, an der
5
+ 9) mit je 1 Schraube M6 x 30, einer
5
10
Die beiden langen Beine ►
sich die Doppellöcher in der Kohleschüssel 11 befi nden.
Montieren Sie die 4 Beine ( ♦
Unterlegscheibe Ø 6 und einer Beinkappe 10 an die Kohleschüssel 11.
DE
AT
CH
FRG 45 A1
9
53
Page 56

Montage
Schritt 2
ACHTUNG
Der Rand der Bodenablage ►
müssen so gedreht werden, dass die Einbuchtungen der Bohrungen nach
außen zeigen, um die Schraubenköpfe darin aufnehmen zu können.
Montieren Sie die Bodenablage ♦
Muttern M5 an die 4 Beine (5 + 9).
6
muss nach unten zeigen. Die Beine (5 + 9)
6
mithilfe von 4 Schrauben M5 x 30 und
DE
AT
CH
5
6
9
Schritt 3
Führen Sie die Achse ♦
Stecken Sie die Räder ♦
einer Unterlegscheibe Ø 8 und einer selbstsichernden Mutter M8.
Ziehen Sie die Muttern mit einem Maulschlüssel SW 13 mm an. Halten Sie ♦
ggf. die Achse
ein Tuch zwischen Zange und Achse 8.
8
durch die unteren Bohrungen der kurzen Beine 9.
7
auf die Achse 8 und sichern Sie diese mit jeweils
8
mit einer Zange fest. Legen Sie zum Schutz vor Kratzern
7
54
9
8
FRG 45 A1
Page 57

Montage
Schritt 4
Montieren Sie den Handgriff ♦
4 Unterlegscheiben Ø 6 und 4 Muttern M5 an der Kohleschüssel 11.
11
4
mithilfe von 4 Schrauben M5 x 12,
4
Schritt 5
Stecken Sie die beiden Windschutz-Bleche ♦ ineinander und schrauben Sie
sie mithilfe einer Schraube M5 x 12, einer Unterlegscheibe Ø 6 und einer
Mutter M5 zusammen. Nutzen Sie dabei den maximalen Abstand zwischen
den Blechen aus, damit das Grillrost zwischen den Schlitzen der WindschutzBleche passt.
DE
AT
CH
FRG 45 A1
55
Page 58

DE
AT
CH
Montage
Schritt 6
Schrauben Sie den montierten Windschutz ♦ mithilfe von 5 Schrauben M5 x 12,
5 Unterlegscheiben Ø 6 und 5 Muttern M5 an der Kohleschüssel 11 fest.
11
56
Schritt 7
Haken Sie die beiden Handgriff e am Grillrost ♦
3
ein.
3
FRG 45 A1
Page 59

Montage
Schritt 8
Hängen Sie den Grillrost ♦
Windschutz ein. Sie können nun die Handgriff e wieder vom Grillrost 3
lösen, damit diese beim Grillen nicht stören.
WARNUNG
Warnung vor Verbrennungen!
Die beiden seitlichen im Grillrost integrierten Bügel sind keine Griff e und
werden im Betrieb heiß!
Fassen Sie die Bügel nicht mit bloßen Händen an. Verwenden Sie zum ►
Einhängen oder zur Höhenverstellung des Grillrosts ausschließlich die
mitgelieferten Handgriff
3
an der gewünschten Stelle in den
e.
3
Schritt 9
Hängen Sie den Warmhalterost ♦
2
2
auf den Windschutz .
DE
AT
CH
FRG 45 A1
57
Page 60

DE
AT
CH
Inbetriebnahme/Reinigung und Pfl ege
Inbetriebnahme
HINWEIS
Vor dem ersten Gebrauch muss der Grill mindestens 30 Minuten ►
aufgeheizt werden.
WARNUNG
Warnung vor Verbrennungen!
VORSICHT! Zum Anzünden oder Wiederanzünden keinen Spiritus oder Benzin
verwenden! Nur Anzündhilfen entsprechend EN 1860-3 verwenden. Es kann
sonst durch Verpuff ungen zu unkontrollierbaren Hitzeentwicklungen kommen.
Schichten Sie einen Teil der Holzkohle in der Kohleschüssel auf. ■
Legen Sie ein bis zwei Feststoff anzünder auf die v
und zünden Sie die Feststoff anzünder mit einem Streichholz bzw. F
Lassen Sie die Feststoff anzünder 2 bis 4 Minuten brennen. Füllen Sie danach ■
die Kohleschüssel langsam mit Holzkohle auf.
Nach ca. 20 Minuten zeigt sich auf der Holzkohle eine w
Der optimale Glutzustand ist nun erreicht.
Verteilen Sie die Holzk
mäßig in der Kohleschüssel.
Hängen Sie den Grillrost ein und beginnen Sie mit dem Grillen. ■
orhandene Schicht Holzkohle
euerzeug an.
eiße Ascheschicht. ■
ohle, mit einem geeigneten Metallwerkzeug, gleich- ■
■
Reinigung und Pfl ege
WARNUNG
Warnung vor Verbrennungen!
Lassen Sie den Grill vor dem Reinigen oder Aufbewahren vollständig ►
abkühlen. Verwenden Sie niemals Wasser zum Löschen der Holzkohle.
Warnung vor Sac
Verwenden Sie keine Scheuer- oder aggressive Reinigungsmittel, da diese ►
die Oberfl äche angreifen können.
Für die normale Reinigung ver
handelsüblichen Spülmittel.
Bei stärkeren Verschmutzungen der emaillierten Teile, verwenden Sie einen
handelsüblichen Emaille Reiniger. Beachten Sie die Anweisungen des Herstellers
des anzuwendenden Reinigungsmittels. Reinigen Sie den Grillrost mit Spülmittel
und einem Haushaltsschwamm.
58
hschäden!
wenden Sie ein Spültuch und Wasser mit einem
FRG 45 A1
Page 61

Entsorgung/Technische Daten
Entsorgung
Entsorgen Sie den Brennstoff vorsichtig und umweltgerecht. Entsorgen Sie
den Restabfall grundsätzlich nur in dafür vorgesehene Gefäße aus Metall
bzw. nicht brennbaren Materialien.
Entsorgen Sie den Grill über einen zugelassenen Entsorgungsbetrieb oder über
Ihre kommunale Entsorgungseinrichtung. Beachten Sie die geltenden Vorschriften.
Setzen Sie sich im Zweifelsfall mit Ihrer Entsorgungseinrichtung in Verbindung.
Führen Sie alle Verpackungsmaterialien einer umweltgerechten Entsorgung zu.
Technische Daten
Maße (montiert) ca. 82 x 52 x 69 cm
Grillrost Ø 47 cm
Gewicht ca. 6 kg
Brennstoff Holzkohle
Fassungsvermögen Kohleschüssel max. 2 kg
DE
AT
CH
FRG 45 A1
59
Page 62

DE
AT
CH
Anhang
Garantie
Sie erhalten auf dieses Gerät 3 Jahre Garantie ab Kaufdatum. Das Gerät wurde
sorgfältig produziert und vor Anlieferung gewissenhaft geprüft.
Bitte bewahren Sie den Kassenbon als Nachweis für den Kauf auf. Bitte setzen
Sie sich im Garantiefall mit Ihrer Servicestelle telefonisch in Verbindung. Nur so
kann eine kostenlose Einsendung Ihrer Ware gewährleistet werden.
HINWEIS
Das Produkt ist lediglich für den privaten und nicht für den gewerblichen
Gebrauch bestimmt. Bei missbräuchlicher und unsachgemäßer Behandlung,
Gewaltanwendung und bei Eingriff en, die nicht von unserer autorisierten ServiceNiederlassung vorgenommen wurden, erlischt die Garantie.
Ihre gesetzlichen Rechte werden durch diese Garantie nicht eingeschränkt.
Die Garantiezeit wird durch die Gewährleistung nicht verlängert. Dies gilt auch
für ersetzte und reparierte Teile.
Eventuell schon beim Kauf vorhandene Schäden und Mängel müssen sofort nach
dem Auspacken gemeldet werden, spätestens aber zwei Tage nach Kaufdatum.
Nach Ablauf der Garantiezeit anfallende Reparaturen sind kostenpfl ichtig.
Service
Service Deutschland
Tel.: 01805 772 033 (0,14 EUR/Min. aus dem dt. Festnetz,
Mobilfunk max. 0,42 EUR/Min.)
E-Mail: kompernass@lidl.de
IAN 71245
Service Österreich
Tel.: 0820 201 222 (0,15 EUR/Min.)
E-Mail: kompernass@lidl.at
IAN 71245
Service Schweiz
Tel.: 0842 665566 (0,08 CHF/Min., Mobilfunk max. 0,40 CHF/Min.)
E-Mail: kompernass@lidl.ch
IAN 71245
Importeur
KOMPERNASS GMBH
BURGSTRASSE 21
D-44867 BOCHUM
www.kompernass.com
Anhang
Die Garantieleistung gilt nur für Material- oder Fabrikationsfehler, nicht ►
aber für Transportschäden, Verschleißteile oder für Beschädigungen an
echlichen Teilen, z. B. Schalter.
zerbr
60
FRG 45 A1
 Loading...