

Page 1

FY WG2 3 Axis Wearable Gimbal
and cameras with similar dimensions
GuiLin FeiYu Technology Incorporated Company
V 1.0ENInstruct ion Manual
Page 2
!
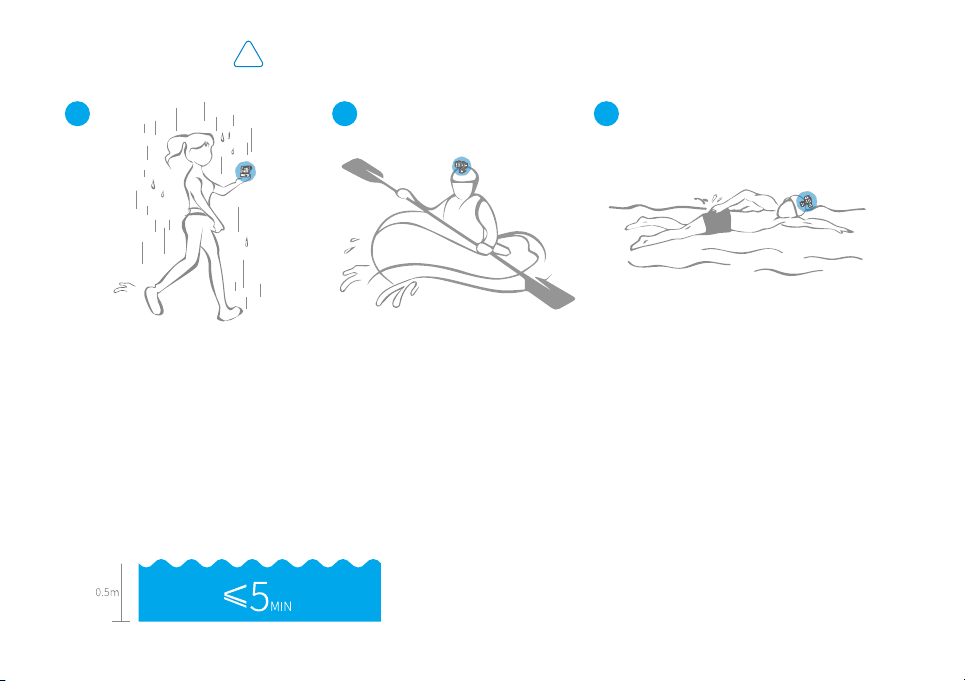
Usage Scenario Demonstration
Rainy
21
Drift Swimming
3
Guidelines For Usage
WG2 has precision machinery transmission mechanism, water proof design can completely use in raining and water
splash scene, it can be used in the water under certain conditions, please follow the requirements below when use in
the water, otherwise, there are risks of damage.
1.Please ensure the usb plug has been covered before
using underwater, dry it and place in a ventilated place
to dry before charging.
2. When use under water, depth of water should be less
than 0.5m, and time of continuous use less than 5mins.
1
3. Used in sea water environment at risk of damage
that is not recommended.
4.When it is splashed by sea water, please wash it with
fresh water immediately, and soak it in fresh water for
3mins, otherwise, the rotation of gimbal will be blocked
by the salt crystals after the sea water dried.
※It is normal phenomenon if there is a small amount of liquid
flow from gimbal or the gimbal is smelly, the liquid is waterproof
paint, a few pungent smells.
Page 3
User Guide
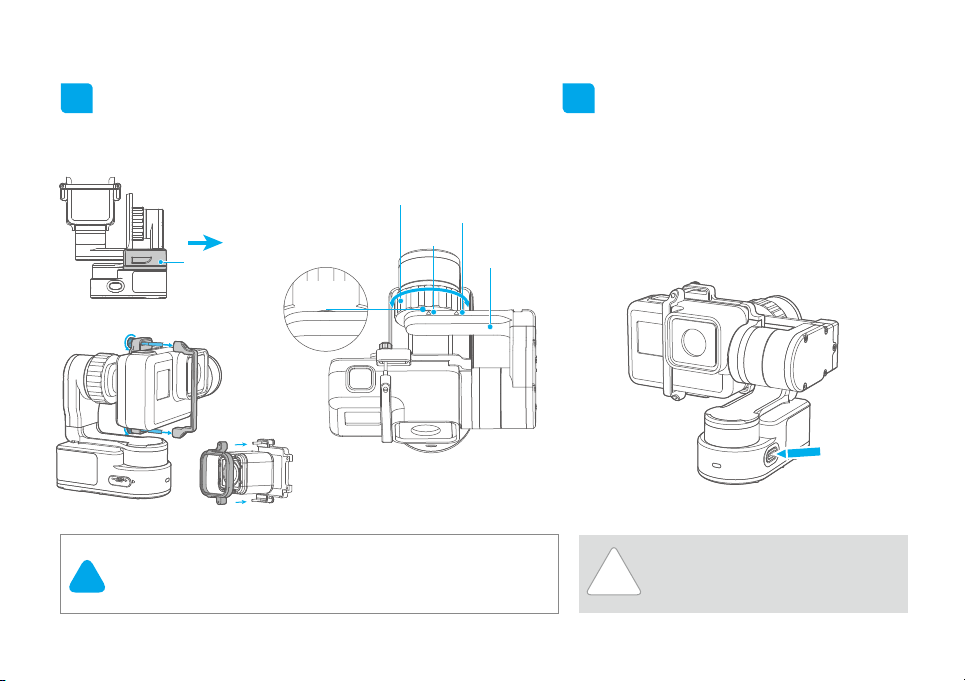
1
Install the Camera
Remove fixed block,install the camera on retainer plate,
then fix the camera with retainer bar and screws.
Knob ring
Hero4
Attention!
!
Hero5
Fixed block
Reference
point
Loosen the knob ring and adjust
the arm length to fit the different
Session
(1) Please install the camera before powering
on the gimbal.
(2 )When not in use, turn off the gimbal and then
remove the camera.
cameras.
Cross
arm
2
Power on / off
Attention: Make sure the camera is secure
before powering on the gimbal.
Power On: Press and hold function button
until the green light is on.
Power Off: Press and hold function button
until the red light changes from quick
flashing to always on.
In case of low battery, the red LED
indicator flashes for three times for
!
every 5 seconds.Please charge WG2.
2
Page 4
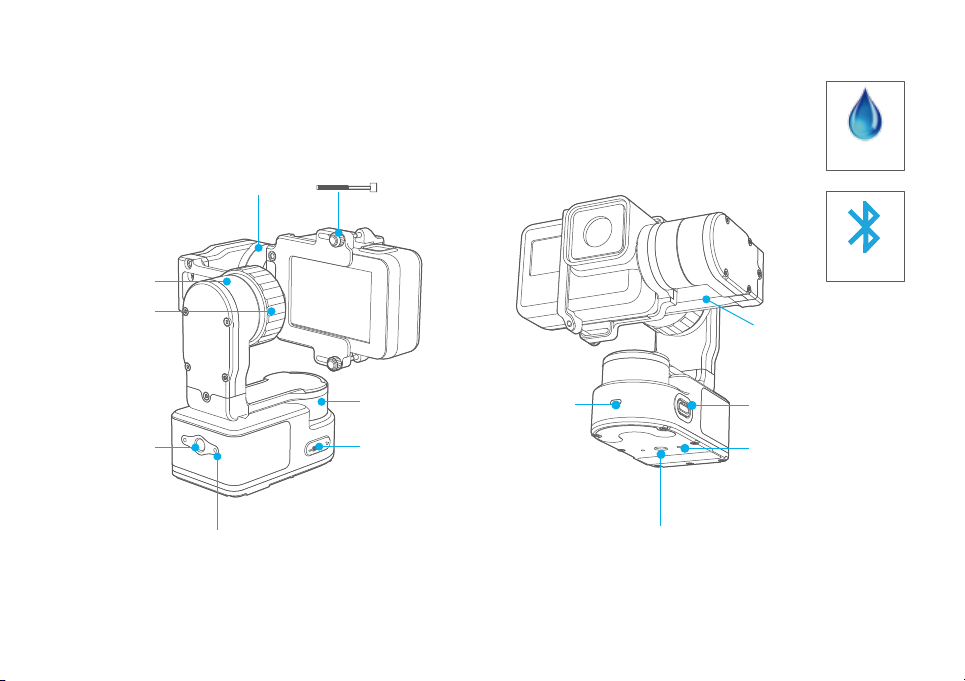
Product Overview
* The showing sports camera is only for reference
Knob ring
Rolling axis
1/4 inch
screw hole
3
Tilting axis
Screw hole
Thumb screw
Panning axis
USB port
Indicator
status
Waterproof
Bluetooth
Cross arm
Function button
T-Clamp
screw Hole
1/4 inch
screw hole
Page 5
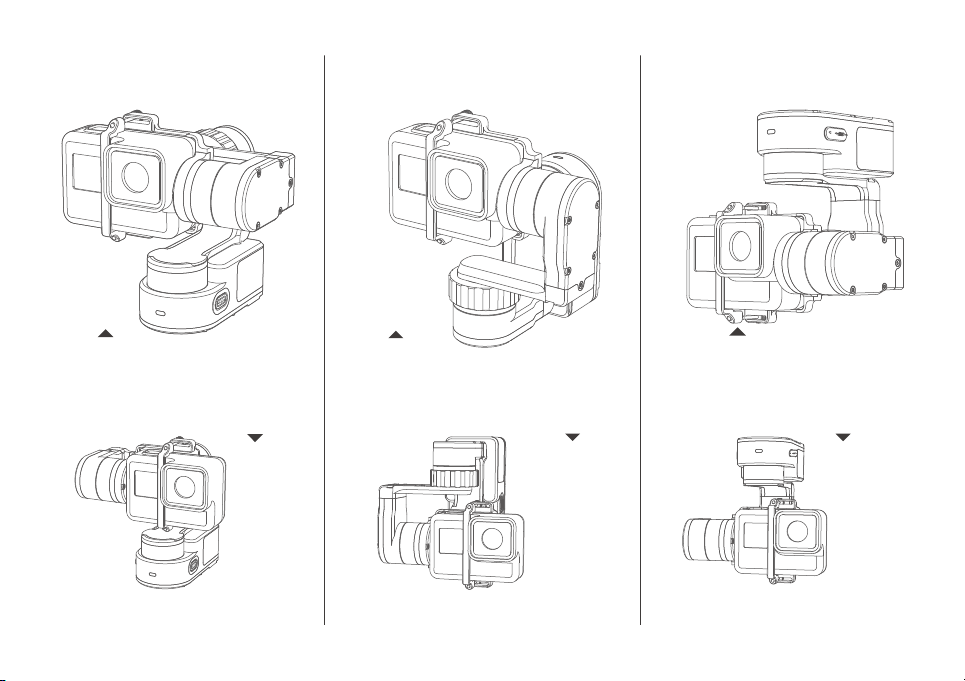
Vertical
Forward
Inverted
Camera in left
Camera in right
Camera in left Camera in left
Camera in right
Camera in right
4
Page 6

App download and connect
1
Download App
Download "Feiyu ON" and install it.
(1) iOS version:
Feiyu ON
(2) Android version:
*Please scan the two-dimensional code via the browser.
Feiyu ON
App Store
2
Connecting App
Feiyu ON
GuiLin FeiYu Technology Incorporated Company
Download
Google play
Feiyu ON
GuiLin FeiYu Technology Incorporated Company
Download
Start the App on your smartphone,follow the instructions to connect the smartphone with gimbal
via bluetooth.
WG 2
WG 2
Connect
WG 2
FY_WG 2_XX
Choose a gimbal
FY_XXX_XX
FY_XXX_XX
FY_XXX_XX
Connect
5
?
?
×
360°
Page 7

Mode /Function
Panning Mode
Tilting and rolling direction
are fixed, and the cameralens
moves according to the hand
Lock Mode
The orientation of the
camera is fixed.
movement of the user.
Panning and Tilting Mode
The rolling direction is fixed,
and the camera lens moves
according to the hand
Reset
Reset the tilting axis of the
gimbal to initial orientation
and initialmode.
movement of the user.
Mode /Function Operation Instructions
Function Button
Single tap
Double tap
Triple tap
Quadruple tap
Fifth tap Single tap again to awake the gimbal, or triple tap to initialize the gimbalInitialization
Mode /Function
Panning Mode / Lock Mode
Panning and tilting mode
Rotate 180°in horizontal Make the camera lens rotate 180 °
Autorotation Mode
Indicator Status
Blue light flashes once
Blue light flashes twice
Blue light keeps flashing
Red light keeps flashing Turning off
Explanation
Single tap to switch between panning mode and lock mode
When in panning and tilting mode, press once to switch to lock mode
Quadruple tap to enter autototation mode
Mode / Status
Panning
Panning and tilting mode
Lock mode / Initializing Blue light on steadily
Initialization failure /
Malfunction
Low battery Red light flashes three times
6
Page 8

Autorotation Mode
Four times clicks on function button, gimbal will access the autorotation mode setting. Manually turn the
gimbal to an initial position, then click again on function button for recording it.Manually turn the gimbal
to end position, then click the functionbutton again for recording it. Gimbal will turn to the initial position
and begin autorotation.
Tilting
2. Turn the panning axis
and tilting axis to the
position ① and hold for
half a second.Click on
function button,
record the position ①.
Tilting
1.Four times clicks on
function button, gimbal
will access the autorotation
mode setting.
Panning
7
Panning
3 .Turn the panning axis
and tilting axis to the
position ② and hold for
half a second .Lick on the
function button again,
record the position ②.
4.Gimbal will recover to
position ① automatically.
Tilting axis and panning
axis turn to position ②
at constant speed.The gimbal
is automatically reset after
the end.
Page 9

Combined use of gimbal autorotation function and
motion camera time-lapse photography function will
make the camera achieve the excellent effect of
time-lapse photography.Theoretical time and gimbal
autorotation speed adaptation effect is better,
Feiyu ON APP can set the autorotation speed.
Annexed parameter table:
Gimbal speed setting and theory time adaptation reference
table.
Manual Lock
Manual lock ,pull to the specified angle to stay half
a second can be lock the current angle.(The tilting
axis and panning axis in the lock mode can be
manual lock and the tilting axis can be manual lock
in the panning mode.)Take the tilting axis as an
example:
1
WG2 speed setting
1
2
3
4 (default)
5
6
7
8
9
10
11
12
WG2 theory time
8 hours / turn
4 hours / turn
2 hours / turn
1 hours / turn (default)
30 minutes / turn
15 minutes / turn
8 minutes / turn
4 minutes / turn
2 minutes / turn
1 minutes / turn
30 seconds / turn
15 seconds / turn
Hold the camera and change its angle in tilting axis
direction.
2
Keep this position for half second, the current angle
will be locked manually.
8
Page 10

Firmware Upgrade
Option 1: connect the gimbal with PC via micro USB cable, and then upgrade the firmware.
(1)
Please visit the official website www.feiyu-tech.com to download the relevant software for upgrading,
including USB driver,firmware upgrade software and product firmware, and install the relevant software,
decompress the firmware files .
Charging
*Please make sure
(equipped by user)
5V
USB cable
Charge with micro USB cable.
Upgrade........
PC
(2)
Option 2: connect the gimbal with smartphone via bluetooth, and then upgrade the firmware.
the battery is fully
charged before you
use the gimbal for
the first time.
Firmware
Upgrade
The current used version 1.7.2,
new firmware is available,
do you want to upgrade?
Later Download
and install it.
Feiyu ON
9
Firmware upgrade
new firmware is available,
do you want to upgrade?
×
Yes
No
Page 11

Gimbal initialization
You can initialize your gimbal:
(1) when camera is not level
(2) if not used for a long period of time
(3) in case of extreme temperature variations
Adjusting steps:
2
Still placed on the
desktop, gimbal is
automatically
initialized.
1
Five batter function button,
the motor is turned off.
3
After the initialization
is successful, the motor
will turn on automatically.
The gimbal is automatically
reset after the end.
Note: If the initialization is not successful for a long time, long press
the function button to turn off the gimbal,restart it and then initialize.
10
Page 12

Parameters
61.1~78.1mm
102.5mm
89.3mm
Titling Angle
360°
Rolling Angle 70°
Panning Angle
Titling Increments
360°
min 1.5°/s max 150°/s
Panning Increments min 1.5°/s max 270°/s
Weight 265 g (Not including camera)
Usage time 2.5 Hours
Adaption Weight 130 g
11
40mm
Page 13

D ISCLAIME R
Prohibit any user for any illegal purpose. Users will be responsible for all behaviors of
purchase and use products.
The Company assumes no liability for any risks related to or resulting from the debug
and use of this product (including the direct, indirect or third-party losses).
For any unknown sources of using, we will not be at any services.
The updating and changes of product firmware and program may cause changes in
function descriptions in this user manual, please read the instructions carefully before
upgrading the firmware and use the corresponding user manual.
You can get the latest user manual from the official website: www.feiyu-tech.com
FeiyuTech reserves the right to amend this manual and the terms and conditions of
use the product at any time.
Please correctly assemble the gimbal in accordance with the diagram
Attention
Please install the camera before powering on the gimbal
When the gimbal is not in use or placed on the table, please ensure it
is powered off
12
Page 14

 Loading...