


Quick Start Guide
© 2007 Sanford, L.P. All rights reserved.
DYMO and LabelWriter are registered trademarks of Sanford, L.P. All other trademarks are the property of their respective holders.
Quick Start Guide
Follow these steps to install the LabelWriter printer and print your first label.
1. Unpacking your LabelWriter Printer
NOTE Do not plug the printer into your computer until asked to do so during the software installation.
1 Unpack your printer and save the packing materials.
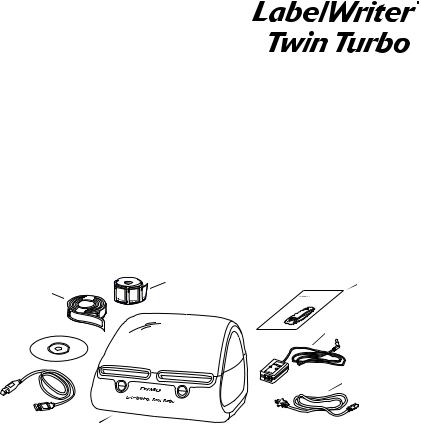
2Make sure you have all the items shown in Figure 1. (Labels included in the package may vary.)
Roll of |
Roll of |
Quick Start Guide |
address labels |
DYMO Stamps labels |
|
|
|
LabelWriter |
|
|
Quick Start |
CD-ROM |
|
Power adapter |
|
|
|
USB cable |
|
|
|
|
Power cable |
LabelWriter printer |
|
|
Figure 1
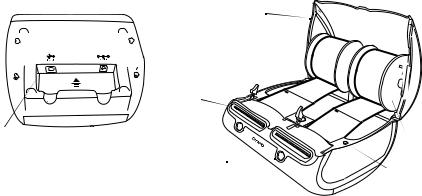
Become familiar with the printer’s major components. See Figure 2.
Top
cover
Label roll
Platen release
Label feed path and tear bar
|
|
DC power |
USB |
Cable |
connector |
connector |
channels |
|
Form-feed  button and LED
Figure 2
Label spool
Label eject button
LabelWriter Printer Features
Your LabelWriter printer is a direct thermal printer and does not use ink or toner. Instead, the printer uses heat from a thermal print head to print on specially treated labels. Labels are the only supplies you will ever need to buy.
The form-feed button on the front of the printer advances a single label. The label eject button is used to remove labels from the printer when changing rolls.
The LED status light visually shows the current state of the printer:
•Solid blue - power is on and the printer is ready.
•Flashing blue - labels are not loaded properly or label spool is empty.
2

2. Installing the Software
NOTE Do not connect the printer to your computer until instructed to do so during the software installation.
To install the software on a Windows system
1Insert the LabelWriter CD into your CD-ROM drive. After a few seconds, the installation screen appears.
If the installation screen does not appear:
a.Click Start, then Run on the Windows taskbar. The Run dialog box appears.
b.Enter D:\install.exe (where D is the letter assigned to the CD-ROM drive) and click OK.
2 Click Install and follow the instructions in the installer.
To install the software on a Mac OS system
1Insert the DYMO LabelWriter CD into the CD-ROM drive.
After a few seconds, the DYMO Label Software Installer icon appears. See Figure 3.
DYMO Label
Figure 3
2Double-click the Installer icon and follow the instructions.
If you do not see your printer in the printer list when the installation is complete, refer to the ReadMe file for instructions on how to add the printer.
3
 Loading...