Dymo LM 150 User Manual

LM150 WEUdef.qxd 23-09-2003 16:07 Pagina 1


 150
150
Electronic
Labelmaker
User Guide
Page 3
Etiqueteuse
Electronique
Guide D‘Utilisation
Page 11
Elektronische
Labelmaker
Gebruikershandleiding
Pagina 21
Elektronisches |
D |
Beschriftungsgerät |
Seite 29 |
Bedienungsanleitung |
|
www.dymo.com

LM150 WEUdef.qxd 23-09-2003 16:07 Pagina 2
On/Off
Style Key
Frame/Align Key
Font/Fixed
Length Key
Extra Key
Numeric Keys
Alpha Keys
CAPS Key
DC Power Connector |
Tape Exit |
LCD Display |
Cutter Button
Print Key
Arrow Keys with OK Key
Cancel Key
Backspace/
New Label Key
Return/OK Key
Symbols Key


 150
150
Space Bar
Shift Keys
Figure 1 LabelMANAGER 150 Electronic Labelmaker

LM150 WEUdef.qxd 23-09-2003 16:07 Pagina 3
About Your LabelMANAGER 150
Electronic Labelmaker
The LabelMANAGER 150 electronic labelmaker allows you to create a wide variety of high-quality, self-adhesive labels. You can choose to print your labels in many different sizes and styles. The labelmaker uses D1 tape cassettes in widths of 1/4” (6 mm), 3/8” (9 mm), or 1/2” (12 mm). These tape cassettes are available in a wide range of colors.
Visit www.dymo.com for information on obtaining tapes and accessories for your labelmaker.
Warranty Registration
Please complete the warranty registration card and return it to the appropriate customer service address within seven days. See the Warranty booklet for details.
Getting Started
Follow the instructions in this section to get started printing your first label.
Inserting the Batteries
The labelmaker uses five AA batteries.
To insert the batteries
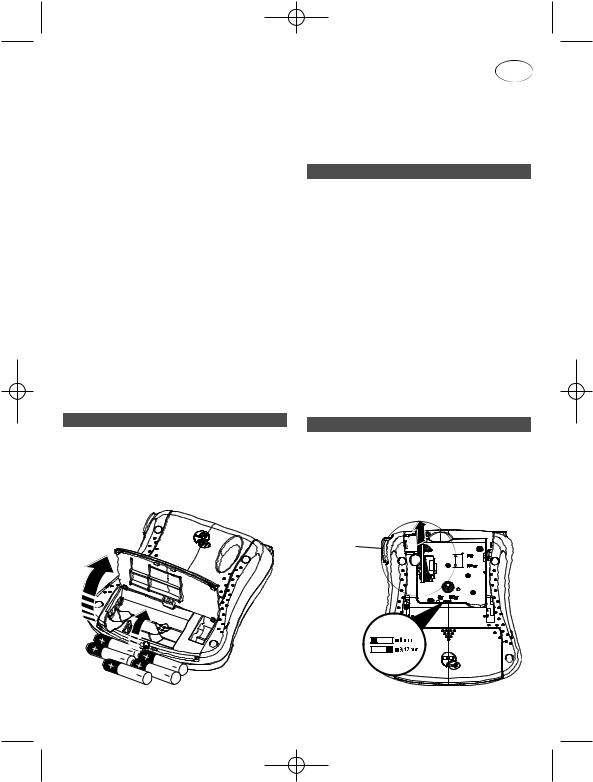
1.Press the thumb catch to open the battery compartment door. See Figure 2.
GB
3. Close the compartment door.
 Remove the batteries if the
not be used for a long period of time.
Connecting the Power Adapter
Connecting the power adapter to the labelmaker disconnects power from the batteries.
To connect the power adapter
1.Plug the power adapter into the connector on the top, left side of the labelmaker.
2.Plug the other end of the power
a power outlet.
 Make sure you disconnect the from the power adapter before you adapter from the main power source. Otherwise, the most recent memory will be lost.
Inserting the Tape Cassette
To insert the tape cassette
1.Press the thumb catch to open the cassette door.
 Remove the protective cardboard from between the print head and roller. Figure 3.
Remove |
Cardboard |
Cassette
Switch
Figure 2 |
Figure 3 |
3
 Loading...