


|
|
Stamper |
|
|
|
Date/Time |
|
LOCK |
|
|
|
|
|
GE |
|
|
|
ESSA |
|
|
|
E M |
|
|
E TIM |
|
|
|
DAT |
|
|
SHIFT |
|
FILE |
|
|
|
SELECT |
|
|
|
SET/ |
|
|
SECURITY |
EDIT |
|
|
|
|
|
ALARM |
CODE |
|
|
|
|
|
|
MODE |
|
|
|
DYMO
Tel: 800.426.7827 or 203.355.9000
Fax: 203.355.9090
www.dymo.com
DYMO, AN ESSELTE BRAND
©2000 DYMO Corporation.
DYMO is a registered trademark of the Esselte Corporation. Part 47000-003 04.00
Electronic
Date/Time Stamper
User Guide
IMPORTANT!
Please read ALL instructions carefully before operating.
Your DYMO Electronic Date/Time Stamper will save you time and increase your productivity. Here are just some of its advanced features:
•Automatically prints Date and/or Time.
•Prints 7 preprogrammed messages and 4 or 6 digit auto-numbering.
•LCD displays message, date, and time.

Usage Tips
To maintain your stamper at peak operating performance, please follow these guidelines:
1.Do not touch the printer head or belt when the unit is printing. This will cause the printer to malfunction and require servicing.
2.Immediately replace LCD display cell-battery if the BATT indicator lights up on the LCD.
3.If printer speed slows down, replace all 4 AA batteries. Operating the unit with low batteries will damage the printer.
4.Always cover the battery compartment before printing.
5.Keep unit away from moisture
6.Avoid placing unit in direct sunlight.
16
Table of Contents
Getting Started |
6 |
Setting Date & Time |
7 |
Stamping/Printing Options |
8 |
Selecting which fields to print |
9 |
Auto-numbering |
10 |
How to lock Auto-numbering |
11 |
Alarm Function |
11 |
Setting The Alarm |
11 |
Deactivating the Alarm |
12 |
Using the Security Code |
12 |
Setting the Security Code |
12 |
Disabling the Security Code |
13 |
Maintenance and Troubleshooting |
13 |
How to refill the ink roll |
13 |
Printer Error/Reset |
14 |
Low Cell-Battery Detection |
15 |
Usage Tips |
16 |
5
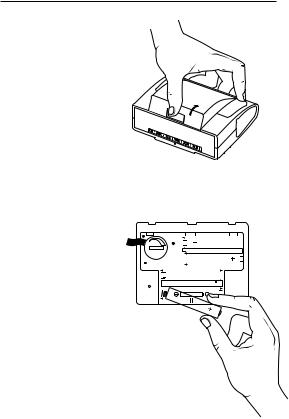
Getting Started
1.Open the
battery compartment as shown.
(figure 2)
shuttle to return to |
the start |
position. |
|
4. The unit is now ready for use. |
|
If the unit does not reset, verify that the print belt shuttle(bottom of unit) is not jammed and slides freely across belt (use ball point pen). Repeat steps 1-4 above.
MADE
CHINA IN
figure 2
Low Cell Battery Detection
2. To activate printing |
|
|
|
|
|
|
|
|
|
|
|
|
Your DYMO Electronic Date/Time Stamper |
|
|
|
|
|
|
|
|
|
|
|
|
automatically checks itself every hour to detect a low |
|
functions, insert |
|
|
|
|
|
|
|
|
|
|
|
|
display battery (3-volt Lithium battery). If display |
4 AA batteries. (figure 3) |
|
|
|
|
|
|
|
|
|
|
battery level is low BATT will turn on in the LCD. |
||
3. To activate the |
|
|
|
|
|
|
|
|
|
|
|
|
|
|
|
INT |
|
|
|
|
|
|
|
|
|
||
OPEN |
•PR R• |
|
|
|
|
|
|
|
|
IMPORTANT! If the BATT indicator appears, |
|||
LCD display, open |
3.0 VOLT |
E SET |
|
|
|
|
|
|
|
|
|||
|
|
|
|
|
|
|
|
|
|
||||
the lithium cell |
|
|
|
|
|
|
|
|
|
|
|
|
replace the 3-volt lithium cell battery |
|
|
|
|
|
|
|
|
|
|
|
|
||
battery door by |
|
|
|
|
|
|
|
|
|
|
MADE IN |
figure 3 |
immediately. |
|
|
|
|
|
|
|
|
|
|
||||
|
|
|
|
|
|
|
|
|
|
||||
|
|
|
|
|
|
|
|
|
|
CHINA |
|
||
using a small coin |
|
|
|
|
"AA" UM-3 |
1. |
|
|
|
|
|||
|
|
|
|
|
|
|
|
|
|
|
|
DO NOT OPERATE UNIT ON LOW BATTERY |
|
(see figure 3) and |
|
|
|
|
|
|
|
|
|
|
|
|
|
discard the red safety ribbon. |
|
|
|
|
|
FOR PROLONGED PERIODS, THIS MAY |
|||||||
Make sure the battery’s positive |
|
|
|
|
|
CAUSE DAMAGE TO YOUR UNIT. |
|||||||
(+) sign is facing up and close the |
|
|
|||||||||||
battery door using a small coin |
|
|
|
|
|
|
|||||||
twisting it in a clockwise direction |
|
|
|||||||||||
the LCD is flashing P-RESET, use |
|
|
|||||||||||
ballpoint pen to reset the unit (figure 4). |
|
|
|||||||||||
6 |
|
|
|
|
|
|
|
|
|
|
|
|
15 |
 Loading...