


 Loading...
LabelManager 220P
The easy-to-use label maker with PDA-style keyboard
User Guide
www.dymo.com
itled-2 1 |
8/20/2007 4:23:19 PM |
Contents |
|
About Your New Label Maker ....................................................... |
5 |
Product Registration.............................................................................. |
5 |
Getting Started ........................................................................... |
5 |
Connecting the Power ............................................................................... |
5 |
Inserting the Batteries........................................................................... |
5 |
Connecting the Optional Power Adapter ............................................... |
6 |
Inserting the Tape Cassette ....................................................................... |
6 |
Using the Label Maker for the First Time ....................................... |
7 |
Getting to Know the Label Maker ................................................. |
7 |
Power ........................................................................................................ |
7 |
LCD Display ................................................................................................ |
8 |
Format ...................................................................................................... |
8 |
Insert ......................................................................................................... |
8 |
Settings ..................................................................................................... |
8 |
CAPS Mode ................................................................................................ |
8 |
Num Lock .................................................................................................. |
9 |
Backspace .................................................................................................. |
9 |
Clear .......................................................................................................... |
9 |
Navigation Keys ........................................................................................ |
9 |
Cancel ....................................................................................................... |
9 |
Formatting Your Label ................................................................. |
9 |
Changing the Font Size ............................................................................. |
9 |
Adding Font Styles .................................................................................. |
10 |
Adding Borders and Underline Styles ...................................................... |
10 |
Creating Two-Line Labels ........................................................................ |
11 |
2
Aligning the Text .................................................................................... |
11 |
Using Mirror Text .................................................................................... |
11 |
Using Symbols and Special Characters ......................................... |
12 |
Adding Symbols ...................................................................................... |
12 |
Adding Punctuation ................................................................................ |
13 |
Using the Currency Key ........................................................................... |
13 |
Adding International Characters ............................................................. |
13 |
Printing Options ........................................................................ |
13 |
Previewing Your Label ............................................................................ |
13 |
Printing Multiple Labels ......................................................................... |
14 |
Creating Fixed-Length Labels ................................................................. |
14 |
Adjusting the Print Contrast ................................................................... |
14 |
Using the Label Maker Memory .................................................. |
15 |
Saving a Label ........................................................................................ |
15 |
Opening Saved Labels ............................................................................. |
15 |
Inserting Saved Text ............................................................................... |
15 |
Caring for Your Label Maker ....................................................... |
16 |
Troubleshooting ........................................................................ |
17 |
Documentation Feedback .......................................................... |
18 |
Environmental Information ....................................................... |
19 |
3

18
17
16
15
14
13
19 |
20 |
21 |
22 |
23 |
24 |
1
2
3
4
5
6
7
8
Caps |
Accent |
12 11 10 9
Figure 1 DYMO® LabelManager® 220P Electronic Label Maker
1 |
Tape cutter |
9 |
Accented character |
17 |
Format |
2 |
10 |
Punctuation |
18 |
On/Off |
|
3 |
Preview |
11 |
Space bar |
19 |
AC power connector |
4 |
Settings |
12 |
Caps |
20 |
Clear |
5 |
OK |
13 |
Insert |
21 |
Navigation |
6 |
Backspace |
14 |
Number Lock |
22 |
LCD Display |
7 |
Currency |
15 |
Cancel |
23 |
Save |
8 |
Return |
16 |
Recall |
24 |
Tape exit |
4
About Your New Label Maker
With the DYMO® LabelManager® 220P electronic label maker, you can create a wide variety of high-quality, self-adhesive labels. You can choose to print your labels in many different font sizes and styles. The label maker uses DYMO D1 tape cassettes in widths of 1/4”(6 mm), 3/8” (9 mm), or 1/2” (12 mm). These tape cassettes are available in a wide range of colors.
Visit www.dymo.com for information on obtaining labels and accessories for your label maker.
Product Registration
Visit www.dymo.com/registration to register your label maker online.
Getting Started
Follow the instructions in this section to print your first label.
Connecting the Power
The label maker is powered by standard batteries or an AC power adapter. To save power, the label maker automatically turns off after two minutes of inactivity.
Inserting the Batteries
The label maker uses six high-capacity AA alkaline batteries.
5
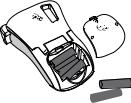
To insert the batteries
1. Slide the battery compartment cover away from the label maker. See Figure 2.
2. Insert the batteries following the polarity markings (+ and –).
3. Replace the cover.  ÇRemove the batteries if the label maker Figure 2
will not be used for a long period of time.
Connecting the Optional Power Adapter
An optional 9 Volt, 1.5 A power adapter can also be used to power the label maker. Connecting the AC adapter to the label maker disconnects the batteries as a power source.
To connect the power adapter
1.Plug the power adapter into the power connector on the top, left side of the label maker.
2.Plug the other end of the power adapter into a power outlet.
ÇMake sure the label maker power is turned off before you disconnect the power adapter from the main power source. Otherwise, your most recent memory settings will be lost.
6
Inserting the Tape Cassette
Your label maker comes with one tape cassette. Visit www.dymo.com for information about purchasing additional tape cassettes.
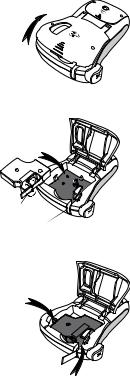
To insert the tape cassette
1.Lift the tape cassette cover to open the tape compartment. See Figure 3.
ÇBefore using the label maker for the first time, remove the protective cardboard insert from the tape exit slot. See Figure 4.
2. Insert the cassette with the label facing up and positioned between the guideposts.
3.Press firmly until cassette clicks into place. See Figure 5.
4.Close the tape cassette cover.
Using the Label Maker for the First Time
The first time you turn on the power, you are asked to select the language. This selection will remain set until you change it, or until the label maker is reset. You can change this selection using the  key.
key.
Figure 3
Figure 4
Click!
Figure 5
7

To set up the label maker
1.Press  to turn on the power.
2.Select the language and press }.
By default, the language is set to English. The language option you choose determines the character set that is available.
3.Select the width of the tape cassette currently in the label maker and press
}.
You are now ready to print your first label.
To print a label
1.Enter text to create a simple label.
2.Press 
 .
.
3.Select the number of copies.
4.Press }to print.
5.Press the cutter button to cut the label.
Congratulations! You printed your first label. Continue reading to learn more about the options available for creating labels.
Getting to Know the Label Maker
Become familiar with the location of the feature and function keys on your label maker. Refer to Figure 1. The following sections describe each feature in detail.
Power
The  button turns the power on and off. After two minutes of no activity, the power is switched off automatically. The last label created is remembered and displayed when the power is turned back on. The previously selected style settings are also restored.
8
Loading...