


WRAP FLAG 1 FLAG 2 FIXED TBLOCK VERT
CAPS BFONT STYLE BOX ULINE BCODE
CLEAR VERT |
BOX/UL CARD ID |
ALIGN |
ERASE |
BCODE |
LANG |
SAVE |
|
|
SAVE |
GRAPHIC |
|
 219
219
Industrial
Labelprinter
Instructions for Use
www.dymo.com

2
WRAP FLAG 1 FLAG 2 FIXED TBLOCK VERT
CAPS BFONT STYLE BOX ULINE BCODE
CLEAR VERT |
BOX/UL CARD ID |
ALIGN |
ERASE |
BCODE |
LANG |
SAVE |
|
|
SAVE |
GRAPHIC |
|
 219
219
Contents part I : Printer Manual |
|
Introduction . . . . . . . . . . . . . . . . . . . . . . . . . . . . . . . . . . . . . . . . . . . . . . . . . . . . . |
3 |
Getting Started . . . . . . . . . . . . . . . . . . . . . . . . . . . . . . . . . . . . . . . . . . . . . . . . . . . . . |
3 |
1. Unpacking your ILP219 kit . . . . . . . . . . . . . . . . . . . . . . . . . . . . . . . . . . . . |
3 |
2. Power Supply . . . . . . . . . . . . . . . . . . . . . . . . . . . . . . . . . . . . . . . . . . . . . . |
3 |
3. Installing/Changing the cassette . . . . . . . . . . . . . . . . . . . . . . . . . . . . . . . |
4 |
4. Printing your first label . . . . . . . . . . . . . . . . . . . . . . . . . . . . . . . . . . . . . . . |
4 |
Getting to know your printer . . . . . . . . . . . . . . . . . . . . . . . . . . . . . . . . . . . . . . . . . . . . |
5 |
Display . . . . . . . . . . . . . . . . . . . . . . . . . . . . . . . . . . . . . . . . . . . . . . . . . . . . . |
5 |
Backlighting . . . . . . . . . . . . . . . . . . . . . . . . . . . . . . . . . . . . . . . . . . . . . . . . . . |
5 |
Typing text and symbols . . . . . . . . . . . . . . . . . . . . . . . . . . . . . . . . . . . . . . . . |
5 |
CAPITALS . . . . . . . . . . . . . . . . . . . . . . . . . . . . . . . . . . . . . . . . . . . . . |
5 |
SPACE . . . . . . . . . . . . . . . . . . . . . . . . . . . . . . . . . . . . . . . . . . . . . . . |
5 |
USING THE SHIFT KEY . . . . . . . . . . . . . . . . . . . . . . . . . . . . . . . . . . |
5 |
BACKSPACE . . . . . . . . . . . . . . . . . . . . . . . . . . . . . . . . . . . . . . . . . . . |
5 |
ERASE . . . . . . . . . . . . . . . . . . . . . . . . . . . . . . . . . . . . . . . . . . . . . . . |
5 |
ESCAPE . . . . . . . . . . . . . . . . . . . . . . . . . . . . . . . . . . . . . . . . . . . . . . |
5 |
NAVIGATION KEY . . . . . . . . . . . . . . . . . . . . . . . . . . . . . . . . . . . . . . . |
6 |
INTERNATIONAL CHARACTERS AND SYMBOLS . . . . . . . . . . . . . . . |
6 |
Formatting your label . . . . . . . . . . . . . . . . . . . . . . . . . . . . . . . . . . . . . . . . . . . . . . . . . |
7 |
TEXT SIZE . . . . . . . . . . . . . . . . . . . . . . . . . . . . . . . . . . . . . . . . . . . . . . . . . . . |
7 |
TEXT STYLE . . . . . . . . . . . . . . . . . . . . . . . . . . . . . . . . . . . . . . . . . . . . . . . . . . |
7 |
VERTICAL TEXT . . . . . . . . . . . . . . . . . . . . . . . . . . . . . . . . . . . . . . . . . . . . . . . |
7 |
UNDERLINING AND BOXED TEXT . . . . . . . . . . . . . . . . . . . . . . . . . . . . . . . . . |
7 |
MULTIPLE LINES . . . . . . . . . . . . . . . . . . . . . . . . . . . . . . . . . . . . . . . . . . . . . . |
8 |
JUSTIFYING TEXT IN MULTI-LINE LABELS . . . . . . . . . . . . . . . . . . . . . . . . . . |
8 |
ALIGNING TEXT ON A LABEL . . . . . . . . . . . . . . . . . . . . . . . . . . . . . . . . . . . . . |
8 |
PRODUCING A BAR CODE . . . . . . . . . . . . . . . . . . . . . . . . . . . . . . . . . . . . . . . |
9 |
PAGE BREAK . . . . . . . . . . . . . . . . . . . . . . . . . . . . . . . . . . . . . . . . . . . . . . . . . |
10 |
Printing modes . . . . . . . . . . . . . . . . . . . . . . . . . . . . . . . . . . . . . . . . . . . . . . . . . . . . . |
11 |
WRAP-AROUND LABELS . . . . . . . . . . . . . . . . . . . . . . . . . . . . . . . . . . . . . . . . |
11 |
FLAG LABELS . . . . . . . . . . . . . . . . . . . . . . . . . . . . . . . . . . . . . . . . . . . . . . . . . |
12 |
COMPONENT/OUTLET LABELS . . . . . . . . . . . . . . . . . . . . . . . . . . . . . . . . . . . |
13 |
TERMINAL BLOCK / PATCHPANEL LABELS . . . . . . . . . . . . . . . . . . . . . . . . . . |
13 |
MODULE MARKING LABELS . . . . . . . . . . . . . . . . . . . . . . . . . . . . . . . . . . . . . |
14 |
Saving labels and preferences . . . . . . . . . . . . . . . . . . . . . . . . . . . . . . . . . . . . . . . . . . |
16 |
Using files on the memory card . . . . . . . . . . . . . . . . . . . . . . . . . . . . . . . . . . . . . . . . . |
17 |
GRAPHICS . . . . . . . . . . . . . . . . . . . . . . . . . . . . . . . . . . . . . . . . . . . . . . . . . . . . . |
17 |
Printing . . . . . . . . . . . . . . . . . . . . . . . . . . . . . . . . . . . . . . . . . . . . . . . . . . . . . |
18 |
ADJUSTING PRINT HEAD TEMPERATURE . . . . . . . . . . . . . . . . . . . . . . . . . . . . . . . . . . |
19 |
Troubleshooting . . . . . . . . . . . . . . . . . . . . . . . . . . . . . . . . . . . . . . . . . . . . . . . . . . . . . |
19 |
Warranty Registration . . . . . . . . . . . . . . . . . . . . . . . . . . . . . . . . . . . . . . . . . . . . . . . . . |
19 |
Contents part II : Software Manual |
|
Getting Started . . . . . . . . . . . . . . . . . . . . . . . . . . . . . . . . . . . . . . . . . . . . . . . . . . . . . |
21 |
Overview . . . . . . . . . . . . . . . . . . . . . . . . . . . . . . . . . . . . . . . . . . . . . . . . . . . . |
21 |
About Labels Sets . . . . . . . . . . . . . . . . . . . . . . . . . . . . . . . . . . . . . . |
21 |
About Graphics . . . . . . . . . . . . . . . . . . . . . . . . . . . . . . . . . . . . . . . . |
21 |
Installing ILP219 Card Loader Software . . . . . . . . . . . . . . . . . . . . . . . . . . . . |
21 |
Registering the Software . . . . . . . . . . . . . . . . . . . . . . . . . . . . . . . . . . . . . . . |
22 |
The Ilp219 Card Loader User Interface . . . . . . . . . . . . . . . . . . . . . . . . . . . . |
22 |
Groups View . . . . . . . . . . . . . . . . . . . . . . . . . . . . . . . . . . . . . . . . . . |
24 |
Graphics View . . . . . . . . . . . . . . . . . . . . . . . . . . . . . . . . . . . . . . . . . |
24 |
Menus and Commands . . . . . . . . . . . . . . . . . . . . . . . . . . . . . . . . . . |
24 |
Getting Help . . . . . . . . . . . . . . . . . . . . . . . . . . . . . . . . . . . . . . . . . . . . . . . . . . |
25 |
Creating Labels . . . . . . . . . . . . . . . . . . . . . . . . . . . . . . . . . . . . . . . . . . . . . . . . . . . . .26 Creating a Label Set . . . . . . . . . . . . . . . . . . . . . . . . . . . . . . . . . . . . . . . . . . .26 Opening a New Label Set . . . . . . . . . . . . . . . . . . . . . . . . . . . . . . . .26 Assigning a Card ID . . . . . . . . . . . . . . . . . . . . . . . . . . . . . . . . . . . .26 Adding Label Text . . . . . . . . . . . . . . . . . . . . . . . . . . . . . . . . . . . . . .27 Adding Symbols . . . . . . . . . . . . . . . . . . . . . . . . . . . . . . . . . . . . . . .27 About Barcodes . . . . . . . . . . . . . . . . . . . . . . . . . . . . . . . . . . . . . . . .28 Creating Groups . . . . . . . . . . . . . . . . . . . . . . . . . . . . . . . . . . . . . . .29 Using Pictures . . . . . . . . . . . . . . . . . . . . . . . . . . . . . . . . . . . . . . . . .30 Downloading the Label Set . . . . . . . . . . . . . . . . . . . . . . . . . . . . . . .32
Using Data from Another Program . . . . . . . . . . . . . . . . . . . . . . . . . . . . . . . .32 Creating Labels Using Smart Paste . . . . . . . . . . . . . . . . . . . . . . . .34 Importing a File from Another Program . . . . . . . . . . . . . . . . . . . . .34
Service and Support . . . . . . . . . . . . . . . . . . . . . . . . . . . . . . . . . . . . . . . . . . . . . . . . . .35
Technical Support . . . . . . . . . . . . . . . . . . . . . . . . . . . . . . . . . . . . . . . . . . . . .35
Contacting Dymo . . . . . . . . . . . . . . . . . . . . . . . . . . . . . . . . . . . . . . . . . . . . . .35
Supported Characters Sets . . . . . . . . . . . . . . . . . . . . . . . . . . . . . . . . . . . . . . . . . . . . .36
Declaration of Conformity . . . . . . . . . . . . . . . . . . . . . . . . . . . . . . . . . . . . . . . . . . . . . .38
Introduction
The Dymo ILP219 helps you mark and identify cables, wires, patch panels and components around your plant.
The ILP219 can print your information to suit the environment you work in: thermally printed tape can be wrapped around cables, flagged around wires or applied onto different surfaces. The information can be spaced along a label to fit a row of switches ,fuses or patch panels.
It can create bar codes, print graphics, and display text in a variety of formats. It can also combine these options in one, providing all the information you require in a highly readable, long-lasting adhesive label.
Dymo’s specially developed ILP 219 Card Loader software allows you to download data and graphics to store on a memory card. In this way, you can manage your labelling and identification, and provide your staff with portable information to label key installations while in the plant or in the field.
Getting Started
1. Unpacking your ILP219 kit
Before you start setting up the printer,
verify you have received the following items in your packaging:
-ILP219 printer + extra protective bumper
-Carrying case
-AC Adaptor
-2 tapes
-Communications cable
-User Manual (English only)
-CD-ROM containing ILP219 Card Loader software + User manual (8 languages )
-1 Memory Card
-Warranty booklet + Registration Card
Operating and Storage Conditions.
Operating temperature |
: 4°C to +40°C |
Operating humidity |
: 10% to 90% RH |
Storage temperature |
: 0°C to + 40°C |
Storage humidity |
: 10% to 90% RH |
2. Power Supply
BATTERIES
• |
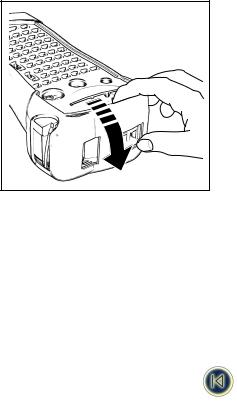
Remove protective bumper (Fig. 1). |
|
• |
Apply pressure to thumb catch then open |
|
|
and lift away battery compartment cover - see fig B1 |
|
|
Fig. 1 |
|
|
|
|
RECHARGEABLE BATTERY PACK
The ILP 219’s optional battery pack provides a long-lasting source of power for the machine, and fits into the battery compartment. This gives you the option of using multiple battery packs to ensure constant power if you are away from an AC power source.
•Remove protective bumper (Fig. 1).
•Remove the battery compartment cover.
•Slide the battery pack in the compartment
•Slide the bumper again over the printer.
Note: Please charge the battery pack for min. 14 hours before initial use.
After connecting the AC adapter press the power-on key to turn the printer on and activate the charging. When the printer automatically shuts off after 2min. the charging will continu.
AC ADAPTOR
•Connect the AC adaptor to socket (Fig. 2). Inserting the adaptor plug disconnects the supply from the batteries.
•Unplug the AC adaptor from the printer before disconnecting the mains power to the adaptor, otherwise last label memory settings will be lost (see also ON/OFF).
3

Fig. 2
Note: Please use the AC Adaptor to re-charge your battery pack and press the power-on key to activate the charging.
3. Installing/Changing the cassette
•Press catch in and open access door (fig B1).
•Hold cassette as shown, then lift cassette B2 straight up and out.
•Ensure tape and ribbon B3 are taut across mouth of cassette and tape passes between guideposts before installing as shown. If necessary, turn spool B4 clockwise to tighten ribbon.
•Check that cassette switch B5 is set for the cassette type -see fig. A notch in the cassette will fit over the switch when it is set correctly.
•Insert cassette with tape and ribbon positioned as shown between print head C2 and pinch roller C1.
•Push firmly C3 until cassette clicks into place. Ensure tape and ribbon are positioned correctly.
•Close door B1 until it clicks shut.
IMPORTANT: Please slide the protective bumper back over the printer.
4. Printing your first label
•Press the red power-on key  . The display will light up and an empty screen will be shown.
•Set your language (default setting is " OFF") :
•Press the  +
+  keys. You’re now in the language selection list.
•Use the arrows H and P to scroll through the list.
•Press  to make your selection.
Note: This is very important as this setting will have an implication on all language related features to the machine such as special characters, currency, unit of measure ( See also page 5)
•Type your name using the ABC keypad
•Press the  key twice ( = current settings -see page 17)
•Your name label is now printed.
•Cut label - slide the cut lever downwards.
4
PART I : Printer Manual
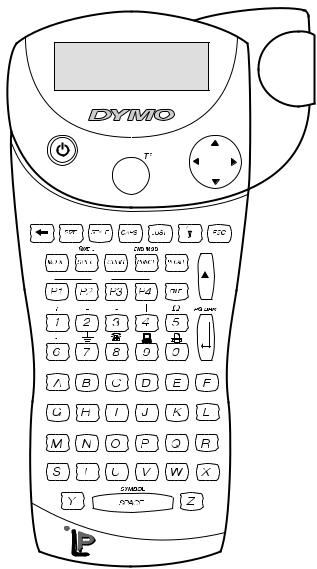
Getting to know your printer
Display
WRAP FLAG 1 FLAG 2 FIXED TBLOCK VERT
CAPS BFONT STYLE BOX ULINE BCODE
These annunciators are explained in more detail throughout the manual.
Backlighting
When the printer is used in a darker environment and the display is difficult to read than the backlighting can be used. Toggling this key will set the backlighting on or off.
Typing text and symbols
CAPITALS
The standard setting for the ILP219 is to type upper case letters. The CAPS indicator on the display will be highlighted to confirm this.
Press  to shift again to lower case.
SPACE
Type  to insert a space in your text.
USING THE SHIFT KEY
The shift key  has a dual action. Press
  and hold down while pressing another key, or press
  and release for the SHIFT key to remain in the locked position.
Use  before pressing an alphabet key to produce an upper case (CAPS) letter.
Use  before pressing a dual-purpose key to access the legend or function above the key . If you press
  while CAPS is set, you will produce a lower-case letter.
BACKSPACE
Press  to delete the character to the left of the cursor.
clear
CLEAR  +
+ 
Press  +
+  to clear all the current text, and cancel any fixed length setting, but leave the text size and other settings unchanged.
erase
ERASE  +
+ 
Press  +
+  to erase all the current text and all defined settings.
ESCAPE
Press the  key takes you out of any setting/function and returns you to the start screen.
5
NAVIGATION KEY
•Press Q or R to move the cursor along the text, one character at a time.
•Press  + Q or R to move the cursor to the beginning or end of the line of text.
• When used in conjunction with certain function keys, use Q or R to select options.
•To insert characters into the text, use Q or R to position the cursor under the character to the right of the insertion point, then type in the characters required.
•Press H or P to move the cursor to the start of the previous or next line of a multi-line label.
•Press  + H or P to move the cursor to the beginning or end of the label.
ADDING INTERNATIONAL CHARACTERS AND SYMBOLS
International characters
The ILP 219 can add a wide range of accented and other international characters. It uses RACE technology ( Rapid Accented Character Entry ), comparable to a mobile phone keyboard, to provide a number of different characters from the same key. If you tap the same key repeatedly within a short time, you can scroll through a sequence of characters based on that letter. For example, pressing the E key repeatedly in the French-language version will scroll through e - é - è - ê - ë. If you wait for more than one second, the character will be selected, and the cursor will move on to the next position.
Note: Please make sure that you have selected the appropriate language or the universal “UNI” language for access to all international characters.
Example:
Type a twice, and the letter à appears. If you tap the key again within one second, á will appear. Pause for a second, and the letter á will be selected, and the cursor will move on to the next position.
Currency symbols
The  key also uses RACE to scroll through a number of currency symbols: e - £ - $ - ¢ - ¥. The starting order of currency symbols in the list depends on your language settings.
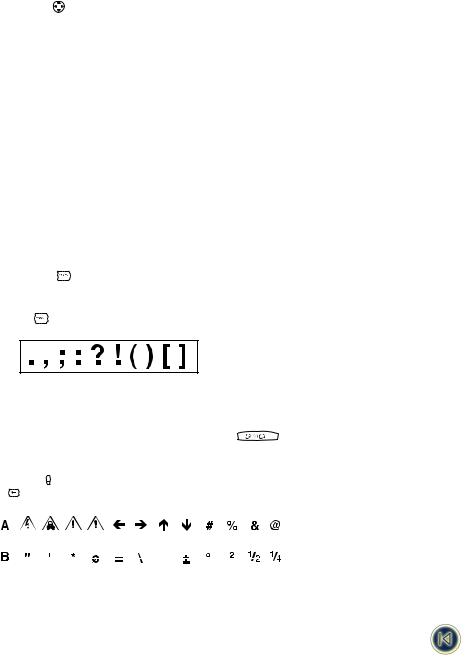
Punctuation
You can insert punctuation in your label by using the PUNCT key, which uses RACE to scroll through a number of punctuation marks:
Other symbols
The ILP219 can print a wide range of symbols.
A first selection of the most common symbols and some international characters can be inserted using the keys, or a key
with H. |
|
|
|
|
|
|
|
|
|
|
|
|
|
|
SYMBOL |
||||
A further range of 20 symbols can be accessed by pressing H and |
|
. Refer to the symbol chart to see the symbols |
|||||||||||||||||
available. You can access the symbol you want in two ways: |
|
|
|
||||||||||||||||
• |
Type the symbol reference code. |
|
|
|
|||||||||||||||
• |
Use the cursor Q or R to navigate along the row of symbols you require. |
||||||||||||||||||
• |
Press ENTER |
|
to insert the symbol into your label |
|
|
|
|||||||||||||
|
|
|
|
||||||||||||||||
Press |
to cancel. |
|
|
|
|||||||||||||||
|
|
|
|
|
|
|
|
|
|
|
|
|
|
|
|
|
|
|
|
|
|
|
|
|
|
|
|
|
|
|
|
|
|
|
|
|
|
|
|
|
|
|
|
|
|
|
|
|
|
|
|
|
|
|
|
|
|
|
|
6
Formatting your label
TEXT SIZE
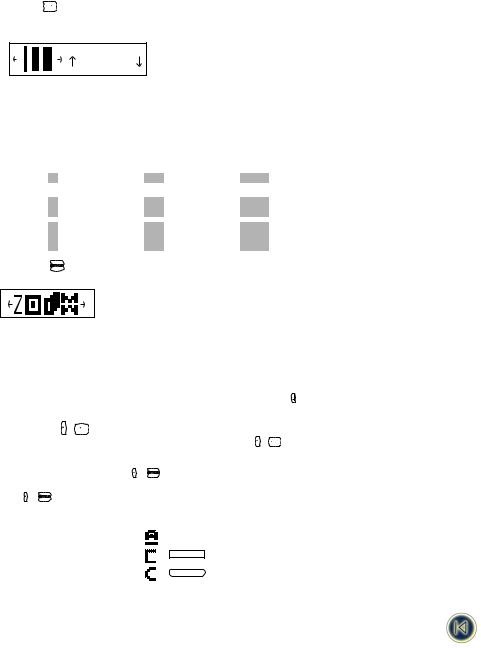
The ILP219 can print text in four different heights (small, medium, large and big font) and in three different widths (condensed, normal and expanded). The combination of height and width is shown in the text size panel in the display.


 B
B
To select the size of text you require, press  .
.
Use H or P on the navigator key to select the height of text you require, and Q or R to select the width of text. Confirm your selection in each case by pressing ENTER  .
.
Please keep in mind that the height of your text is also depending on the size of the tape you have installed ( see following table).
Height Condensed Normal Extended
small
medium
large
TEXT STYLE
Besides the size of text, you can also choose one of four styles for your text:
|
italic |
|
|
|
|
shadow |
|
|
|
|
outline |
|
|
|
|
MIRROR |
|
|
|
• |
Press STYLE, and the display will prompt you to select one of these four options |
|||
• |
Select the style you require using the Q and R arrows, and press ENTER . The style indicator will be highlighted. |
|||
Note : that you cannot combine these styles with each other. |
|
|||
VERTICAL TEXT + |
|
|
||
Single-line labels can be printed with the text running vertically. Pres + |
to select this option. |
|||
You cannot underline vertical text. |
|
|
||
|
|
|
BOX/UL |
|
UNDERLINING AND BOXED TEXT |
+ |
|
||
You can choose three options: underlined text, boxed text (square) or boxed text (rounded). |
||||
Press + |
, and use the Q or R keys to select the style you want. |
|
||
Note that you cannot underline text in a box. |
|
|||
1.underlined
2.square box
3.square box with rounded corners
= TEXT
= TEXT
= TEXT
7
MULTIPLE LINES
Press ENTER  to start the next line of text on a multi-line label.
This is a two line label on the display will be printed as:
ROOM
DATA
and the display will indicate two lines: (show line display)
You can print up to four lines on one label, depending on the width of the tape you are using:
JUSTIFYING TEXT IN MULTI-LINE LABELS
For multi-line labels, you can choose three options for your text alignment: left-justified, centre-justified, or right-justified. Press ALIGN repeatedly to toggle between these three options, which are shown on the left of the display.
Press ENTER  to make your selection.
left justified: |
STAIRCASE |
|
|
emergency lighting |
|
|
BX-243 |
|
centred: |
|
STAIRCASE |
|
|
emergency lighting |
|
|
BX-243 |
right justified: |
|
STAIRCASE |
|
|
emergency lighting |
|
|
BX-243 |
|
|
ALIGN |
ALIGNING TEXT ON A LABEL |
+ |
|
For fixed-length labels, you can also choose how you position your text in relation to the edge of the label: left, centred, or aligned right.
Left-aligned will place the blank space within the label after the text (on the right). Right-aligned will place the blank space within the label before the text (on the left) Centre-aligned will split the blank space within the label equally on both sides of the text.
|
|
ALIGN |
Press H + |
to toggle between the different alignment combinations (left, centred, right). |
|
Press |
to make your selection |
|
Note that you can combine these alignments with different justifications of your multi-line labels (see following table for nine |
||
possible combinations). |
||
left-justified |
|
|
STAIRCASE |
|
|
left-aligned: |
|
|
emergency lighting |
|
|
|
|
|
|
BX-243 |
|
|
8 |
|

left-justified |
|
|
STAIRCASE |
centre-aligned: |
|
|
|
|
|
emergency lighting |
|
|
|
|
|
|
|
|
BX-243 |
left-justified |
|
|
|
|
|
STAIRCASE |
|
right-aligned: |
|
|
|
|
|
emergency lighting |
|
|
|
|
|
|
|
|
BX-243 |
centre-justified |
|
|
|
|
|
STAIRCASE |
|
left-aligned: |
|
|
|
|
emergency lighting |
||
|
|
||
|
|
|
BX-243 |
centre-justified |
|
|
|
|
|
STAIRCASE |
|
centre-aligned: |
|
|
emergency lighting |
|
|
|
BX-243 |
centre-justified |
|
|
|
|
|
|
|
|
|
STAIRCASE |
|
right-aligned: |
|
|
|
|
|
emergency lighting |
|
|
|
|
|
|
|
|
BX-243 |
right-justified |
|
|
|
|
|
|
|
|
|
STAIRCASE |
|
left-aligned: |
|
|
|
|
emergency lighting |
||
|
|
||
|
|
|
BX-243 |
right-justified |
|
|
|
|
|
STAIRCASE |
|
centre-aligned: |
|
|
|
|
|
emergency lighting |
|
|
|
|
|
|
|
|
BX-243 |
right-justified |
|
|
|
|
|
STAIRCASE |
|
right-aligned: |
|
|
|
|
|
emergency lighting |
|
|
|
|
|
|
|
|
BX-243 |
|
|
|
BCODE |
PRODUCING A BAR CODE |
+ MODE |
||
The ILP 219 can generate bar codes in the six standard barcode formats: EAN-13, EAN-8, UPC-A, UPC-E, CODE-39 and CODE-128. Barcodes can be printed on 19mm wide labels only and can be either full height or mixed with text on one or two lines.
To create a bar code:
•Press H + MODE to display the barcode type previously selected.
•Use H or P to step through the barcode types available: EAN-13, EAN-8, UPC-A, UPC-E, CODE-39 and CODE-128.
•Press  to select the barcode type displayed. The barcode indicator will light in the display and the symbols ( and ( will appear at each end of the space allocated for barcode characters.
Note : Backspace  or Escape
  will cancel the barcode function and return to the current label.
•Enter the characters which will become the barcode, e.g.: 1234567.
•Press  to return to the label.
Note that the barcode indicator will appear in the display whenever the cursor is positioned under barcode characters.
• To edit a barcode, press H+ MODE ; the barcode characters only will be displayed and the barcode indicator will light in the display.
• Press  or H + MODE again to return to the label.
On a single line label, a bar code can be mixed with text which is small, medium or large size:
ABC 123456 ABC 123456 ABC 123456
9
 Loading...