


 Loading...
Rhino 6000
Advanced Labeling Tool with PC Connectivity
Quick Start Guide ................................................ |
1 |
Guide de démarrage rapide ................................. |
7 |
Beknopte handleiding........................................ |
15 |
Erste Schritte..................................................... |
21 |
Quick Start Guide
Follow these steps to install your RHINO 6000 label printer and software, and print your first label.
1. Unpacking your printer
NOTE Do not plug the printer into your computer until asked to do so during the software installation.
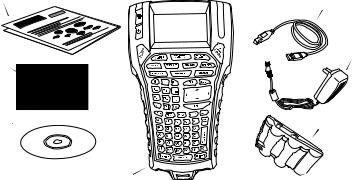
1.Unpack your label printer and save the packing materials.
2.Make sure you have all the items shown in Figure 1.
Quick Start and Quick Reference Guides
|
USB cable |
Two RHINO |
Power adapter |
label cassettes |
|
CD-ROM
Battery pack
RHINO 6000 label printer
Figure 1
1
2. Connecting the power
The label printer can operate using the rechargable battery pack or the AC power adapter. For temporary backup power, six AA alkaline batteries can be used.
To charge the battery pack the first time you use the printer, insert the battery pack and plug in the power adapter. Charging the battery pack the first time takes approximately eight hours. Recharging the battery pack will take approximately two hours.
To insert the battery pack
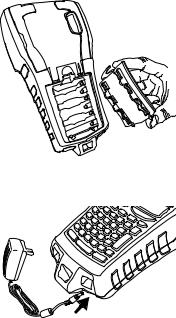
1.Remove the battery compartment cover. See Figure 2.
2.Insert the battery pack into the battery compartment.
3.Replace the battery compartment cover.
To connect the power adapter
1.Plug the power adapter into the power connector on the bottom of the printer. See Figure 3.
2.Plug the other end of the power adapter into a power outlet.
Figure 2
Figure 3
2
3. Inserting the label cassette
Your printer comes with two RHINO label cassettes.
Visit www.dymo.com for information about purchasing additional label cassettes.
To insert the label cassette
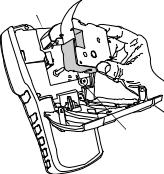
1.Lift the label cassette cover to open the label compartment. See Figure 4.
2.Make sure the label and ribbon are taut across the mouth of the cassette and that the label passes between the guideposts. If necessary, turn the spool clockwise to tighten the ribbon.
3.Insert the cassette and press gently until the cassette is eased into place.
4.Make sure the two blue clips lock the cassette in place. Refer to the label on the cassette.
5.Close the label cassette cover.
To remove the label cassette
Lift
Eject
Button
Figure 4
1.Lift the label cassette cover to open the label cassette compartment.
2.Press the Eject button. The label cassette is automatically lifted.
3.Replace the cassette as described above.
3
4. Connecting the printer to your computer
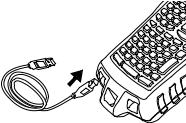
Your printer connects to your computer using the USB connection located on the top of the printer.
NOTE Do not connect the printer to your computer until prompted to do so during the software installation.
To connect the printer to your computer
1. Plug the USB cable into the USB port on the bottom of the printer. See Figure 5.
2. Plug the USB cable into a USB port ONLY when prompted during the software installation.
5. Installing the Software |
Figure 5 |
To install the software |
|
1.Insert the RHINO Connect Software CD into your CD-ROM drive. After a few seconds, the installation screen appears. If the installation screen does not appear:
a.Click Start and then Run on the Windows taskbar. The Run dialog box appears.
b.Enter D:\setup.exe (where D is the CD-ROM drive letter) and click OK.
2.Follow the on-screen instructions.
3.When prompted by the installer, plug the USB cable into a USB port.
4
6. Printing your first label with the printer
You are now ready to print your first label. The first time you turn on the printer, you are asked to select your language and units of measure. You are also asked to select the width of the tape cassette currently inserted in the printer.
To print your first label
1.Press  to turn on the power.
2.Use the up and down arrow keys to select the language you wish to use and press OK.
3.Use the up and down arrow keys to select the units of measure you wish to use and press OK.
4.Select the tape width of the tape cassette currently inserted in the printer and press OK.
5.Enter some text for your label using the alphanumeric keys.
6.Press PRINT.
7.Press CUT and remove the label.
Congratulations! You have printed your first label.
5
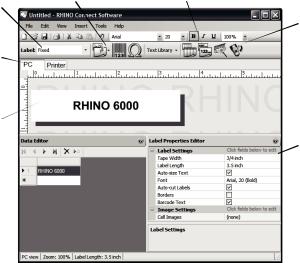
7. Using RHINO Connect Software
The following figure shows some of the many features available in RHINO Connect Software.
|
Add images, barcodes, |
Quickly create a series of |
|
Change the label |
symbols, and predefined text. |
labels using serialization. |
|
type on the fly. |
|
|
|
Work in two |
|
|
|
modes: Create |
|
|
|
labels and print |
|
|
|
directly to the |
|
|
|
printer, or create |
|
|
|
labels for transfer |
|
|
|
to a RHINO printer. |
|
|
|
Preview your |
|
|
|
labels exactly as |
|
|
|
they will print. |
|
|
|
Use the Data |
|
|
|
Editor to enter |
|
|
|
label text and |
|
|
|
add labels to |
|
|
|
the label file. |
|
|
|
Transfer label files and custom symbols and text to your RHINO printer.
Set label properties to further customize your labels.
For complete details on how to use the software, refer to the RHINO Connect Software online help.
6

Guide de démarrage rapide
Suivez les étapes ci-dessous pour installer le logiciel et l’imprimante d’étiquettes RHINO 6000 et imprimer votre première étiquette.
1. Déballage de l’imprimante
NOTE Ne reliez pas l’imprimante à l’ordinateur avant d’être invité à le faire au cours de l’installation du logiciel.
1.Déballez votre imprimante d’étiquettes et conservez l’emballage.
2.Assurez-vous que vous disposez de tous les éléments indiqués dans la Figure 1.
Guide de démarrage rapide et Aide-mémoire
|
Câble USB |
Deux cassettes |
Adaptateur |
d’étiquettes RHINO |
|
CD-ROM
Bloc-piles
Imprimante d’étiquettes RHINO 6000
Figure 1
7

2. Mise en marche
L’imprimante d’étiquettes peut être alimentée par des piles rechargeables ou par un adaptateur c.a. Pour une alimentation de réserve temporaire, vous pouvez utiliser six piles alcalines AA.
Pour charger le bloc-piles la première fois que vous utilisez l’imprimante, mettez-le en place et branchez l’adaptateur. Le premier chargement des piles dure huit heures approximativement. Il faut compter ensuite deux heures environ pour les recharger.
Pour mettre le bloc-piles en place
1.Retirez le couvercle du compartiment à piles. Voir Figure 2.
2.Placez le bloc-piles dans le compartiment à piles.
3.Remettez le couvercle en place.
Pour connecter l’adaptateur
1.Branchez l’adaptateur dans le connecteur d’alimentation situé au bas de l’imprimante. Voir Figure 3.
2.Branchez l’autre extrémité de l’adaptateur dans une prise de courant.
Figure 2
Figure 3
8
Loading...