


 Loading...
S50 | S100 | S180
Portable Digital USB Shipping Scale User Guide
Guide d'utilisation du Pèse colis USB numérique portable GebruikershandleidingDraagbare digitale pakketweegschaal Bedienungsanleitung - Digitale USB-Versandwaage
Guía del usuario de la báscula digital USB portátil para paquetería Guia do UtilizadorBalança Digital para Envios USB
Bilancia portatile per pacchi di grandi dimensioni con connessione USBe - Guida per l'utente Bærbar digital USB fragtvægt - brugervejledning
Bruksanvisning för bärbar digital fraktvåg med USB
Portable Digital USB Shipping Scale -pakettivaaka - Käyttöopas Brukerhåndbok, bærbar, digital USB-forsendelsesvekt
Instrukcja użytkownika przenośnej wagi do przesyłek z gniazdem USB Návod k použití digitální USB zasílací váhy
Ta ınabilir Dijital USB Bağlantılı Sevkiyat Terazisi Kullanım Kılavuzu Hordozható digitális USB szállítmányozási mérleg használati útmutató Návod na obsluhu prenosnej digitálnej expedičnej váhy s USB pripojením

S50 | S100 | S180
DYMO® Portable Digital USB Shipping Scale . . . . . . . . . . . . . . . . . . . . . . . . . . . . . . . . . . . . . 1 Pèse colis USB numérique portable DYMO®. . . . . . . . . . . . . . . . . . . . . . . . . . . . . . . . . . . . . . 9 DYMO® Draagbare digitale pakketweegschaal. . . . . . . . . . . . . . . . . . . . . . . . . . . . . . . . . .17 DYMO® Portable, digitale USB-Versandwaage . . . . . . . . . . . . . . . . . . . . . . . . . . . . . . . . . .25 Báscula digital USB portátil para paquetería de DYMO® . . . . . . . . . . . . . . . . . . . . . . . . .33 Balança Digital para Embalagens USB DYMO® . . . . . . . . . . . . . . . . . . . . . . . . . . . . . . . . . .41 Bilancia portatile DYMO® per pacchi di grandi dimensioni con connessione USB .49 DYMO® Bærbar digital USB fragtvægt . . . . . . . . . . . . . . . . . . . . . . . . . . . . . . . . . . . . . . . . . .57 DYMO® bärbar digital fraktvåg med USB. . . . . . . . . . . . . . . . . . . . . . . . . . . . . . . . . . . . . . . .65 DYMO® Portable Digital USB Shipping Scale -pakettivaaka . . . . . . . . . . . . . . . . . . . . . .73 DYMO® Digital USB pakkevekt . . . . . . . . . . . . . . . . . . . . . . . . . . . . . . . . . . . . . . . . . . . . . . . . .81 Przenośna cyfrowa waga do przesyłek DYMO® z gniazdem USB . . . . . . . . . . . . . . . . .89 Přenosná elektronická přepravní váha DYMO® s USB připojením . . . . . . . . . . . . . . . .97 DYMO® Taşınabilir Dijital USB Bağlantılı Kargo Terazisi . . . . . . . . . . . . . . . . . . . . . . . . 105 DYMO® hordozható digitális USB szállítmányozási mérleg . . . . . . . . . . . . . . . . . . . . 113 Prenosná digitálna expedičná váha DYMO® s USB pripojením . . . . . . . . . . . . . . . . . 121
DYMO® Portable Digital USB Shipping Scale
Your new DYMO® Portable Digital USB Shipping Scale has a no-skid platform surface and a detachable display for hand-held viewing or mounting. This User Guide provides instructions for using the scale.
! When moving the scale, lift the scale by the handles located on the sides of the scale. Do not lift the scale by the display.
Visit www.dymo.com/register to register your scale.
Setting Up the Scale
The scale is powered through the included power adapter. Optionally, the scale can be powered through a USB port on your computer or by three AAA batteries.
To set up the scale
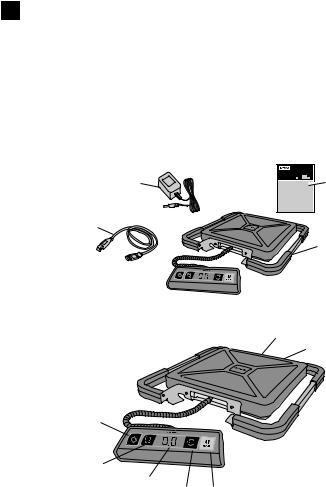
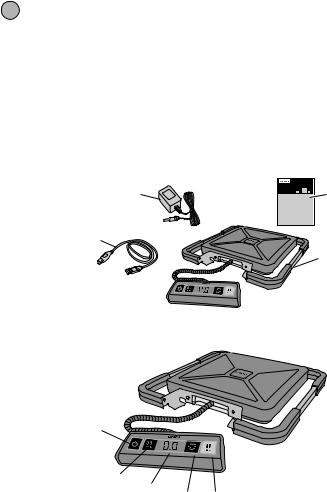
1.Unpack the scale.
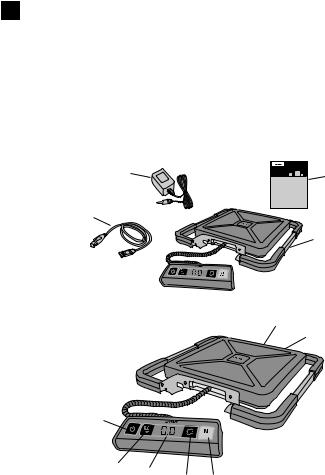
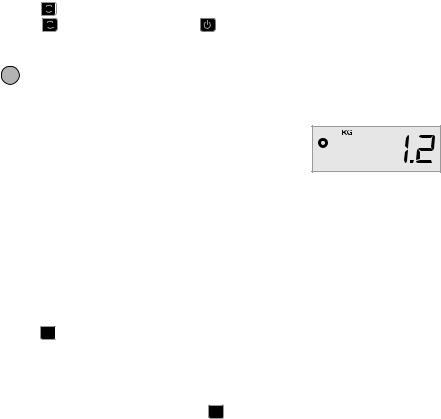
2.Make sure you have all the items shown in the following figure.
Power adapter |
User Guide |
|
USB cable
DYMO Shipping Scale
3. Become familiar with the major components of the scale.
Power connector
USB port
Power
Zero/ LCD
Tare display Kg/Lb Hold
4.Set the scale on a firm, flat surface.
5.Remove the protective covering from the LCD display.
1
Connecting the Power
The scale is powered through the included power adapter. Optionally, the scale can be powered through a USB port on your computer or by three AAA batteries.
To connect the power adapter
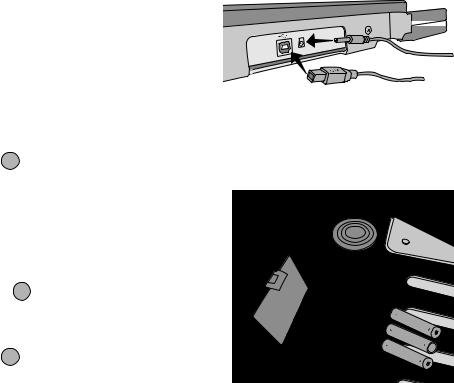
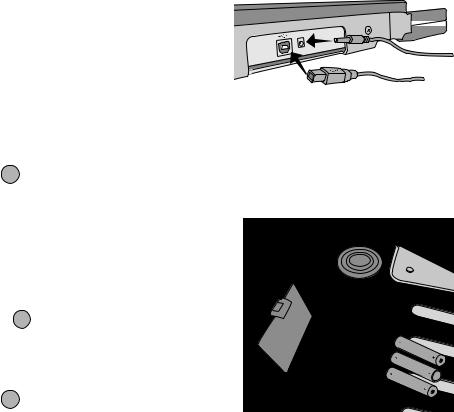
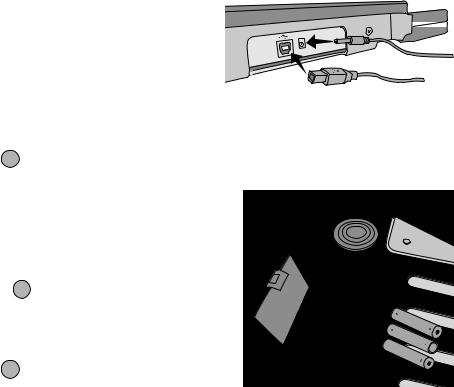
1. Plug the power adapter into the power connector on the back of the scale.
2. Plug the other end of the power adapter into a power outlet.
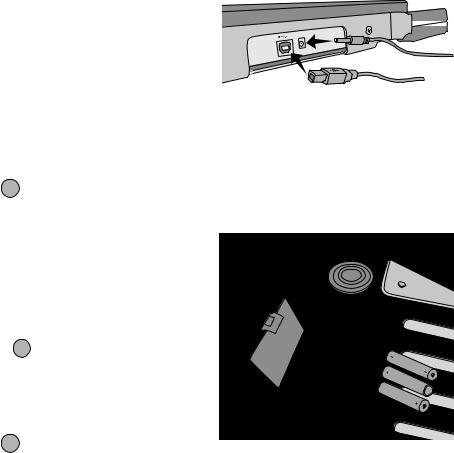
To connect the USB cable
1.Plug the USB cable into the USB port on the back of the scale.
2.Plug the other end of the USB cable into an available USB port on your computer. The scale is automatically recognized by your computer when the power is turned on.
!If connecting the scale through a USB hub, always use a powered hub or another source of power, such as the included power adapter or batteries.
To insert the batteries
1.Disconnect the power adapter or USB cable from the scale.
2.Remove the battery compartment cover from the back of the scale.
3.Insert three AAA batteries as shown.
!Make sure to insert the batteries correctly. Inserting the batteries backwards can damage the scale.
4.Replace the battery compartment cover.
!Remove the batteries if the scale will not be used for a long period of time.
AAA AAA AAA
2
Turning On the Power
The scale has an Auto Shut Off feature which automatically turns off the scale after three minutes of inactivity. You can turn off this Auto Shut Off feature.
To turn the scale on
Press  on the front of the scale.
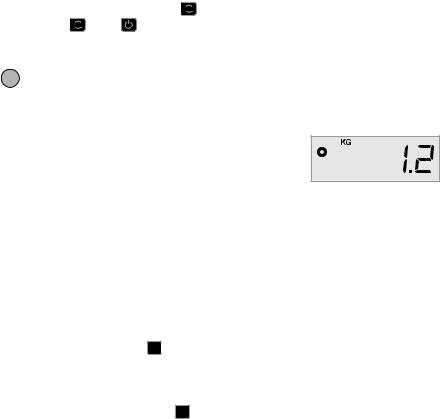
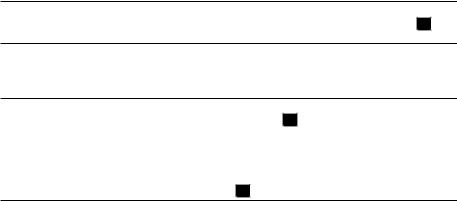
When the scale is first turned on, wait a few seconds for the scale to stabilize before weighing items. The display shows 0.0 when ready.
To turn the scale off
Press  on the front of the scale to turn the scale off.
The scale turns off automatically after three minutes of inactivity.
To turn off Auto Shut Off |
|
|
|
||||
1. |
While the scale is off, press and hold |
kg lb |
. |
||||
2. |
While holding |
|
kg lb |
, press |
. |
|
|
|
|
|
|||||
|
|
|
|||||
|
|
|
|
|
|
|
|
The display shows A.OF and then 0.0 when ready. The scale now remains on until manually turned off.
! Turning off the Auto Shut Off feature is temporary. You need to repeat this procedure each time you turn on the scale.
Using the Scale
Always wait for 0.0 to display before placing an item on the scale platform.
After placing an item on the scale, wait for several seconds for the weight to appear. When the scale is ready, a o appears to the left of the weight.
To weigh an item
Place an item on the scale platform.
Using the Tare Feature
You can weigh small items or items that cannot be easily placed on the scale platform by placing the items in a container and using the Tare/Zero button to eliminate the weight of the container.
To use the tare feature
1.
2.
Place an empty container on the platform.
When the scale is ready, press |
0.0 |
. |
TARE |
||
The display is set to zero. |
|
|
3.Place the items to be weighed in the container.
The display shows the weight of the items, without the weight of the container.
4. After removing the container, press
0.0 TARE
to reset the scale to zero.
3

Using the Hold Feature
When an item being weighed extends over the front of the scale and you cannot see the display, you can freeze the display so that the weight is still displayed after removing the item.
To use the Hold feature
1.Press HOLD .
The display shows HOLD and then 0.0 when ready.
2.Place the item on the scale.
3.After a few seconds, remove the item from the scale.
The weight continues to be displayed for about ten seconds.
4.Press HOLD to deactivate the hold feature.
Changing the Units of Measure
Your scale can display weight in English (pounds) or metric (kilograms) units. The default unit of measure is metric. Each time you turn on the scale, the scale defaults to the unit of measure that was last used.
To change the units of measure
Press
kg |
lb |
to toggle between English and metric units.
Mounting the Display
The scale features a detachable display. The display can be mounted to most metallic surfaces using the built-in magnets. You can also mount the display using the mounting holes on the back of the display and standard screws. A mounting template is included at the back of this User Guide. The display can be mounted up to 1.8 meters (6 feet) from the scale base.
To mount the display to a non-metallic surface
1.Drill two holes 120 mm (4 3/4 inch) apart at the desired height on the wall using the template at the back of this User Guide.
2.Screw one screw into each of the holes until the screw head sticks out from the wall 3 mm (1/8 inch).
!Allowing the screw heads to stick out farther than 3 mm (1/8 inch) may damage the scale display.
3.Align the holes on the back of the scale display with the screws.
4.Slide the display onto the screws.
The display should slide onto the screws firmly and securely.
4
Caring for the Scale
With proper care and handling, your scale will give you years of service. Keep the following in mind when using your scale:
•Your scale works best when operated and stored at normal room temperature. Avoid lengthy exposure to extreme heat or cold.
•Only operate the scale on a stable, vibration free surface.
•Exposure to dust, dirt, moisture, vibration, and air currents; and proximity to other electronic equipment can affect the reliability and accuracy of your scale.
•Using the scale in proximity to wireless devices, such as mobile phones, can cause the scale display to fluctuate when the device is in use.
•Although this scale is designed to be quite durable, gently place items to be weighed on the platform. Avoid rough treatment, as this may permanently damage the internal sensor and void your warranty.
•You can permanently damage the scale by placing significantly overweight items on the scale platform.
•Avoid shaking, dropping, or otherwise shocking the scale. This is a precision instrument and MUST BE HANDLED WITH EXTREME CARE.
•The scale has been calibrated at the factory and will not need to be calibrated again.
Technical Specifications
NOT LEGAL FOR TRADE
Model |
S50 |
S100 |
S180 |
|
|
|
|
Capacity |
50 kg (110 pounds) |
100 kg (220 pounds) |
180 kg (396 pounds) |
|
|
|
|
Weight Increments |
0.1 kg (0.2 lb) |
0.1 kg (0.2 lb) |
0.2 kg (0.5 lb) |
|
|
|
|
Accuracy |
±200 g |
±200 g |
±400 g |
Under 50 kg |
|||
Over 50 kg |
|
±400 g |
±800 g |
|
|
|
|
Units |
kg/g (lb/oz) |
kg/g (lb/oz) |
kg/g (lb/oz) |
|
|
|
|
Auto Shut Off |
After three minutes of inactivity |
|
|
|
|
|
|
Operating Temperature |
10° - 40° C (50° - 104° F) |
|
|
|
|
|
|
Interface |
USB 2.0 Low Speed HID Scale Device |
|
|
|
|
|
|
Power |
AC adapter, USB, or 3 AAA alkaline batteries |
|
|
|
|
|
|
For information about our other scale products, visit www.dymo.com.
5
Troubleshooting
Problem/Error Message |
Solution |
|
|
|
|
|
|
No display |
Ensure the scale is plugged in, or replace the batteries. |
||
|
|
|
|
LO is displayed |
Replace the batteries. |
|
|
|
|
|
|
Negative number is displayed |
A tare value is displayed as a negative number when the items |
||
|
are removed from the scale. Press |
0.0 |
to reset the scale to zero. |
|
TARE |
||
|
|
|
|
00000 is displayed |
The item on the scale platform exceeds the maximum capacity |
||
|
of the scale. Remove the item immediately to prevent damage |
||
|
to the scale. |
|
|
Display reads 0.0 with an item on the platform
This can happen because:
• The Tare/Zero button, |
0.0 |
, was pressed while an item was on |
TARE |
||
|
|
|
the scale.
• Power to the scale was disconnected or turned off and then on again with an item on the scale.
In both of these cases, remove the item from the platform and
press |
0.0 |
to return the display to 0.0. |
TARE |
||
|
|
|
If you need further assistance, you can obtain support at www.dymo.com.
Warranty
TWO-YEAR LIMITED WARRANTY
Dymo scales are sold with a two-year warranty from the date of purchase against defects in design, materials and workmanship. If this product is found to be defective within that time, we will promptly repair or replace it at our cost. This warranty does not cover accidental damage, wear and tear or consequential or incidental loss.
WHAT IS COVERED?
This warranty covers this product only and only against defects in design, materials or workmanship. If, after inspection of your returned product, we find that the product is defective in design, materials or workmanship, we shall at no charge to you repair or replace the product at our discretion, and return the product to you. You are responsible for the full cost of shipping the product to Dymo, but there is no charge for the inspection or the return postage.
WHAT IS NOT COVERED?
This warranty does not cover loss of or damage to a computer or other devices connected directly or indirectly to this Dymo product. This warranty also does not cover any loss of or damage to data, programs, records or other information. This warranty does not cover any defect or loss which would not have occurred if instructions in the owner's manual had been followed. This warranty does not cover other incidental or consequential damages even if Dymo has been informed of the possibility of such damages. This warranty is in lieu of all other warranties, express or implied. This warranty gives you specific rights and you may also have other rights, which may vary from state to state or country to country.
HOW TO MAKE A WARRANTY CLAIM
To make a warranty claim, please contact customer support: www.dymoservice.com
Electrostatic Discharge Precautions
Electrostatic discharge (Static Electricity or ESD) can cause damage to any electronic device, including the scale. To avoid damage, follow these simple steps:
•Always disconnect the scale from your computer or USB hub when changing the battery.
•Always discharge any accumulated static electricity from yourself before connecting the scale to your computer or USB hub. If your computer uses a three-pin, grounded connector, you can do this by touching the metal case of your computer. As an alternative, try touching a cold water faucet.
6
Environmental Information
The equipment that you bought has required the extraction and use of natural resources for its production. It may content hazardous substances for the health and the environment.
In order to avoid the dissemination of those substances in our environment and to diminish the pressure on the natural resources, we encourage you to use the appropriate take-back systems. Those systems will reuse or recycle most of the materials of your end life equipment in a sound way.
The crossed-bin symbol marked in your device invites you to use those systems.
If you need more information on the collection, reuse and recycling systems, please contact your local or regional waste administration. You can also contact us for more information on the environmental performance of our products.
Documentation Feedback
We are constantly working to produce the highest quality documentation for our products. We welcome your feedback. Send us your comments or suggestions about our online Help, printed, or PDF manuals.
Please include the following information with your feedback:
•Product name and version number
•Type of document: printed manual, PDF, or online Help
•Topic title (for online Help) or page number (for printed or PDF manuals)
•Brief description of content (for example, step-by-step instructions that are inaccurate, information that requires clarification, areas where more detail is needed, and so on)
•Suggestions for how to correct or improve the documentation
We also welcome your suggestions for additional topics you would like to see covered in the documentation. Send email feedback to:
documentation@dymo.com
Please keep in mind that this email address is only for documentation feedback. If you have a technical question, please contact Customer Service.
7
8
Pèse colis USB numérique portable DYMO®
Votre nouveau pèse colis USB numérique portable DYMO® comprend un plateau à surface antidérapante et un affichage amovible pour une visualisation ou une fixation portative. Ce guide d’utilisation fournit des instructions sur l’utilisation de la balance.
! Lorsque vous déplacez la balance, soulevez-la par les poignées situées sur ses côtés. Ne la soulevez pas par l’affichage.
Visitez le site www.dymo.com/register pour enregistrer votre balance.
Installation de la balance
La balance est alimentée par l’adaptateur secteur fourni. La balance peut également être alimentée via un port USB sur votre ordinateur ou par trois piles AAA.
Pour installer la balance
1.Déballez la balance.
2.Assurez-vous que vous disposez de tous les objets indiqués sur la figure suivante.
Adaptateur secteur |
Guide d’utilisation |
Câble USB
Balance d’expédition DYMO
3. Familiarisez-vous avec les principaux composants de la balance.
Connecteur électrique
Port USB
Alimentation |
|
Zero/Tare |
|
(Tare/Mise |
Affichage LCD |
à zéro) |
Kg/Lb Hold (Maintien)
4.Placez la balance sur une surface solide et plane.
5.Enlevez le film protecteur posé sur l’affichage LCD.
9
Branchement électrique
La balance est alimentée par l’adaptateur secteur fourni. La balance peut également être alimentée via un port USB sur votre ordinateur ou par trois piles AAA.
Pour brancher l’adaptateur secteur
1. Raccordez l’adaptateur au connecteur d’alimentation situé à l’arrière de la balance.
2. Branchez l’autre extrémité de l’adaptateur dans une prise de courant.
Pour brancher le câble USB
1.Branchez le câble USB au port USB situé à l’arrière de la balance.
2.Branchez l’autre extrémité du câble USB dans un port USB disponible sur votre ordinateur. La balance est reconnue automatiquement par votre ordinateur quand l'alimentation électrique est en marche.
!Si le raccordement de la balance s’effectue par un concentrateur USB, utilisez toujours un concentrateur alimenté ou une autre source d’alimentation, par exemple les piles ou l’adaptateur secteur fourni.
Pour insérer les piles
1.Débranchez l’adaptateur secteur ou le câble USB de la balance.
2.Retirez le couvercle du compartiment des piles à l’arrière de la balance.
3.Insérez trois piles AAA comme indiqué.
!Veillez à insérer les piles correctement. L’insertion des piles à l’envers risque d’endommager la balance.
4.Replacez le couvercle du compartiment des piles.
!Retirez les piles en cas de non utilisation prolongée de la balance.
AAA AAA AAA
10

Mise en marche
La balance est dotée d’une fonction Auto Shut Off (Arrêt automatique) qui l’éteint automatiquement après trois minutes d’inactivité. Vous pouvez désactiver cette fonction.
Pour mettre la balance en marche
Appuyez sur la touche  à l’avant de la balance.
Lorsque vous mettez la balance en marche pour la première fois, attendez quelques secondes qu’elle se stabilise avant de peser des objets. L’affichage indique 0.0 lorsque la balance est prête.
Pour éteindre la balance
Appuyez sur la touche  à l’avant de la balance pour l’éteindre.
La balance s’éteint automatiquement après trois minutes d’inactivité.
Pour désactiver la fonction Auto Shut Off (Arrêt automatique)
1.
2.
Lorsque la balance est éteinte, appuyez sur la touche |
kg lb |
et maintenez-la enfoncée. |
||||
|
|
|
|
|
|
|
Tout en maintenant la touche |
|
kg lb |
enfoncée, appuyez sur la touche |
. |
||
|
||||||
|
|
|
|
|
|
|
L’affichage indique A.OF puis 0.0 lorsque la balance est prête.
Désormais, la balance restera en marche jusqu’à ce qu’elle soit arrêtée manuellement.
! La désactivation de la fonction Auto Shut Off (Arrêt automatique) est temporaire. Vous devez répéter cette procédure à chaque fois que vous mettez la balance en marche.
Utilisation de la balance
Attendez toujours que 0.0 s’affiche avant de placer un objet sur le plateau de la balance.
Lorsque vous posez un objet sur la balance, son poids s’affiche quelques secondes plus tard. Lorsque la balance est prête, le symbole o apparaît à gauche du poids.
Pour peser un objet
Placez l’objet sur le plateau de la balance.
Utilisation de la fonction Tare
Vous pouvez peser des objets de petite taille ou des objets qui ne peuvent pas être facilement placés sur le plateau de la balance en les mettant dans un récipient et en utilisant la touche Tare/Zero (Tare/Mise à zéro) afin d’éliminer le poids de ce récipient.
Pour utiliser la fonction Tare
1.Posez un récipient vide sur le plateau.
2.Lorsque la balance est prête, appuyez sur la touche L’affichage est mis à zéro.
0.0 TARE
.
3.Placez les objets à peser dans le récipient.
L’affichage indique le poids des objets pesés, sans le poids du récipient.
4. Retirez le récipient et appuyez sur la touche
0.0 TARE
pour remettre la balance à zéro.
11
Utilisation de la fonction Hold (Maintien)
Quand un objet à peser dépasse la face avant de la balance et vous empêche de voir l’affichage, vous pouvez figer ce dernier de sorte que le poids demeure affiché après le retrait de l’objet.
Pour utiliser la fonction Hold (Maintien)
1.Appuyez sur la touche HOLD .
L’affichage indique HOLD (MAINTIEN), puis 0.0 lorsque la balance est prête.
2.Placez l’objet sur la balance.
3.Après quelques secondes, retirez l’objet de la balance.
Le poids demeure affiché pendant dix secondes environ.
4.Appuyez sur la touche HOLD pour désactiver la fonction Hold (Maintien).
Modification des unités de mesure
La balance peut afficher le poids en unités anglo-saxonnes (livres) ou métriques (kilogrammes). L’unité de mesure par défaut est l’unité métrique. Chaque fois que vous mettez la balance en marche, elle affiche par défaut la dernière unité de mesure utilisée.
Pour modifier les unités de mesure
Appuyez sur la touche
kg |
lb |
pour alterner entre les unités anglo-saxonnes et métriques.
Fixation de l’affichage
La balance comprend un affichage amovible. L’affichage peut être fixé sur la plupart des surfaces métalliques avec les aimants intégrés. Vous pouvez également fixer l’affichage en utilisant les trous de fixation à l’arrière de l’affichage et des vis standard. Un modèle de fixation est fourni au verso de ce guide d’utilisation. L'affichage peut être fixé jusqu’à 1,8 mètre (6 pieds) de la base de la balance.
Pour fixer l’affichage sur une surface non métallique
1.A la hauteur adaptée sur le mur, percez deux trous espacés de 120 mm (4 3/4 pouce) en vous reportant au modèle fourni au verso de ce guide d'utilisation.
2.Placez une vis dans chacun des trous et vissez jusqu'à ce que la tête de la vis ne dépasse du mur que de 3 mm (1/8 pouce).
! Une longueur supérieure à 3 mm (1/8 pouce) risque d'endommager l'affichage de la balance.
3.Alignez les trous à l’arrière de l’affichage de la balance sur les vis.
4.Glissez l’affichage sur les vis.
L’affichage doit glisser sur les vis fermement et solidement.
12
Entretien de la balance
Si vous l’entretenez et la maniez convenablement, la balance vous assurera de longues années de service. Lorsque vous vous en servez, gardez à l’esprit les indications suivantes :
•La balance fonctionne mieux lorsqu’elle est utilisée et entreposée à température ambiante. Évitez des expositions prolongées à une forte chaleur ou à un froid intense.
•N’utilisez la balance que sur une surface stable, sans vibrations.
•L’exposition à la poussière, à la saleté, à l’humidité, aux vibrations et aux courants d’air, ainsi que la proximité d’autres équipements électroniques peuvent altérer le fonctionnement et la précision de votre balance.
•L’utilisation de la balance à proximité d’un dispositif sans fil comme un téléphone portable peut provoquer des oscillations et des variations dans l’affichage de la balance lorsque le dispositif est utilisé.
•Bien que la balance soit conçue pour durer longtemps, placez délicatement les objets à peser sur le plateau. Évitez les traitements agressifs qui peuvent endommager de manière permanente le détecteur interne de la balance et annuler votre garantie.
•Vous pouvez endommager définitivement la balance en plaçant sur son plateau des objets extrêmement lourds.
•Évitez les secousses, les chutes et les chocs. Il s’agit d’un appareil de précision qui DOIT ÊTRE MANIÉ TRÈS DÉLICATEMENT.
•La balance a été calibrée à l’usine et n’a pas besoin d’être calibrée une nouvelle fois.
Spécifications techniques
NON LÉGAL POUR LE COMMERCE
Modèle |
S50 |
S100 |
S180 |
|
|
|
|
Capacité |
50 kg (110 livres) |
100 kg (220 livres) |
180 kg (396 livres) |
|
|
|
|
Échelons de poids |
0,1 kg (0,2 lb) |
0,1 kg (0,2 lb) |
0,2 kg (0,5 lb) |
|
|
|
|
Précision |
|
|
|
En dessous de 50 kg |
±200 g |
±200 g |
±400 g |
Au-dessus de 50 kg |
|
±400 g |
±800 g |
|
|
|
|
Unités |
kg/g (lb/oz) |
kg/g (lb/oz) |
kg/g (lb/oz) |
|
|
|
|
Auto Shut Off (Arrêt |
Après trois minutes d’inactivité |
|
|
automatique) |
|
|
|
|
|
|
|
Température de |
10 à 40 °C (50 à 104 °F) |
|
|
fonctionnement |
|
|
|
|
|
||
Interface |
Périphérique pour balance HID à basse vitesse USB 2.0 |
||
|
|
|
|
Alimentation |
Adaptateur secteur, USB ou 3 piles alcalines AAA |
|
|
|
|
|
|
Pour obtenir des renseignements concernant nos autres balances, veuillez visiter www.dymo.com.
13
Dépannage
Problème/Message d’erreur |
Solution |
|
|
|
|
Pas d’affichage |
Vérifiez que la balance est mise sous tension ou remplacez |
|
|
les piles. |
|
|
|
|
LO (PILE FAIBLE) s’affiche |
Remplacez les piles. |
|
|
|
|
Un nombre négatif s’affiche |
Une valeur de tare s’affiche sous la forme d’un nombre négatif |
|
|
lorsque les objets sont retirés de la balance. Appuyez sur la |
|
|
touche TARE |
pour remettre la balance à zéro. |
|
0.0 |
|
|
|
|
|
|
|
00000 s’affiche |
L’objet placé sur le plateau dépasse la capacité maximale de la |
|
|
balance. Retirez-le immédiatement pour éviter que la balance |
|
|
ne soit endommagée. |
|
L’affichage indique 0.0 lorsqu’un objet est placé sur le plateau
Cela peut arriver pour les raisons suivantes :
• L’utilisateur a appuyé sur la touche Tare/Zero (Tare/Mise
à zéro), 0.0 , alors qu’un objet était posé sur la balance. TARE
• La balance a été débranchée ou éteinte, puis remise en marche avec un objet sur la balance.
Dans ces deux cas, retirez l’objet du plateau et appuyez
sur la touche 0.0 pour remettre l’affichage à 0.0. TARE
Si vous avez besoin d’aide supplémentaire, vous pouvez obtenir de l’aide depuis le site www.dymo.com.
Garantie
GARANTIE LIMITÉE DE DEUX ANS
Les balances Dymo sont garanties pendant deux ans à compter de la date d’achat contre les vices de matériau, de conception et de fabrication. Si le produit s’avère défectueux pendant cette période, nous le réparerons ou le remplacerons rapidement à nos frais. Cette garantie ne couvre pas les dommages accidentels, les dommages causés par l’usure ou les pertes consécutives ou accessoires.
QUE COUVRE CETTE GARANTIE ?
Ce produit est uniquement garanti contre les vices de conception, de matériau et de fabrication. Si, après inspection du produit que vous nous avez renvoyé, nous constatons que ce dernier comporte des vices de conception, de matériau et de fabrication, nous le réparerons ou le remplacerons sans aucun frais, à notre discrétion, et nous vous le renverrons. Vous devez acquitter le coût total de l’expédition du produit à Dymo, mais il n’y a pas de frais liés à l’inspection ou au port de retour.
QU’EST CE QUI N’EST PAS COUVERT PAR LA GARANTIE ?
Cette garantie ne couvre pas la perte ou les dommages causés à un ordinateur ou à d’autres périphériques branchés directement ou indirectement à ce produit Dymo. Cette garantie ne couvre pas non plus la perte ou les dommages causés aux données, aux programmes, aux enregistrements ou autres renseignements. Cette garantie ne couvre pas les pertes ou les défauts causés par le non respect des instructions du manuel d’utilisation. Cette garantie ne couvre pas les autres dommages accessoires ou consécutifs, même si Dymo a été avisé de l’éventualité de tels dommages. Cette garantie exclut toute autre garantie, expresse ou implicite. Cette garantie vous donne des droits juridiques particuliers, mais vous pouvez bénéficier d’autres droits pouvant varier d’un état à l’autre ou d’un pays à l’autre.
COMMENT EFFECTUER UNE RÉCLAMATION AU TITRE DE LA GARANTIE
Pour effectuer une réclamation au titre de la garantie, veuillez vous adresser au service clientèle : www.dymoservice.com
14
Protection contre les décharges électrostatiques
Les décharges électrostatiques (électricité statique ou ESD) peuvent endommager tous les dispositifs électroniques, y compris la balance. Pour éviter ces dommages, suivez ces étapes simples :
•Débranchez toujours la balance de votre ordinateur ou du concentrateur USB lorsque vous changez la pile.
•Déchargez toujours l’électricité statique accumulée sur vous avant de brancher la balance à votre ordinateur ou au concentrateur USB. Si votre ordinateur utilise un connecteur à trois broches mis à la masse, vous pouvez le faire en touchant le boîtier métallique de votre ordinateur. Sinon, essayez de toucher un robinet d’eau froide.
Informations environnementales
L’équipement que vous avez acheté a nécessité pour sa production l’extraction et l’utilisation de ressources naturelles. Il peut contenir des substances dangereuses pour la santé et lenvironnement.
Afin d’éviter la dissémination de ces substances dans notre environnement et de réduire l’exploitation des ressources naturelles, nous vous encourageons à utiliser les systèmes de récupration appropriés. Ces systèmes réutiliseront ou recycleront de manière saine la plupart des composants de votre équipement périmé.
Le symbole d’une poubelle barrée sur votre dispositif vous invite à utiliser ces systèmes.
Si vous désirez plus de renseignements sur les systèmes de ramassage, de réutilisation et de recyclage, veuillez communiquer avec votre administration locale ou régionale chargée de l’évacuation des déchets. Vous pouvez également nous contacter pour plus de renseignements sur la performance environnementale de nos produits.
Commentaires sur la documentation
Nous nous efforçons constamment de produire la documentation de la meilleure qualité possible pour nos produits. Nous accueillons favorablement vos commentaires. Envoyez-nous vos commentaires ou suggestions concernant notre aide en ligne, nos manuels imprimés ou nos manuels au format PDF.
Veuillez inclure les renseignements suivants avec vos commentaires :
•Nom du produit et numéro de version
•Type de document : manuel imprimé, manuel au format PDF ou aide en ligne
•Titre de la rubrique (pour l’aide en ligne) ou numéro de la page (pour les manuels imprimés ou au format PDF)
•Brève description du contenu (par exemple, instructions étape par étape imprécises, renseignements devant être clarifiés, parties nécessitant plus de détails, etc.)
•Suggestions pour la correction ou l’amélioration de la documentation
Nous accueillons aussi favorablement vos suggestions concernant des sujets qui, selon vous, devraient être traités dans la documentation.
Envoyez vos commentaires par courriel à : documentation@dymo.com
Veuillez garder à l’esprit que cette adresse de courriel est réservée uniquement aux commentaires sur la documentation. Si vous avez une question technique, veuillez vous adresser au service clientèle.
15
16
DYMO® Draagbare digitale pakketweegschaal
Uw nieuwe DYMO® draagbare digitale pakketweegschaal beschikt over een antislipoppervlak en een verwijderbaar scherm voor draagbare weergave of montage. Deze handleiding geeft instructies over het gebruik van de weegschaal.
! Gebruik de handvaten aan de zijkant van de weegschaal om de weegschaal op te tillen en te verplaatsen. Til de weegschaal niet op aan het scherm.
Bezoek www.dymo.com/register om uw weegschaal te registreren.
De weegschaal instellen
De weegschaal wordt van stroom voorzien via de meegeleverde stroomadapter. Optioneel kan de weegschaal van stroom worden voorzien via een USB-poort op de computer of door drie AAA-batterijen.
De weegschaal opstellen.
1.De weegschaal uitpakken.
2.Controleer of alle onderdelen in de volgende afbeelding aanwezig zijn.
Stroomadapter |
Gebruikershandleiding |
|
USB-kabel
DYMO pakketweegschaal
3. Raak vertrouwd met de belangrijkste onderdelen van de weegschaal.
Stroomconnector
USB-poort
Stroom
Zero/tarra
LCD-display Kg/Lb Hold
4.Zet de weegschaal op een stevige, vlakke ondergrond.
5.Verwijder de beschermlaag van het LCD-scherm.
17
Stroom aansluiten
De weegschaal wordt van stroom voorzien via de meegeleverde stroomadapter. Optioneel kan de weegschaal worden aangedreven via een USB-poort op een computer of door drie AAA-batterijen.
De stroomadapter aansluiten
1. Verbind de stroomadapter met de stroomconnector achteraan de weegschaal.
2. Steek de stekker van de stroomadapter in een stopcontact.
Aansluiten van de USB-kabel
1.Sluit de USB-kabel aan op de USB-poort achteraan de weegschaal.
2.Sluit het andere uiteinde van de USB-kabel aan op een lege USB-poort op uw computer. De weegschaal wordt automatisch herkend door uw computer wanneer deze is ingeschakeld.
!Als u de weegschaal aansluit via een USB-hub, gebruik dan altijd een hub met voeding of een andere stroombron, zoals de meegeleverde stroomadapter of batterijen.
De batterijen plaatsen
1.Ontkoppel de stroomadapter of USB-kabel van de weegschaal.
2.Open het deksel van de batterijhouder aan de achterkant van de weegschaal.
3.Plaats drie AAA-batterijen zoals getoond.
!Zorg ervoor dat de batterijen correct geplaatst zijn. De batterijen verkeerd plaatsen kan de weegschaal beschadigen.
4.Plaats het klepje van het batterijcompartiment terug.
!Verwijder de batterijen als de weegschaal lange tijd niet gebruikt gaat worden.
AAA AAA AAA
18
De stroom inschakelen
De weegschaal heeft een automatische functie, waarmee de weegschaal wordt uitgeschakeld na drie minuten zonder activiteit. U kunt deze functie voor automatische uitschakeling uitzetten.
De weegschaal inschakelen
Druk op  vooraan op de weegschaal.
Als u de weegschaal voor de eerste keer aanzet, wacht dan een aantal seconden, zodat
de weegschaal zichzelf in evenwicht kan brengen, voordat u voorwerpen begint te wegen. Op het scherm verschijnt 0.0 als de weegschaal klaar is voor gebruik.
De weegschaal uitschakelen
Druk op  vooraan op de weegschaal om de weegschaal uit te schakelen.
De weegschaal wordt automatisch uitgeschakeld na drie minuten zonder activiteit.
De automatische uitschakeling uitzetten
1.
2.
Druk op |
kg lb |
en houd ingedrukt terwijl de schaal uitgeschakeld is. |
Terwijl u |
kg lb |
ingedrukt houdt, drukt u op . |
Op het scherm verschijnt A.OF en vervolgens 0.0 als de weegschaal klaar is voor gebruik. De weegschaal blijft nu aangeschakeld tot u hem handmatig uitschakelt.
! Het uitschakelen van de automatische uitschakelfunctie is tijdelijk.
U moet deze procedure elke keer herhalen na het inschakelen van de weegschaal.
De weegschaal gebruiken
Wacht altijd tot u 0.0 op het scherm ziet voordat u een voorwerp op het weegplatform zet.
Na het plaatsen van een voorwerp op de weegschaal moet u enkele seconden wachten tot het gewicht verschijnt. Als
de weegschaal klaar is, verschijnt een o links van het gewicht.
Een voorwerp wegen
Plaats een voorwerp op het weegplatform.
De tarra-functie gebruiken
U kunt kleine voorwerpen of voorwerpen die niet eenvoudig op het weegplatform
kunnen worden geplaatst wegen door de voorwerpen in een houder te plaatsen en de knop Tarra/Zero te gebruiken om het gewicht van de houder af te trekken.
De tarra-functie gebruiken
1. Plaats een lege houder op het weegplatform.
2. Druk op |
0.0 |
als de schaal klaar is met wegen. |
TARE |
||
|
|
|
Het scherm wordt op nul gezet.
3.Plaats de te wegen voorwerpen in de houder.
Op het scherm wordt het gewicht van de voorwerpen weergegeven, zonder het gewicht van de houder.
4. Druk na het verwijderen van de houder op
0.0 TARE
om de weegschaal terug op nul te zetten.
19

De Hold-functie gebruiken
Als de afmetingen van een voorwerp het aflezen van het scherm verhinderen kunt u het scherm vastzetten zodat het gewicht nog steeds wordt weergegeven nadat het voorwerp verwijderd is.
De Hold-functie gebruiken
1.Druk op HOLD .
Op het scherm verschijnt HOLD en vervolgens 0.0 als de weegschaal klaar is.
2.Plaats het voorwerp op het weegplatform.
3.Verwijder het voorwerp na een aantal seconden van de weegschaal. Het gewicht blijft ongeveer tien seconden lang weergegeven.
4.Druk op HOLD om de hold-functie uit te schakelen.
De maateenheid instellen
Uw weegschaal kan het gewicht weergeven in Engelse ponden of metrische eenheden (kg). De standaardinstelling is metrisch. Elke keer dat u de weegschaal inschakelt, zal de laatst gebruikte maateenheid automatisch terug worden ingeschakeld.
De maateenheid instellen
Druk op
kg |
lb |
om te wisselen tussen Engelse ponden en metrische eenheden.
Het scherm monteren
De weegschaal is voorzien van een verwijderbaar scherm. Het scherm kan worden gemonteerd op de meeste metalen oppervlakken met behulp van de ingebouwde magneten. U kunt het scherm ook monteren met de montagegaten achteraan op het scherm en standaard schroeven. Aan het einde van deze handleiding vindt u een malplaatje. Het scherm kan worden gemonteerd op tot 1,8 meter verwijderd van de onderzijde van de weegschaal.
Montage van het scherm op een niet-metalen oppervlak.
1.Boor twee gaten 120 mm uit elkaar op de gewenste hoogte in de muur met behulp van het malplaatje achteraan in deze handleiding.
2.Draai een schroef in elk van de gaten tot de kop van de schroef nog 3 mm uit de muur steekt.
!De schroef meer dan 3 mm laten uitsteken kan schade veroorzaken aan het scherm.
3.Lijn de gaten achteraan op het scherm uit met de schroeven.
4.Schuif het scherm op de schroeven.
Het scherm moet stevig en veilig op de schroeven komen te zitten.
20
Onderhoud van de weegschaal
Met de juiste zorg en onderhoud zult u jarenlang plezier van uw weegschaal hebben. Houd het volgende in gedachten tijdens het gebruik van uw weegschaal:
•Uw weegschaal werkt het beste, wanneer deze wordt bediend en opgeslagen bij normale kamertemperatuur. Vermijd langdurige blootstelling aan extreme hitte of koude.
•Gebruik de weegschaal alleen op een stevige, vlakke ondergrond.
•Blootstelling aan stof, vuil, vocht, trillingen en luchtstromingen, evenals nabijheid van andere elektronische apparatuur, kan de betrouwbaarheid en nauwkeurigheid van de weegschaal beïnvloeden.
•De schaal gebruiken in de nabijheid van draadloze apparatuur zoals mobiele telefoons, kan ervoor zorgen dat de waarden op het scherm fluctueren.
•Hoewel deze schaal is ontworpen om bijzonder duurzaam te zijn, moeten voorwerpen voorzichtig op het platform worden geplaatst. Vermijd ruwe behandeling, dit kan de interne sensor permanent beschadigen en uw garantie opheffen.
•U kunt de schaal permanent beschadigen door aanzienlijk overgewicht te plaatsen op het weegplatform.
•Vermijd schudden, vallen of andere schokken. Deze weegschaal is een precisie-instrument en moet MET UITERSTE ZORG BEHANDELD WORDEN.
•De weegschaal is in de fabriek geijkt en hoeft niet opnieuw te worden geijkt.
Technische specificaties
NIET VOOR DE HANDEL
Model |
S50 |
S100 |
S180 |
|
|
|
|
Capaciteit |
50 kg (110 pounds) |
100 kg (220 pounds) |
180 kg (396 pounds) |
|
|
|
|
Gewichtverhogingen |
0,1 kg (0,2 lb) |
0,1 kg (0,2 lb) |
0,2 kg (0,5 lb) |
|
|
|
|
Nauwkeurigheid |
|
|
|
Minder dan 50 kg |
±200 g |
±200 g |
±400 g |
Meer dan 50 kg |
|
±400 g |
±800 g |
|
|
|
|
Eenheden |
kg/g (lb/oz) |
kg/g (lb/oz) |
kg/g (lb/oz) |
|
|
|
|
Automatisch uitschakelen |
Na drie minuten zonder gebruik |
|
|
|
|
|
|
Bedrijfstemperatuur |
10° - 40 °C (50° - 104 °F) |
|
|
|
|
|
|
Interface |
USB 2.0 Low Speed HID weegschaal |
|
|
|
|
|
|
Stroom |
AC-adapter, USB, of 3 AAA alkalinebatterijen |
|
|
|
|
|
|
Bezoek www.dymo.com voor meer informatie over onze weegschalen.
21
Probleemoplossing
Probleem/foutbericht |
Oplossing |
|
|
Geen weergave |
Zorg ervoor dat de weegschaal aangesloten is (USB poort of |
|
adapter) of installeer batterijen. |
|
|
LO wordt weergegeven |
Vervang de batterijen. |
Er wordt een negatief getal weergegeven
Een tarra-waarde wordt weergegeven als een negatief getal,
als de items zijn verwijderd van de weegschaal. Druk |
TARE |
om |
|
0.0 |
|
de weegschaal op nul te zetten. |
|
|
|
|
00000 wordt weergegeven |
Het voorwerp op het weegplatform overschrijdt de |
|
maximumcapaciteit van de weegschaal. Verwijder het |
|
voorwerp onmiddellijk om schade aan de weegschaal |
|
te vermijden. |
Het scherm geeft 0.0 met een voorwerp op het platform
Dit kan worden veroorzaakt door:
• De Tarra/Zero knop 0.0 werd ingedrukt terwijl een TARE
voorwerp op de weegschaal stond.
•De stroom naar de weegschaal werd ontkoppeld of uitgeschakeld en dan terug aangeschakeld met een voorwerp op de weegschaal.
Verwijder in beide gevallen het voorwerp van het platform
en druk op |
TARE |
om het scherm terug op 0.0 te zetten. |
|
0.0 |
|
|
|
|
Indien u meer help nodig hebt, kunt u ondersteuning verkrijgen via www.dymo.com.
Garantie
GARANTIE VOOR TWEE JAAR
Dymo weegschalen worden verkocht met een garantie van twee jaar vanaf de datum van aankoop tegen defecten in ontwerp, materialen en fabricage. Als dit product binnen deze tijdsperiode defect wordt bevonden, dan zullen wij het tijdig en kosteloos vervangen of repareren. Deze garantie dekt geen schade veroorzaakt door ongelukken, slijtage, gevolgschade of verlies.
WAT IS ER GEDEKT?
Deze garantie dekt dit product uitsluitend en alleen tegen defecten in ontwerp, materialen of fabricagefouten. Indien wij na controle van uw geretourneerde product besluiten dat het product defect is in het ontwerp, materialen of fabricage, dan zullen wij het kosteloos voor u repareren of vervangen naar eigen goeddunken, en het product naar u terugzenden. U bent verantwoordelijk voor de volledige verzendingskosten van het product naar Dymo, maar er zijn geen kosten voor de inspectie of de retourverzendkosten.
WAT IS ER NIET GEDEKT?
Deze garantie geldt niet voor verlies van of schade aan een computer of andere apparaten die direct of indirect verbonden zijn met dit product van Dymo. Deze garantie geldt ook niet voor enig verlies van of beschadiging van gegevens, programma's, documenten of andere informatie. Deze garantie dekt geen defecten of schade die voorkwamen omdat de instructies in de gebruikershandleiding niet werden nageleefd. Deze garantie geldt niet voor andere incidentele of gevolgschade, zelfs indien Dymo op de hoogte is gesteld van de mogelijkheid van dergelijke schade. Deze garantie vervangt alle andere garanties, uitdrukkelijk of impliciet. Deze garantie geeft u specifieke rechten en u kunt ook andere rechten hebben, die kunnen variëren van staat tot staat of van land tot land.
HOE EEN CLAIM IN TE DIENEN
Om een garantieclaim in te dienen kunt u contact opnemen met de klantenondersteuning: www.dymoservice.com
22

Voorzorgsmaatregelen tegen elektrostatische ontlading
Elektrostatische ontlading (statische elektriciteit of ESD) kan schade veroorzaken aan elektronische apparatuur, met inbegrip van de weegschaal. Volg deze eenvoudige stappen om schade te vermijden:
•Ontkoppel altijd de weegschaal van uw computer of USB-hub voor het vervangen van de batterij.
•Ontlaad altijd geaccumuleerde statische elektriciteit uit uw lichaam, voordat u de weegschaal op uw computer of USB-hub aansluit. Als uw computer gebruik maakt van een geaarde stekker met drie pinnen, dan kunt u dit doen door de metalen behuizing van uw computer aan te raken. Probeer als alternatief een koudwaterkraan aan te raken.
Informatie over het milieu
Bij de productie van de apparatuur die u hebt gekocht, is het noodzakelijk geweest natuurlijke hulpbronnen te onttrekken en te gebruiken. Deze kan schadelijke stoffen voor de gezondheid en het milieu bevatten.
U kunt de verspreiding van deze stoffen in ons milieu beperken en onze natuurlijke hulpbronnen ontlasten door het gebruik van terugnamesystemen. Deze systemen zullen het grootste deel van de materialen van uw afgedankte apparatuur op een goede manier hergebruiken of recycleren.
Het symbool met de doorgekruiste vuilnisbak op uw weegschaal vraagt u deze systemen te gebruiken.
Voor meer informatie over inzamelings-, hergebruiken recyclingsystemen kunt u contact opnemen met uw plaatselijke of regionale afvalverwerkingsbedrijf. U kunt ook met ons contact opnemen voor meer informatie over de milieueffecten van onze producten.
Feedback over documentatie
DYMO Corporation stelt voortdurend alles in het werk om documentatie van topkwaliteit op te stellen voor onze producten. Stuur ons gerust uw feedback. We stellen uw commentaar of suggesties over onze Online Help, afgedrukte of pdf-documenten op prijs.
Voeg de volgende informatie toe aan uw feedback:
•Productnaam inclusief versienummer
•Type van document: gedrukte handleiding, PDF of de Online Help
•Titel van onderwerp (voor online help) of paginanummer (voor gedrukte handleidingen of PDF).
•Korte beschrijving van inhoud (bijvoorbeeld instructies die onnauwkeurig zijn of niet duidelijk, plaatsen waar meer details nodig zijn enz.).
•Suggesties over hoe de documentatie moet worden gecorrigeerd of verbeterd
Stuur ons ook gerust uw suggesties voor meer onderwerpen die u graag behandeld zou zien in de documentatie. Stuur uw e-mails naar:
documentation@dymo.com
Denk eraan: dit e-mailadres is uitsluitend bestemd voor feedback over documentatie. Met technische vragen kunt u terecht bij de klantenondersteuning.
23
24
DYMO® Portable, digitale USB-Versandwaage
Ihre neue portable, digitale USB-Versandwaage von DYMO® hat einen nicht rutschenden Wägeteller und ein abnehmbares Display für das Ablesen in der Hand oder für die Montage. Dieses Bedienerhandbuch enthält Anweisungen für die Verwendung der Waage.
! Verwenden Sie die Haltegriffe an den Seiten der Waage, um die Waage zu transportieren. Verwenden Sie nicht das Display, um die Waage anzuheben.
Besuchen Sie www.dymo.com/register, um Ihre Waage zu registrieren.
Einrichten der Waage
Die Waage wird durch das im Lieferumfang enthaltene Netzteil mit Strom versorgt. Optional können Sie die Waage über einen USB-Anschluss an Ihrem Computer oder mit drei AAA-Batterien betreiben.
So richten Sie die Waage ein
1.Packen Sie die Waage aus.
2.Überprüfen Sie, ob alle in der folgenden Abbildung dargestellten Teile vorhanden sind.
Netzteil |
Bedienungsanleitung |
USB-Kabel
DYMO-Versandwaage
3. Machen Sie sich mit den Hauptkomponenten der Waage vertraut..
Netzteilanschluss
 USB-Anschluss
Stromversorgung
Null/Tara
LCD-Display Kg/Lb Halten
4.Stellen Sie die Waage auf eine feste, ebene Oberfläche.
5.Entfernen Sie die Schutzabdeckung vom LCD-Display.
25
Anschluss an die Stromversorgung
Die Waage wird durch das im Lieferumfang enthaltene Netzteil mit Strom versorgt. Optional können Sie die Waage über einen USB-Anschluss an Ihrem Computer oder mit drei AAA-Batterien betreiben.
So schließen Sie das Netzteil an
1. Schließen Sie das Netzteil am Netzanschluss an der Rückseite der Waage an.
2. Stecken Sie den Netzstecker in eine Netzsteckdose.
So schließen Sie das USB-Kabel an:
1.Stecken Sie das USB-Kabel in den USB-Anschluss an der Rückseite der Waage.
2.Stecken Sie das andere Ende des USB-Kabels in einen verfügbaren USB-Anschluss Ihres Computers.
Die Waage wird automatisch durch den Computer erkannt, sobald die Stromzufuhr eingeschaltet wird.
! Wenn Sie die Waage an einen USB-Hub anschließen, verwenden Sie in jedem Fall einen mit Strom versorgten Hub oder eine andere Stromquelle, wie das im Lieferumfang enthaltene Netzteil oder Batterien.
So setzen Sie die Batterien ein
1.Entfernen Sie das Netzteil oder das USBKabel von der Waage.
2.Entfernen Sie die Batteriefachabdeckung hinten an der Waage.
3.Legen Sie drei AAA-Batterien wie gezeigt ein.
!Vergewissern Sie sich, dass die Batterien korrekt eingelegt sind. Umgekehrt eingelegte Batterien können die Waage beschädigen.
4.Setzen Sie den Batteriefachdeckel wieder auf.
!Entfernen Sie die Batterien, wenn die Waage längere Zeit nicht benutzt wird.
AAA AAA AAA
26
Loading...