

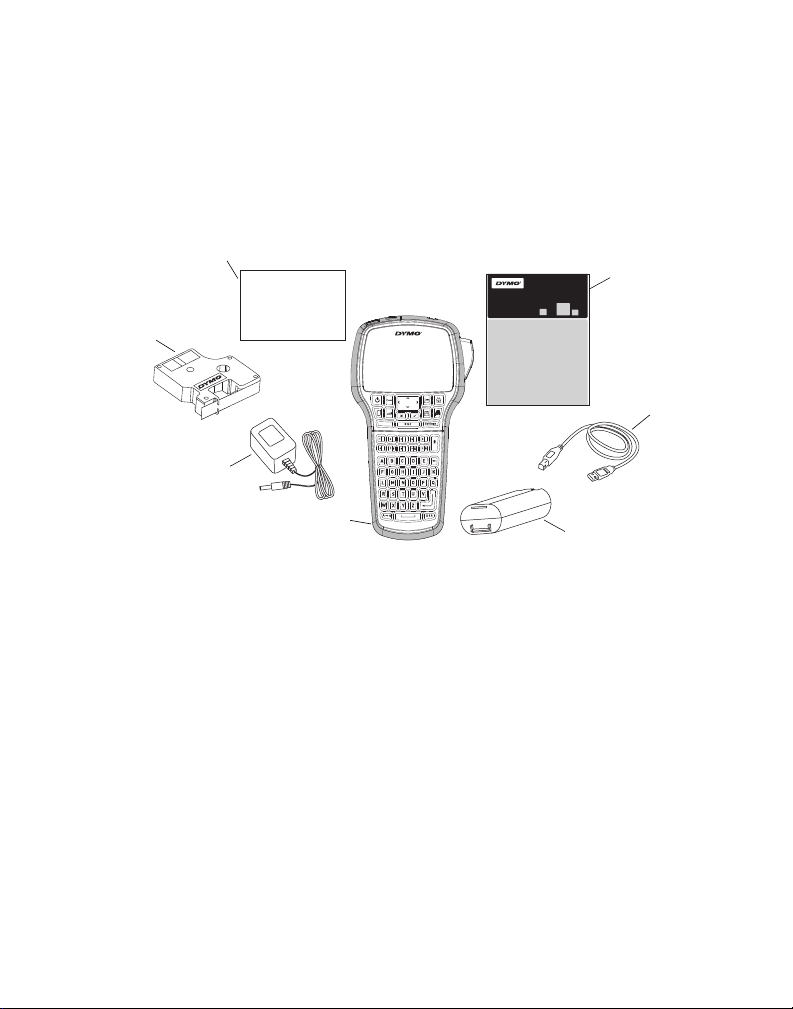
Figure 1
Warranty card
USB cable
Charging adapter
Quick Start Guide
D1 label cassette
Lithium-ion battery
LabelManager 420P label maker
Quick Start
Make sure you have all the items shown in Figure 1. (Labels included in the
package may vary.)
warranty
card
Insert
-
.
,
+
–
Shift
%
For complete information on using your label maker, download the full
LabelManager 420P User Guide from the Support section of the DYMO Web site
at www.dymo.com.
1
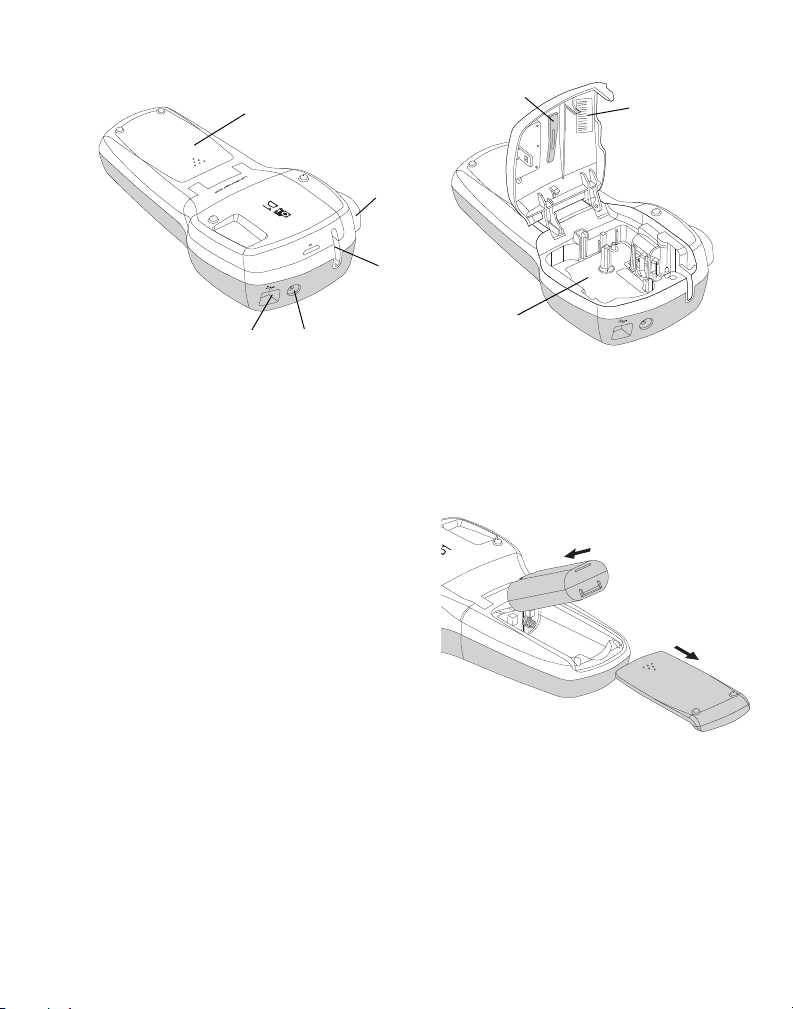
Become familiar with the features shown in Figure 2.
0000000000000
Figure 2
7
1
6
2
3
4
5
8
Figure 3
1
Battery compartment
2
Cutter button
3
Label exit slot
4
Power connector
5
USB connector
6
Label compartment
7
Cleaning tool
8
Serial number label
Inserting the Battery
To insert the battery
1 Slide the battery compartment cover
away from the label maker. See Figure 3.
2 Insert the battery into the battery
compartment.
3 Replace the battery compartment cover.
To charge the battery
1 Plug the charging adapter into the power
connector on the top of the label maker.
2 Plug the other end of the charging adapter into a power outlet.
NOTE The charging adapter is only used for recharging the battery; the
charging adapter cannot be used to power the label maker.
2
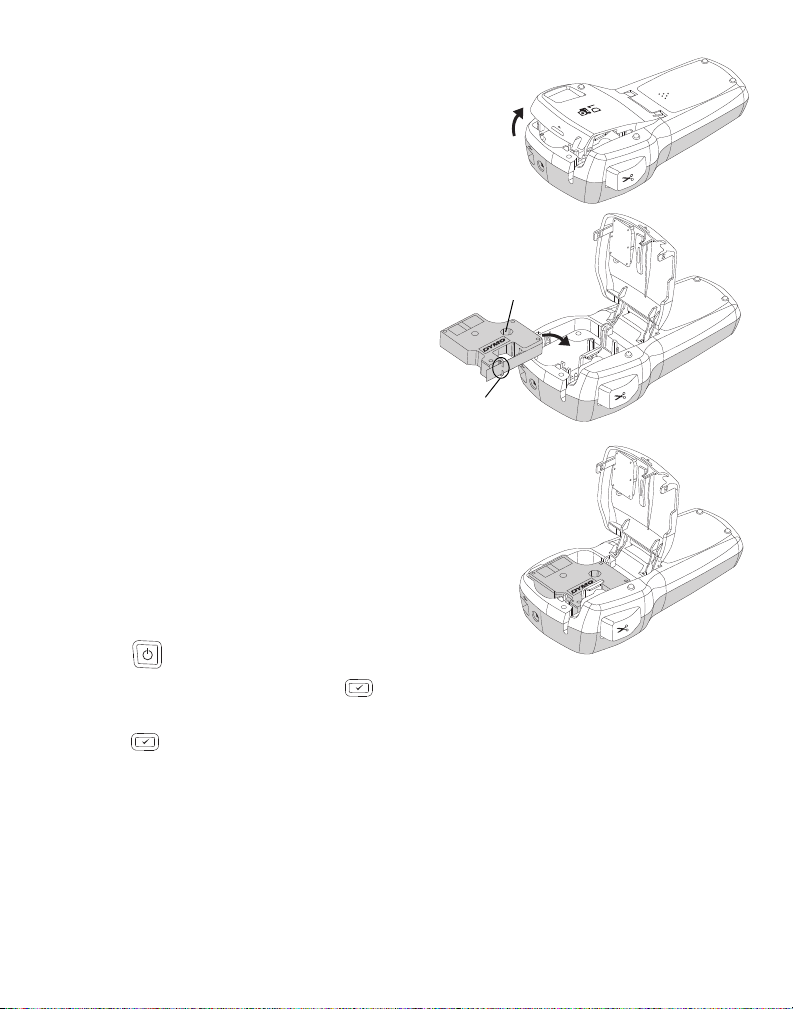
Inserting the Label Cassette
Figure 4
Label
guides
Ribbon
rewind
spool
Figure 5
Figure 6
Your label maker uses DYMO D1 label cassettes.
To insert the label cassette
1 Lift the label cassette cover to open the label
compartment. See Figure 4.
2 Make sure the tape and ribbon are taut
across the mouth of the cassette and
that the tape passes between the label
guides. See Figure 5.
If necessary, turn the ribbon rewind
spool clockwise to tighten the ribbon.
3 Insert the cassette and press firmly until
the cassette clicks into place. See
Figure 6.
4 Close the label cassette cover.
Printing Your First Label
The first time you turn on the power, you are
asked to select the language and label width.
These selections remain set until you change
them.
To set up the label maker
1 Press to turn on the power.
2 Select the language and press .
3 Select the width of the label cassette currently in the label maker and
press .
3

To print a label
Split
backing
Figure 7
Figure 8
1 Enter text to create a simple label.
2 Press .
3 Press the cutter button to cut the label.
4 Remove the paper backing from the label to expose
the adhesive, and then attach the label.
Using Your Label Maker with Your Computer
Connecting the Label Maker to your Computer
The label maker connects to your computer using the USB connection located on
the top of the label maker. You do not need to install additional software or drivers
to use the label maker with your computer.
To connect the label maker to your computer
1 Plug the USB cable into the USB port on the top of
the label maker. See Figure 8.
2 Plug the other end of the USB cable into an
available USB port on your computer.
4

Starting the Built-In Software
The built-in software resides on the label maker; no installation is required.
To start the software for Windows
1 If necessary, press to turn on the label maker.
®
Depending on Windows AutoRun settings, the software may start
automatically.
2 If the software does not start automatically, do one of the following:
• If the AutoRun or AutoPlay dialog box appears, follow the on-screen
instructions to start the DYMO Label Light software.
• If the AutoRun dialog box does not appear, navigate to My
Computer
To start the software for Mac OS
1 If necessary, press to turn on the label maker.
DYMO 420P, and then click DYMO Label Light.exe.
®
The DYMO 420P volume appears on your desktop.
2 Double-click DYMO 420P to open the volume.
3 Double-click to start the software.
Disconnecting the Label Maker from Your Computer
To disconnect the label maker from your computer
1 (Mac Only) Drag the DYMO 420P volume to the trash.
2 Press the power button to turn off the label maker.
3 Unplug the USB cable from your computer.
5

Printing Labels with the Built-In Software
Insert text you’ve
copied to the
Clipboard.
Format your label
as you would in
any text editor.
Create a
new label.
Match the label
width to the label
cassette in the
label maker.
Start advanced
DYMO Label v.8
software.
Rotate images 90
degrees.
Choose to print
a horizontal or
vertical label.
Add a border
around the label.
Choose a fixed length for the
label or make the label resize
automatically to fit the text.
Crop an image
added to the label.
Change the units of
measure or
language settings.
Capture an area of
the screen and insert
on your label.
View the status of
the label maker.
Print a label.
Zoom the label.
The following figure shows some of the features available in the software.
To print a first label
1 Click once on the label in the Edit area and type some text.
2 Click to print the label.
3 Press the cutter button on the label maker to cut the label.
To capture and insert an image from your desktop
1 Click on the toolbar.
2 Drag the curser to draw a selection box around the area to capture.
The selected area is inserted into your label.
6

Installing the DYMO Label™ v.8 Software
To install the software on a Windows® system
1 Click in the built-in software to download the latest version of DYMO
Label v.8 from the Support section of the DYMO Web site.
When DYMO Label v.8 is installed, clicking will start the software.
2 Close all open Microsoft Office applications.
3 Double-click the Installer icon.
After a few seconds, the installation screen appears.
4 Click Install and follow the instructions in the installer.
NOTE Depending on your system configuration, the software
installation could take some time while the required Microsoft .NET
software is installed.
5 If not already connected, connect the label maker to your computer.
QuickBooks If you have QuickBooks 2007 or later, you will be prompted
to install the QuickBooks Add-in.
To install the software on a Mac OS
1 Click in the built-in software to download the latest version of DYMO
®
system
Label v.8 from the Support section of the DYMO Web site.
When DYMO Label v.8 is installed, clicking will start the software.
2 Double-click the Installer icon and follow the on-screen instructions.
3 If not already connected, connect the label maker to your computer.
™
7

Printing Labels with DYMO Label™ v.8 Software
Insert text,
addresses,
images,
shapes, lines,
barcodes,
dates, and
counters.
Apply a layout to
a label.
Store your
favorite
addresses or
other data in the
Address Book;
automatically
insert the data
on your label.
Visually
choose your
label type and
apply layouts.
Select a label
maker to print
your labels.
Print a label.
Capture an area of the screen
and insert on your label.
The following figure shows some of the major features available in DYMO Label v.8.
To print your first label
1 Click in the built-in software to start DYMO Label v.8 software.
The first time you start DYMO Label software, a list of available label types is
displayed on the left side of the window and a blank label is displayed in the
Edit area.
2 From the Labels tab, select a tape label and then select a layout.
Make sure that the width of the tape label you select matches the width of
the label cassette loaded in the label maker.
3 Click once on the tape label in the Edit area and type some text.
4 Click to print the label.
For complete details on using the software, refer to the online Help.
8

LabelManager 420P Quick Reference
Shift
+
–
-
,
.
%
Insert
1
2
3
4
8
910
11
12
14
15
17 20 21
22
16
13
5
7
18 19
6
Figure 9
1
Print
2
Preview
3
Save
4
5
6
7
8
Settings
Symbols
Shift
Backspace
Return
9
Accented characters
10
Space bar
11
Caps
12
Numeric keys
13
Insert
14
Font Size
15
New label/Clear
16
On/Off
17
Format
18
LCD display
19
Cancel
20
Navigation
21
OK
22
Open
9

Formatting Quick Reference
4
85
1
23
7
6
1
Font type
2
Font size
3
Font style
4
Borders
Font Types
Font Sizes
Label Width Font Size Available
1/4” (6 mm) 8, 10, 12 point
3/8” (9 mm) 8, 10, 12, 16, 20 point
1/2” (12 mm) 8, 10, 12, 16, 20, 24 point
3/4” (19 mm) 8, 10, 12, 16, 20, 24, 32, 40 point
Borders
5
Mirror
6
Vertical text
7
Alignment
8
Label length
To take advantage of more advanced formatting features, click in the built-in
software to download and install DYMO Label™ v.8 software from the DYMO
Web site.
10
 Loading...