


 Loading...
USER MANUAL
Corel® Painter™ Essentials User Manual
The contents of this user manual and the associated Corel Painter Essentials software are the property of Corel Corporation and its respective licensors, and are protected by copyright. For more complete copyright information about Corel Painter Essentials, please refer to the About Corel Painter Essentials section in the Corel Painter Essentials menu of the software.
Copyright 1991–2003 Corel Corporation. All rights reserved.
Corel, the Corel logo, Corel Painter, and Natural-Media are trademarks or registered trademarks of Corel Corporation and/or its subsidiaries in Canada, the U.S. and/or other countries. Adobe, Photoshop, and PostScript are trademarks of Adobe Systems Incorporated in the United States and/or other countries. Canon is a registered trademark of Canon Inc. EPSON Stylus is a registered trademark of Seiko Epson Corporation.
Hewlett-Packard and DeskJet are registered trademarks of Hewlett Packard. Mac, Mac OS, Quick Draw, and Finder are registered trademarks of Apple Computer, Inc., registered in the United States and other countries. Windows is a registered trademark of Microsoft Corporation in the United States and/or other countries. Minolta QMS is a trademark of Minolta Co., Ltd. Netscape Navigator is a registered trademark of Netscape Communications Corporation. Tektronix is a registered trademark of Tektronix, Inc. Wacom, Intuos, and ToolID are trademarks or registered trademarks of Wacom Company, Ltd. Other product, font, and company names and logos may be trademarks or registered trademarks of their respective companies.

Contents
Welcome to Corel Painter Essentials
What’s Included in Corel Painter Essentials? . . . . . . . . . . . . . . . . . . . . . . 1
Streamlined User Interface . . . . . . . . . . 1 Why Upgrade to Corel Painter 8? . . . . . 2 About Your User Manual . . . . . . . . . . . 5 Corel Customer Support Services . . . . . . 6
The Workspace
Using Menus and Document Window . . 9
Workspace Tour . . . . . . . . . . . . . . . . . 10
Using the Toolbox . . . . . . . . . . . . . . . 11
Using Selectors . . . . . . . . . . . . . . . . . . 14
Using the Property Bar . . . . . . . . . . . . 14
Using the Brush Selector Bar . . . . . . . . 15
Working with Palettes . . . . . . . . . . . . . 16
Exploring the Palettes . . . . . . . . . . . . . 17
Basics
Opening Documents . . . . . . . . . . . . . . 19
Working with Documents . . . . . . . . . . 22
Saving Files . . . . . . . . . . . . . . . . . . . . . 27
Closing Documents and Quitting the
Application . . . . . . . . . . . . . . . . . . . . . 29
Setting Preferences . . . . . . . . . . . . . . . 29
Wacom Intuos Support . . . . . . . . . . . . 32
Using Textures and Patterns
Using Paper Texture . . . . . . . . . . . . . . 35
Using Patterns . . . . . . . . . . . . . . . . . . 36
Color
Working with Color . . . . . . . . . . . . . . 39
Changing Paper Color . . . . . . . . . . . . . 40
Using Gradients . . . . . . . . . . . . . . . . . 42
Painting
Exploring Painting . . . . . . . . . . . . . . . . 43 Understanding Brushes . . . . . . . . . . . . 44 Using a Stylus or Mouse . . . . . . . . . . . 44 Selecting a Brush . . . . . . . . . . . . . . . . 45 Brush Settings . . . . . . . . . . . . . . . . . . . 45 Where You Can Paint . . . . . . . . . . . . . 47 Marking the Canvas . . . . . . . . . . . . . . 47 Painting with Color . . . . . . . . . . . . . . . 48 Painting with Airbrushes . . . . . . . . . . . 49 Filling Techniques . . . . . . . . . . . . . . . . 50
Cloning and Tracing
Cloning Imagery . . . . . . . . . . . . . . . . . 53
Cloning a Document . . . . . . . . . . . . . . 54
Using Tracing Paper . . . . . . . . . . . . . . 54
Changing Clone Source . . . . . . . . . . . . 55

Painting in the Clone . . . . . . . . . . . . . 56 Using Auto Van Gogh . . . . . . . . . . . . 56 Turning Other Brushes into Cloners . . 57
Using Layers
Layer Basics . . . . . . . . . . . . . . . . . . . . 60 Working with Layers . . . . . . . . . . . . . 60 Creating Layers . . . . . . . . . . . . . . . . . 60 Saving Files Containing Layers . . . . . . 62 Deleting Layers . . . . . . . . . . . . . . . . . 62 Managing Layers . . . . . . . . . . . . . . . . 62 Editing Layers . . . . . . . . . . . . . . . . . . 65 Changing Layer Characteristics . . . . . . 67
Using Selections
Working with Selections . . . . . . . . . . 69
Creating Selections . . . . . . . . . . . . . . 70
Editing Path-Based Selections . . . . . . . 72
Using Image Effects |
|
Basics of Applying Effects . . . . . . . . . |
75 |
Orientation Effects . . . . . . . . . . . . . . . |
77 |
Apply Lighting . . . . . . . . . . . . . . . . . . |
80 |
Apply Surface Texture . . . . . . . . . . . . |
82 |
Other Surface Control Effects . . . . . . . |
84 |
Esoterica Effects . . . . . . . . . . . . . . . . |
86 |
The Image Hose |
|
How it Works . . . . . . . . . . . . . . . . . . |
87 |
Using the Image Hose . . . . . . . . . . . . |
88 |
Controlling the Image Hose . . . . . . . . |
88 |
Working with Text
The Text Layer . . . . . . . . . . . . . . . . . . 91 Applying Effects to Text . . . . . . . . . . . 91
Printing
Understanding Printing . . . . . . . . . . . 95
Setting Up Printing . . . . . . . . . . . . . . 95
Printing an Image . . . . . . . . . . . . . . . 96
ii |
Table of contents |

1 Welcome to Corel Painter Essentials
Corel Painter Essentials is the leading Natural-Media painting application. Corel Painter Essentials lets you simulate a wide range of art tools, from acrylics and airbrushes to crayons and oils.
What’s Included in Corel Painter Essentials?
Corel Painter Essentials lets you experiment with a wide range of Natural-Media tools. A portfolio of features will help you expand your digital drawing and painting techniques.
Streamlined User Interface
Corel Painter Essentials features a streamlined user interface based on the following new elements:
Toolbox
The toolbox appears vertically and, by default, is docked to the top-left corner of the document window. The toolbox lets you access the tools in Corel Painter Essentials, as well as the primary and secondary colors, and provides easy access to the Paper, Pattern, Gradient and Nozzle libraries.
The toolbox can be undocked and moved anywhere inside the application window, or it can be turned off.
Property Bar
The property bar is context-sensitive depending on which tool is selected, providing commonly used controls for each tool.

The property bar is docked below the menu bar by default, but it can be undocked and moved to any location in the document window, or turned off.
Brush Selector
The Brush Selector lets you choose a brush category, using the Brush Category picker, and a brush variant, using the Brush Variant picker. The name of the selected brush category is displayed on the right side of the Brush Selector.
The Brush Selector is docked, by default, to the top-right corner of the document window, beside the property bar. It can be undocked and moved to any location in the document window, or it can be turned off.
Palettes
The palettes include the following feature:
•Expand/Collapse — You can expand or collapse palettes by
clicking the palette arrow in the top corner of the palette. When the triangle points down, the palette is expanded. When it points to the right, the palette is collapsed.
Brush Variants
Corel Painter Essentials includes an array of Brush variants. Brushes are included in the following 15 categories:
•Acrylics
•Airbrushes
•Artists
•Blenders
•Chalks
•Cloners
•Crayons
•Erasers
•Image Hose
•Oils
•Palette Knives
•Pastels
•Pattern Pens
•Pencils
• Tinting
Why Upgrade to Corel Painter 8?
Corel Painter 8 lets you experiment with the industry’s widest range of Natural-Media tools and includes all the features and behaviors of Corel Painter Essentials.
Corel Painter 8 includes a new Mixer palette that realistically mimics the traditional paint mixing experience. Digital water color, a new Sketch effect, and more than 400 new brushes all expand your creative potential.
You can create custom brush variants using the new Brush Creator, which includes the Randomizer, Transposer, and Stroke Designer. Corel Painter 8 also includes redesigned layer masks and channels that provide a smoother workflow and greater compatibility with Adobe Photoshop.
Info Palette
The new Info palette provides access to the following information:
2 |
Welcome to Corel Painter Essentials |

•Image size preview
•Document information, such as width and height
•X and Y coordinates and the cursor position
•Context-sensitive information based on the selected tool. For example, if the Eyedropper tool is selected, the HSV and RGB information is displayed.
•Unit information, such as pixels, inches, and resolution
Mixer Palette
The new Mixer palette lets you mix colors interactively. The Mixer palette contains a Brush tool and a Palette Knife tool for applying and mixing colors, mimicking the traditional experience of mixing two or more colors on a palette.
The Mixer palette also includes an Eyedropper tool for sampling specially mixed colors from imagery, as well as Zoom and Pan tools for easy navigation in the palette. You can choose to save your Mixer palette
settings for future use, and you can create a custom color set from the colors in the Mixer palette.
Digital Water Color
Digital Water Color is a simple, transparent medium that is ideal for hand painting line drawings, touching up photographs, or creating simple water color washes.
Sketch Effect
The new Sketch effect in Corel Painter 8 lets you convert images or photographs to simple pencil drawings, while providing controls for the amount of paper grain being applied, the heaviness of the pencil line, and the desired level of detail.
New Brush Variants
Corel Painter 8 includes over 400 new Brush variants. New brushes are included in the following categories:
•Acrylics
•Airbrushes
•Artists
•Blenders
•Calligraphy Pens
•Chalks
•Charcoals
•Colored Pencils
•Conte
•Crayons
•Digital Water Color
•Distortion
•Erasers
•Felt Pens
•F-X
•Gouache
•Image Hose
•Liquid Ink
•Oil Pastels
•Oils
•Palette Knives
•Pastels
•Pattern Pens
•Pencils
•Pens
Corel Painter Essentials |
3 |

•Photo
•Sponges
•Sumi-e
•Tinting
•Water Colors
Brush Creator
Corel Painter 8 features a Brush Creator, which is designed to make the brush variant creation process easy and fun. The Brush Creator includes three key features:
•Randomizer — The Randomizer lets you choose an existing brush variant and randomize its properties to create a new variant. You can set the amount of randomization to determine how much of the original brush’s properties remain—a low amount will result in variants that are very similar to the original, while a high amount will result in variants that are radically different. To help you visualize how the new brush variants will look, the Randomizer
provides a brush stroke preview of each new variant.
•Transposer — The Transposer lets you change the properties of one brush variant using the properties of another. For example, you can choose the 2B Pencil and create brush variants that are mutated toward another variant, such as Charcoal. To help you visualize how the new brush variants will look, the Transposer provides a brush stroke preview of each new variant.
•Stroke Designer — The Stroke Designer lets you modify the properties of brush variants using advanced controls. The Stroke Designer has 16 different sets of controls: General, Size, Spacing, Angle, Bristle, Well, Rake, Random, Mouse, Cloning, Impasto, Image Hose, Airbrush, Water, Digital Water, and Liquid Ink. To make the brush creation process more visual and interactive, the Stroke Designer includes a live preview that
updates each time you make changes to the brush variant.
Industry-Standard Masks,
Layer Masks, and Channels
Layer Masks: The redesigned layer masks let you hide and reveal areas of layers without making permanent changes to an image.
Channels: The Channels palette lets you use alpha channels to create and store masks to modify, separate, and preserve specific areas of an image.
And So Much More...
•Thumbnail previews for Layers, Layer Masks, and Channels
•Brush cursor preview that lets you see the size of the brush you’re painting with
•Enhanced keyboard shortcuts to make it easier to transition between Corel Painter 8 and other applications
•Enhanced file compatibility with Adobe Photoshop
4 |
Welcome to Corel Painter Essentials |

•New paper textures, patterns, Image Hose nozzles, brush looks, gradients, and more!
•Extra content CD, including 100 pictures from http://www.brandxpictures.com, hundreds of brushes, paper textures, and more!
About Your User Manual
You can find answers to most of your questions in the Corel
Painter Essentials User Manual. Available as PDF, it provides information you need to get the most out of Corel Painter Essentials.
The Corel Painter Essentials User Manual is for both the Mac OS and Windows platforms. As a convention, Mac OS commands precede Windows commands in the text.
When a modifier key differs between the Mac OS and Windows, the Mac OS modifier is listed first, followed by the Windows modifier. For example,
Command + I (Mac OS) or Ctrl + I
(Windows) means that Mac OS users would press Command + I and Windows users would press Ctrl + I.
Choosing a menu item from a menu follows the convention “Choose menu name > menu item.” For simplicity, the term “folder” refers to directories as well as folders. The Corel Painter Essentials interface for Mac OS and Windows platforms is identical, unless otherwise specified.
Registering Products
Registering products is important. Registration provides you with timely access to the latest product updates, valuable information about product releases, and access to free downloads, articles, tips and tricks, and special offers.
You can register a Corel product
•online—follow the instructions provided on the Corel Web site
•by mail—send the product registration card to the Corel Customer Service Center nearest you
•during installation—follow the instructions provided by the product setup
Before Calling Corel Technical
Support
Before you call Corel Technical Support, please check out some of Corel's complimentary online support options. Please have the following information available to assist the Technical Support representative in helping you:
•a brief description of the problem, including the exact text of any error messages received and the steps required to re-create the problem
•the type of computer, monitor, pointing device (for example, mouse or stylus), printer, and video adapter (display adapter) you are using
•the type and version number of the operating system you are using
•the product information (version number, serial number from the
Corel Painter Essentials |
5 |

product authenticity card, and PIN) of the Corel application you are using. To find the product information, choose Help menu > About Corel Painter Essentials in the application.
•a list of any applications loaded into RAM. Click the Start menu on the Windows taskbar, and click
Programs > Startup to determine whether there are any other applications running.
Corel Customer Support Services
Corel Support Services can provide you with prompt and accurate information about product features, specifications, pricing, availability, services and technical support.
Online Support
For information about online support services, visit www.corel.com/support. Please note, some of the services are available only in English.
Corel Knowledge Base
kb.corel.com
The Corel Knowledge Base allows you to read, print and download documents that contain answers to many technical questions.
Newsgroups
www.corel.com/newsgroups
The newsgroups (peer-to-peer forums) llow you to exchange information, tips and techniques with other users of Corel products.
Downloads
www.corel.com/downloads
You can download product patches, updates and trial versions.
Telephone Support
For detailed information regarding telephone support services please visit www.corel.com/support. Live
telephone support for this Corel product is available as a fee-based service only.
North America
•For pricing, purchasing, or general inquiries about Corel products, you can call Customer Service tollfree at 1-800-772-6735.
•To speak directly to a technician on a Pay-As-You-Go line please dial 1- 900-733-8780. To speak directly to a technician on a Pay-Per-Incident line please dial 1-877-662-6735.
The hours of operation are 8:30 a.m. to 7:30 p.m., Monday to Friday, Eastern Standard Time (EST).
Outside North America
For pricing, purchasing, or general inquiries about Corel products, call Customer Service toll-free at the corresponding in-country number listed below.
6 |
Welcome to Corel Painter Essentials |
Please note that these numbers may change as we adapt our services to fit user needs. Check the international support numbers page at www.corel.com/support for the most up to date contact details.
Contact Customer Service for pricing, purchasing, general inquiries, or replacement CDs. Contact Technical Support should you require technical assistance operating your Corel software.
Country |
Customer |
Technical |
|
Service |
Support |
Argentina |
0800 777 3203 |
57 1 523 1240 |
Australia |
1 800 658 850 |
61 2 8844 4101 |
Austria |
0192 89600 |
0192 89600 |
Belgium (Dutch) |
0240 06733 |
0240 06733 |
Belgium (French) |
0240 06777 |
0240 06777 |
Brazil |
0800 14 1212 |
55 11 5696 5797 |
Chile |
54 0800 777 3203 |
57 1 523 1240 |
China |
10 800 610 2323 |
10 800 610 2673 |
Colombia |
01 800 091 9370 |
57 1 523 1240 |
Czech Republic |
0224 239645 |
0224 239645 |
Denmark |
352 58008 |
352 58008 |
Finland |
922 906040 |
922 906040 |
France |
0170 706090 |
0170 706090 |
Germany |
06922 2220288 |
06922 2220288 |
Hong Kong |
800 964 514 |
800 964 515 |
Hungary |
204 117089 |
204 117089 |
Indonesia |
1 803 61 539 |
1 803 61 544 |
Ireland |
0124 77724 |
0124 77724 |
Corel Painter Essentials |
7 |

Country |
Customer |
Technical |
|
Service |
Support |
Israel |
44 1628 581601 |
44 1628 581601 |
Italy |
0236 003600 |
0236 003600 |
Japan |
81 3554 53274 |
81 3531 93013 |
Luxembourg |
44 1628 581603 |
44 1628 581603 |
Malaysia |
1 800 807 895 |
1 800 807 899 |
Mexico |
1 800 1234 854 |
57 1 523 1240 |
Netherlands |
0207 132700 |
0207 132700 |
New Zealand |
0508 267 351 |
0800 908 592 |
Norway |
229 71908 |
229 71908 |
Poland |
071 3477279 |
071 3477279 |
Portugal |
44 1628 581601 |
44 1628 581601 |
Singapore |
800 6161 853 |
800 6161 854 |
South Africa |
0860 223 388 |
0860 223 388 |
South Korea |
82 2 3444 5166 |
82 2 3444 5166 |
Spain |
0914 141500 |
0914 141500 |
Sweden |
0856 610555 |
0856 610555 |
Switzerland |
0158 03300 |
0158 03300 |
Switzerland |
0158 03280 |
0158 03280 |
Taiwan |
00801 61 1411 |
00801 61 1412 |
UK |
0870 774 0202 |
0870 774 0202 |
8 |
Welcome to Corel Painter Essentials |

2 The Workspace
The Corel Painter Essentials workspace has been designed to give you easy access to tools, effects, commands, and features.
The workspace is organized across a series of menus, selectors, and interactive palettes. Some features are also available in the frame of the document window.
Using Menus and
Document Window
Using the commands on the Corel Painter Essentials menu bar, you can:
•work with files and editing commands
•adjust and apply effects
•perform selection operations
•control the document window or the Corel Painter Essentials workspace
The document window lets you access the following features with the click of a button:
•tracing paper
•drawing mode
•navigation
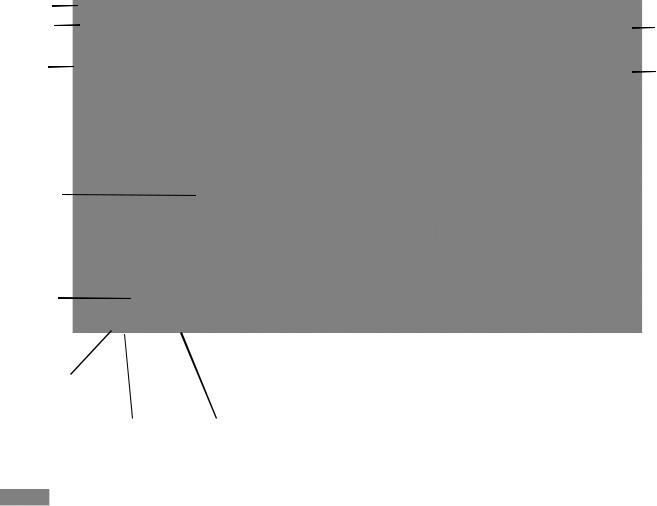
Workspace Tour
Menu bar
Property bar
Toolbox
Canvas
Document window
Drawing mode icon
Navigation |
Zoom slider |
icon |
|
Brush selector
Colors palette
 Layers
palette
10 |
The Workspace |

Using the Toolbox
In the toolbox, there are tools to make marks, draw shapes, fill shapes with color, view and navigate, and make selections. There are also four selectors that let you choose papers, gradients, patterns, and nozzles.
The toolbox.
Some tools of similar function share a space in the toolbox. The button for only one of these tools is displayed at a
time. Any tool that has a triangle in the bottom-right corner has one or more tools underneath it in a flyout menu.
The toolbox is open by default; however, it can be closed. You can move the toolbox around the document window, and you can dock the toolbox to the document window or to other palettes.
The current tool can be modified by options on the property bar, which change as you change tools. For more information, see “Using the Property Bar” on page 14.
To access tools grouped in flyout menus:
1In the toolbox, hold down the tool icon whose flyout menu you want to open.
2Choose the tool you want to use.
Some tools share a space in the toolbox. Hold down the tool button that’s displayed to open the flyout menu.
To close the toolbox
•Do one of the following:
•Click the Close button in the top corner of the toolbox.
•Choose Window menu > Hide Toolbox.
To open the toolbox, choose
Window menu > Show Toolbox.
To move the toolbox
1Place the cursor over the title bar of the toolbox.
Corel Painter Essentials |
11 |

2Drag the toolbox to a new location in the document window.
To dock the toolbox
1Place the cursor over the title bar of the toolbox.
2Drag the toolbox to the edge of the document window or a palette.
3When the toolbox lines up with the edge of the document window or palette, release the mouse button.
The toolbox will snap into place.
Navigation and Utility Tools
The Magnifier Tool
You can use the Magnifier tool to magnify areas of an image when you are performing detailed work, or to reduce areas to get an overall view of an image. For more information, see “Zooming” on page 22.
The Grabber Tool
The Grabber tool gives you a quick way to scroll an image. For more information, see “Repositioning Documents” on page 24.
The Rotate Page Tool
The Rotate Page tool lets you rotate an image window to accommodate the way you draw naturally. Refer to “Rotating Documents” on page 24 for more information.
The Crop Tool
The Crop tool lets you remove unwanted edges from the image. For more information, see “Cropping Images” on page 25.
Tools that Apply Color
The Brush Tool
You use the Brush tool to make marks on the Canvas or a layer. The Brush tool represents a category of marking tools. Within the Brush category are pencils, pens, chalk, an airbrush, oil paints, and more.
When the Brush tool is selected, you can choose specific brushes from the Brush selector bar. For more information about selecting brushes and tools, refer to “Selecting a Brush” on page 45.
On the property bar, you can set size, opacity and, depending on the brush variant selected, sometimes grain.
The Paint Bucket Tool
The Paint Bucket tool lets you fill an area. The property bar shows fill choices and fill color selections.
12 |
The Workspace |

Double-click the Paint Bucket tool to specify what color in the image to lock out of your fill. For more information on the Paint Bucket tool, refer to “Filling Techniques” on page 50.
The Dropper Tool
The Dropper tool lets you pick up a color from an existing image. When you select a color with the Dropper tool, that color becomes the current color on the Colors palette. For more information, see “Sampling Colors from Imagery” on page 41.
The Selection Tools
The Rectangular Selection Tool
You use the Rectangular Selection tool to create rectangular selections. Refer to “Using Selection Tools” on page 70 for more information.
The Oval Selection Tool |
The Selection Adjuster Tool |
You use the Oval Selection tool to create oval selections. Refer to “Using Selection Tools” on page 70 for more information.
The Lasso Tool
The Selection Adjuster tool lets you select, move, and manipulate selections created with the Rectangular, Oval, and Lasso selection tools.
The Text Tool
The Lasso tool lets you draw a freehand selection. Refer to “Using Selection Tools” on page 70 for more information.
The Adjuster Tools
The Layer Adjuster Tool
The Layer Adjuster tool is used to select, move and manipulate layers. Refer to “Using Layers” on page 59 for more information.
The Text tool creates text shapes. Use the property bar to set the font, point size, alignment and text color. For more information, see “Working with Text” on page 91.
The Color Selection Box
The Color Selection box lets you choose primary and secondary colors. The front rectangle displays the primary color, and the back rectangle displays the secondary color. For more information, refer to “Understanding Primary and Secondary Colors” on page 40.
Corel Painter Essentials |
13 |
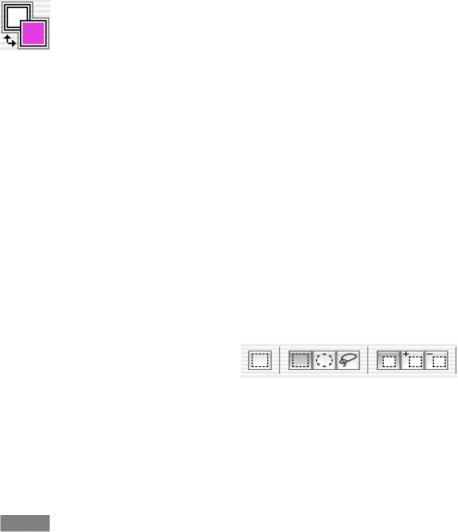
The Color Selection box.
To change the primary or secondary color:
1Double-click the primary or secondary color rectangle.
2Choose a color from the Color dialog box.
Using Selectors
The selectors in the toolbox give you quick access to the libraries for the following Corel Painter Essentials elements: papers, gradients, patterns, and nozzles.
You can display items in selectors in a list with thumbnails.
To open a selector:
1Click the flyout menu arrow on the bottom-right corner of the selector you want to open.
2Choose an item from the list.
Using the Property Bar
The property bar in Corel Painter Essentials is context-sensitive — it changes according to the tool you are using.
You can access settings and options for each tool, and you can change them according to your preferences using the boxes or pop-up sliders. Tool settings are retained when you switch from one tool to another. You can also use the property bar to restore the default settings of the selected tool.
The property bar is docked horizontally to the menu bar by default. You can move the property bar anywhere in the document window, dock it under the menu bar again, or close it.
The property bar for the Rectangular Selection tool.
To access tool settings on the property bar:
• Choose a tool from the toolbox.
Tool settings are displayed on the property bar.
To change tool settings on the property bar:
1Choose a tool from the toolbox.
2Do any of the following:
•Type a value in the box next to the control, or click the arrow next to the control and adjust the pop-up slider.
•Click a box to make a selection.
•Enable or disable the check box next to the option you want to use.
Note
• Not all of these options are available for every tool. The settings change depending on the tool selected.
To reset the default tool settings:
•Click the Reset Tool button on the property bar.
Note
• The Reset Tool button on the property bar has the same icon as the selected tool in the toolbox.
14 |
The Workspace |

To move the property bar:
•Point to the bar on the right side of the property bar, and drag it to its new location.
To dock the property bar:
•Point to the title bar of the property bar, and drag it under the menu bar.
The property bar snaps into place.
To close the property bar:
•Do one of the following:
•Choose Window menu > Hide Property Bar.
•If the property bar is undocked, click the close button on the title bar.
Tip
• To show the property bar, choose Window menu > Show Property Bar.
Using the Brush Selector Bar
The Brush selector bar lets you choose from a variety of brush categories and variants. Brush categories are groups of similar brushes and media. Brush variants are specific brushes and brush settings within a brush category.
The name of the selected brush category appears at the top of the Brush selector bar. The name of the selected brush variant appears under the brush category name.
The Brush selector bar.
To display the Brush selector bar:
•Choose Window menu > Show Brush Selector Bar.
To choose a brush from the Brush selector bar:
1On the Brush selector bar, click the Brush Category arrow and choose a brush category.
2Click the Brush Variant arrow, and choose a variant.
Previewing Brushes
The Brush Category selector shows you a preview of the currently selected brush category and lets you choose a new brush category. The Brush Variant selector does the same for brush variants.
You can preview brush categories and variants in lists with thumbnails.
To display brush categories and variant lists:
•On the Brush selector bar, click the Brush Category or Brush Variant arrow.
Corel Painter Essentials |
15 |

Items in the Brush selector bar can be displayed as lists with thumbnails.
Brush Selector Bar Menu
Commands
The Brush selector bar menu restores either one or all brush variant defaults.
Moving and Docking the
Brush Selector Bar
The Brush selector bar is displayed at the top-right of the property bar by default. It can be moved to a new location in the document window, or it can be docked to the edge of the document window or other palettes.
To move the Brush selector bar
•Point to the title bar of the Brush selector bar, and drag it to its new location.
To dock the Brush selector bar
1Point to the title bar of the Brush selector bar, and drag it to the edge of the document window or a palette.
2When the Brush selector bar is lined up with the edge of the document window or palette, release the mouse button.
The Brush selector bar snaps into place.
Closing the Brush Selector
Bar
You can close the Brush selector bar to hide it from view.
To close the Brush selector bar
•Do one of the following:
•Choose Window menu > Hide Brush Selector Bar.
•If the Brush selector bar is undocked, click the close button on the title bar.
Working with Palettes
The interactive palettes in Corel Painter Essentials let you access the commands, controls, and settings available when creating documents.
Showing and Hiding Palettes
You can show or hide a palette by choosing its name from the Window menu.
To show or hide a palette:
•Choose Window menu, and choose the palette you want to show or hide.
Tip
• You can hide a palette by clicking the close box on the palette title bar.
To show or hide all palettes:
•Choose Window menu > Show/ Hide Palettes.
16 |
The Workspace |
Exploring the Palettes
As you work with Corel Painter Essentials, you’ll use the following palettes:
The Colors Palette
•The Colors palette lets you choose primary and secondary colors for painting in Corel Painter Essentials documents. You can also use the Clone Color option on the Colors palette . For more information, see “Working with Color” on page 39.
The Layers Palette
•The Layers palette contains thumbnail previews of all the layers in a Corel Painter Essentials document. You can use the buttons on the Layers palette to add, arrange and delete layers. You can use the slider to adjust the opacity.
Navigating Palettes
When a palette is displayed, it must be expanded for you to access its settings. You can collapse palettes to save screen real estate, while keeping them displayed in the application.
To expand or collapse a palette:
•Click the palette arrow in the top corner of the palette.
When the triangle points down, the palette is expanded. When it points to the right, the palette is collapsed.
To scroll through the Layers palette:
•Do one of the following:
•Use the scrollbar on the right side of the palette to scroll through the palette.
•Press Option + click (Mac OS) or Alt + click (Windows), and drag vertically inside the palette. The cursor changes to a hand and the palette scrolls as you drag.
Docking Palettes
You can save valuable room on your screen by docking palettes.
This handy feature of Corel Painter Essentials lets them be docked into place when they get close to the top or bottom edge of another palette. In addition to tidying up your workspace, this feature can help keep a palette from being covered up by another palette.
To dock palettes:
1Place the cursor over the title bar of the palette you want to dock.
2Drag the palette to the top or bottom of a second palette.
3When the first palette lines up with the second palette, release the mouse button.
The palette will snap into place.
To undock palettes:
1Place the cursor over the title bar of the palette you want to undock.
2Drag the palette to another location in the workspace.
Corel Painter Essentials |
17 |

3 Basics
The Corel Painter Essentials application provides a digital workspace in which you can create new imagery or alter existing imagery using the Corel Painter Essentials Natural-Media tools and effects. Your working image is known as a document and is displayed in a document window—this document window includes navigation and productivity features to help you work efficiently.
As you create an image, you can save your document in a number of different file formats: RIFF (Corel Painter Essentials native format), JPEG, and TIFF, to name a few. Corel Painter Essentials also lets you open/ import images in many file formats.
Every artist works in a unique way, and every computer system has its own configuration of memory, disks, printers, and accessories. Corel Painter Essentials preferences let you customize the program for your own
work style and optimum performance on your particular system. You can also optimize the features of your tablet and pens in Corel Painter Essentials.
Opening Documents
The first step to creating an image in Corel Painter Essentials is opening a document. You can open a blank Canvas by creating a new document, work with an existing image by opening a file, place a file into a document, or acquire an image from a scanner or digital camera to place directly into a document.
Creating New Documents
The New command creates a blank, untitled document based on the specifications you set in the New dialog box.

•Canvas Size shows the RAM requirement for creating the document at the specified width, height, and resolution. This number does not reflect the file size for the saved document. A saved Corel Painter Essentials file is usually 25% to 50% of the size of the working document, depending on the number of colors it contains.
•Width and Height determine the dimensions of the Canvas. You can change the unit of measurement using the menu. Choose from pixels (the default), inches, centimeters, points, picas, and columns (2" wide).
•Resolution is the number of pixels per inch (ppi) or centimeter that make up an image. In the New dialog, setting the document’s pixels per inch is the same as setting its dpi. Refer to “Understanding Resolution” on page 21 for detailed information about document, screen, and print resolutions.
•Paper Color lets you select a background paper color—or Canvas color—when you create a new document. The default is white.
To create a new document:
1Choose File menu > New.
2In the New dialog box, enter values for the width, height, and resolution of the document.
Change the unit of measurement by choosing an option from the menu.
3Click in the Paper Color box to set the document’s background to a color other than white.
Choose a color from the system color picker that appears.
4Click OK.
A new document appears in the workspace.
Opening Existing Documents
You can open documents from other graphics applications and use Corel Painter Essentials to add brush
strokes, tints, or paper textures. Or, you can clone a document to re-create it in a different medium.
Corel Painter Essentials lets you open the following file formats:
•RIFF—Corel Painter Essentials native format (RIF)
•TIFF (TIF)
•Mac PICT (PCT)
•Windows Bitmap (BMP)
•GIF—Corel Painter Essentials does not convert GIF animations to frame stacks.
•JPEG (JPG).
Note
• Corel Painter Essentials does not support LZW compressed TIFF file format. Only uncompressed TIFF files open into Corel Painter Essentials.
To open an existing document:
1Choose File menu > Open.
2In the Select Image dialog box, use the dialog controls to locate the file you want to open.
20 Basics

Corel Painter Essentials lists every image’s file size, file format, and dimensions in pixels. In addition, files saved in Corel Painter Essentials include a thumbnail image for browsing purposes.
3Click Browse.
The Browse dialog box shows thumbnails for all the RIFF files in a folder.
4Double-click the file name, or select a file and click Open.
Tip
• The File menu also offers you a shortcut to previously opened documents. Before choosing Open in the File menu, check the recently opened files list at the bottom of the File menu.
Acquiring Images
You can acquire images for Corel Painter Essentials directly from an external device—such as a scanner or digital camera—if the device provides a TWAIN driver (Windows)
Before acquiring images:
•Make sure your TWAIN driver is properly installed.
Understanding Resolution
When working with images in a digital workspace, it is helpful to understand the concept and applications of resolution. Resolution refers to how Corel Painter Essentials measures, displays, saves, and prints images—either as small squares of color known as pixels or as mathematical objects known as vectors.
A document’s resolution affects both its appearance on your computer screen and its print quality. You can specify a document’s resolution when you create a new document, acquire an image, and save/export a file.
Resolution and Screen Appearance
Most monitors have a resolution of 72 dpi (dots per inch). Because of this, the Corel Painter Essentials display default is 72 ppi (pixels per inch). This
means that each pixel in the Corel Painter Essentials image occupies one pixel on your monitor. The display resolution does not affect the document’s actual ppi—only how the image is displayed on the monitor.
For example, a 300 ppi document displays at approximately four times its actual size. This happens because each pixel in the Corel Painter Essentials image occupies one pixel on your monitor, and the monitor’s pixels are four times the size of the image’s pixels. Put another way, at 300 pixels per inch, your document will be approximately a quarter of its on-screen size when printed. In this example, if you want to view the image at actual size, set the zoom level to 25%.
Keep in mind that if you leave the dimensions in pixels and then change the pixels per inch (resolution), the actual printed size will be affected by the change. If you set your document size in inches, centimeters, points, or picas and change resolution, the dimensions will not be affected by the change.
Corel Painter Essentials |
21 |

Resolution and Print Quality
The resolution of output devices (printers) is measured in dpi and, in the case of halftones, lines per inch (lpi). Output device resolutions vary depending on the type of press and paper you’re printing on. Generally, a photograph will be output at a crisp 150 lpi if printed on glossy magazine stock and at 85 lpi for more porous, and therefore more forgiving, newspaper stock.
If you are using a personal laser printer or inkjet printer, set your document size in inches, centimeters, points, or picas at the dpi specific to your printer. Most printers will produce excellent output from images set to 300 ppi. Your file will be output correctly, at the best resolution for your laser printer and at the proper size. Increasing the file’s ppi setting does not necessarily improve the output, and can make for a larger and sometime unwieldy file.
If you are using a commercial printer or a more sophisticated output device, the dimensions of the image should always be set to the actual size it will
appear in the printed piece. For the resolution, a good rule of thumb is to set your document’s pixels per inch to twice the desired lpi. So, when lpi is 150, the pixels per inch should be twice that, or 300; if the lpi is 85, the pixels per inch should be 170. It’s a good idea to check with your service bureau if you have questions about output device resolution.
Working with Documents
Viewing Documents
You can change your view of an image by changing its level of magnification (zooming in or out), repositioning the document in the Corel Painter Essentials workspace, or rotating the document. You can also change the characteristics of the document window by changing the screen mode, and by selecting options from the Canvas menu.
Zooming
By default, Corel Painter Essentials opens a document at 100% magnification, but you can change the level of magnification by zooming. You can zoom in and out using the Magnifier tool, reset magnification and zoom to fit the screen. You can even zoom in and out while working with other tools.
The Magnifier tool lets you zoom in and out by clicking in the document window.
To zoom in:
1 Do one of the following:
22 Basics

•Choose the Magnifier tool in the toolbox.
•Hold down Command + Spacebar (Mac OS) or Ctrl + Spacebar (Windows).
The Magnifier cursor shows a plus sign (+) — indicating you are increasing magnification (zooming in).
2Click or drag in the document window.
•Clicking magnifies the image to the next level, as defined in the Zoom Level menu on the property bar.
•When you drag, Corel Painter Essentials chooses the magnification level that most closely conforms to the selected area and centers the screen view on that area.
The percentage the document is magnified appears in the document window’s title bar.
To zoom out:
1 Do one of the following:
•Choose the Magnifier tool and hold down Option (Mac OS) or Alt + Ctrl (Windows).
•Hold down Option +Command +Spacebar (Mac OS) or Alt + Ctrl + Spacebar (Windows).
The Magnifier cursor shows a minus sign (-) — indicating you are decreasing magnification (zooming out).
2Click in the document window.
Each click reduces the magnification to the next level, as defined in the Zoom Level menu on the property bar.
Tip
• You can also zoom in or out by moving the Scale slider, typing a value in the bottom left corner of the image window, or choosing an option from the Zoom Level pop-up menu on the property bar.
To zoom using the Magnifier tool
1In the toolbox, click the Magnifier tool.
2Choose a zoom level from the Zoom Level pop-up menu on the property bar.
To reset magnification to 100%:
• Double-click the Magnifier tool.
To zoom to fit the screen:
•Do one of the following:
•Choose Window menu >
Zoom to Fit Screen.
•Double-click the Grabber tool in the toolbox  .
.
Corel Painter Essentials generates a view of the entire document to fit the size of your screen.
To access the Magnifier tool while any other tool is selected:
•Press Command + Spacebar (Mac OS) or Ctrl + Spacebar
(Windows) and click to zoom in; press Command + Option + Spacebar (Mac OS) or Ctrl + Alt + Spacebar (Windows) and click to zoom out.
Corel Painter Essentials |
23 |

Repositioning Documents
The Grabber tool allows you to reposition a document in the Corel Painter Essentials workspace and view different areas of an image.
To use the Grabber tool:
1Activate the Grabber tool by doing one of the following:
•Choosing the Grabber tool  .
.
•Holding down the Spacebar.
The cursor changes to the Grabber tool and the property bar shows the zoom level. You can change the zoom level from the property bar.
2Do one of the following:
•Drag in the document window to scroll through your image.
•Click once in the document window to center the image.
To access the Grabber tool from any tool:
• Hold down the Spacebar.
To size your image window to fit the screen area:
•Do one of the following:
•Double-click the Grabber tool.
•Choose Window menu > Zoom to Fit.
•Click Fit on Screen on the property bar.
Tip
• To return the image window to center, click once with the Grabber tool or click Center Image on the property bar.
Rotating Documents
The Rotate Page tool lets you rotate an image on the screen to accommodate the way you draw naturally.
You can access the Rotate tool by clicking on the small arrow at the lower right corner of the Grabber tool. Select the Rotate tool from the flyout menu that opens. It will then appear in the toolbox.
To rotate the page:
1Activate the Rotate Page tool by doing one of the following:
•Clicking it in the toolbox  .
.
•Holding down Option + Spacebar (Mac OS) or Alt + Spacebar (Windows).
The cursor changes to a hand with a pointing finger.
2Drag in the document window to rotate the image.
Move the cursor clockwise to rotate the image clockwise. Move the cursor counter-clockwise to rotate the image counter-clockwise.
The new rotation angle appears on the property bar.
Tip
• You can also rotate an image by specifying a rotation angle on the property bar.
24 Basics
Rotate a document to accommodate the way you naturally draw.
To return an image to its original orientation:
1 Activate the Rotate Page tool  .
.
2Do one of the following:
•Click once in the document window.
•Double-click the Rotate Page tool.
•Click the Reset Tool button on the property bar.
To constrain rotation to 90° increments:
•Hold down the Shift key while rotating.
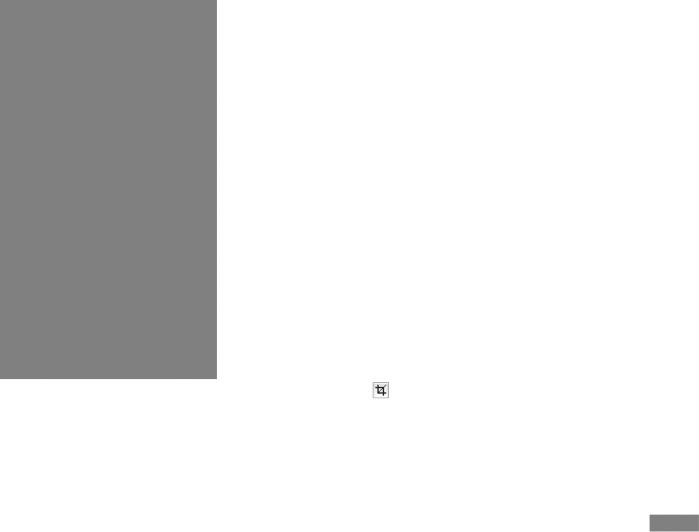
Cropping Images
You can remove unwanted edges from the image with the Crop tool. You can adjust the ratio of the cropped image, and choose to maintain the aspect ratio.
To crop an image: |
|
1 Click the Crop tool |
in the |
toolbox. |
|
2Drag inside the image to define the rectangular area you want to keep.
You can adjust the rectangle by dragging a corner or any of its edges.
3When you’re ready to execute the crop, click inside the rectangle.
To constrain cropping to a square:
•Press Shift + drag while defining the rectangular area with the Crop tool.
To adjust the ratio of the cropped image:
1Click the Crop tool in the toolbox.
2On the property bar, type ratio values in the boxes.
3If necessary, enable the Ratio check box to maintain aspect ratio when cropping the image.
Using Full Screen Mode
Full screen mode allows you to hide your computer’s desktop and view the document window without scroll bars. When full screen mode is on, the document window is centered over a solid background. All Corel Painter
Corel Painter Essentials |
25 |

Essentials features—except the buttons on the document window— work when using full screen mode.
To toggle the full screen mode on and off:
•Press Command + M (Mac OS) or Ctrl + M (Windows), or choose
Window menu > Screen Mode Toggle.
Tip
• You can position the image window anywhere on the screen by holding down the Spacebar and dragging with your mouse or stylus.
Resizing the Canvas
If you want the same image at a different scale, you can resize the canvas. You can also change the size of the drawing area, and you can crop the canvas.
To resize the canvas:
1Choose Canvas menu > Resize.
Corel Painter Essentials displays the Resize dialog box, which shows
the current and new size by width, height, and resolution.
2Enter a new value for width, height or resolution.
For more information on these values, refer to “Creating New Documents” on page 19.
3The Constrain File Size option lets you choose how to deal with dimensions relative to resolution.
When Constrain File Size is enabled, you can change the height and width of the image together. The resolution will change accordingly.
When Constrain File Size is disabled, you can change the height and width independently of the resolution, and vice versa.
If you choose Pixels or Percent as the unit and enter a value, Corel Painter Essentials automatically disables the Constrain option.
4Click OK.
To resize the drawing area:
1Choose Canvas menu > Canvas Size.
2In the Canvas Size dialog box, specify the number of pixels you want to add to any side of the canvas.
Enter negative values to reduce the canvas size.
To crop the canvas:
1Display the image at a scale where you can see all of it.
2In the toolbox, choose the Crop tool  .
.
3Drag in the image to describe the rectangular area you want to keep.
4Adjust the rectangle by dragging a corner or any of its edges.
To constrain the cropping rectangle to a certain aspect ratio, enter values for the width and height aspect, and enable the Ratio option on the property bar.
5Click inside the rectangle to perform the cropping operation.
26 Basics
Loading...