


AfterShot Pro 3
Table of contents
 Loading...

Corel
®
AfterShot
®
Pro 3
User Guide

Contents i
Contents
Quick Start . . . . . . . . . . . . . . . . . . . . . . . . . . . . . . . . . . . . . 1
Welcome . . . . . . . . . . . . . . . . . . . . . . . . . . . . . . . . . . . . . . . 9
What is Corel AfterShot Pro?. . . . . . . . . . . . . . . . . . . . . . . . . . . . . 9
What’s new in Corel AfterShot Pro 3? . . . . . . . . . . . . . . . . . . . . . 14
Workspace tour . . . . . . . . . . . . . . . . . . . . . . . . . . . . . . . . . . . . . 16
Understanding non-destructive editing . . . . . . . . . . . . . . . . . . . . 18
Understanding the Library . . . . . . . . . . . . . . . . . . . . . . . . . . . . . . 22
Understanding the export process . . . . . . . . . . . . . . . . . . . . . . . . 24
System requirements. . . . . . . . . . . . . . . . . . . . . . . . . . . . . . . . . . 26
Supported cameras and file formats . . . . . . . . . . . . . . . . . . . . . . 27
About image size . . . . . . . . . . . . . . . . . . . . . . . . . . . . . . . . . . . . 28
Learning how to use Corel AfterShot Pro . . . . . . . . . . . . . 31
Using the Help system. . . . . . . . . . . . . . . . . . . . . . . . . . . . . . . . . 31
Corel AfterShot Pro User Guide PDF. . . . . . . . . . . . . . . . . . . . . . . 32
Learning with video tutorials . . . . . . . . . . . . . . . . . . . . . . . . . . . . 32
Using Web-based resources. . . . . . . . . . . . . . . . . . . . . . . . . . . . . 32
Library and catalogs . . . . . . . . . . . . . . . . . . . . . . . . . . . . . 35
About the Library . . . . . . . . . . . . . . . . . . . . . . . . . . . . . . . . . . . . 35
About catalogs . . . . . . . . . . . . . . . . . . . . . . . . . . . . . . . . . . . . . . 36
Importing images . . . . . . . . . . . . . . . . . . . . . . . . . . . . . . . . . . . . 37
Managing your Library . . . . . . . . . . . . . . . . . . . . . . . . . . . . . . . . 39
Portable catalogs . . . . . . . . . . . . . . . . . . . . . . . . . . . . . . . . . . . . 43
File System mode . . . . . . . . . . . . . . . . . . . . . . . . . . . . . . . 45
Image settings in File System mode . . . . . . . . . . . . . . . . . . . . . . . 45
Editing photos. . . . . . . . . . . . . . . . . . . . . . . . . . . . . . . . . . 47

ii Corel AfterShot Pro 3
About non-destructive editing. . . . . . . . . . . . . . . . . . . . . . . . . . . 48
About adjustment tools . . . . . . . . . . . . . . . . . . . . . . . . . . . . . . . 49
Standard tools . . . . . . . . . . . . . . . . . . . . . . . . . . . . . . . . . . . . . . 52
Histogram. . . . . . . . . . . . . . . . . . . . . . . . . . . . . . . . . . . . . . . . . . 52
Basic Adjustments. . . . . . . . . . . . . . . . . . . . . . . . . . . . . . . . . . . . 53
Presets . . . . . . . . . . . . . . . . . . . . . . . . . . . . . . . . . . . . . . . . . . . . 57
Color tools . . . . . . . . . . . . . . . . . . . . . . . . . . . . . . . . . . . . . . . . . 57
Tone tools. . . . . . . . . . . . . . . . . . . . . . . . . . . . . . . . . . . . . . . . . . 63
Detail tools . . . . . . . . . . . . . . . . . . . . . . . . . . . . . . . . . . . . . . . . . 65
Metadata tools . . . . . . . . . . . . . . . . . . . . . . . . . . . . . . . . . . . . . . 71
Plugins . . . . . . . . . . . . . . . . . . . . . . . . . . . . . . . . . . . . . . . . . . . . 73
Selective editing . . . . . . . . . . . . . . . . . . . . . . . . . . . . . . . . . . . . . 77
Retouching with Heal, Clone, or Blemish Remover . . . . . . . . . . . . 84
Removing red eye . . . . . . . . . . . . . . . . . . . . . . . . . . . . . . . . . . . . 88
Cropping . . . . . . . . . . . . . . . . . . . . . . . . . . . . . . . . . . . . . . . . . . 88
Straightening . . . . . . . . . . . . . . . . . . . . . . . . . . . . . . . . . . . . . . . 89
Working with Presets . . . . . . . . . . . . . . . . . . . . . . . . . . . . . . . . . 90
Copying and pasting settings . . . . . . . . . . . . . . . . . . . . . . . . . . . 93
Undoing changes . . . . . . . . . . . . . . . . . . . . . . . . . . . . . . . . . . . . 95
About default settings. . . . . . . . . . . . . . . . . . . . . . . . . . . . . . . . . 96
Using the History palette. . . . . . . . . . . . . . . . . . . . . . . . . . . . . . . 97
Editing photos in an external image editor . . . . . . . . . . . . . . . . . 98
Corel AfterShot HDR. . . . . . . . . . . . . . . . . . . . . . . . . . . . . 101
Working with Corel AfterShot HDR . . . . . . . . . . . . . . . . . . . . . . 101
Organizing images . . . . . . . . . . . . . . . . . . . . . . . . . . . . . . 103
Versions . . . . . . . . . . . . . . . . . . . . . . . . . . . . . . . . . . . . . . . . . . 103
Stacks . . . . . . . . . . . . . . . . . . . . . . . . . . . . . . . . . . . . . . . . . . . . 105
Thumbnail indicators . . . . . . . . . . . . . . . . . . . . . . . . . . . . . . . . 108
Sorting . . . . . . . . . . . . . . . . . . . . . . . . . . . . . . . . . . . . . . . . . . . 109
Filtering . . . . . . . . . . . . . . . . . . . . . . . . . . . . . . . . . . . . . . . . . . 110

Contents iii
Labels . . . . . . . . . . . . . . . . . . . . . . . . . . . . . . . . . . . . . . . . . . . . 111
Ratings . . . . . . . . . . . . . . . . . . . . . . . . . . . . . . . . . . . . . . . . . . . 113
Flags. . . . . . . . . . . . . . . . . . . . . . . . . . . . . . . . . . . . . . . . . . . . . 113
Keywords. . . . . . . . . . . . . . . . . . . . . . . . . . . . . . . . . . . . . 115
Effective use of keywords . . . . . . . . . . . . . . . . . . . . . . . . . . . . . 115
Working with keywords and keyword sets . . . . . . . . . . . . . . . . . 117
Metadata. . . . . . . . . . . . . . . . . . . . . . . . . . . . . . . . . . . . . 123
Types of metadata . . . . . . . . . . . . . . . . . . . . . . . . . . . . . . . . . . 123
Storing and sharing metadata . . . . . . . . . . . . . . . . . . . . . . . . . . 124
Working with metadata . . . . . . . . . . . . . . . . . . . . . . . . . . . . . . 125
Viewing metadata. . . . . . . . . . . . . . . . . . . . . . . . . . . . . . . . . . . 125
Editing metadata . . . . . . . . . . . . . . . . . . . . . . . . . . . . . . . . . . . 126
Managing metadata sets. . . . . . . . . . . . . . . . . . . . . . . . . . . . . . 126
Finding photos by using metadata . . . . . . . . . . . . . . . . . . . . . . 128
Metadata in images that you output . . . . . . . . . . . . . . . . . . . . . 130
Adding metadata in other applications . . . . . . . . . . . . . . . . . . . 131
Watermarks. . . . . . . . . . . . . . . . . . . . . . . . . . . . . . . . . . . 133
Watermark settings. . . . . . . . . . . . . . . . . . . . . . . . . . . . . . . . . . 134
Saving watermarks as presets . . . . . . . . . . . . . . . . . . . . . . . . . . 137
Exporting images. . . . . . . . . . . . . . . . . . . . . . . . . . . . . . . 139
About exporting . . . . . . . . . . . . . . . . . . . . . . . . . . . . . . . . . . . . 139
Exporting without a batch preset . . . . . . . . . . . . . . . . . . . . . . . 140
Exporting with a batch preset . . . . . . . . . . . . . . . . . . . . . . . . . . 142
Using batches with folders . . . . . . . . . . . . . . . . . . . . . . . . . . . . 143
Pausing, resuming, and stopping batches . . . . . . . . . . . . . . . . . 143
Managing batches . . . . . . . . . . . . . . . . . . . . . . . . . . . . . . . . . . 144
Understanding export settings. . . . . . . . . . . . . . . . . . . . . . . . . . 146
Web Galleries . . . . . . . . . . . . . . . . . . . . . . . . . . . . . . . . . . . . . . 151
Copying images . . . . . . . . . . . . . . . . . . . . . . . . . . . . . . . . . . . . 155

iv Corel AfterShot Pro 3
Adjusting the workspace . . . . . . . . . . . . . . . . . . . . . . . . . 159
Showing and hiding panels. . . . . . . . . . . . . . . . . . . . . . . . . . . . 160
Viewing options . . . . . . . . . . . . . . . . . . . . . . . . . . . . . . . . . . . . 161
Multi-Image View . . . . . . . . . . . . . . . . . . . . . . . . . . . . . . . . . . . 161
Resizing panels . . . . . . . . . . . . . . . . . . . . . . . . . . . . . . . . . . . . . 162
Magnifier . . . . . . . . . . . . . . . . . . . . . . . . . . . . . . . . . . . . . . . . . 163
Metadata viewer . . . . . . . . . . . . . . . . . . . . . . . . . . . . . . . . . . . . 164
Slideshows . . . . . . . . . . . . . . . . . . . . . . . . . . . . . . . . . . . . 165
About slideshows . . . . . . . . . . . . . . . . . . . . . . . . . . . . . . . . . . . 165
Slideshow settings . . . . . . . . . . . . . . . . . . . . . . . . . . . . . . . . . . 166
Playing a slideshow . . . . . . . . . . . . . . . . . . . . . . . . . . . . . . . . . . 167
Printing . . . . . . . . . . . . . . . . . . . . . . . . . . . . . . . . . . . . . . 169
Printing with Corel AfterShot Pro. . . . . . . . . . . . . . . . . . . . . . . . 169
Printing a folder of images . . . . . . . . . . . . . . . . . . . . . . . . . . . . 171
Print settings. . . . . . . . . . . . . . . . . . . . . . . . . . . . . . . . . . . . . . . 171
Controlling print jobs and page breaks . . . . . . . . . . . . . . . . . . . 172
Managing print batches . . . . . . . . . . . . . . . . . . . . . . . . . . . . . . 174
Print layouts . . . . . . . . . . . . . . . . . . . . . . . . . . . . . . . . . . . . . . . 175
Application preferences . . . . . . . . . . . . . . . . . . . . . . . . . . 181
Accessing preferences . . . . . . . . . . . . . . . . . . . . . . . . . . . . . . . . 182
General preferences . . . . . . . . . . . . . . . . . . . . . . . . . . . . . . . . . 182
Display preferences . . . . . . . . . . . . . . . . . . . . . . . . . . . . . . . . . . 183
Color Management preferences. . . . . . . . . . . . . . . . . . . . . . . . . 185
Import and Cache preferences. . . . . . . . . . . . . . . . . . . . . . . . . . 185
Renaming preferences. . . . . . . . . . . . . . . . . . . . . . . . . . . . . . . . 186
Sequence preferences . . . . . . . . . . . . . . . . . . . . . . . . . . . . . . . . 187
Keyboard preferences . . . . . . . . . . . . . . . . . . . . . . . . . . . . . . . . 187
Soft Proofing preferences . . . . . . . . . . . . . . . . . . . . . . . . . . . . . 188
Copy Sets preferences . . . . . . . . . . . . . . . . . . . . . . . . . . . . . . . . 188

Contents v
Defaults preferences . . . . . . . . . . . . . . . . . . . . . . . . . . . . . . . . . 189
Crop preferences. . . . . . . . . . . . . . . . . . . . . . . . . . . . . . . . . . . . 189
External Editor preferences . . . . . . . . . . . . . . . . . . . . . . . . . . . . 190
Performance preferences . . . . . . . . . . . . . . . . . . . . . . . . . . . . . . 190
Hardware Acceleration preferences . . . . . . . . . . . . . . . . . . . . . . 190
Additional information . . . . . . . . . . . . . . . . . . . . . . . . . . 193
Renaming formats. . . . . . . . . . . . . . . . . . . . . . . . . . . . . . . . . . . 193
Metadata tags . . . . . . . . . . . . . . . . . . . . . . . . . . . . . . . . . . . . . 204
File locations . . . . . . . . . . . . . . . . . . . . . . . . . . . . . . . . . . . . . . . 206
Command line options . . . . . . . . . . . . . . . . . . . . . . . . . . . . . . . 208
Custom print layouts. . . . . . . . . . . . . . . . . . . . . . . . . . . . . . . . . 209
About color management . . . . . . . . . . . . . . . . . . . . . . . . . . . . . 211
Terminology . . . . . . . . . . . . . . . . . . . . . . . . . . . . . . . . . . . . . . . 214
Updating and extending the application . . . . . . . . . . . . . 219
Finding and installing downloadable content. . . . . . . . . . . . . . . 219
Providing feedback for downloadable content. . . . . . . . . . . . . . 220
Restoring purchases . . . . . . . . . . . . . . . . . . . . . . . . . . . . . . . . . 220

vi Corel AfterShot Pro 3

Quick Start 1
Quick Start
This section introduces some of the basic tasks that you can accomplish
in Corel AfterShot Pro. If you're looking for a quick way to start working
with the application, take a few minutes to go through the steps
below. The steps include handy shortcuts and tips that help you work
quickly.
There are three main steps:
1.Open your photos in Corel AfterShot Pro.
2.Select and edit one or more photos.
3.Output your edited photos individually or as a batch.
Before you begin, see “Workspace tour” on page 16 for a quick
overview of the workspace.
Step one: Open your photos
To get you started quickly, we're going t
o w
ork directly from the folders
on your computer. After you're familiar with the application, you can
choose to build a Library by importing photos into Corel AfterShot Pro.
When you're ready for more information, see“About the Library” on
page 35.
To navigate to your photos
• In Corel AfterShot Pro, click the File System tab, and navigate to
your folder in the Directory View.
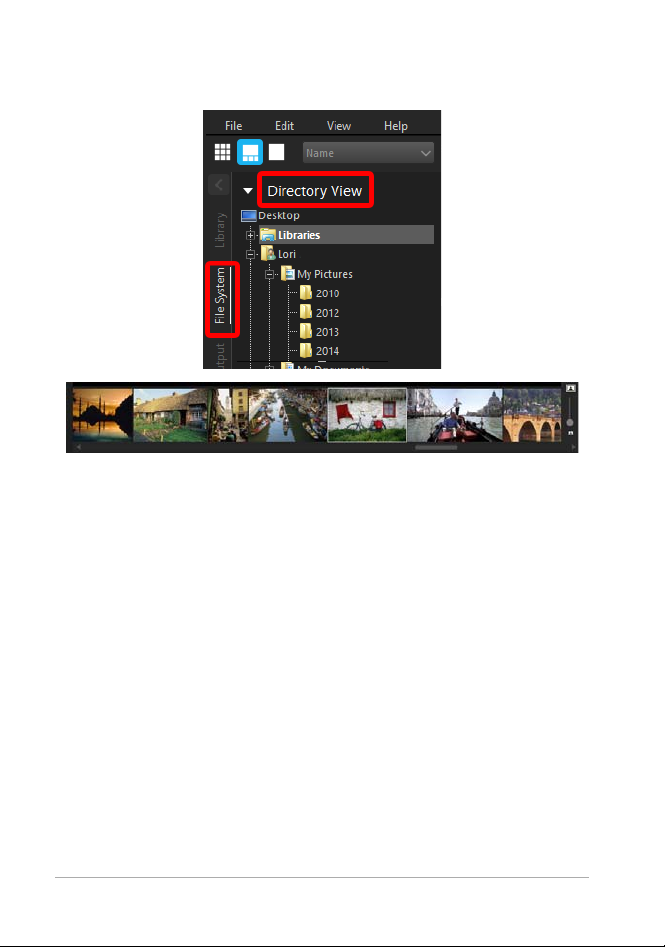
2 Corel AfterShot Pro 3
When you click a folder, the photos from the folder are displayed
as thumbnails in the Thumbnail panel.
Thumbnail panel, displayed as a strip in Standard View
Step two: Selecting and editing photos
To view and adjust images, you need to
select them. The Thumbnail
panel displays thumbnails of the photos that are in the active folder.
When you select a thumbnail, the Preview panel displays a larger view
of the photo. When you edit a photo, the original file (master file) is
never altered — edit information is saved separately and what you see
onscreen is a master version, a preview that shows your edits. You can
edit the entire photo or a selected area of the photo. When you are
finished editing a photo, you can simply move on to the next photo, or
you can save your changes as a new version. This means that you
capture the edits as a variation of the original file. The version can be
viewed as a thumbnail or in the Preview panel. It can also be output.

Quick Start 3
To preview and select photos
1 In the Browse panel, click the File System tab.
2 Navigate to the folder you want. The Thumbnail panel displays the
photos that are in the folder.
3 Click a thumbnail to display it in the Preview panel.
Before you start editing, you can choose between viewing the
edits
directly on the master version of your file, or creating a new
version for editing by pressing Insert or by right-clicking the
th
um
bnail and choosing Version > New Version from Defaults.
Note: The last image you select is called the active image. While
in Multi-Image View mode, metadata changes, adjustments,
and other edits apply only to the active image.
You can also
Scroll quickly through thumbnails
Press
[ or ].
Compare two or more photos (or
versions) in the Preview panel
Click the
Toggle Multi-Image
View
button (or press M),
and
Ctrl + click or Command-
click the thumbnails. The Preview
panel displays the selected
photos.
This is a great way to select and
flag the best photo in a series of
similar photos. For more
information about flagging and
organizing your photos, see
“Organizing images” on
page 103.
Select all thumbnails
Press
Ctrl + A or Command-A.
Deselect thumbnails Click a background area of the
Thumbnail panel or press
Ctrl +
D or Command-D.
4 Corel AfterShot Pro 3
To edi t a p hot o
1 In the Browse panel, navigate to the folder you want.
The Thumbnail panel displays the ph
otos that are in the folder.
2 Click a thumbnail to display it in the Preview panel.
3 Experiment by trying any of the editing actions in the following
table.
To Do the following
Flag or add
keywords (i.e. add
metadata)
• Flag — click a thumbnail and on the Top
toolbar click the Flag as Pick button or
press . (period key). To mark a photo as a
reject, click the Flag as Reject button
or press , (comma key).
• Keywords — on the Tools panel, click the
Metadata tab, click inside the Keywords
box, and type one or more keywords,
separated by commas.
Crop a photo On the AfterShot Pro toolbar at the bottom of
the Preview panel, click the
Crop tool . In the
Cropping palette, adjust the settings that you
want, and in the Preview panel, drag the crop
area over the area that you want to preserve.
Click
Done in the Cropping palette.
Adjust the color,
tone, or sharpness
of the entire
photo
In the Tools panel, click the
Standard tab, and
adjust the settings you want in the
Basic
Adjustments section.

Quick Start 5
Tip: There are some handy ways to undo actions. Here are a
few you can try:
• To undo one action at a time, press Ctrl + Z or
Command-Z.
•
To reset a Tools panel slider to its original setting,
double-click the slider name.
• To clear all the changes that you've made to a photo,
right-click the thumbnail, and choose Settings >
Apply Default Settings from the context menu.
To show your edits on a new version
• In the Thumbnail panel, right-click or Control-click an edited
photo (master version), and from the context menu, choose
Version > New Version from Current.
Note: You can confirm that a photo has been edited by looking
for the Edit icon in the corner of the thumbnail.
Edit a selected
area only
1 Click the
Open Layer Manager button in
the upper-right corner of the window.
2 In the
Layers palette, click the +Adjust
button at the top of the palette. A new editing
layer is created.
3 Click a
Region tool, such as the Circle Region
tool, click an area that you want to adjust, and
adjust the
Size, Feather, or other settings at the
bottom of the
Layers palette.
4 In the
Basic Adjustments section of the Tools
panel, adjust any of the settings you want — the
changes apply to the selected area(s) of the
current layer.
To Do the following
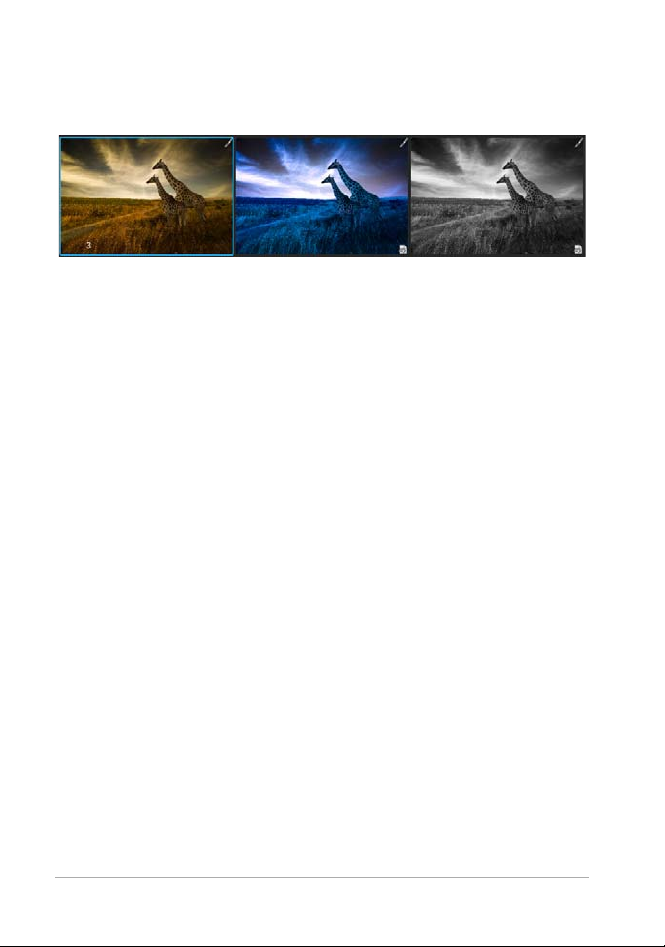
6 Corel AfterShot Pro 3
A new thumbnail appears next to the thumbnail of the master
version. By default, versions use the following naming convention:
original file name + version number (_v2, _v3, ...).
Three edited versions based on the same master file
You can now return to the master version and edit it in a new way and
create another version. To start from the original settings, you can clear
the edits made to the master version by right-clicking or Control-
c
lick
ing the thumbnail, and choosing Settings > Apply Default
Se
ttings from the context menu.
Tip: Whether you choose to create a new version before or after
editing a master version depend
s on your workflow. For
example, if you know that you want to make several versions
from the outset, you can create a version before you start
editing, so you can always see how the original master file
looks. If you want to quickly fix a photo, you can simply edit the
master version—you can create other versions later if you want.
The non-destructive nature of editing in Corel AfterShot Pro
gives you maximum flexibility.
For more information about editing
pho
tos, see “Editing photos” on
page 47.
Step three: Exporting photos for sharing and print
After you organize and edit your photos, you can share your work by
expo
rting your photos. Exporting lets you save your photos to a
standard file format so that you can share your work on the Web, via
email, or use your files in other applications. You can also output your
Quick Start 7
files to print. There are a number of standard output choices, called
batches, that let you output quickly, but you can also create a custom
batch. For example, you can choose file type, quality, color space, and
image size. You can also set a naming convention to rename the files
when they are output and you can apply presets. For more information
about outputting, see Exporting images.
To get you started quickly, let's use standard batches to save to JPEG
and print a couple of 5 x 7 inch photos.
To output to a full-sized JPEG
1 In the Thumbnail panel, select one or more photos that you want
to output.
2 Do one of the following:
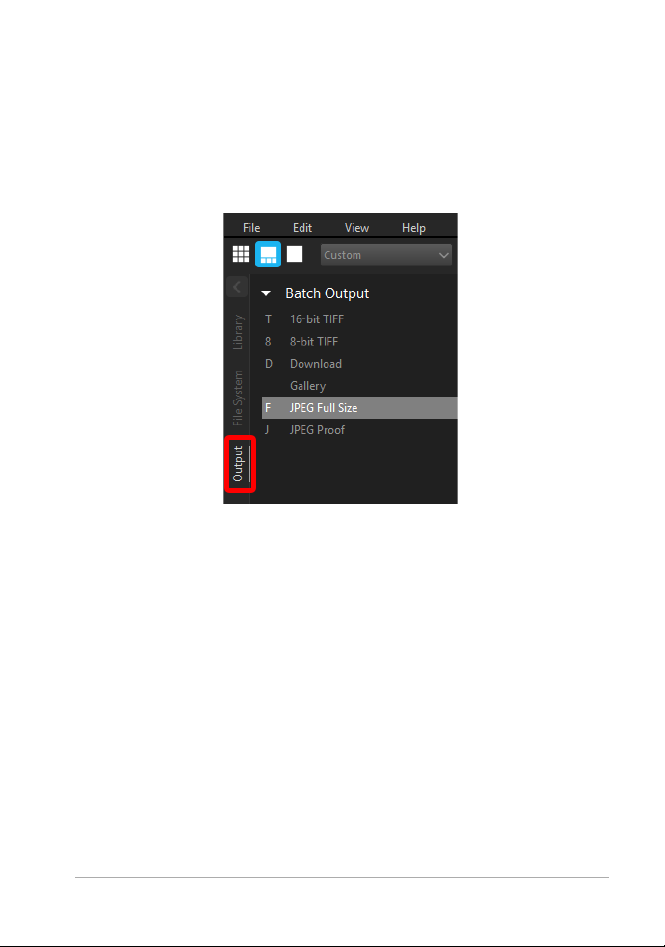
• • In the Browse panel, click the Output tab, and in the Batch
Out
put section, drag the thumb
nails to JPEG Full Size.
• • Press F (shortcut key assigned to JPEG Full Size batch).
3 In the Select a Destination dialog box, choose a folder where the
files will be saved.

8 Corel AfterShot Pro 3
After you select a destination folder, files are saved automatically
to that folder for the rest of the session. You can change the
destination and access other output settings by double-clicking a
batch name in the Batch Output or Printing section.
To print to a standard print size
1 In the Thumbnail panel, select two photos that you want to print.
2 In the Browse panel, click the Output tab, and in the Printing
section, drag the thumbnails to a batch name, such as 5x7 Qty.2.
Numbers appear ne
xt to the batch name, (0 of 2), to indicate the
nu
mber of photos printed and the total number of photos in the
batch.
3 Double-click the batch name to preview the print job in the Print
Settings dialog box.
4 In the Print Layout section, enable the Scale crop or Scale reduce
option (matches the photos to the selected print ratio) and
preview the results.
5 Choose your printer from the drop-down list in the bottom left
corner.
6 Click Print.
Moving on
Now that you have been introduced to the basics, here are some
additional topics that will provide you with more detailed information:
• About the Library
• Managing your Library
• Editing photos
• Organizing images
• Exporting images

Welcome 9
Welcome
In this section, you’ll learn about
• What is Corel AfterShot Pro?
• What’s new in Corel AfterShot Pro 3?
• Workspace tour
• Understanding non-destructive editing
• Understanding the Library
• Understanding the export process
• System requirements
• Supported cameras and file formats
• About image size
What is Corel AfterShot Pro?
Corel AfterShot Pro is a fast, flexible workflow application for digital
photos, including RAW formats, JPEG, and TIFF. Corel AfterShot Pro is
designed to help you organize, optimize, and output your photos. You
can work with individual photos or tap into powerful and flexible
multi-image processing options that let you adjust and output your
photos so you can print them or share them via email or the Web. Corel
AfterShot Pro is completely non-destructive; your original image files
are always safe. You can use Corel AfterShot Pro on its own, or with
your favorite image editing software.
For a full list of learning resources, from the menu bar choose Help >
Learning Center.

10 Corel AfterShot Pro 3
How is Corel AfterShot Pro different from other image-
editing software?
There are a few things that set Corel AfterShot Pro apart from
traditional image-editing software. Let's take a look at these
differences.
Action
Traditional image-
editor
Corel AfterShot Pro
Open files
that you
want to edit
File > Open File,
open one or more
files.
As a workflow application,
you tend to work with folders,
so click the
File System tab,
and click a folder. You can
then right-click to import the
folder to the
Library or click a
thumbnail and start editing.
Edit files Start editing each
open file, when
finished, the editing
information is saved
to the file.
Start editing, creating one or
more looks (versions) for each
photo. The edits are saved
automatically to a sidecar file
(XMP) so that your original file
is never affected. You can
really experiment, even
between editing sessions.

Welcome 11
What is photo workflow?
Photo workflow refers to all the activities that occur between the initial
image capture and the final photo output. Photographers have very
different workflows, depending on the volume of photos they take and
what they do with the photos. Your workflow might be as simple as
downloading images from your camera's memory card and printing
them on a printer that is attached to your computer. A photo workflow
might also include any of the following:
• Organizational tasks, such as adding keywords and star ratings so
y
ou
can search and sort your images
• Editing and adjusting photos to correct, enhance, or creatively
manipulate photos
• Backing up and archiving photos
• Sharing photos through email or on the Web
Save the files
File > Save, usually
for each file that you
want to output, save
to the file format you
want (such as JPEG).
You either overwrite
your existing file, or
create a new file.
Select as many thumbnails
(photos or looks) as you want,
and to export to a standard
JPEG, press
F. Want TIFF? Press
T. New files are created, your
original file is never affected.
*Corel AfterShot Pro lets you
export multiple files at one
time, and offers a range of
settings that let you customize
your output. Choose
File >
Export or right-click any of
the batch presets in the
Batch
Output
section of the
Output tab to access the
settings.
Action
Traditional image-
editor
Corel AfterShot Pro
12 Corel AfterShot Pro 3
• Printing photos in-house, through online printing services, service
bureaus, or prepress facilities
Corel AfterShot Pro supports a wide range of workflow options and
workin
g st
yles to ensure that you can get the best quality from your
photos in the least amount of time.
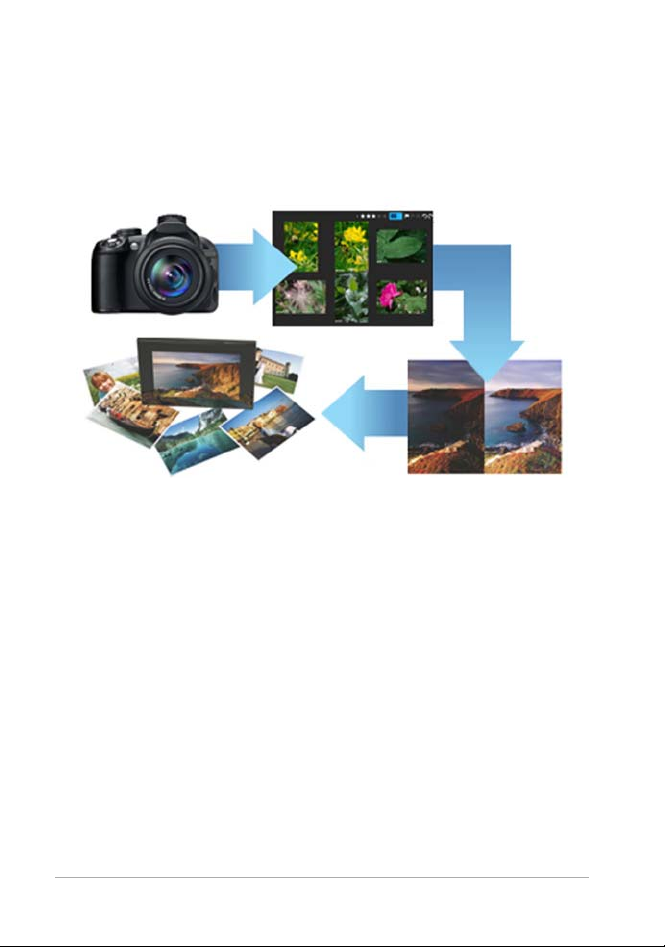
Photo workflow: 1. Transfer photos from your camera to your
computer, 2. Import the photos into Corel AfterShot Pro, 3.
Edit your photos, creating one or more versions, 4. Export a
version to a JPEG or TIFF file.
Corel AfterShot Pro is organized into three workflow areas: Asset
management, Image editing, and Output generation.
Asset management lets you catalog your original digital photos as
master files and view, add, browse and search photo metadata. As
your photo library grows from hundreds to thousands of photos,
maintaining a coherent, organized, searchable library becomes critical.
Corel AfterShot Pro provides all the tools needed to catalog your
current photographs, and makes it easy to add to your library.
Welcome 13
Image editing lets you adjust and correct elements such as exposure,
white balance, detail, and distortions. You can get creative with a
variety of editing features that you can apply to an entire photo or a
selected area. For example, you can use selective editing to select one
color area in your photo and apply a color to that area without
affecting the rest of the photo.
Output generation lets you share the photos that you have worked on
in Corel AfterShot Pro. Your photos can be output in a wide range of
formats that you can print, email, or share on the Web. The powerful
Batch Conversion feature lets you take advantage of multi-image
processing.

14 Corel AfterShot Pro 3
What’s new in Corel AfterShot Pro 3?
New! Comprehensive Watermarking
Protect and promote your work with versatile and quick-to-apply new
Wa
termarking features. Deter unauthorized copying, brand your
photos with your logo or contact info, or add any text and graphics.
Apply watermarks to individual photos or batches, and easily adjust
size, rotation, position, transparency and more. For more information,
see “Watermarks” on page 133.
Enhanced! Highlight Recovery
Regain more of the detail and tone from your overexposed photos with
en
hanced Highlight Recovery in AfterShot Pro 3. Powered by a new
algorithm, this feature lets you access more of the data in your RAW
files for superior image quality. A Highlight Recovery Range slider gives
you finer control over specific areas to adjust within your image. For
more information, see “Tone tools” on page 63.
New! Blemish Remover
Save time and edit faster by doing more touchups and photo
corr
ectio
ns in AfterShot Pro 3, rather than jumping to Corel PaintShop
Pro or Adobe PhotoShop. The new Blemish Remover offers circle,
brush, polygon and freehand tools for detailed editing, making
portrait editing faster and easier than ever. Remove dust, spots,
smudges and a variety of imperfections on any photo. For more
information, see “Retouching with Heal, Clone, or Blemish Remover”
on page 84.
New! Image Preset Library
Now it’s easier to tap into the power o
f presets to automate more of
your repetitive processing jobs or quickly reproduce a look that would
otherwise be tedious to replicate. The new Image Preset Library in

Welcome 15
AfterShot Pro 3 lets you browse, preview and download free and for-
purchase presets. For more information, see “Finding and installing
downloadable content” on page 219.
New! Lens Corrections
Update to Corel AfterShot Pro 3 for n
ew
, sought-after lens corrections
that build on the hundreds of lenses already supported by Corel
AfterShot to quickly correct the different types of distortion introduced
by various lenses. Join the AfterShot Pro community on Facebook to
discover when new lens corrections are posted or to share your own.
For more information, see “Lens Correction” on page 67.
Enhanced! See what’s new with Plugins
The new Plugin Manager lets you find and insta
ll plugins in a flash
from within AfterShot Pro 3. Extend your software with free plugins
from the community, purchase plugins and get updates. Want to try
making your own plugins? Our unique plugin API and toolkit let you
make pro-quality plugins that tap into the full power of the AfterShot
Pro processing pipeline. A love of photography, a knowledge of C++
and the updated Plugin SDK are all you need. Share your plugins freely
with the AfterShot community, or work with Corel to sell them. Want
to learn more? Contact Corel via the Feedback Helper. For more
information, see “Updating and extending the application” on
page 219.
New! Camera profiles
Corel constantly delivers support for today's most popular, powerful
a
n
d creative cameras, including professional DSLRs, flexible and high-
quality mirrorless cameras, and many more. A new dynamic camera
profile updater notifies you when new cameras are added and a new
feedback mechanism captures and prioritizes your requests with Corel.
16 Corel AfterShot Pro 3
For more information, see “Updating and extending the application”
on page 219.
Get involved!
Corel has built AfterShot Pro to give you, the photographer, control,
letting
you make your own plugins, lens corrections and presets.
Similarly, a new feedback loop makes it easier for you to send your
ideas and requests to the Corel Photo team—better helping us to meet
your needs. Simply click ‘feedback’ and send us your comments.
“Providing feedback for downloadable content” on page 220.
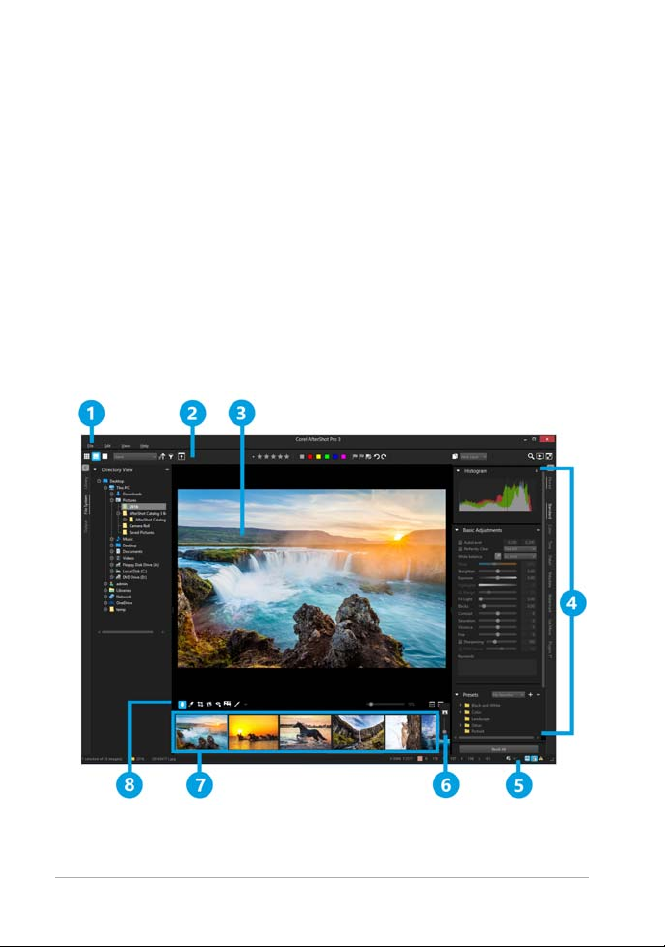
Workspace tour
The Corel AfterShot Pro workspace includes the following elements:

Welcome 17
1. Menu bar
The menu bar is used to acce
ss common functions and features. For
example, you can import folders, set your preferences, or access the
Help.
2. Top toolbar
This toolbar contains a variety of search, metadata, layer, and viewing
commands.
3. Preview panel
The Preview panel lets you view a large ve
rsion o
f the photo that is
selected in the Thumbnail panel. When Multi-Image View is enabled,
the Preview panel displays previews of
all the selected thumbnails. You
can view image adjustments and zoom into or out of the selected
images.
4. Tools panel
Like the Browse panel, the Tools panel
has tabs for pages that contain
a number of sections. For example, the Standard page displays the
Histogram, Basic Adjustments, and Presets sections. Sections can be
pinned so they stay visible.
The Tools panel can be hidden so that more room is available for
viewing your images. Just click the arrow
at the top of the Tools
panel tabs to hide or show this panel.
Included in the Tools panel is the Get More page. It is home to a
collection of downloadable content that includes camera profile
updates, plugins, and image presets. For more information, see
5. Status bar
The Status bar lets you view information about the current image and
ac
cess
viewing controls such as Toggle Multi-Image View
and Lock

18 Corel AfterShot Pro 3
Position and Zoom. Soft-proofing and Clipping Warning controls
are also accessible here.
6. Thumb Zoom toolbar
This toolbar contains the Thumbnail Size control which lets you adjust
the size
of the thumbnails in the Thumbnail panel.
7. Thumbnail panel
At the bottom of the main Corel AfterShot Pro window, this panel
shows th
umbnails for the folder, container, search or browse category
selected with the Browse panel. All the images in the folder are initially
visible in the Thumbnail panel, but you can filter the images to show
only the thumbnails that match a specific set of criteria.
8. AfterShot Pro toolbar
This toolbar contains editing tools and
vie
wing options for the Preview
panel.
9. Browse panel
The Browse panel is your main access p
oint for your photos. The panel
has tabs for the Library, File System, and Output pages. Some pages
are fu
rther divided into sections. For example, the Library page consists
of a Cat
alogs section and a Metadata Browser section. The Browse
panel can be hidden so that more room is available for viewing your
images. Just click th
e left arrow at the top of the Browse panel tabs
to hide or show the panel.
There are many ways to adjust and customize the Corel AfterShot Pro
workspace. “Adjusting the workspace” on page 159.
Understanding non-destructive editing
Corel AfterShot Pro is a non-destructive image editor, meaning that
adjustments you make to your images in Corel AfterShot Pro will never
Welcome 19
alter the data in the original image. You are free to experiment as much
as you want, knowing that you can always revert to the original
version. As a non-destructive image editor, the adjustments you create
are stored either in a sidecar XMP file, within the Corel AfterShot Pro
catalog database, or both. This means that when you're ready to share
or export your work, you need to output the versions you want to a
standard file format.
All your edits are saved in a sidecar file (XMP)
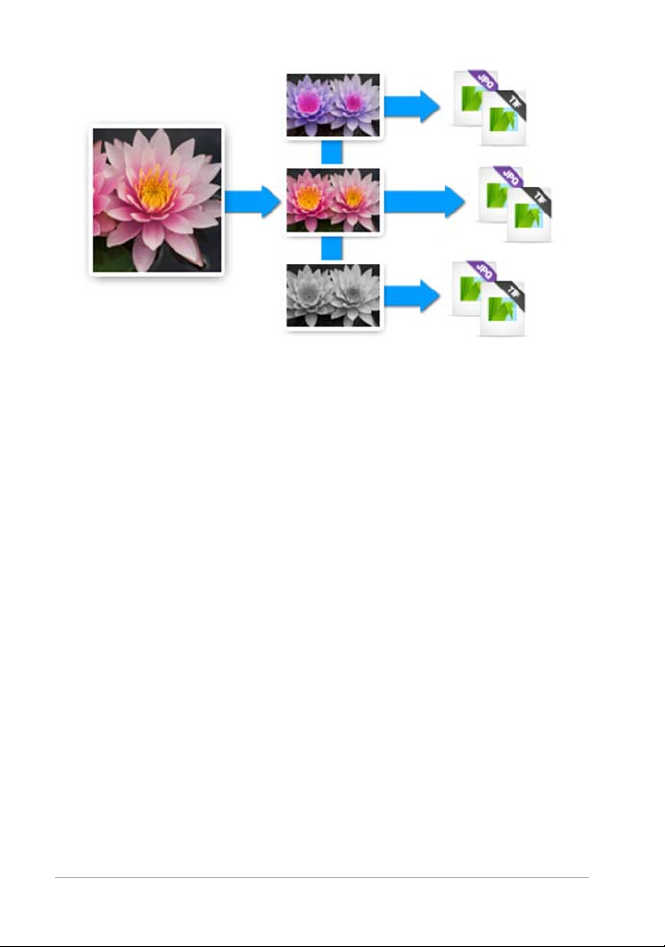
When you edit a photo in Corel AfterShot Pro, a new version is created
that contains the adjustments you've made. Corel AfterShot Pro allows
more than one set of image adjustments to be made on a single photo,
allowing you to efficiently make many versions of a single image.
Creating a new version does not make a copy of the original master
file, but rather just allows you to apply different image adjustments
and metadata to the same Master file.
20 Corel AfterShot Pro 3
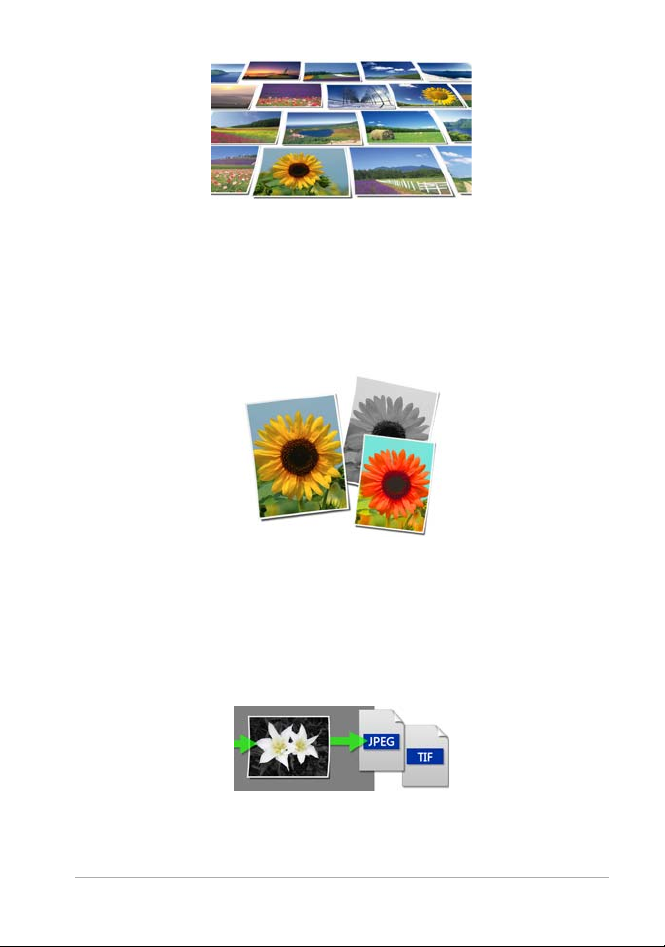
Master version from original (left) and edited versions (center).
The changes are committed only when you output to JPEG or
TIFF.
XMP files
Corel AfterShot Pro stores its settings in an XMP file that is slightly
diff
erent from other popular image editors and photo management
applications. We do this to prevent Corel AfterShot Pro from
overwriting settings created by other applications and to circumvent
limitations inherent in the current XMP standard (such as only being
able to export the metadata from one version at a time, or the inability
to save different settings for a RAW file and a JPEG that were created
in camera as a RAW+JPEG pair).
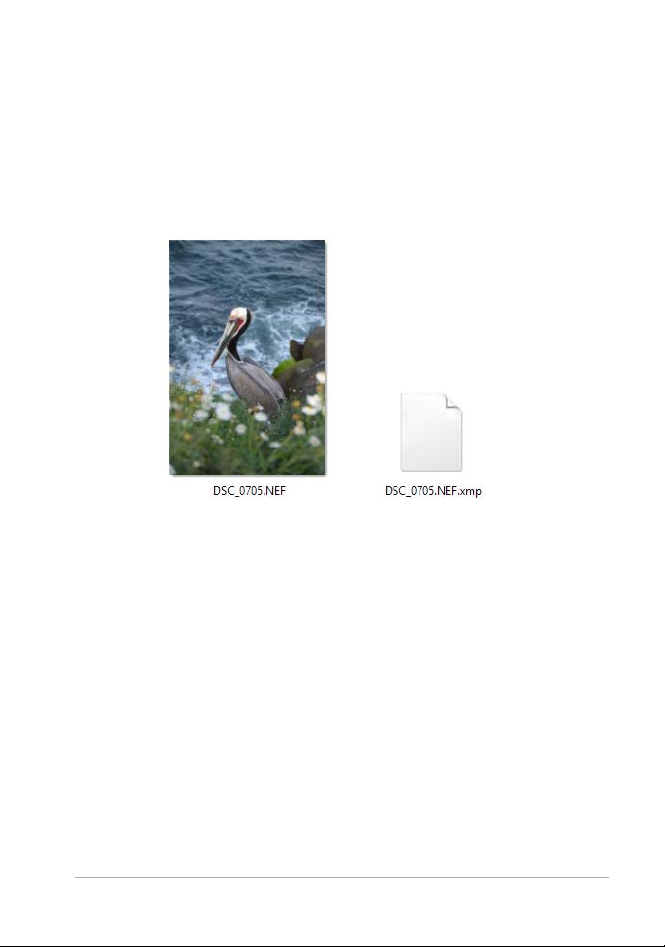
Corel AfterShot Pro uses a similar, but slightly different filename to
sto
r
e this enhanced XMP data. The XMP filename is created by simply
adding ".xmp" to the end of the complete filename of the image file it
describes (while many other applications build the XMP filename by
first dropping the image file extension (like "jpg", "nef" or "cr2") before
adding "xmp"). So a Corel AfterShot Pro XMP file would look like

Welcome 21
img_0000.jpg.xmp while an XMP from other applications for the
same image would simply be img_0000.xmp.
Corel AfterShot Pro lets you create a standard XMP file that other
a
p
plications will read, but this limits the settings to those officially
supported by the XMP standard (one set of metadata per image file).
Shared XMP data
Other applications store image a
d
justments in sidecar XMP files, and
metadata added in other applications can be imported into Corel
AfterShot Pro. These include:
• Star ratings
• Color labels
• Flags (called 'Picks' or 'Selec
ts
' in other applications)
• Keywords and categories
• IPTC and EXIF data
Likewise, applying any of these settings to images in Corel AfterShot
Pro will write this data back to the XMP file for
those images. Many
a
pplications allow you sync settings from XMP files with the settings
they hold in their internal databases. After the sync process is
complete, adjustments made in Corel AfterShot Pro appear in those
applications as well.
For more information, see “Organizing imag
es” on page 103.
XMP data exclusive to Corel AfterShot Pro
Settings from image editing tools with
in
Corel AfterShot Pro and other
applications are also stored within XMP files; however, these settings
are not shared amongst applications from different manufacturers.
This is due to the technical differences in implementing various image
adjustment tools. These differences in how the various tools are
implemented give each application its own image quality

22 Corel AfterShot Pro 3
characteristics, and prohibit image adjustment settings from being
shared between applications.
Using Corel AfterShot Pro in no way limits
wha
t you can do with your
images or which applications you can use to edit or manage your
digital photographic files.
How metadata is processed when you import files
Corel AfterShot Pro reads and collect
s m
etadata embedded in image
files, in Corel AfterShot Pro XMP files and standard XMP files. The
process and order of collecting metadata from these various sources is
shown below.
1.If a Corel AfterShot Pro XMP file exists, metadata is
read from this file
and no other metadata is imported.
2.If no Corel AfterShot Pro XMP file is found, me
tadata is re
ad from
Standard XMP files.
3.If XMP content is embedded in the image file, this is read
next and is
added to any previously found XMP data, but common fields found in
any other source are ignored.
Understanding the Library
Your Library is where you store one or more catalogs of photos. It is a
key part of the asset management system. It lets you access the master
files (original photos) as well as all the versions that you create. You can
read photo metadata, and search and browse for photos based on the
associated metadata.
Review the information in th
is section, and when you're ready to start
importing, see Importing images.
Loading...