


SX20
Table of contents
 Loading...
1 2 3
4 5 6
7 8 9
*
0
#
.@
pqrs tuv wxyz
defabc
ghi jkl mno
D15097.22 Cisco TelePresence SX10, SX20 User Guide APRIL 2020
All contents © 2020 Cisco Systems, Inc. All rights reserved
1
Cisco TelePresence User Guide
SX10 & SX20
CE9.12

2
D15097.22 Cisco TelePresence SX10, SX20 User Guide APRIL 2020
All contents © 2020 Cisco Systems, Inc. All rights reserved
What’s in this guide
Contents
All entries in the table of contents are
active hyperlinks that take you to the
corresponding article.
To go between chapters, you can click
on the icons in the sidebar.
Note: Some of the features described
in this user guide are optional and they
may not apply to your device.
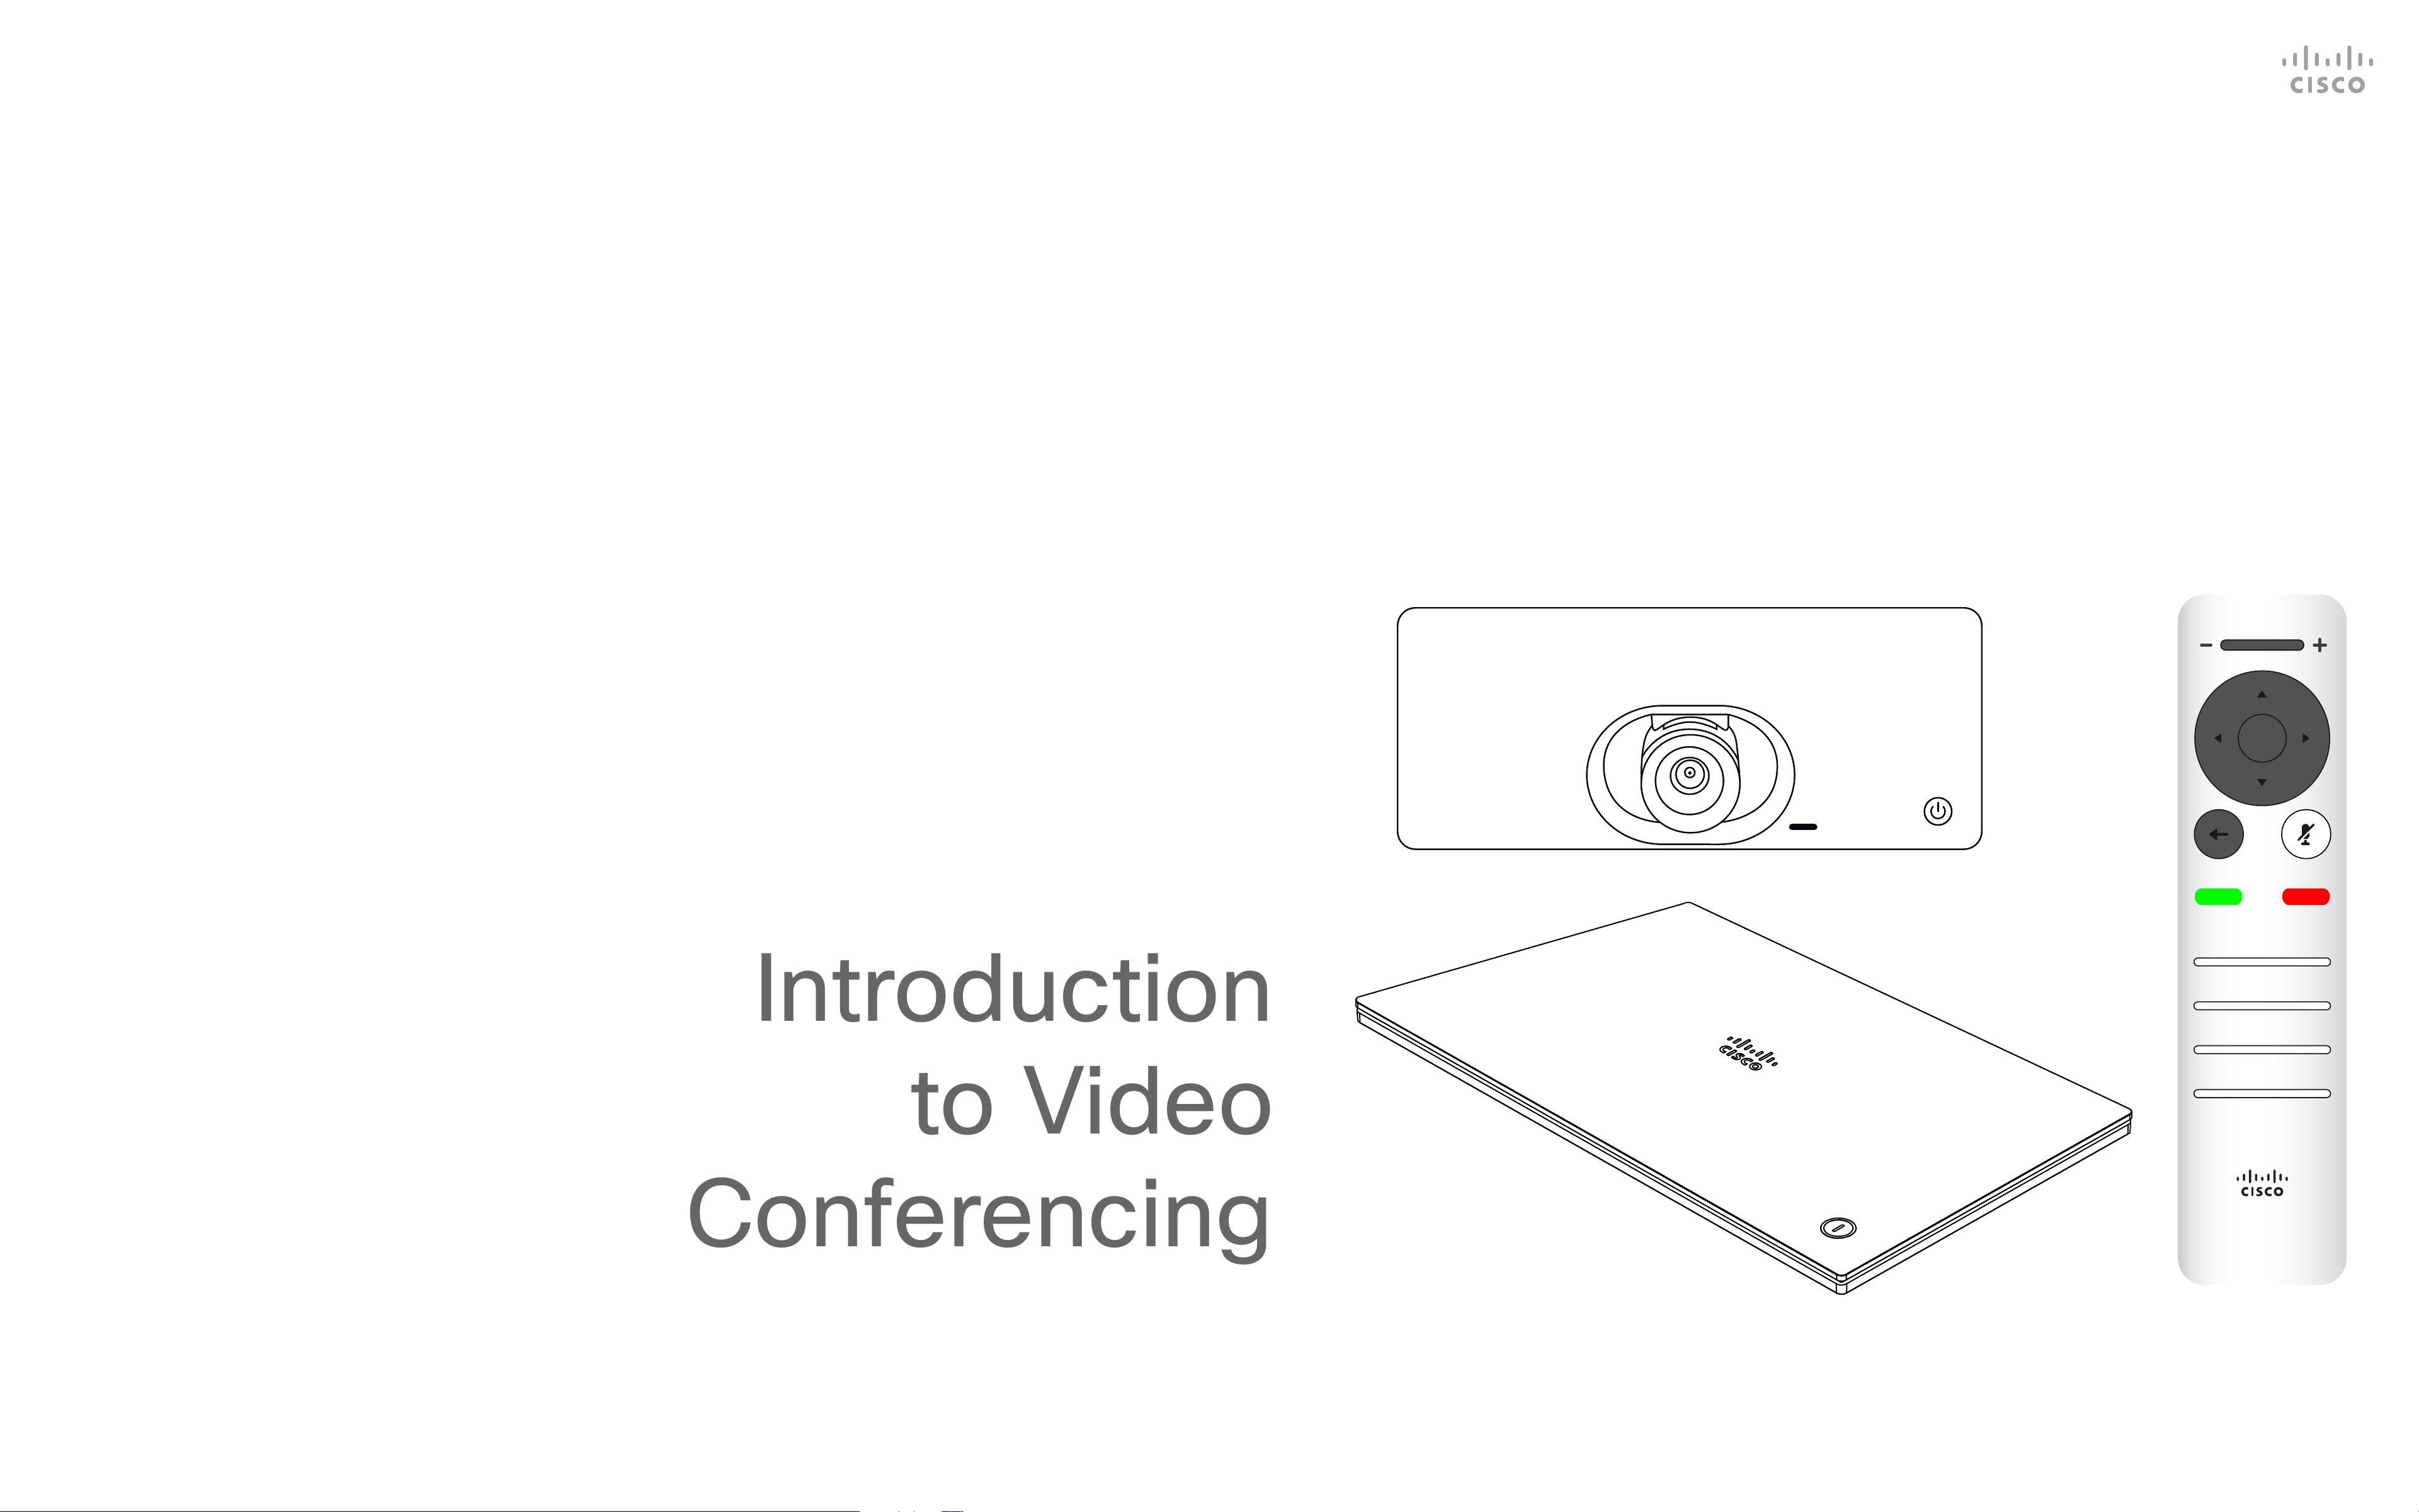
Introduction to Video Conferencing
The Home Screen
..................................................................... 4
The Remote Control (I)
.............................................................. 5
The Remote Control (II)
............................................................. 6
Video Calls
Place a Call From the Contact List
............................................ 8
Edit a Contact Before the Call
................................................... 9
Edit the Call Rate, then Place the Call
..................................... 10
Place a Call Using Name, Number, or IP-Address
.................. 11
Add Additional Participants to an Existing Call
........................ 12
Disconnect a Participant From a Conference
.......................... 13
Receive a Call ......................................................................... 14
Receive Additional Calls While Already In a Call ..................... 15
Transfer an Ongoing Call
......................................................... 16
Change the Layout of the Screen
........................................... 17
Enable Do Not Disturb
............................................................. 18
Enable Standby
....................................................................... 19
Forward All Calls
..................................................................... 20
Intelligent Proximity
Cisco Proximity Ultrasound Signal
........................................... 22
Content Sharing
Start and Stop Presentation
.................................................... 24
Change Presentation Layout In a Call
..................................... 25
Scheduled Meetings
Join a Scheduled Meeting
...................................................... 27
Contacts
Add Someone to Favorites, Outside a Call
.............................. 29
Add Someone to Favorites, While in a Call
............................. 30
Camera Control
View Camera Settings (Local camera)
.................................... 32
Far-End Camera Control
......................................................... 33
Move the Selfview PiP
............................................................ 34
Turn Camera On or O
........................................................... 35
Settings
Access Settings
...................................................................... 37
3
D15097.22 Cisco TelePresence SX10, SX20 User Guide APRIL 2020
All contents © 2020 Cisco Systems, Inc. All rights reserved
Introduction to Video Conferencing
1 2 3
4 5 6
7 8 9
*
0
#
.@
pqrs tuv wxyz
defabc
ghi jkl mno
4
D15097.22 Cisco TelePresence SX10, SX20 User Guide APRIL 2020
All contents © 2020 Cisco Systems, Inc. All rights reserved
Use the Cursor controls the remote
control to move about the screen
and press OK/Enter to open the
selected menu eld.
Use the Cancel key to exit a menu
(and return to the Home screen)
undoing any changes. Use the Back
key to go one step back.
The remote control buttons are
described on the following pages.
The Intelligent Proximity feature
allows you to share, see and capture
content from a video device wirelessly
on your own device. You can also use
your own device to control calls on
the video device. See also “Intelligent
Proximity” on page 21.
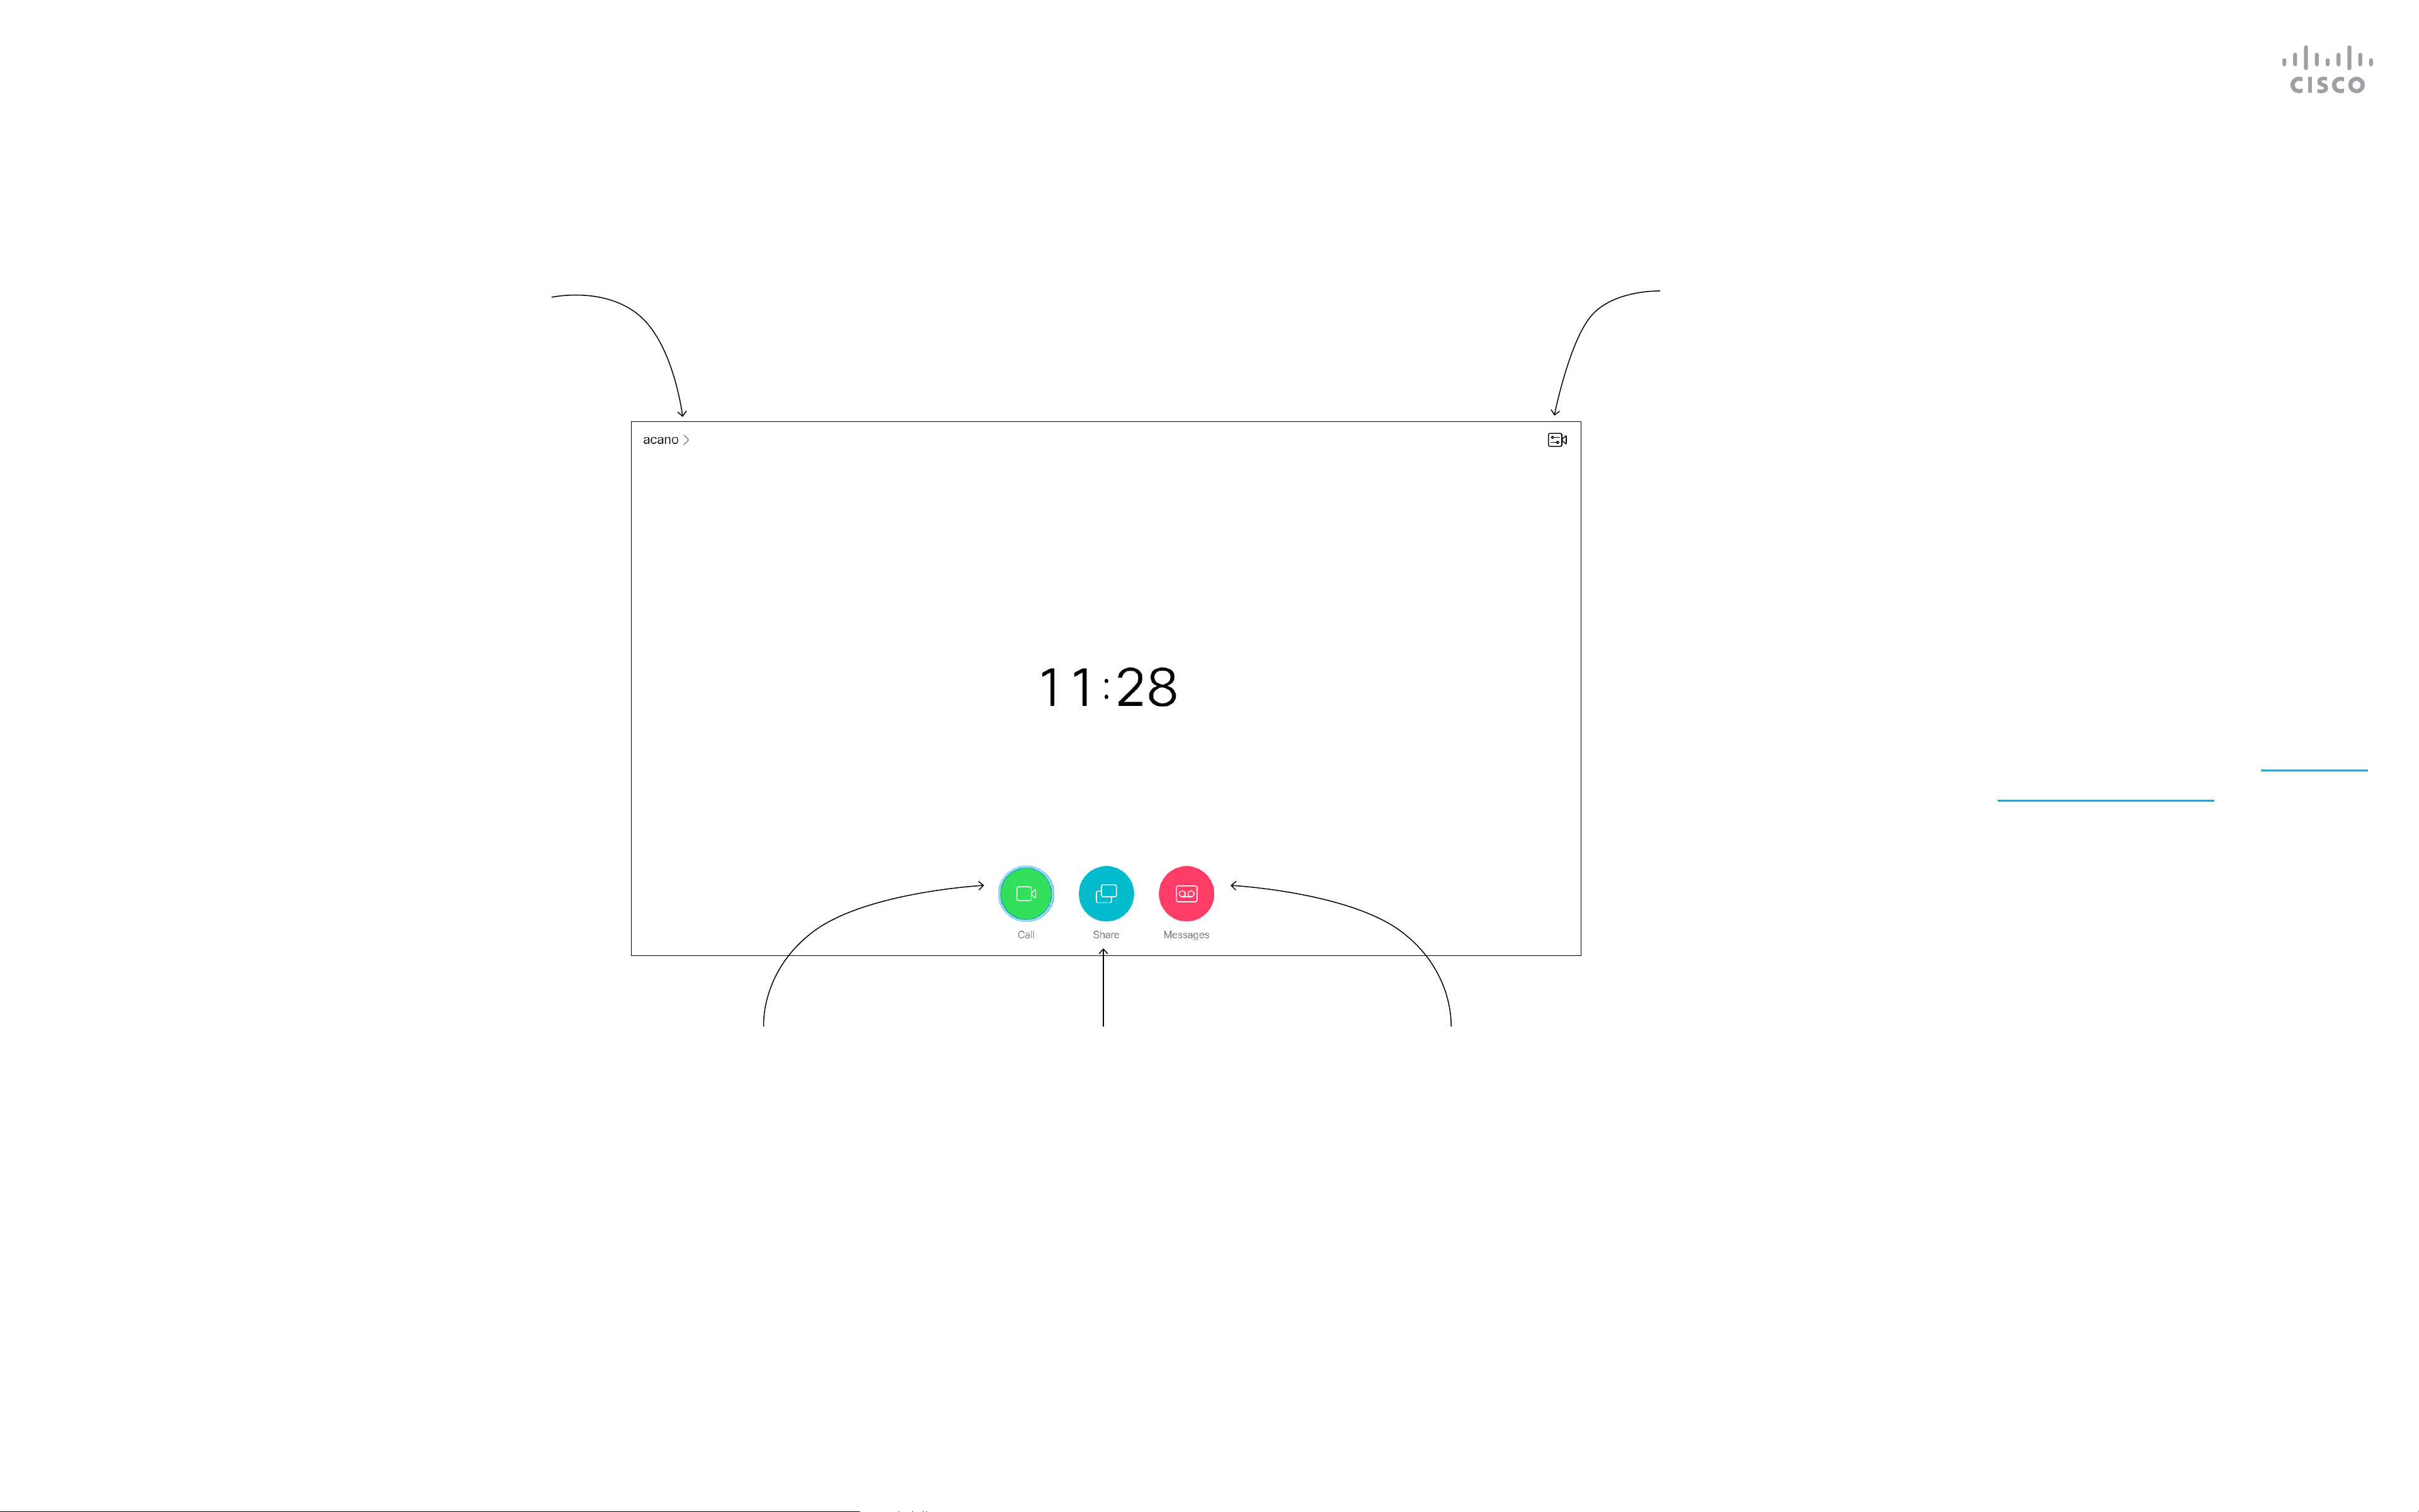
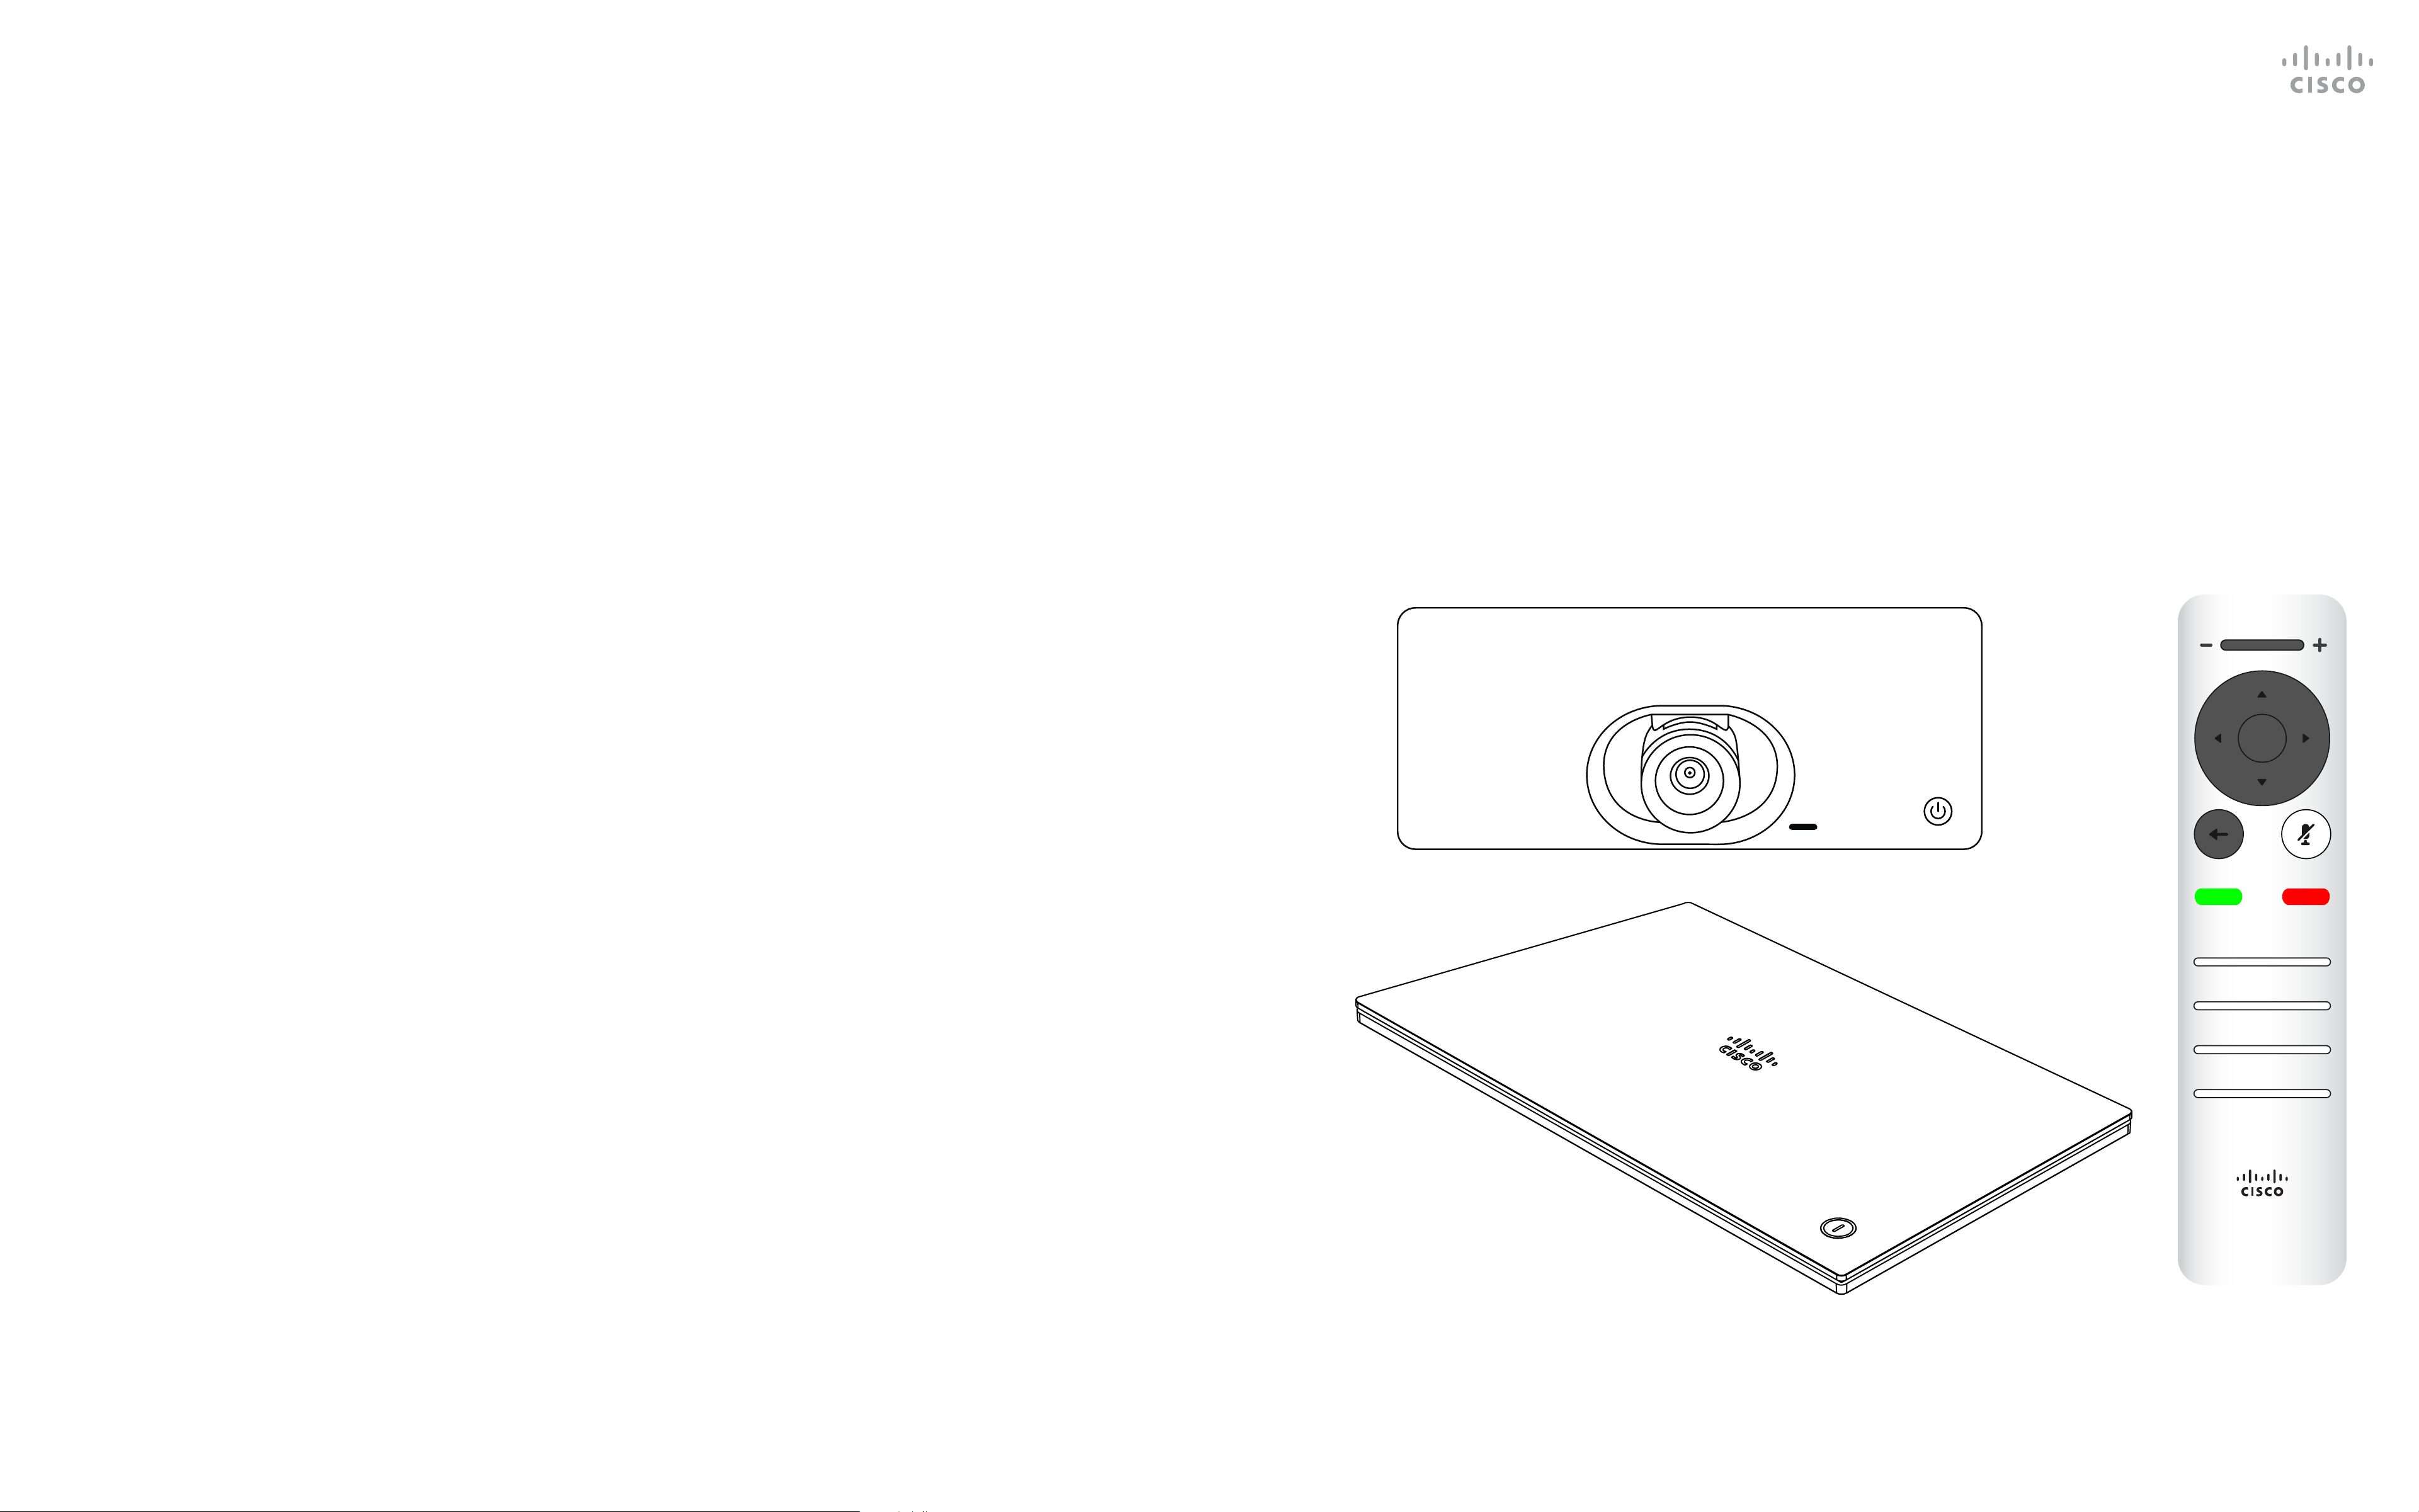
The Home Screen
Introduction
Operating tips
The Call button
located to the left
in the lower part
of the display.
The Share button
is located to
the right in the
lower part of the
display.
If a messaging
system exists
for your device,
access messages
from here.
Tip When set to Do Not Disturb, ringtones are muted and call attempts made by
others to reach you appear as missed calls. You may, however, place calls as
much as you like.
As default, there is a 60 minutes timeout on the Do not disturb (after which the
device returns to normal operation), but this may have been changed to a dierent
setting by your Video Support Team.
Upper left corner
of the screen
contains the More
icon (>) which
provides access
to Standby mode,
System information
and the Do Not
Disturb feature.
The Camera
Control menu icon
is located in the
upper right corner
of the display.
5
D15097.22 Cisco TelePresence SX10, SX20 User Guide APRIL 2020
All contents © 2020 Cisco Systems, Inc. All rights reserved
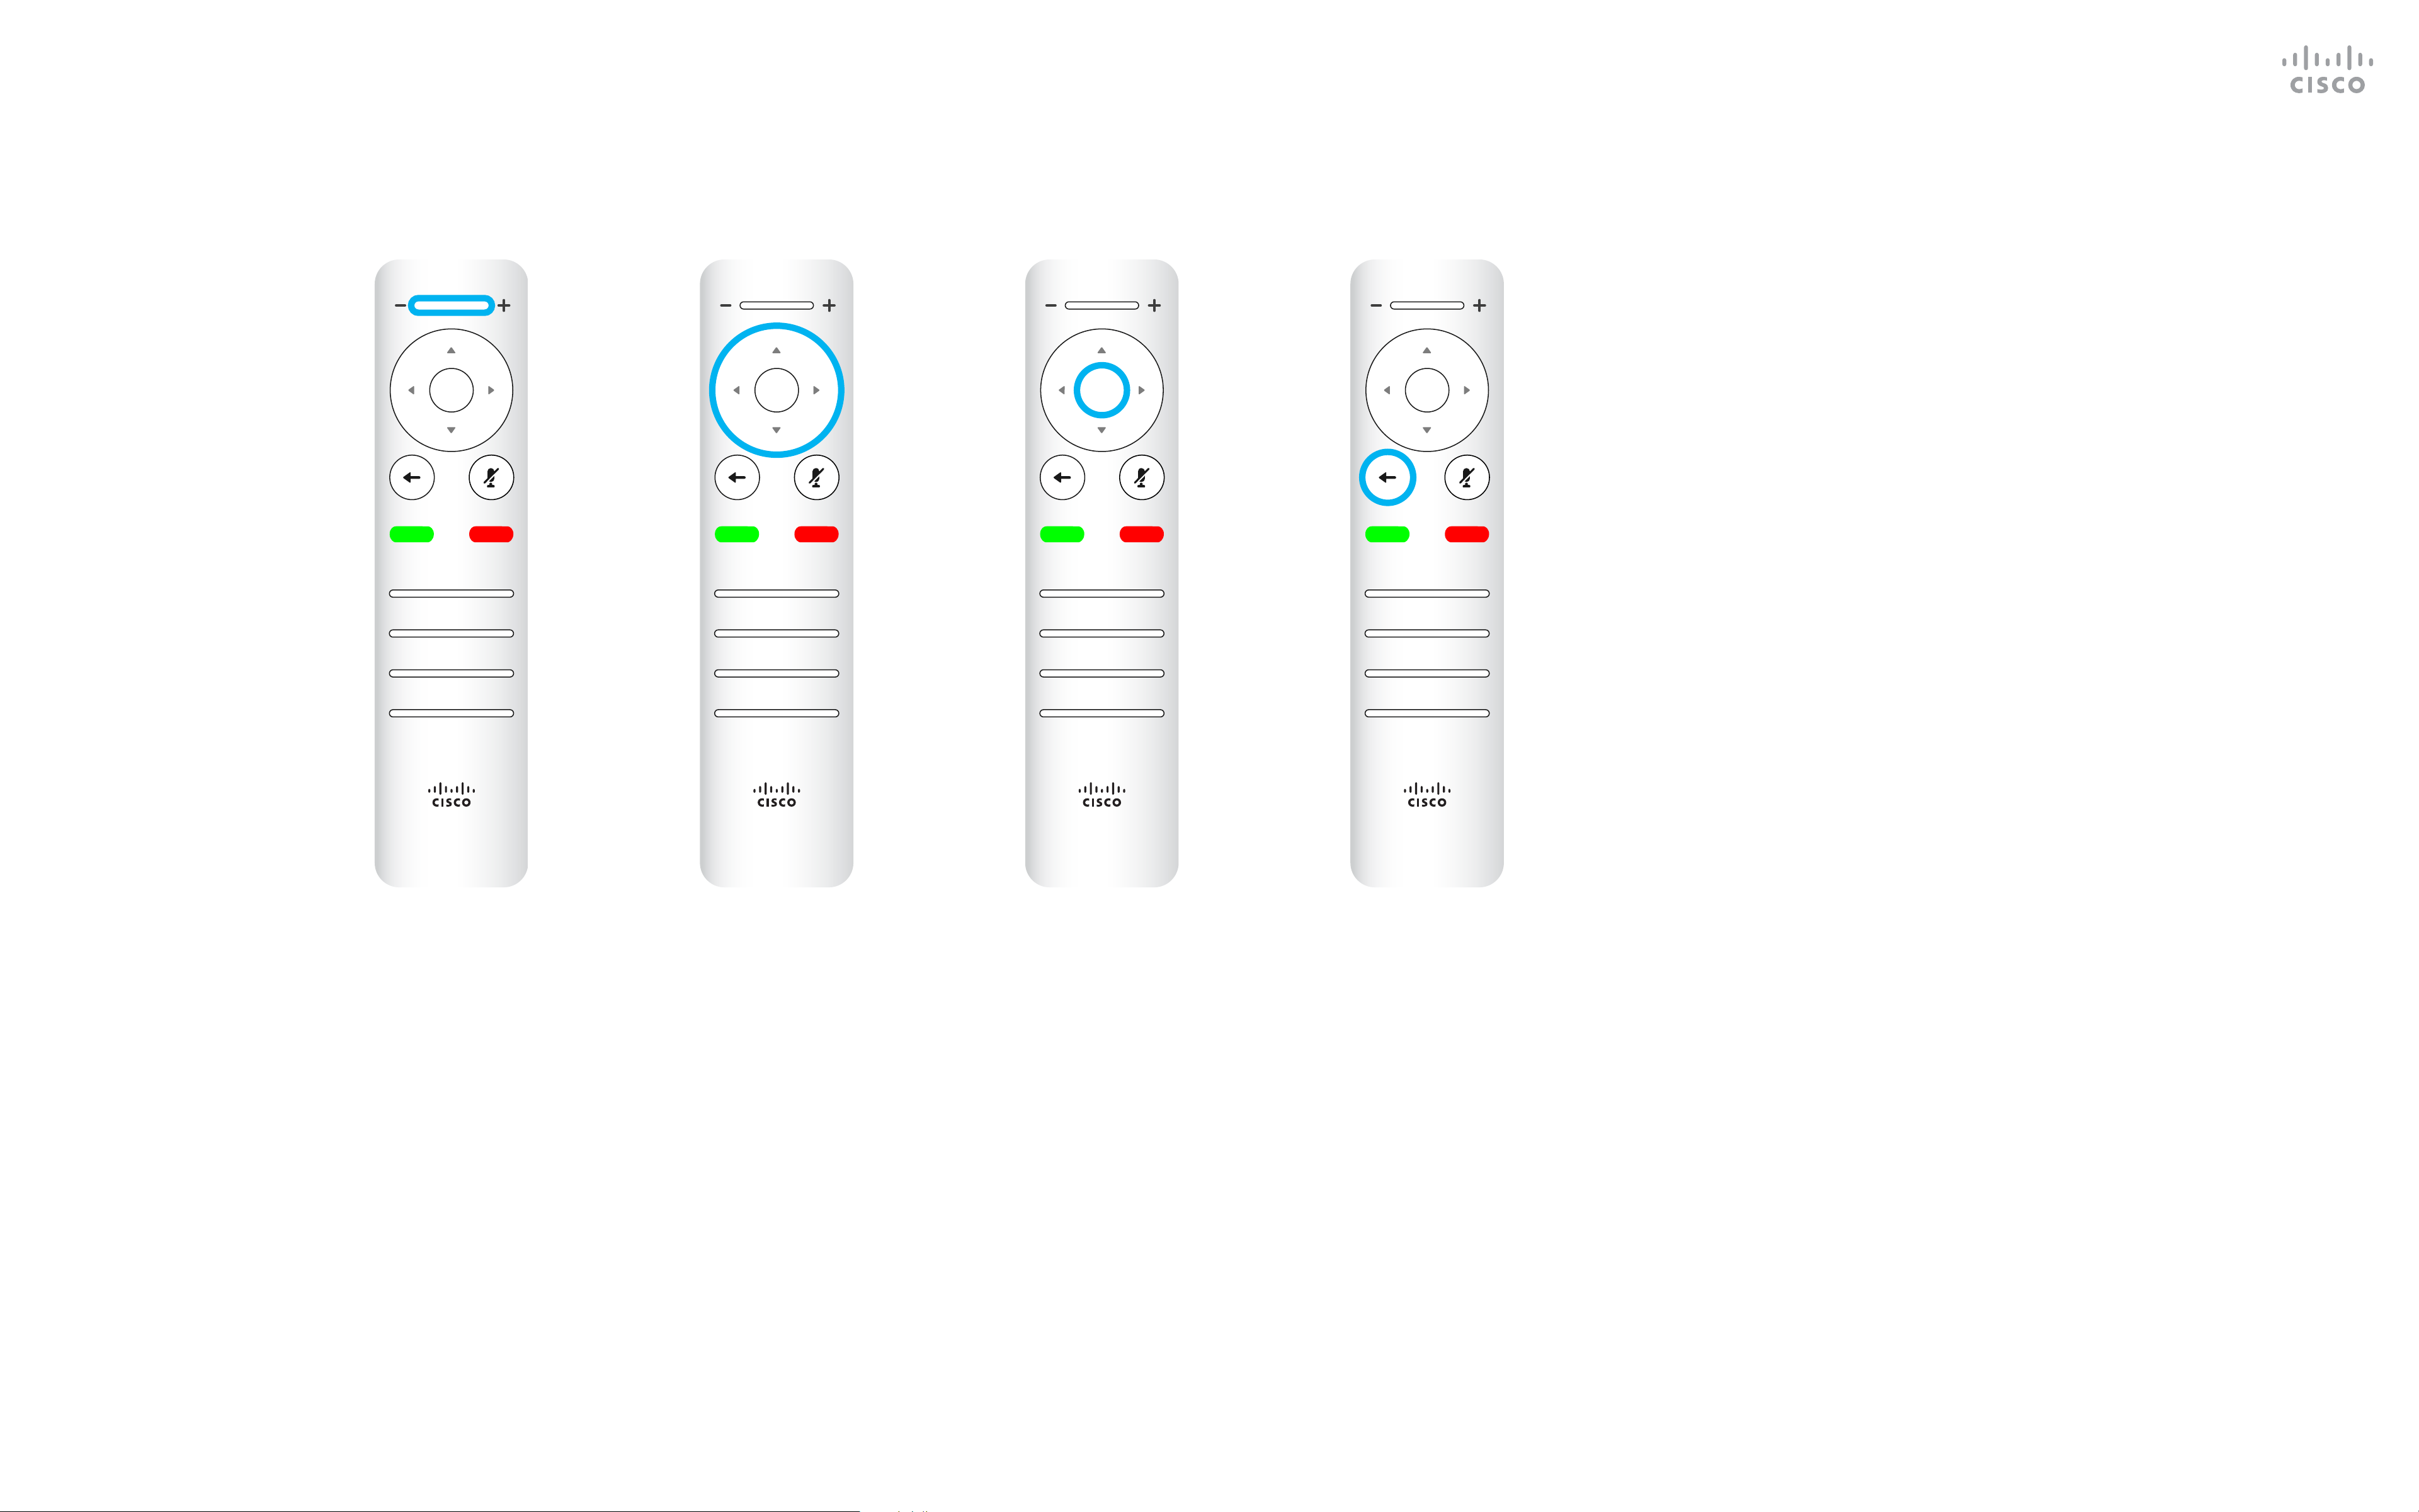
Left part of the uppermost
button controls
Lower volume /Decrease.
Right part of the uppermost
button controls
Higher volume /Increase.
1 2 3
4 5 6
7 8 9
*
0
#
.@
pqrs tuv wxyz
defabc
ghi jkl mno
OK / Enter is
done by means
of the center
circular key.
1 2 3
4 5 6
7 8 9
*
0
#
.@
pqrs tuv wxyz
defabc
ghi jkl mno
Go back one step
is done by means of
the left circular key
1 2 3
4 5 6
7 8 9
*
0
#
.@
pqrs tuv wxyz
defabc
ghi jkl mno
1 2 3
4 5 6
7 8 9
*
0
#
.@
pqrs tuv wxyz
defabc
ghi jkl mno
To operate
Field selector /Cursor
keys use the perimeter
keys of the circular eld
(Left/Right/Up/Down).
Use the Cursor controls to move
about the screen and press OK/
Enter to open the selected menu
eld.
Use the Cancel key to exit a menu
(and return to the Home screen)
undoing any changes. Use the Back
key to go just one step back.
The Remote Control (I)
Introduction
Operating tips
6
D15097.22 Cisco TelePresence SX10, SX20 User Guide APRIL 2020
All contents © 2020 Cisco Systems, Inc. All rights reserved
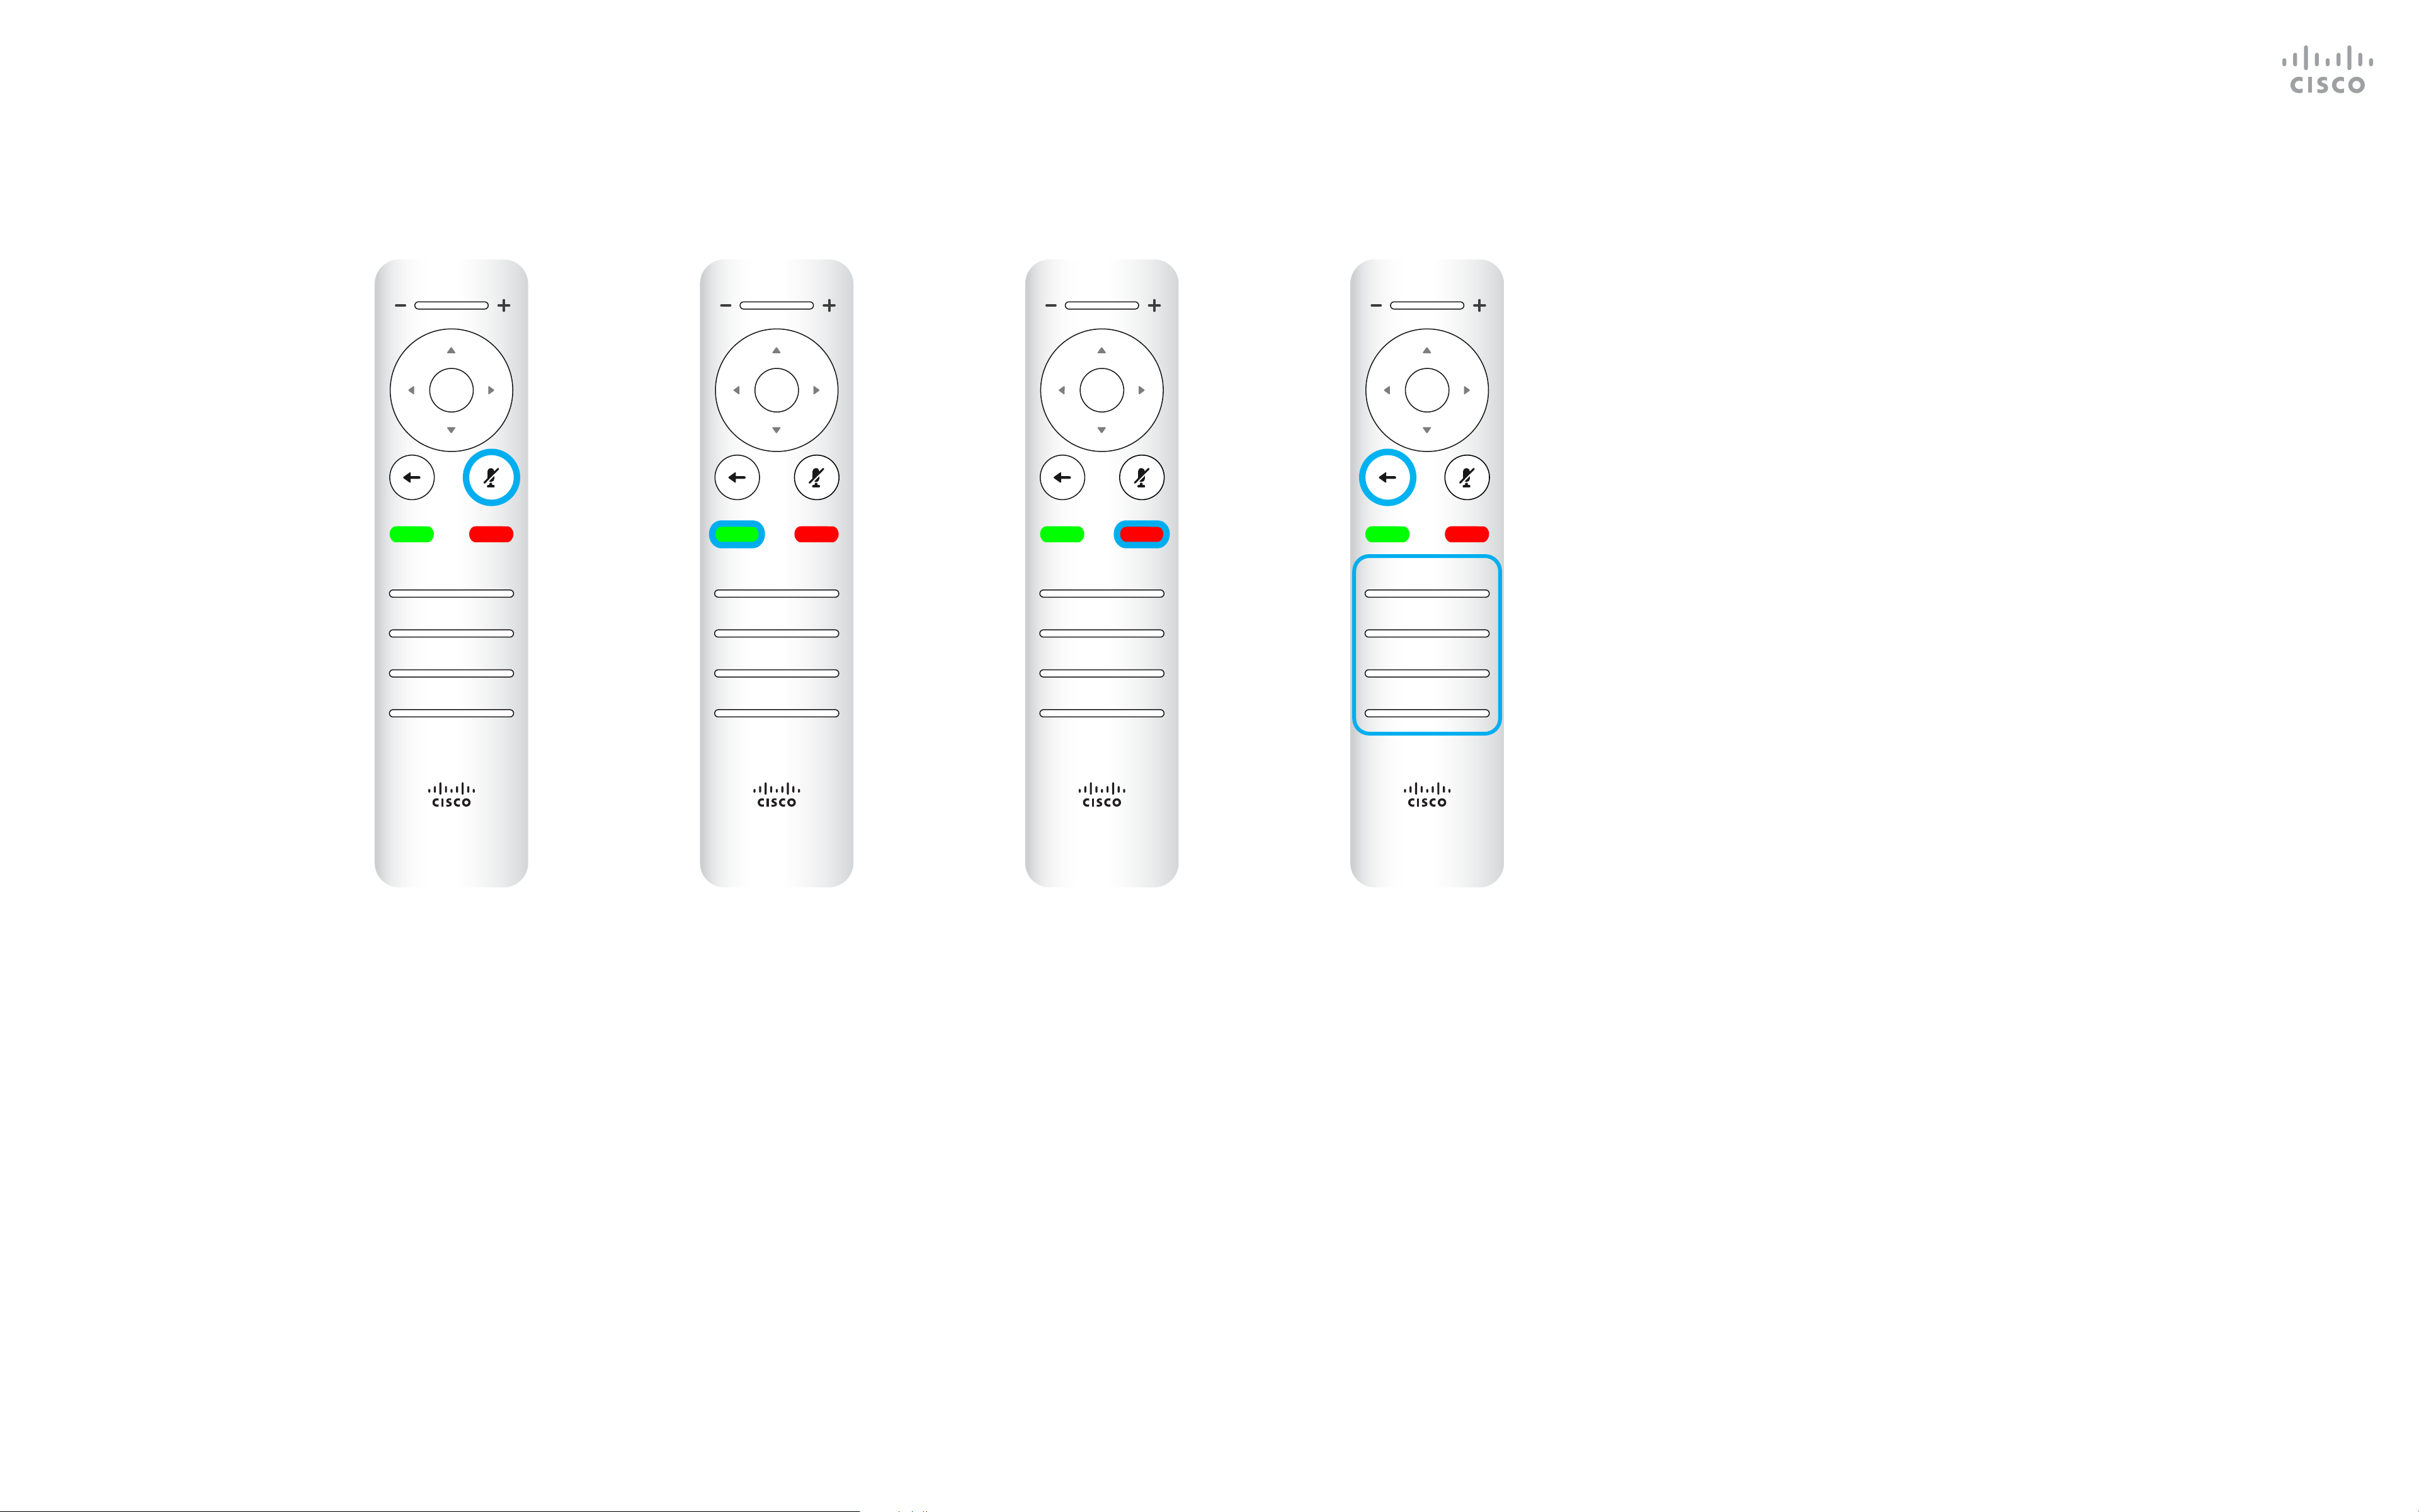
The Keypad is used to
dial someone or input
numerals. There is a
raised bump on digit 5 to
identify the keys.
The key below the Mute
key is the Reject incoming
call / End call / Cancel /
Back to Home screen
(outside calls).
1 2 3
4 5 6
7 8 9
*
0
#
.@
pqrs tuv wxyz
defabc
ghi jkl mno
1 2 3
4 5 6
7 8 9
*
0
#
.@
pqrs tuv wxyz
defabc
ghi jkl mno
1 2 3
4 5 6
7 8 9
*
0
#
.@
pqrs tuv wxyz
defabc
ghi jkl mno
1 2 3
4 5 6
7 8 9
*
0
#
.@
pqrs tuv wxyz
defabc
ghi jkl mno
Microphone mute/unmute
is the right circular key.
1 2 3
4 5 6
7 8 9
*
0
#
.@
pqrs tuv wxyz
defabc
ghi jkl mno
The key below the Go back is
the green Call button /
Accept incoming call.
Use the Cursor controls to move
about the screen and press OK/
Enter to open the selected menu
eld.
Use the Cancel key to exit a menu
(and return to the Home screen)
undoing any changes. Use the Back
key to go just one step back.
The Remote Control (II)
Introduction
Operating tips
1 2 3
4 5 6
7 8 9
*
0
#
.@
pqrs tuv wxyz
defabc
ghi jkl mno
D15097.22 Cisco TelePresence SX10, SX20 User Guide APRIL 2020
All contents © 2020 Cisco Systems, Inc. All rights reserved
7
Video
Calls
8
D15097.22 Cisco TelePresence SX10, SX20 User Guide APRIL 2020
All contents © 2020 Cisco Systems, Inc. All rights reserved
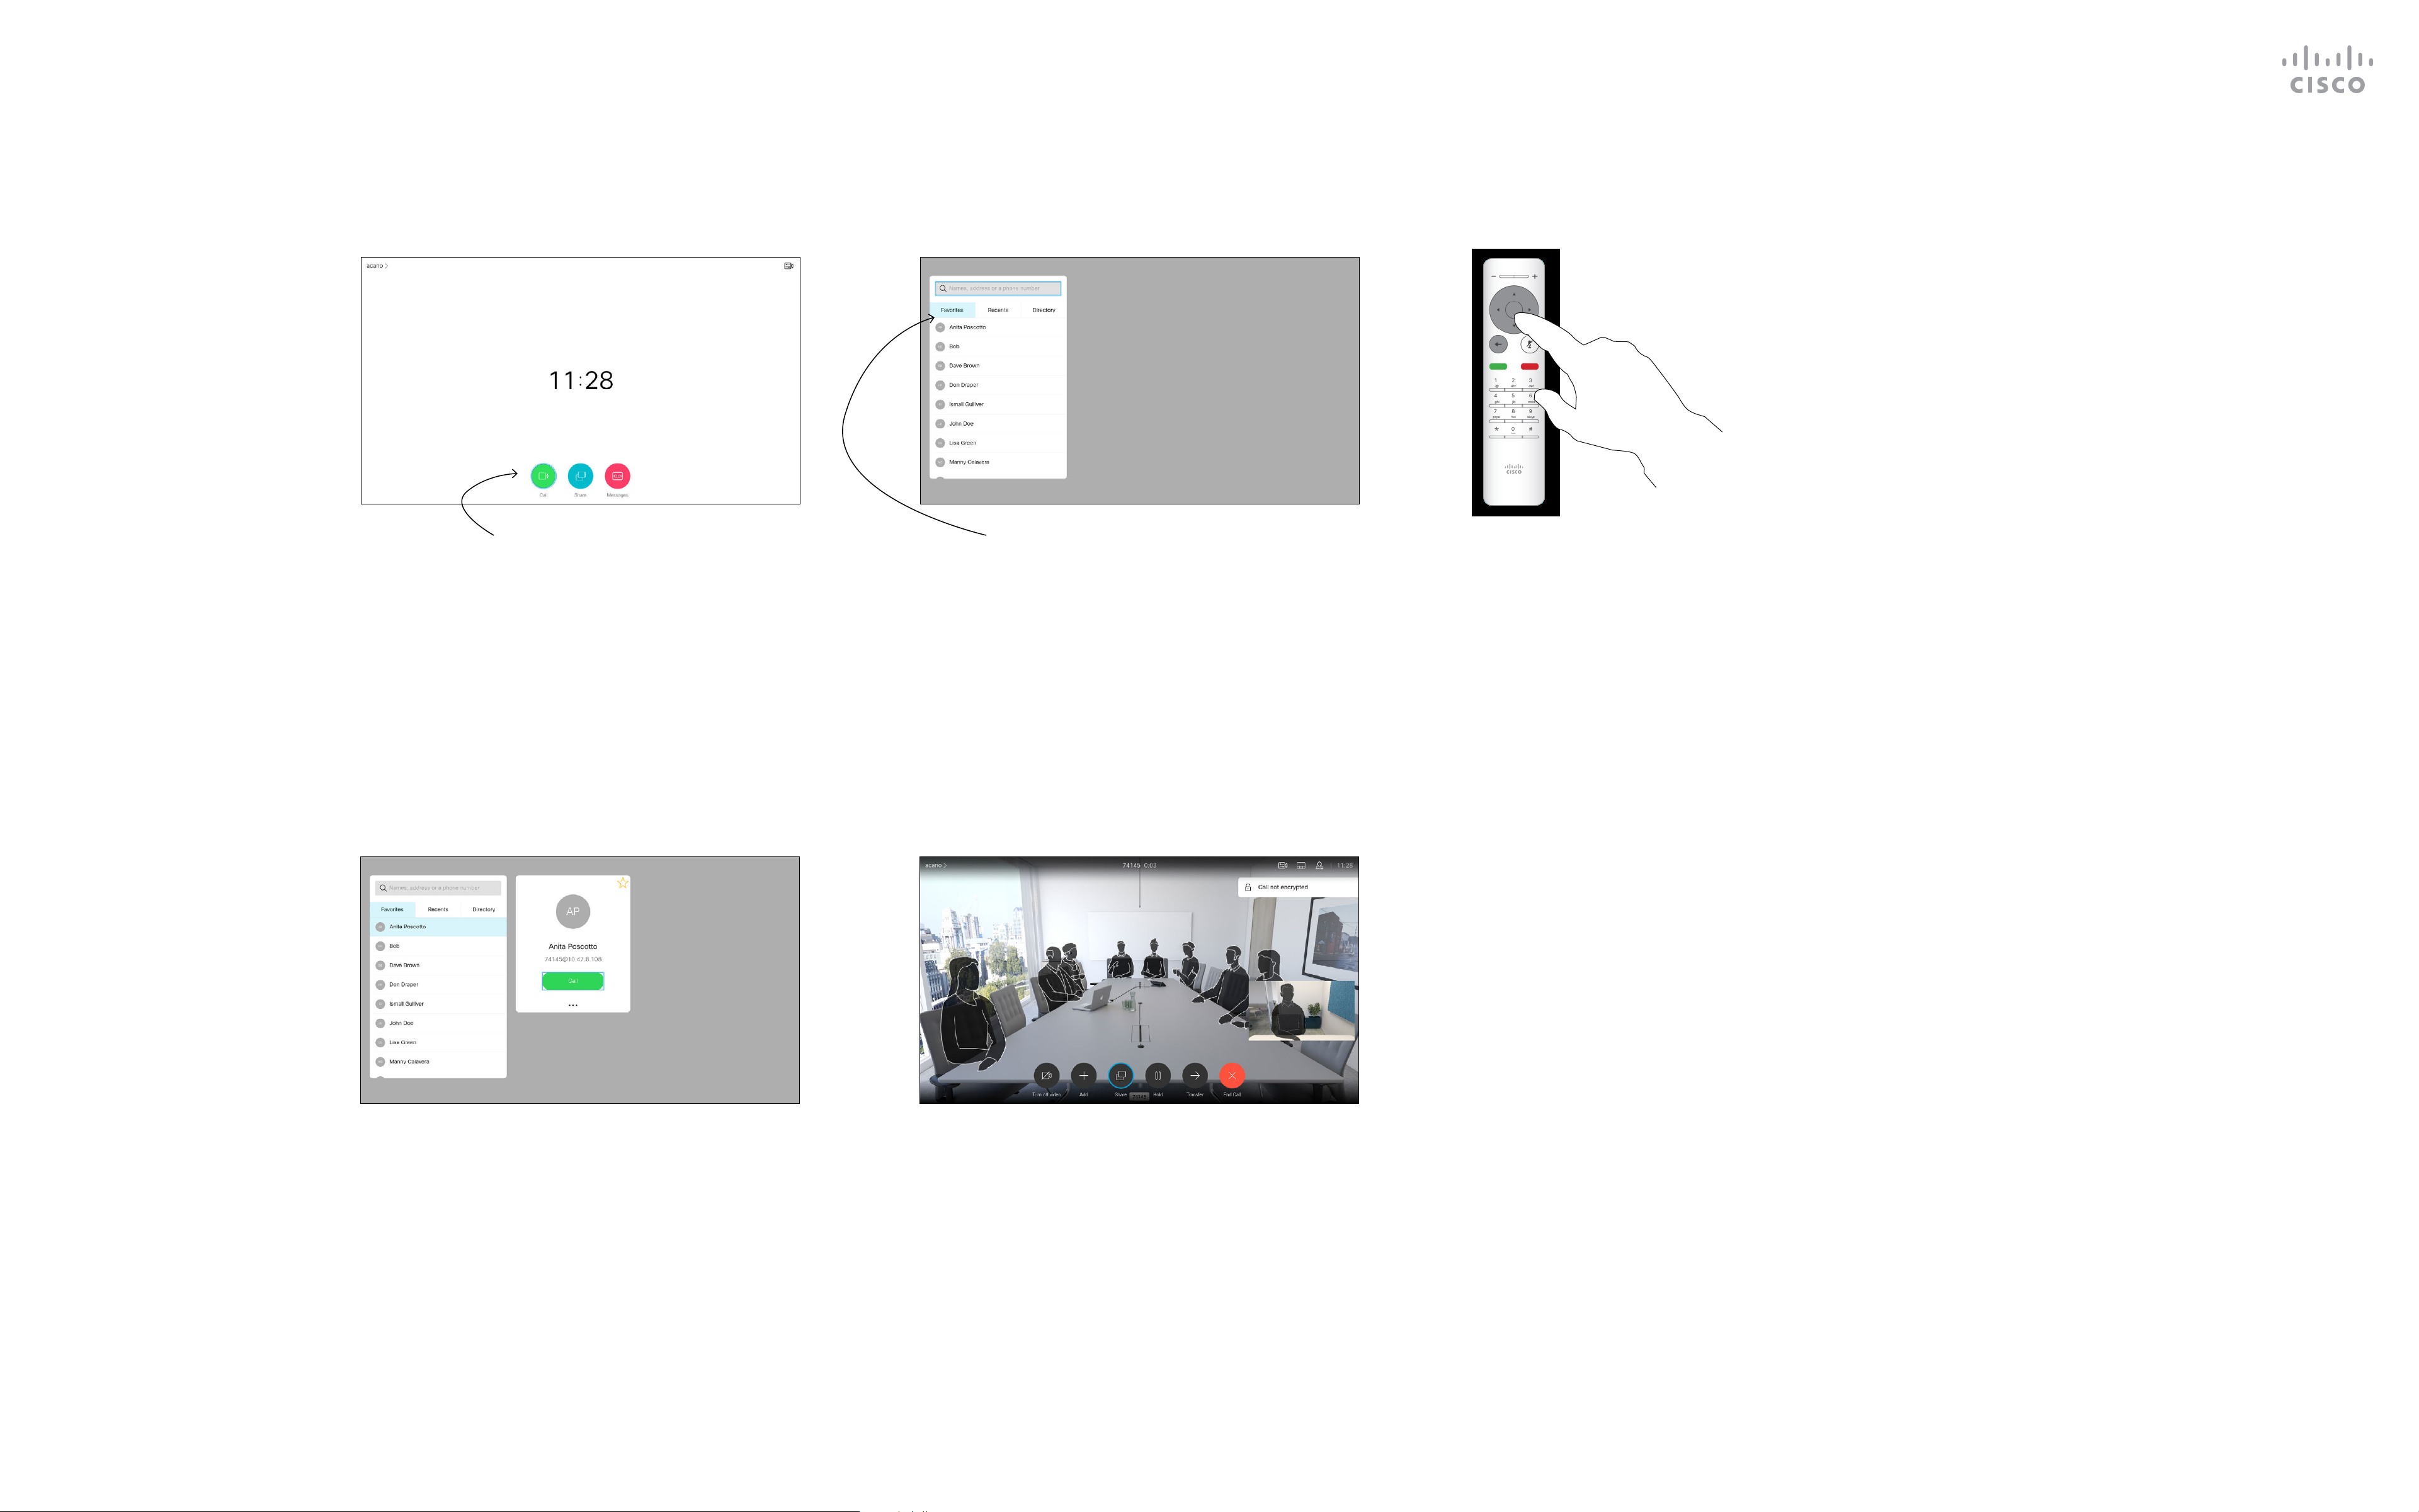
Your list of Contacts consists of
three parts:
Favorites. These contacts have
been added by you. These
entries are typically those you call
frequently or otherwise need to
access in a swift and convenient
manner from time to time. A favorite
is denoted by a golden asterisk
Directory is typically a corporate
directory installed on your device by
your video support team.
Recents is a list of calls you have
placed, received, or missed earlier.
The following options apply:
•
You can key in a name, number, or
an IP address and the device looks
in all lists for you.
•
You can select a tab and then scroll
through the list or key in a name
or number. Your search is then
restricted to that specic list.
•
You can add the entry to the list of
Favorites; edit aspects of the entry
before calling and/or change the
call rate (the bandwidth applied to
the call).
Place a Call From the Contact List
Video Calls
About List of Contacts
In the Call menu, press OK or the green
Call button on the remote control to place
the call.
Once an entry has been located, press OK
on the remote control to invoke the Call
menu.
Press the red End Call button on the
remote control, or use the Cursor keys
to select End Call on the screen and then
press OK to terminate the call.
Make sure Call is selected (the leftmost icon
along the bottom of the screen) and press
OK on the remote control or press the
green Call button on the remote control.
The Contact list appears. Use the Cursor keys
on the remote control to navigate between
Favorites, Recents and Directory (horizontally)
and then down in one of the lists.
1 2 3
4 5

9
D15097.22 Cisco TelePresence SX10, SX20 User Guide APRIL 2020
All contents © 2020 Cisco Systems, Inc. All rights reserved
For more on the Contacts list, see
the previous page.
You may need to edit an entry in
one of the lists of Contacts before
you place the call, such as to add
a prex, a sux, or otherwise alter
the entry to ensure success.
Edit a Contact Before the Call
Video Calls
About Editing
Once an entry has been located, press OK
on the remote control to invoke the Call
menu.
Make sure Call is selected (the leftmost icon
along the bottom of the screen) and press
OK on the remote control or press the
green Call button on the remote control.
Use the Cursor keys on the remote control
to navigate to the More eld (
...
) and press
OK.
Navigate down to Edit and Call (center
eld in the More menu) an press OK.
Edit the entry as required and press the
green Call button on the remote control to
place the call.
Use the Cursor keys on the remote control
to navigate between Favorites, Recents and
Directory and then down in one of the lists.
1 2 3
4 5 6
10
D15097.22 Cisco TelePresence SX10, SX20 User Guide APRIL 2020
All contents © 2020 Cisco Systems, Inc. All rights reserved
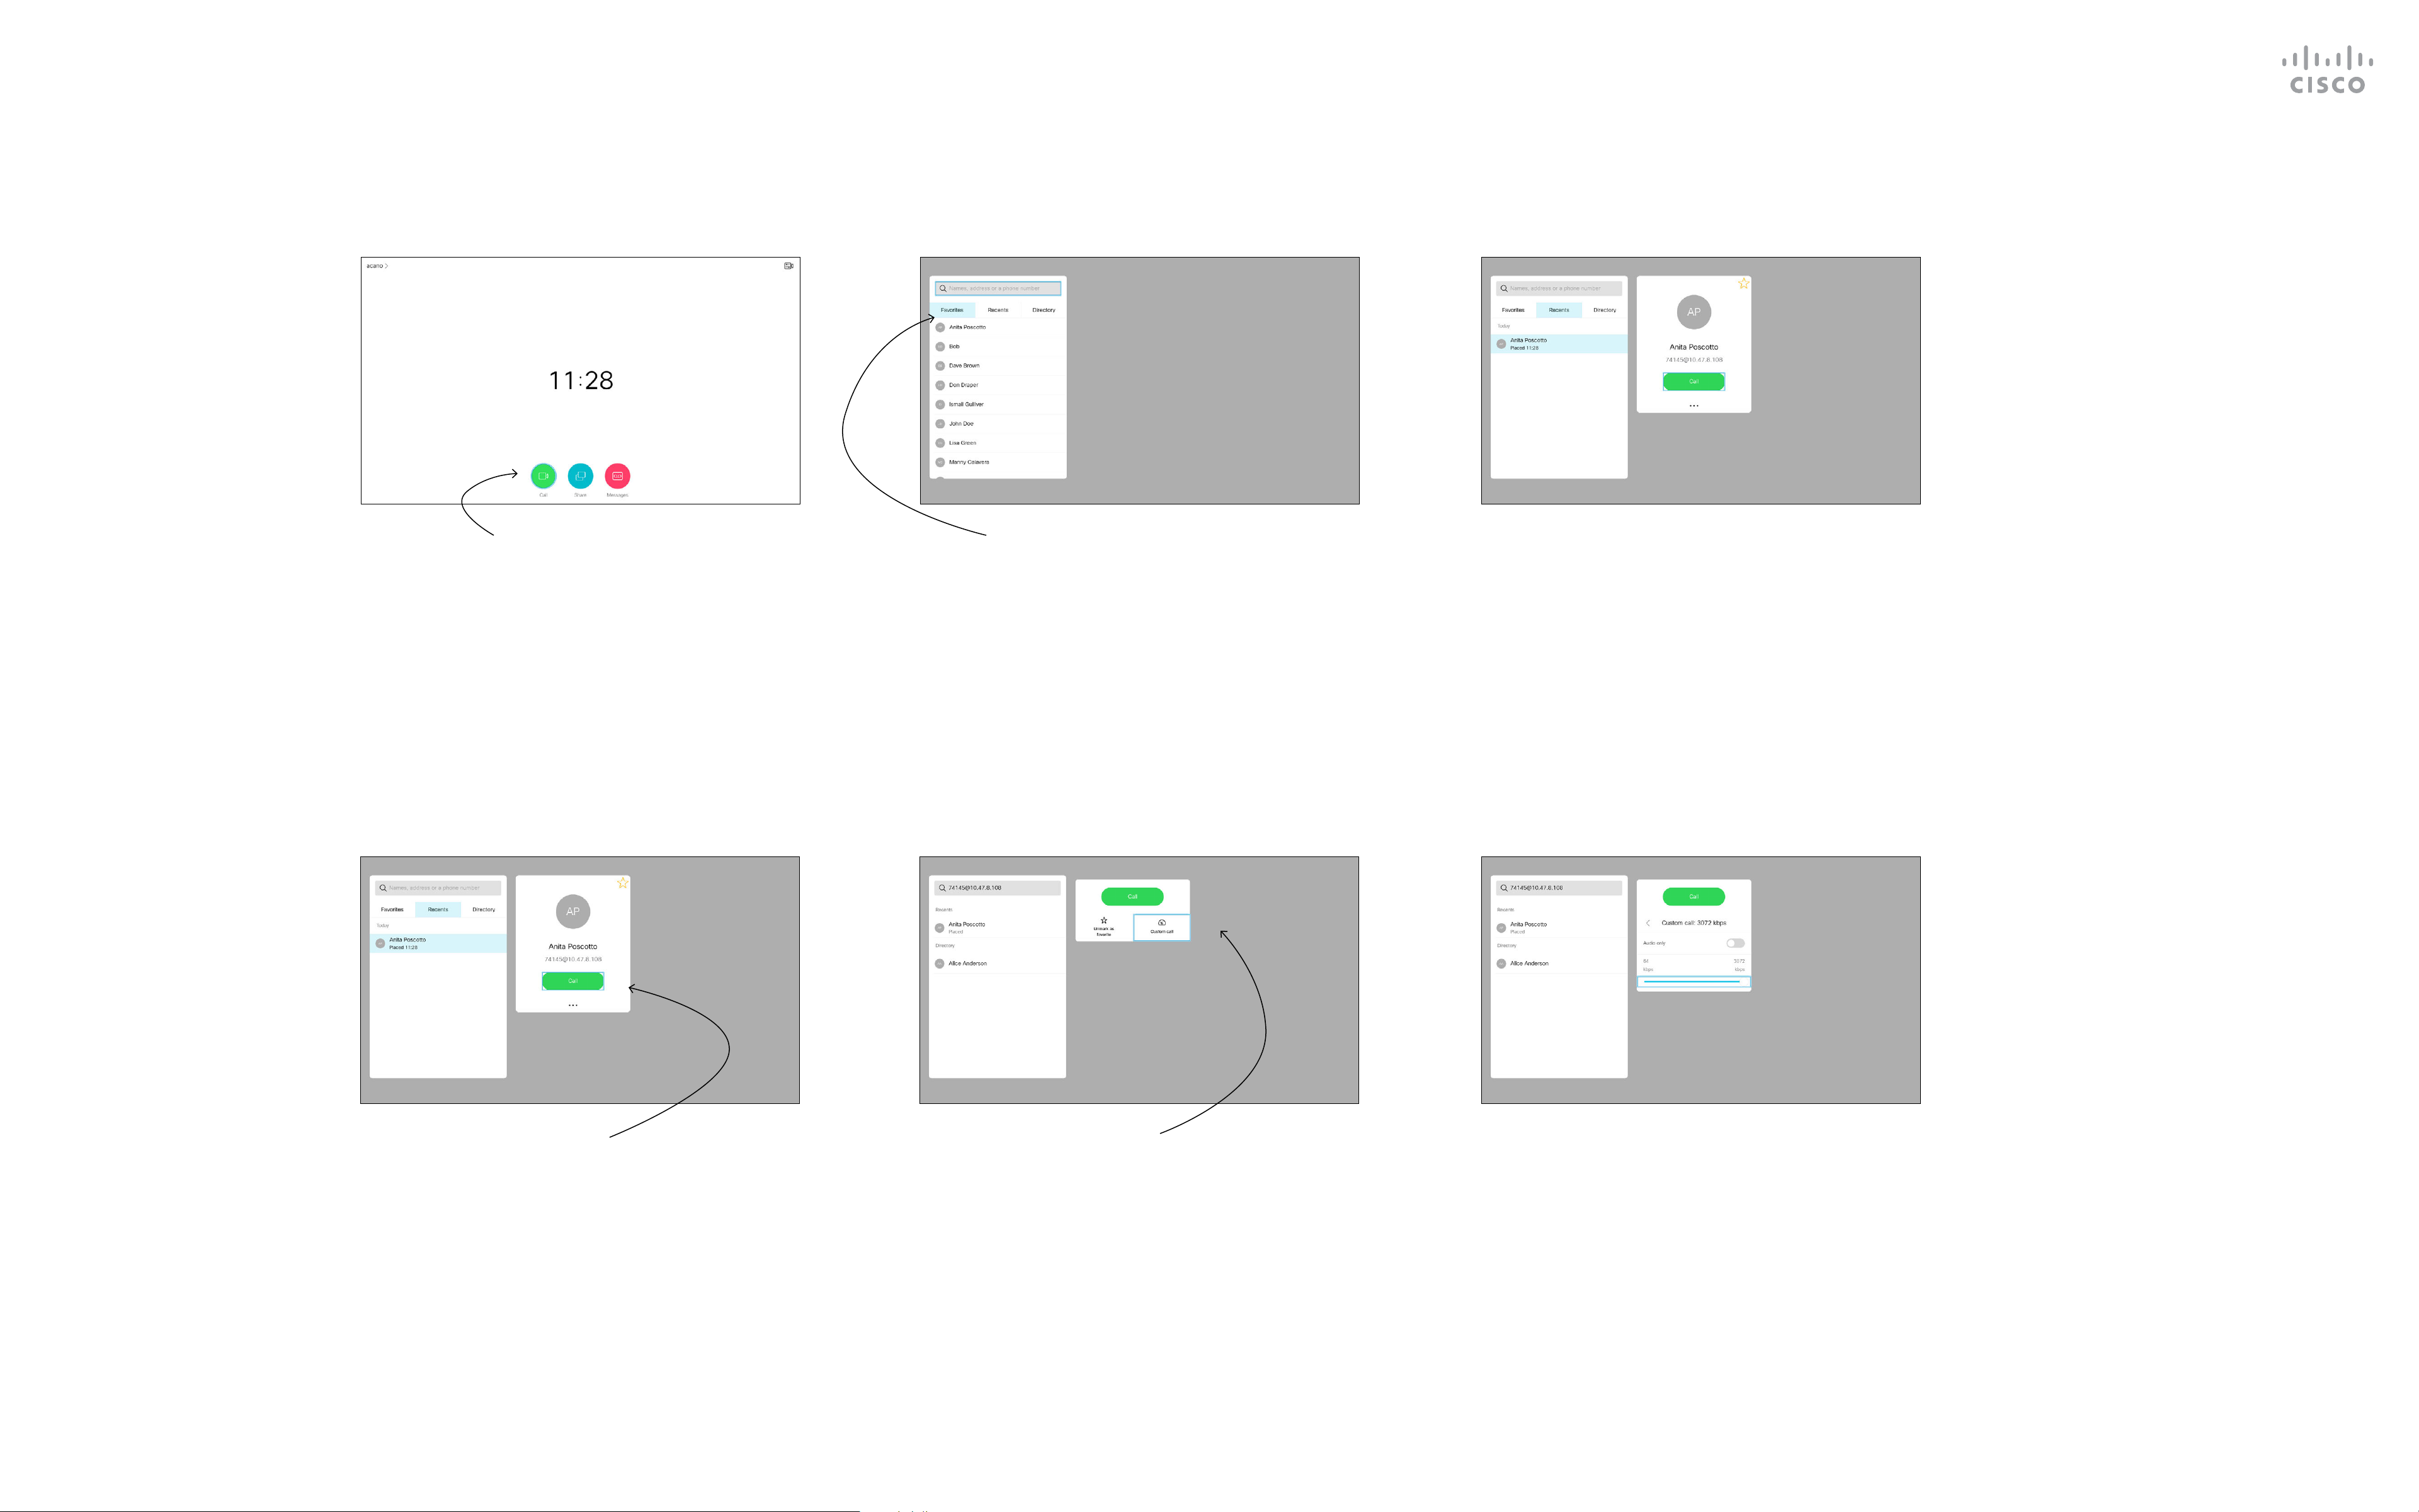
Call rate is the term used to express
the amount of bandwidth allocated
to the call. It’s measured in kbps
(kilobits per second).
The higher the call rate is, the better
the quality is, but on the expense of
higher bandwidth consumption.
The device comes with a default
call rate. This is normally set by
your video support team. Under
normal conditions the call rate
is adjusted automatically by the
device, whenever needed. This is
done to avoid choking the video call
when you try to call someone at a
higher rate than their device and
connection support.
If the automatic call rate setting fails,
you can also do this manually as a
last resort.
Call rate cannot be changed during
a call, but you may change it just
before you place a call, as shown at
left.
Edit the Call Rate, then Place the Call
Video Calls
About Call Rate
Once an entry has been located, press OK
on the remote control to invoke the Call
menu.
Make sure Call is selected (the leftmost icon
along the bottom of the screen) and press
OK on the remote control or press the
green Call button on the remote control.
Use the Cursor keys on the remote control
to navigate to the More eld (
...
) and press
OK.
Move down to Custom call and press OK. Use the Cursor keys as required and
press the green Call button on the remote
control to place the call.
Use the Cursor keys on the remote control
to navigate between Favorites, Recents and
Directory and then down in one of the lists.
1 2 3
4 5 6
11
D15097.22 Cisco TelePresence SX10, SX20 User Guide APRIL 2020
All contents © 2020 Cisco Systems, Inc. All rights reserved
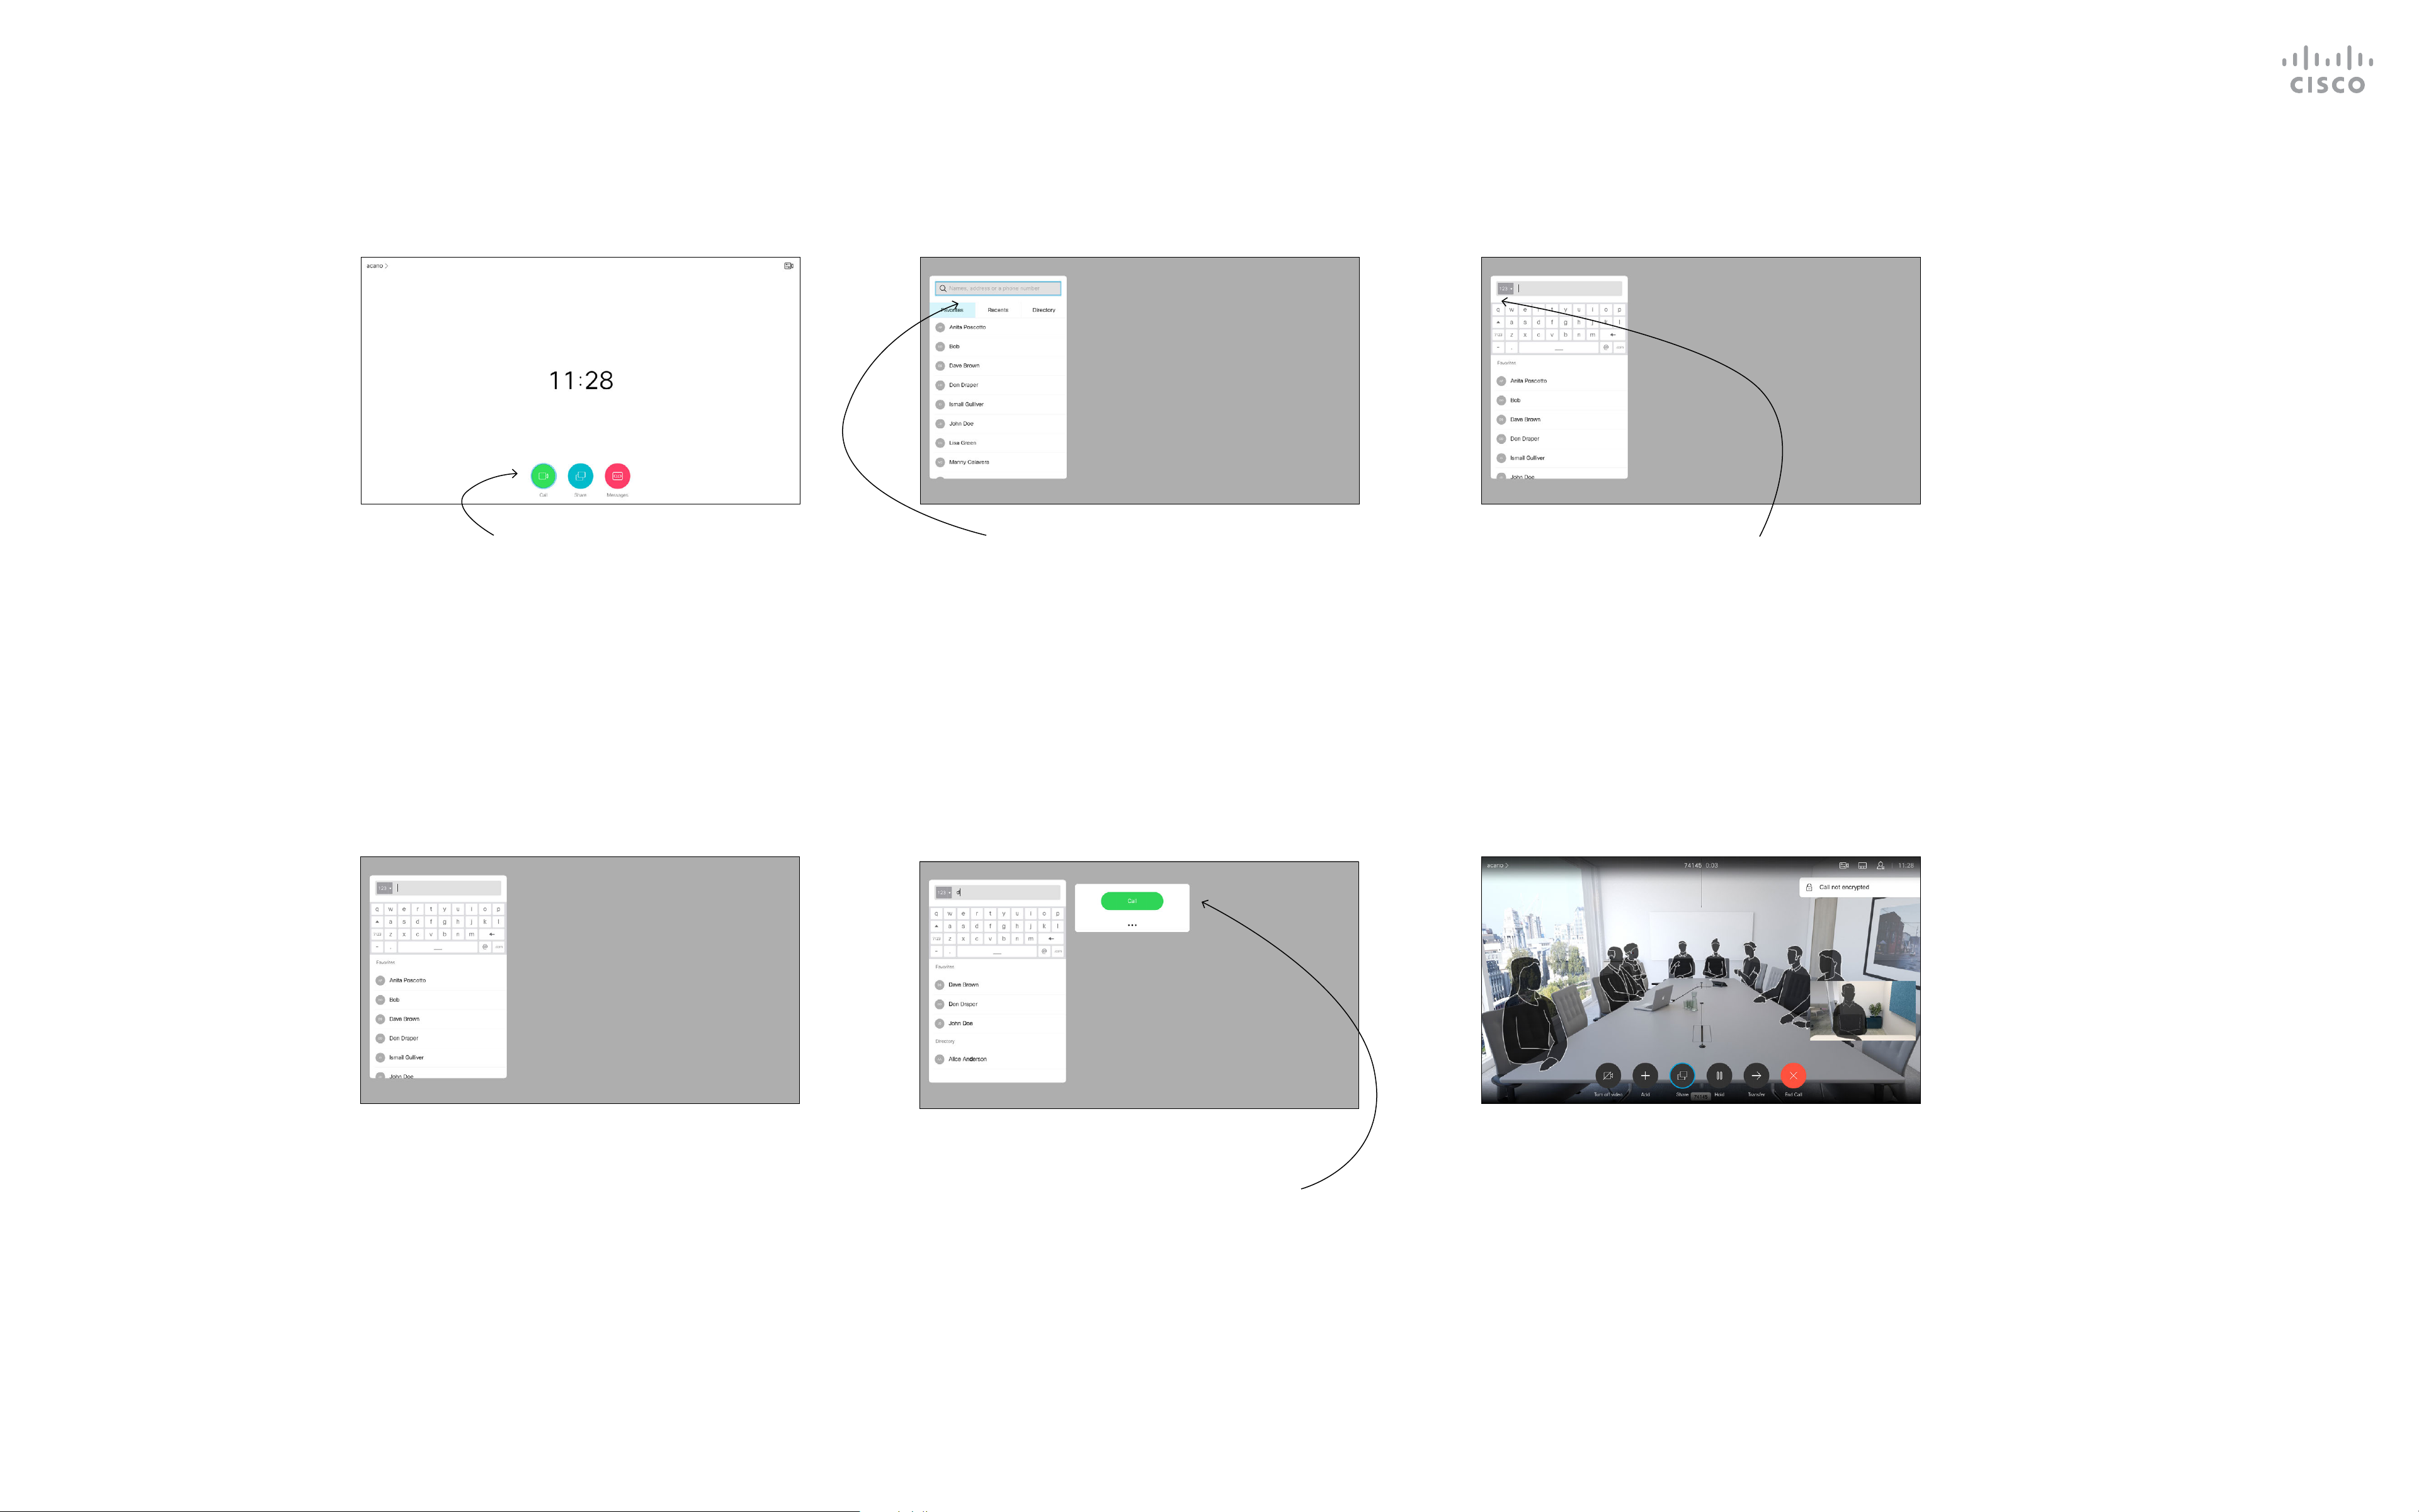
You can call someone who is not
listed in your list of contacts by
keying in their name, address or
number using the virtual keyboard.
Anyone you have previously called
appears in the Recents list and you
can then add any of them to your list
of Favorites. This is described in the
section Contacts.
Call Using Video Address
The procedure when using an IP
type video address to call someone
is similar. Just key in the address
and use
*
(the asterisk button in
the lower left corner on the remote
control) as separator. The device
interprets this as a valid IP address
separator so that the video address
appears as correctly entered.
Place a Call Using Name, Number, or IP-Address
Video Calls
About Placing Calls
Make sure Call is selected (the leftmost icon
along the bottom of the screen) and press
OK on the remote control or press the
green Call button on the remote control.
To use the virtual keyboard, navigate down
to and about the keyboard and select
characters. Press OK to select a character.
To enter numbers select 123.
Then press the green Call button on
the remote control to place the call.
Alternatively, navigate to the Call icon and
press OK.
Use the Cursor keys to navigate to the
Search or Dial eld at the top of the menu.
Press OK.
Press the red End Call button on the
remote control, or use the Cursor keys
to select End Call and then press OK to
terminate the call.
1 2 3
4 5 6
12
D15097.22 Cisco TelePresence SX10, SX20 User Guide APRIL 2020
All contents © 2020 Cisco Systems, Inc. All rights reserved
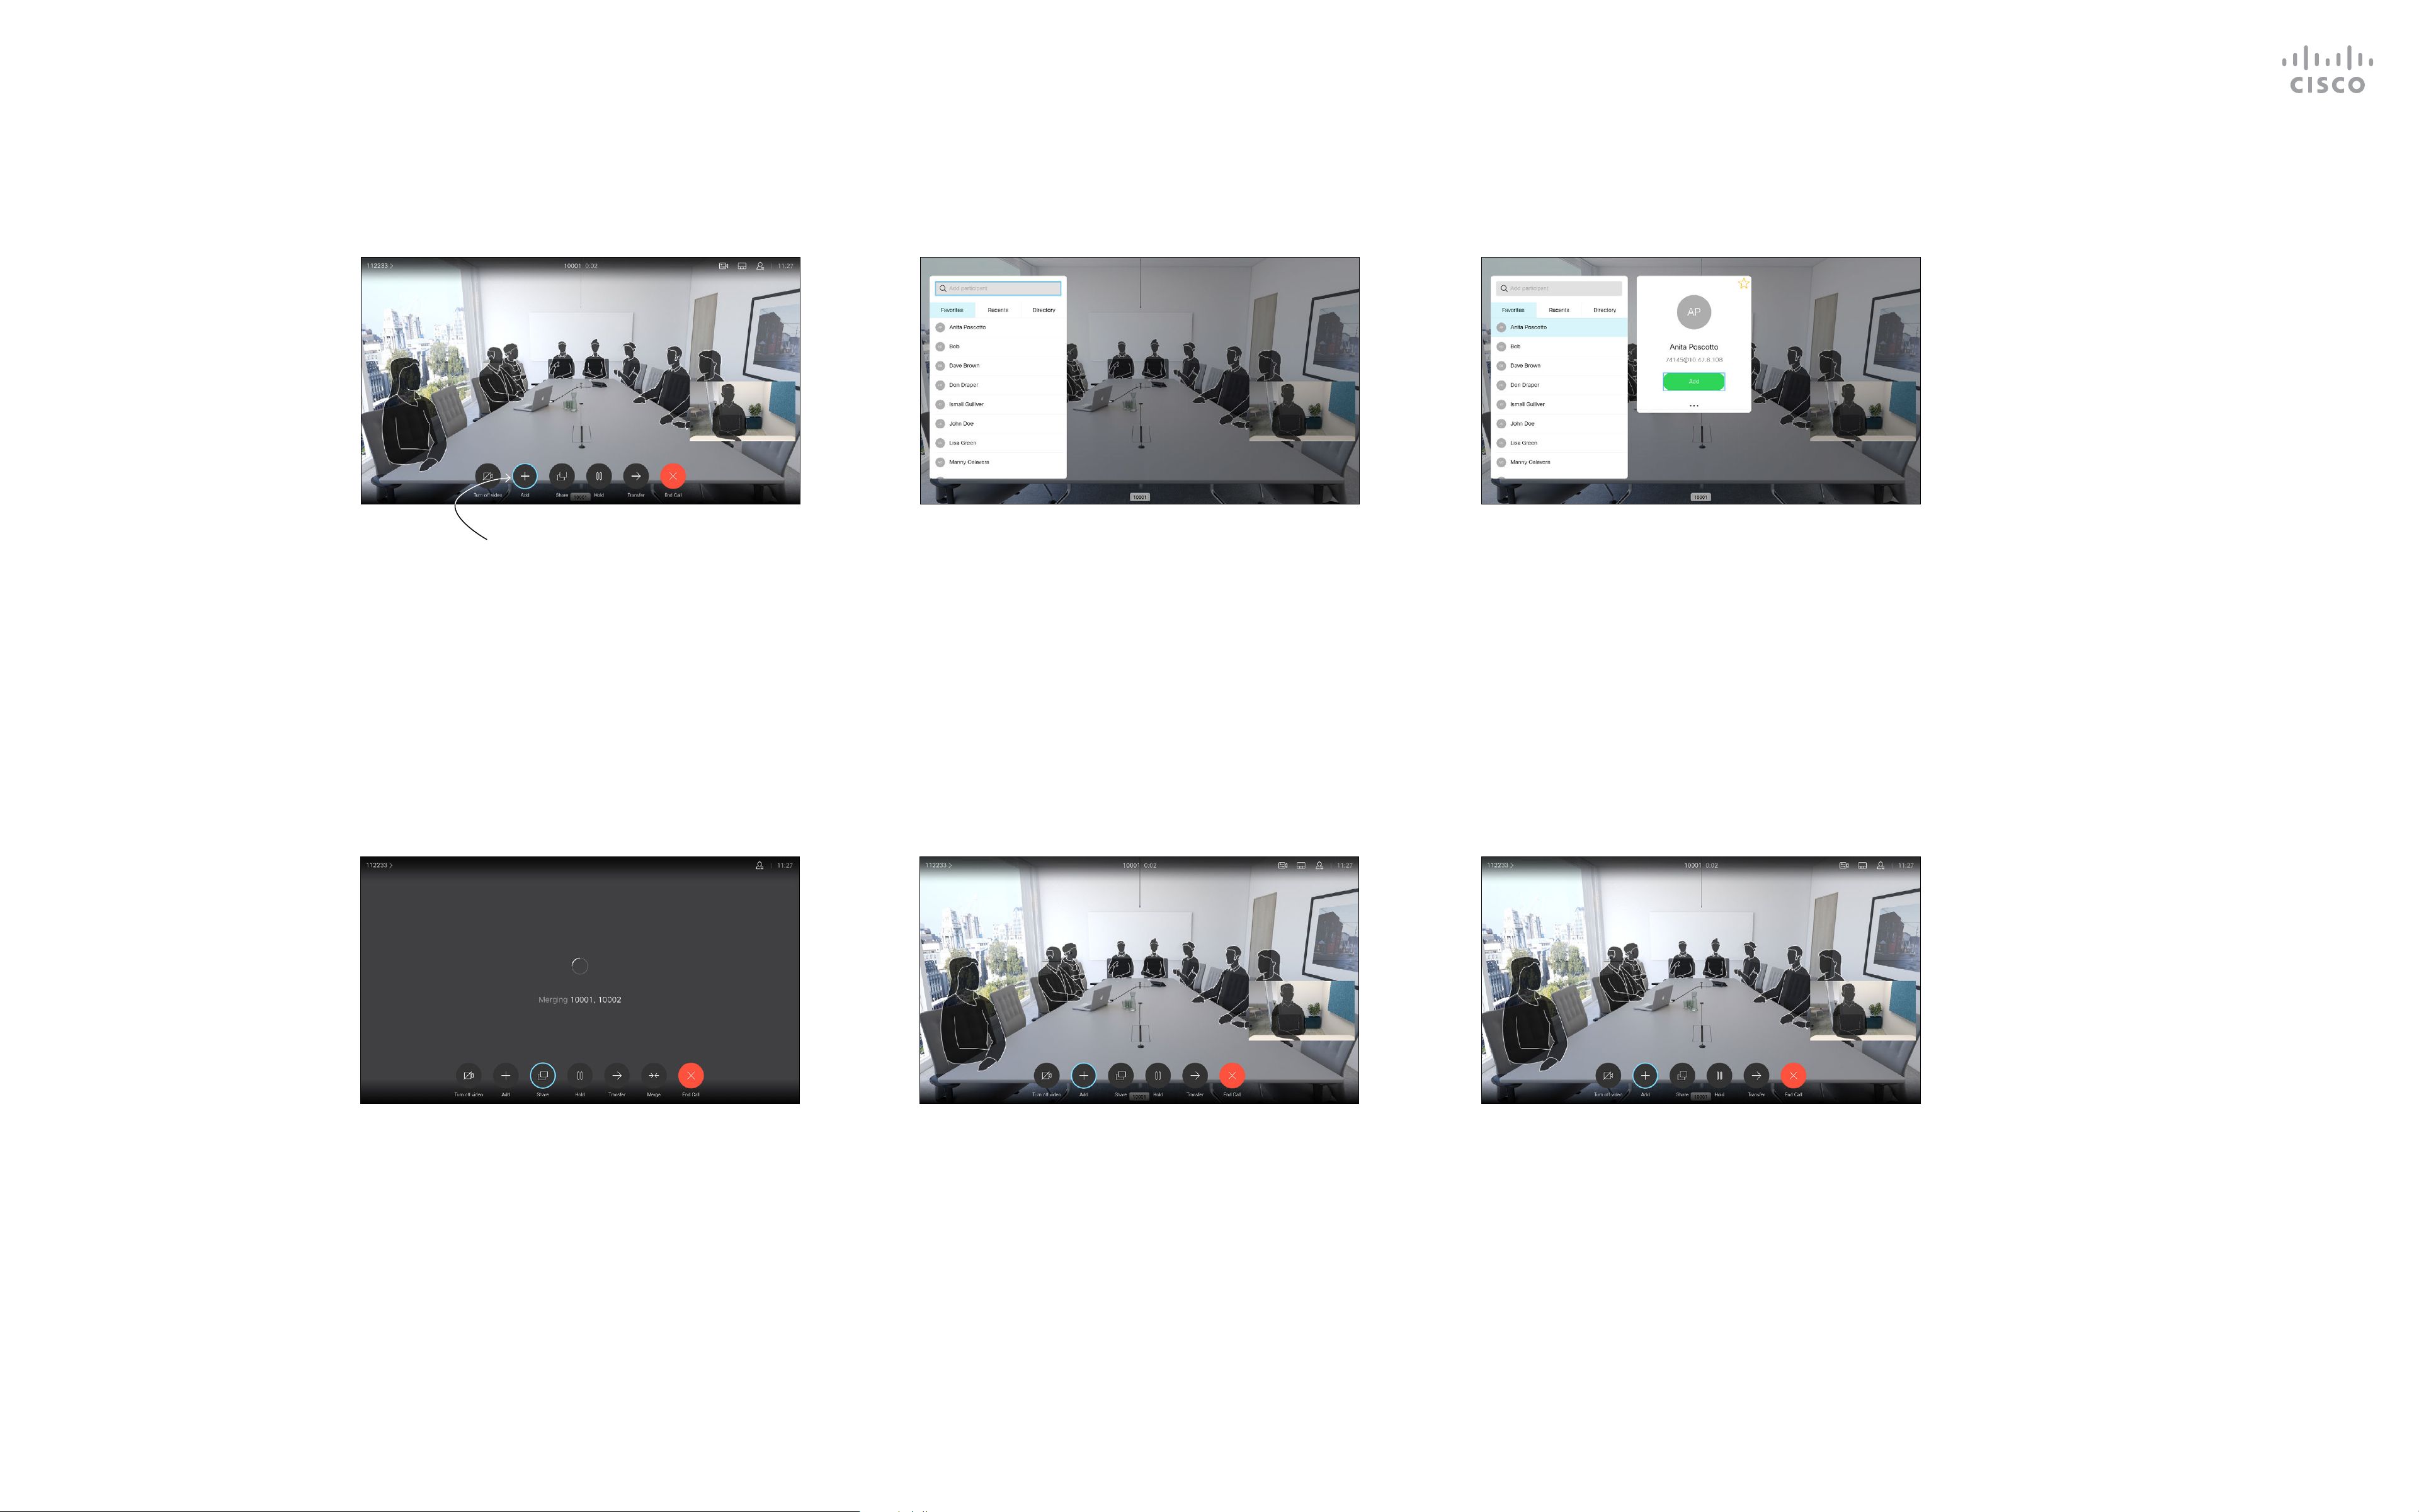
Add Additional Participants to an Existing Call
Video Calls
In a call, navigate to Add and press OK on
the remote control. This will put the current
call on hold.
The calls are now merged together.
Navigate to Add and press OK to expand
the call into a conference.
Locate the participant to be added in the
usual way. Press OK.
Repeat the process to add more
participants, if needed.
Press the red End Call button on the
remote control, or use the Cursor keys
to select End Call and then press OK to
terminate the call.
Your network may be equipped
with the capability to initiate a video
conference with several participants.
The maximum number of
participants supported by your
video device depends on device
conguration and the video
infrastructure. If in doubt, contact
your video support team.
If you want to initiate a video
conference, you must call each
participant one by one.
If you are the one who initiated the
conference, you can end the entire
conference. The other participants
can only disconnect themselves
from the conference.
About
Video Conferences
1 2 3
4 5 6
Loading...