


 Loading...
ADMINISTRATION
GUIDE
Cisco Small Business
WAP4410N Wireless-N Access Point with Power Over Ethernet

Cisco and the Cisco logo are trademarks or registered trademarks of Cisco and/or its affiliates in the U.S. and other countries. To view a list of Cisco trademarks, go to this URL: www.cisco.com/go/trademarks. Third-party trademarks mentioned are the property of their respective owners. The use of the word partner does not imply a partnership relationship between Cisco and any other company. (1110R)
© 2012 Cisco Systems, Inc. All rights reserved. |
Document Revision Number OL-19774-02 |

|
Contents |
|
|
|
|
Chapter 1: Introduction |
6 |
Audience |
6 |
Organization |
7 |
Chapter 2: Planning Your Wireless Network |
8 |
Network Topology |
8 |
Roaming |
8 |
Network Layout |
9 |
Example of a Simple Wireless Network |
10 |
Protecting Your Network |
11 |
Chapter 3: Getting to Know the Wireless-N Access Point |
13 |
Front Panel |
13 |
Back Panel |
14 |
Antennas and Positions |
14 |
Chapter 4: Connecting the Cisco WAP4410N Access Point |
15 |
Placement Options |
15 |
Desktop Option |
15 |
Wall-Mount Option |
16 |
Stand Option |
16 |
Connecting the Cisco WAP4410N Access Point to the Network |
17 |
Using a PoE Switch or Router |
17 |
Using a Standard Switch or Router |
18 |
Chapter 5: Setting Up the Cisco WAP4410N Wireless-N Access Point |
19 |
Launching the Web-Based Configuration Utility |
19 |
Navigating the Utility |
20 |
Setup |
21 |
Wireless |
21 |
AP Mode |
21 |
WAP4410N Wireless-N Access Point with Power Over Internet Administration Guide |
3 |

|
Contents |
|
|
|
|
Administration |
21 |
Status |
22 |
Chapter 6: Configuring the Cisco WAP4410N Wireless-N Access Point |
23 |
Setup |
23 |
Basic Setup |
24 |
Time |
26 |
Advanced |
27 |
Wireless |
28 |
Basic Settings |
28 |
Security |
30 |
Connection Control |
37 |
Wi-Fi Protected Setup |
39 |
VLAN and QoS |
39 |
Advanced Settings |
41 |
AP Mode |
43 |
Administration |
44 |
Management |
44 |
Log |
46 |
Diagnostics |
47 |
Factory Default |
48 |
Firmware Upgrade |
48 |
Reboot |
49 |
Configuration Management |
49 |
SSL Certification Management |
50 |
Status |
50 |
Local Network |
50 |
Wireless |
51 |
System Performance |
52 |
Appendix A: Troubleshooting |
54 |
WAP4410N Wireless-N Access Point with Power Over Internet Administration Guide |
4 |

Contents
Appendix B: Where to Go From Here |
61 |
WAP4410N Wireless-N Access Point with Power Over Internet Administration Guide |
5 |

1
Introduction
The Cisco WAP4410N access point allows for greater range and mobility within your wireless network while also allowing you to connect the wireless network to a wired environment. It also supports the Wi-Fi Protected Setup (WPS) feature to help you simplify the setting up of security on a wireless network. The Cisco WAP4410N offers the convenience of Power over Ethernet (PoE), in addition to regular 12VDC power adaptor, so it can receive data and power over a single Ethernet network cable.
The Cisco WAP4410N supports the 802.11n Draft 2.0 Specification by IEEE. It also supports 802.11g and 802.11b clients in a mixed environment. In addition, this access point provides longer coverage by using multiple antennas to transmit and receive data streams in different directions.
Use the instructions in this guide to help you connect the access point, set it up, and configure it to bridge your different networks. These instructions should be all you need to get the most out of the access point.
Audience
The audience for this document includes wireless network users, administrators, and managers.
WAP4410N Wireless-N Access Point with Power Over Internet Administration Guide |
6 |

Introduction |
1 |
|
|
Organization |
|
|
|
|
|
Organization
This table describes the contents of each chapter in this document.
Chapter Title |
Description |
|
|
“Introduction” on page |
Introduces the access point and its capabilities. |
6 |
|
|
|
“Planning Your |
Describes how to connect the access point to the |
Wireless Network” on |
network. |
page 8 |
|
|
|
“Getting to Know the |
Describes the physical features of the access point. |
Wireless-N Access |
|
Point” on page 13 |
|
|
|
“Connecting the Cisco |
Explains how to place and connect the access point. |
WAP4410N Access |
|
Point” on page 15 |
|
|
|
“Setting Up the Cisco |
Explains how to use the web-based utility to |
WAP4410N Wireless-N |
configure the basic settings of the access point |
Access Point” on page |
through your web browser. |
19 |
|
|
|
“Configuring the Cisco |
Describes how to configure and manage your |
WAP4410N Wireless-N |
WAP4410 access point. |
Access Point” on page |
|
23 |
|
|
|
“Troubleshooting” on |
Provides solutions to problems that may occur |
page 54 |
during the installation and operation of the access |
|
point. |
|
|
“Where to Go From |
Provides links to related sources of information. |
Here” on page 61 |
|
|
|
WAP4410N Wireless-N Access Point with Power Over Internet Administration Guide |
7 |

2
Planning Your Wireless Network
Network Topology
A wireless network is a group of computers, each equipped with one or more wireless adapters. Computers in a wireless network must be configured to share the same radio channel to talk to each other. Several computers equipped with wireless cards or adapters can communicate with each other to form an ad-hoc network without the use of an access point.
Cisco also provides products to allow wireless adaptors to access wired network through a bridge such as the wireless access point, or wireless router. An integrated wireless and wired network is called an infrastructure network. Each wireless computer in an infrastructure network can talk to any computer in a wired or wireless network via the access point or wireless router.
An infrastructure configuration extends the accessibility of a wireless computer to a wired network, and may double the effective wireless transmission range for two wireless adapter computers. Since an access point is able to forward data within a network, the effective transmission range in an infrastructure network may be more than doubled since access point can transmit signal at higher power to the wireless space.
Roaming
Infrastructure mode also supports roaming capabilities for mobile users. Roaming means that you can move your wireless computer within your network and the access points will pick up the wireless computer’s signal, providing that they both share the same wireless network (SSID) and wireless security settings.
Before you consider roaming, choose a feasible radio channel and optimum access point position. Proper access point positioning combined with a clear radio signal will greatly enhance performance.
WAP4410N Wireless-N Access Point with Power Over Internet Administration Guide |
8 |

Planning Your Wireless Network |
2 |
|
|
Network Layout |
|
|
|
|
|
Network Layout
The Wireless-N Access Point has been designed for use with 802.11n, 802.11g and 802.11b products. The access point is compatible with 802.11n, 802.11g and 802.11b adapters, such as the notebook adapters for your laptop computers, PCI adapters for your desktop PCs, and USB adapters for all PCs when you want to enjoy wireless connectivity. These wireless products can also communicate with a 802.11n, 802.11g or 802.11b wireless print server (if available).
To link your wired network with your wireless network, connect the access point’s Ethernet network port to any switch or router that uses Power over Ethernet (PoE). It can also connect to a non-PoE switch or router by using the access point’s power adaptor.
With these, and many other, Cisco products, your networking options are limitless. Go to the Cisco website at www.cisco.com for more information about wireless products.
WAP4410N Wireless-N Access Point with Power Over Internet Administration Guide |
9 |
Planning Your Wireless Network |
2 |
|
|
Example of a Simple Wireless Network |
|
|
|
|
|
Example of a Simple Wireless Network
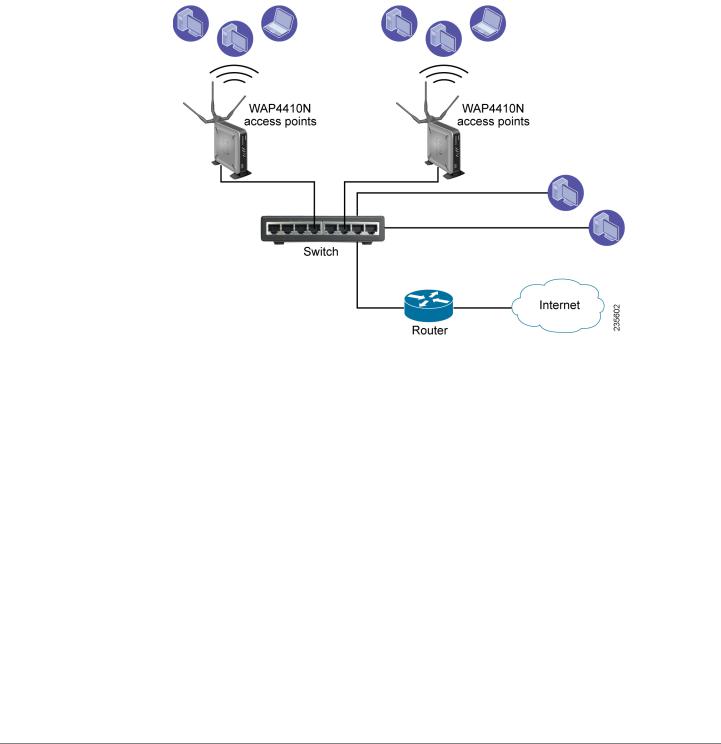
The diagram below shows a typical infrastructure wireless network setup.
In this illustration, the switch connects to a router that connects to the Internet. The network provides connectivity among wireless network devices and computers that have a wired connection to the switch. The wireless access points connect to a Cisco switch that provides them with power. Each access point connects multiple wireless devices to the network.
WAP4410N Wireless-N Access Point with Power Over Internet Administration Guide |
10 |
Planning Your Wireless Network |
2 |
|
|
Protecting Your Network |
|
|
|
|
|
Protecting Your Network
Wireless networks are easy to find. Hackers know that to join a wireless network, wireless networking products first listen for “beacon messages.” These messages can be easily decrypted and contain much of the network’s information, such as the network’s SSID (Service Set Identifier).
Here are steps you can take to protect your network:
Change the administrator’s password regularly
Every wireless networking device stores network settings (for example, SSID and WEP keys) in its firmware.
Your network administrator is the only person who can change network settings. If a hacker discovers the administrator’s password, then the hacker too can change those settings.
Protect your SSID
•Disable SSID broadcasting. Most wireless networking devices give you the option of broadcasting the SSID. While this option may be more convenient, it allows anyone to log into your wireless network. This includes hackers.
So, don’t broadcast the SSID.
•Make the SSID unique. Wireless networking products come with a default SSID set by the factory. Hackers know these defaults and can check them against your network. Change your SSID to something unique and not something related to your company or the networking products you use.
•Change the SSID often. Change your SSID regularly so that hackers who gain access to your wireless network will have to begin again.
Enable MAC Address Filtering
MAC address filtering allows you to provide access to only those wireless nodes with certain MAC addresses. Filtering makes it harder for a hacker to access your network with a random MAC address.
Secure Your Network
•WEP—WEP is often looked upon as a cure-all for wireless security concerns. This is overstating WEP’s ability. Again, this can only provide enough security to make a hacker’s job more difficult.
There are several ways that WEP can be maximized: - Use the highest level of encryption possible.
WAP4410N Wireless-N Access Point with Power Over Internet Administration Guide |
11 |

Planning Your Wireless Network |
2 |
|
|
Protecting Your Network |
|
|
|
|
|
-Use “Shared Key” authentication.
-Change your WEP key regularly.
•WPA/WPA2 Personal—The WPA-Personal and WPA2-Personal methods offer two encryption methods, TKIP and AES, with dynamic encryption keys.
•WPA /WPA2 Enterprise—The WPA-Enterprise and WPA2-Enterprise option requires that your network has a RADIUS server for authentication.
A network encrypted with WPA/WPA2 is more secure than a network encrypted with WEP, because WPA/WPA2 uses dynamic key encryption. To protect the information as it passes over the airwaves, you should enable the highest protection level.
Implementing encryption may have a negative impact on your network’s performance, but if you are transmitting sensitive data over your network, encryption should be used.
!
CAUTION Remember that each device in your wireless network must use the same encryption method and encryption key or your wireless network will not function properly
WAP4410N Wireless-N Access Point with Power Over Internet Administration Guide |
12 |

3
Getting to Know the Wireless-N Access Point
This chapter describes the external features of the Cisco WAP4410N Access
Point.
Front Panel
The access point’s front panel lights display information about network activity.
•POWER Light—(Green) Lights up and remains lit when the device is powered on.
•PoE Light—(Green) Lights up when the access point is powered through an Ethernet cable.
•WIRELESS Light—(Green) Lights up when the wireless module is active on the access point. This light flashes when the access point is actively sending to or receiving data from a wireless device.
•ETHERNET Light—(Green) Lights up when the access point successfully connects to a device through the Ethernet network port. This light flashes when the access point is actively sending to or receiving data from one of the devices over the Ethernet network port.
WAP4410N Wireless-N Access Point with Power Over Internet Administration Guide |
13 |

Getting to Know the Wireless-N Access Point |
3 |
|
|
Back Panel |
|
|
|
|
|
Back Panel
The back panel of the device consists of:
•RESET Button—There are two ways to reset the access point to the factory default configuration. Either press the Reset button for approximately 10 seconds or restore the defaults using the web-based utility of the access point.
•ETHERNET Port—Connects to Ethernet network devices, such as a switch or router.
•POWER Port—Connects the access point to power using the supplied 12VDC power adapter. Use if your switch or router does not support PoE.
Antennas and Positions
The Cisco WAP4410N Access Point has three detachable 2dBi omni-directional antennas. These antennas are located on the back of the device.
The three antennas have a base that can rotate 90 degrees when in the standing position. The three antennas support 3X3 “multiple in, multiple out” (MIMO) diversity in wireless-N mode.
WAP4410N Wireless-N Access Point with Power Over Internet Administration Guide |
14 |

4
Connecting the Cisco WAP4410N Access Point
This chapter describes how to place and connect the Cisco WAP4410N access point to your network.
Depending on your application, you might want to set up the device first before mounting it.
Placement Options
You can place the Cisco WAP4410N horizontally on its rubber feet, vertically in a stand, or mount it on the wall.
Desktop Option
For desktop mounting, place the access point horizontally on a surface so it sits on its four rubber feet.
WAP4410N Wireless-N Access Point with Power Over Internet Administration Guide |
15 |
Connecting the Cisco WAP4410N Access Point |
4 |
|
|
Placement Options |
|
|
|
|
|
Wall-Mount Option
To mount the Cisco WAP4410N access point on a wall, follow these steps.
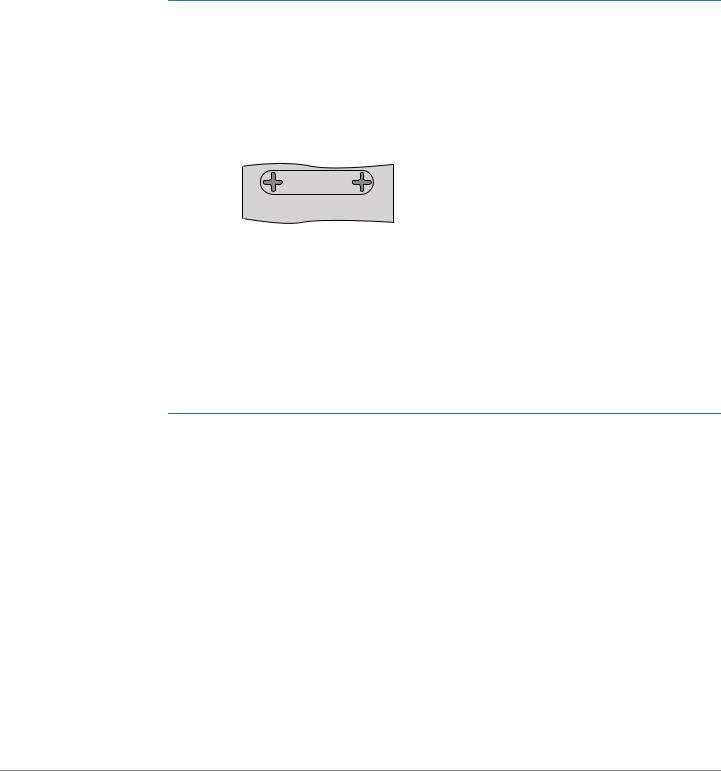
STEP 1 Determine where you want to mount the device and install two screws (not supplied) that are 2-15/16 inches apart (approximately 7.46 cm.).
STEP 2 With the back panel pointing up (if installing vertically), line up the Cisco WAP4410N Access Point so that the wall-mount crisscross slots on the bottom of the access point line up with the two screws.
Wall mount slots
 2-15/16


 251580
STEP 3 Place the wall-mount slots over the screws and slide the device down until the screws fit snugly into the wall-mount slots.
Stand Option
To place the access point vertically in a stand, follow these steps.
STEP 1 Locate the left side panel of the device (opposite of the antenna).
STEP 2 With the two large prongs of one of the stands facing outward, insert the short prongs into the little slots in the device, and push the stand upward until the stand snaps into place.
Repeat this step with the other stand.
WAP4410N Wireless-N Access Point with Power Over Internet Administration Guide |
16 |

Connecting the Cisco WAP4410N Access Point |
4 |
|
|
Connecting the Cisco WAP4410N Access Point to the Network |
|
|
|
|
|
Connecting the Cisco WAP4410N Access Point to the Network
You can connect the Cisco WAP4410N access point to your network in one of the following ways:
•Using a PoE Switch or Router
•Using a Standard Switch or Router
Using a PoE Switch or Router
To connect the Cisco WAP4410N to your network using a PoE switch or router, connect the Ethernet port of the access point to a PoE port on the PoE switch.
WAP4410N Wireless-N Access Point with Power Over Internet Administration Guide |
17 |
Connecting the Cisco WAP4410N Access Point |
4 |
|
|
Connecting the Cisco WAP4410N Access Point to the Network |
|
|
|
|
|
The lights on the front panel light up as soon as the Cisco WAP4410N Access
Point powers on.
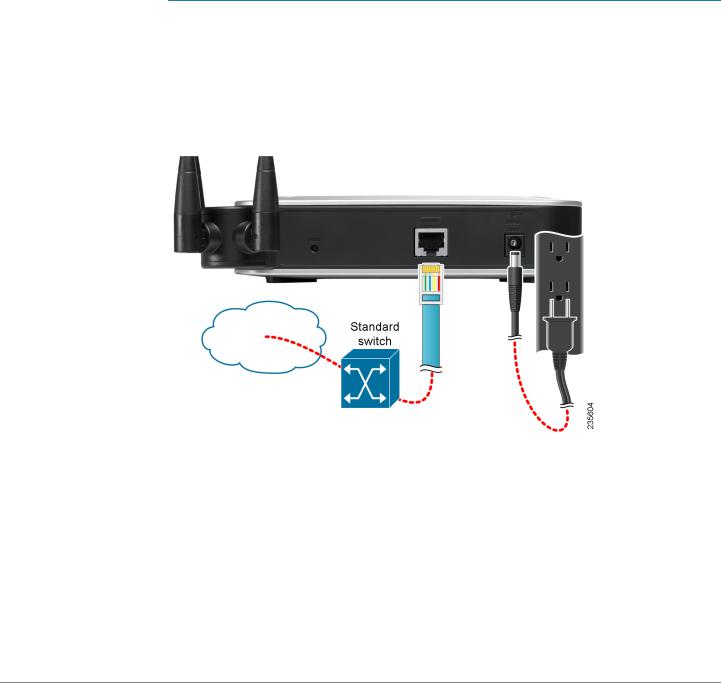
Using a Standard Switch or Router
To connect the Cisco WAP4410N to your network using a standard switch or router, follow these steps.
STEP 1 Use the supplied Ethernet cable to connect the Ethernet port of the access point to an Ethernet port on the switch.
STEP 2 Connect the included power adapter to the Power port of the Cisco WAP4410N Access Point.
STEP 3 Plug the power adapter into an electrical outlet.
The lights on the front panel light up as soon as the Cisco WAP4410N Access
Point powers on.
WAP4410N Wireless-N Access Point with Power Over Internet Administration Guide |
18 |

5
Setting Up the Cisco WAP4410N Wireless-N Access Point
The Cisco WAP4410N access point works with the default settings. However, you can change these settings to suit your needs by accessing the access point using a web-based configuration utility.
NOTE Make sure that you have enabled TCP/IP on your computers prior to proceeding. Computers communicate over the network with this protocol.
Launching the Web-Based Configuration Utility
The firmware v2.0.0.5 or later releases changed the factory default IP address configuration to DHCP. Before installation, make sure that your DHCP server is running and can be reached. You may need to disconnect and reconnect the devices for them to discover their new IP addresses from the DHCP server.
If the Cisco WAP4410N access point does not receive a DHCP response after 60 seconds, it falls back to the following default static IP address: 192.168.1.245 and a default mask of 255.255.255.0.
NOTE For firmware releases earlier than v2.0.0.5, the static IP address is 192.168.1.245.
To configure the Cisco WAP4410N access point, follow these steps to access the Cisco WAP4410N web-based configuration utility from your computer.
STEP 1 Connect the Cisco WAP4410N to the same network as your computer.
STEP 2 Locate the IP address of the Cisco WAP4410N access point.
a.For firmware releases later than v2.0.0.5, locate the IP address assigned by your DHCP server by accessing your router/DHCP server.
b.For firmware releases earlier than v2.0.0.5, the WAP device’s static IP address is 192.168.1.245 and a default mask of 255.255.255.0. To reach that IP address, be sure that your computer is on the 192.168.1.xxx network.
WAP4410N Wireless-N Access Point with Power Over Internet Administration Guide |
19 |
Loading...