


 Loading...
User Guide
Linksys WET610N/WES610N Dual-Band N Entertainment Bridge

Linksys E-Series |
Contents |
Contents
Product Overview
LED panel |
2 |
Ports panel |
3 |
Wireless Security Checklist
Change the default wireless network name or SSID |
4 |
Change the default password |
4 |
Enable MAC address filtering |
4 |
Enable encryption |
4 |
General Network Security Guidelines |
4 |
Additional Security Tips |
5 |
Advanced Configuration
How to access the browser-based utility |
6 |
Setup > Basic Setup |
7 |
Language |
7 |
Network Setup |
7 |
Wireless > Basic Wireless Settings |
7 |
Basic Wireless Settings |
8 |
Wireless Security |
8 |
Wi-Fi Protected Setup |
9 |
Wireless > Wireless Network Site Survey . |
. . . . . . . . . . . . . . 10 |
Wireless Network Site Survey |
10 |
Wireless > WMM® |
11 |
WMM |
12 |
Wireless > Advanced Wireless Settings |
13 |
Advanced Wireless |
13 |
Administration > Management |
14 |
Management |
14 |
Administration > Factory Defaults |
15 |
Factory Defaults |
15 |
Administration > Upgrade Firmware |
15 |
Upgrade Firmware |
15 |
Status > Bridge |
15 |
Bridge Information |
16 |
Local Network |
16 |
Status > Wireless |
16 |
Wireless |
16 |
Troubleshooting
WES610N/WET610N |
17 |
Specifications
WES610N |
18 |
WET610N |
19 |
i
Linksys WES610N/WET610N |
Product Overview |
Product Overview
Thank you for choosing the Linksys Dual-Band N Entertainment Bridge. The bridge can connect any wired, Ethernet device to your wireless network. The bridge is based on dual-band Wireless-N, so it is compatible with any Wireless-N, -G, -A, or -B router or access point. For first-time installation, follow the steps on the CD folder. To configure advanced settings, use the convenient, browser-based utility.
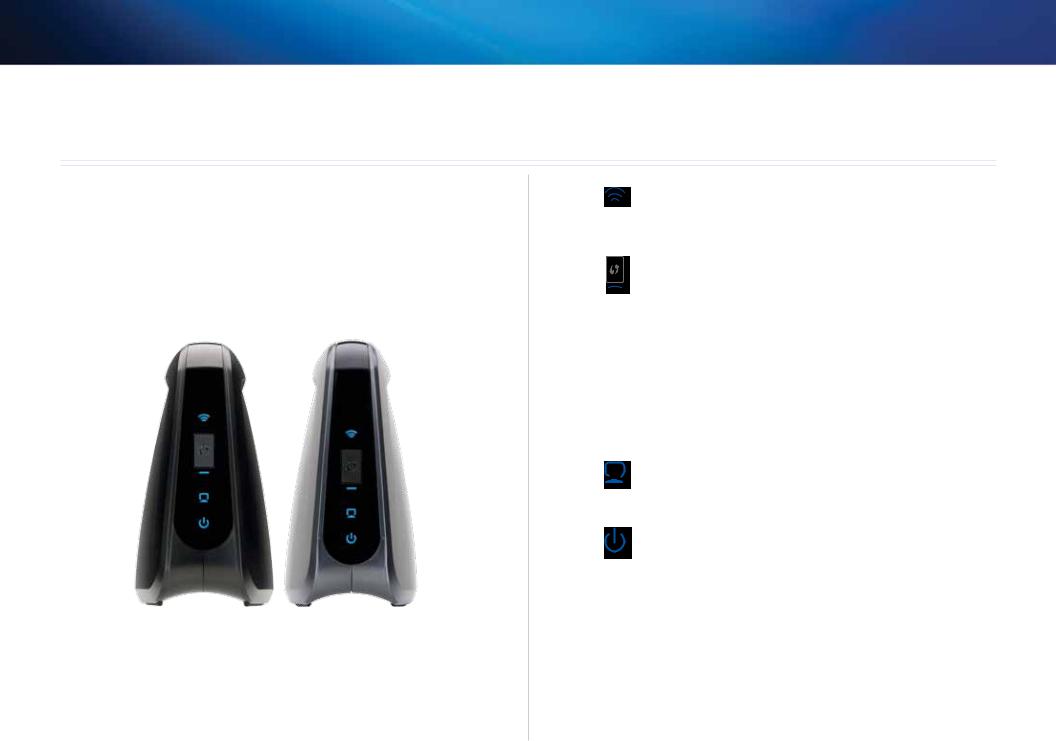
LED panel
Wireless (Blue) The Wireless LED lights up when there is a wireless connection. The LED flashes when the bridge is actively sending or receiving data over the wireless network.
Wi-Fi Protected Setup Button If your router supports Wi-Fi Protected Setup and uses WPA or WPA2 security, then you can use Wi-Fi Protected Setup to automatically connect the bridge. To use Wi-Fi Protected Setup, refer to “Wireless > Basic Wireless Settings” on page 7.
Wi-Fi Protected Setup LED (Blue/Amber) The LED flashes blue for two minutes during Wi-Fi Protected Setup. It lights up blue when wireless security is enabled. If there is an error during the Wi Fi Protected Setup process, then the LED lights up amber. Make sure the network router supports Wi Fi Protected Setup. Wait until the LED is off, and then try again.
Ethernet (Blue) The Ethernet LED lights up when there is a wired connection. The LED flashes when the bridge is actively sending or receiving data over the Ethernet port(s).
Power (Blue) The Power LED lights up when the bridge is powered on.
WES610N |
WET610N |
2
Linksys WES610N/WET610N |
Product Overview |
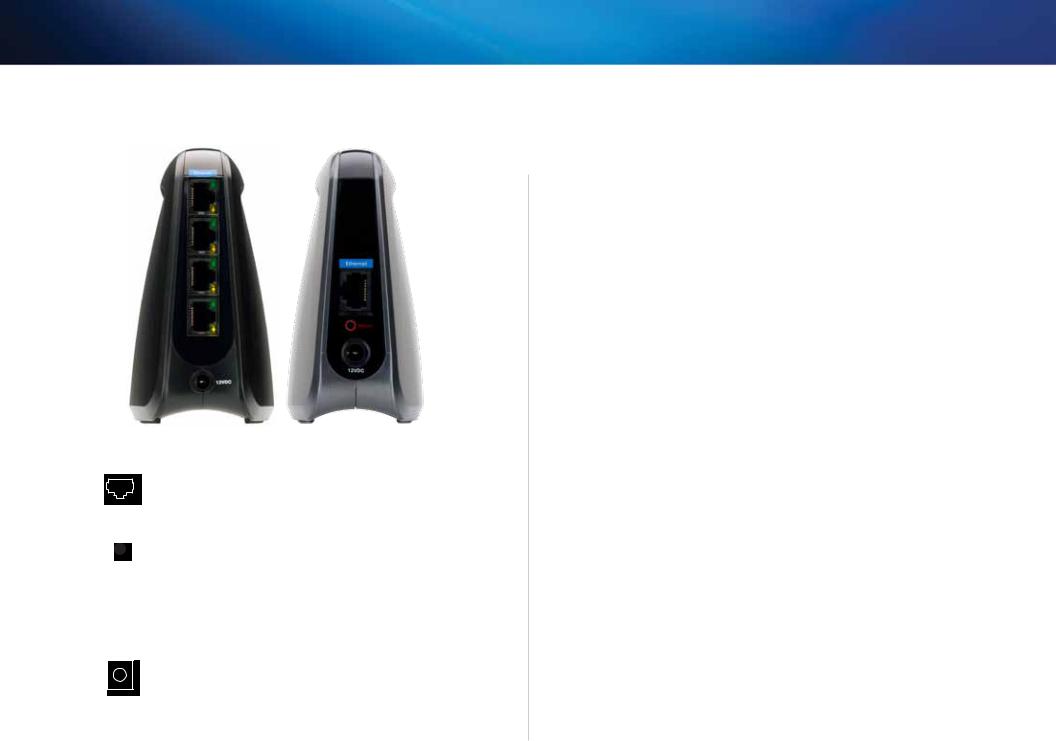
Ports panel
WES610N |
WET610N |
Ethernet The Ethernet port(s) connects the bridge to a computer or other Ethernet network device. The WES610N has four ports, and the WET610N has a single port.
Reset There are two ways to reset the bridge’s factory defaults. Either press and hold the Reset button for approximately five seconds, or restore the defaults from Administration > Factory Defaults in the bridge’s browser-based utility. The WES610N has a reset button on the bottom, and the WET610N has a reset button on the back port panel.
Power The Power port connects the bridge to the included power adapter.
3

Linksys WES610N/WET610N |
Wireless Security Checklist |
Wireless Security Checklist
Wireless networks are convenient and easy to install, so homes with highspeed Internet access are adopting them at a rapid pace. Because wireless networking operates by sending information over radio waves, it can be more vulnerable to intruders than a traditional wired network. Like signals from your cellular or cordless phones, signals from your wireless network can also be intercepted. Since you cannot physically prevent someone from connecting to your wireless network, you need to take some additional steps to keep your network secure.
Change the default wireless network name or SSID
Wireless devices have a default wireless network name or Service Set Identifier (SSID) set by the factory. This is the name of your wireless network, and can be up to 32 characters in length. Linksys wireless products use linksys as the default wireless network name. You should change the wireless network name to something unique to distinguish your wireless network from other wireless networks that may exist around you, but do not use personal information (such as your Social Security number) because this information may be available for anyone to see when browsing for wireless networks.
Change the default password
For wireless products such as access points and routers, you will be asked for a password when you want to change their settings. These devices have a default password set by the factory. The Linksys default password is admin. Hackers know these defaults and may try to use them to access your wireless device and change your network settings. To thwart any unauthorized changes, customize the device’s password so it will be hard to guess.
Enable MAC address filtering
Linksys routers give you the ability to enable Media Access Control (MAC) address filtering. The MAC address is a unique series of numbers and letters assigned to every networking device. With MAC address filtering enabled, wireless network access is provided solely for wireless devices with specific MAC addresses. For example, you can specify the MAC address of each computer in your home so that only those computers can access your wireless network.
Enable encryption
Encryption protects data transmitted over a wireless network. Wi-Fi Protected Access (WPA/WPA2) and Wired Equivalent Privacy (WEP) offer different levels of security for wireless communication.
A network encrypted with WPA/WPA2 is more secure than a network encrypted with WEP, because WPA/WPA2 uses dynamic key encryption. To protect the information as it passes over the airwaves, you should enable the highest level of encryption supported by your network equipment.
WEP is an older encryption standard and may be the only option available on some older devices that do not support WPA.
General Network Security Guidelines
Wireless network security is useless if the underlying network is not secure.
••Password protect all computers on the network and individually password protect sensitive files.
••Change passwords on a regular basis.
••Install anti-virus software and personal firewall software.
••Disable file sharing (peer-to-peer). Some applications may open file sharing without your consent and/or knowledge.
4

Linksys WES610N/WET610N |
Wireless Security Checklist |
Additional Security Tips
••Keep wireless routers, access points, or gateways away from exterior walls and windows.
••Turn wireless routers, access points, or gateways off when they are not being used (at night, during vacations).
••Use strong passphrases that are at least eight characters in length. Combine letters and numbers to avoid using standard words that can be found in the dictionary.
5

Linksys WES610N/WET610N |
Advanced Configuration |
Advanced Configuration
After setting up the bridge by following the steps on the CD folder, the bridge will be ready for use. However, if you want to change its advanced settings, use the bridge’s browser-based utility. This chapter describes each web page of the utility and each page’s key functions. You can access the utility via a web browser on a computer networked with the bridge.
The browser-based utility has these main tabs: Setup, Wireless, Administration, and Status. Additional tabs will be available after you click one of the main tabs.
How to access the browser-based utility
Use a web browser to access the browser-based utility.
If the bridge is connected to a network with a DHCP server (usually the network router), then the bridge will obtain its IP address from the DHCP server. If there is no DHCP server, then the bridge will use its default static IP address, 169.254.1.250. (If you set a permanent static IP address on the bridge through the browser-based utility, then enter the static IP address instead.)
Note
If you do not know the bridge’s IP address, then find its IP address in the DHCP clients table of your router. (Refer to the documentation for your router.)
If you cannot locate the bridge’s IP address, you can reset the bridge; press the Reset button on the bridge for approximately five seconds, using a straightened paper clip. This will reset the bridge back to the factory default settings. The bridge will request an IP address from the DHCP server (usually the network router). If no DHCP server is found, then the bridge will use its default static IP address, 169.254.1.250, until it detects a DHCP server and is assigned a dynamic IP address.
If the bridge is not associated with a router and is using the factory default settings, connect a computer to the bridge using an Ethernet connection to access the web based utility.You will need to configure the Ethernet connection on the computer with a static IP address and subnet mask.
The IP address of your Ethernet adapter should be set to a specific IP address.
1.In the IP address field, enter 169.254.x.y (x should be replaced by a number between 1 and 254, and y should be replaced by a number between 0 and 255).
2.In the Subnet mask field, enter 255.255.0.0.
Note
The steps to assign a static IP address to the Ethernet adapter on your computer vary by operating system. For instructions, please refer to the help documentation of your specific operating system.
After you have assigned your Ethernet adapter with a static IP address, launch your web browser, and enter the Adapter’s IP address (the default setting is
169.254.1.250)in the Address field. Press Enter.
A password request screen appears. (Non-Windows XP users will see a similar screen.) Leave the User name field blank. Enter the password you created during the Setup Wizard. If you did not create a new password, use the default password admin. (You can set a new password from the Administration > Management screen.) Click OK to continue.
Note
If the password request screen does not appear, wait two minutes and try again.
6
Loading...