


CTK-3400SK EN/ES
USER’S GUIDE
Please keep all information for future reference.
Safety Precautions
Before trying to use the Digital Keyboard, be sure to read the separate “Safety Precautions”.
GUÍA DEL USUARIO
Guarde toda información para tener como referencia futura.
Precauciones de seguridad
Antes de intentar usar el teclado digital, asegúrese de leer las “Precauciones de seguridad” separadas.
CTK3400SK-ES-1A
Español English
|
|
|
NOTICE |
|
|
|
|
|
This equipment has been tested and found to comply with the limits for a Class B digital device, pursuant to Part 15 of the |
||||||||
FCC Rules. These limits are designed to provide reasonable protection against harmful interference in a residential |
||||||||
installation. This equipment generates, uses and can radiate radio frequency energy and, if not installed and used in |
||||||||
accordance with the instructions, may cause harmful interference to radio communications. However, there is no guarantee |
||||||||
that interference will not occur in a particular installation. If this equipment does cause harmful interference to radio or |
||||||||
television reception, which can be determined by turning the equipment off and on, the user is encouraged to try to correct |
||||||||
the interference by one or more of the following measures: |
|
|
|
|
|
|||
• Reorient or relocate the receiving antenna. |
|
|
|
|
|
|
|
|
• Increase the separation:1.0between the equipment and receiver. |
|
|
|
|
|
|||
• Connect the equipment into an outlet on a circuit different from that to which the receiver is connected. |
|
|||||||
• Consult the dealer or an experienced radio/TV technician for help. |
|
|
|
|
|
|||
Version |
|
FCC WARNING |
|
|
|
|
|
|
Changes or modifications not expressly approved by the party responsible for compliance could void the user’s authority to |
||||||||
operate the equipment. |
Remarks |
|
|
|
|
|
|
|
|
|
|
|
|
|
|
|
|
|
|
|
|
|
|
|
||
|
Declaration of Conformity |
|
|
|
|
Bankselect Modulation Dataentry Volume Pan Expression |
||
Model Number: CTK-3400SK |
|
|
|
|
|
|
|
|
Trade Name: CASIO COMPUTER CO., LTD. |
|
|
|
|
|
|
|
|
Responsible party: CASIO AMERICA, INC. |
|
|
|
|
|
|
|
|
Address: 570 MT. PLEASANT AVENUE, DOVER, NEW JERSEY 07801 |
|
|
|
|
only) |
|||
Telephone number: 973-361-5400 |
|
|
|
|
** |
|
|
|
|
|
|
|
|
= |
|
|
|
This device complies with Part 15 of the FCC Rules, Operation is subject to the following two conditions: |
|
|||||||
|
|
|
|
127 |
v |
|
|
|
(1) This device may not cause harmful interference, and (2) this device must accept any interference received, including |
||||||||
interference that may cause undesired operation. |
|
|
|
|
|
|
|
|
|
|
|
|
|
|
|
|
|
Important! |
Recognized |
116116- |
Mode3 X |
O9nH v =1- |
9nHv 8nH= 0, |
X O |
O |
(MSBO O O2* O O O |
|
||||||||
Please note the following important information before using this product. |
||||||||
|
|
|
127011270*- |
|||||
• Before using the optional AD-E95100L Adaptor to power the unit, be sure to check the AC Adaptor for any damage first. |
||||||||
|
|
|
|
|
X |
|
|
|
Carefully check the power cord for breakage, cuts, exposed wire and other serious damage. Never let children use an AC
adaptor that is seriously damaged.
• Never attempt to recharge batteries.
• Do not use rechargeable batteries.
• Never mix old batteries with new ones.
•Use recommended batteries or equivalent types.
•Always make sure that positive (+) and negativeTransmitted (–) poles are
•Replace batteries as soon as possible after any sign they16 are
1-
•Do not short-circuit the battery terminals. 1
•The product is not intended for children under 3 years.
•Use only CASIO AD-E95100L adaptor.
•The AC adaptor is not a toy.
facing correctly |
|
3 |
96 |
getting weak. |
|
Mode X |
36 - |
• Be sure to disconnect the AC adaptor before cleaning the product.
as indicated-127=0near the battery compartment.2 |
|||
9nH v = 1 X 9nH v |
X X |
O |
O X O * O O X |
O |
|
|
|
|
|
|
|
|
|
|
Manufacturer: |
|
|
|
32 |
1 38 7 10 11 |
|
|
|
|
|
|
|
|
|
|
|
|
|
|
|
|
|
|
|
|
|
|
Default Messages Altered |
True |
Note Note |
Key’s Ch’s |
0, |
6, |
|
|
|
|
|
|
|
Default Changed |
|
voice |
ON OFF |
|
|
||
|
|
|
|
3400SK-CTK |
Function |
|
|
Bender |
|
|
|||
|
|
|
|
This mark applies in EU countries only. |
|
CASIO COMPUTER CO., LTD. |
|
|
|
|
|||
|
|
|
|
|
|
|
6-2, Hon-machi 1-chome, Shibuya-ku, Tokyo 151-8543, Japan |
|
|||||
|
|
|
|
|
|
|
Responsible within the European Union: |
|
|
|
|||
|
|
|
|
|
|
|
CASIO EUROPE GmbH |
|
|
|
|
|
|
|
|
|
|
|
|
|
|
|
|
|
|
||
|
|
|
|
|
|
|
Casio-Platz 1, 22848 Norderstedt, Germany |
|
|
|
|||
|
|
|
|
|
|
|
|
|
|
|
|
|
|
|
|
|
|
|
|
|
|
|
|
|
|
|
|
|
|
|
|
|
|
|
|
|
|
|
|
|
|
|
|
|
|
|
|
Basic Channel |
Mode |
Note Number |
Velocity |
After Touch |
Pitch |
Control Change |
|
|
● Any reproduction of the contents of this manual, either in part or its entirety, is prohibited. Except for your own, personal |
||||||||||||
|
|
|
|
Model: |
|
|
|
|
|
|
|
|
|
use, any other use of the contents of this manual without the consent of CASIO is prohibited under copyright laws.
● IN NO EVENT SHALL CASIO BE LIABLE FOR ANY DAMAGES WHATSOEVER (INCLUDING, WITHOUT LIMITATION, DAMAGES FOR LOSS OF PROFITS, BUSINESS INTERRUPTION, LOSS OF INFORMATION) ARISING OUT OF THE USE OF OR INABILITY TO USE THIS MANUAL OR PRODUCT, EVEN IF CASIO HAS BEEN ADVISED OF THE POSSIBILITY OF SUCH DAMAGES.
● The contents of this manual are subject to change without notice.
● The actual appearance of the product may be different from that shown in the illustrations in this User’s Guide. ● Company and product names used in this manual may be registered trademarks of others.

 Contents
General Guide ........................... |
EN-2 |
Using the [–] and [+] Buttons (bo) ....................... |
EN-4 |
Using the FUNCTION Button (3)....................... |
EN-4 |
Getting Ready to Play .............. |
EN-5 |
Preparing the Music Stand ................................... |
EN-5 |
Power Supply ....................................................... |
EN-5 |
Returning the Digital Keyboard to |
|
Its Factory Default Settings .................................. |
EN-6 |
Playing the Digital Keyboard... |
EN-7 |
Turning on Power and Playing ............................. |
EN-7 |
Using Headphones............................................... |
EN-8 |
Changing Keyboard Response to |
|
Touch Pressure (Touch Response)...................... |
EN-8 |
Using the Metronome ........................................... |
EN-9 |
Controlling the Keyboard |
|
Sounds .................................... |
EN-10 |
Select from a variety of |
|
musical instrument sounds................................. |
EN-10 |
Layering Two Tones........................................... |
EN-10 |
Splitting the Keyboard between |
|
Two Different Tones ........................................... |
EN-11 |
Using Reverb...................................................... |
EN-12 |
Using a Pedal ..................................................... |
EN-12 |
Changing the Pitch (Transpose, Tuning)............ |
EN-13 |
Using the Pitch Bend Wheel to |
|
Shift the Pitch of Notes ....................................... |
EN-13 |
Playing the Demo Songs ....... |
EN-14 |
Using Auto |
|
Accompaniment..................... |
EN-15 |
Playing the Rhythm Part only ............................. |
EN-15 |
Playing All Parts ................................................. |
EN-16 |
Using Auto Accompaniment Effectively.............. |
EN-18 |
Using One-Touch Preset.................................... |
EN-19 |
Saving Keyboard Setups to |
|
Registration Memory ............. |
EN-20 |
To save a setup to registration memory ............. |
EN-21 |
To recall a setup from registration memory ........ |
EN-21 |
Recording Your |
|
Keyboard Play........................ |
EN-22 |
Recording and Playing Back Keyboard Play ...... |
EN-22 |
Song Recording Data ......................................... |
EN-23 |
Connecting External |
|
Devices ................................... |
EN-24 |
Connecting a Computer...................................... |
EN-24 |
MIDI Settings ...................................................... |
EN-25 |
Connecting to Audio Equipment ......................... |
EN-26 |
Reference................................ |
EN-27 |
Troubleshooting.................................................. |
EN-27 |
Specifications ..................................................... |
EN-29 |
Operating Precautions........................................ |
EN-30 |
Fingering Guide.................................................. |
EN-31 |
Chord Example List ............................................ |
EN-32 |
MIDI Implementation Chart
English
Included Accessories |
|
Separately Available Accessories |
●Music Stand |
|
• You can get information about accessories that |
●Leaflets |
|
are separately for this product from the CASIO |
• Safety Precautions |
|
catalog available from your retailer, and from the |
• Appendix |
|
CASIO website at the following URL. |
• Other (Warranty, etc.) |
|
|
Items included as accessories are subject to change without notice. |
|
http://world.casio.com/ |
|
|
|
EN-1


 General Guide
•In this manual, the term “Digital Keyboard” refers to the CTK-3400SK.
•In this manual, buttons and other controllers are identified using the numbers shown below.
1 |
2 |
3 |
4 |
5 |
6 |
7 8 |
9 bk bl |
bm |
|
bn |
bo |
bp |
bq |
|
br |
bs |
bt |
ck |
cl |
cm |
cn |
co |
cp cq |
|
|
|
cn |
cr |
cs |
ct |
EN-2
General Guide 

• The following explains the meanings of the #and $symbols that appear on the product console and with the key names below.
#: Indicates a function that is enabled by holding down the 3(FUNCTION) button when pressing a button. $ : Indicates a function that is enabled by holding down the button for some time.
1Pbutton EN-6, 7 |
bpTONE buttons EN-10, 19 |
2VOLUME slider EN-7 |
bqRHYTHM buttons EN-6, 15, 19 |
3FUNCTION button EN-4, 10, 11, 12, 13, 19, 25, 26 |
brBANK button EN-20, 21 |
4TOUCH button EN-8 |
bsArea 1 button EN-20, 21 |
5METRONOME, $BEAT button EN-9 |
btArea 2 button EN-20, 21 |
6TEMPO buttons EN-9, 19 |
ckArea 3 button EN-20, 21 |
7INTRO, LAYER button EN-18 |
clArea 4 button EN-20, 21 |
8NORMAL/FILL-IN, SPLIT button EN-11, 15, 18 |
cmSTORE button |
9VAR./FILL-IN button EN-18 |
cnSpeakers |
bkSYNCHRO/ENDING button EN-18, 19 |
coRhythm list |
blSTART/STOP button EN-14, 15 |
cpDisplay |
bmACCOMP, $CHORDS button EN-14, 16 |
cqTone list |
bnRECORDER button EN-22 |
crPITCH BEND wheel |
bo[–]/[+] buttons |
csCHORD root names EN-16 |
EN-4, 6, 7, 9, 10, 11, 12, 13, 14, 15, 16, 19, 25, 26 |
ctPercussion instrument list |
Back
English
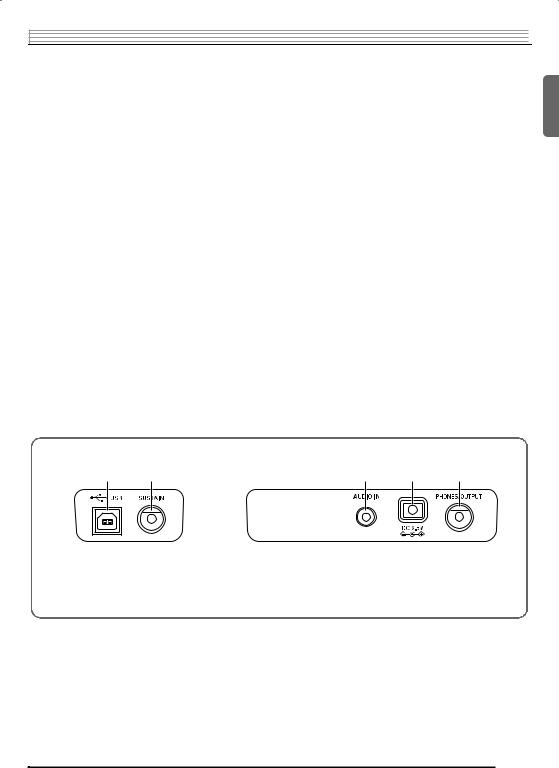
dkUSB port EN-24 |
dmAUDIO IN jack EN-26 |
dlSUSTAIN jack EN-12 |
dnDC 9.5V terminal EN-5 |
|
doPHONES/OUTPUT jack EN-8, 26 |
EN-3

 General Guide
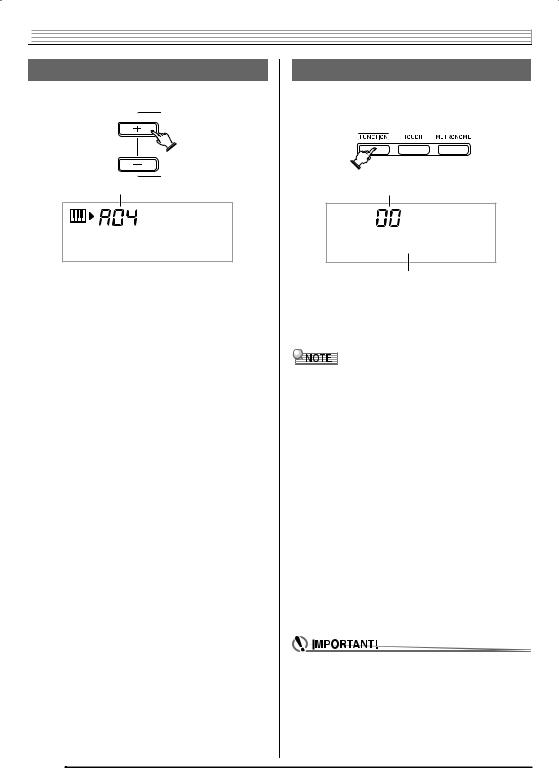
Using the [–] and [+] Buttons (bo)
You can use the [+] (increase) and [–] (decrease) buttons (bo) to change the displayed number or value.
Setting
M d e r n P n o
•Holding down either button scrolls the displayed setting.
•Pressing both buttons at the same time will revert to the initial default setting or the recommended setting.
•Holding down 3(FUNCTION) while pressing bo(–/+) [–] will decrease the displayed number of value by 10. Holding
down 3(FUNCTION) while pressing bo(–/+) [+] will increase it by 10.
Using the FUNCTION Button (3)
Use the FUNCTION button (3) to access settings that let you select the reverb type, pedal effect, etc.
1. Press 3(FUNCTION).
Setting
T r a n s .
Parameter
2.Next press 3until the parameter whose setting you want to change is displayed.
Each press of 3cycles through the available parameters.
•When selecting a parameter, you can scroll backwards by holding down 3as you press 4(TOUCH).
|
Parameter |
Display |
See Page |
1 |
Transpose |
Trans. |
EN-13 |
|
|
|
|
2 |
Accompaniment Volume |
AcompVol |
EN-19 |
|
|
|
|
3 |
Tuning |
Tune |
EN-13 |
|
|
|
|
4 |
Reverb |
Reverb |
EN-12 |
|
|
|
|
5 |
Keyboard Channel |
Keybd Ch |
EN-25 |
|
|
|
|
6 |
Navigate Channels |
Navi. Ch |
EN-25 |
|
|
|
|
7 |
Local Control |
Local |
EN-26 |
|
|
|
|
8 |
Accomp Out |
AcompOut |
EN-26 |
|
|
|
|
9 |
Pedal Effect |
Jack |
EN-12 |
|
|
|
|
10 |
Pitch Bend Range |
Bend Rng |
EN-13 |
|
|
|
|
3.When the parameter you want is displayed, use bo(–/+) to change its setting.
•The parameter setting will disappear from the upper left area of the screen if you do not perform any operation for some time.
•The tone and other parameters revert to their initial defaults whenever you turn on power (page EN-7).
EN-4

 Getting Ready to Play
Preparing the Music Stand
 Music stand
Power Supply
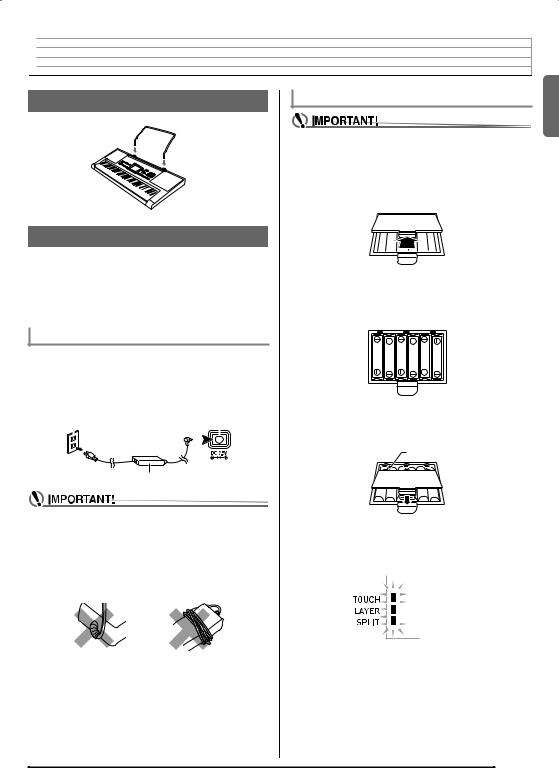
Either an AC adaptor or batteries can be used to power this Digital Keyboard. Normally, use of AC adaptor power is recommended.
•The AC adaptor does not come with this Digital Keyboard. Purchase it separately from your retailer. See page EN-1 for information about options.
Using the AC Adaptor
Make sure that you use only the AC adaptor specified for this Digital Keyboard. Use of a different type of AC adaptor can cause malfunction.
Specified AC Adaptor: AD-E95100L
(JEITA Standard plug)
Household power outlet |
DC 9.5V terminal |
||||
|
|
|
|
|
|
|
|
|
|
|
|
|
|
|
|
|
|
AC adaptor
•Be sure to turn off Digital Keyboard power before connecting or disconnecting the AC adaptor.
•The AC adaptor will become warm to the touch after very long use. This is normal and does not indicate malfunction.
•To prevent breaking of the wire, take care to avoid putting any type of load on the power cord.
No bending! |
No winding! |
•Never insert metal, pencils, or any other objects into the product’s 9.5V DC terminal. Doing so creates the risk of accident.
Using Batteries
•Be sure to turn off power before loading batteries.
•It is up to you to prepare six commercially available AA-size batteries. Do not use oxyride batteries or any other nickel based batteries.
1.Open the battery cover on the bottom of the Digital Keyboard.
2.Load six AA-size batteries into the battery compartment.
Make sure the positive + and negative - ends of the batteries are facing as shown in the illustration.
3.Insert the tabs of the battery cover into the holes on the side of the battery compartment, and close the cover.
Tabs
■ Low Battery Indication
The indicator shown below starts to flash to let you know when battery power is low. Replace the batteries with new ones.
 Low battery indicator
  (flashes)
English
EN-5

 Getting Ready to Play
■ Saving Settings
Your Digital Keyboard is equipped with a recorder and other features that you can use to store data you create. This stored data is retained even when the Digital Keyboard is turned off.* However, the tone, rhythm, and other settings you configure on the Digital Keyboard’s console normally are returned to their initial power on defaults whenever you turn off power.
*The data and settings below are always retained even when power is turned off.
−Registration data (page EN-20)
−Song recording data (page EN-22)
Returning the Digital Keyboard to Its Factory Default Settings
Perform the following procedure when you want to return the Digital Keyboard’s stored data and settings to their initial factory defaults.
1.Turn off the Digital Keyboard.
2.While holding down bo(–/+) [–] and the bq (RHYTHM) [POPS] button at the same time, press 1(P).
•Keep boand the bq(RHYTHM) [POPS] button depressed until the next step is complete.
3.When the message “Pls wait” appears on the screen, release both of the above buttons.
•You will be able to use the Digital Keyboard in a short while after its system is initialized.
•See “Turning on Power and Playing” (page EN-7) for information about turning digital power on and off.
EN-6

 Playing the Digital Keyboard
1 2 4 5 6 |
|
|
|
bo |
|||||||||||||
|
|
|
|
|
|
|
|
|
|
|
|
|
|
|
|
|
|
|
|
|
|
|
|
|
|
|
|
|
|
|
|
|
|
|
|
|
|
|
|
|
|
|
|
|
|
|
|
|
|
|
|
|
|
|
|
|
|
|
|
|
|
|
|
|
|
|
|
|
|
|
|
|
|
|
|
|
|
|
|
|
|
|
|
|
|
|
|
|
|
|
|
|
|
|
|
|
|
|
|
|
|
|
|
|
|
|
|
|
|
|
|
|
|
|
|
|
|
|
|
|
|
|
|
|
|
English
Turning on Power and Playing
1.Press 1(P).
This turns on power.
•To turn off the Digital Keyboard, press 1again.
2.Try playing something on the keyboard. Use 2 (VOLUME) to adjust volume.
Increase
Decrease
•Pressing 1(P) to turn off power actually puts the
Digital Keyboard into a standby state. Minute amounts of current continue to flow within the Digital Keyboard in the standby state. If you do not plan to use the Digital Keyboard for a long time or if there is a lightning storm in your area, be sure to unplug the AC adaptor from the power outlet.
•The message “Pls wait” will remain on the display while a data save operation is in progress. Do not perform any other operation while it is displayed. Turning off the Digital Keyboard can cause Digital Keyboard data to be deleted or become corrupted.
Auto Power Off
If you do not perform any operation on the Digital Keyboard for one of the trigger times noted below, Auto Power Off will turn off power.
During battery operation : 6 minutes During AC adaptor operation : 30 minutes
■ Disabling Auto Power Off
You can disable Auto Power Off to ensure that power is not turned off automatically during a concert, etc.
1.While holding down bo(–/+) [+], turn on power.
Auto Power Off will be disabled.
EN-7

 Playing the Digital Keyboard
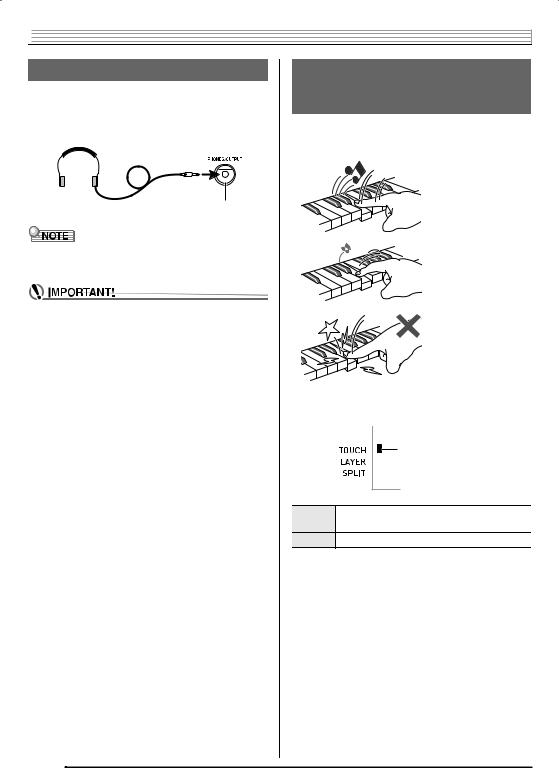
Using Headphones
Using headphones cuts off output from the built-in speakers, which means you can practice playing even late at night without disturbing others.
•Be sure to turn down the volume level before connecting headphones.
PHONES/OUTPUT jack
•Headphones do not come with the Digital Keyboard.
•Use commercially available headphones. See page EN-1 for information about options.
•Do not listen to very high volume output over headphones for long period. Doing so creates the risk of hearing damage.
•If you are using headphones that require an adaptor plug, make sure you do not leave the adaptor plugged in when removing the headphones.
Changing Keyboard Response to Touch Pressure
(Touch Response)
Touch Response alters tone volume in accordance with keyboard pressure (speed). This provides you some of the same expressivity you get on an acoustic piano.
Pressing fast produces louder notes.
Pressing slowly produces softer notes.
Do not try to use too much pressure.
1.Press 4(TOUCH) to toggle touch response on and off.
Indicator disappears when
Touch Response is turned off.
Off Touch Response is turned off. Sound volume is fixed, regardless of key press speed.
On Touch Response is turned on.
EN-8
|
|
|
|
|
|
|
|
Playing the Digital Keyboard |
|||||
|
|
|
|
|
|
|
Changing the Metronome Tempo |
||||||
|
Using the Metronome |
|
|
||||||||||
|
|
|
|
|
|
|
Use the following procedure to change the tempo of the |
||||||
The metronome lets you play and practice along with a steady |
|||||||||||||
|
|
metronome. |
|||||||||||
beat to help keep you on tempo. |
|
|
|||||||||||
|
|
|
|
|
|
|
|
||||||
|
Start/Stop |
|
|
1. Press 6(TEMPO). |
|||||||||
|
|
|
Use w(slower) and q(faster) to change the tempo |
||||||||||
1. Press 5(METRONOME). |
|
|
setting. Holding down either button changes the setting at |
||||||||||
|
|
high speed. |
|||||||||||
|
This starts the metronome. |
|
|
• |
Pressing wand qat the same time will initialize the |
||||||||
|
This pattern changes with each beat. |
|
|
|
tempo setting in accordance with the currently selected |
||||||||
|
|
|
|
song or rhythm. |
|||||||||
|
|
|
|
|
|
|
|
||||||
|
|
|
|
|
|
|
• |
Pressing 6causes the tempo value to flash on the |
|||||
|
|
|
|
|
|
||||||||
|
|
|
|
|
|
|
|
display. While the tempo value is flashing, you can use |
|||||
|
|
|
|
|
|
|
|
boto change it. |
|||||
|
|
|
|
|
|
|
• |
The tempo value will stop flashing if you do not perform |
|||||
|
|
|
|
|
|
|
|
any operation for a short while. |
|||||
2. Press 5again to stop the metronome. |
|
|
Tempo value (flashes) |
|
|
|
|
||||||
|
|
|
|
||||||||||
|
|
|
|||||||||||
Changing the Beats per Measure
You can configure the metronome to use a bell sound for the first beat of each measure of the song you are playing.
•You can specify 0, or a value from 2 to 6 as the number of beat per measure.
•When playing a built-in song, the beats per measure setting (which determines when the bell sounds) is configured automatically for the currently selected song.
1.Hold down 5until the beats per measure setting screen appears on the display.
B e a t
•If you do not perform any operation for after the beats per measure setting screen appears, the display will return to the screen displayed before you pressed 5.
2.Use bo(–/+) to enter the number of beats per measure.
•The bell will not sound if you specify 0 for this setting. In this case, all beats are indicated by a click sound. This setting lets you practice with a steady beat, without worrying how many beats there are in each measure.
English
EN-9

 Controlling the Keyboard Sounds
3
7 8
Select from a variety of musical instrument sounds
Your Digital Keyboard lets you select tones for a wide variety of musical instrument sounds, including violin, flute, orchestra, and more. Even the same song sound takes on a different feel by changing the instrument type.
To select an instrument for playing
1.Press one of the eight bp(TONE) buttons to select the tone group you want.
2.Use bo(–/+) to select the tone number you want.
Tone number
S t . G r P n o
Tone name
The corresponding tone number and tone name will appear on the screen.
•See the separate “Appendix” for a complete list of available tones.
•When one of the drum sets is selected (tone numbers H20 through H25), each keyboard key is assigned a different percussion sound.
bo bp
3.Try playing something on the keyboard.
The tone of the instrument you selected will sound.
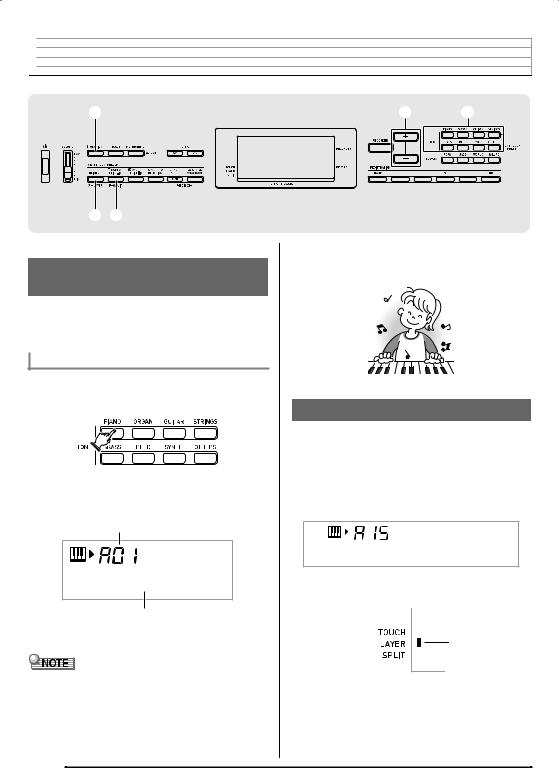
Layering Two Tones
You can use the following procedure to layer two different tones (such as piano and strings) so they sound simultaneously when you press a keyboard key.
1.Select the first tone you want to use.
Press bp(TONE) and then use bo(–/+) to select the tone you want.
Example: A15 ELEC.PIANO
E . P i a n o
2.While holding down 3(FUNCTION), press 7 (LAYER).
Lights
EN-10
 Loading...