


iPF785
Table of contents
 Loading...
Large Format Printer
Series
Basic Guide
Preface
Safety Precautions......................................................2
Manuals for this printer................................................... 6
Handling Paper
Handling rolls................................................................ 12
Handling sheets............................................................ 21
Consumables and Maintenance
Ink Tanks...................................................................... 25
Printheads.................................................................... 30
Maintenance Cartridge................................................. 37
Cleaning the Printer...................................................... 42
Printer Parts
Operations and Display Screen.................................... 46
Printer parts.................................................................. 58
Printer Relocation
Preparing to Transfer the Printer.................................. 63
Software Installation
Installing the Printer Driver (Windows)......................... 70
Installing the Printer Driver (Mac OS)........................... 72
Convenient Printer Driver Features.............................. 74
Adjustments for Better Print Quality
Adjusting the Printhead................................................ 80
Adjusting the feed amount............................................ 82
Troubleshooting
Error Message
Manuals for this printer
Setup Guide
Quick Guide
Basic Guide Electronic manual
User's Guide Electronic manual
Paper Reference Guide Electronic manual
Read this manual before attempting to operate the printer.
Keep this manual in a handy location for future referencing.
Problems Regarding Paper.......................................... 85
Printing does not start................................................... 95
The printer stops during a print job............................... 96
Problems with the printing quality................................. 97
Cannot print over a network........................................ 104
Installation problems................................................... 105
HP-GL/2 problems...................................................... 107
Other problems........................................................... 109
Messages regarding paper......................................... 113
Messages regarding ink.............................................. 122
Messages regarding printing or adjustment................ 124
Messages regarding printheads................................. 125
Messages regarding the maintenance cartridge......... 127
Messages regarding the hard disk.............................. 128
Messages regarding HP-GL/2.................................... 130
Other Messages......................................................... 131
Error Messages.......................................................... 133
ENG
ver1.00 2013-11-28

Safety Precautions
Preface
Preface
Safety Precautions
Safety Precautions
Safety Precautions ........................................................................................................................................................... 2
Legal Notices ...................................................................................................................................................................... 4
Safety Precautions
Safety Precautions
Preface Safety Precautions
Follow the warnings and precautions below to use the printer safely. Do not perform any operations or procedures
other than as described in this manual. Doing so may result in unexpected accidents and can cause a fire or electrical shocks.
iPF785 Series
Printer location
• Do not set up the printer in any location exposed to alcohol, thinner, or other volatile liquids. If these substances
Warning
come into contact with electrical components inside the printer, there is a risk of fire or electrical shock.
• Never install the printer on an unstable or vibrating surface. If it falls over, this could cause personal injury.
• Never set up the printer in a location that is exposed to high humidity or large amounts of dust, or exposed to
Caution
direct sunlight, high temperature, or open flame. This could cause a fire or electrical shock. Use the printer location in an environment where temperature and humidity are within the ranges of 15 °C to 30 °C (59 °F to 86 °F)
and 10 to 80% RH (with no condensation).
• Never place the printer on a heavy wool or shag carpet. The fibers may enter the printer and cause a fire.
• Keep the area around the power outlet clear of items so that you can disconnect the power cable immediately if
the printer starts operating abnormally. In the event of a printer malfunction, remove the power cable from the
outlet as soon as possible to prevent fire and electrical shocks.
Do not install the printer near sources of strong electromagnetic fields, whether equipment that generates such
•
fields or places where such fields occur. This could damage the printer or cause malfunction.
Power Supply
• Never handle the power cable with wet hands. Doing so may cause electrical shock.
• Insert the power cable securely and completely into the power source. If the power cable is not inserted complete-
Warning
ly, this could cause a fire or electrical shock.
• Do not use any power cable other than the one provided. This could cause a fire or electrical shock. Never use
the power cable with any other electrical device.
• Never cut the power cable or attempt to modify it, and never stretch it or bend it forcefully. Never place a heavy
object on the power cable. Damaged sections of the power cable could cause a short circuit and may cause a fire
or electrical shock.
• Never connect the power cable to a power strip or any power source shared by other electrical devices. This could
cause a fire or electrical shock.
Never knot the power cable or wrap it around itself. This could cause a fire or electrical shock.
•
Periodically disconnect the power cable and use a dry cloth to wipe away dust that has collected on the plug and
•
the area around the power outlet. Leaving the power cable plugged in and not cleaned for a long period, especially in an area subject to dust, oil, and humidity, could cause the insulation material to deteriorate and lead to a fire.
Basic Guide
iPF785 Series
• Always grip the plug to remove the power cable from the power outlet. Pulling on the power cable could damage
Caution
• Never use an extension cord. This could cause a fire or electrical shock.
• Never use any power source other than 100–120 / 220–240 V AC. This could cause a fire or electrical shock. The
Safety Precautions
the cable and lead to a fire or electrical shock.
printer operating conditions are described below. Use the printer under the following conditions.
Power supply voltage: 100–120 / 220–240 V AC
Power supply frequency: 50/60 Hz
In an Emergency
• If the printer emits smoke or strange odors, continuing to use the printer may cause a fire or electrical shock.
Warning
Cleaning the Printer
Switch the printer off immediately and remove the power plug from the power outlet. Contact your Canon dealer or
support center.
• For cleaning, use a cloth dampened in water. Never use flammable solvents such as alcohol, benzene, or thinner.
Warning
If these substances come into contact with electrical components inside the printer, there is a risk of fire or electrical shock.
• Always disconnect the power cable from the outlet before cleaning the printer. If the printer is switched on acci-
Caution
Pacemakers
dentally, moving parts inside the printer may cause personal injuries.
• This printer generates a low-level magnetic field. Anyone wearing a pacemaker who experiences discomfort while
Warning
Moving the Printer
working around the printer should leave the area. Consult a physician before continuing to work around the printer.
• Moving the printer requires at least three people, holding it on both sides and from behind. Be careful to avoid
Caution
back strain and other injuries.
• When moving the printer, firmly grasp the Carrying Handles under each side and in back. The printer may be
unsteady if you hold it at other positions, which poses a risk of injury from dropping the printer.
Preface Safety Precautions
Printhead, Ink Tanks, and Maintenance Cartridge
• Always store consumables in a safe location out of the reach of small children. If a child licks or ingests ink acci-
Caution
dentally, seek medical assistance immediately.
• If ink accidentally gets in your eyes, immediately rinse with water.
If ink gets on your skin, immediately clean it off with soap and water.
If irritation persists in your eyes or on your skin, contact a physician immediately.
• Avoid dropping or shaking printheads, ink tanks, and maintenance cartridges. Spilled ink can stain clothing and
the work area.
• Never touch the electrical contacts of the Printhead after printing. The contacts become extremely hot and can
cause minor burns.
Basic Guide
3
Legal Notices
Other
• Never disassemble the printer or attempt repairs. There are high voltage parts inside the printer that can cause a
Warning
fire or electrical shock.
• Never use flammable sprays around the printer. The gas of flammable sprays can cause a fire or electrical shock,
if it contacts high voltage points inside the printer.
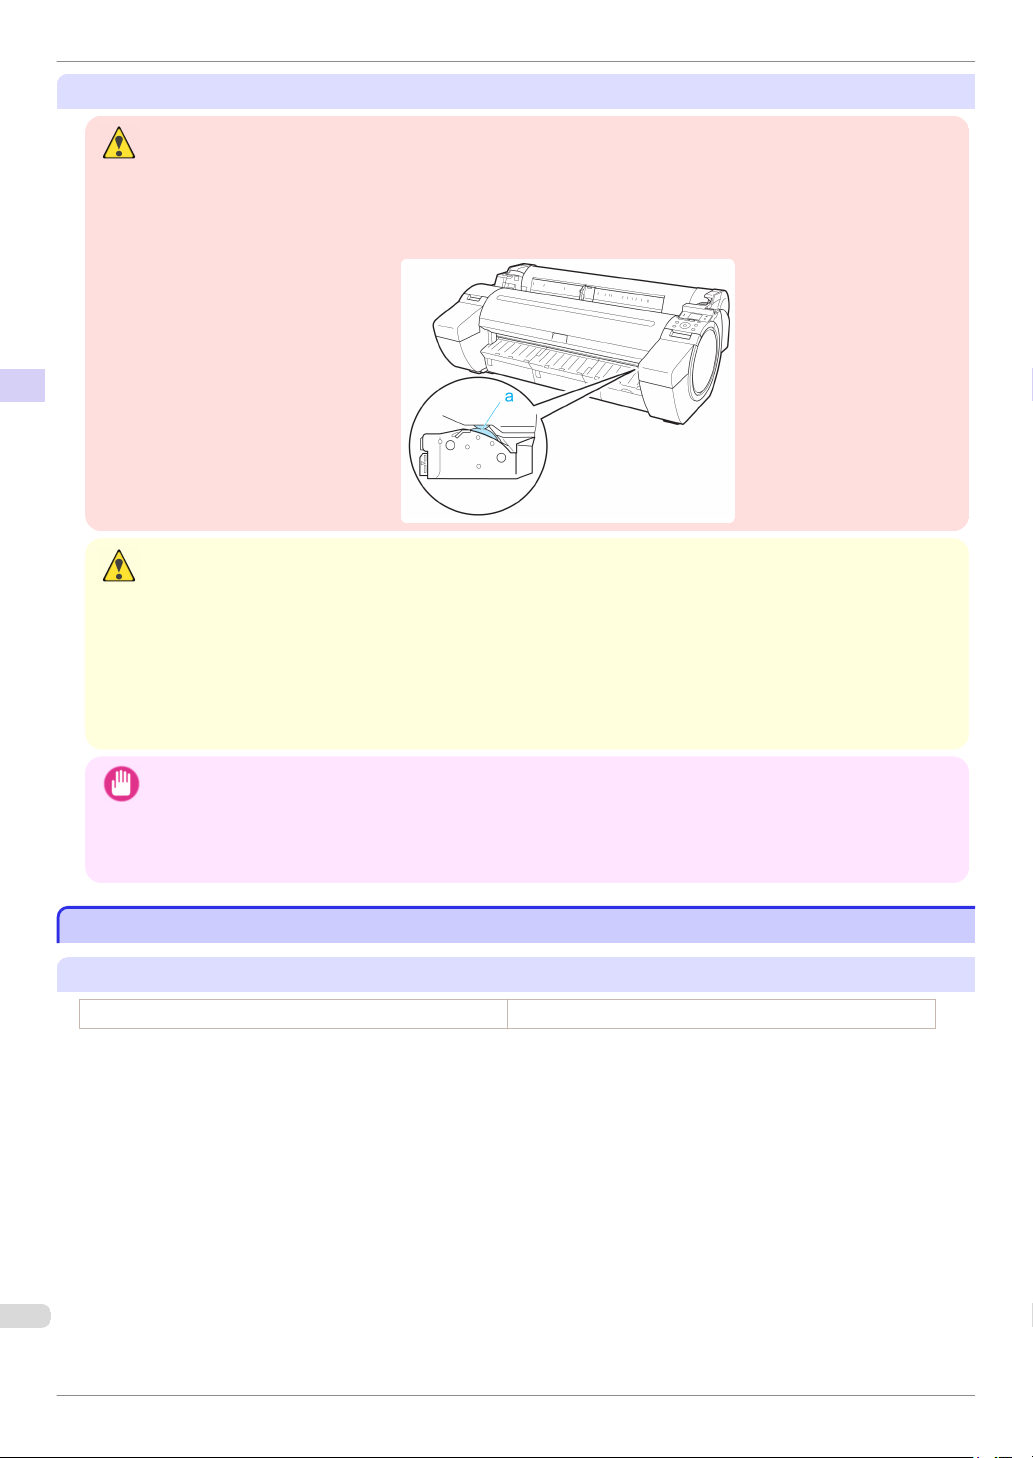
• Never touch the cutting edge of Cutter Unit (a). This could cause personal injury.
Preface Safety Precautions
• Never insert your hand into the printer while it is printing. Moving parts inside the printer can cause injuries.
• Never place anything on the printer such as small metal objects (paper clips, staples), liquids, any type of liquid
Caution
container that contains flammable liquids (alcohol, benzene, etc.). If such objects fall into the printer, this could
cause a fire or electrical shock.
• To prevent a fire hazard or dangerous electric shock, if a foreign object falls into or a liquid spills into the printer,
press the Power button immediately to switch the printer off, unplug the printer power cable from the outlet, and
then contact your Canon dealer or support center. If you continue to use the printer, this could cause a fire or
electrical shock.
iPF785 Series
• Connect the interface cable correctly. To avoid damage, before connection make sure that the shape of the cable
Important
connector matches the connection point on the printer.
• During printing, turn on the ventilation system in the room.
• We recommend ensuring ample space for installation.
Legal Notices
Legal Notices
FCC Regulations (U.S.A)
Canon Large Format Printer iPF785
This device complies with Part 15 of the FCC Rules. Operation is subject to the following two conditions: (1) This
device may not cause harmful interference, and (2) this device must accept any interference received, including
interference that may cause undesired operation.
Note: This equipment has been tested and found to comply with the limits for class B digital device, pursuant to
Part 15 of the FCC Rules. These limits are designed to provide reasonable protection against harmful interference
in a residential installation.
This equipment generates, uses and can radiate radio frequency energy and, if not installed and used in accordance with the instructions, may cause harmful interference to radio communications.However, there is no guarantee that interference will not occur in a particular installation. If this equipment does cause harmful interference to
radio or television reception, which can be determined by turning the equipment off and on, the user is encouraged
to try to correct the interference by one or more of the following measures:
•
Reorient or relocate the receiving antenna.
•
Increase the separation between the equipment and receiver.
Basic Guide

iPF785 Series
•
Connect the equipment into an outlet on a circuit different from that to which the receiver is connected.
•
Consult the dealer or an experienced radio/TV technician for help.
Use of shielded cable is required to comply with Class B limits in Subpart B of Part 15 of FCC Rules.
Do not make any changes or modifications to the equipment unless otherwise specified in the manual.
If such changes or modifications should be made, you could be required to stop operation of the equipment.
Canon U.S.A. Inc.
One Canon Park Melville, NY 11747 , U.S.A.
Tel No. 1-800-652-2666
Legal Notices
For CA, USA Only
Included battery contains Perchlorate Material - special handling may apply.
See http://www.dtsc.ca.gov/hazardouswaste/perchlorate/ for detail.
Trademarks
•
Canon, the Canon logo, and imagePROGRAF are trademarks or registered trademarks of CANON INC.
•
Microsoft is a registered trademark of Microsoft Corporation.
•
Windows is a trademark or registered trademark of Microsoft Corporation in the U.S. and/or other countries.
•
Mac, Mac OS, Bonjour and OS X are trademarks of Apple Inc., registered in the U.S. and other countries.
•
Adobe RGB, a trademark of Adobe Systems Incorporated, is color space proposed by Adobe Systems Incorporated.
Copyright
•
Unauthorized reproduction of this user manual in whole or part is prohibited.
Legal Notice
•
It is illegal to reproduce currency, bills, negotiable securities and other documents prohibited by law. Reproduction of such items may be subject to criminal prosecution.
•
It is illegal to reproduce legal certificates, licenses, travel tickets, and certain public and private documents prohibited from reproduction by law. Reproduction of such items may be subject to criminal prosecution.
•
Please note that intellectual property protected by copyright may not be reproduced without the express permission of the copyright holder except for personal or household use under limited circumstances.
Preface Safety Precautions
Basic Guide
5

Manuals for this printer
Manuals for this printer
Manuals for this printer
Manuals for this printer ................................................................................................................................................. 6
To view the User's Guide or Paper Reference Guide ........................................................................................ 6
About This User Manual .............................................................................................................................................. 10
Manuals for this printer
Manuals for this printer
This printer has the following manuals.
Preface Manuals for this printer
Setup Guide Instructions for unpacking and setting up the printer, and for
Quick Guide Contains information such as a guide to exchanging paper,
Basic Guide Descriptions of basic printer operations. Electronic manuals
User's Guide Detailed instructions for using the printer.
Paper Reference Guide This guide describes about the types and specifications of the
Setup Guide Quick Guide Basic Guide User's Guide Paper Reference Guide
Name Contents Medium
installing the software and electronic manuals.
Ink Tank, and Printhead, and cautions for using the product
safely.
available media on the printer.
iPF785 Series
Printed Manuals
To view the User's Guide or Paper Reference Guide
To view the User's Guide or Paper Reference Guide
To view the User's Guide or Paper Reference Guide, display the various manuals on the website from the links in
the software installed on your computer.
•
Windows
The basic instructions for displaying the User's Guide or Paper Reference Guide from the printer driver are as
follows.
1
Install the software.
Note that the driver installation procedure varies depending on the type of connection.
(See "Installing the Software (Windows).") ➔P.70
2
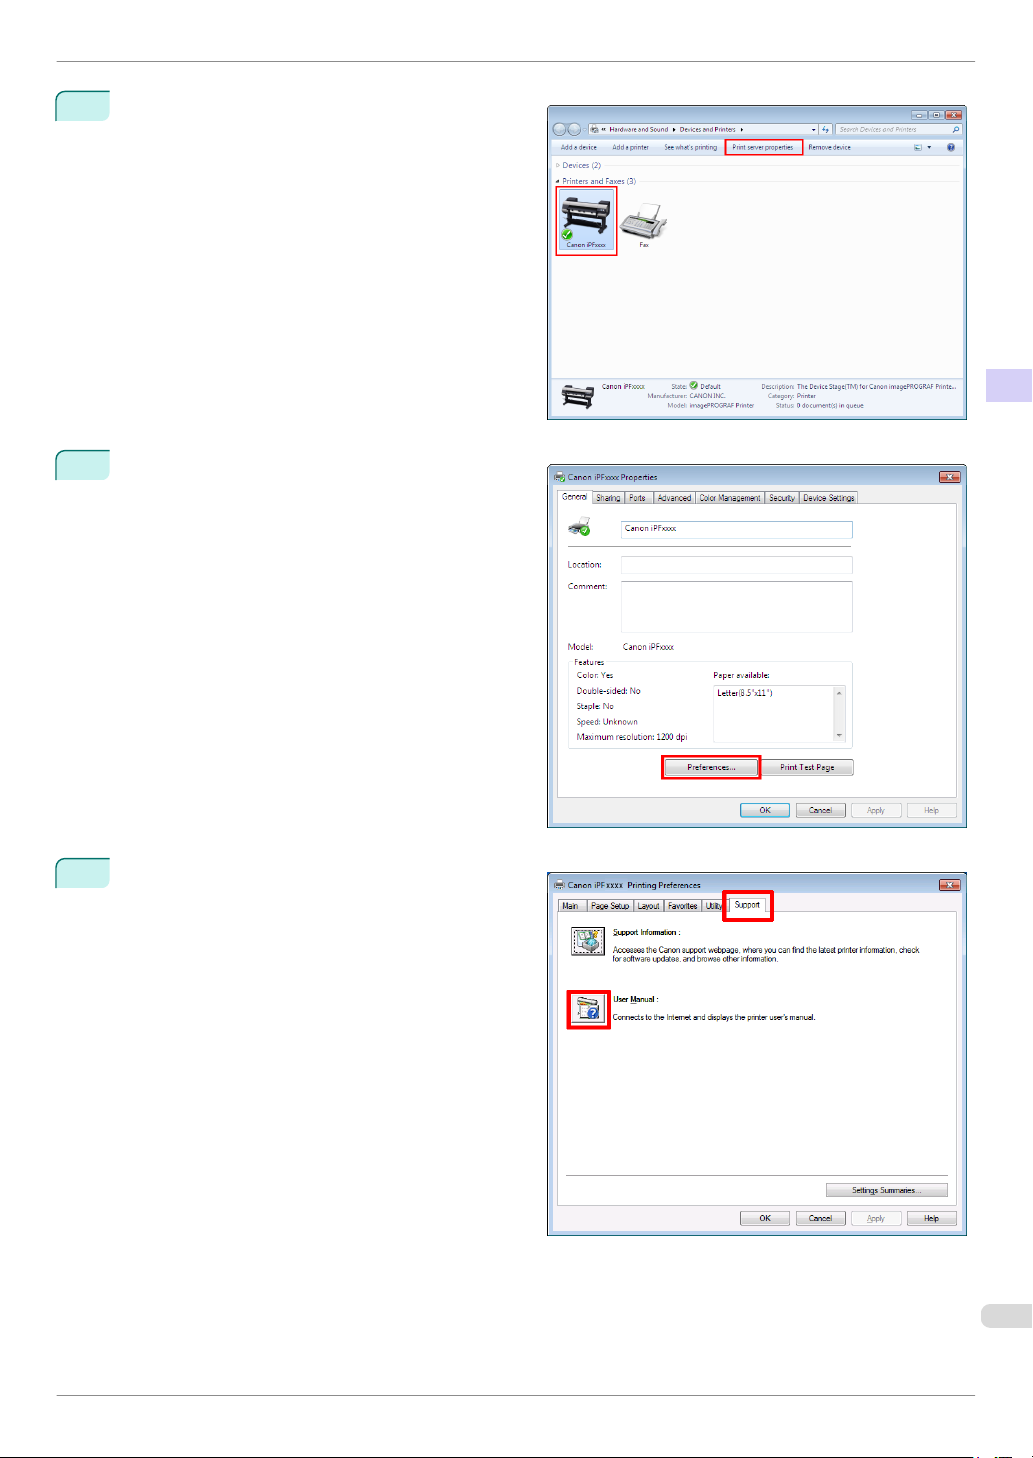
Click start > Printers and Faxes (or Printer, Devices and Printers).
Basic Guide
iPF785 Series
Right-click the printer, and then click Properties (or
3
Printer Properties).
Click Preferences (or Printing Preferences) to
4
display the Printing Preferences dialog box with
the printer name added to the title.
To view the User's Guide or Paper Reference Guide
Preface Manuals for this printer
Select the Support sheet and click the User Man-
5
ual button.
7
Basic Guide
To view the User's Guide or Paper Reference Guide
To display User's Guide, click User's Guide.
6
Alternately, to display Paper Reference Guide, click
Paper Reference Guide.
Preface Manuals for this printer
•
Mac OS
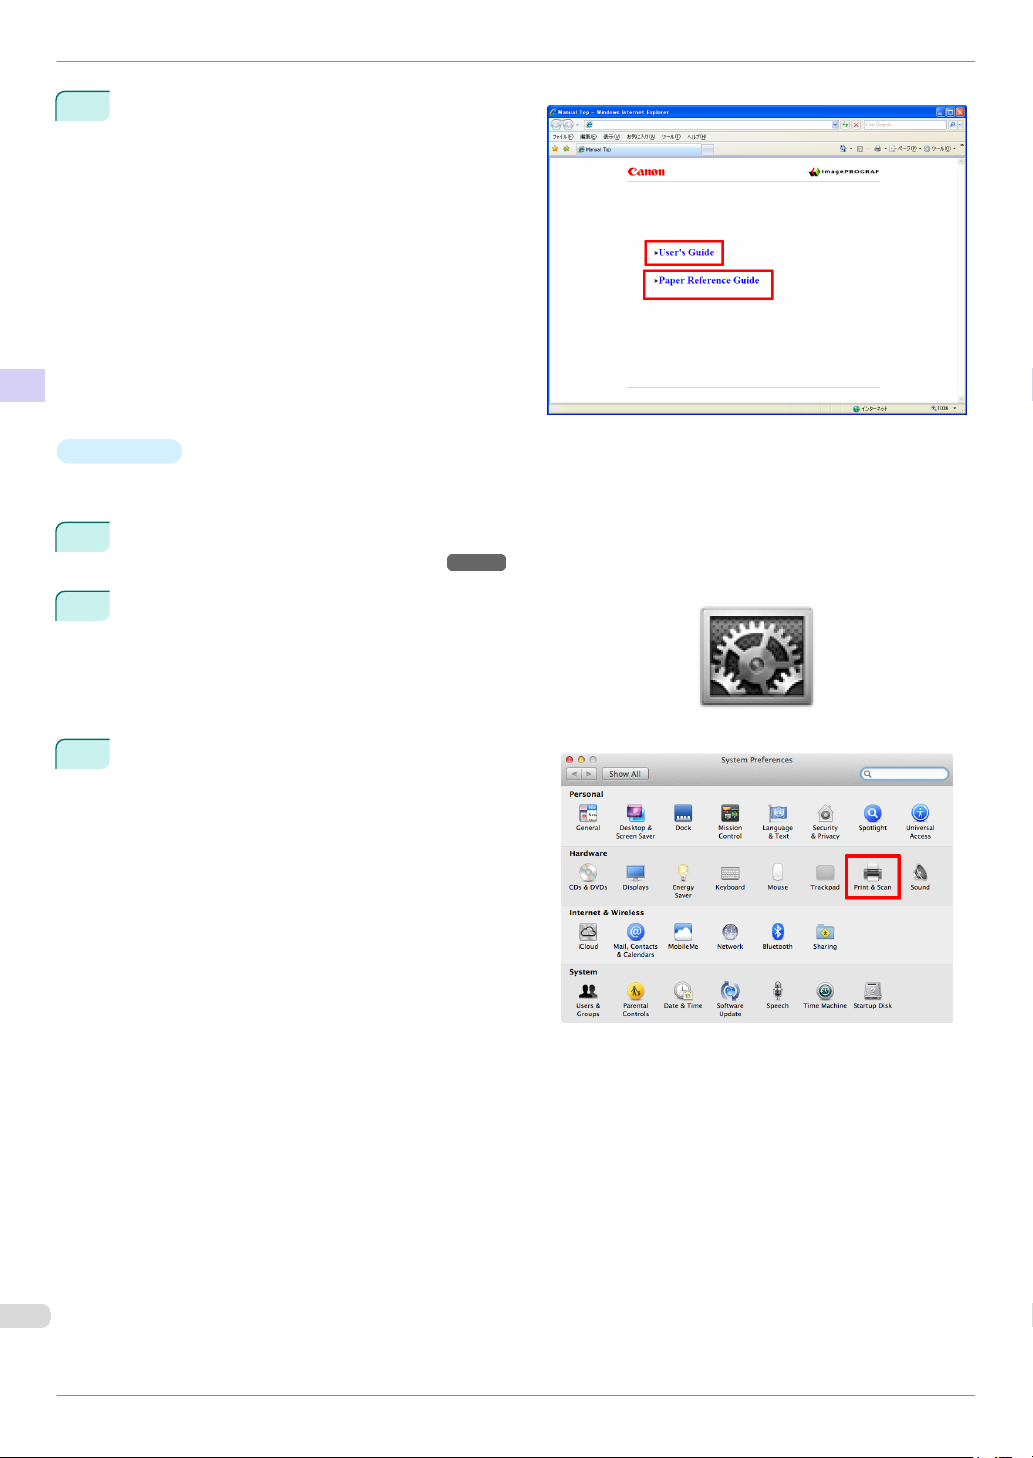
The basic instructions for displaying the User's Guide or Paper Reference Guide from imagePROGRAF Print-
monitor are as follows.
1
Install the software.
(See "Installing the Software (Mac OS).")
Click System Preferences icon in the Dock.
2
➔P.72
iPF785 Series
Click Printers & Scanners (Print & Scan or Print &
3
Fax).
Basic Guide
iPF785 Series
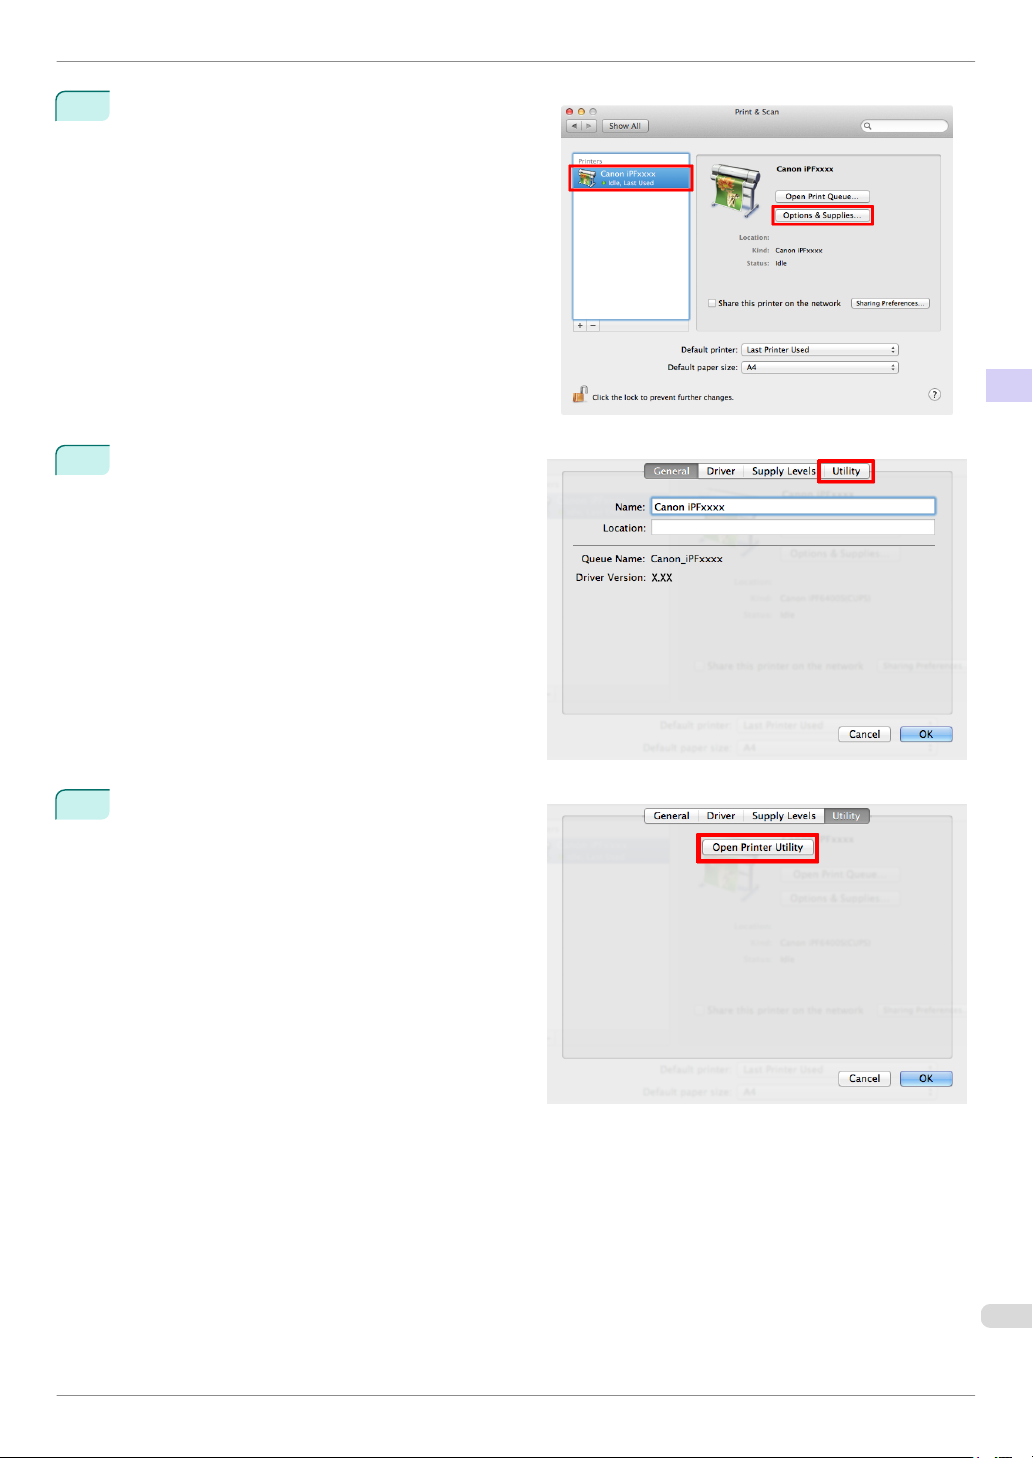
Select the printer in the Printer list and click Options
4
& Supplies.
Click Utility.
5
To view the User's Guide or Paper Reference Guide
Preface Manuals for this printer
Click Open Printer Utility.
6
9
Basic Guide
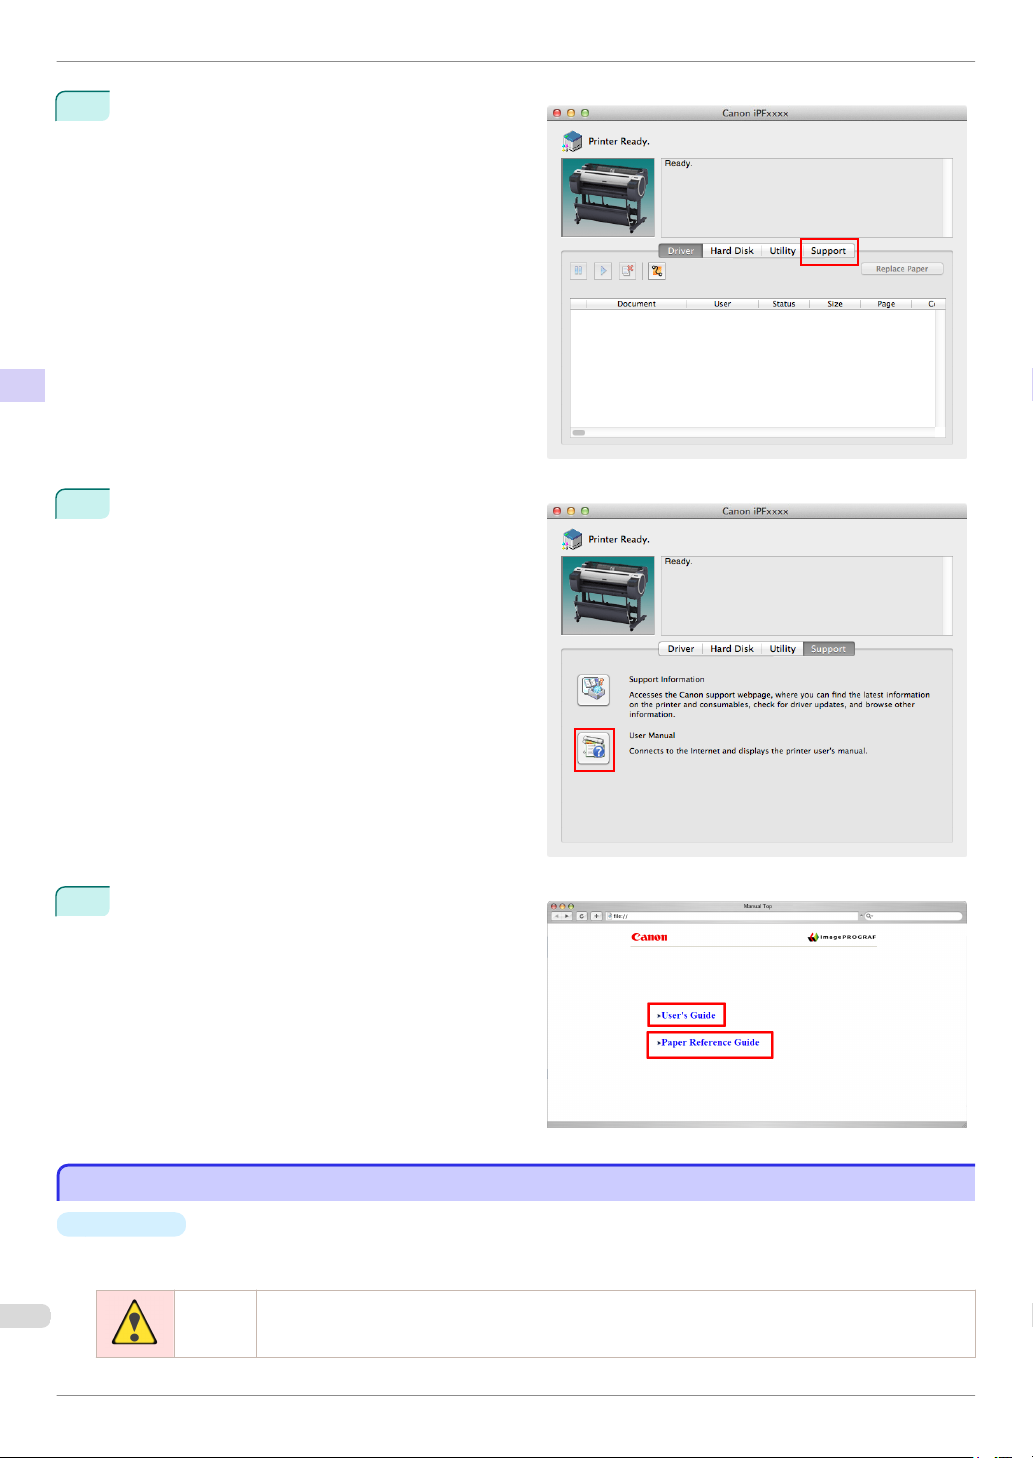
About This User Manual
Click Support.
7
Preface Manuals for this printer
Click the User Manual button.
8
iPF785 Series
To display User's Guide, click User's Guide.
9
Alternately, to display Paper Reference Guide, click
Paper Reference Guide.
About This User Manual
About This User Manual
•
Symbols
The following symbols are used in this user manual to indicate safety information and explanations on restric-
tions or precautions in use.
Warning Indicates warning items for which operating error poses a risk of death or serious injury. To ensure safe
use, always follow these warnings.
Basic Guide

iPF785 Series
About This User Manual
Caution Indicates caution items for which operating error poses a risk of injury. To ensure safe use, always follow
these cautions.
Important Indicates important information and restrictions that definitely are to be followed during operation. Be sure
to read this information to prevent troubles, malfunctions, or damage to equipment or property by operating errors.
Note Indicates helpful reference information and supplemental information on particular topics.
•
Button names and user interface elements
Key and button names on the control panel and user interface elements in software (such as menus and but-
tons) are indicated as follows in this user manual.
Control panel buttons Example: Press the OK button.
Control panel messages Example: Head Cleaning is displayed.
Software interface items
(menus and buttons)
Keyboard keys Example: Press the Tab key.
•
Cross-reference
Example: Click OK.
Other pages or manuals that provide related information are indicated as follows in this user manual.
Cross-reference in the same user manual Example: see "Menu Structure." ➔ P.51
Cross-reference in related manuals Example: Refer to the Paper Reference Guide.
Other cross-reference Example: See the printer driver help.
•
Figures and software screens
•
Figures in this user manual may be different from the actual appearance of the printer in some cases.
•
Screens depicted in this user manual for the printer driver or other software may be different from the actual screens because of subsequent updates.
•
May we request
•
The information in this user manual is subject to change without notice.
•
We strive to ensure accuracy of information in this user manual, but if you notice errors or omissions, contact support center.
Preface Manuals for this printer
Basic Guide
11
Attaching the Roll Holder to Rolls
Handling Paper
Handling Paper
Handling rolls
Handling rolls
Attaching the Roll Holder to Rolls ........................................................................................................................... 12
Loading Rolls in the Printer ........................................................................................................................................ 15
Removing the Roll from the Printer ........................................................................................................................ 18
Handling Paper Handling rolls
Attaching the Roll Holder to Rolls
Attaching the Roll Holder to Rolls
When printing on rolls, attach the Roll Holder to the roll.
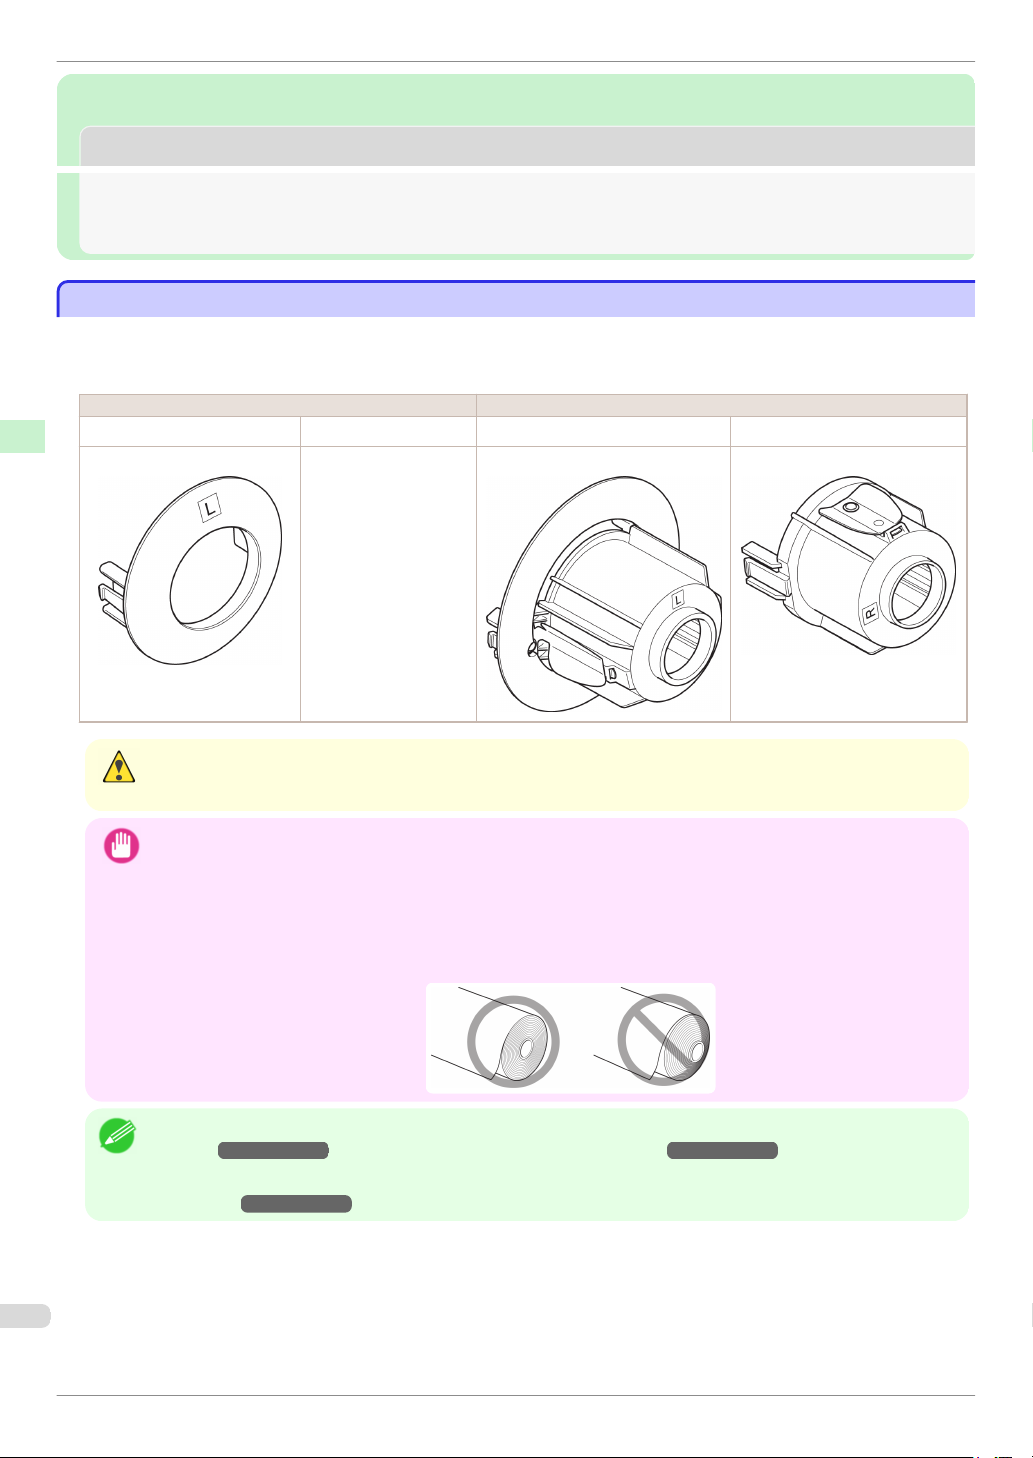
Rolls have a two- or three-inch paper core. Use the correct attachment for the paper core. The printer comes
equipped with the 2-Inch Paper Core Attachment installed.
Using Rolls with a 2-Inch Paper Core Using Rolls with a 3-Inch Paper Core
Holder Stopper (Left Side) Roll Holder (Right Side) Holder Stopper (Left Side) Roll Holder (Right Side)
2-Inch Paper Core Attachment No Attachment Needed 3-Inch Paper Core Attachment L 3-Inch Paper Core Attachment R
iPF785 Series
• Set the roll on a table or other flat surface so that it does not roll or fall. Rolls are heavy, and dropping a roll may
Caution
cause injury.
• When handling the roll, be careful not to soil the printing surface. This may affect the printing quality. We recom-
Important
mend wearing clean cloth gloves when handling rolls to protect the printing surface.
• Use scissors or a cutting tool to cut the edge of the roll paper if it is uneven, dirty, or has tape residue. Otherwise,
it may cause feeding problems and affect the printing quality. Be careful not to cut through any barcodes printed
on the roll.
• Align the edges of the paper on both ends of the roll. Misalignment may cause feeding problems.
• For details on supported sizes and types of rolls, see Paper Sizes or the Paper Reference Guide. (See "Paper
Sizes.") ➔User's Guide (See "Displaying the Paper Reference Guide.") ➔ User's Guide
Note
• To view instructions as you attach the Roll Holder, press the Navigate button. (See "How to View Instructions with
Navigate.") ➔User's Guide
Basic Guide
iPF785 Series
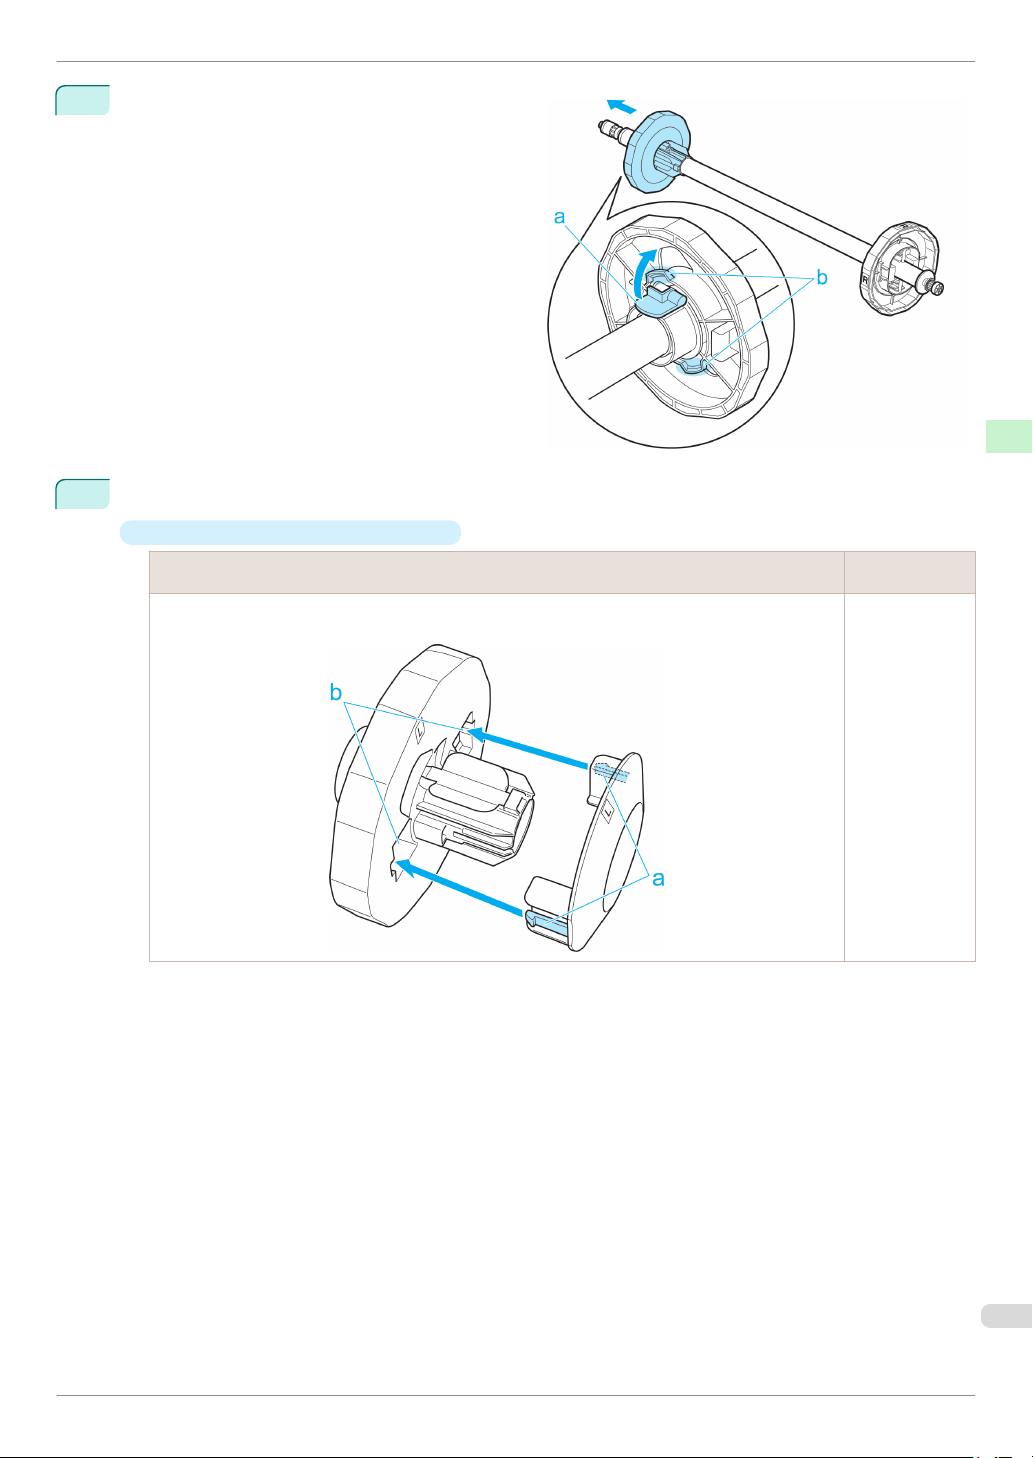
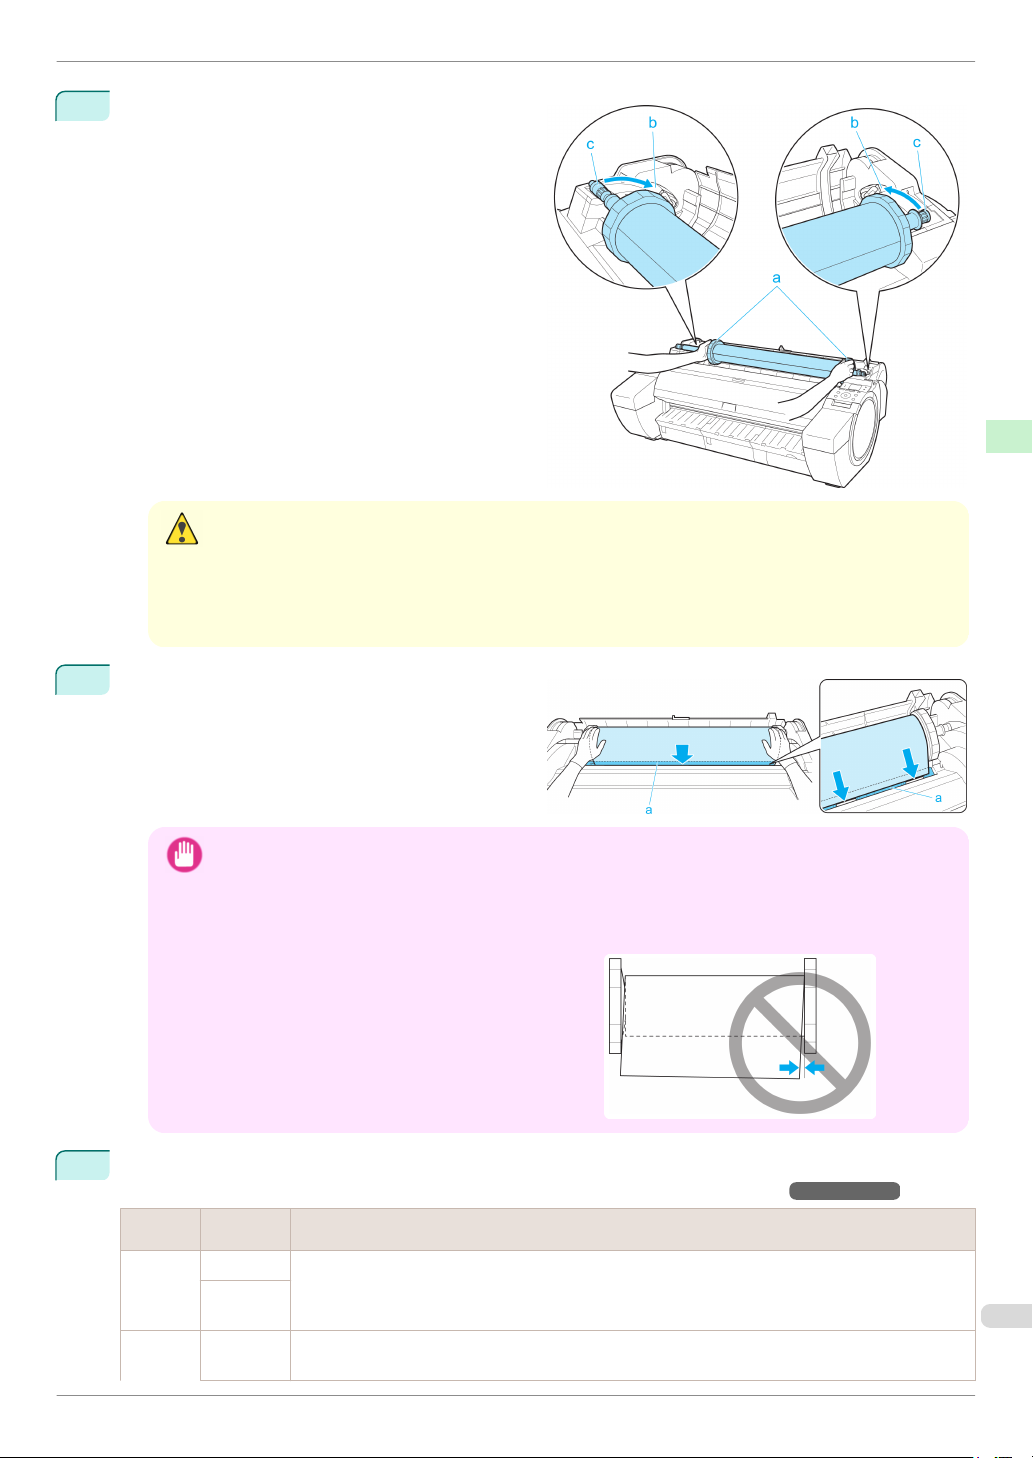
Lift the Holder Stopper lever (a) from the shaft side
1
to unlock it. Holding the Holder Stopper at the position indicated (b), remove it from the Roll Holder.
2
Insert the respective attachments for the roll paper core on the Roll Holder and Holder Stopper.
•
Attaching the Roll Holder to Rolls
Using rolls with a 2-inch paper core
Holder Stopper (Left Side)
Align the tips (a) of the 2-Inch Paper Core Attachment with the holes (b) of the Holder Stopper and
insert it firmly.
Roll Holder (Right
Side)
No attachment
is needed.
Handling Paper Handling rolls
Basic Guide
13
Attaching the Roll Holder to Rolls
•
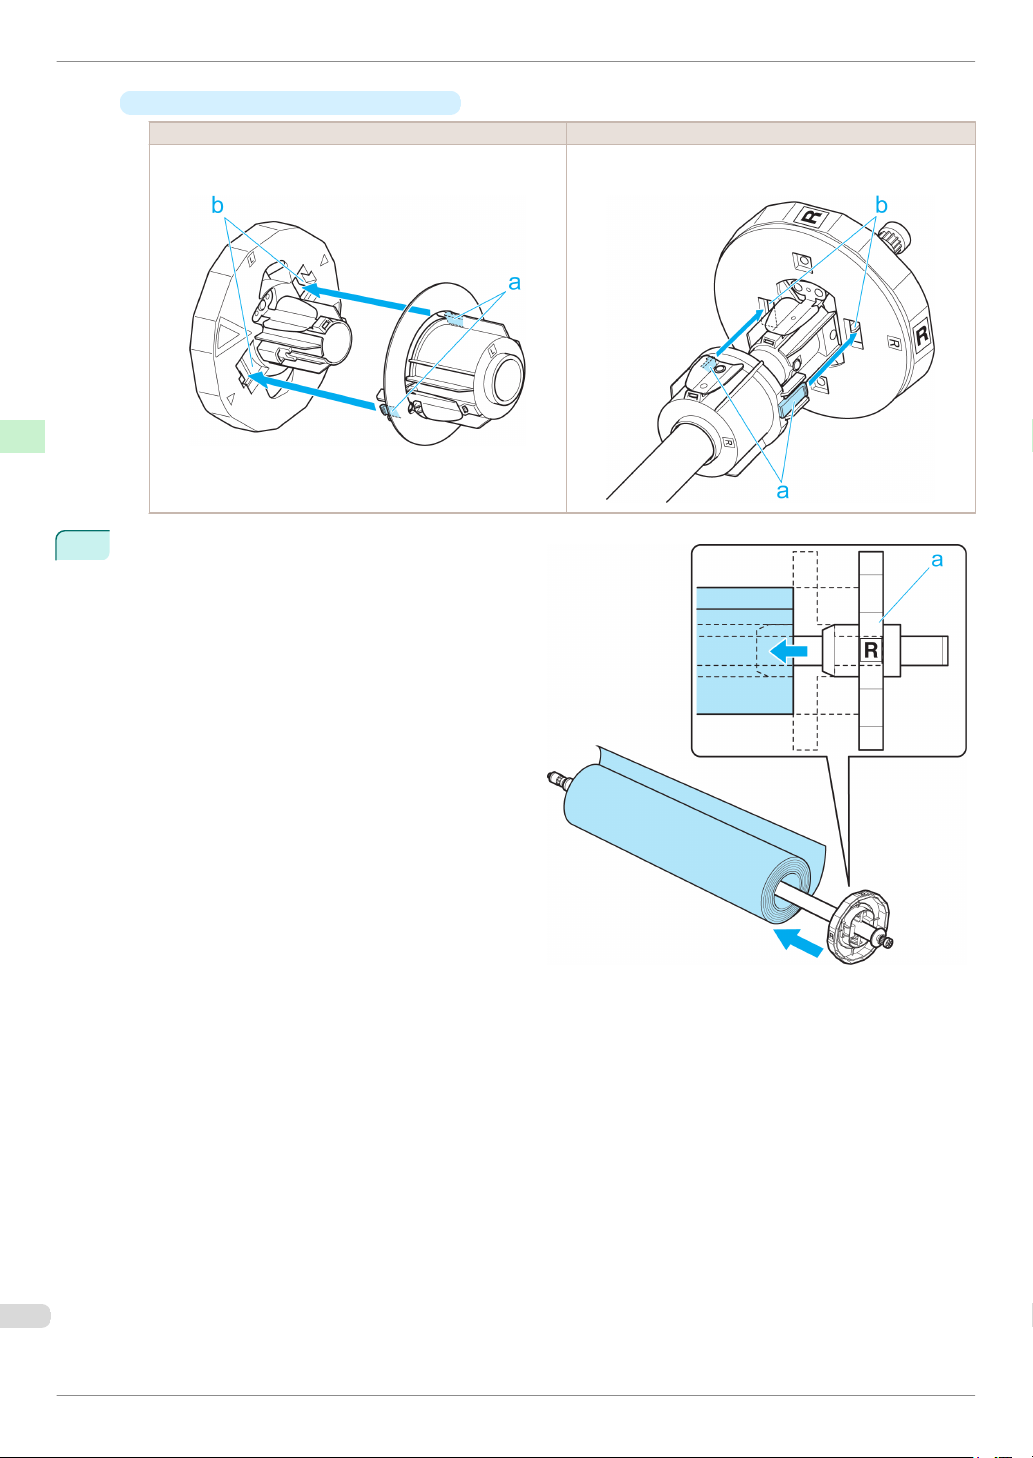
Using rolls with a 3-inch paper core
Holder Stopper (Left Side) Roll Holder (Right Side)
Handling Paper Handling rolls
3
Align the tips (a) of the 3-Inch Paper Core Attachment L
with the holes (b) of the Holder Stopper and insert it firmly.
With the edge of the roll paper facing forward as
Align the tips (a) of 3-Inch Paper Core Attachment R with
the holes (b) of the Roll Holder and insert it firmly.
shown, insert the Roll Holder from the right of the
roll. Insert it firmly until the roll touches the flange
(a) of the Roll Holder, leaving no gap.
iPF785 Series
Basic Guide
iPF785 Series
4
Loading Rolls in the Printer
Loading Rolls in the Printer
Follow these steps to load rolls in the printer.
Loading Rolls in the Printer
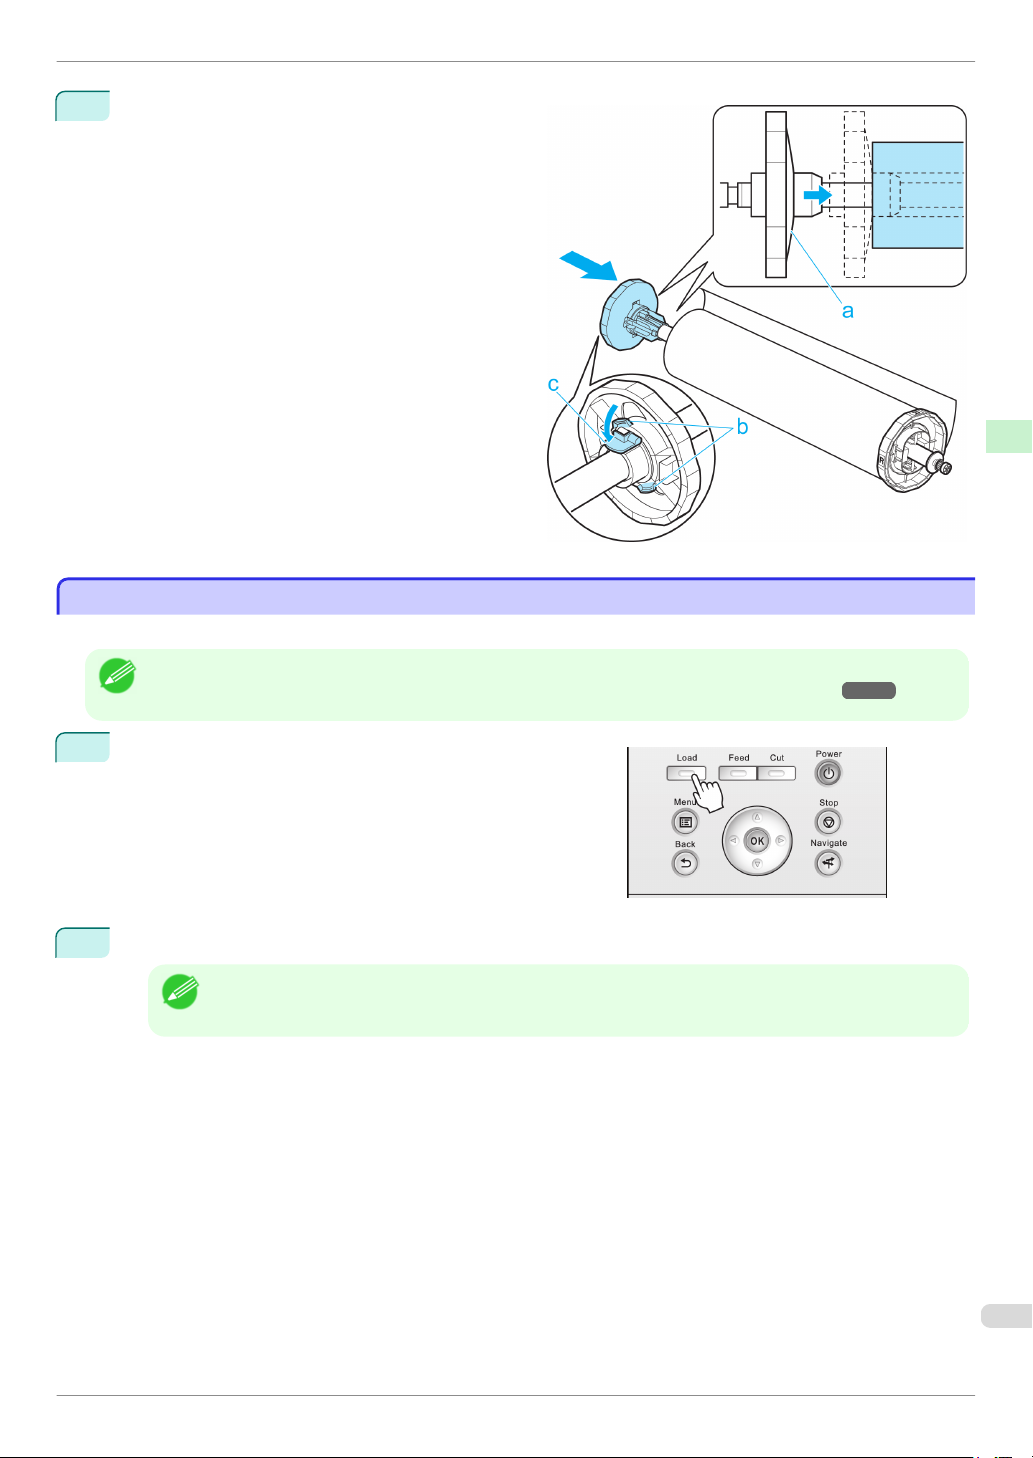
Insert the Holder Stopper from the left in the Roll
Holder as shown. Holding it at the position shown
(b), push it firmly in until the flange (a) of the Holder
Stopper touches the roll. Lock the Holder Stopper
lever (c) by pushing it down toward the shaft side.
Handling Paper Handling rolls
• Before loading rolls, make sure the printer is clean inside the Top Cover and around the Ejection Guide. If these
areas are dirty, we recommend cleaning them in advance. (See "Cleaning Inside the Top Cover.") ➔ P.42
Note
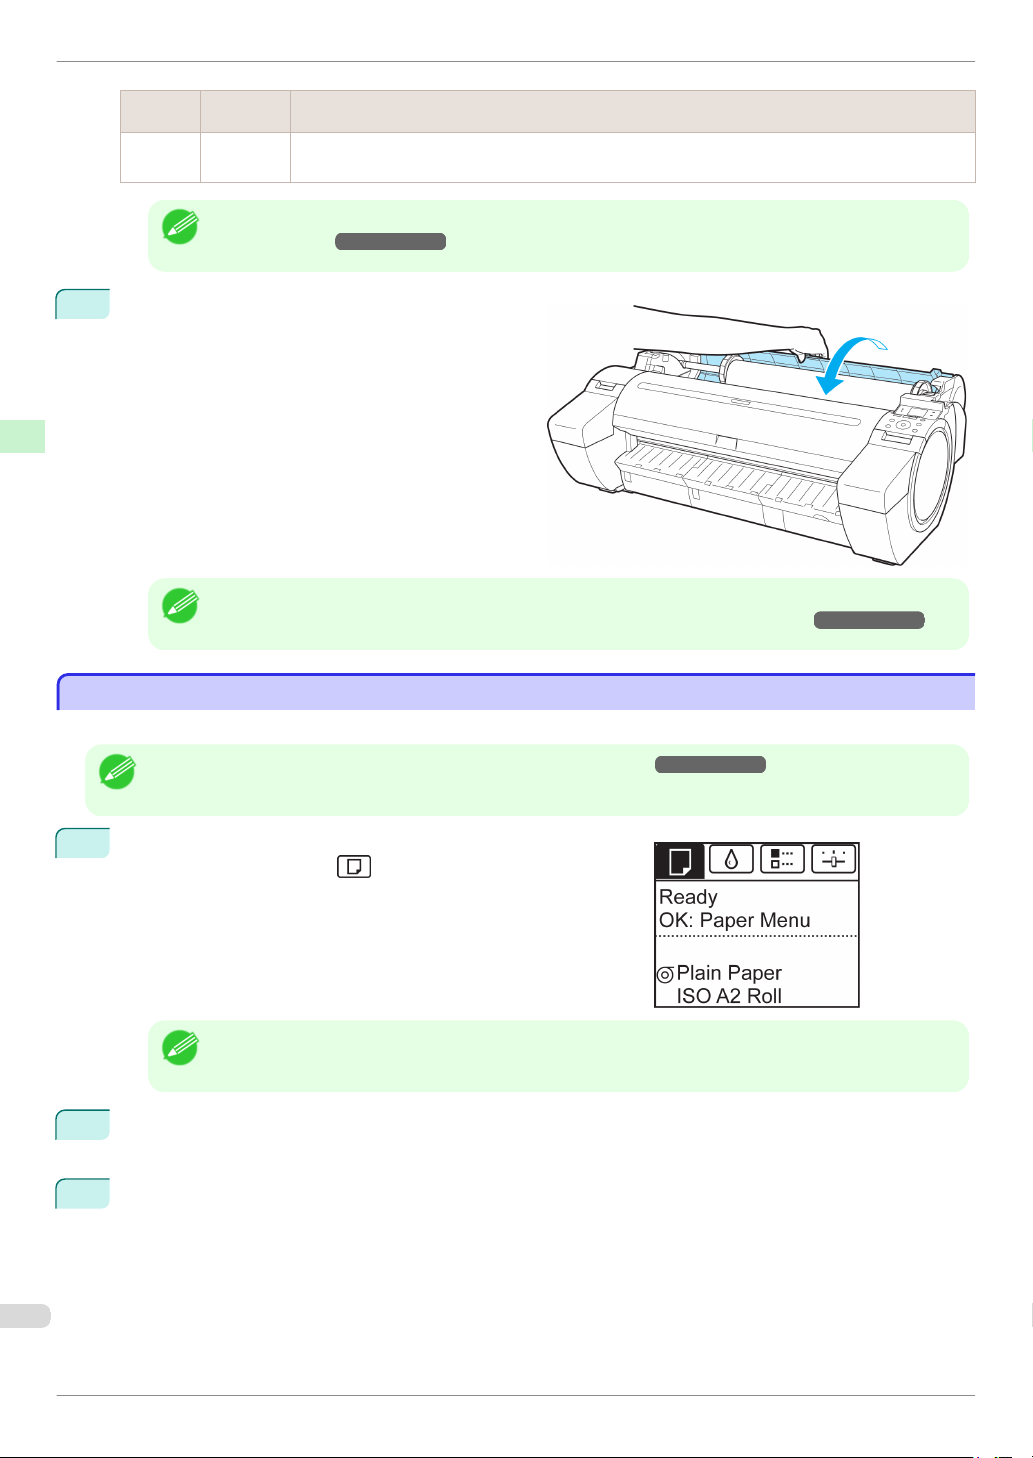
Press the Load button.
1
2
Press ▲ or ▼ to select "Load Roll Paper", and then press the OK button.
• If any paper has been advanced that will not be used, a message is shown requesting you to remove it.
Press ▲ or ▼ to select Yes, and then press the OK button. Remove the paper and go to the next step.
Note
Basic Guide
15
Loading Rolls in the Printer
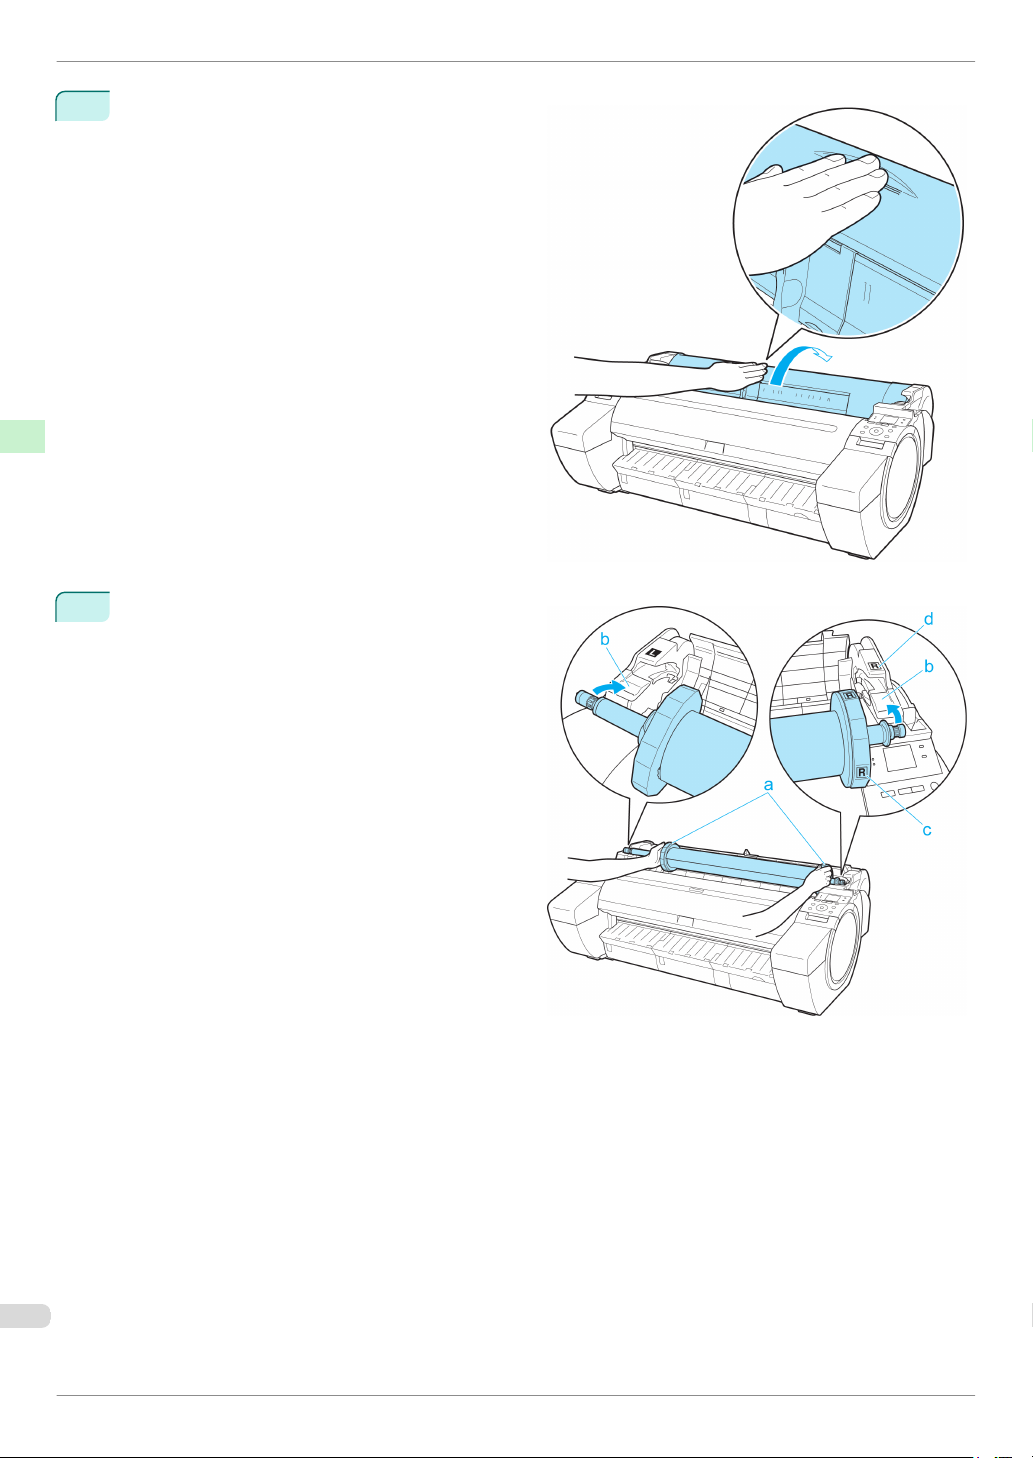
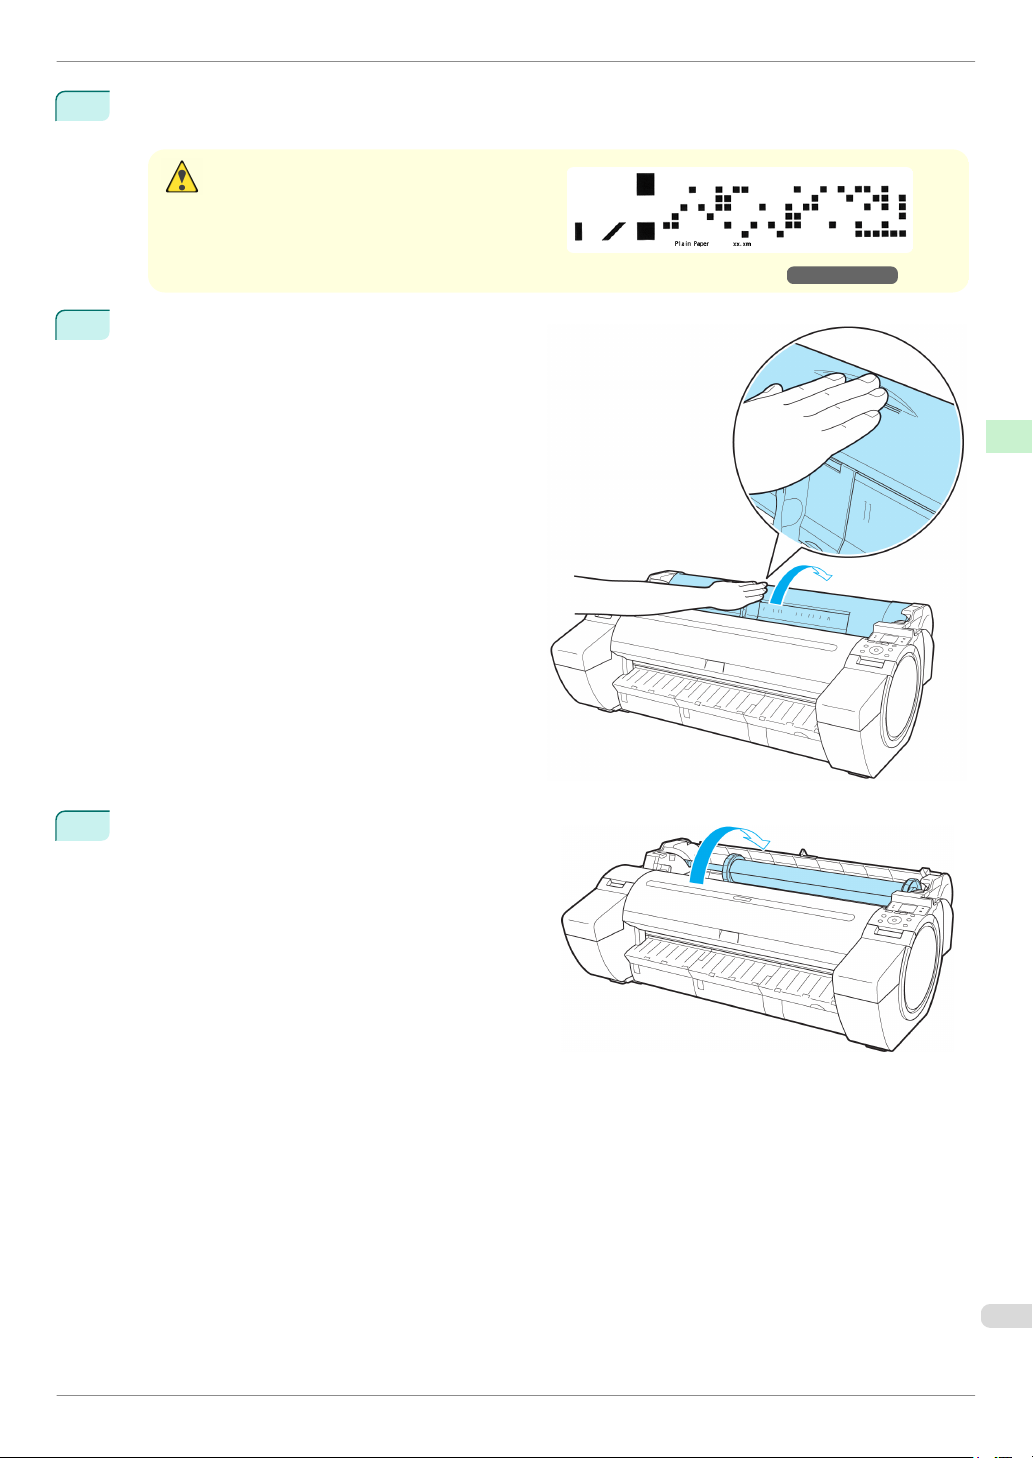
Positioning your hands as shown, open the Roll
3
Cover.
Handling Paper Handling rolls
Holding the Roll Holder flange (a), rest the Roll
4
Holder shaft on the Roll Ledge (b).
At this time, position the holder so that the R label
(c) on the [W label (c) on the Roll Holder flange is
aligned with the R label (d) on the printer .
iPF785 Series
Basic Guide
iPF785 Series
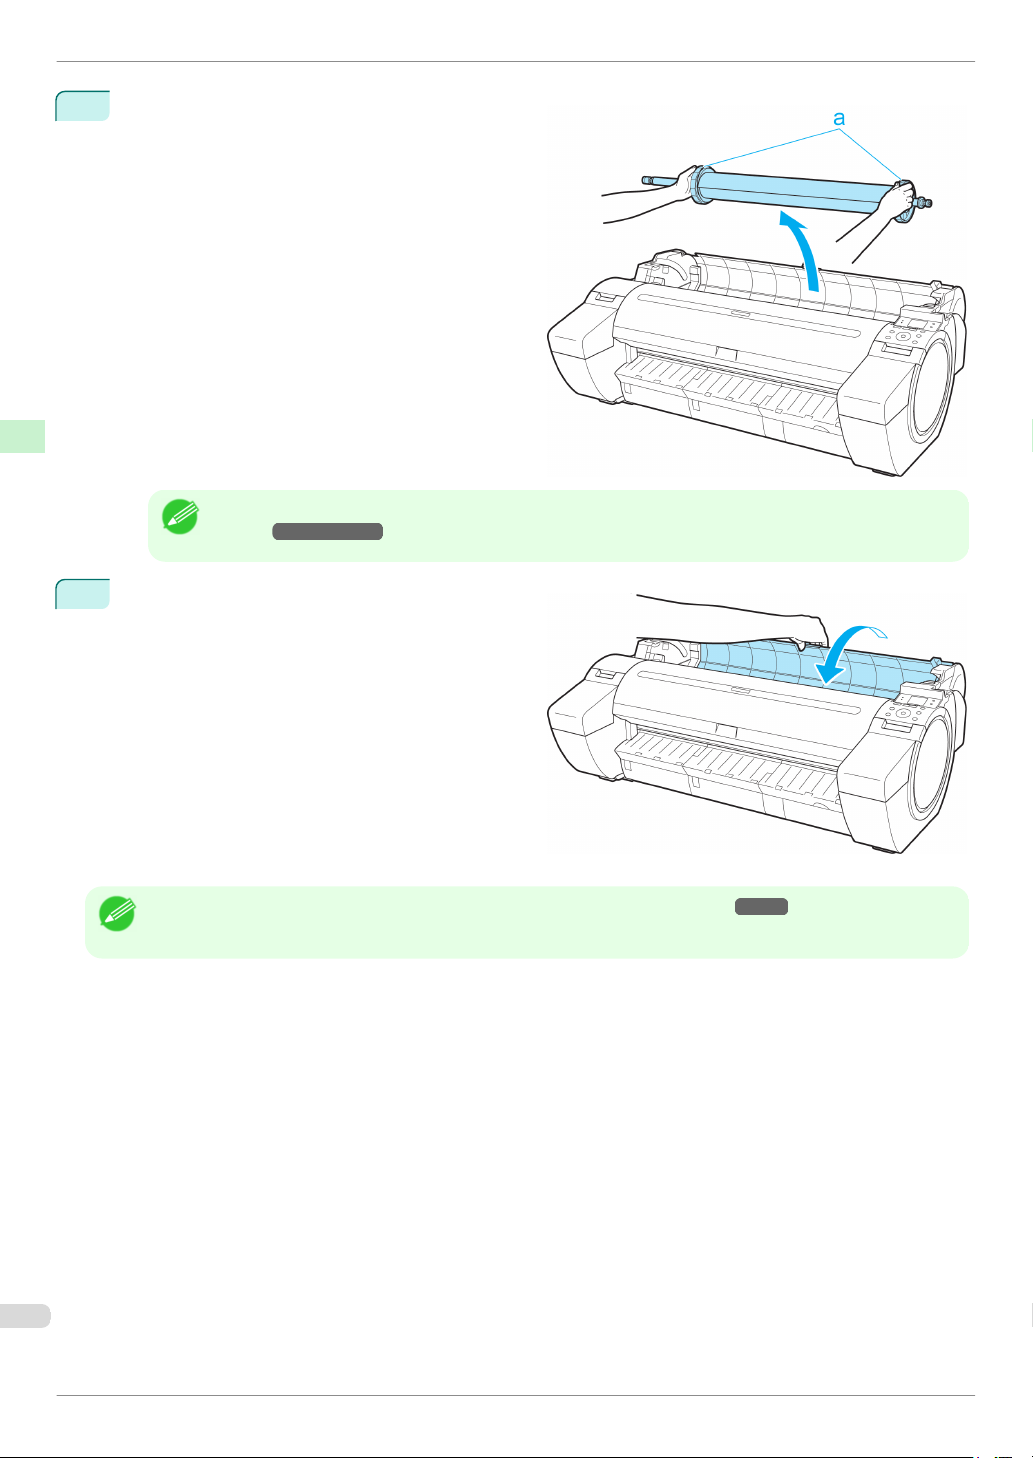
Holding the Roll Holder flange (a), guide the holder
5
along the Roll Loading Slots (b) on both ends,
keeping the holder level as you load it in the Roll
Holder Slot.
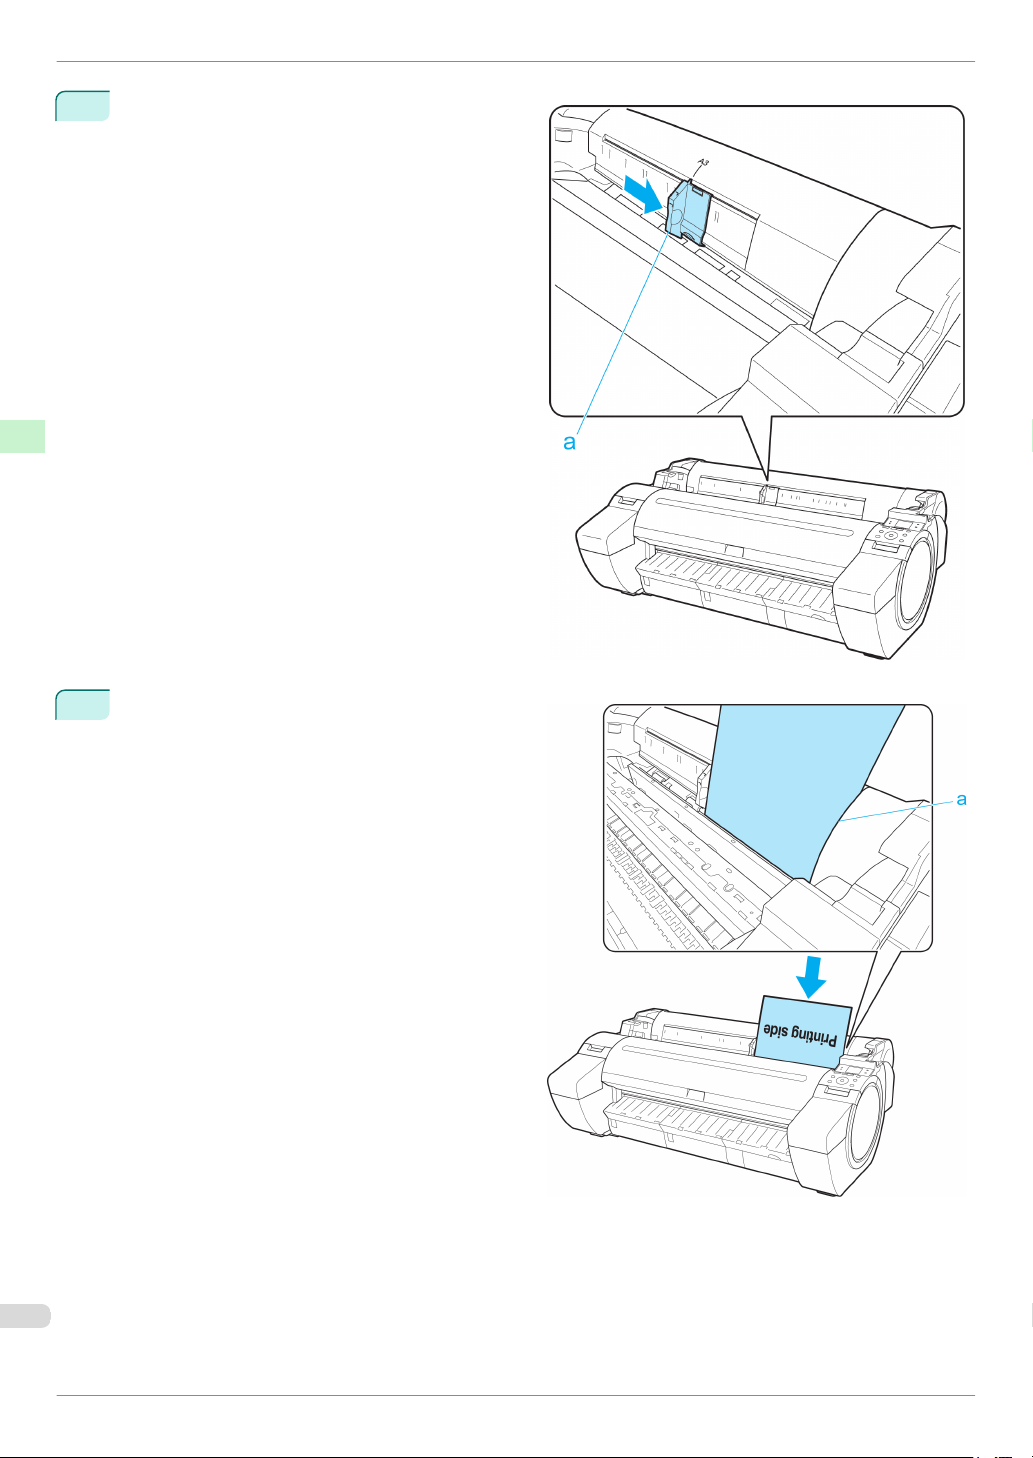
Advance the roll to insert the leading edge in the
6
Paper Feed Slot (a) until you hear a tone.
Loading Rolls in the Printer
• Do not force the Roll Holder into the printer with the right and left ends reversed. This may damage the
Caution
printer and Roll Holder.
• Do not release the flanges until the holder is loaded in the Roll Holder Slot.
• Be careful not to pinch your fingers between the Roll Loading Slots (b) and the Roll Holder shaft (c) when
loading rolls.
Handling Paper Handling rolls
• Be careful not to soil the printing surface of roll paper as you insert it in the slot. This may affect the
Important
printing quality. We recommend wearing clean cloth gloves when handling rolls to protect the printing
surface.
• If the paper is wrinkled or warped, straighten it out before loading it.
Load paper straight so it is not fed askew.
•
7
Once paper feeding starts, you will need to do the following, based on the ManageRemainRoll setting and
the barcode printed on rolls. (See "Keeping Track of the Amount of Roll Paper Left.")
ManageRemainRoll
Off Printed A menu for selection of the type of paper is automatically shown on the Display Screen.
On Printed The type and amount of paper left is automatically detected based on the barcode printed on the roll.
Barcodes Printer Operation After the Paper is Fed
Not printed
Press ▲ or ▼ to select the type of paper, and then press the OK button.
There is no need to specify the type and length of the paper.
➔User's Guide
17
Basic Guide
Removing the Roll from the Printer
iPF785 Series
Handling Paper Handling rolls
8
ManageRemainRoll
On
Barcodes Printer Operation After the Paper is Fed
Not printed
A menu for selection of the paper type and length is automatically shown on the Display Screen.
Press ▲ or ▼ to select the type and length of paper loaded, and then press the OK button.
• For details on types of paper to select, see the Paper Reference Guide. (See "Displaying the Paper Ref-
erence Guide.") ➔User's Guide
Note
Holding it at the positions indicated, close the Roll
Cover.
• Cut the edge of the roll after the paper is advanced if it is soiled or if there are cuts from scissors or the
blade after removing creased edges. (See "Specifying the Cutting Method for Rolls.") ➔ User's Guide
Note
Removing the Roll from the Printer
Removing the Roll from the Printer
Remove rolls from the printer as follows.
• If you need to cut the roll, see "Specifying the Cutting Method for Rolls." ➔ User's Guide
Note
On the Tab Selection screen of the Control Panel, press ◀ or
1
▶ to select the Paper tab ( ).
• If the Tab Selection screen is not displayed, press the Menu button.
Note
2
Press the OK button.
The Paper Menu is displayed.
3
Press ▲ or ▼ to select Eject Paper, and then press the OK button.
Basic Guide
iPF785 Series
4
Press ▲ or ▼ to select Yes, and then press the OK button.
The roll is now rewound and ejected.
Positioning your hands as shown, open the Roll
5
Cover.
Removing the Roll from the Printer
If you have selected ManageRemainRoll > On
•
Caution
in the Control Panel menu, a barcode is printed
on the leading edge of the roll.
Do not remove the roll before the barcode is
printed. You will be unable to keep track of the
amount of roll paper left. (See "Keeping Track of the Amount of Roll Paper Left.") ➔ User's Guide
Handling Paper Handling rolls
Using both hands, rotate the Roll Holder toward the
6
back to rewind the roll.
19
Basic Guide
Removing the Roll from the Printer
Holding the Roll Holder flange (a), remove the
7
holder from the Roll Holder Slot.
Handling Paper Handling rolls
• For instructions on removing the Roll Holder from rolls, see "Removing the Roll Holder from
Rolls." ➔User's Guide
Note
Holding it at the positions indicated, close the Roll
8
Cover.
iPF785 Series
• To load new roll paper in the printer at this point, see "Loading Rolls in the Printer." ➔ P.15
Note
Basic Guide

iPF785 Series
Handling sheets
Handling sheets
Loading Sheets in the Printer .................................................................................................................................... 21
Removing Sheets ............................................................................................................................................................ 23
Loading Sheets in the Printer
Loading Sheets in the Printer
Follow these steps to load sheets in the printer.
Loading Sheets in the Printer
• One sheet of paper can be loaded in the Paper Feed Slot at a time. Do not load more than one sheet at a time.
Important
This may cause paper jams.
• Before feeding paper or printing, make sure the sheet is flat against the Roll Cover. The sheet may jam if it curls
before feeding or printing and the trailing edge drops toward the front.
• Paper that is wrinkled or warped may jam. If necessary, straighten the paper and reload it.
• Load the paper straight. Loading paper askew will cause an error. (See "Paper is crooked..") ➔ P.118
• Store unused paper in the original package, away from high temperature, humidity, and direct sunlight.
Note
Select sheets as the paper source.
1
•
If a print job was received
Sheets are automatically selected, and the media type and size specified by the print job are shown on
the Display Screen. Go to the next step.
Handling Paper Handling sheets
•
If no print job was received
1.
Press the Load button.
2.
Press ▲ or ▼ to select "Load Cut Sheet", and then press the OK button.
• If any paper has been advanced that will not be used, a message is shown requesting you to remove it.
Press ▲ or ▼ to select Yes, and then press the OK button. Remove the paper and go to the next step.
Note
Basic Guide
21
Loading Sheets in the Printer
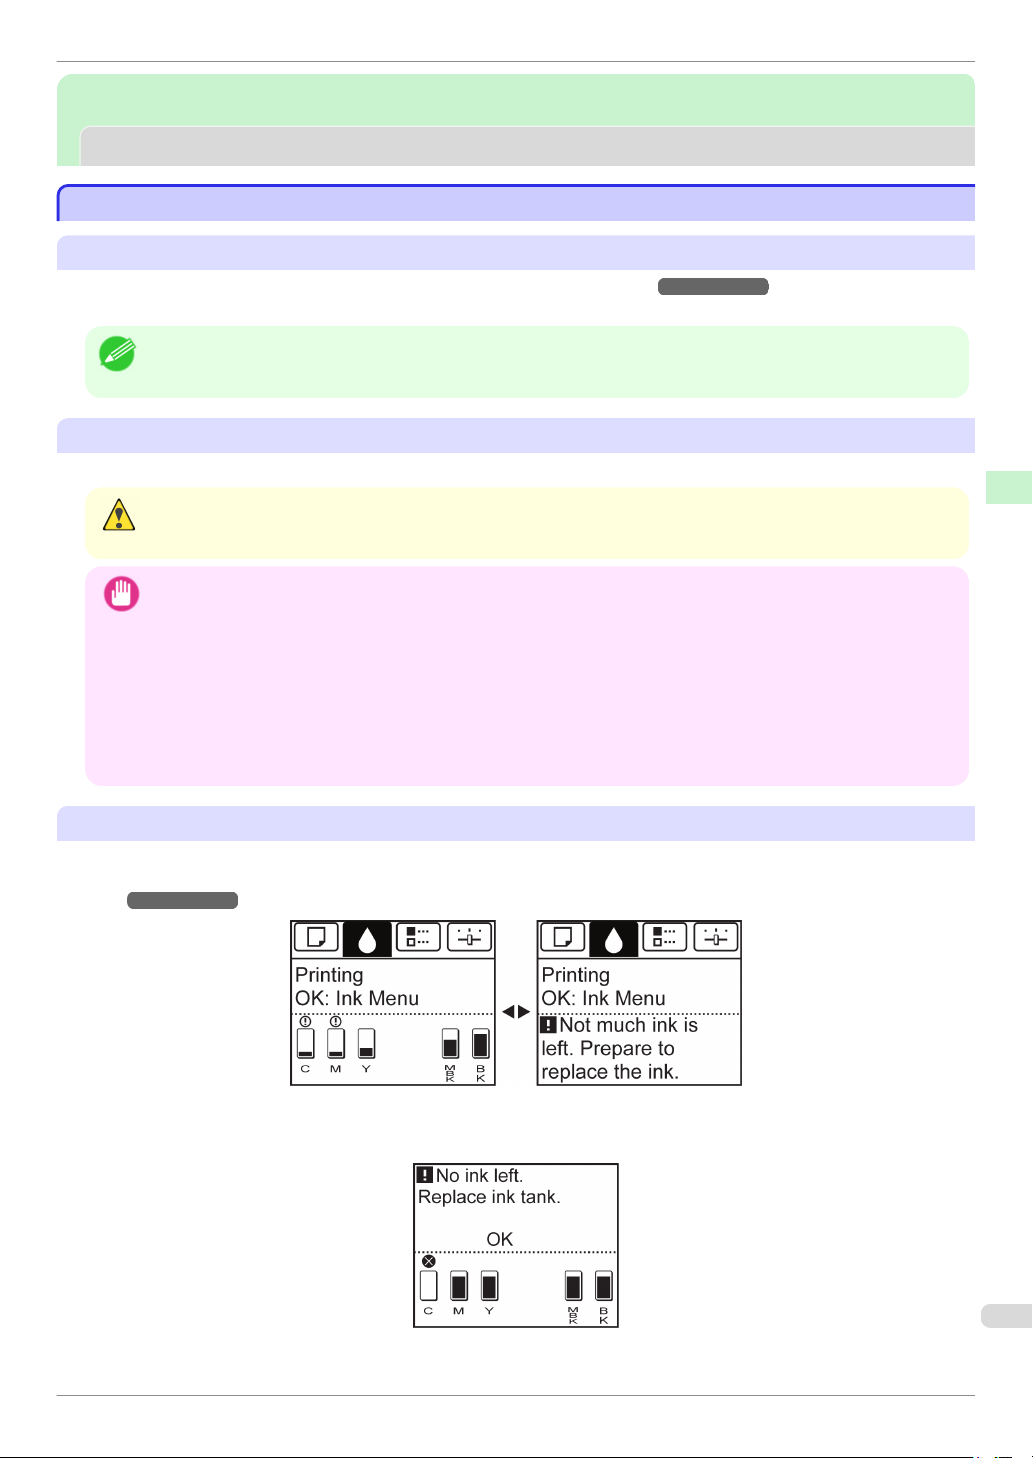
Slide the Width Guide (a) to align it with the mark
2
for the size of paper you will load.
Handling Paper Handling sheets
iPF785 Series
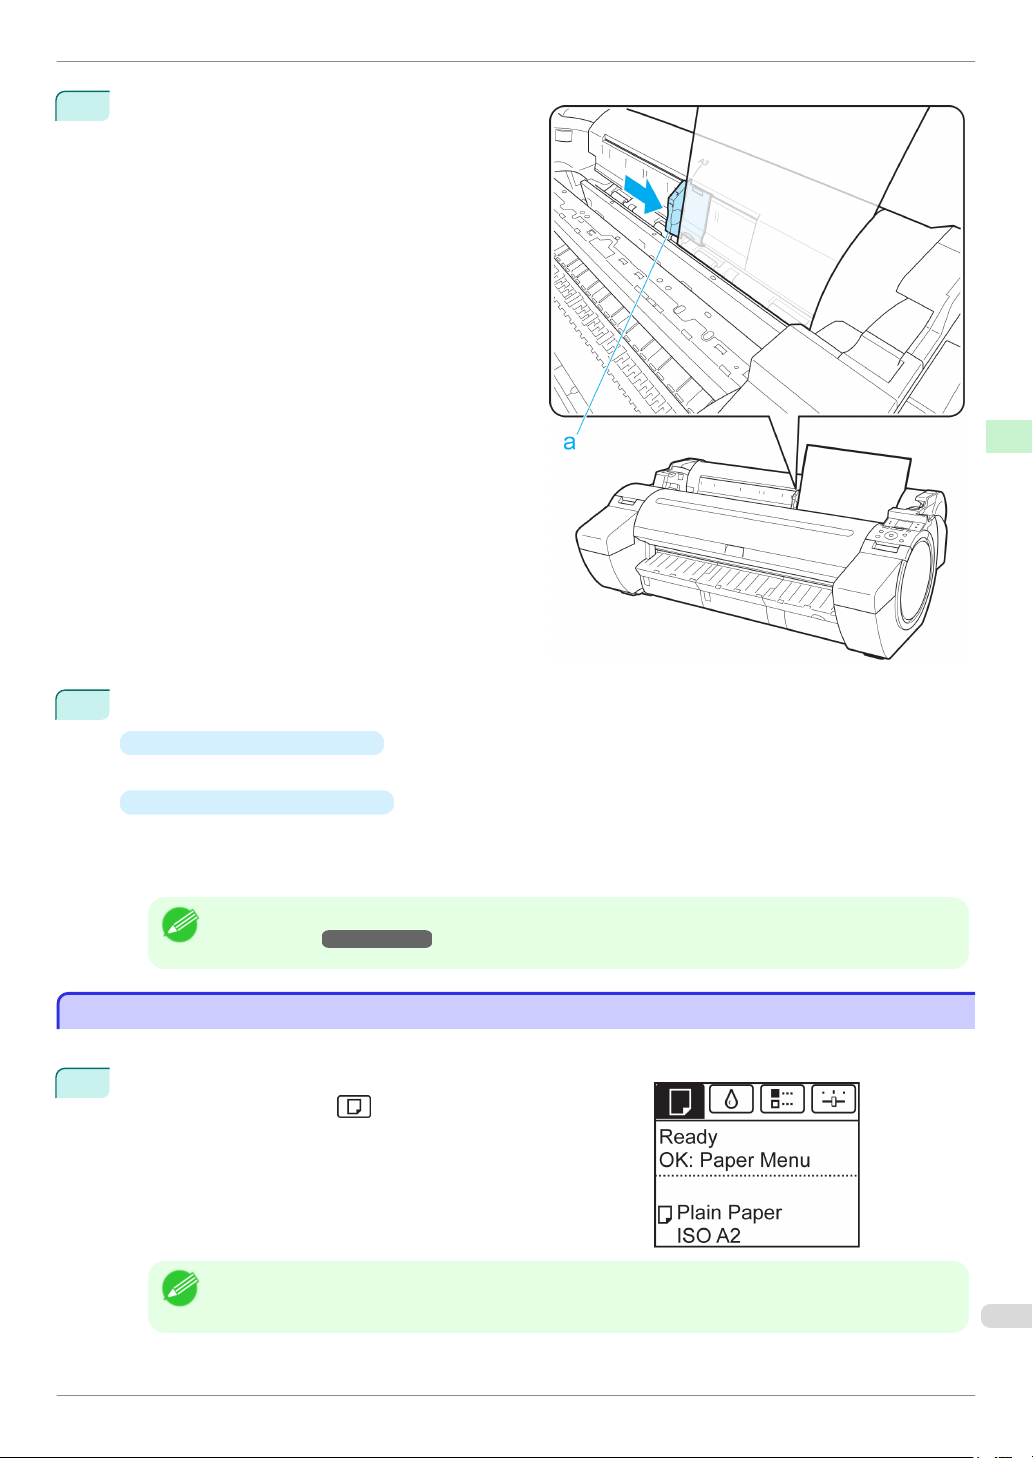
Load a single sheet printing-side up in the Paper
3
Feed Slot, with the right edge aligned with the Paper Alignment Guide (a) to the right of the Roll Cover.
Insert the paper until the leading edge makes contact and you hear a tone.
Basic Guide
iPF785 Series
Move the Width Guide (a) carefully to match the
4
size of paper loaded.
Set the Width Guide against the edge of the paper
to prevent the paper from becoming crooked or
wrinkled.
Removing Sheets
Handling Paper Handling sheets
5
Press the OK button.
•
If a print job was received
The printer now starts printing the print job.
•
If no print job was received
A menu for selection of the type of paper is automatically shown on the Display Screen.
Press ▲ or ▼ to select the type of paper, and then press the OK button.
The printer now starts feeding the paper.
• Refer to Paper Reference Guide for details on type of paper to select. (See "Displaying the Paper Refer-
ence Guide.") ➔User's Guide
Note
Removing Sheets
Removing Sheets
Remove sheets from the printer as follows.
On the Tab Selection screen of the Control Panel, press ◀ or
1
▶ to select the Paper tab ( ).
• If the Tab Selection screen is not displayed, press the Menu button.
Note
Basic Guide
23

Removing Sheets
2
Press the OK button.
The Paper Menu is displayed.
3
Press ▲ or ▼ to select Eject Paper, and then press the OK button.
4
Press ▲ or ▼ to select Yes, and then press the OK button.
The paper is ejected from the front of the printer.
Holding the paper, push the Release Lever back
5
Handling Paper Handling sheets
and remove the sheet.
iPF785 Series
Pull the Release Lever forward.
6
Basic Guide
iPF785 Series
Consumables and Maintenance
Consumables and Maintenance
Ink Tanks
Ink Tanks
Replacing Ink Tanks
Replacing Ink Tanks
Compatible ink tanks
For information on the compatible ink tanks for this printer, see "Ink Tanks."
Replacement ink tanks in 130 ml (4.4 fl oz) and 300 ml (10.2 fl oz) capacities are supported.
Replacing Ink Tanks
➔User's Guide
• Depending on the color, you can also use ink tanks of different capacities.
Note
Precautions when handling ink tanks
Take the following precautions when handling ink tanks.
• For safety, keep ink tanks out of the reach of children.
• If ink is accidentally ingested, contact a physician immediately.
Caution
• There may be ink around the ink supply section of ink tanks you removed. Handle ink tanks carefully during re-
Important
placement. The ink may stain clothing.
• Do not install used ink tanks in another model of printer.
This will prevent correct ink level detection, which may damage the printer or cause other problems.
• We recommend using up an Ink Tank in the course of printing within six months after breaking the seal. Printing
quality may be affected if you use older ink tanks.
• Do not leave the printer without ink tanks installed for extended periods (a month or more). Residual ink may
become clogged inside the printer and affect printing quality.
Consumables and Maintenance Ink Tanks
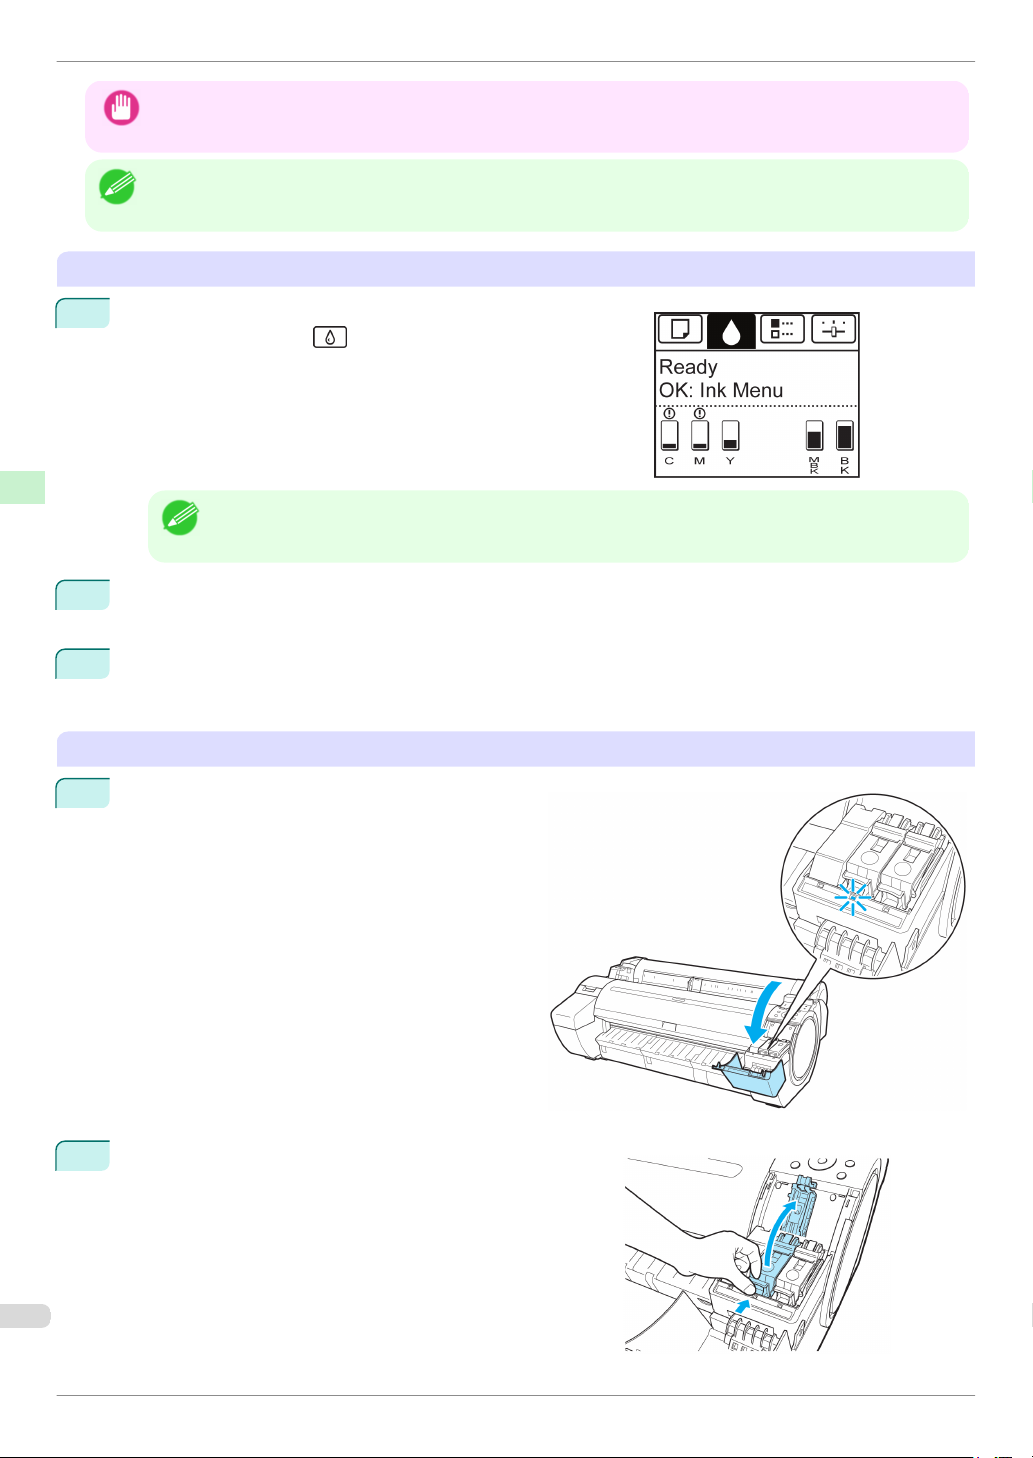
Confirm the message
When the ink level becomes low, a message is displayed on the Display Screen.
According to the message, replace the ink tank or prepare a new ink tank. (See "When to Replace Ink
Tanks.")
If a message requests you to replace an Ink Tank, press the OK button. In this case, you can skip the step Access
the menu for ink tank replacement. Follow the instructions in Remove the ink tanks.
➔User's Guide
25
Basic Guide
Replacing Ink Tanks
• Do not remove an Ink Tank during initialization immediately after turning on the printer, or during printhead clean-
Important
ing. Ink may leak out.
• Ink Tank replacement is possible even during printing, when print jobs are being canceled, or when paper is being
advanced.
Note
Consumables and Maintenance Ink Tanks
Access the menu for Ink Tank replacement
On the Tab Selection screen of the Control Panel, press ◀ or
1
▶ to select the Ink tab ( ).
• If the Tab Selection screen is not displayed, press the Menu button.
Note
2
Press the OK button.
The Ink Menu is displayed.
iPF785 Series
3
Press ▲ or ▼ to select Rep. Ink Tank, and then press the OK button.
A message on the Display Screen requests you to open the Ink Tank Cover.
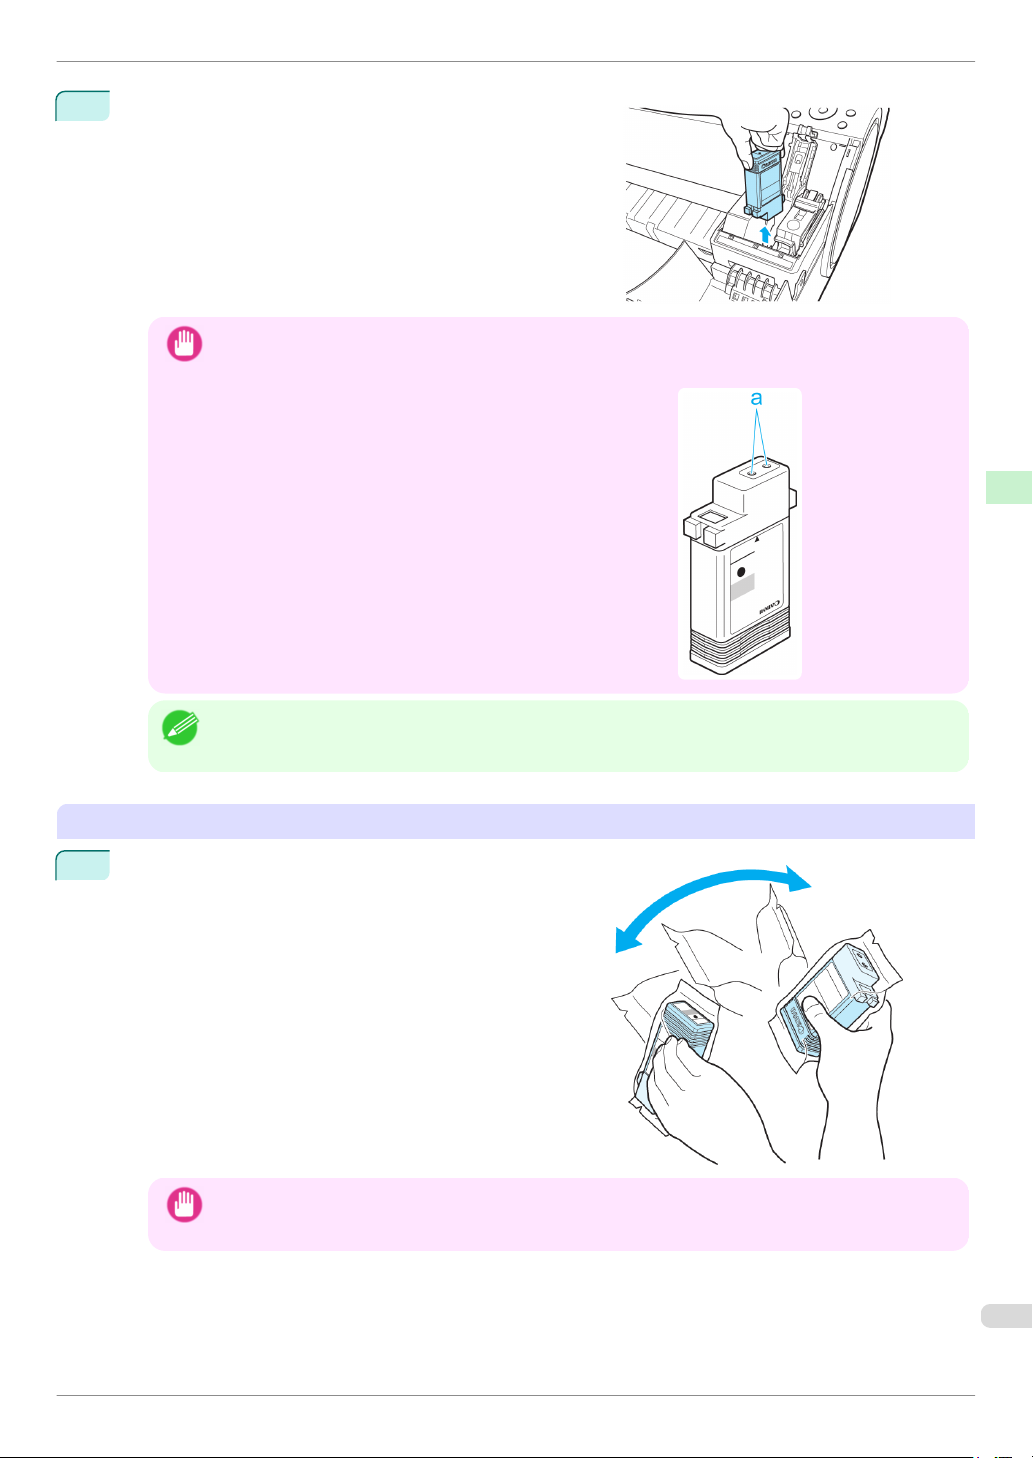
Remove the Ink Tank
Open the Ink Tank Cover and check the ink lamps.
1
Ink lamps flash when there is little ink left.
Press the tip of the Ink Tank Lock Lever of the color for re-
2
placement horizontally and pull the Ink Tank Lock Lever up
to open it.
Basic Guide
iPF785 Series
Hold the Ink Tank by the grips and remove it. Press the OK
3
button.
Replacing Ink Tanks
• Do not turn off the printer while the Ink Tank is removed.
Important
It may cause the interior of the Ink Tank Cover to become soiled.
If there is still ink in the Ink Tank you removed, store it with the
•
ink holes (a) facing up. Otherwise, ink may leak and cause
stains. Put the Ink Tank in a plastic bag and seal it.
Consumables and Maintenance Ink Tanks
• Dispose of used ink tanks according to local regulations.
Note
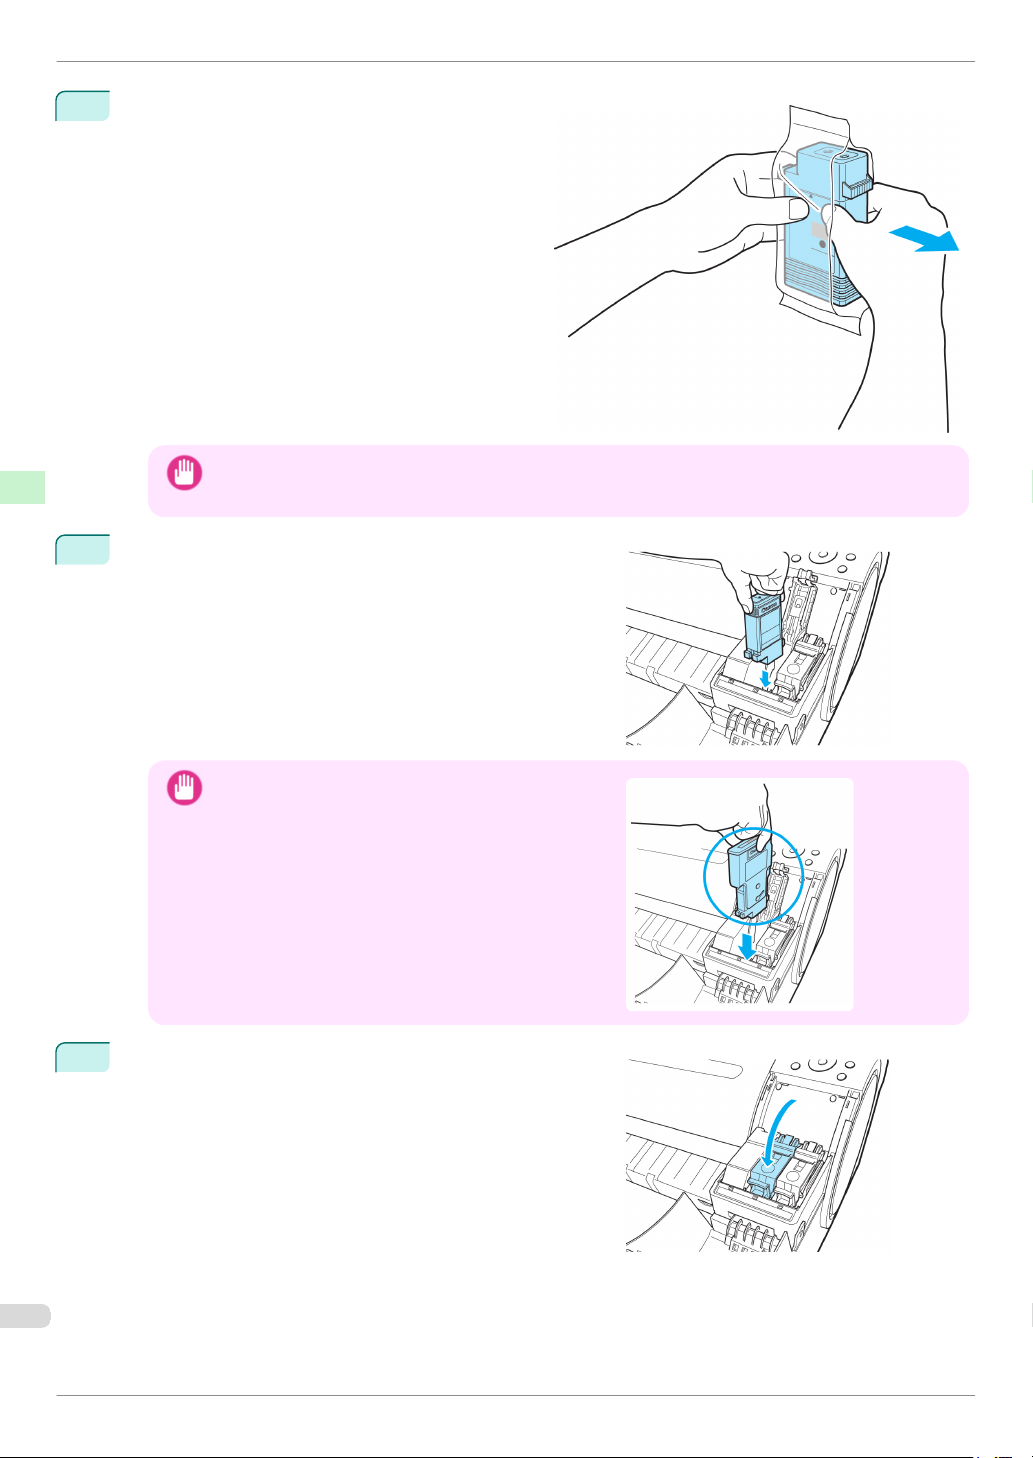
Installing Ink Tanks
Before opening the pouch, gently agitate the Ink Tank once
1
or twice. Agitate the ink in the Ink Tank by slowly rotating
the Ink Tank upside-down and right side up repeatedly.
• After installing an ink tank, do not remove and shake it. Doing so may cause the ink to leak out.
• If you do not agitate the Ink Tank, the ink may settle, which may affect printing quality.
Important
Basic Guide
27
Replacing Ink Tanks
Open the pouch and remove the Ink Tank.
2
Consumables and Maintenance Ink Tanks
• Never touch the ink holes or electrical contacts. This may cause stains, damage the Ink Tank, and affect
Important
Press the OK button and install the Ink Tank into the holder
3
as shown, with the ink holes facing down.
printing quality.
iPF785 Series
Ink tanks cannot be installed in the holder if the color
•
Important
or orientation is incorrect.
If the Ink Tank does not fit in the holder, do not force it
in. Check the Ink Tank serial number, the Ink Color Label, the color of the Ink Tank, and the orientation of the
Ink Tank before reinstalling it.
Forcing the Ink Tank into the holder may damage the
printer.
Push the Ink Tank Lock Lever closed until it clicks into place.
4
Basic Guide

iPF785 Series
Replacing Ink Tanks
Do not push the Ink Tank in by hand.
•
Important
Forcing the Ink Tank into the holder may damage the
printer.
If a 130 ml (4.4 fl oz) ink tank is installed facing the
•
wrong direction, the rotating part of the Ink Tank Lock
Lever come out of place.
If this happens, open the Ink Tank Lock Lever to return
it to the proper position.
Consumables and Maintenance Ink Tanks
Make sure the Ink Lamp is lit in red.
5
• If the Ink Lamp is not lit, reinstall the tank.
Note
Close the Ink Tank Cover.
6
Basic Guide
29
Replacing the Printhead
Printheads
Printheads
Replacing the Printhead
Replacing the Printhead
When to replace the Printhead
Consumables and Maintenance Printheads
Replace the Printhead in the following situations.
•
If the printing quality does not improve even after one or two cycles of Head Cleaning B from the printer
menu
•
If the Display Screen indicates "Open top cover and replace the printhead."
•
If your Canon dealer has advised you to replace the Printhead
Compatible printheads
For information on compatible printheads, see "Printhead."
➔User's Guide
Precautions when handling the Printhead
Take the following precautions when handling the Printhead.
• For safety, keep the Printhead out of the reach of children.
• If ink is accidentally ingested, contact a physician immediately.
Caution
• Do not touch the Printhead immediately after printing. The Printhead becomes extremely hot, and there is a risk of
burns.
iPF785 Series
• There may be ink around the nozzles of the Printhead you remove. Handle the Printhead carefully during re-
Important
placement. The ink may stain clothing.
• Do not open the Printhead pouch until immediately before installation. After removing the Printhead from the
pouch, install it right away. If the Printhead is left after the pouch is opened, the nozzles may dry out, which may
affect printing quality.
Access the menu for Printhead replacement
• When replacing the Printhead immediately after printing, wait a few minutes before replacing it. The metal parts of
Caution
the Printhead become hot during printing, and there is a risk of burns from touching these parts.
• Your hands may become dirty during Printhead replacement. Use the gloves provided with the new Printhead for
Important
replacement.
• Prepare a new Ink Tank when ink levels are low.
Note
On the Tab Selection screen of the Control Panel, press ◀ or
1
▶ to select the Settings/Adj. tab (
).
Basic Guide
Loading...