


 Loading...
Operating Information
Please read this guide before operating this product. |
ENG |

Contents
Contents
Chapter 1 |
|
Preface................................................................................................................. |
7 |
Trademarks................................................................................................. |
8 |
Copyright................................................................................................... |
10 |
Notes for the reader................................................................................. |
11 |
Abbreviations used in this manual......................................................... |
13 |
Available documentation......................................................................... |
14 |
Chapter 2 |
|
Main parts.......................................................................................................... |
15 |
Overview of the machine configuration................................................. |
16 |
The paper module.................................................................................... |
19 |
Bulk paper modules................................................................................. |
21 |
The automatic document feeder (ADF).................................................. |
23 |
The operator panel................................................................................... |
26 |
The operator attention light.................................................................... |
30 |
The copy tray............................................................................................ |
32 |
Stacker/stapler and integrated punch unit............................................. |
33 |
The puncher.............................................................................................. |
47 |
Inserter...................................................................................................... |
49 |
Folder......................................................................................................... |
52 |
Chapter 3 |
|
Operating concept............................................................................................ |
59 |
Operating concept.................................................................................... |
60 |
Access the Settings Editor....................................................................... |
64 |
Maintain the 'Media catalog' .................................................................. |
66 |
Maintain the 'Media families' ................................................................. |
68 |
Maintain the 'Color pre-sets' .................................................................. |
70 |
Maintain the 'Input profiles' ................................................................... |
72 |
Maintain the 'Output profiles' ................................................................ |
73 |
Maintain the 'Spot colors' ...................................................................... |
74 |
Prepare print jobs with PRISMAprepare................................................ |
75 |
Prepare print jobs with the printer driver............................................... |
77 |
Manage production printing................................................................... |
80 |
Chapter 4 |
|
Operator panel views....................................................................................... |
83 |
The dashboard.......................................................................................... |
84 |
The 'Schedule' view................................................................................. |
86 |
The 'Jobs' view......................................................................................... |
87 |
2

Contents
The 'Trays' view....................................................................................... |
89 |
The 'System' view.................................................................................... |
90 |
Chapter 5 |
|
Power information............................................................................................ |
93 |
The power buttons and power modes................................................... |
94 |
Turn on the controller.............................................................................. |
96 |
Turn on the printer................................................................................... |
97 |
Turn off the printer................................................................................... |
98 |
Use the Sleep mode................................................................................. |
99 |
Chapter 6 |
|
Print jobs.......................................................................................................... |
101 |
General information............................................................................... |
102 |
Introduction to the print function.................................................... |
102 |
Description of the print job settings............................................... |
104 |
Contradiction handling.................................................................... |
118 |
Manage print jobs.................................................................................. |
119 |
Print an urgent job immediately..................................................... |
119 |
Give priority to a print job............................................................... |
120 |
Print a scheduled job later............................................................... |
121 |
Reprint a job...................................................................................... |
122 |
Print a job ticket................................................................................ |
124 |
Make a proof..................................................................................... |
125 |
Stop the printer................................................................................. |
126 |
Delete print jobs............................................................................... |
128 |
Schedule a waiting job for printing................................................ |
130 |
Select more than one job for printing............................................ |
131 |
Print a file from a USB drive............................................................ |
132 |
Media handling....................................................................................... |
133 |
Introduction to the 'Schedule' view................................................ |
133 |
Load the media using the 'Schedule' view.................................... |
137 |
Description of the 'Trays' view........................................................ |
139 |
Load the media using the 'Trays' view........................................... |
142 |
Introduction to the 'Media' section................................................. |
144 |
Introduction to the media handling................................................ |
146 |
Add temporary media to the 'Media catalog' ............................... |
148 |
Perform a media registration.......................................................... |
149 |
Change the job settings before printing............................................... |
151 |
Change the number of sets............................................................. |
151 |
Check the first set............................................................................. |
152 |
Change the use of separator sheets............................................... |
154 |
Stack the prints with an offset......................................................... |
155 |
Combine jobs.................................................................................... |
157 |
Change the output settings before printing......................................... |
159 |
3

Contents
Change '2-sided' into '1-sided' and vice versa............................... |
159 |
Change the binding edge................................................................. |
160 |
Select a different media for a job.................................................... |
161 |
Change the settings for covers........................................................ |
162 |
Shift the image roughly to create binding space........................... |
163 |
Shift the image precisely to create binding space or correct the lay- |
|
out...................................................................................................... |
164 |
Change the print delivery settings.................................................. |
166 |
Change the finishing method.......................................................... |
168 |
Chapter 7 |
|
Copy jobs......................................................................................................... |
169 |
General information............................................................................... |
170 |
Introduction to the copy function.................................................... |
170 |
Description of the copy job settings............................................... |
172 |
Feeding originals into the ADF........................................................ |
194 |
Put originals on the glass plate....................................................... |
197 |
Copy your documents............................................................................ |
201 |
Make a copy...................................................................................... |
201 |
Combine subsets into 1 document................................................. |
202 |
Access other functions during a copy job or scan job.................. |
203 |
The zoom behavior........................................................................... |
204 |
Create and use custom copy templates......................................... |
207 |
Rename a copy job........................................................................... |
208 |
Copy non-standard size originals.................................................... |
209 |
Scan now and print later (postponed copying)............................. |
210 |
Finish the output............................................................................... |
211 |
Adjust the image to improve the copy and scan quality.............. |
212 |
Chapter 8 |
|
Scan jobs......................................................................................................... |
213 |
Introduction to the scan function.......................................................... |
214 |
Description of the scan job settings..................................................... |
216 |
Scan to file.............................................................................................. |
227 |
Scan to USB............................................................................................ |
228 |
Combine subsets into one file............................................................... |
229 |
Chapter 9 |
|
Paper, toner, and staples............................................................................... |
233 |
Consumables.......................................................................................... |
234 |
Loading paper......................................................................................... |
237 |
Load the media into the integrated paper trays............................ |
237 |
Adjust the integrated paper tray to hold a different paper size..... |
243 |
Load the media into the paper module.......................................... |
245 |
Adjust the media size for the paper module.................................. |
252 |
Load the media into the bulk paper modules................................ |
257 |
4

Contents
Adjust the media size for the bulk paper module.......................... |
263 |
Load the media into the inserter..................................................... |
272 |
Load the media into the special feeder (multipurpose tray)......... |
278 |
Loading transparencies.................................................................... |
285 |
Loading tab paper............................................................................ |
287 |
Load tab paper into the paper tray................................................. |
289 |
Removing paper waste.......................................................................... |
292 |
Check the status of the punch waste box....................................... |
292 |
Remove the punch waste of the punch unit.................................. |
293 |
Remove the trim waste.................................................................... |
296 |
Toner....................................................................................................... |
299 |
Checkthestatusofthetonerreservoirandwastetonercontainer.299 |
|
Replace the toner cartridge............................................................. |
301 |
Staples..................................................................................................... |
306 |
Check the status of the staple cartridges........................................ |
306 |
Replace the staple cartridge in the stapler unit............................. |
308 |
Replace the staple cartridge in the saddle stitch unit.................... |
312 |
Chapter 10 |
|
Adapt printer settings to your needs............................................................ |
317 |
System settings (access through the operator panel)........................ |
318 |
Introduction to the 'Setup' section.................................................. |
318 |
Work with the workflow profiles..................................................... |
320 |
Change the warning time................................................................ |
324 |
Disable the warning time................................................................. |
325 |
Truncate the job name..................................................................... |
326 |
Adjust the brightness and contrast of the operator panel............ |
327 |
Access Settings Editor settings via the operator panel................. |
328 |
Automated workflows (access through the Settings Editor).............. |
331 |
Introduction to automated workflows............................................ |
331 |
Add an automated workflow........................................................... |
333 |
Edit an automated workflow........................................................... |
334 |
Delete an automated workflow....................................................... |
335 |
Restore the factory default workflow.............................................. |
336 |
Hotfolders................................................................................................ |
337 |
Introduction to hotfolders................................................................ |
337 |
Activate the hotfolder function........................................................ |
338 |
Create a hotfolder............................................................................. |
339 |
Create a shared network folder on a workstation.......................... |
340 |
Create a hotfolder default ticket ('default_ticket.jdf')..................... |
342 |
Chapter 11 |
|
Maintenance and calibration......................................................................... |
343 |
Introduction to the 'Maintenance' section........................................... |
344 |
Routine cleaning..................................................................................... |
346 |
5

Contents
Introduction....................................................................................... |
346 |
Clean the glass plate and underside the feeder............................. |
347 |
Clean the automatic document feeder (ADF)................................. |
348 |
Clean the wire................................................................................... |
352 |
Clean the roller................................................................................. |
353 |
Clean the automatic document feeder rollers................................ |
354 |
Clean the drum................................................................................. |
355 |
Clean the operator panel................................................................. |
356 |
Maintenance........................................................................................... |
357 |
Reset the day counters..................................................................... |
357 |
Find the meter readings (counters)................................................. |
358 |
Handle paper jams........................................................................... |
359 |
'Auto color mismatch correction' ................................................... |
360 |
Calibration............................................................................................... |
361 |
Introduction to printer calibration................................................... |
361 |
Calibrate the printer - '1. Shading correction' ............................... |
362 |
Calibrate the printer - '2. Auto gradation adjustment' ................. |
364 |
Calibrate the controller - '3. Media family calibration' ................. |
366 |
Adjust the CMYK calibration curve manually................................ |
368 |
Chapter 12 |
|
Specifications.................................................................................................. |
369 |
Specifications......................................................................................... |
370 |
Chapter 13 |
|
Third party software....................................................................................... |
391 |
Third Party Software.............................................................................. |
392 |
The Software Subjected to the Other Conditions................................ |
394 |
The Apache Software License, Version 1.1.......................................... |
396 |
Bouncy Castle License........................................................................... |
397 |
dump/restore.......................................................................................... |
398 |
MIT License............................................................................................. |
400 |
fontconfig................................................................................................ |
401 |
The FreeType Project LICENSE............................................................. |
402 |
J2ME........................................................................................................ |
405 |
libpng....................................................................................................... |
406 |
Adobe Flash Player (in NetFront).......................................................... |
408 |
The BSD License..................................................................................... |
410 |
MSTLIB.................................................................................................... |
416 |
Java Servlet Implementation Classes Version 2.1.1 Binary Code Li- |
|
cense........................................................................................................ |
418 |
GNU GENERAL PUBLIC LICENSE......................................................... |
419 |
GNU LESSER GENERAL PUBLIC LICENSE.......................................... |
426 |
Eclipse Public License - v 1.0 ................................................................ |
436 |
COMMON PUBLIC LICENSE Version 1.0.............................................. |
441 |
6
Chapter 1
Preface

Trademarks
Trademarks
List of trademarks
Adobe, Acrobat, Reader and Distiller are registered trademarks of Adobe Systems Incorporated.
PostScript 3® is a registered trademark of Adobe Systems Incorporated.
Microsoft, Windows, Windows NT, Windows 98, Windows 2000, Windows XP, and Windows Server 2003 are registered trademarks or trademarks of Microsoft Corporation in the United States and/or other countries.
Products in this publication are referred to by their general trade names. In most, if not all cases, these designations are claimed as trademarks or registered trademarks of their respective companies.
PANTONE® Colors displayed in the software application or in the user documentation may not match PANTONE-identified standards. Consult current PANTONE Color Publications for accurate color. PANTONE® and other Pantone, Inc. trademarks are the property of Pantone, Inc. © Pantone, Inc., 2007
Pantone, Inc. is the copyright owner of color data and/or software which are licensed to (insert name of your company) to distribute for use only in combination with (insert appropriate name of Licensed Materials). PANTONE Color Data and/or Software shall not be copied onto another disk or into memory unless as part of the execution of (insert appropriate name of Licensed Materials).
This product contains the Universal Font Scaling Technology or UFST® under license from Monotype Imaging, Inc. UFST® is a trademark of Monotype Imaging, Inc. registered in the United States Patent and Trademark Office and may be registered in certain jurisdictions.
8Chapter 1 - Preface

Trademarks
Copyright © 1989 - 1996, 1997, 2003, 2004, 2008, all rights reserved, by Monotype Imaging Inc.
Java and all Java based trademarks and logos are trademarks or registered trademarks of Oracle and/or its affiliates.
This product includes NetFront, a product of ACCESS Co., Ltd., for the Internet function. NetFront is a registered trademark or trademark of ACCESS Co., Ltd., in Japan and/or other countries.
The Web Access Software includes modules developed by Independent JPEG Group. This product contains Adobe® Flash® Player technology under license from Adobe Systems Incorporated.
Copyright(C) 1995-2003 Adobe Systems Inc. All rights reserved.
Adobe and Adobe Flash are trademarks or registered trademarks of Adobe Systems Inc. in the United States and/or other countries. http://www.adobe.com/software/flash/about/
Chapter 1 - Preface |
9 |

Copyright
Copyright
Copyright 2011 by Canon Inc. All rights reserved.
No part of this publication may be reproduced or transmitted in any form or by any means,electronicormechanical,includingphotocopyingandrecording, or byanyinformation storage or retrieval system without the prior written permission of Canon Inc.
© 2011, Océ
Allrightsreserved.Nopartofthisworkmaybereproduced,copied,adapted,ortransmitted in any form or by any means without written permission from Océ.
Océ makes no representation or warranties with respect to the contents hereof and specificallydisclaimsanyimpliedwarrantiesofmerchantabilityorfitnessforanyparticular purpose.
Furthermore, Océ reserves the right to revise this publication and to make changes from timetotimeinthecontenthereofwithoutobligationtonotifyanypersonofsuchrevision or changes.
This product includes software and/or software modules that are licensed by Canon Inc. or its licensors from third parties. Use and distribution of this software and/or software modules are subject to copyrights (a) and (b) below.
(a)
Copyright © 1999, 2000, 2002 Aladdin Enterprises. All rights reserved.
(b)
Copyright © Unpublished Work of Novell, Inc. All Rights Reserved
10 Chapter 1 - Preface
Notes for the reader
Notes for the reader
Introduction
This manual helps you to use the imageRUNNER ADVANCE C9075S PRO/C9065 PRO.Themanualcontainsadescriptionoftheproductandguidelinestouseandoperate the imageRUNNER ADVANCE C9075S PRO/C9065 PRO.
Definition
Attention-Getters
Partsofthismanualrequireyourspecialattention.Thesepartscanprovidethefollowing:
•Additional general information, for example, information that is useful when you perform a task.
•Information to prevent personal injuries or property damage.
Symbols used in this manual
Thefollowingsymbolsareusedinthismanualtoexplainprocedures,restrictions,handling precautions, and instructions that should be observed for safety.
Overview of the attention-getters# |
|
|
Word |
Icon |
Indicates |
WARNING |
|
Indicates a warning concerning operations |
|
|
that may lead to death or injury to persons if |
|
|
not performed correctly. To use the machine |
|
|
safely,alwayspayattentiontothesewarnings. |
CAUTION |
|
Indicatesacautionconcerningoperationsthat |
|
|
mayleadtoinjurytopersonsifnotperformed |
|
|
correctly. To use the machine safely, always |
|
|
pay attention to these cautions. |
IMPORTANT |
|
Indicatesoperationalrequirementsandrestric- |
|
|
tions. Be sure to read these items carefully to |
|
|
operate the machine correctly and to avoid |
|
|
damaging the machine or property. |
NOTE |
|
Indicates a clarification of an operation or |
|
|
contains additional explanations for a proce- |
dure. Reading these notes is highly recommended.
Chapter 1 - Preface |
11 |

Notes for the reader
Word |
Icon |
Indicates |
Indicates an operation that must not be performed. Read these items carefully and make sure not to perform the described operations.
12 Chapter 1 - Preface

Abbreviations used in this manual
Abbreviations used in this manual
#
Microsoft Windows 2000: |
Windows 2000 |
Microsoft Windows 2000 Professional: |
Windows 2000 Professional |
Microsoft Windows 2000 Server: |
Windows 2000 Server |
Microsoft Windows Server 2003: |
Windows Server 2003 |
Microsoft Windows XP: |
Windows XP |
Microsoft Windows XP Professional: |
Windows XP Professional |
Microsoft Windows Vista operating system: |
Windows Vista |
Microsoft Windows 7 operating system: |
Windows 7 |
Microsoft Windows Server 2008: |
Windows Server 2008 |
Microsoft Windows operating system: |
Windows |
Novell NetWare: |
NetWare |
Apple Macintosh: |
Macintosh |
Apple Mac: |
Mac |
Chapter 1 - Preface |
13 |

Available documentation
Available documentation
ForimageRUNNERADVANCEC9075SPRO/C9065PRO,thefollowinginformation is available.
•Operating information
•Safety Instructions for the printer
•Safety Information for the controller
•Material Safety Data Sheets.
14 Chapter 1 - Preface
Chapter 2
Main parts

Overview of the machine configuration
Overview of the machine configuration
Introduction
The following figures display two example configurations.
3
2

 4
4 
5
6
15 |
14 |
13 |
12 |
7
|
|
|
|
|
|
|
|
|
|
|
|
|
|
|
|
|
|
|
|
8 |
|
|
|
|
9 |
|
1 |
||
[8] Extended configuration

 4
4 

17
16 |
11 |
10 |
[9] Compact configuration
Main unit
#
|
Component |
Function |
1 |
PRISMAsync controller |
The controller helps you set up the |
|
|
workflowtomeetyourspecificneeds. |
16 Chapter 2 - Main parts

|
|
Overview of the machine configuration |
|
Component |
Function |
2 |
Operator panel |
The operator panel helps you with |
|
|
your daily work, for example the |
|
|
scheduling of the jobs. Furthermore, |
|
|
the operator panel helps you to solve |
|
|
errors. |
3 |
Operator attention light |
The operator attention light enables |
|
|
you to check the status of the system |
|
|
from a distance. |
|
|
Theoperatorwarninglightisoption- |
|
|
al. |
4 |
Automatic document feeder |
The automatic document feeder is |
|
(ADF) |
used to copy and scan sets of 1-sided |
|
(Duplex Color Image Reader |
and 2-sided documents automatical- |
|
Unit-A1) |
ly. You can scan documents, such as |
|
|
books,thickoriginals,thinoriginals, |
|
|
andtransparencies,ontheglassplate. |
5 |
Toner compartment cover |
Gives access to the toner bottles. |
6 |
Fixing transport unit |
The fixing transport unit contains |
|
|
thecomponentsthatprintthemedia. |
|
|
Access to the fixing transport unit is |
|
|
only required when a paper jam oc- |
|
|
curs or when maintenance is re- |
|
|
quired. |
7 |
Integrated paper trays |
The main unit contains paper trays |
|
|
holding the media that will be print- |
|
|
ed on. |
8 |
Main unit |
The engine module consists of com- |
|
|
ponents 2–7. |
Optional paper modules |
|
|
Input options# |
|
|
|
Component |
Function |
9 |
Paper module |
The additional paper module has |
|
(Multi-Drawer Paper Deck-A1) |
paper trays that contain the media |
|
|
that will be printed. |
Chapter 2 - Main parts |
17 |

Overview of the machine configuration
|
Component |
Function |
|
10 |
Bulk paper module |
The bulk paper module contains the |
|
|
(POD Deck Lite-A1) |
media that will be printed. The bulk |
|
|
|
paper module contains 1 tray. |
|
11 |
Bulk paper module |
The bulk paper module contains the |
|
|
(Paper Deck Unit-A1) |
media that will be printed. The bulk |
|
|
|
paper module contains 1 tray. |
|
Optional finishing equipment |
|
|
|
Output options# |
|
|
|
|
Component |
Function |
|
12 |
Inserter |
The inserter feeds cover sheets, sepa- |
|
|
(Document Insertion Unit-H1) |
rator sheets, or preprinted colored |
|
|
|
sheets for printed documents and |
|
|
|
booklets. |
|
13 |
Puncher |
Use the puncher to punch holes into |
|
|
(Professional Puncher-C1 and |
prints.Punchersallowyoutochange |
|
|
ProfessionalPuncherIntegration |
die sets. |
|
|
Unit-B1) |
|
|
14 |
Folder |
The folder is used to fold prints in |
|
|
(Paper Folding Unit-G1) |
different ways. |
|
15 |
Stacker/stapler |
Thestacker/stapleroffersthe follow- |
|
|
(Booklet Finisher-A1, Punch |
ing functionality. |
|
|
Unit-BG1/BH1/BF1 and Inner |
• |
Stack prints |
|
Booklet Trimmer-A1) |
• |
Staple prints |
|
The name of the puncher unit |
• |
Create stapled booklets |
|
may differ according to region. |
• |
Punch prints |
|
|
• |
Trim booklets |
16 |
Stacker/stapler |
Thestacker/stapleroffersthe follow- |
|
|
(Staple Finisher-A1 with Punch |
ing functionality. |
|
|
Unit-BG1/BH1/BF1) |
• |
Stack prints |
|
The name of the puncher unit |
• |
Staple prints |
|
may differ according to region. |
• |
Punch prints |
17 |
Copy tray |
The copy tray is used to receive the |
|
|
|
prints and copies. |
|
18 Chapter 2 - Main parts

The paper module
The paper module
Introduction
The optional paper module (Multi-Drawer Paper Deck-A1) provides three additional paper trays. You can load up to 2000 sheets of paper (80 g/m2 / 20 lb bond) per tray.
#
IMPORTANT
•If the printer is in Sleep mode, you may not be able to open the paper trays, even when pressing the Open buttons. In this case, press the Sleep Mode key on the operator panel to reactivate the printer, then press the Open button on the paper tray you want to open.
•TodetectwhenmultiplepapersarefedwithMulti-DrawerPaperDeck-A1,Paper Deck Double Feeding Detection Kit-A1 is required.
•If Multi-Drawer Paper Deck-A1 is attached, the special feeder cannot be used.
#
NOTE
The following paper sizes can load into Multi-Drawer Paper Deck-A1:
-330 × 483 mm
-320 × 450 mm (SRA3)
-305 × 457 mm
-A3, B4, A4, A4R, B5, B5R, and A5R
-Custom size (139.7 × 182.0 mm to 330.2 × 487.7 mm)
-13" × 19"
-12 5/8" × 17 11/16"
-12" × 18"
-11" × 17"
-LGL, LTR, LTRR, STMTR, EXEC
-Custom size (5½" × 7 1/8" to 13" × 19 1/4")
Chapter 2 - Main parts |
19 |

The paper module
Components and their functions
1
2
3
[10] The paper module
Paper module components and their functions#
 No.
No.  Function
1Front cover (buffer pass)
Open this cover to remove jammed paper.
2Open button
Presstoopenthepapertraywhenyouneedtoloadpaperorcheckforapaper jam.
3Paper tray
Contains the media that will be printed on.
•Overview of the machine configuration, on page 16
•Load the media into the paper module, on page 245
•Adjust the media size for the paper module, on page 252
20 Chapter 2 - Main parts
Bulk paper modules
Bulk paper modules
Introduction
The optional bulk paper module (Paper Deck Unit-A1/POD Deck Lite-A1) allows you to load up to 4000 sheets of paper (64 g/m2 / 17 lb bond) or 3500 sheets of paper (80 g/m2 / 20 lb bond).
#
IMPORTANT
If the printer is in Sleep mode, you may not be able to open the bulk paper module. In this case, press the Sleep Mode key on the operator panel to reactivate the printer, then press the Open button on the bulk paper module.
#
NOTE
•The paper size of the Paper Deck Unit-A1 is fixed to A4 or B5/LTR.
•The following paper sizes can load into POD Deck Lite-A1:
-330 × 483 mm
-320 × 450 mm (SRA3)
-305 × 457 mm
-A3, B4, A4, A4R, and B5
-13" × 19"
-12 5/8" × 17 11/16"
-12" × 18"
-11" x 17"
-LGL, LTR, and LTRR
Chapter 2 - Main parts |
21 |

Bulk paper modules
Illustration
1 |
2 |
1 |
2 |
3 |
3 |
Paper Deck Unit-A1 |
POD Deck Lite-A1 |
[11] Available bulk paper modules
Components and their functions
Bulk paper module components and their functions#
 No.
No.  Function
1Release button
Press to move the paper deck away from the main unit when you want to detach it from the printer.
2Open button
Press to open the paper deck when you want to load paper or check for a paper jam.
3Paper supply indicator
Allows you to check the amount of paper remaining in the paper deck.
•Overview of the machine configuration, on page 16
•Load the media into the bulk paper modules, on page 257
•Adjust the media size for the bulk paper module, on page 263
22 Chapter 2 - Main parts

The automatic document feeder (ADF)
The automatic document feeder (ADF)
Introduction
The automatic document feeder (ADF) copies and scans sets of 1-sided and 2-sided documents automatically. You can scan documents, such as books, thick originals, thin originals, and transparencies, on the glass plate.
#
CAUTION
Do not put your fingers into the gaps around the original supply tray, as your fingers may get caught. Also, be careful not to drop objects, such as paper clips, into the gaps. Doing so may damage the printer or cause it to break down.
#
IMPORTANT
•When using the glass plate to copy or scan thick originals, such as books or magazines, do not press down hard on the feeder.
•Blocking the original output area can result in damaging originals, and printing may not take place correctly. Therefore, do not place objects into the original output area.
•If the glass plate is dirty, print quality may deteriorate. Make sure the feeding belt and glass plate are clean.
Illustration
1 |
2 |
3 |
|
|
4 |
|
|
|
|
5 |
|
|
7 |
6 |
8 |
9 |
10 |
[12] The ADF includes the glass plate
Chapter 2 - Main parts |
23 |
The automatic document feeder (ADF)
11 |
[13] The ADF handle helps you close the ADF
Components and their functions
ADF components and their functions#
 No.
No.  Function
1Feeder cover
Open this cover to clear a paper jam.
2Original set indicator
Lights when originals are placed in the original supply tray.
3Original supply tray
Originals placed here are automatically fed into the feeder sheet by sheet. Place originals into this tray with the surface that you want to scan face up.
4Auxiliary original supply tray
Pull out this tray when feeding large paper.
5Auxiliary original output tray
Pull out this tray when outputting large paper.
6Original output tray
Originals that have been scanned from the original supply tray are output into the original output tray in the order they are fed in the feeder.
7Slide guides
Adjust the slide guides to match the width of the original.
8Document feed scanning area
Scans documents sent from the feeder.
9Glass plate
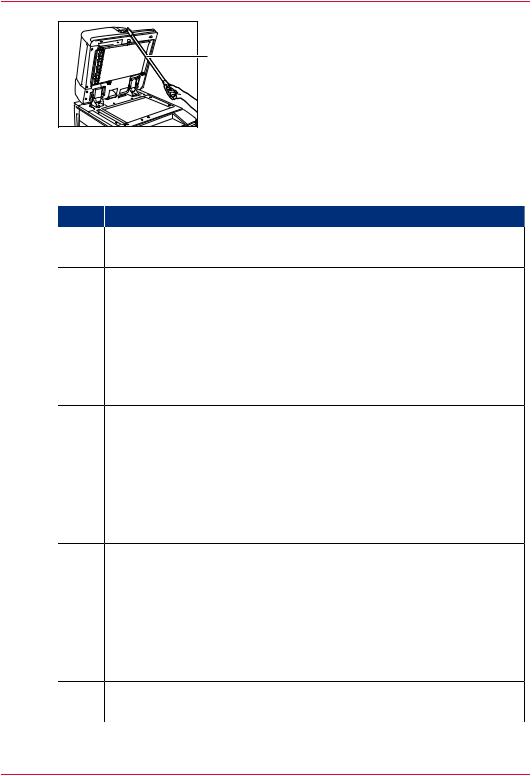
Use the glass plate when scanning books, thick originals, thin originals, transparencies, and so on.
10Inner cover
Open this cover when cleaning the document feed scanning area.
11ADF handle
The ADF handle helps you close the feeder.
24 Chapter 2 - Main parts

The automatic document feeder (ADF)
•Overview of the machine configuration, on page 16
•Feeding originals into the ADF, on page 194
•Put originals on the glass plate, on page 197
Chapter 2 - Main parts |
25 |
The operator panel
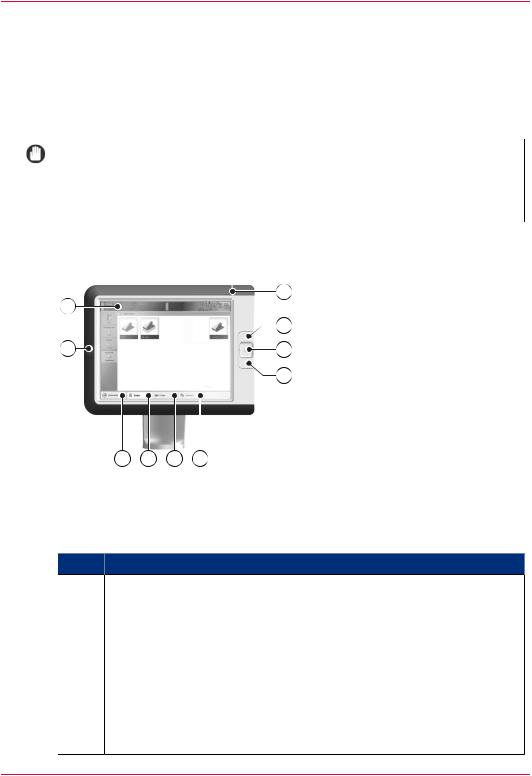
The operator panel
Introduction
Theoperatorpanelhelpsyoutocarryoutprintjobs,copyjobsandscanjobs.Thissection describes the main components of the operator panel.
#
IMPORTANT
Youcancleanthescreenoftheoperatorpanelwitha50%mixofwaterandisopropyl alcohol (K2). Use a lint-free cloth. Always put the cleaner onto the cloth and not directly on the screen.
Illustration
|
10 |
9 |
|
|
1 |
4 |
2 |
|
3 |
5 |
6 |
7 |
8 |
[14] The operator panel |
|
||
The components of the operator panel
The components of the operator panel# |
|
|
|
Component |
Function |
1 |
Sleep mode key |
Dependingonwhethertheprinteriscurrently |
|
|
active or in the sleep mode: |
|
|
• Put the machine into the sleep mode, or |
|
|
• Wake up the machine from the sleep |
|
|
mode. |
|
|
• Shut down the printer and controller. |
2 |
Stop key |
Stop the printer. |
|
|
• After a set, or |
|
|
• As soon as possible |
26 Chapter 2 - Main parts

|
|
The operator panel |
|
Component |
Function |
3 |
Paper tray key |
Getimmediateandalwaysaccesstothe'Trays' |
|
|
sectionontheoperatorpaneltodothefollow- |
|
|
ing, for example: |
•Check the content of all paper trays.
•Load a new media type into a paper tray.
•Change the media type which is available in one of the paper trays.
4 |
USB port |
Use the USB port to: |
|
|
• Connect the spectrophotometer and cali- |
|
|
brate the printer and controller. |
|
|
• Print a file from an USB drive |
|
|
• Scan to a USB drive |
5 |
'Schedule' button |
Accessthe'Schedule'viewtomanagethejobs |
|
|
in the schedule. |
6 |
'Jobs' button |
Access all functions to print, copy and scan |
|
|
your documents. |
|
|
• Manage or change the settings of jobs in |
|
|
thelistsof'Waitingjobs','Scheduledjobs' |
|
|
and 'Printed jobs'. |
|
|
• Carry out copy jobs and scan jobs. |
7 |
'Trays' button |
Access the 'Trays' view on the operator panel |
|
|
to do the following, for example: |
|
|
• Check the content of all paper trays. |
|
|
• Load a new media type into a paper tray, |
or
• Change the media type which is available in one of the paper trays.
Chapter 2 - Main parts |
27 |

The operator panel
|
Component |
Function |
|
8 |
'System' button |
Access 'System' view to do the following, for |
|
|
|
example: |
|
|
|
• Check the status of the toner, staples and |
|
|
|
|
other supplies. |
|
|
• |
Read the counters. |
|
|
• |
Start maintenance. |
|
|
• Set up the preferred workflows. |
|
|
|
• Change a number of default system set- |
|
|
|
|
tings. |
|
|
• Adjust the brightness and contrast of the |
|
|
|
|
LCD panel. |
|
|
• Shut down the printer. |
|
|
|
• View the content of the Media catalogue |
|
|
|
|
or add temporary media to the Media cat- |
|
|
|
alogue. |
|
|
• Start maintenance, calibration and media |
|
|
|
|
registration |
|
|
• Adjust the CMYK curve manually. |
|
9 |
Dashboard |
Thedashboarddisplaysinformationaboutthe |
|
|
|
system status such as: |
|
|
|
• Information about the current printing |
|
|
|
|
process. |
|
|
• Information about operator intervention |
|
|
|
|
that is required soon. |
|
|
• |
Information about errors. |
|
|
• Information about the status of the toner |
|
reservoir and staple cartridges.
• Continue the job when the status is 'On hold'.
28 Chapter 2 - Main parts

|
|
|
The operator panel |
|
Component |
Function |
|
10 |
Status LED |
Displays the status of the system. |
|
|
|
• |
Red |
|
|
|
The machine has stopped, for example |
|
|
|
because a required media type is not avail- |
|
|
|
able or an error has occurred. Operator |
|
|
|
attention is required now. |
|
|
• |
Orange |
|
|
|
The machine will stop soon, for example |
|
|
|
because more paper is required. Operator |
|
|
|
attention is required soon. |
|
|
|
The orange light illuminates when the |
|
|
|
machine reaches the warning time. The |
|
|
|
warningtimeisatimeyoucansettodeter- |
|
|
|
mine when the orange light must illumi- |
|
|
|
nate. You can set the warning time in the |
|
|
|
'System' view of the operator panel. |
|
|
• |
Green |
|
|
|
The machine is busy printing. The ma- |
|
|
|
chinecanprintlongerthanthesetwarning |
|
|
|
time. Operator attention is not required. |
|
|
• |
No color. |
|
|
|
The machine is idle. There are no jobs |
|
|
|
scheduled for printing. |
•Overview of the machine configuration, on page 16
•Stop the printer, on page 126
•Introduction to the Schedule view, on page 133
•The operator attention light, on page 30
Chapter 2 - Main parts |
29 |

The operator attention light
The operator attention light
Introduction
The operator attention light on top of the printer helps you to monitor the status of the printerfromadistance.Thecolorsofthelightsmatchtheprinterstatusthatthedashboard displays.
Illustration
[15] The operator attention light
Status colors
The status colors of the operator attention light#
Color |
Description |
Red |
The machine has stopped, for example because a required |
|
media type is not available or an error has occurred. |
|
Operator attention is required now. |
30 Chapter 2 - Main parts
Loading...