


Canon iP4800 series On-screen Manual |
Page 1 of 468 pages |
 How to Use This Manual
 Printing This Manual
MC-5240-V1.00
Basic Guide |
Advanced Guide |
Troubleshooting |
Describes the summary of |
Describes the detailed |
|
this product. |
function of this product. |
|
iP4800 series Basic Guide |
Page 2 of 468 pages |
 How to Use This Manual
 Printing This Manual
 About Disc Label Printing
MP-5113-V1.00
Contents
 Overview of the Printer
Main Components
 Printing
Printing Photos (Easy-PhotoPrint EX)
Printing Documents
Printing Web Pages (Easy-WebPrint EX)
Starting Various Software Applications
 Other Usages
Printing Photos from a PictBridge Compliant Device
 Loading Paper
Loading Paper
 Advanced Guide
 Routine Maintenance
Replacing an Ink Tank
When Printing Becomes Faint or Colors Are
Incorrect
Cleaning the Paper Feed Roller
Cleaning the Pad in the Cassette
Opening the Maintenance Screen
 Appendix
Legal Limitations on Use of Your Product and Use of Images
Tips on How to Use Your Printer
Overview of the Printer |
Page 3 of 468 pages |
 Advanced Guide
  Troubleshooting
Contents > Overview of the Printer
Overview of the Printer
This section shows the component names of the printer and describes their functions.
Main Components
Front View
Rear View
Inside View
 Page top
Main Components |
|
|
Page 4 of 468 pages |
||||
|
|
|
Advanced Guide |
|
|
|
|
|
|
|
|
Troubleshooting |
|
||
|
|
|
|
|
|||
|
|
|
|
|
|
|
|
|
Contents > Overview of the Printer > Main Components |
|
|
|
|
||
C001
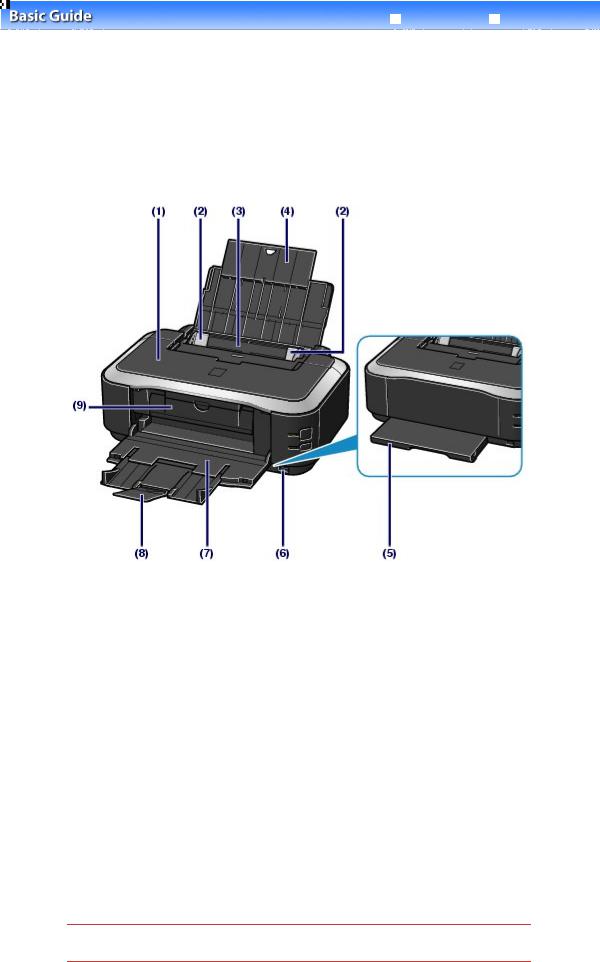
Main Components
 Front View
 Rear View
 Inside View
 Front View
(1) Top Cover
Open to replace the ink tanks or remove jammed paper inside the printer.
(2) Paper Guides
Slide to align with both sides of the paper stack.
(3) Rear Tray
Load photo paper or envelopes which you can use on the printer. Two or more sheets of the same size and type of paper can be loaded at the same time, and fed automatically one sheet at a time.
See Loading Paper .
(4) Paper Support
Open and pull out to load paper in the Rear Tray.
(5) Cassette
Load A4, B5, A5, or Letter-sized plain paper and insert it into the printer. Two or more sheets of the same size of plain paper can be loaded at the same time, and fed automatically one sheet at a time.
See Loading Paper .
(6) Direct Print Port
Connect a PictBridge compliant device such as a digital camera to print directly.
See Printing Photos from a PictBridge Compliant Device .
 Warning
 Do not connect any equipment other than PictBridge compliant devices to the Direct Print Port of the printer. This may cause fire, electric shock, or damage to the printer.
Main Components |
Page 5 of 468 pages |
 Important
 Do not touch the metal casing.
(7) Paper Output Tray
Printed paper is ejected. Open it fully before printing.
(8) Output Tray Extension
Extend and open to support the printouts. Open it when printing.
(9) Inner Cover
Close it when printing on paper.
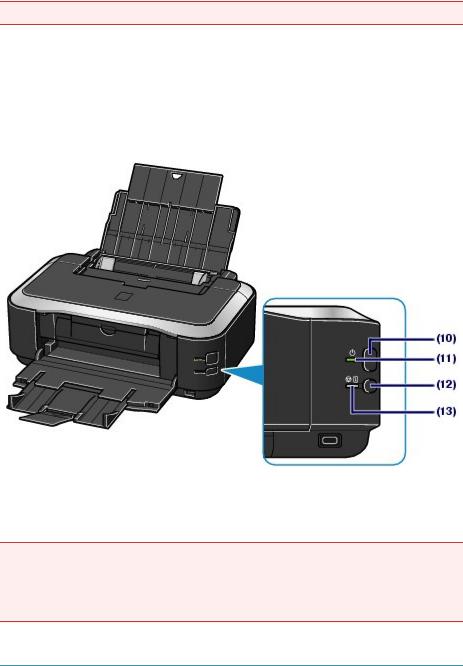
(10) ON button
Press to turn the power on or off.
 Important
Disconnecting the power plug
 When disconnecting the power plug after turning off the power, be sure to confirm that
the POWER lamp is not lit. If the power plug is disconnected from the wall outlet while the
POWER lamp is lit or flashing, the printer may become unable to print properly since the Print Head is not protected.
 Note
Note
Auto power on/off feature
 You can set the printer to turn on or off automatically.
-Auto Power On: Automatically turns on the printer when data is sent from the computer.
-Auto Power Off: Automatically turns off the printer when no data is sent for a certain interval.
Specify this setting on the Maintenance sheet of the printer driver setup window.
For details on the settings, refer to the on-screen manual: |
Advanced Guide . |
|
|
(11) POWER lamp
Lights green after flashing when the power is turned on.
(12) RESUME/CANCEL button
Press to cancel a print job in progress. You can press this button to release from printer error status and resume printing, after the printer problem is resolved.
(13) Alarm lamp
Lights or flashes orange when an error occurs, such as paper-out or ink-out.
 Note
Note
Main Components |
Page 6 of 468 pages |
POWER and Alarm lamps
 You can check the status of the printer by the POWER and Alarm lamps.
-POWER lamp is off: The power is off.
-POWER lamp lights green: The printer is ready to print.
-POWER lamp flashes green: The printer is getting ready to print, or printing is in progress.
-Alarm lamp flashes orange: An error has occurred and the printer is not ready to print. For details, refer to " Troubleshooting " in the on-screen manual: Advanced Guide .
-POWER lamp flashes green and Alarm lamp flashes orange alternately: An error that requires contacting the service center may have occurred.
For details, refer to " Troubleshooting " in the on-screen manual: Advanced Guide .
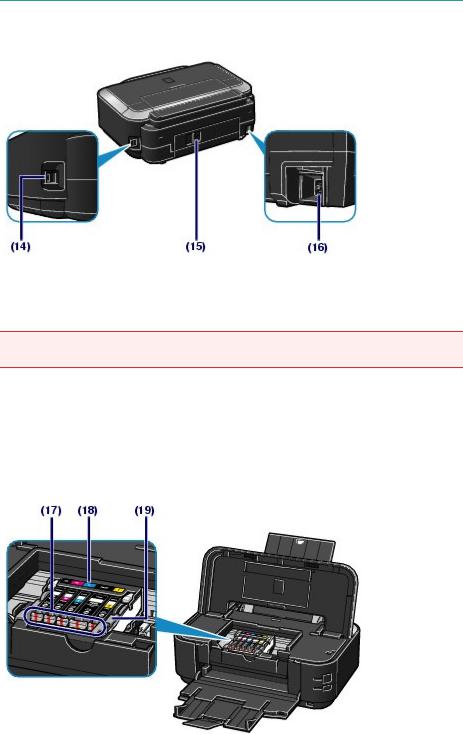
 Rear View
(14) USB Port
Plug in the USB cable to connect the printer with a computer.
 Important
 Do not touch the metal casing.
 Do not plug in or unplug the USB cable while printing.
(15) Rear Cover
Detach to remove jammed paper.
(16) Power Cord Connector
Plug in the supplied power cord.
 Inside View
(17) Ink lamps
Light or flash red to indicate the ink tank status.
See Checking the Ink Status .
(18) Print Head Holder
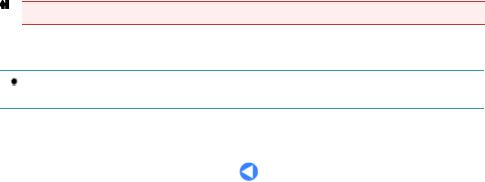
Main Components |
Page 7 of 468 pages |
Install the Print Head.
(19) Print Head Lock Lever
Locks the Print Head into place.
 Important
 Do not raise this lever after installing the Print Head.
 Note
Note
For details on installing the Print Head and ink tanks, refer to the printed manual: |
Getting |
Started.
 Page top
Printing |
Page 8 of 468 pages |
 Advanced Guide
  Troubleshooting
Contents > Printing
Printing
This section describes the procedure to print documents or photos.
You can easily print photos taken with your digital camera by using Easy-PhotoPrint EX supplied with the printer.
Printing Photos (Easy-PhotoPrint EX)
Using Various Functions of Easy-PhotoPrint EX
Printing Documents
Printing Web Pages (Easy-WebPrint EX)
Starting Various Software Applications
Solution Menu EX
Easy-WebPrint EX
 Page top
Printing Photos (Easy-PhotoPrint EX) |
Page 9 of 468 pages |
 Advanced Guide
  Troubleshooting
Contents > Printing > Printing Photos (Easy-PhotoPrint EX)
C051
Printing Photos (Easy-PhotoPrint EX)
Print image data saved on your computer by using Easy-PhotoPrint EX supplied with the printer.
This section describes the procedure to print borderless photos on 4" x 6" / 10 x 15 cm photo paper.
For details on Easy-PhotoPrint EX, refer to the on-screen manual: Advanced Guide .
 Note
Note
 Install Easy-PhotoPrint EX from the Setup CD-ROM when it has not been installed or has been uninstalled. To install Easy-PhotoPrint EX, select Easy-PhotoPrint EX in Custom Install.
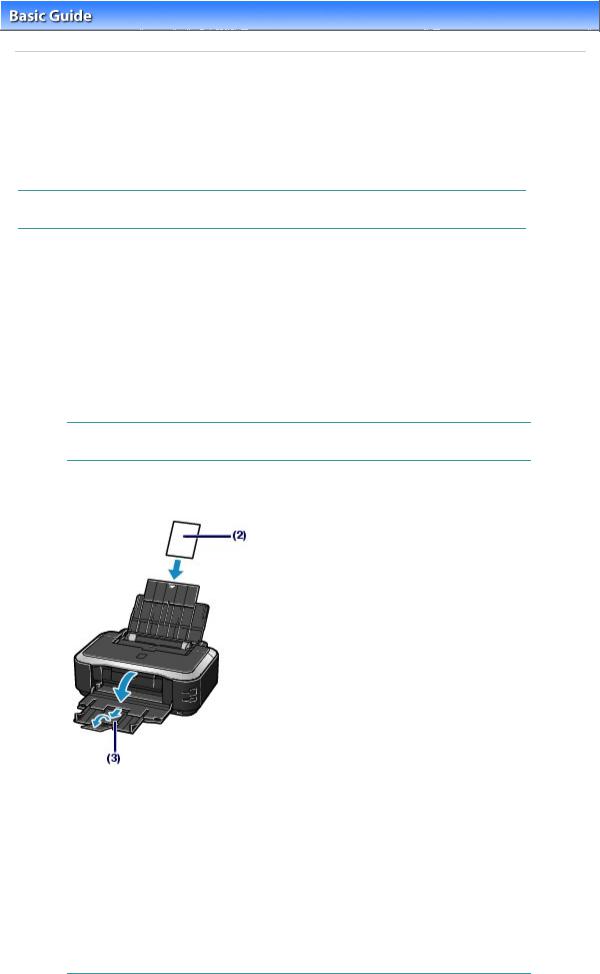
1. Prepare for printing.
(1) Make sure that the printer is turned on.
See Front View .
(2) Load paper.
See Loading Paper .
Here we load 4" x 6" / 10 x 15 cm photo paper in the Rear Tray.
 Note
Note
 Load A4 or Letter-sized plain paper in the Cassette and other sizes or types of paper such as photo paper in the Rear Tray.
(3)Open the Paper Output Tray gently, and extend the Output Tray Extension to open.
2. Start Easy-PhotoPrint EX from Solution Menu EX.
(1) Start Solution Menu EX.
See Solution Menu EX .
 Click Here: Solution Menu EX
(2) Click  (Photo Print) in the Photo Print menu.
Easy-PhotoPrint EX will be started, and the operation screen of Photo Print will appear.
 Note
Note

Printing Photos (Easy-PhotoPrint EX) |
Page 10 of 468 pages |
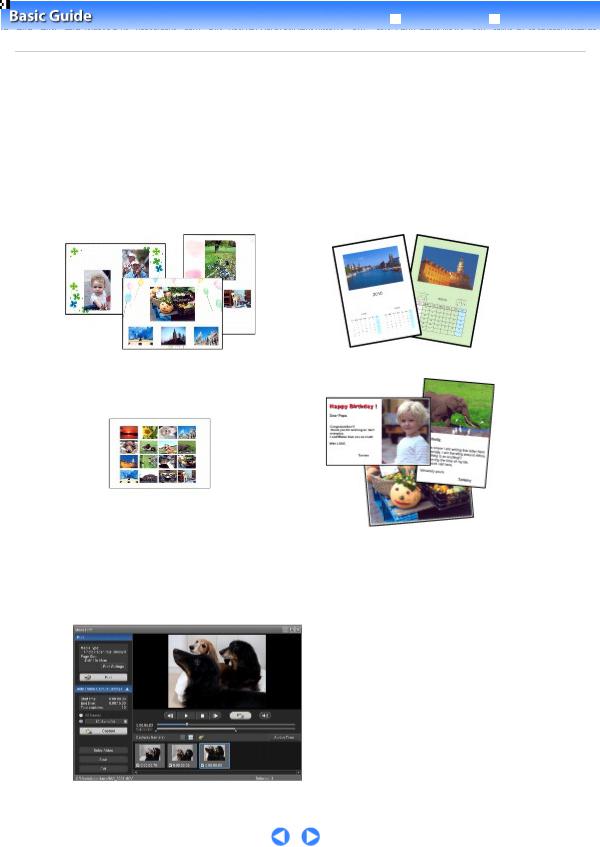
 In addition to photo printing, functions for creating albums, calendars, and other photo items are available.
See Using Various Functions of Easy-PhotoPrint EX.
3. Select a photo to print.
(1)Select the folder in which images are saved.
(2)Click the image to print.
The number of copies appears as "1", and the image you selected appears in the selected image area (A).
You can select two or more images at the same time.
 Note
Note
 To print two or more copies, click
 To cancel the selection, click the image to cancel in the selected image area (A) and click
 (Delete Imported Image) (B). You can also use number of copies to zero.
 You can also correct or enhance the selected image.
For details, refer to the on-screen manual: Advanced Guide .  You can capture and print an image from a video.
See Using Various Functions of Easy-PhotoPrint EX.
(3) Click Select Paper.
4. Select the loaded paper.
(1)Make sure that your printer's name is selected in Printer.
(2)Make sure that Automatically Select is selected in Paper Source.
 Note
Note
For details on other settings for Paper Source, refer to the on-screen manual: |
Advanced |
Guide.
(3) Select the size and type of the loaded paper in Paper Size and Media Type.
Here we select 4"x6" 10x15cm in Paper Size and the type of the loaded photo paper in Media Type.
 Note
Note
Printing Photos (Easy-PhotoPrint EX) |
Page 11 of 468 pages |
 If you select A4 or Letter-sized plain paper when Automatically Select is selected in Paper Source, the printer feeds the paper from the Cassette. If you select other sizes or types of paper such as photo paper, the printer feeds the paper from the Rear Tray.
If you select the wrong page size or media type, the printer may feed paper from the wrong paper source or may not print with the proper print quality.
(4) Click Layout/Print.
5. Select a layout and start printing.
(1) Select the layout of the photo.
Here we select Borderless (full).
The preview will appear in the selected layout for confirmation of the required print result.
 Note
Note
 You can change the direction of photo or crop photos to print.
For details on the operation, refer to the on-screen manual: |
Advanced Guide . |
|
|
(2) Click Print.
 Note
Note
 To cancel a print job in progress, press the RESUME/CANCEL button on the printer or click Cancel Printing on the printer status monitor. After canceling the print job, blank sheets of paper may be ejected.
To display the printer status monitor, click the printer icon on the taskbar. In Windows Vista or Windows XP, click Canon XXX (where " XXX" is your printer's name) on the taskbar.
 Page top
Using Various Functions of Easy-PhotoPrint EX |
|
Page 12 of 468 pages |
|||
|
|
Advanced Guide |
|
|
|
|
|
|
Troubleshooting |
|
|
|
|
|
|
||
|
|
|
|
|
|
Contents > Printing > Printing Photos (Easy-PhotoPrint EX) > Using Various Functions of Easy-PhotoPrint EX
C052
 Using Various Functions of Easy-PhotoPrint EX
This section introduces a few of the useful functions of Easy-PhotoPrint EX.
For details, refer to the on-screen manual: Advanced Guide.
 Creating Your Own Prints
You can create an album or calendar using your photos.
Album |
Calendar |
Stickers |
Layout Print |
 Creating Still Images from Videos
You can capture video frames and create still images.
 Page top
Printing Documents |
Page 13 of 468 pages |
 Advanced Guide
  Troubleshooting
Contents > Printing > Printing Documents
C053
Printing Documents
This section describes the procedure to print a document of A4 size on plain paper.
For details, refer to the on-screen manual: Advanced Guide.
 Note
Note
 Operations may vary depending on your software application. For details on the operation, refer to the instruction manual of your application.
 The screens used in this section are for printing with Windows 7 operating system Home Premium (hereafter referred to as "Windows 7").
1.
2.
Make sure that the printer is turned on.
See Front View .
Load paper.
See Loading Paper .
Here we make sure that A4 plain paper is loaded in the Cassette.
3.
4.
5.
 Note
Note
 Load A4, B5, A5, or Letter-sized plain paper in the Cassette and other sizes or types of paper such as photo paper in the Rear Tray.
Open the Paper Output Tray gently, and extend the Output Tray Extension to open.
Create (or open) a document to print using an appropriate software application.
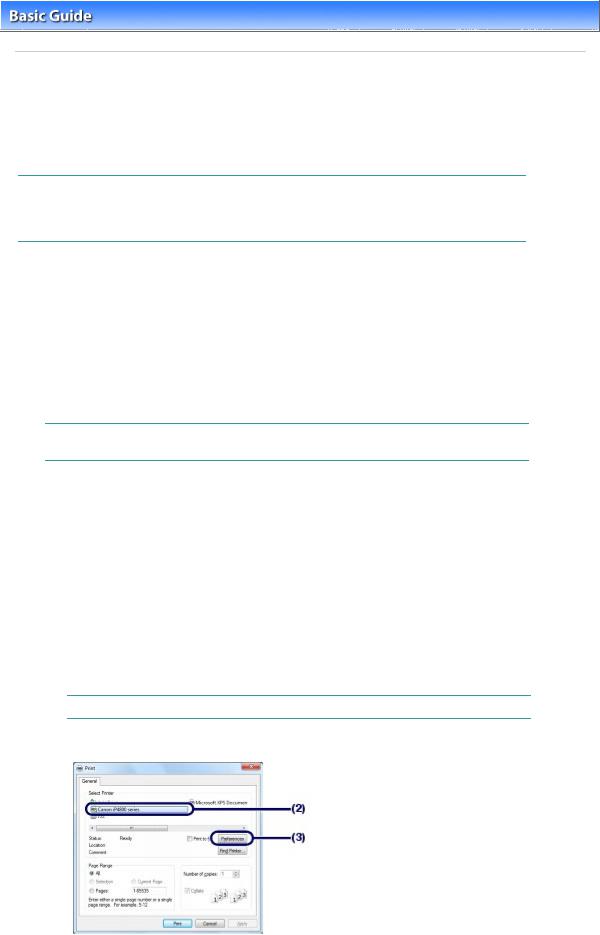
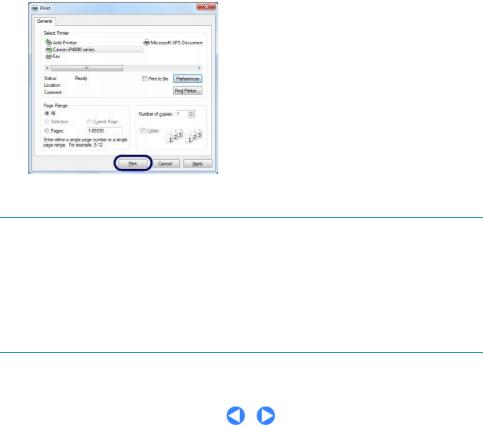
Open the printer driver setup window.
(1) Select Print on the File menu or the command bar in your software application.
The Print dialog box will appear.
(2) Make sure that your printer's name is selected.
 Note
Note
 If another printer's name is selected, click and select your printer's name.
(3) Click Preferences (or Properties).
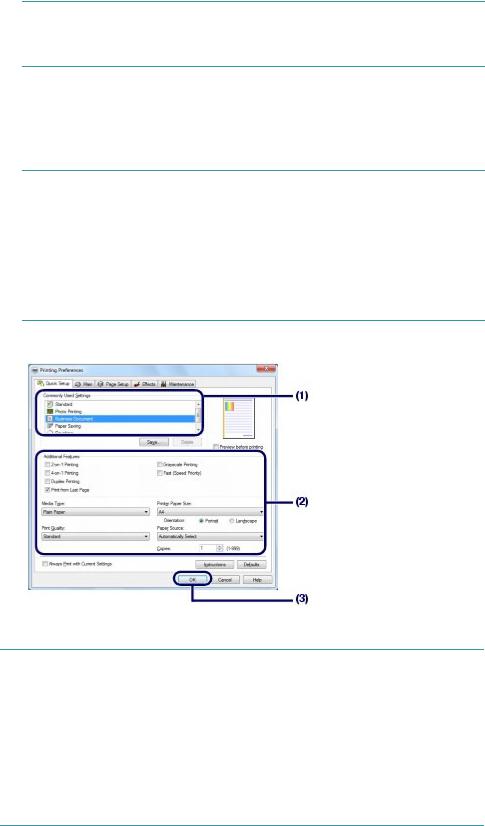
6. Specify the required print settings.
Printing Documents |
Page 14 of 468 pages |
(1) Select Business Document in Commonly Used Settings.
 Note
Note
 When the print object such as Business Document or Photo Printing is selected in Commonly Used Settings, the items in Additional Features will be selected automatically. The settings suitable for the print object such as media type or print quality will also appear.
(2) Make sure of the displayed settings.
Here we make sure that Plain Paper in Media Type, Standard in Print Quality, A4 in Printer Paper Size, and Automatically Select in Paper Source are selected.
 Note
Note
 When you specify two or more copies in Copies, the printed pages will be collated.
 The settings can be changed.
However, after changing Printer Paper Size, confirm that the setting for Page Size on the Page Setup sheet matches the setting set in the software application.
For details, refer to the on-screen manual: Advanced Guide .
 If you select A4, B5, A5, or Letter-sized plain paper when Automatically Select is selected
in Paper Source, the printer feeds the paper from the Cassette. If you select other sizes or types of paper such as photo paper, the printer feeds the paper from the Rear Tray.
If you select the wrong page size or media type, the printer may feed paper from the wrong paper source or may not print with the proper print quality.
(3) Click OK.
 Note
Note
 For details on the printer driver functions, click Help or Instructions to view the online help or
the on-screen manual: Advanced Guide . The Instructions button appears on the Quick Setup, Main and Maintenance sheets if the on-screen manual is installed on your computer.
 You can name the changed settings and add to Commonly Used Settings. For details, refer to the on-screen manual: Advanced Guide .
 If the Always Print with Current Settings check box is selected, the current settings will be applied from the next print job onward. Some software applications may not have this function.
 To display the preview to confirm the print result, select the Preview before printing check box. Some software applications may not have a preview function.
 You can specify the detailed print settings on the Main sheet or Page Setup sheet. Advanced Guide .
7. Start printing.
Click Print (or OK) to start printing.
Printing Documents |
Page 15 of 468 pages |
 Note
Note
 To cancel a print job in progress, press the RESUME/CANCEL button on the printer or click Cancel Printing on the printer status monitor. After canceling the print job, blank sheets of paper may be ejected.
To display the printer status monitor, click the printer icon on the taskbar. In Windows Vista operating system (hereafter referred to as "Windows Vista") or Windows XP, click Canon XXX (where " XXX" is your printer's name) on the taskbar.
 If printed ruled lines are misaligned or print results are unsatisfactory, adjust the print head position.
See Aligning the Print Head .
 Page top

Printing Web Pages (Easy-WebPrint EX) |
Page 16 of 468 pages |
 Advanced Guide
  Troubleshooting
Contents > Printing > Printing Web Pages (Easy-WebPrint EX)
C054
Printing Web Pages (Easy-WebPrint EX)
Easy-WebPrint EX provides quick and easy printing of web pages for Internet Explorer.
You can print web pages automatically resized to fit the paper width without cutting off the sides of pages, or preview and select the desired web pages to print.
Easy-WebPrint EX requires Internet Explorer 7 or later.
 Important
 It is unlawful to reproduce or edit the copyrighted work of another person without permission from the copyright holder, except for personal use, use within the home, or other use within the limited scope as defined by the copyright. Additionally, reproducing or editing photographs of people may infringe on portrait rights.
 Note
Note
 For information on installing or starting Easy-WebPrint EX, see Easy-WebPrint EX .
The clip function, for example, allows you to clip desired parts of web pages and edit them to print.
For details on operating Easy-WebPrint EX, refer to the online help. Click Easy-WebPrint EX (A) on the toolbar, then select Help from the pull-down menu to view the online help.

Printing Web Pages (Easy-WebPrint EX) |
Page 17 of 468 pages |
 Page top
Starting Various Software Applications |
Page 18 of 468 pages |
 Advanced Guide
  Troubleshooting
Contents > Printing > Starting Various Software Applications
C055
Starting Various Software Applications
This section describes Solution Menu EX, which is used to start the software applications supplied with the printer. The information on Easy-WebPrint EX, a software application for printing web pages, is also included.
 Solution Menu EX
Solution Menu EX is a software application that provides quick access to other software applications supplied with the printer, manuals, and online product information.
 Note
Note
 Install Solution Menu EX, the on-screen manual, or other supplied software applications you want to use from the Setup CD-ROM when they have not been installed or have been uninstalled. To install them, select them in Custom Install.
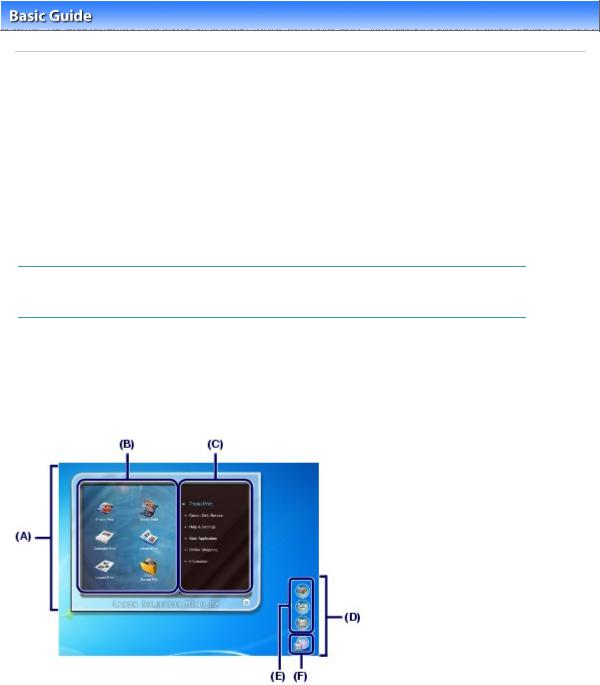
Menus are displayed in Category Menu Area of Solution Menu EX Main Screen. Click a menu in Category Menu Area to display icons for functions available in that menu, in Function Icon Area of Main Screen.
The number and types of icons or menus displayed in Main Screen may vary depending on your printer and region.
* The screen below is for Windows 7.
(A)Main Screen
(B)Function Icon Area
(C)Category Menu Area
(D)Desktop Accessory
(E)Shortcut menu to which you can add the icons of frequently used functions
(F)Accessory Icon that lets you display Main Screen, show or hide Shortcut menu, etc.
Photo Print
Print photos taken with a digital camera.
Canon Web Service
Download content or materials from the website for printing.
CREATIVE PARK PREMIUM
CREATIVE PARK PREMIUM is a premium content service available exclusively to users of genuine
Canon inks for this printer.
Make sure that genuine Canon ink tanks are installed properly for all colors.
Starting Various Software Applications |
Page 19 of 468 pages |
Help & Settings
View the Solution Menu EX online help or the on-screen manual of the printer. Set up Solution Menu EX or the printer.
Start Application
Start the supplied software applications such as Easy-PhotoPrint EX and My Printer.
With My Printer, you can display the printer driver setup window, and get information on what action to take if you have trouble with the operation.
Online Shopping
Purchase consumables such as ink from the website.
Information
Find useful information on the printer.
 Note
Note
 The computer must be connected to the Internet to access the website for useful information, etc.
 For details on operating Solution Menu EX, refer to the online help. Select the Help & Settings menu, then click
  (Solution Menu EX's Help) to view the online help.
 Starting Software Applications from Solution Menu EX
From Solution Menu EX, you can start a software application, and also directly access a function of the software application.
The following procedure is to start Solution Menu EX and, for example, select one of the Easy-
PhotoPrint EX functions, Photo Print.
1. Start Solution Menu EX.
Double-click  (Solution Menu EX) on the desktop.
 Click Here: Solution Menu EX
 Note
Note
 Unless the default setting has been changed, Solution Menu EX starts automatically when you start up the computer.
 To start Solution Menu EX from the Start menu, select All Programs, Canon Utilities, Solution
Menu EX, then Solution Menu EX.
 If Solution Menu EX Main Screen does not appear after starting Solution Menu EX, right-click
  (Accessory Icon) and select Show Main Screen.
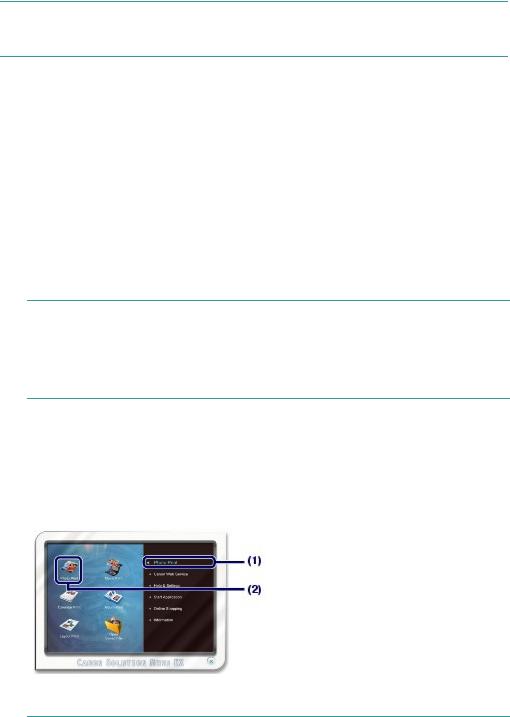
2. Select the function of a software application that you want to start.
(1)Click the Photo Print menu.
(2)Click  (Photo Print).
Easy-PhotoPrint EX will be started, and the operation screen of Photo Print will appear.
 Note
Note
 In addition to photo printing, functions for creating albums, calendars, and other photo items

Starting Various Software Applications |
Page 20 of 468 pages |
are available.
For details on operations and functions of Easy-PhotoPrint EX, see |
Printing Photos (Easy- |
PhotoPrint EX). |
|
|
|
 Easy-WebPrint EX
When Easy-WebPrint EX is installed, it adds a toolbar to your Internet Explorer screen. The toolbar is available whenever Internet Explorer is running.
 Note
Note
Installing Easy-WebPrint EX
 If Easy-WebPrint EX is not installed, the guidance for installation of Easy-WebPrint EX may appear in the notification area of the taskbar.
To install Easy-WebPrint EX, click the displayed guidance and follow the instructions on the screen.  You can also install Easy-WebPrint EX from the Setup CD-ROM .
To install Easy-WebPrint EX, select Easy-WebPrint EX in Custom Install.
 To install Easy-WebPrint EX on your computer, Internet Explorer 7 or later is required and the computer must be connected to the Internet.
 Page top
Other Usages |
Page 21 of 468 pages |
 Advanced Guide
  Troubleshooting
Contents > Other Usages
Other Usages
This section introduces the function to print photos from your PictBridge compliant device such as a digital camera connecting with a USB cable.
Printing Photos from a PictBridge Compliant Device
 Page top
Printing Photos from a PictBridge Compliant Device |
Page 22 of 468 pages |
 Advanced Guide
  Troubleshooting
Contents > Other Usages > Printing Photos from a PictBridge Compliant Device
C063
Printing Photos from a PictBridge Compliant Device
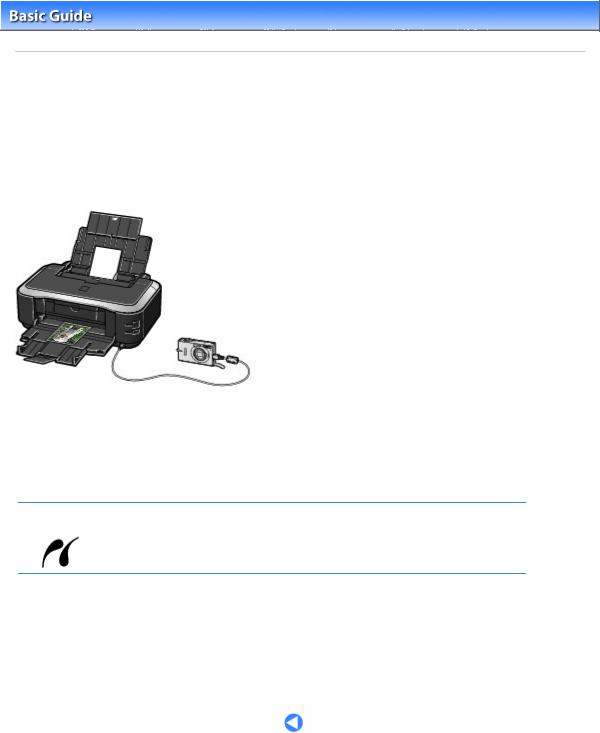
You can connect the PictBridge compliant device to this printer with a USB cable that is recommended by the device's manufacturer, and print saved images directly.
For details on how to print saved images connecting the PictBridge compliant device, refer to the onscreen manual: Advanced Guide .
For details on the print settings on the PictBridge compliant device, refer to the instruction manual supplied with the device.
Connectable devices:
Any PictBridge compliant device can be connected to this printer regardless of the manufacturer or model as long as it is compliant with the PictBridge Standard.
 Note
Note
 PictBridge is the Standard to print your photos directly without using a computer, connecting a device such as a digital still camera, digital camcorder, or camera-equipped mobile phone.
(PictBridge) A device with this mark is PictBridge compliant.
Printable image data format:
This printer accepts images* taken with a camera compliant with the Design rule for Camera File system and PNG files.
* Exif 2.2/2.21 compliant
 Page top
Loading Paper |
Page 23 of 468 pages |
 Advanced Guide
  Troubleshooting
Contents > Loading Paper
Loading Paper
This section describes types of paper you can load and how to load printing paper in the Cassette or
Rear Tray.
Loading Paper
Paper Sources to Load Paper
Loading Paper in the Cassette
Loading Paper in the Rear Tray
Loading Photo Paper
Loading Envelopes
Media Types You Can Use
Media Types You Cannot Use
 Page top

Loading Paper |
Page 24 of 468 pages |
 Advanced Guide
  Troubleshooting
Contents > Loading Paper > Loading Paper
C071
Loading Paper
 Paper Sources to Load Paper
 Loading Paper in the Cassette
 Loading Paper in the Rear Tray
 Media Types You Can Use
 Media Types You Cannot Use
 Paper Sources to Load Paper
The printer has two paper sources to feed paper; Cassette and Rear Tray.
You can load paper in either one of the paper sources, depending on the page size and media type of paper. Paper is fed from the Cassette or Rear Tray depending on the selection of the page size or media type.
See Media Types You Can Use .
 Note
Note
 When printing, select the correct page size and media type. If you select the wrong page size or media type, the printer may feed paper from the wrong paper source or may not print with the proper print quality.
For details on how to load paper in each paper source, see Loading Paper in the Cassette or Loading Paper in the Rear Tray .
 Loading Plain Paper in the Cassette
When you use A4, B5, A5, or Letter-sized plain paper, load it in the Cassette.
The printer feeds paper from the Cassette automatically by selecting plain paper (A4, B5, A5, or
Letter size) in the print settings with the printer driver when printing.
For details on how to change the paper source setting, refer to the on-screen manual: Advanced
Guide .
 Loading Photo Paper / Envelopes in the Rear Tray
When you use photo paper, load it in the Rear Tray.
The printer feeds paper from the Rear Tray automatically by selecting the media types other than plain paper, such as photo paper, in the print settings with the printer driver when printing.
When you use plain paper other than A4, B5, A5, or Letter size, also load it in the Rear Tray.

Loading Paper |
Page 25 of 468 pages |
 Page top
Loading Paper in the Cassette |
Page 26 of 468 pages |
 Advanced Guide
  Troubleshooting
Contents > Loading Paper > Loading Paper > Loading Paper in the Cassette
C072
 Loading Paper in the Cassette
You can load only A4, B5, A5, or Letter-sized plain paper in the Cassette.
Load other sizes or types of paper in the Rear Tray.
See Media Types You Can Use .
 Note
Note
Advice for printing on plain paper
 We recommend Canon genuine photo paper for printing photos.
For details on the Canon genuine paper, see Media Types You Can Use .
 You can use general copy paper.
For the page size and paper weight you can use for this printer, see Media Types You Can Use .
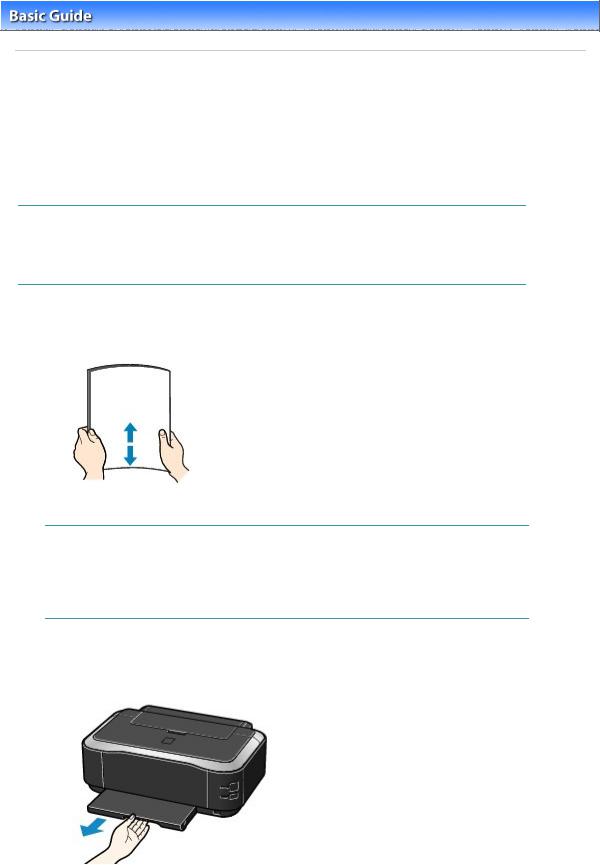
1. Prepare paper.
Align the edges of paper. If paper is curled, flatten it.
 Note
Note
 Align the edges of paper neatly before loading. Loading paper without aligning the edges may cause paper jams.
 If paper is curled, hold the curled corners and gently bend them in the opposite direction until the paper becomes completely flat.
For details on how to flatten curled paper, refer to " Troubleshooting " in the on-screen manual:
Advanced Guide .
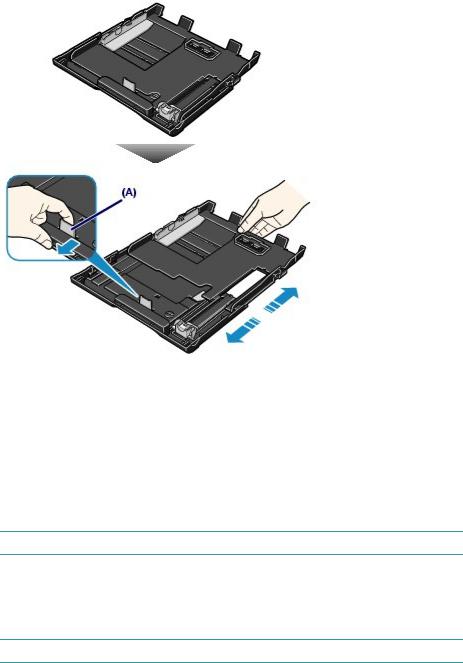
2. Prepare the Cassette.
(1) Pull out the Cassette from the printer.
(2)Remove the Cover on the Cassette.
(3)Pull the tab (A) towards you to unlock and extend the Cassette.
Loading Paper in the Cassette |
Page 27 of 468 pages |
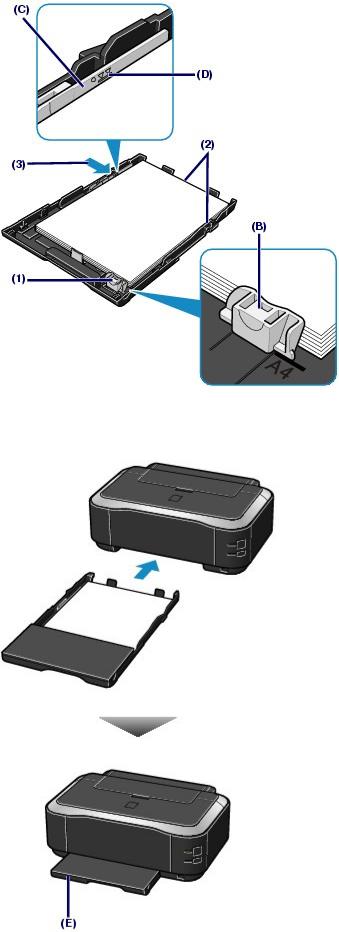
3. Load paper.
(1) Slide the Paper Guide (B) to align with the mark of page size.
The Paper Guide (B) will stop when it aligns with the corresponding page size mark.
(2)Load the paper stack WITH THE PRINT SIDE FACING DOWN and THE LEADING EDGE TO THE FAR SIDE, and align it against the right side of the Cassette.
 Note
Note
 There may be a little space between the Paper Guide (B) and the paper stack.
(3)Slide the Paper Guide (C) on the left to align completely with the side of the paper stack.
 Note
Note
 Do not load sheets of paper higher than the Load Limit Mark (D).
Loading Paper in the Cassette |
Page 28 of 468 pages |
(4)Set the Cover on the Cassette.
(5)Insert the Cassette into the printer.
Push the Cassette all the way into the printer.
(E) The Cassette sticks out of the printer when correctly set.
Loading Paper in the Cassette |
Page 29 of 468 pages |
 Note
Note
 Do not force the Cassette into the printer any further. This can damage the printer or Cassette.
4. Open the Paper Output Tray gently, and extend the Output Tray Extension to open.
 Note
Note
After loading paper
 Select the size and type of the loaded paper in Printer Paper Size and Media Type in the printer driver.
See Printing Documents .
 Page top

Loading Paper in the Rear Tray |
Page 30 of 468 pages |
 Advanced Guide
  Troubleshooting
Contents > Loading Paper > Loading Paper > Loading Paper in the Rear Tray
C073
 Loading Paper in the Rear Tray
You can load photo paper or envelopes in the Rear Tray.
 Loading Photo Paper
 Important
 If you cut plain paper into small size such as 4" x 6" / 10 x 15 cm, 4" x 8" / 101.6 x 203.2 mm, 5" x 7" / 13 x 18 cm, or 2.16" x 3.58" / 55.0 x 91.0 mm (Card size) to perform trial print, it can cause paper jams.
1. Prepare paper.
See step 1 in Loading Paper in the Cassette .
Align the edges of paper. If paper is curled, flatten it.
2. Load paper.
(1)Open the Paper Support, and pull it out.
(2)Open the Paper Output Tray gently, and extend the Output Tray Extension to open.
(3)Slide the Paper Guides (A) to open them, and load the paper in the center of the Rear Tray WITH THE PRINT SIDE FACING YOU.
(4)Slide the Paper Guides (A) to align them with both sides of the paper stack.
Do not slide the Paper Guides too hard. The paper may not be fed properly.
 Loading...