


IPF655
Setup Guide
ENG
Introductory Information
QT5-2309-V1 ©CANON INC. 2009 Printed in JAPAN
1
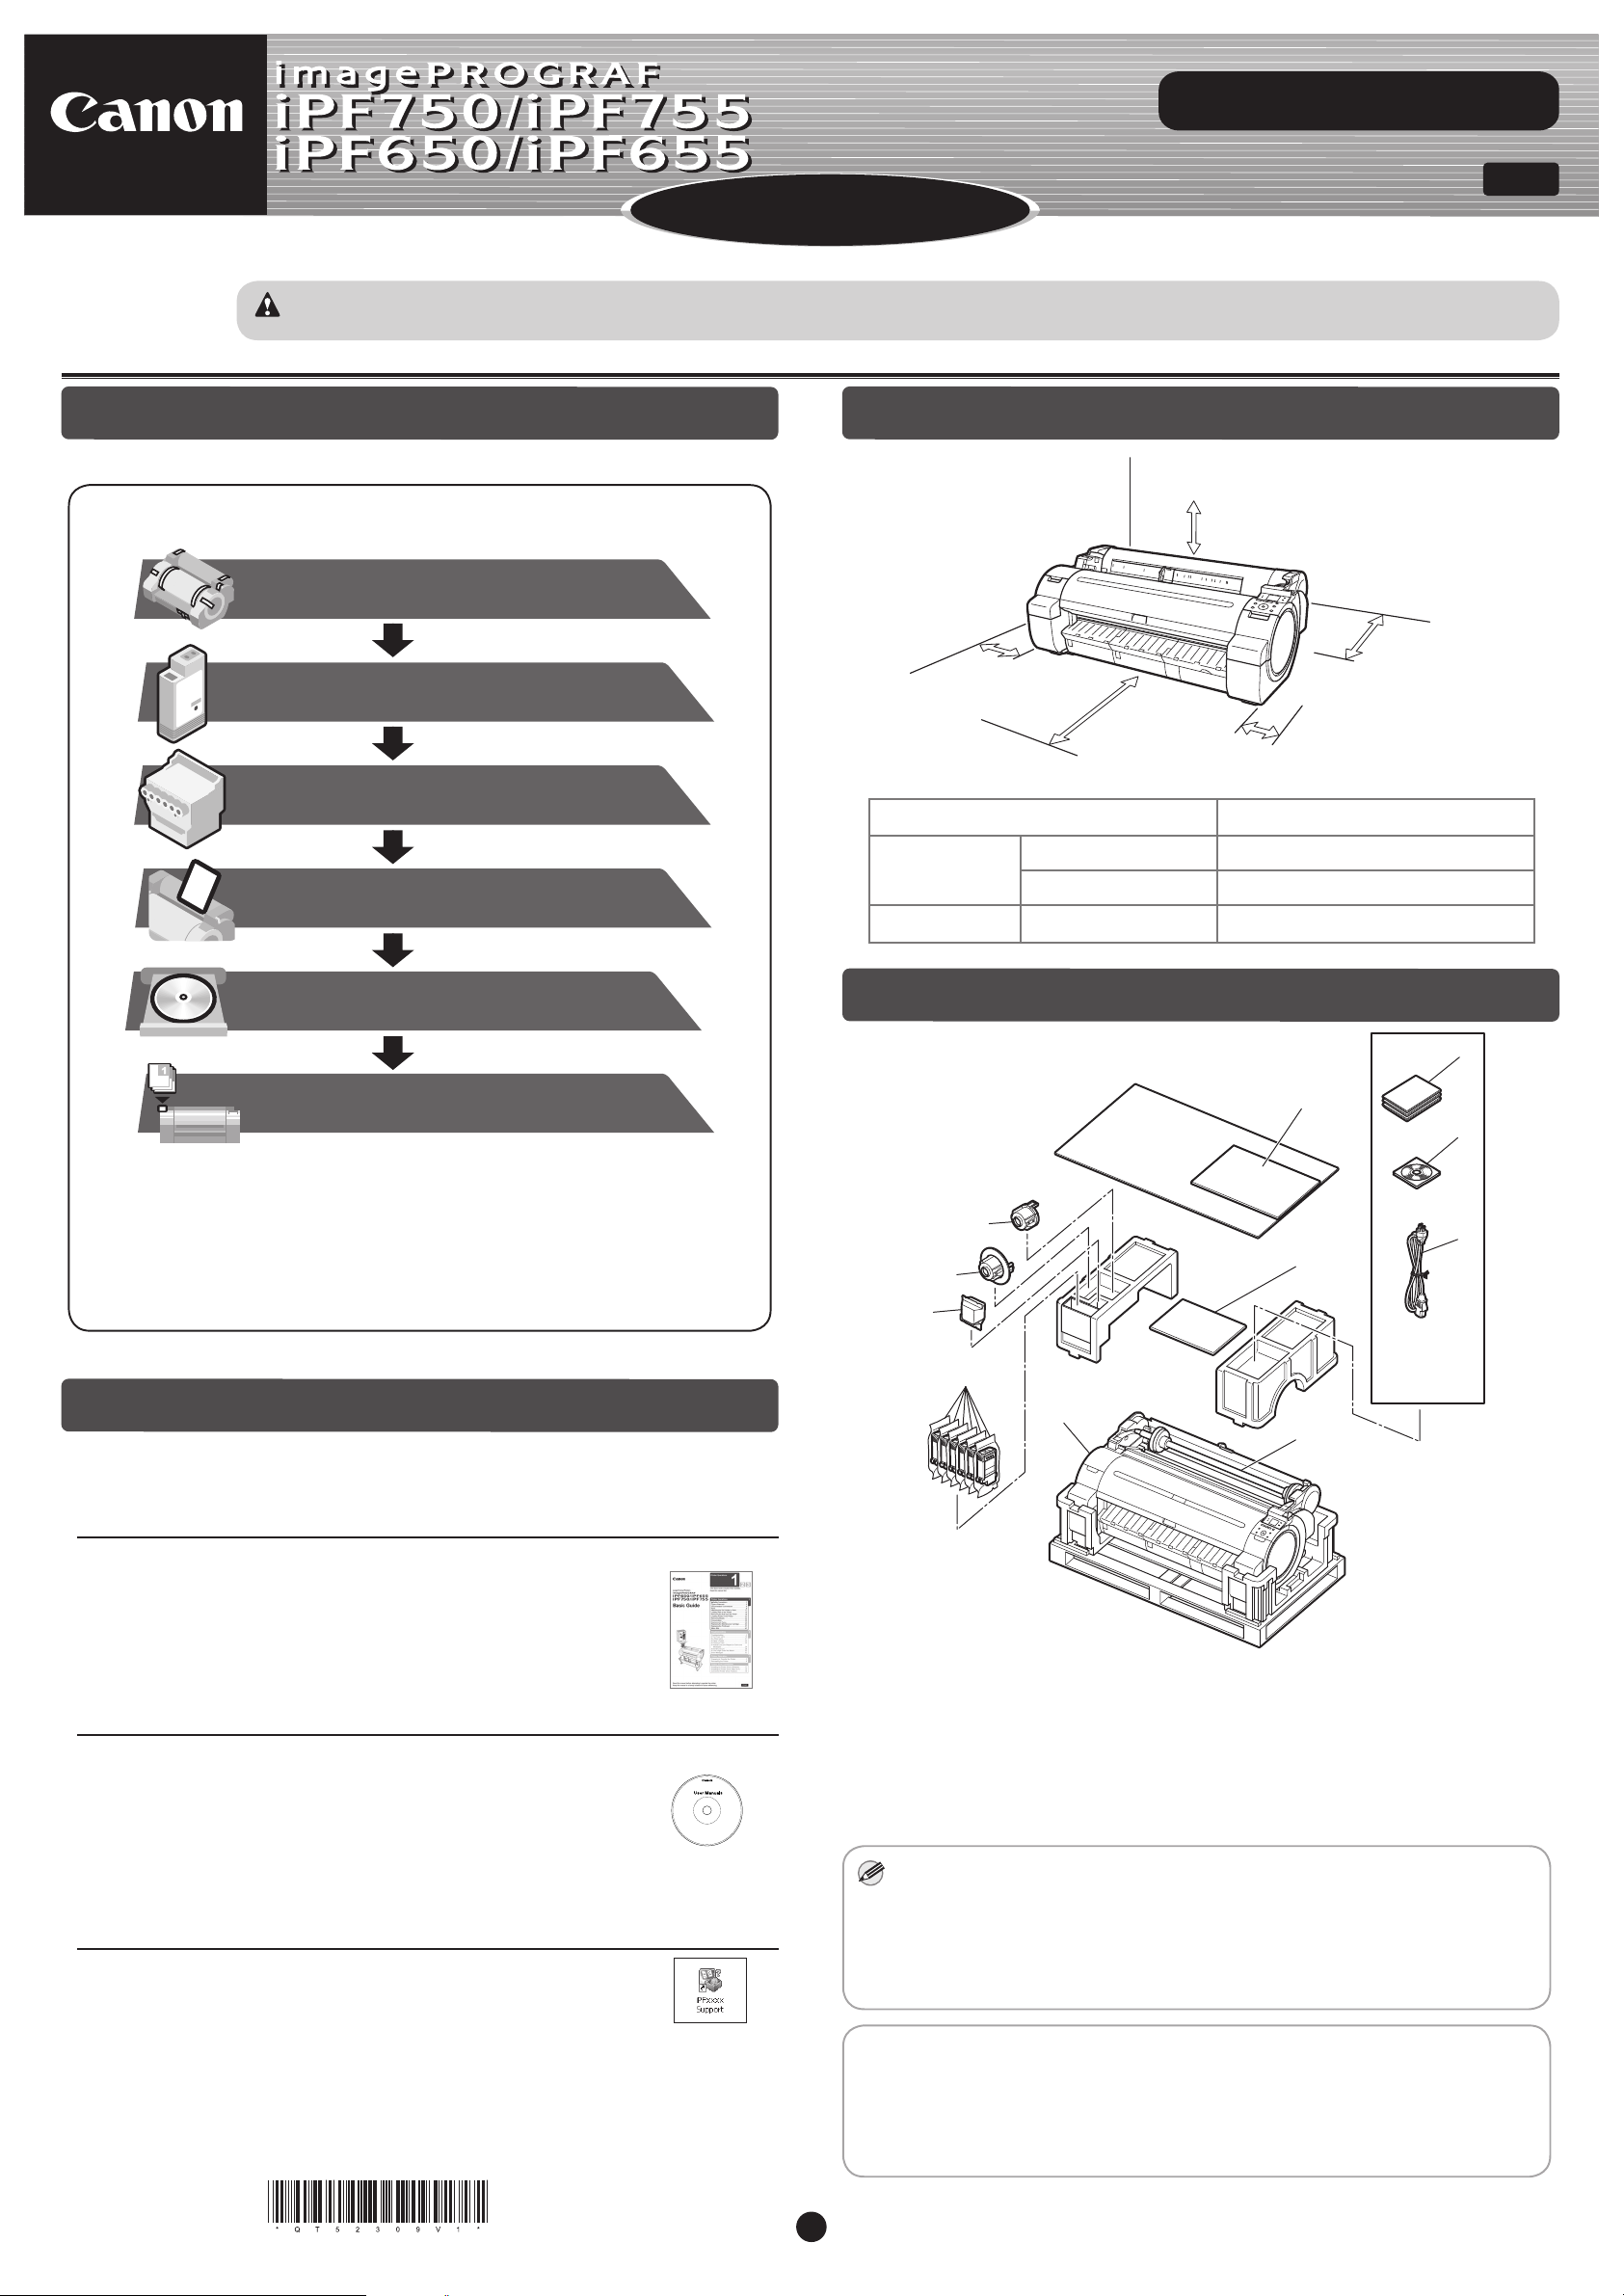
Printer and stand 1704 × 1470 × 1362
i
j
k
c
d
e
f
g
h
b
a
These are the steps in printer installation.
Details for each step are given in this Setup Guide . Simply follow the instructions
to install the printer.
If an error message is displayed during setup or other problems occur, refer to
"Responding to Messages".
Introduction
Printer
Installation space (W x D x H mm)
iPF650/iPF655
Printer alone 1397 × 1308 × 807
With stand attached 1397 × 1470 × 1362
Overview of Setup Space Required for Installation
Read this manual before attempting to operate the printer.
Keep this manual in a handy location for future reference.
iPF750/iPF755
O
Printera.
c.
Roll holder: Already attached to printer
d.
3-inch paper core attachment R
e. Printhead
f. Starter ink tanks:
Bk, MBk (x 2), C, M, Y
g.
Sample paper
Package Contents
Some items are included with the printer but not described in this manual.
Keep these items in a safe place after setup because they are used in
various printing applications.
•
For instructions on using items not described in this manual, refer to the
User Manual.
•
A cable to connect the printer to a computer is not provided with the printer. •
h. Setup Guide (this document)
i. Set of printer documentation
j. Set of CD-ROMs
k. Power cord
b.
3-inch paper core attachment L
After installing the printer as shown in this Setup Guide , refer to the
documentation for instructions on operation and maintenance.
Daily operation
Detailed instructions
The Basic Guide includes three booklets containing the following information:
Instructions on basic operation
Troubleshooting tips and maintenance procedures
1
2
3
The User Manuals CD-ROM (User Manual) includes the following information:
Printer operating instructions
Printer driver instructions
Printing instructions
•
•
•
Maintenance procedures
Instructions for network printing
•
•
Troubleshooting tips
Printer menu descriptions
Printer driver function details
•
•
•
Specifi cations, details on consumables
and optional accessories, and other
information
•
Supported paper
The Paper Reference Guide provides information about paper.
In Windows, double-click the iPFxxxx Support desktop icon.
(iPFxxxx represents the printer model.)
•
You can access the User Manual and Paper Reference Guide as follows:
In Mac OS X, click iPF Support, added to the Dock. •
Printer Documentation
Preparations for transferring the printer, and instructions for
reinstalling the printer driver
• Canon, the Canon logo, and imagePROGRAF are trademarks or registered trademarks of CANON
INC.
• Microsoft and Windows are trademarks of Microsoft Corporation, registered in the U.S. and other
countries.
• Macintosh is a trademark of Apple Inc., registered in the U.S. and other countries.
• All other trademarks or registered trademarks described in this Setup Guide are the property of
their respective owners.
Instructions in this Setup Guide show the iPF755 printer. Note that your printer may look different from these illustrations in some cases. However,
basic operations are the same.
•
*
Values enclosed in [ ] are for when the stand is attached.
Caution
Preparations
Install the Ink Tanks
Install the Printhead
Load Cut Sheet Paper
Install the Printer Driver and
the User Manual
(P.2)
(P.3)
(P.4)
(P.5)
(P.6)
+300mm
+200mm
+600mm
+10mm =0mm?
+200mm
㧖
Store Accessories in the Pockets
(P.15)
MEM
2
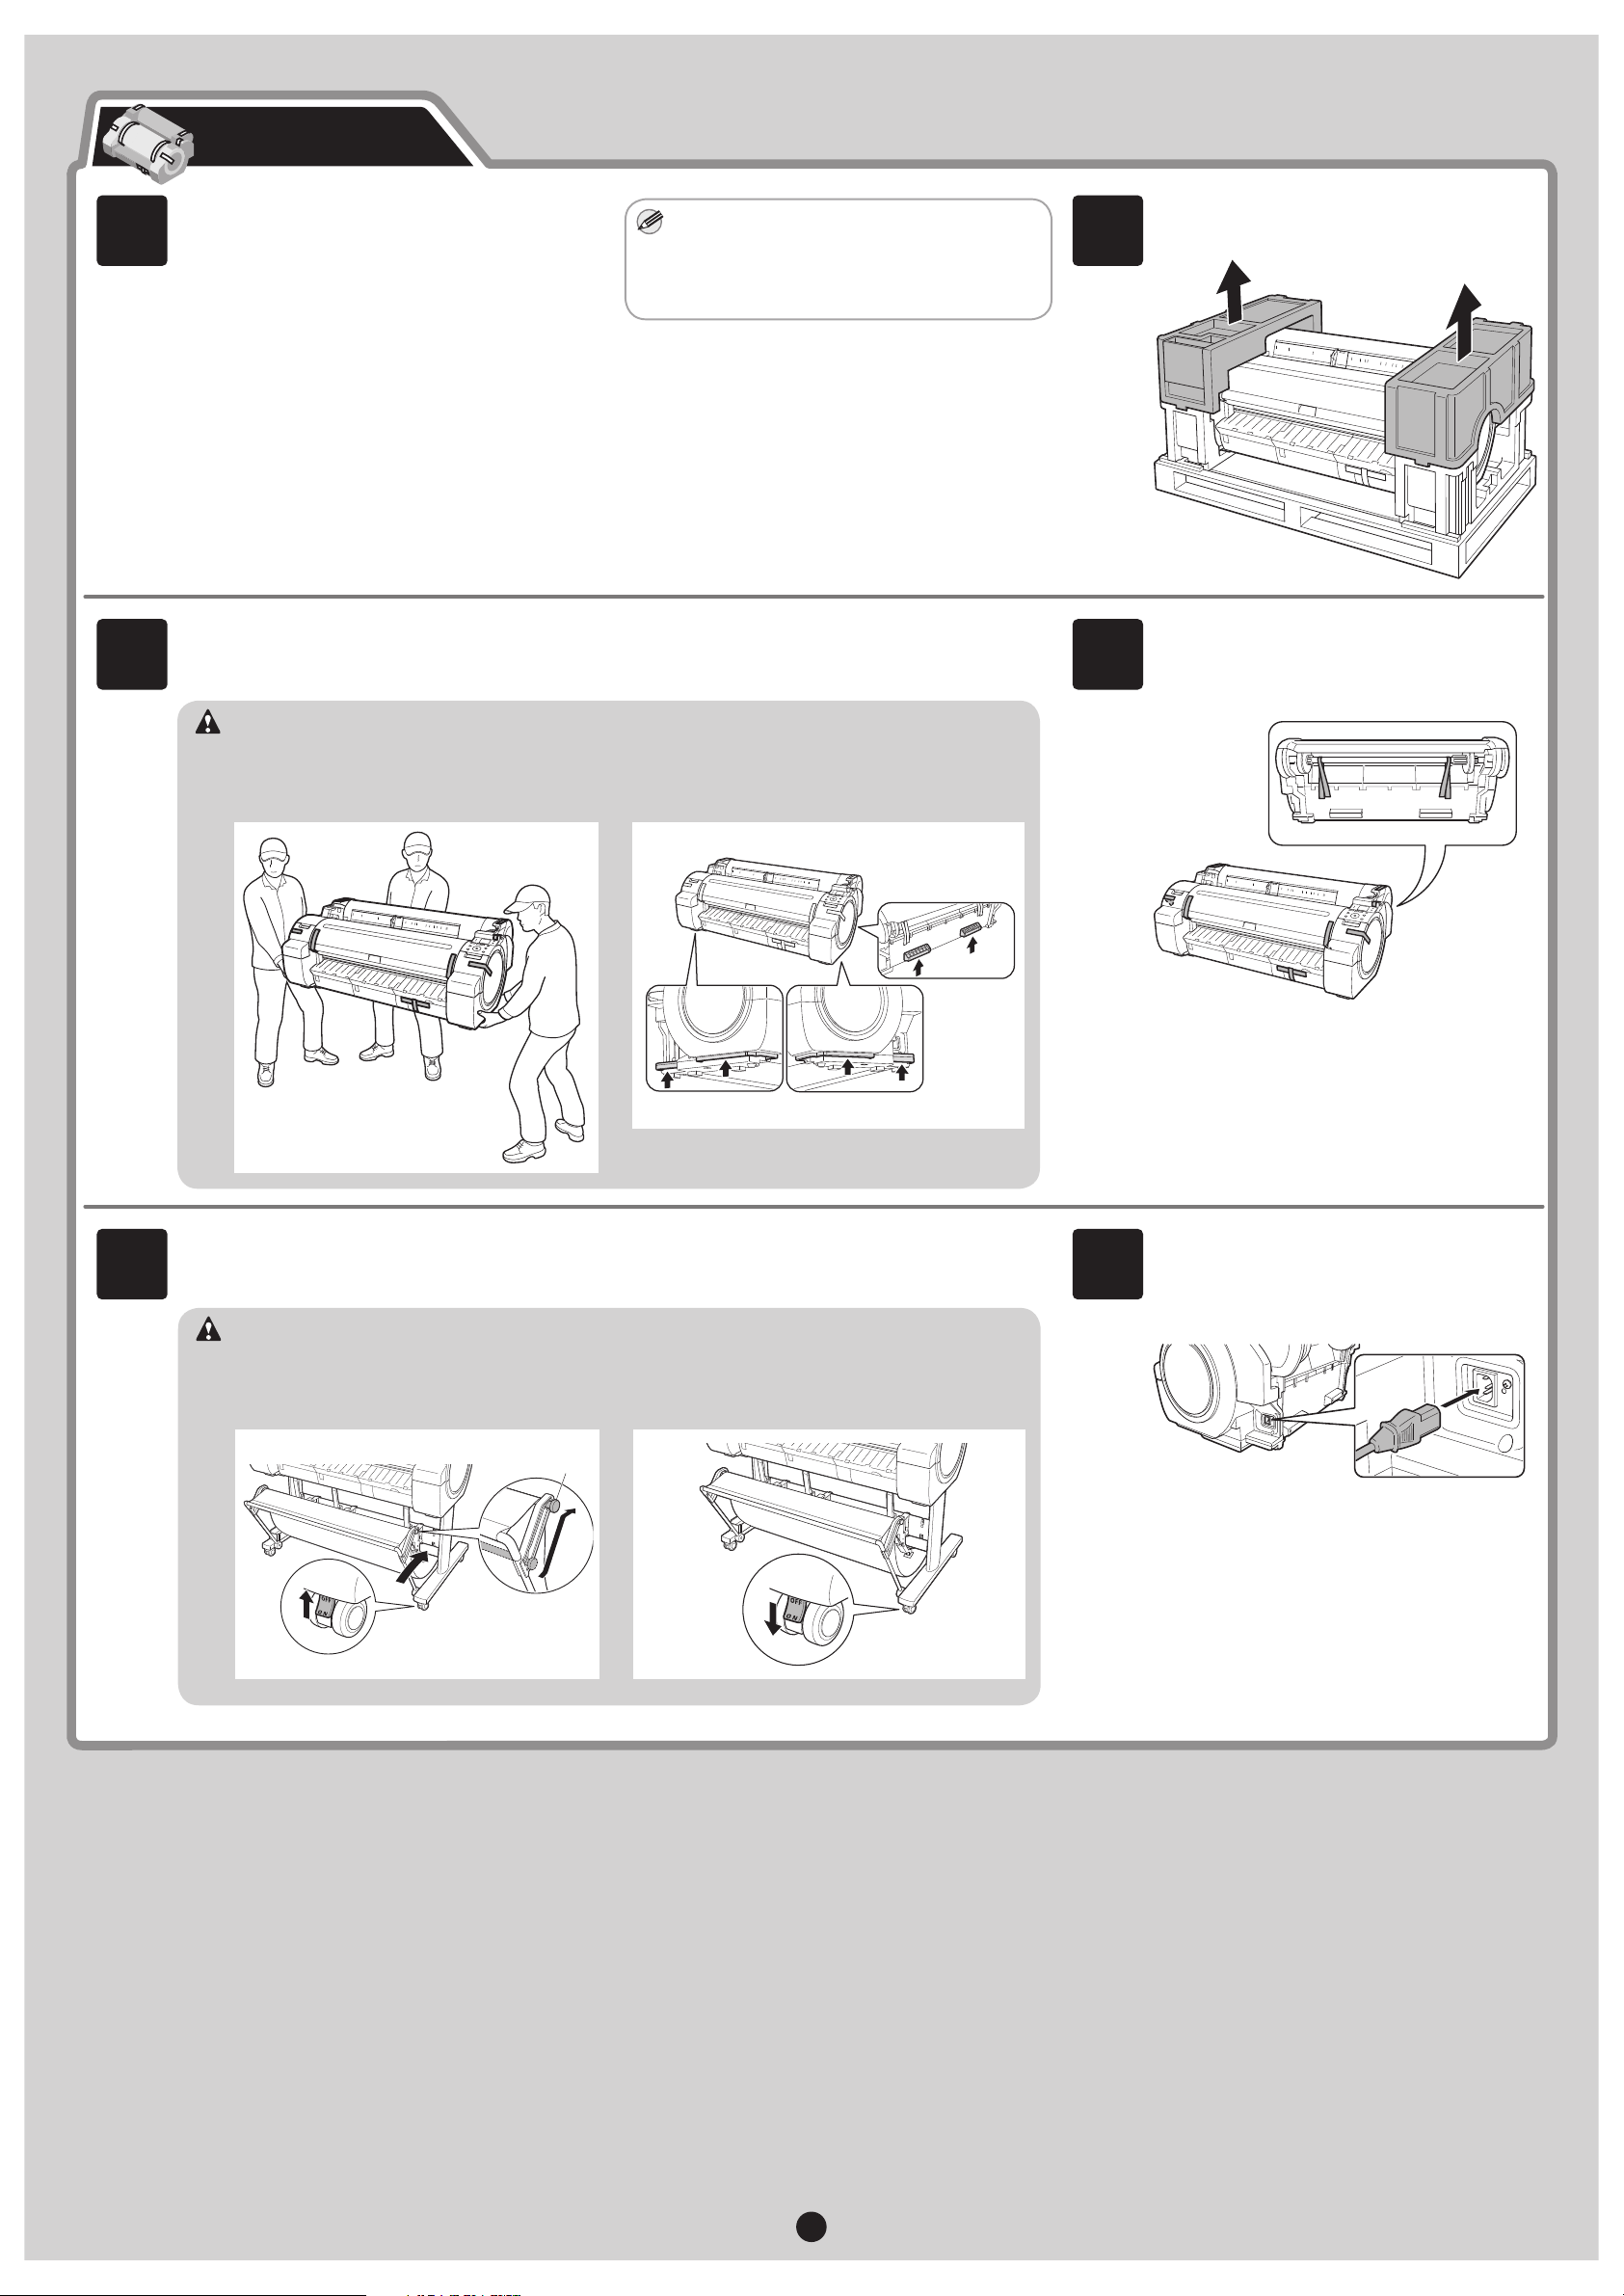
Prepare the printer for use by installing the printer and connecting the power cord.
Remove the packing materials from the
top of the printer.
2
Install the printer. You can use the
following two methods for installing the
printer.
• Install with a stand
Assemble the stand and install the
printer referring to the Printer Stand
Setup Guide included with the stand.
After installation, proceed to step 4.
• Install without a stand on a table
Proceed to step 2.
1
Stands may be standard or optional
depending upon your model and location.
iPF750/iPF755: Standard
iPF650/iPF655: Optional (equipped as
standard in some locations)
•
O
Preparations
Remove the orange tape used to secure
the roll holder to the printer.
4
Three people should hold the printer's carrying handles and place the printer on a table or
other fl at location.
When moving the printer, fi rmly grasp the
carrying handles. Holding the printer at
other positions is dangerous, and may
cause injury and damage if the printer is
dropped.
•
3
The iPF750/iPF755 weighs approximately
52 kg and the iPF650/iPF655 approximately
43 kg by themselves. Moving the printer
requires at least three people. Be careful
to avoid back strain and other injuries.
•
Plug the power cord into the power supply
connector on the right of the printer and
plug the other end into the outlet.
Move the printer to the location where you
will use it.
65
When moving the stand, lift the support rod
to the position (a) before closing the output
stacker and unlocking the 4 casters. Failure
to do so may lead to scratched fl ooring,
damage to the basket cloth, and injury.
• After you have moved the stand, be sure to
lock the 4 casters.
•
OFF
a
Caution
MEM
Caution
ON
3
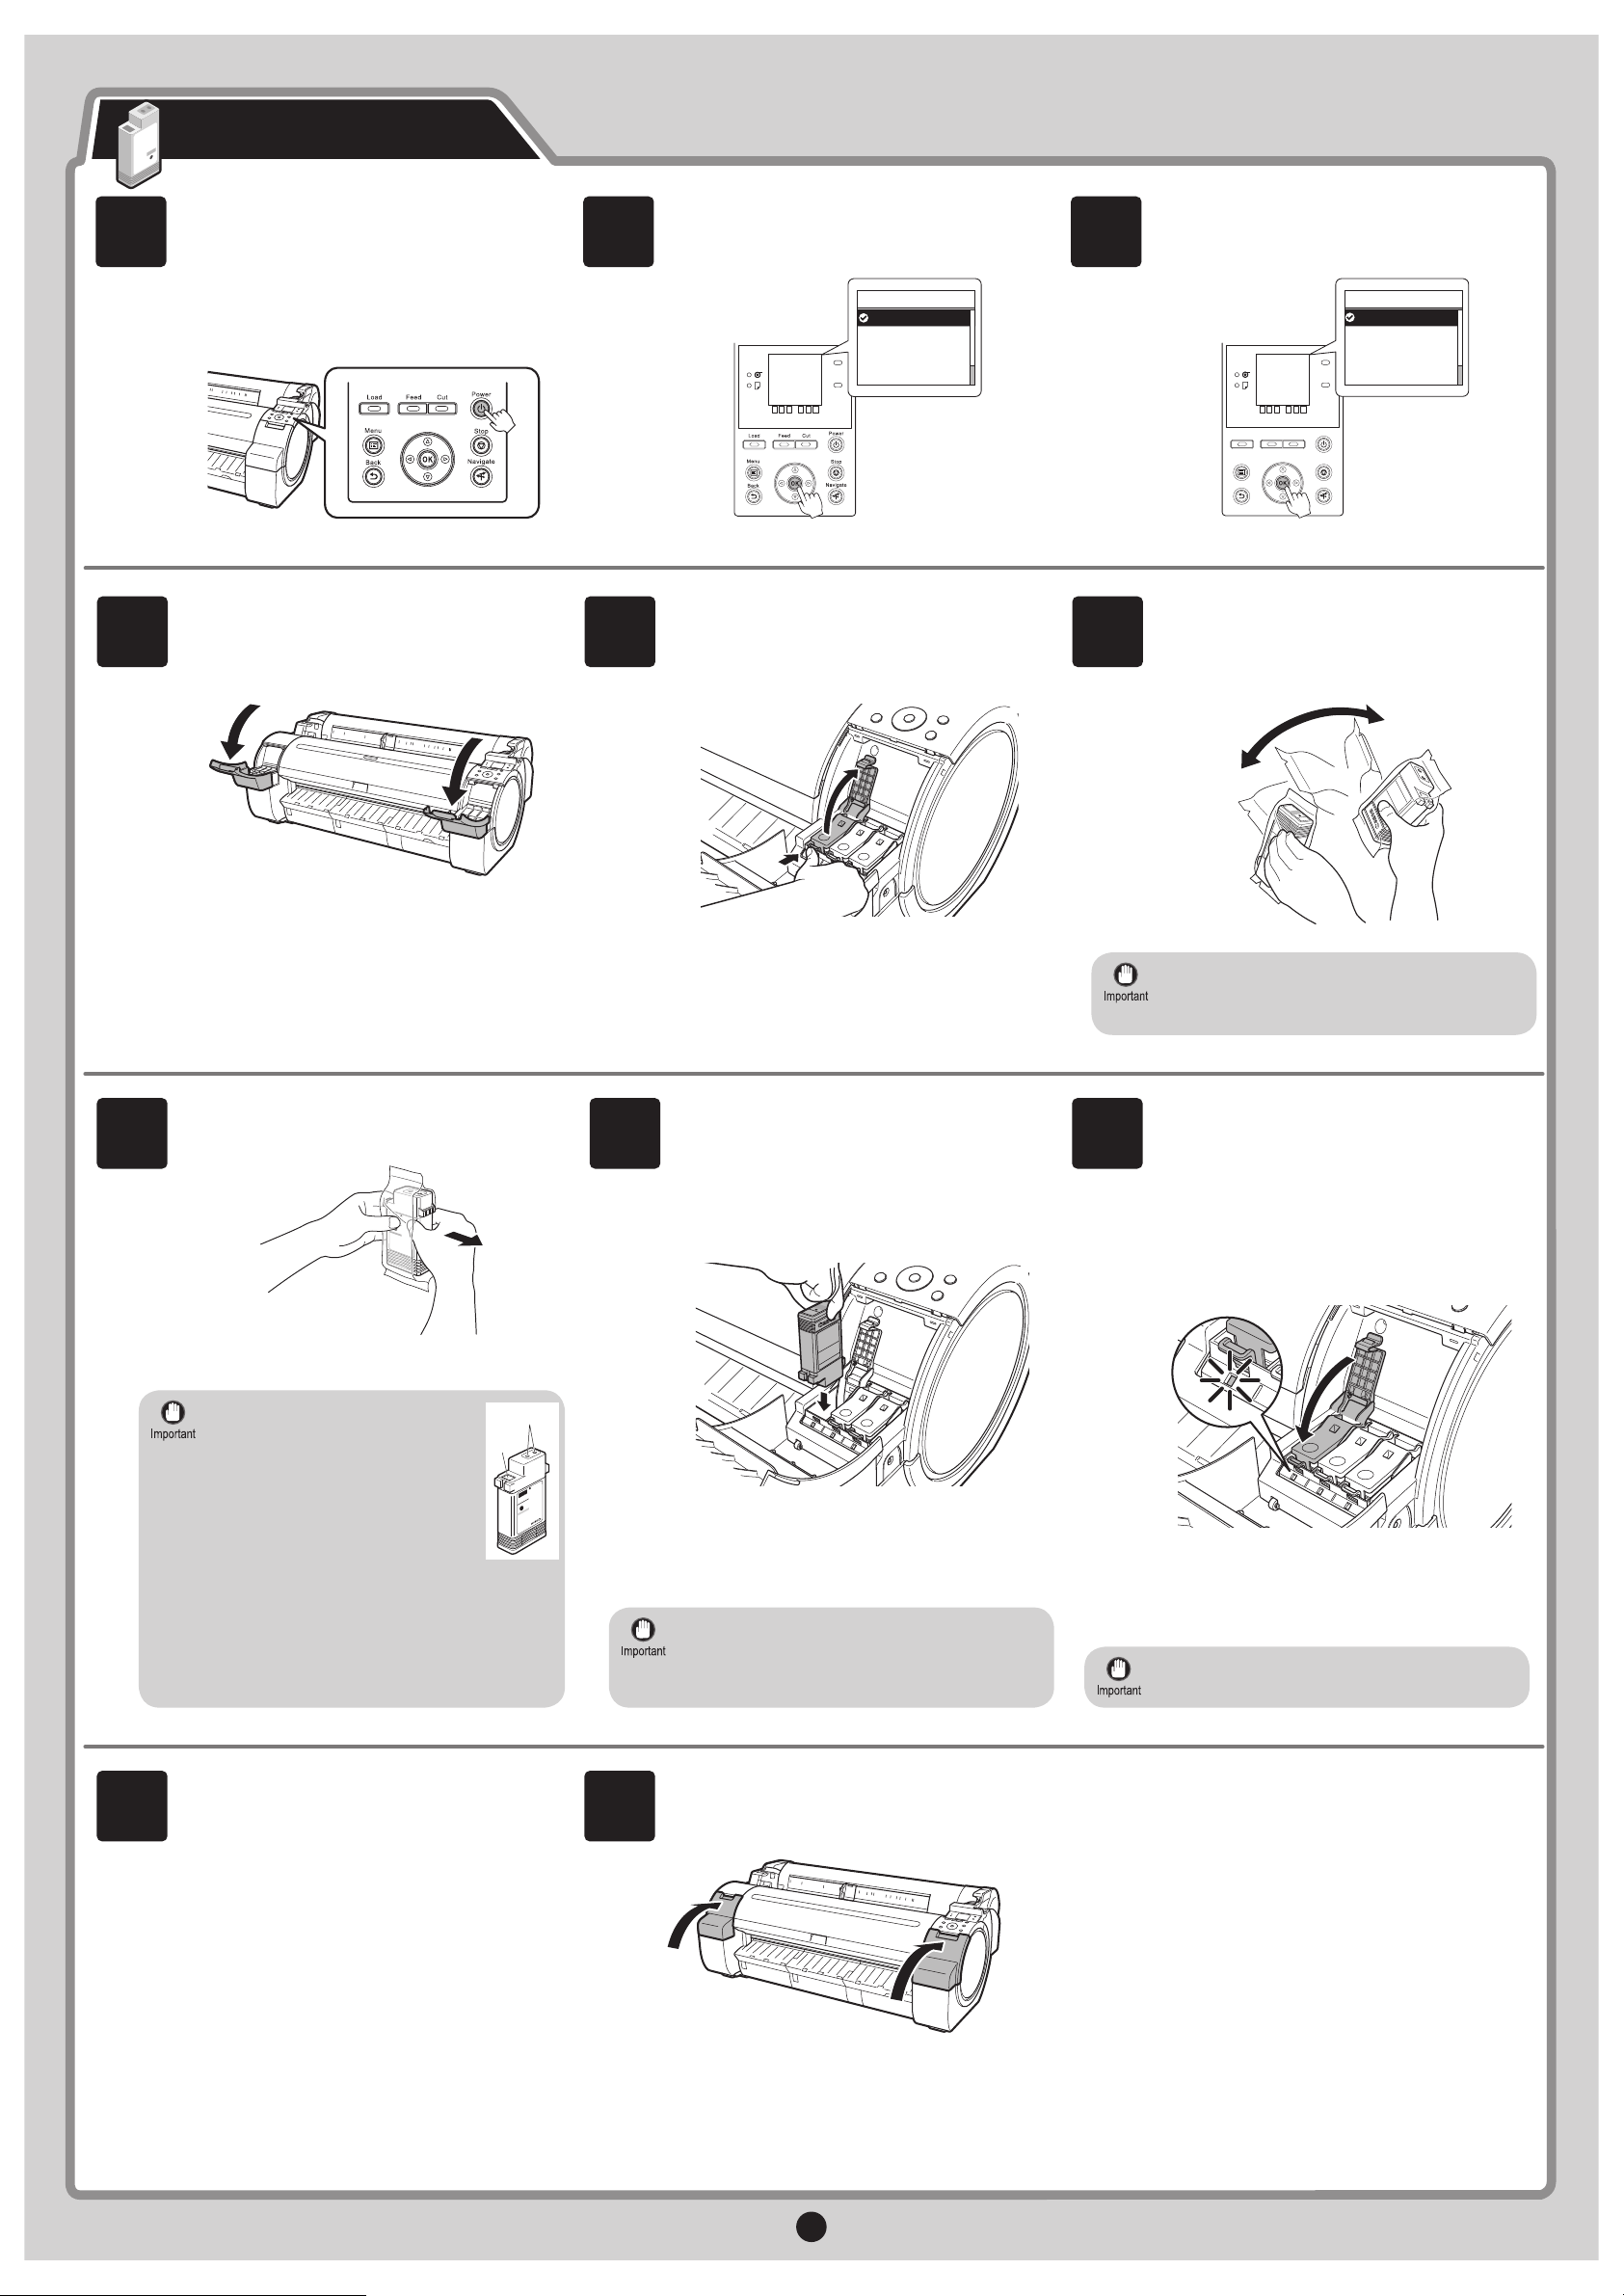
Repeat steps 5 to 9 to install all of the ink
tanks .
9
Close the ink tank cover .
10
11
Never touch the ink holes (a)
or metal contacts (b). Touching
these parts may cause stains,
damage the ink tank , and affect
print quality.
•
Avoid dropping the ink tank after
removing it from the pouch.Otherwise,
ink may leak and cause stains.
•
Do not remove and shake ink tanks that
have already been installed in the printer
because ink may leak out.
•
If the ink tank does not fi t in the holder,
make sure the color of the ink tank lock
lever matches the color of the ink tank , and
check the orientation of the ink tank .
•
897
If the ink lamp is not lit, repeat steps 5, 8,
and 9.
•
Close the ink tank lock lever until it clicks
into place. Make sure the ink lamp is lit in
red.
Open the pouch and remove the ink tank .
Insert the ink tank into the holder facing
as shown, with the ink holes down.
Load all six ink tanks .
Install the Ink Tanks
When the following screen appears, use
the ▲ and ▼ keys to select a language
and press OK.
Select your local time zone and press OK.
Press the power button to turn on the
printer.
1 2 3
4 5 6
Failure to shake ink tanks may result in
reduced print quality because ink ingredients
have settled on the bottom of the tank.
•
Instructions on ink tank installation
are shown on the display screen. As
instructed, grab the handle on the ink tank
cover to open it.
While pressing the stopper of the ink tank
lock lever inwards, open the ink tank lock
lever upwards.
Shake the ink tanks gently 1 to 2 times
before opening the pouch.
Data
Message
Language
English
ᣣᧄ⺆
Français
Italiano
Deutsch
㪈㪆㪉
Time Zone
0:London (GMT)
+1:Paris,Rome
+2:Athens,Cairo
Data
+3:Moscow
Message
+4:Eerevan,Baku
FEED Cut
Power
Stop
Navigate
Load
Menu
Back
㪈㪆㪌
b
a
4
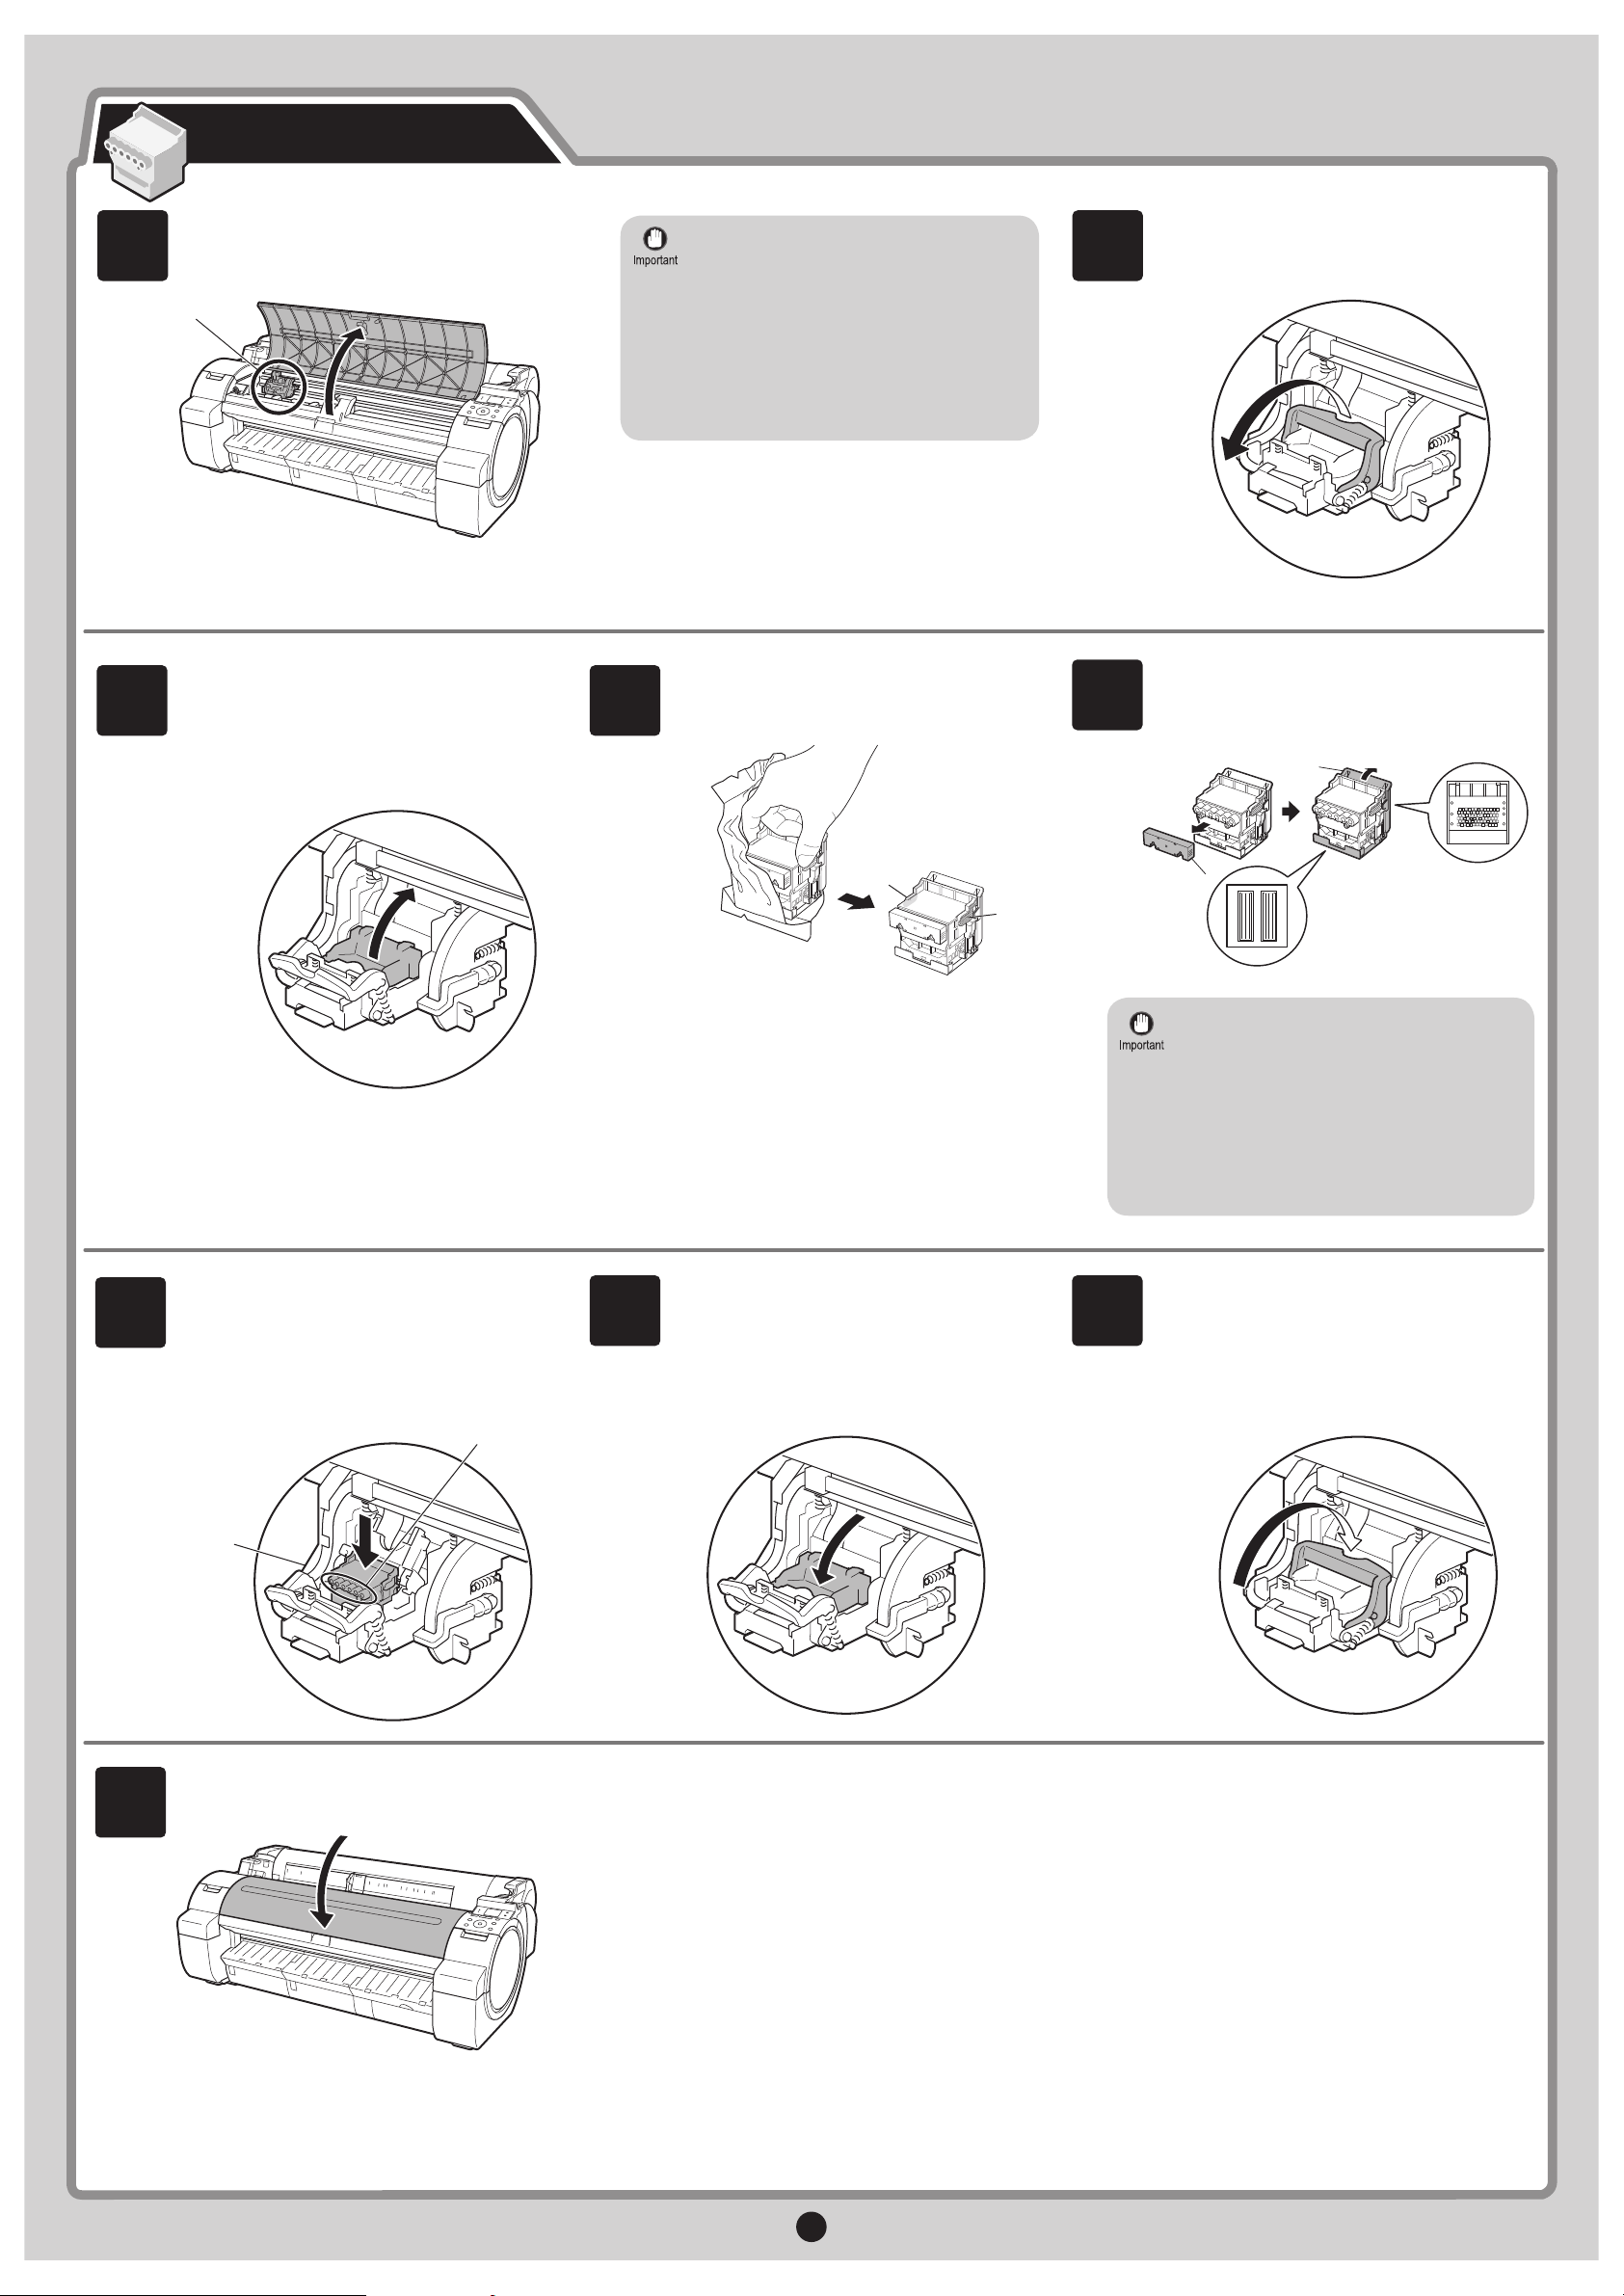
Push the printhead fi xer lever all the way
back.
Pull the printhead fi xer cover down toward
the front to lock the printhead in place.
Insert the printhead into the carriage (b)
with the ink holes (a) facing away from the
printer as shown in the fi gure. Carefully
push the printhead fi rmly into the carriage
(b), ensuring that the part covered by
the protective part does not touch the
carriage.
6
7
8
Close the top cover .
9
Next, install the printhead.
Install the Printhead
When installing the printhead, do not
move the carriage (a) from the position
shown in the fi gure.
If you move the carriage (a), a warning
noise sounds and the printhead cannot
be installed.
If you have moved the carriage (a),
close the top cover. The carriage (a)
moves to the position shown in the
fi gure.
•
Open Upper Cover is shown on the
display screen. As instructed, open the top
cover .
Instructions on printhead replacement are
shown on the display screen.
Pull the printhead fi xer lever forward all
the way to open it completely.
1
2
Remove the orange protective part (a).
To remove orange protective part (b),
push the grip (c) as you remove the
part
.
5
• Do not reattach the protective part after
removing it. Dispose of these materials
according to local regulations.
Never touch the parts covered by the
protective part.
This may damage the
printhead
and affect printing quality.
•
The printhead contains ink, so be careful
not to spill it once the protective
part
is
removed.
•
Lift the printhead fi xer cover to open it
fully.
Hold the printhead by the grips (a) as you
remove it from the pouch.
a
a
34
a
c
b
a
a
b
5
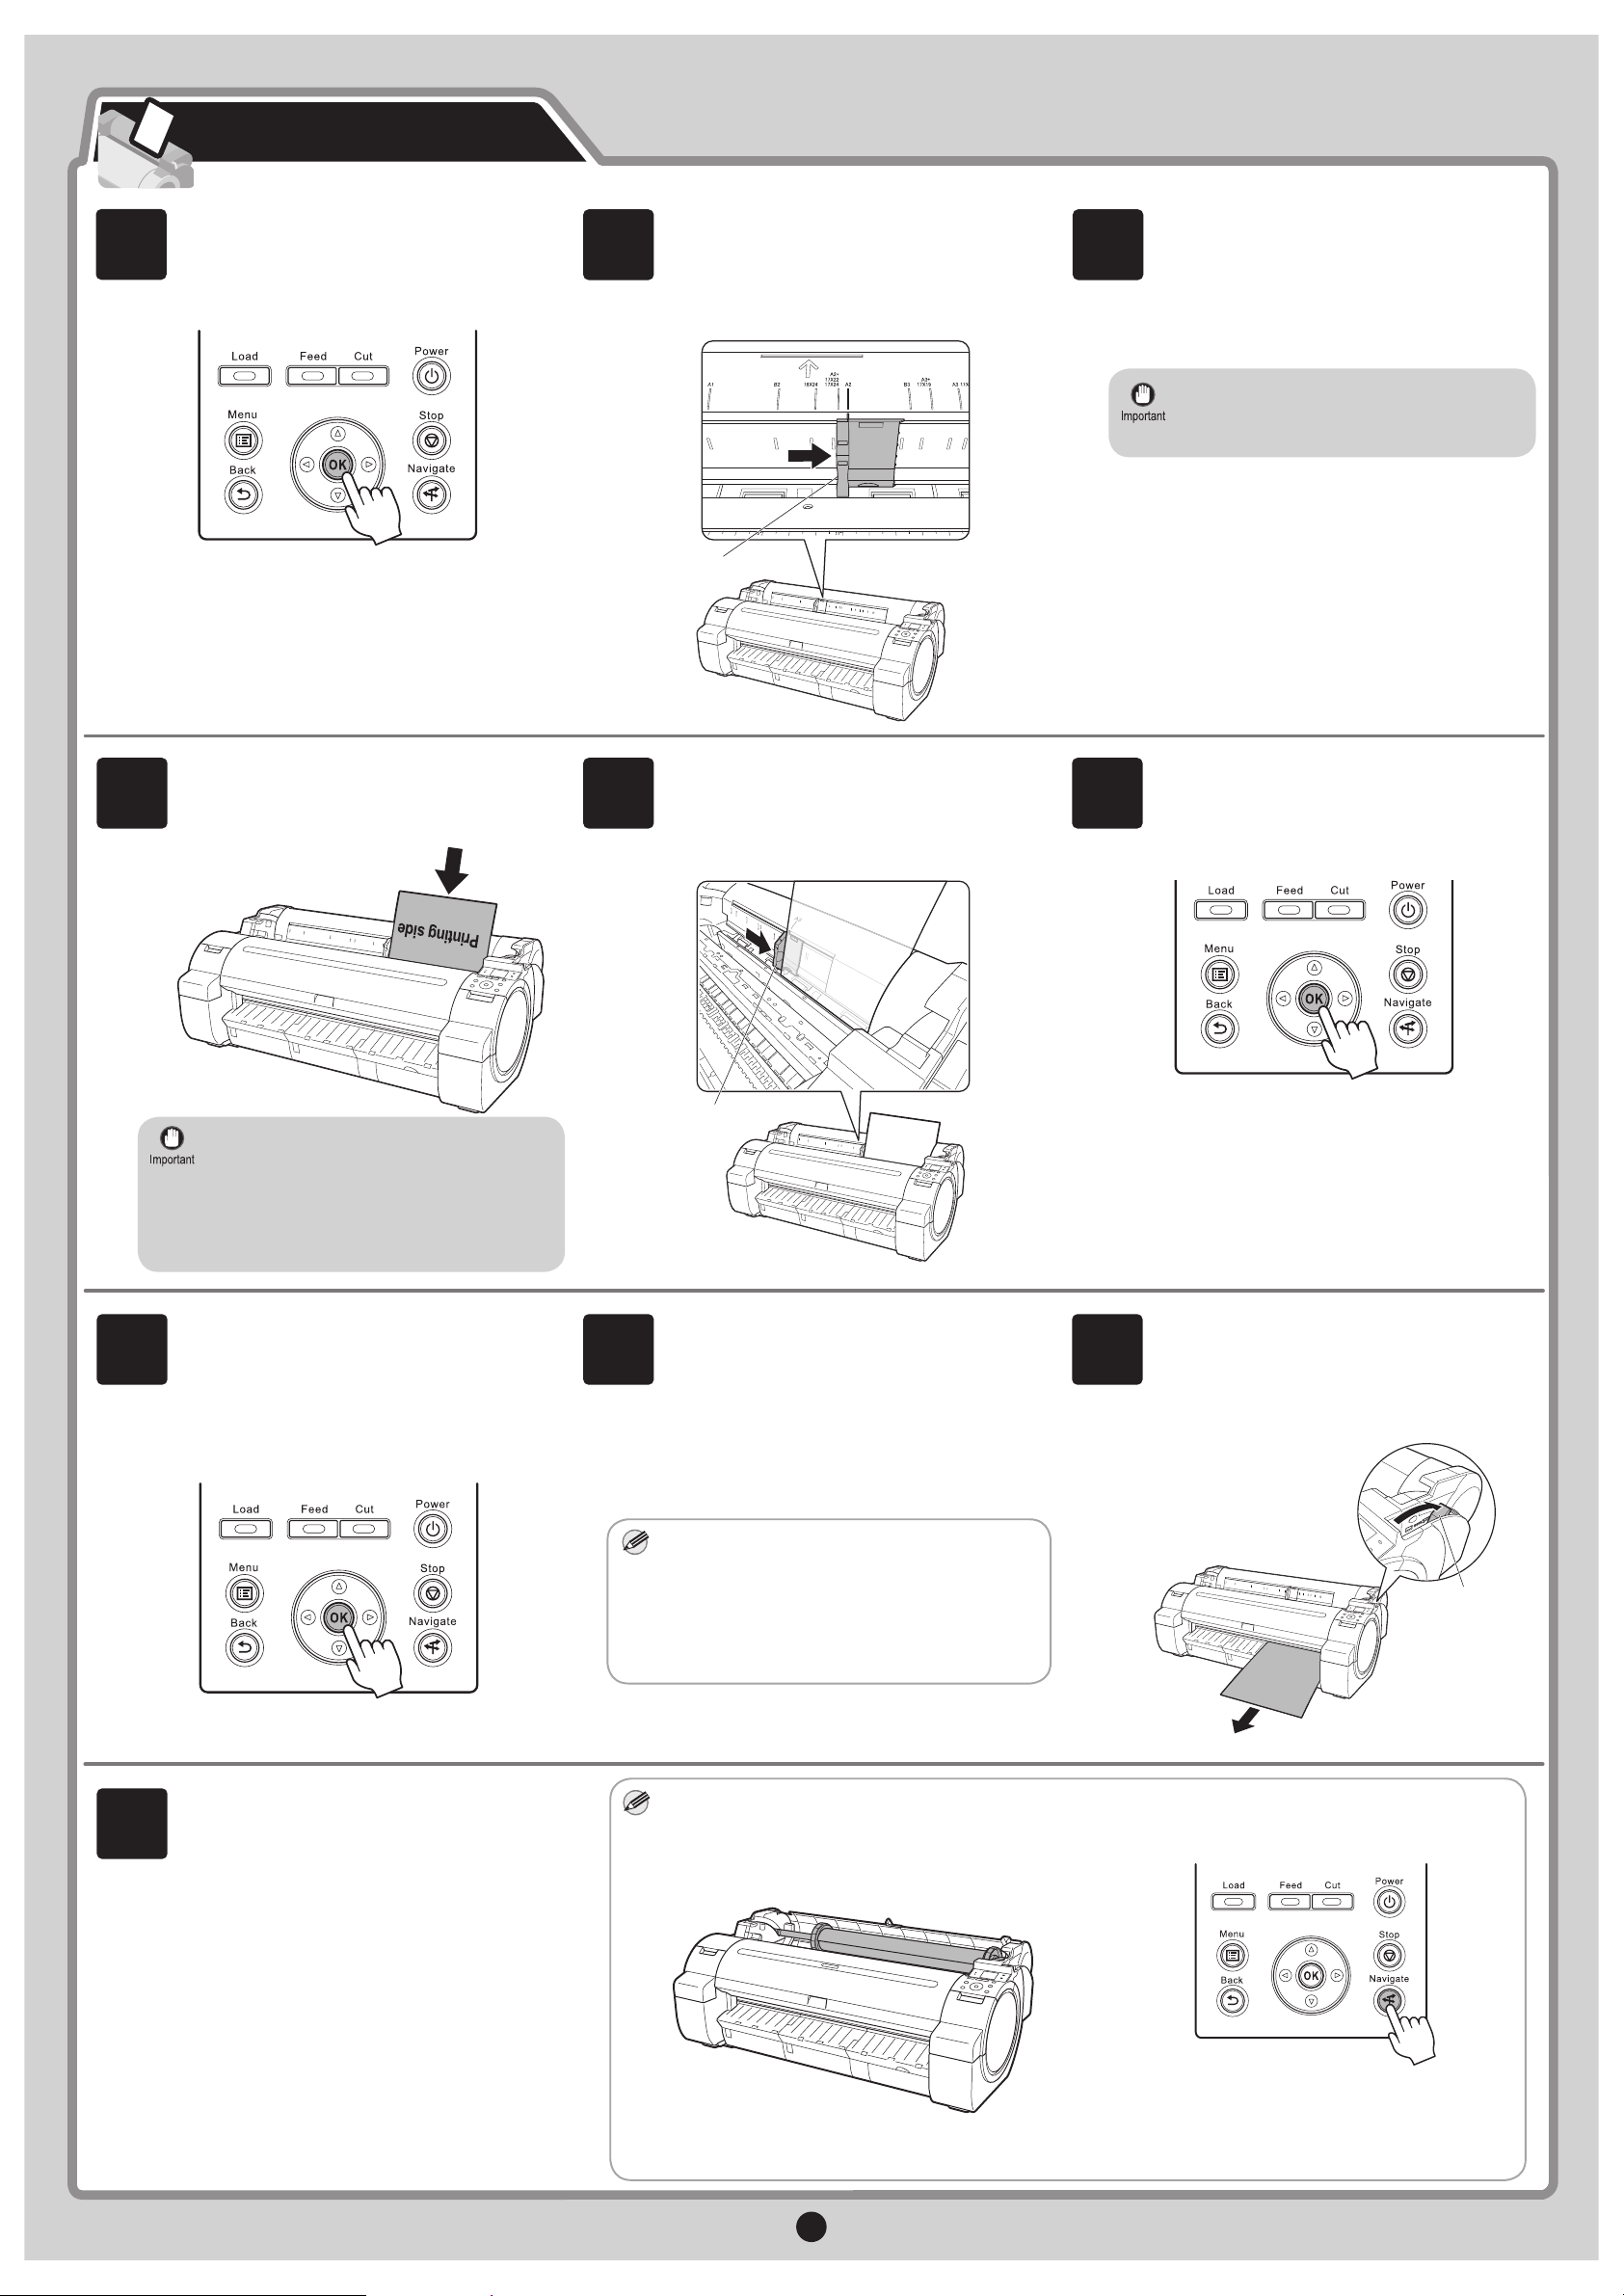
When printhead adjustment ends, paper is
printed with an adjustment pattern and is
ejected.
While holding the paper, press the release
lever (a) backwards to remove the paper.
9
Load paper for adjusting the printhead into the printer.
Follow these steps to load cut sheet paper into the printer. The sample paper provided is used in this example.
Load Cut Sheet Paper
Return unused paper to the pouch it
came in, and store it away from heat,
humidity and direct sunlight.
•
Slide the width guide (a) and align it
with the mark for the size of paper to be
loaded. In this example, align the width
guide with A2 to align it with the size of the
sample paper.
Select type of paper for printhead adj.
is shown on the display screen. Check
that Cut Sheet is selected and press OK.
Instructions on loading cut sheets are
shown on the display screen.
Prepare one sheet of paper.
Refer to the packaging for the paper to
check which side is the printable surface.
1
2
3
Only one sheet can be loaded in the
printer. Do not load two or more sheets.
Doing so might cause a paper jam.
•
Wrinkled or warped paper might cause
paper jams. Be sure to fl atten the paper
out before loading it.
•
Load paper with the printable surface
face up.
Insert the paper until its leading edge
touches a stop and you hear a tone.
4
A message confi rming paper advance is
shown on the display screen. Press OK.
6
Pull the release lever forward.
Printer setup is now complete.
For how to load roll paper, refer to the Basic
Guide (1), to the User Manual installed
at "Install the Printer Driver and the User
Manual", or to the instructions displayed by
the navigation function of the control panel.
•
Follow the procedure below to display the
navigation on how to load roll paper.
1. Press Navigate.
2. Use the ▲ and ▼ keys to select Load Roll
Paper and press OK.
3. Use the ▲ and ▼ keys to select View Op.
Guide and press OK.
The navigation starts.
O
10
The screen for selecting the paper type is
shown on the display screen. Press ▲ or
▼ to select the type of paper loaded in the
printer.
Select Coated Paper and press OK.
Then from the menu that appears, select
Coated Paper and press OK.
7
The paper is advanced.
O
During printer installation, ink fi lls the system
between the ink tanks and printhead . In
addition, printheads are cleaned to keep the
printer in optimal condition. This may cause
the maintenance cartridge capacity indicator
to drop to about 80%, but this is not a problem
with the printer.
When paper advance ends, the system
is automatically fi lled with ink for the fi rst
time and printhead adjustment is started.
It takes a total of about 20 minutes.
Make use of this time by referring to
"Install the Printer Driver and the User
Manual" on page 6 to install the printer
driver and the User Manual on your PC.
8
Adjust the position of the width guide (a)
to the size of the paper to be loaded.
Make sure the width guide fi ts properly
against the edge of the paper to prevent it
from being tilted or wrinkled.
5
a
a
MEM
a
MEM
 Loading...