


SL |
RO |
PL |
HR |
EN |

Thank-you for choosing a Candy washing machine. We are confident it will loyally assist you in safely washing your clothes, even delicates, day after day.
You can register your product at www.registercandy.com to gain faster access to supplementary services solely reserved to our most loyal customers.
Carefully read this manual for correct and safe appliance use and for helpful tips on efficient maintenance.
 Only use the washing machine after carefully reading these instructions. We recommend you always keep this manual on hand and in good conditions for any future owners.
Please check that the appliance is delivered with this instruction manual, warranty certificate, service centre address and energy efficiency label. Also check that plugs, curve for drain hose and liquid detergent or bleach tray (only on some models) are included. We recommend you keep all these components.
Each product is identified by a unique 16character code, also called the “serial number”, printed on the sticker affixed to the appliance (porthole area) or in the document envelope found inside the product. This code is a sort of specific product ID card that you will need to register it and should you need to contact the Candy Customer Service Centre.
Environmental conditions
This appliance is marked according to the European directive 2002/96/EC on Waste Electrical and Electronic Equipment (WEEE).
By ensuring this product is disposed of correctly, you will help prevent potential negative consequences for the environment and human health, which could otherwise be caused by inappropriate waste handling of this product.
The symbol on the product indicates that this product may not be treated as household waste. Instead it shall be handed over to the applicable collection point for the recycling of electrical and electronic equipment.
Disposal must be carried out in accordance with local environmental regulations for waste disposal.
For more detailed information about treatment, recovery and recycling of this product, please contact your local city office, your household waste disposal service or the shop where you purchased the product.
Contents
1.GENERAL SAFETY RULES
2.INSTALLATION
3.PRACTICAL TIPS
4.MAINTENANCE AND CLEANING
5.QUICK USER GUIDE
6.CONTROLS AND PROGRAMS
7.CUSTOMER SERVICE CENTRE AND WARRANTY
2

1.GENERAL SAFETY RULES
!This appliances is intended to be used in household and similar applications such as:
-Staff kitchen areas in shops, offices and other working environments;
-Farm houses;
-By clients in hotels, motels and other residential type environments;
-Bed and breakfast type environments. A different use of this appliance from household environment or from typical housekeeping functions, as commercial use by expert or trained users, is excluded even in the above applications. If the appliance is used in a manner inconsistent with this it may reduce the life of the appliance and may void the manufacturer’s warranty. Any damage to the appliance or other damage or loss arising through use that is not consistent with domestic or household use (even if located in a domestic or household environment) shall not be accepted by the manufacturer to the fullest extent permitted by law.
!This appliance can be used by children aged from 8 years and above and persons with reduced physical, sensory or mental capabilities or lack of experience and knowledge if they have been given supervision or instruction concerning use of the appliance in a safe way and understand the hazards involved.
Children shall not play with the appliance. Cleaning and user maintenance shall not be made by children without supervision.
!Children should be supervised to ensure that they do not play with the appliance.
!Children of less than 3 years should be kept away unless continuously supervised.
!If the supply cord is damaged, it must be replaced by the manufacturer, its service agent or similarly qualified persons in order to avoid a hazard.
!Only use the hose-sets supplied with the appliance for the water supply connection (do not reuse old hose-sets).
!Water pressure must be between 0,05 MPa and 0,8 MPa.
!Make sure that a carpet do not obstruct the base of the machine and ventilation openings.
!The OFF condition is reached by placing the reference mark on the programmes control/knob in the vertical position. Any other different position of such control sets the machine in ON condition.
!After installation, the appliance must be positioned so that the plug is accessible.
!The maximum load capacity of dry clothes depends on the model used (see control panel).
EN
3

!To consult the product fiche please refer to the manufacturer website.
Safety instructions
!Before cleaning or maintaining the washing machine, unplug the appliance and turn off the water faucet.
!Make sure the electrical system is grounded. Otherwise, seek qualified professional assistance.
!Please do not use converters, multiple sockets or extension cords.
 WARNING:
water may reach very high temperatures during the wash cycle.
!In the event of fault and/or malfunction, turn off the washing machine, close the water faucet and do not tamper with the appliance.
Immediately contact the Customer Service Centre and only use original spare parts. Failure to observe these instruction may jeopardise appliance safety.
!Make sure there is no water in the drum before opening the porthole.
!Do not pull on the power cord or appliance to unplug the machine.
!Do not expose the washing machine to rain, direct sunlight or other weather elements.
!When moving, do not lift the washing machine by the knobs or detergent drawer; during transport, never rest the porthole on the trolley. We recommend two people lift the washing machine.
Appliance complies with European Directives:
!2006/95/EC (LVD);
!2004/108/EC (EMC);
!2009/125/EC (ErP);
!2011/65/EU (RoHS)
and subsequent amendments.
4
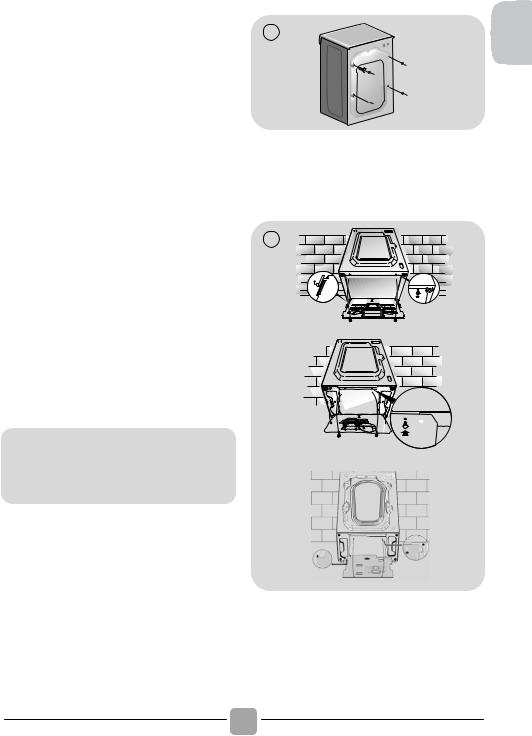
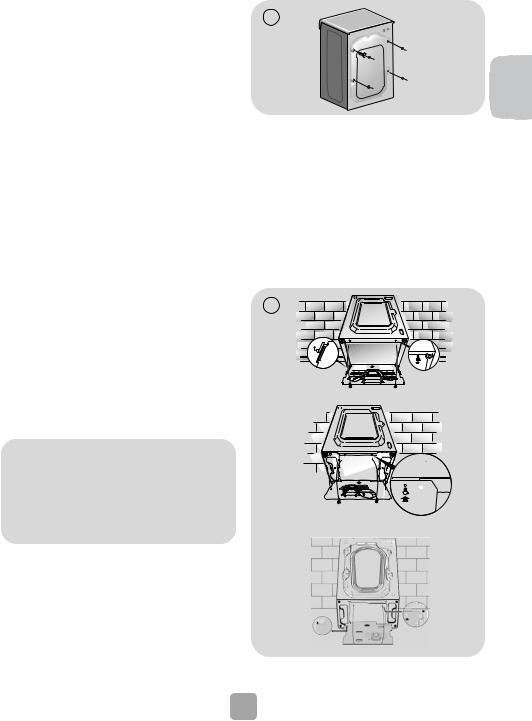
2. INSTALLATION
!Cut the tube straps, being careful not to damage the tube and power cord.
!Unscrew the 2 or 4 screws (A) on the back and remove the 2 or 4 shims (B) as illustrated in figure 1.
!Close the 2 or 4 holes using the plugs included in the instruction envelope.
!If the washing machine is built-in, after cutting the hose straps, unscrew the 3 or 4 screws (A) and remove the 3 or 4 shims (B).
!In some models, 1 or more shims will fall inside the machine: tilt the washing machine forward to remove them. Close the holes using the plugs found in the envelope.
 WARNING:
keep packaging materials away from children.
!Place the polionda sheet on the bottom as shown in figure 2 (according to the model, consider version A, B or C).
5
1
A  A
A
BA B A
B B
B
2
A |
|
3 |
|
1 |
2 |
||
|
B
C
3
2 |
1 |
EN
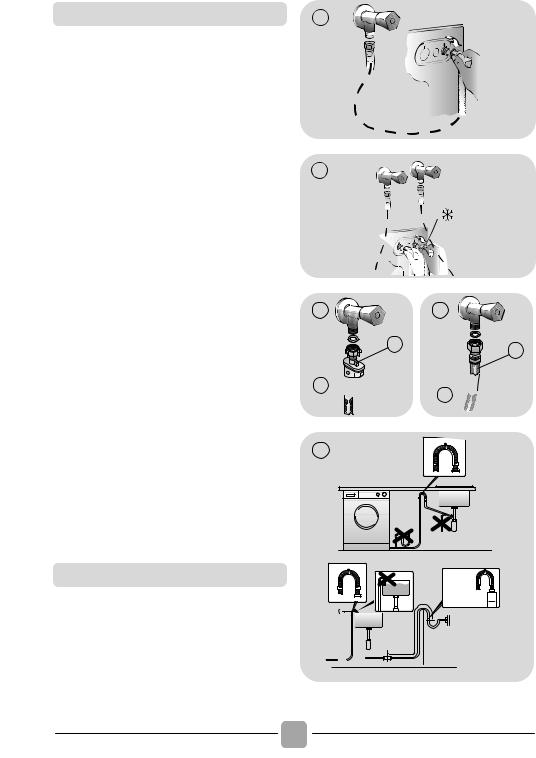
Hydraulic connections
!Connect the water tube to the faucet, only using the drain tube supplied with the washing machine (fig. 3).
DO NOT OPEN THE FAUCET.
!Some models may include one or more of the following features:
!HOT&COLD (fig. 4):
water mains connection settings with hot and cold water for higher energy savings.
Connect the grey tube to the cold water faucet  and the red one to the hot water faucet. The machine can be connected to the cold water faucet only: in this case, some programs may start a few minutes later.
!AQUASTOP (fig. 5):
a device located on the supply tube that stops water flow if the tube deteriorates; in this case, a red mark will appear in the window “A” and the tube must be replaced. To unscrew the nut, press the one-way lock device "B".
!AQUAPROTECT – SUPPLY TUBE WITH GUARD (fig. 6):
Should water leak from the primary internal tube "A", the transparent containment sheath "B" will contain water to permit the washing cycle to complete. At the end of the cycle, contact the Customer Service Centre to replace the supply tube.
1
5 |
6 |
B |
B |
|
A 

 A
A 

7
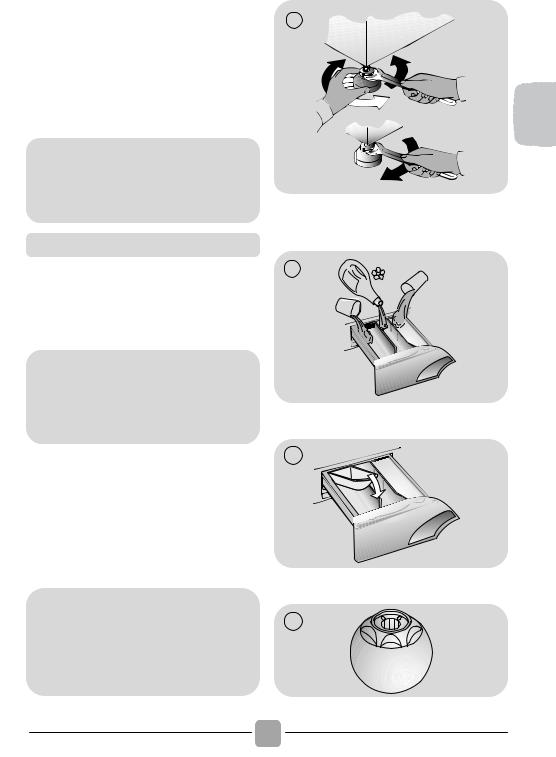
Setting
!Near the washing machine to the wall, being careful that the tube is not bent or crushed, and place the drain tube in the tub or, preferably, connect it to a wall drain at least 50 cm high with diameter greater than the washing machine tube
(fig. 7).
6
max 100 cm
|
min 4 cm |
+2,6 mt |
|
max |
min 50 cm |
|
max 85 cm |
!Level the appliance using the feet as |
8 |
|
|
|
illustrated in figure 8: |
|
|
|
|
a. turn the nut clockwise to release the |
|
|
|
|
screw; |
|
|
|
A |
b. rotate the foot to raise or lower it until it |
|
|
|
|
adheres to the floor; |
|
|
|
|
c. lock the foot, screwing in the nut, until it |
|
|
|
|
adheres to the bottom of the washing |
|
|
|
B |
machine. |
|
|
|
|
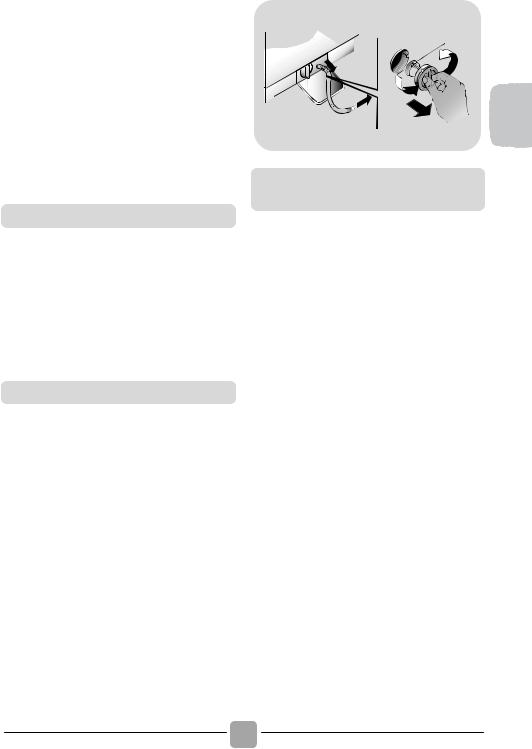
!Plug in the appliance. |
|
|
|
|
WARNING: |
|
|
|
|
|
|
|
|
|
|
|
|
|
|
|
C |
|||
contact the Customer Service Centre |
|
|||
should the power cord need |
|
|
|
|
replacement. |
|
|
|
|
Detergent drawer
The detergent draw is split into 3 compartments as illustrated in figure 9:
!compartment "1": for prewash detergent;
!compartment “ ”: for special additives, softeners, starch fragrances, etc.;
 WARNING:
only use liquid products; the washing machine is set to automatically dose additives at each cycle during the last rinse.
!compartment "2": for washing detergent.
A liquid detergent cup is also included in some models (fig. 10). To use it, place it in compartment "2". This way, liquid detergent will only enter the drum at the right time. The cup can also be used for bleach when the “Rinse” program is selected.
 WARNING:
some detergents are hard to remove. In this case we recommend using the specific container to be placed in the drum (example in figure 11).
7
9
10
11
1 |
2 |
EN

3. PRACTICAL TIPS
Load tips
WARNING: when sorting laundry, make sure:
-have eliminated metallic objects such as barrettes, pins, coins, from laundry;
-to have buttoned pillow cases, closed zips, tied loose belts and long robe ribbons;
-to have removed rollers from curtains;
-to have carefully read clothing washing labels;
-to have removed any persistent stains using specific detergents.
!When washing rugs, bedcovers or other heavy clothing, we recommend you avoid centrifuging.
!To wash wool, make sure the item can be machine washed and marked by the “Pure virgin wool” symbol with the “Does not mat” or “Machine washable” label.
Helpful suggestions for the user
A guide environmentally friendly and economic use of your appliance.
Maximise The Load Size
!Achieve the best use of energy, water, detergent and time by using the recommended maximum load size.
Save up to 50% energy by washing a full load instead of 2 half loads.
Do you need to pre-wash?
!For heavily soiled laundry only!
SAVE detergent, time, water and between 5 to 15% energy consumption by NOT selecting Prewash for slight to normally soiled laundry.
8
Is a hot wash required?
!Pretreat stains with stain remover or soak dried in stains in water before washing to reduce the necessity of a hot wash programme.
Save up to 50% energy by using a 60°C wash programme.
Following is a quick guide with tips and recommendations on detergent use at the various temperatures. In any case, always read the instructions on the detergent for correct use and doses.
When washing heavily soiled whites, we recommend using cotton programs of 60°C or above and a normal washing powder (heavy duty) that contains bleaching agents that at medium/high temperatures provide excellent results.
For washes between 40°C and 60°C the type of detergent used needs to be appropriate for the type of fabric and level of soiling.
Normal powders are suitable for “white” or colour fast fabrics with high soiling, while liquid detergents or “colour protecting” powders are suitable for coloured fabrics with light levels of soiling.
For washing at temperatures below 40°C we recommend the use of liquid detergents or detergents specifically labeled as suitable for low temperature washing.
For washing wool or silk, only use detergents specifically formulated for these fabrics.
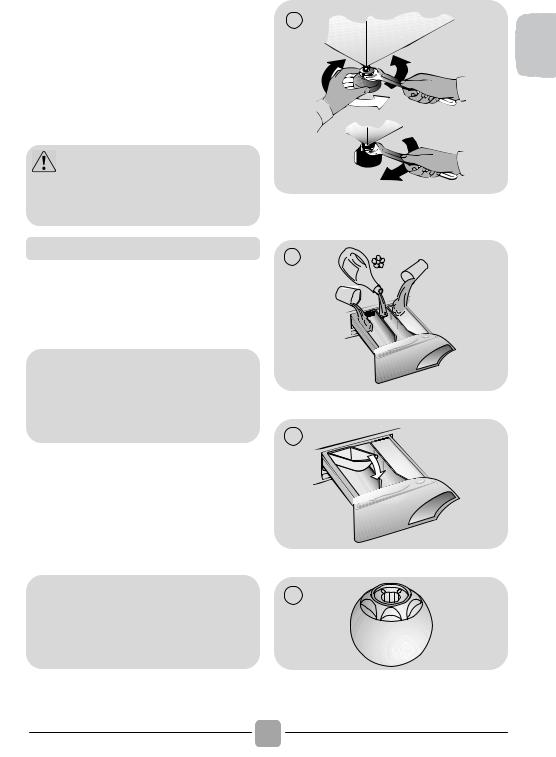
4.MAINTENANCE AND CLEANING
To clean the washing machine exterior, use a damp cloth, avoiding abrasives, alcohol and/or solvents. The washing machine does not require any special care for ordinary cleaning: clean drawer compartments and the filter; some tips on how to move the machine or on long periods of disuse are provided below.
EN
Drawer cleaning
!We recommend you clean the drawer to avoid accumulating detergent and additive residue.
!To do this, extract the drawer using slight force, clean it with running water and reinsert it in its housing.
Filter cleaning
!The washing machine comes with a special filter able to trap large residue, such as buttons or coins, which could clog the drain.
!Only available on certain models: pull out the corrugated hose, remove the stopper and drain the water into a container.
!Before unscrewing the filter, we recommend you place an absorbent cloth under it to keep the floor dry.
!Turn the filter counter-clockwise to the limit stop in the vertical position.
!Remove and clean the filter; when finished, replace it turning it clockwise.
!Repeat the previous steps in reverse order to reassemble all parts.
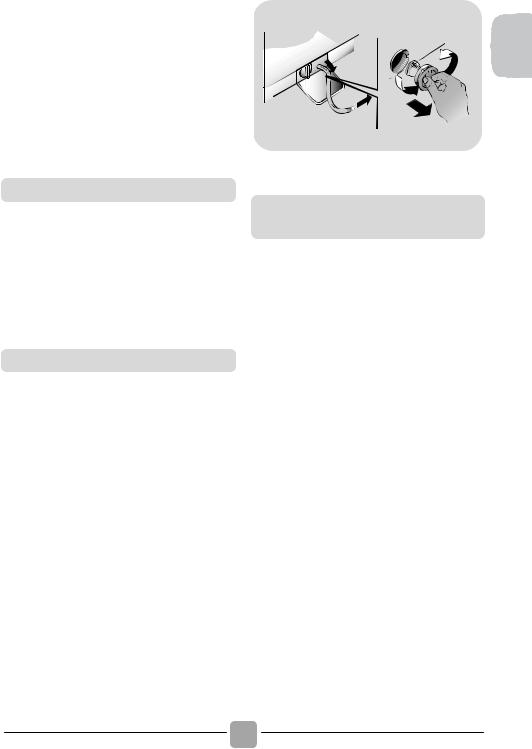
Suggestions for moves or prolonged disuse
!Should the washing machine be stored in an unheated room for a long period of time, drain all water from tubes.
!Unplug the washing machine.
!Detach the tube from the strap and lower it, fully draining water into a bowl.
!Secure the drain tube with the strap when finished.
9
5. QUICK USER GUIDE
This washing machine automatically adapts the level of the water to the type and quantity of washing. This system gives a decrease in energy consumption and a sensible reduction in washing times.
Program selection
!Turn on the washing machine and select the required program.
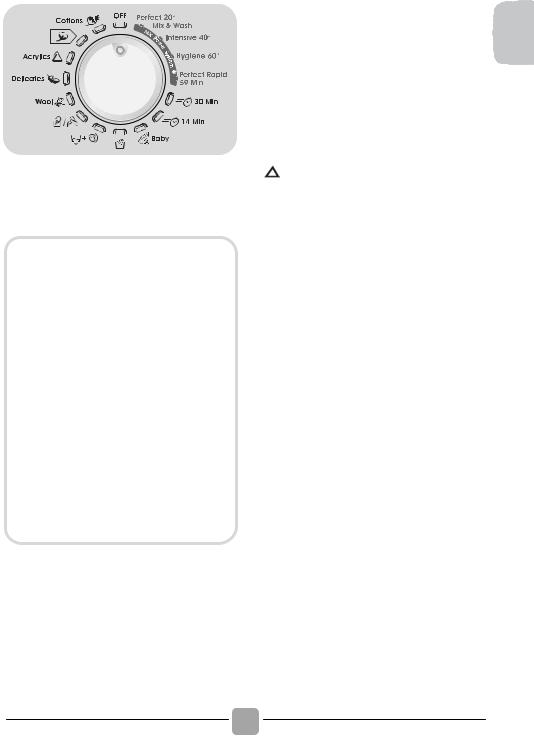
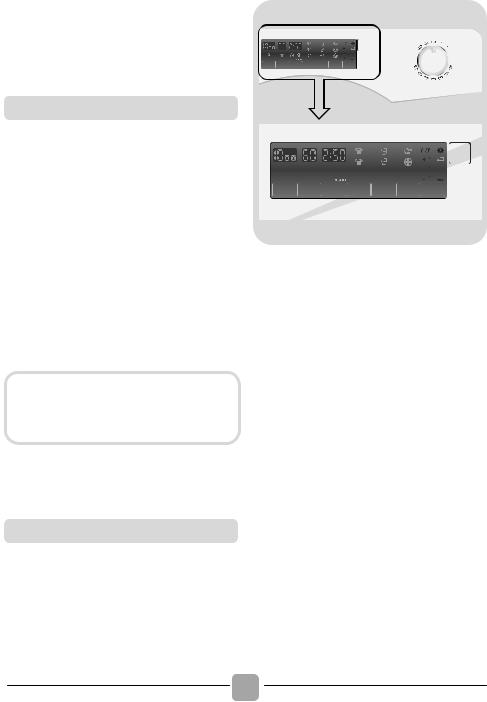
6.CONTROLS AND PROGRAMS

 A
A
!Adjust the washing temperature if necessary and press the required "option" buttons.
!Press the START/PAUSE button to start washing.
Should power go out when the washing machine is running, a special memory saves the settings and, when power returns, the machine resumes the cycle from where it left off.
!The message "end" will appear on the display or the corresponding led will turn on at the end of the program.
Wait until the porthole locked light turns off: about 2 minutes after the program ends.
!Turn off the washing machine.
For any type of wash, see the program table and follow the operating sequence as indicated.
Technical data
Water pressure: min 0,05 Mpa max 0,8 Mpa
Spin r.p.m.:
L
M


 B
B
C D E F G H I
AProgramme selector with OFF position
BSTART/PAUSE button
CSPIN SELECTION button
DTEMPERATURE SELECTION button
EDELAY START button
FSTAIN LEVEL button
GEXTRA RINSE button
HOPTIONS button
IEASY IRON button
LDigital display
MDOOR LOCKED indicator light
See rating plate.
Power input / Power current fuse amp / Supply voltage:
See rating plate.
10
 WARNING:
Don’t touch the display while inserting the plug because the machines calibrates the systems during the first seconds: touching the display, the machine couldn’t work property. In this case, remove the plug and repeat the operation.
Opening the door
A special safety device prevents the door from being opened immediately after the end of the cycle.
Wait for 2 minutes after the wash cycle has finished and the "Door Security" light has gone out before opening the door.
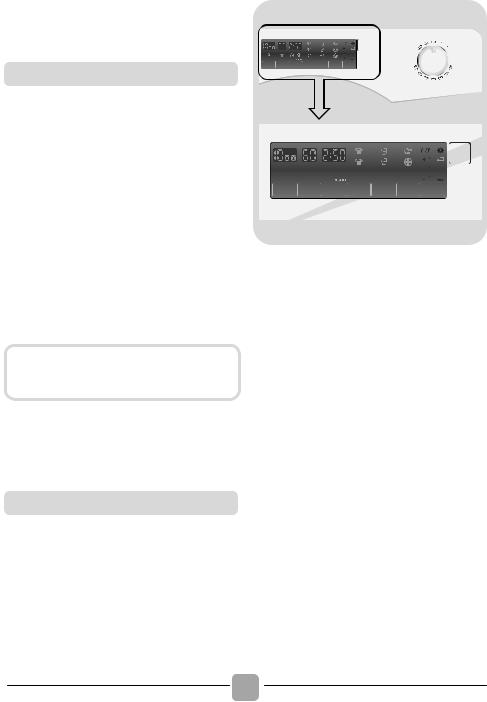
PROGRAMME selector with OFF position
When the programme selector is turned the display lights up to show the settings for the programme selected.
For energy saving, at the end of the cycle or with an inactivity period, the display level contrast will decrease.
N.B.: To switch the machine off, turn the programme selector to the OFF position.
!Press the START/PAUSE button to start the selected cycle.
The programme selector must be returned to the OFF position at the end of each cycle or when starting a subsequent wash cycle prior to the next programme being selected and started.
START/PAUSE button
Close the door BEFORE selecting the button START/PAUSE.
!Press to start the selected cycle.
When the START/PAUSE button has been pressed, the appliance can take few seconds before it starts working.
ADD OR REMOVE ITEMS AFTER THE PROGRAMMES HAS STARTED (PAUSE)
!Press and hold the START/PAUSE button for about 2 seconds (some indicator light and the time remaining indicator will flash, showing that the machine has been paused).
!Wait 2 minutes until the safety device unlocks the door.
!After you have added or removed items, close the door and press the START/PAUSE button (the programme will start from where it left off).
!Once a programme is selected the programme selector remains stationary on the selected programme till cycle ends.
!Switch off the washing machine by turning the selector to OFF.
CANCELLING THE PROGRAMME
!To cancel the programme, set the selector to the OFF position.
!Select a different programme.
11
EN

!Re-set the programme selector to the OFF position.
The option buttons should be selected before pressing the START/PAUSE button.
If an option is selected that is not compatible with the selected programme then the option indicator first flashes and then goes off.
!It is not possible to raise the temperature over the maximum allowed for every programme, in order to save the fabrics.
DELAY START button
!This button allows you to pre-programme the wash cycle to delay the start of the cycle for up to 24 hours.
!To delay the start use the following procedure:
SPIN SELECTION button
!By pressing this button, it is possible to reduce the maximum speed, and if you wish, the spin cycle can be cancelled.
!To reactivate the spin cycle press the button until you reach the spin speed you would like to set.
To prevent damage to the fabrics, it is not possible to increase the speed over that which is automatically suitable during the selection of the program.
!It is possible to modify the spin speed without pausing the machine.
The machine is fitted with a special electronic device, which prevents the spin cycle should the load be unbalanced.
This reduces the noise and vibration in the machine and so prolongs the life of your machine.
TEMPERATURE SELECTION button
!This button allows you to change the temperature of the wash cycles.
12
-Set the required programme.
-Press the button once to activate it (h00 appears on the display) and then press it again to set a 1 hour delay (h01 appears on the display). The pre-set delay increases by 1 hour each time the button is pressed, until h24 appears on the display, at which point pressing the button again will reset the delay start to zero.
-Confirm by pressing the START/PAUSE button (the light on the display starts to flash). The countdown will begin and when it has finished the programme will start automatically.
!It is possible to cancel the delay start by turning the programme selector to OFF.
If there is any break in the power supply while the machine is operating, a special memory stores the selected programme and, when the power is restored, it continues where it left OFF
STAIN LEVEL button
!By selecting this button there is a choice of 3 levels of wash intensity, depending on how much the fabrics are soiled (can be used only on some programmes as shown in the table of programmes).

!Once the programme has been selected the indicator light will automatically show the stain level set for that programme.
!Selecting a different stain level the relevant indicator will light up.
EXTRA RINSE button
!This button allows you to add rinses at the end of the washing cycle. The maximum number of extra rinses is related to the programme selected.
!This function has been studied for the people with delicate and sensitive skin, for which also a least residue of detergent can cause irritations or allergies.
!It advises to also use this function for the children items and in case of washings of very dirty items, for which it is due to use a lot of detergent, or in the washing of toweling items whose fibres mostly have the tendency to hold the detergent.
- HYGIENE
!With this option it is possible to hygienize the clothes, the washing programme reach a temperature of 60°C.
- NIGHT CYCLE
!This option reduces the intermediate spin speed to 400 rpm, where applicable, increase the water level during rinsing and keep the laundry immersed in water after the final rinse, in order to spread the fibre sevenly.
!During the phase in which the water is held in the tub, the relevant indicator light blink to show that the machine is at a standstill.
!Deselect the option to end the cycle with a spin dry (which may be reduced or cancelled using the appropriate button) and emptying phase.
!Thanks |
to electronic control, the water |
in the |
intermediate phases is emptied |
silently, making this option very useful for washing at night.
EASY IRON button
OPTIONS button
You can choose between three different options:
- PREWASHING
!This option allows you to make a prewash and it is particularly useful for heavily soiled loads (can be used only on some programmes as shown in the table of programmes).
!We recommend you use only 20% of the recommended quantities shown on the detergent pack.
This function minimizes creases as much as possible.
It can be used on "mixed" "delicate" and "wool" programmes, it eliminates the intermediate spins. On the mixed programme the option reduces the duration of the last spin, on the delicate and wool one, the machine will not drain and spin until the button is switched off.
During this last phase, the light flashes indicating that the machine is in pause. Deselecting the button, the washing cycle will be complete.
13
EN
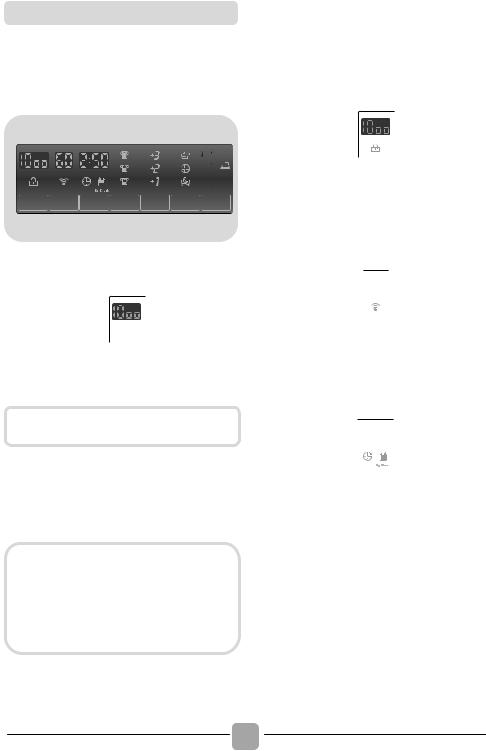
Digital Display
The display’s indicator system allows you to be constantly informed about the status of the machine.
the wash cycle has finished and the DOOR LOCKED light has gone out before opening the door. At the end of the cycle turn the programme selector to OFF.
2) SPIN SPEED
2 |
3 |
4 |
5 |
6 |
7 |
|
2 |
||||||||||||
1 |
|
|
|
|
|
|
|
|
|
|
|
|
|
|
|
|
|
|
This show the spin speed of the selected |
|
|
|
|
|
|
|
|
|
|
|
|
|
|
|
|
|
|
||
|
|
|
|
|
|
|
|
|
|
|
|
|
|
|
|
|
|
||
|
|
|
|
|
|
|
|
|
|
|
|
|
|
|
|
|
|
||
|
|
|
|
|
|
|
|
|
|
|
|
|
|
|
|
|
|
||
|
|
|
|
|
|
|
|
|
|
|
|
|
|
|
|
|
|
||
|
|
|
|
|
|
|
|
|
|
|
|
|
|
|
|||||
|
|
|
|
|
|
|
|
|
|
|
|
|
|
|
|
|
|
||
|
|
|
|
|
|
|
|
|
|
|
|
|
|
|
|
|
|
|
programme that can be changed or omitted |
|
|
|
|
|
|
|
|
|
|
|
|
|
|
|
|
|
|
|
|
|
|
|
|
|
|
|
|
|
|
|
|
|
|
|
|
|
|
|
by the relevant button. |
|
|
|
|
|
|
|
|
|
|
|
|
|
|
|
|
|
|
|
|
89 10
1)DOOR LOCKED INDICATOR LIGHT
1
!The indicator light is illuminated when the door is fully closed.
Close the door BEFORE selecting the START/PAUSE button.
!When START/PAUSE is pressed on the machine with the door closed, the indicator will flash momentarily and then illuminate.
If the door is not properly closed, the light will continue to flash for about 7 seconds, after which the start command will be automatically delete. In this case, close the door in the proper way and press the START/PAUSE button.
!A special safety device prevents the door from being opened immediately after the end of the cycle. Wait for 2 minutes after
3) WASH TEMPERATURE
3 
This show the washing temperature of the selected programme that can be changed (where allowed) by the relevant button.
4) CYCLE DURATION
4
!When a programme is selected the display automatically shows the cycle duration, which can vary, depending on the options selected.
!Once the programme has started you will be kept informed constantly of the time remaining to the end of the wash.
!The appliance calculates the time to the end of the selected programme based upon a standard loading, during the cycle, the appliance corrects the time to that applicable to the size and composition of the load.
14
5) STAIN LEVEL |
9) DELAY START |
5{
!Once the programme has been selected, the indicator light will automatically show the stain level set for that programme.
!Selecting a different stain level the relevant indicator will light up.
6) EXTRA RINSES
{ 6
The indicator lights show the extra rinses selected by the relevant button.
7) OPTIONS
 }7
}7
The |
indicator lights show |
the option that |
can |
be selected by the |
relevant button |
(PREWASH, HYGIENE and NIGHT CYCLE).
8) WI-FI (some models only)
8
!In the models with the Wi-Fi option, the icon indicates that the Wi-Fi system is working.
!For all other information in the Wi-Fi system, there is a specific manual inside
the machine.
EN
9
This flashes when delay start has been set.
10) Kg Check (function active only on Cotton and Synthetics programmes)
10
!During the first minutes of the cycle, the "Kg Check" indicator remain on while the intelligent sensor will weigh the laundry and adjust the cycle time, water and electricity consumption accordingly.
!Through every wash phase "Kg Check" allows to monitor information on the wash load in the drum and in the first minutes of the wash it:
-adjusts the amount of water required;
-determines the length of the wash cycle;
-controls rinsing according to the type of fabric selected to be washed it;
-adjusts the rhythm of drum rotation for the type of fabric being washed;
-recognizes the presence of lather, increasing, if necessary, the amount of water during rinsing;
-adjusts the spin speed according to the load, thus avoiding any imbalance.
15

Table of programmes |
|
|
|
|
|
|
|
2 |
1 |
|
|
|
|
|
|
|
|
|
|
PROGRAM |
|
|
kg * |
|
TEMP.°C |
DETERGENT |
|||
|
|
|
|
|
|
|
|||
|
|
(MAX.) |
|
Recommended |
Max. |
2 |
1 |
||
|
|
|
|
|
|
||||
Perfect 20° |
1) |
3,5 |
4 |
4,5 |
5,5 |
20° |
20° |
|
|
Mix & Wash |
|
|
|||||||
|
|
|
|
|
|
||||
Intensive 40° |
1) |
3,5 |
4 |
4,5 |
5,5 |
40° |
40° |
|
|
Hygiene 60° |
|
3,5 |
4 |
4,5 |
5,5 |
60° |
60° |
|
|
Perfect Rapid |
|
1,5 |
2 |
2,5 |
3 |
40° |
40° |
|
|
59 Min |
|
|
|
||||||
|
|
|
|
|
|
|
|
|
|
Rapid 30 Min |
|
1,5 |
2 |
2,5 |
2,5 |
30° |
30° |
|
|
Rapid 14 Min |
|
1 |
1 |
1 |
1,5 |
30° |
30° |
|
|
Baby |
1) |
3,5 |
4 |
4,5 |
5,5 |
60° |
60° |
|
|
Rinse |
|
- |
- |
- |
- |
- |
- |
|
|
Drain + Spin |
|
- |
- |
- |
- |
- |
- |
|
|
Hand/Silk |
|
1 |
2 |
2 |
2 |
30° |
30° |
|
|
Wool |
|
1 |
2 |
2 |
2 |
40° |
40° |
|
|
Delicates |
|
2 |
2 |
2,5 |
2,5 |
40° |
40° |
|
|
Mixed |
1) |
2,5 |
3 |
3,5 |
4 |
40° |
60° |
|
( ) |
Cottons |
** |
5 |
6 |
7 |
8 |
40° |
60° |
|
( ) |
1) |
|
||||||||
|
|
|
|
|
|
|
|
|
|
Whites |
1) |
5 |
6 |
7 |
8 |
60° |
90° |
|
( ) |
|
|
|
16 |
|
|
|
|
|
|
Please read these notes:
*Maximum load capacity of dry clothes, according to the model used (see control panel).
**STANDARD COTTON PROGRAMMES ACCORDING TO (EU) No 1015/2010 and No 1061/2010.
COTTON PROGRAMME WITH A TEMPERATURE OF 60°C.
COTTON PROGRAMME WITH A TEMPERATURE OF 40°C.
These programmes are suitable to clean normally soiled cotton laundry and they are the most efficient programmes in terms of combined energy and water consumptions for washing cotton laundry.
These programmes have been developed to be compliant with the temperature on the wash label on the garments and the actual water temperature may slightly differ from the declared temperature of the cycle.
The spin speed may also be reduced, to match any guidelines suggested on the fabric label, or for very delicate fabrics cancel the spin completely this option is available with a spin speed button. This function can be activated with the button SPIN SELECTION.
If the label does not indicate specific information, it is possible to use the maximum spin expected in the program.
An over dosing of detergent can cause |
EN |
excessive foaming. |
|
If the appliance detects the presence of |
|
excessive foam, it may exclude the spinning |
|
phase or extend the duration of the program |
|
and increase water consumption. |
|
( ) Only with PREWASH option selected (programmes with PREWASH option available).
(Only for models with liquid detergent compartment)
When only a limited number of articles have stains which require treatment with liquid bleaching agents, preliminary removal of stain can be carried out in the washing machine.
Pour the bleach into the liquid bleach container, inserted into the compartment marked "2" in the detergent drawer, and set the special programme RINSE.
When this phase has terminated, turn the programme selector on the OFF position, add the rest of the fabrics and proceed with a normal wash on the most suitable programme.
1)For the programmes shown you can adjust the duration and intensity of the wash using the STAIN LEVEL button.
17

Programs selection
To clean different types of fabrics and various levels of dirt, the washing machine has specific programs to meet every need of washing (see table).
Mix Power System +
The washing machine is equipped with an innovative pre-mix of detergent and water. A jet of water under high pressure sprays the mixture directly in the load.
In the initial phase of the wash cycle, the high pressure spray facilitate the penetration of the wash solution through the fibres, thoroughly removing dirt ensuring the best wash performance.
The system also delivers the "Mix Power System +", during the rinse, the complete removal of the residues of detergent due to its high pressure water jet, which invests the laundry.
Perfect 20°C – Mix & Wash
This innovative "Mix Power System +" technology, allows you to wash fabrics such as cottons, synthetics and mixed fabrics at 20°C with a performance which is comparable to a 40°C wash.
The consumption of this programme is about 50% of a conventional 40°C. Cottons wash.
We suggest a wash load equal to 2/3 of the maximum capacity of the machine.
This programme applies to the washing system "Mix & Wash" which allows you to wash different fabrics and colours together.
 WARNING:
New coloured garments should be washed separately for at least 5 or 6 washes.
Certain large dark items such as jeans and towels should always be washed separately.
Never mix NON COLOURFAST fabrics.
18
Intensive 40°
This programme is suitable for cotton garments and achieves excellent cleaning results at 40°C ensuring the application of fabrics and colors.
Hygiene 60°
This programme is suitable for cotton garments and has been specially developed to remove stubborn stains already at 60°C thanks to the "Mix Power System +" technology.
Perfect Rapid 59 Min
This specially designed programme maintains the high quality wash performance whilst greatly reducing the wash time.
The programme is designed for a reduced load (see table of programmes).
Rapid 30 Min
A complete washing cycle (wash, rinse and spin). This programme is particularly suited to slightly dirty cottons and mixed fabrics. With this programme it is recommended to use only 20% of the detergent normally used to avoid waste.
Rapid 14 Min
A complete washing cycle (wash, rinse and spin). This programme is suited to slightly dirty cottons and mixed fabrics. With this programme it is recommended to use only 20% of the detergent normally used to avoid waste.
Baby
This program allows you to wash all baby clothes getting a perfect clean and sanitizing effect, setting the temperature at 60°C minimum.
To optimize the result of the sanitizing effect we recommend the use of powder detergent.
Rinse
This program performs 3 rinses with an intermediate spin (which can be reduced or excluded by using the appropriate button) . It is used for rinsing any type of fabric, for example after a wash carried out by hand.

Drain + Spin
The program completes the drain and a maximum spin. It is possible to delete or reduce the spin with the SPIN SELECTION button.
Hand/Silk
This programme allows a delicate washing cycle for garments specified as "Hand Wash only" and laundry items made from Silk or specified as "Wash as Silk" on the fabric label.
Wool
This program performs a wash cycle dedicated to the wool fabrics that can be washed in a washing machine, or the articles to be washed by hand.
Delicates
This program alternates among moments of work during breaks and is particularly suitable
for washing delicate fabrics. The wash cycle and rinses are carried out with a high level of water to ensure the best performance.
Mixed
The washing and rinsing are optimized in the rhythms of rotation of the drum and to the water levels. The gentle spin, ensures a reduced formation of creases in the fabric.
Cottons 40°C - 60°C
This program is suitable to clean normally soiled cotton laundry and it is the most efficient program in terms of combined energy and water consumptions for washing cotton laundry.
Whites
Made to have a perfect washing. The final spin at maximum speed gives more efficient removal.
19
EN

7. CUSTOMER SERVICE CENTRE AND WARRANTY
If you believe the washing machine is not working correctly, consult the quick guide provided below with some practical tips on how to fix the most common problems.
Problem |
Possible causes and practical solutions |
|
|
|
|
The washing machine |
Make sure it is correctly plugged in. |
|
does not work/start |
Make sure power is on. |
|
|
Check whether the required program was correctly selected and to |
|
|
have correctly started the machine. |
|
|
Make sure the fuse has not blown and that the wall socket is working, |
|
|
testing it with another appliance such as a lamp. |
|
|
The porthole may not be correctly closed: open and close it again. |
|
The washing machine |
Make sure the water faucet is open. |
|
does not fill with |
|
|
Make sure the timer is correct set. |
||
water |
||
The washing machine |
Make sure the filter is not clogged. |
|
does not drain water |
Make sure the drain hose is not bent. |
|
|
Make sure there are no foreign objects in the filter. |
|
Water leaked on the |
This may be due to a leak in the gasket between the faucet and supply |
|
floor near the washing |
||
tube; in this case, replace it and tighten the tube and faucet. |
||
machine |
||
|
||
The washing machine |
This could be due to the fact that water has not been completely |
|
does not centrifuge |
drained: wait a few minutes. |
|
|
Some models include a "no centrifuge" function: make sure it is not on. |
|
|
An excessive amount of detergent could prevent centrifuge: reduce the |
|
|
amount at the next wash. |
|
Strong vibrations are |
The washing machine may not be fully levelled: if necessary, adjust |
|
heard during centrifuge |
the feet as indicated in the specific section. |
|
|
Make sure transport brackets were removed. |
|
|
Make sure the load is evenly distributed. |
|
If a specific ERROR |
If error no. 0, 1, 5, 7 or 8 appears or blinks, contact the Customer |
|
appears of blinks |
Service Centre directly. |
|
|
If error no. 2 appears or blinks, the machine does not load water. |
|
|
Make sure the water faucet is open. |
|
|
If error no. 3 appears or blinks, the machine does not correctly drain. |
|
|
Make sure the drain is free and that the drain hose is not bent. |
|
|
If error no. 4 appears or blinks, the machine is too full. Close the |
|
|
water faucet and contact the Customer Service Centre. |
|
|
If error no. 9 appears or blinks, turn off the washing machine, wait 10 |
|
|
– 15 seconds and restart the program. |
20
The use of ecological detergents without phosphates may cause the following effects:
-cloudier rinse drain water: This effect is tied to the suspended zeolites which do not have negative effects on rinse efficiency.
-white powder (zeolites) on laundry at the end of the wash: this is normal, the powder is not absorbed by fabric and does not change its colour.
-foam in the water at last rinse: this does not necessary indicate poor rinsing.
-abundant foam: This is often due to the anionic surfactants found in the detergents which are hard to eliminate from laundry.
In this case, do not re-rinse to eliminate these effects: it will not help at all.
If the problem persists or if you suspect a malfunction, immediately contact the Candy Customer Service Centre.
You can also register for the Candy service plan to receive free home service after the warranty expires.
Attention: the call is not toll-free. The cost will be communicated in a voice message by your telephone operator's customer service.
Warranty
The product is guaranteed under the terms and conditions stated on the certificate included with the product. The warranty certificate must be duly filled in and stored, so as to be shown to the Authorised Candy Service Centre in case of need.
Register your product!
Don’t waste time. Register your washing machine at once, and discover the benefits to which you are entitled. Discover how at www.registercandy.com or by calling the number stated on the related material.
The manufacturer declines all responsibility for any printing errors in the booklet included with this product. Moreover, it also reserves the right to make any changes deemed useful to its products without changing their essential characteristics.
EN
Candy recommends you always use original spare parts available at our Customer Service Centre.
21

Zahvaljujemo Vam na odabiru Candy perilice rublja. Uvjereni smo da će Vas nova perilica rublja vjerno služiti kroz dugi niz godina, za pranje svih vaših odjevnih predmeta, uključujući i osjetljivo rublje.
Svoju novu perilicu rublja možete registrirati na www.registercandy.com i na taj način dobiti brži pristup dodatnim uslugama, rezerviranim isključivo za naše najvjernije kupce.
Pažljivo pročitajte ovaj priručnik jer sadrži podatke za sigurno i pravilno korištenje uređaja kao i korisne savjete o učinkovitom održavanju.
 S upotrebom perilice rublja krenite nakon pažljivog čitanja svih uputa kako biste ih u potpunosti shvatili. Preporučamo čuvanje ovog priručnika, kako bi vama ili eventualnim budućim vlasnicima uvijek bio pri ruci.
Nakon isporuke, provjerite da su uz uređaj isporučene upute za upotreba, jamstveni list, popis ovlaštenih servisera i naljepnice sa oznakama energetske učinkovitosti. Također provjerite da su uz perilicu isporučeni: savijeni nosač odvodne cijevi i posudica za tekuća sredstva za pranje (samo neki modeli). Preporučamo da pažljivo čuvate sve isporučene dijelove.
Svaki naš proizvod označen je jedinstvenim 16-znamenkastim brojem - serijskim brojem, otisnutim na naljepnici na uređaju (u predjelu vrata perilice) ili u priloženoj kuverti uz ostalu dokumentaciju (unutar uređaja). Taj broj je i svojevrsna identifikacijska oznaka proizvoda koja će vam trebati pri registraciji proizvoda ili u kontaktu s ovlaštenim Candy servisom.
Zaštita okoliša
Ovaj je uređaj u skladu s Europskom smjernicom 2002/96/EZ o otpadu električne i elektronske opreme (WEEE).
Brigom o pravilnom zbrinjavanju ovog uređaja, pridonijet ćete prevenciji potencijalnih negativnih posljedica za prirodu i ljudsko zdravlje, do kojih bi u suprotnom moglo doći u slučaju nepravilnog zbrinjavanja otpada nakon završetka vijeka trajanja uređaja. Simbol na proizvodu označava da se ovaj uređaj ne smije tretirati kao obični kućanski otpad; umjesto toga, mora se odvesti do najbližeg mjesta za recikliranje električne i elektronske opreme.
Zbrinjavanje se mora izvršiti u skladu s trenutno važećim zakonskim propisima o zbrinjavanju otpada. Za detaljnije informacije o upotrebi, popravku i recikliranju ovog proizvoda, kontaktirajte nadležno javno tijelo (ogranak za ekologiju i okoliš), službu za zbrinjavanje kućanskog otpada ili prodavaonicu u kojoj ste kupili proizvod.
Sadržaj
1.INFORMACIJE O SIGURNOSTI I PREDOSTROŽNOSTI
2.INSTALACIJA
3.PRAKTIČNI SAVJETI
4.ČIŠĆENJE I ODRŽAVANJE
5.KRATKE UPUTE ZA UPOTREBU PERILICE RUBLJA
6.KONTROLE I PROGRAMI PRANJA
7.OVLAŠTENI SERVIS I JAMSTVO
22

1.INFORMACIJE O SIGURNOSTI I PREDOSTROŽNOSTI
!Ovaj uređaj namijenjen je isključivo za kućnu upotrebu i slične primjene poput:
−za pranje odjeće djelatnika u prodavaonicama, uredima i sl;
−za pranje odjeće djelatnika manjih obrtničkih tvrtki, farmi i sl;
−za pranje odjeće gostiju u;
−hostelima, motelima, prenoćištima i sl. Ovaj uređaj namijenjen je isključivo za kućnu upotrebu, za uobičajene kućanske poslove. Nije namijenjen za drugačije primjene, npr. u profesionalne svrhe, čak i ako ga koriste stručnjaci ili posebno obučeni korisnici.
Korištenje koje nije u skladu s ovim uputama može smanjiti radni vijek uređaja ili dovesti do ukidanja jamstva proizvođača. Bilo koji kvar ili šteta na uređaju koja je proizašla zbog neprimjernog korištenja ili onoga koje nije u skladu s korištenjem u kućanstvu (čak i ako se uređaj nalazi u kućanstvu) neće biti prihvaćena od strane proizvođača u jamstvenom roku.
!Ovaj uređaj mogu koristiti djeca sa 8 ili više godina te osobe sa smanjenim psihičkim i mentalnim kapacitetom ili manjkom iskustva i znanja ako su pod nadzorom ili su educirani koristiti uređaj na siguran način i razumiju moguće posljedice. Djeca se ne smiju igrati sa uređajem. Čišćenje i korištenje uređaje ne smiju raditi djeca bez nadzora.
!Pazite na djecu i držite ih pod stalnim nadzorom kako se ne bi igrala s uređajem.
!Djeca mlađa od 3 godine trebaju se držati podalje uređaja osim ako su pod stalnim nadzorom.
!U slučaju oštećenja glavnom električnog kabla, zamjenu mora izvršiti ovlašteni servis kako bi se izbjegla opasnost za korisnika.
!Koristite isključivo novi komplet cijevi (dovodnu i odvodnu) koji je isporučen uz uređaj, nemojte koristiti stari komplet cijevi.
!Pritisak vode mora biti između 0,05 MPa and 0,8 Mpa.
!Ukoliko je perilica postavljena na podu, podmetnite tepih ili sličnu podlogu te pripazite da otvori za ventilaciju na dnu uređaja nis blokirani.
!Položaj "isključeno" (OFF) postiže se postavljanjem pripadajuće oznake na gumbu programatora u okomiti položaj. Svaki drugi položaj gumba programatora ostavlja perilicu rublja "uključenom" (ON).
!Pripazite da su nakon instalacije i postavljanja uređaja, utikač i utičnica dostupni u svakom trenutku.
!Maksimalan kapacitet suhog rublja ovisi o modelu (vidi kontrolnu ploču).
!Dokumentaciju o proizvodu možete pronaći i na web stranici prizvođača.
HR
23

Sigurnosne upute
!Prije početka čišćenja, izvadite utikač iz zidne utičnice i zatvorite dovod vode.
!Pripazite da su električne instalacije u kućanstvu UZEMLJENE. U suprotnom, potražite pomoć ovlaštenog električara.
!Ne spajajte uređaj na električnu mrežu preko produžnih kablova, višestrukih utičnica ili raznih ispravljača.
 UPOZORENJE:
Tijekom ciklusa pranja, voda u perilici rublja može postići vrlo visoku temperaturu.
!U slučaju kvara ili nepravilnog rada perilice, isključite uređaj, izvucite utikač iz utičnice i zatvorite dovod vode. Ne pokušavajte sami popraviti uređaj već se obratite ovlaštenom servisu, te uvijek zahtijevajte ugradnju originalnih rezervnih dijelova. Nepoštivanje navedenih uputa može imati negativan utjecaj na sigurnost korisnika i samog uređaja.
!Prije otvaranja vrata perilice rublja, provjerite da u bubnju nema vode.
!Kako biste isključili uređaj, nemojte povlačiti električni kabel ili sam uređaj.
!Držite perilicu rublja podalje od nepovoljnih vremenskih uvjeta: kiše, vlage, izravne sunčeve svjetlosti.
!Prilikom prenošenja ili pomicanja perilice rublja, nemojte je držati za gumbe ili ladicu za deterdžent, niti naslanjajte vrata perilice na transportna kolica. Kako je perilica rublja veoma teška, preporučamo da je uvijek podižu dvije osobe.
24
Uređaj je u skladu s Europskim smjernicama:
!2006/95/EC (LVD);
!2004/108/EC (EMC);
!2009/125/EC (ErP);
!2011/65/EU (RoHS);
te kasnijim izmjenama i dopunama.
2. INSTALACIJA
!Prerežite trake kojima su pričvršćene cijevi i električni kabel, pritom pazeći da ih ne oštetite.
!Uklonite 2 ili 4 vijka (A) sa stražnje strane uređaja te 2 ili 4 podloška (B) kao što je prikazano na slici 1.
!Zatvorite 2 ili 4 otvora korištenjem isporučenih poklopaca (nalaze se u kuverti s dokumentacijom).
!Ukoliko je perilica rublja ugradbena, nakon što prerežete trake, uklonite 3 ili 4 vijka (A) i 3 ili 4 podloška (B).
!Kod nekih modela perilica, 1 ili više podložaka past će unutar uređaja - kakbo biste ih uklonili, nagnite perilicu rublja prema naprijed. Zatvorite otvore korištenjem isporučenih poklopaca (nalaze se u kuverti s dokumentacijom).
 UPOZORENJE:
Ambalažu uređaja (stiropor, najlon i sl.) držite van dohvata djece jer za njih može biti opasna.
1
A |
BA |
B |
B |
A |
|
A |
||
|
||
B |
HR |
|
|
2
A |
|
3 |
|
1 |
2 |
||
|
B
!Postavite ploču |
od |
valovitog |
|
C |
|
||
|
materijala na dno uređaja, kako je |
|
|
3 |
|||
|
prikazano na slici 2 (zavisno o |
|
|
||||
|
modelu uređaja, |
uzmite |
u obzir |
2 |
1 |
||
|
verziju A, B ili C). |
|
|
|
|||
|
|
|
|
|
|
|
|
|
|
|
|
|
25 |
|
|
|
|
|
|
|
|
|
|

Spajanje na vodovodnu mrežu
!Spojite dovodnu cijev na slavinu. Za odvod vode iz uređaja koristite isključivo isporučenu cijev (sl. 3).
NE OTVARAJTE SLAVINU (prije nego se upoznate sa svim narednim uputama).
!Neki modeli perilica rublja mogu imati jednu ili više niže navedenih mogućnosti:
!VRUĆA I HLADNA VODA (sl.4): Spajanjem na vodovodnu instalaciju s priključkom na toplu i hladnu vodu može se postići veća
ušteda u potrošnji električne energije. Spojite sivu cijev na slavinu za hladnu vodu  a crvenu na slavinu za toplu vodu. Perilicu rublja možete spojiti samo na hladnu vodu, pri čemu može doći do kašnjenja u pokretanju nekih programa pranja.
!AQUASTOP (sl.5): Uređaj koji je ugrađen na dovodnu cijev zaustavlja dovod vode u slučaju da se cijev ošteti; u takvom slučaju na prozorčiću “A” prikazat će se crvena oznaka i cijev mora biti zamijenjena. Da odvrnete maticu, pritisnite tipku-osigurač "B".
!AQUAPROTECT - DOVODNA CIJEV S ZAŠTITOM (sl.6): Ako glavna unutarnja cijev "A" curi, voda ć e se zadržati u prozirnoj zaštitnoj cijevi "B" kako bi se omogućio završetak ciklusa pranja. Nakon toga, kontaktirajte ovlašteni servis radi zamjene dovodne cijevi.
1
5 |
6 |
B |
B |
|
A 

 A
A 

7
Postavljanje
!Pripazite da dovodna i odvodna cijev nisu previše savijene ili pritisnute od strane okolnih predmeta ili zidova. Odvodnu cijev možete objesiti preko umivaonika ili wc školjke ili spojiti na stalni zidni odvod koji mora biti minimalno na 50 cm visine i promjera većeg od odvodne cijevi (sl. 7).
26
max 100 cm
|
min 4 cm |
+2,6 mt |
|
max |
min 50 cm |
|
max 85 cm |
!Poravnajte perilicu rublja pomoću podesivih nožica (slika 8):
a.okrenite maticu udesno da otpustite vijak; b.podesite nožicu kako biste povisili ili
snizili perilicu (sve dok čvrsto ne prianja na pod);
c.učvrstite nožicu tako da zategnete maticu, sve dok ne prianja uz dno perilice rublja.
!Nakon poravnanja, uključite perilicu.
 UPOZORENJE:
Ukoliko je potrebno zamijeniti glavni električni kabel, kontaktirajte ovlašteni servis.
Ladica za deterdžent
Ladica za deterdžent podijeljena je na 3 odjeljka slika 9:
!odjeljak “1”: deterdžent za predpranje;
!odjeljak “ ”:posebni dodaci, omekšivači, bijelila itd;
 UPOZORENJE:
U ovom odjeljku koristite samo tekuća sredstva; perilica rublja je podešena da u svakom ciklusu pranja automatski uzima dodatke pri zadnjem ispiranju.
!odjeljak “2”: deterdžent za glavno pranje.
!Posudica za tekući deterdžent isporučena je samo uz neke modele perilica rublja (sl.10). Ako je želite koristiti, umetnite posudicu u odjeljak "2". Samo na taj način, tekući deterdžent ući će u bubanj u pravo vrijeme. Posudica se može koristiti i za izbjeljivanje rublja ukoliko je odabran program za ispiranje.
 UPOZORENJE:
Neke vrste deterdženta se teško otapaju. Pri korištenju takve vrste deterdženta koristite poseban spremnik koji se stavlja izravno u bubanj perilice (primjer na slici 11).
27
8
9
10
11
A
B
C
1 |
2 |
HR

3. PRAKTIČNI SAVJETI
Savjeti za pripremu rublja
UPOZORENJE: prije stavljanja rublja u perilicu, učinite sljedeće:
-s rublja uklonite metalne predmete poput kopči, kovanica iz džepova, sigurnosnih igli i sl.
-zakopčajte dugmad na posteljini, zatvorite patentne zatvarače, zavežite pojaseve i duge trake na odjeći;
-uklonite kopče /držače sa zavjesa;
-pažljivo pročitajte upute za pranje koje se nalaze na etiketama odjeće;
-za uklanjanje tvrdokornih mrlja koristite posebna sredstva.
!Kod pranja manjih prostirki, pokrivača za krevete i drugog težeg rublja, preporuča se da isključite centrifugiranje.
!Vunenu odjeću i druge vunene predmete perite u perilici rublja samo ako su deklarirani za pranje u perilici rublja ili za ručno pranje.
Da li je potrebno pranje vrelom vodom?
!Da izbjegnte potrebu za pranjem na visokoj temperaturi, mrlje na odjeći prethodno obradite sredstvom za uklanjanje mrlja ili namakanjem takve odjeće prije glavnog pranja. Uštedite do 50% električne energije pranjem na 60°C.
Pročitajte niže navedene kratke upute sa savjetima i preporukama za korištenje deterdženta na različitim temperaturama pranja. U bilo kojem slučaju, uvijek pročitajte upute za pravilno korištenje i doziranje koje se nalaze na ambalaži deterdženta.
Prilikom pranja jako zaprljanog bijelog rublja preporučamo upotrebu programa za pamuk na 60°C ili više i uobičajeni praškasti deterdžent koji sadrži sastojke za izbjeljivanje. Takvi deterdženti postižu odlične rezultate pranja na srednjim/visokim temperaturama.
Praktični savjeti za korisnika
Savjeti za ekonomično i ekološko korištenje vaše perilice rublja.
Najveća količina rublja za pranje
!Najbolju učinkovitost u potrošnji električne energije, vode i deterdženta možete postići ako perilicu napunite s maksimalno preporučenom količinom rublja. Uz potpuno napunjenu perilicu uštedjet ćete i do 50% električne energije u odnosu na dva polovična pranja.
Da li je potrebno predpranje
!Samo za jako prljvo rublje! UŠTEDITE deterdžent, vrijeme, vodu i između 5 do 15% na potrošnji električne energije ako za manje ili uobičajeno prljavo rublje NE koristite predpranje.
Za pranje između 40°C i 60°C koristite deterdžente odgovarajuće vrsti tkanine i razini prljavštine. Uobičajeni praškasti deterdženti prikladni su za bijele i tkanine postojanih boja većeg stupnja zaprljanosti, dok su tekući deterdženti, kao i praškasti deterdženti za zaštitu boja prikladniji za obojene tkanine i manji stupanj zaprljanosti.
Za pranje na temperaturama ispod 40°C preporučamo upotrebu tekućih deterdženata ili onih posebno istaknutih za pranje na niskim temperaturama.
Za pranje vune ili svile, koristite isključivo deterdžente koji su posebno namijenjeni za takve vrste tkanina.
28
4.ČIŠĆENJE I ODRŽAVANJE
Za pranje vanjskih površina perilice rublja, koristite vlažnu mekanu krpu, izbjegavajte oštra/gruba sredstva (npr. vim) ili sredstva na bazi alkohola, otapala i sl. Za uobičajeno čišćenje/održavanje, perilica rublja ne zahtijeva posebnu brigu, povremeno operite ladicu za deterdžent i očistite filter. Ukoliko ne namjeravate koristiti perilicu kroz duži period, u nastavku su navedeni savjeti kako je pripremiti.
Čišćenje ladice za deterdžent
!Kako ne bi došlo do začepljenja odvoda vode, u perilicu rublja ugrađen je poseban filter koji zadržava predmete poput kovanica, gumba, ostataka tkanina, kose i sl.
!Pažljivo izvucite ladicu za deterdžent iz perilice (bez pretjerane sile). Operite ladicu pod tekućom vodom i vratite je nazad u perilicu.
Čišćenje filtera
!Da ne dođe do začepljenja odvoda vode u perilicu rublja ugrađen je poseban filter koji zadržava predmete poput kovanica, gumba, ostataka tkanina, kose i sl.
!Dostupno samo na određenim modelima: Rebrastu cijev povucite prema van, uklonite graničnik i ispustite vodu u spremnik.
!Za sakupljanje vode koja će isteći iz filtera (ili cijevi) podmetnite posudicu ili suhu krpu.
!FIlter okrenite ulijevo dok se ne zaustavi u okomitom položaju.
!Izvucite i očistite filter, a nakon čišćenja vratite ga u početan položaj okretanjem udesno.
!Ponovite prethodne korake obrnutim redoslijedom kako biste namjestili sve dijelove.
HR
Priprema perilice rublja u slučaju dužeg nekorištenja/preseljenja
Ukoliko uređaj nemate namjeru koristiti kroz duži period (posebice ako će biti smješten u negrijanoj prostoriji) ili ako ga namjeravate premjestiti, postupite kako slijedi.
!Iskopčajte glavni električni kabel.
!Ispustite svu vodu iz odvodne cijevi.
!Odspojite dovodnu cijev sa slavine i ispustite svu vodu.
!Osigurajte cijevi povezivanjem ili ljepljivom trakom.
29
5.KRATKE UPUTE ZA UPOTREBU PERILICE RUBLJA
Ova perilica rublja automatski prilagođava razinu vode prema vrsti i količini rublja. Ta mogućnost pridonosi manjoj potrošnji električne energije i osjetno smanjuje vrijeme pranja.
Izbor programa pranja
!Uključite perilicu rublja i odaberite željeni program pranja.
!Podesite temperaturu pranja i po potrebi odaberite odgovarajuću tipku dodatnih opcija.
!Pritisnite START/PAUSE tipku kako biste pokrenuli ciklus pranja.
U slučaju da tijekom rada perilice rublja nestane električne energije iz bilo kojeg razloga, postavke programa pohranit će se u posebnu memoriju, a nakon povratka električne energije perilica rublja nastavit će ciklus pranja od trenutka u kojem je zaustavljena.
!Nakon završetka programa, na ekranu će se prikazati riječ "end" (kraj) ili ć e se ugasiti odgovarajući svjetlosni indikator.
Pričekajte da se ugasi svjetlosni indikator sigurnosnog zaključavanja vrata, oko 2 minute nakon završetka programa.
!Isključite perilicu rublja.
Za bilo koju vrstu pranja, pogledajte podatke u tablici programa i slijedite tijek rada kako je navedeno.
Tehnički podaci
Dozvoljeni pritisak vode u vodovodnoj mreži: min 0,05 Mpa
max 0,8 Mpa
Brzina centrifugiranja: pogledati pločicu(naljepnicu) s.
Priključna snaga/ Snaga osigurača/ Napon: pogledati pločicu(naljepnicu) s.
6.KONTROLE I PROGRAMI PRANJA

 A
A
L
M


 B
B
C D E F G H I
A Gumb za odabir programa s OFF položajem (isključeno)
BSTART/PAUSE tipka
CTipka za ODABIR BRZINE CENTRIFUGE
DTipka za ODABIR TEMPERATURE
ETipka za ODGODU POČETKA PRANJA
FTipka za ODABIR STUPANJ ZAPRLJANOSTI RUBLJA
GTipka za DODATNO ISPIRANJE
HTipka DODATNIH OPCIJA
ITipka za ZAŠTITU OD GUŽVANJA
LDigitalni display
MSvjetlosni indikator SIGURNOSNOG ZAKLJUČAVANJA VRATA
30
 Loading...