


SR UKR HR |
PT |
EN |

Thank-you for choosing a Candy washing machine. We are confident it will loyally assist you in safely washing your clothes, even delicates, day after day.
You can register your product at www.registercandy.com to gain faster access to supplementary services solely reserved to our most loyal customers.
Carefully read this manual for correct and safe appliance use and for helpful tips on efficient maintenance.
 Only use the washing machine after carefully reading these instructions. We recommend you always keep this manual on hand and in good conditions for any future owners.
Environmental conditions
This appliance is marked according to the European directive 2012/19/EU on Waste Electrical and Electronic Equipment (WEEE).
WEEE contains both polluting substances (which can cause negative consequences for the environment) and basic components (which can be re-used). It is important to have WEEE subjected to specific treatments, in order to remove and dispose properly all pollutants, and recover and recycle all materials. Individuals can play an important role in ensuring that WEEE does not become an environmental issue; it is essential to follow some basic rules:
!WEEE should not be treated as household waste;
!WEEE should be handed over to the relevant collection points managed by the municipality or by registered companies. In many countries, for large WEEE, home collection could be present.
Please check that the appliance is delivered with this instruction manual, warranty certificate, service centre address and energy efficiency label. Also check that plugs, curve for drain hose and liquid detergent or bleach tray (only on some models) are included. We recommend you keep all these components.
Each product is identified by a unique 16character code, also called the “serial number”, printed on the sticker affixed to the appliance (porthole area) or in the document envelope found inside the product. This code is a sort of specific product ID card that you will need to register it and should you need to contact the Candy Customer Service Centre.
In many countries, when you buy a new appliance, the old one may be returned to the retailer who has to collect it free of charge on a one-to-one basis, as long as the equipment is of equivalent type and has the same functions as the supplied equipment.
Contents
1.GENERAL SAFETY RULES
2.INSTALLATION
3.PRACTICAL TIPS
4.MAINTENANCE AND CLEANING
5.QUICK USER GUIDE
6.CONTROLS AND PROGRAMS
7.CUSTOMER SERVICE CENTRE AND WARRANTY
2

1.GENERAL SAFETY RULES
!This appliances is intended to be used in household and similar applications such as:
-Staff kitchen areas in shops, offices and other working environments;
-Farm houses;
-By clients in hotels, motels and other residential type environments;
-Bed and breakfast type environments.
A different use of this appliance
from |
household |
environment |
or |
from typical |
housekeeping |
functions, as commercial use by expert or trained users, is excluded even in the above applications. If the appliance is used in a manner inconsistent with this it may reduce the life of the appliance and may void the manufacturer’s warranty.
Any damage to the appliance or other damage or loss arising through use that is not consistent with domestic or household use
(even if located in a domestic or household environment) shall not be accepted by the manufacturer to the fullest extent permitted by law.
!This appliance can be used by children aged from 8 years and above and persons with reduced physical, sensory or mental capabilities or lack of experience and knowledge if they have been given supervision or instruction concerning use of the appliance
in a safe way and understand the hazards involved.
Children shall not play with the appliance. Cleaning and user maintenance shall not be made by children without supervision.
!Children should be supervised to ensure that they do not play with the appliance.
!Children of less than 3 years should be kept away unless continuously supervised.
!If the supply cord is damaged, it must be replaced by the manufacturer, its service agent or similarly qualified persons in order to avoid a hazard.
!Only use the hose-sets supplied with the appliance for the water supply connection (do not reuse old hose-sets).
!Water pressure must be between 0,05 MPa and 0,8 MPa.
!Make sure that a carpet do not obstruct the base of the machine and ventilation openings.
!The OFF condition is reached by placing the reference mark on the programmes control/knob in the vertical position. Any other different position of such control sets the machine in ON condition (only for models with programmes knob).
EN
3
!After installation, the appliance must be positioned so that the plug is accessible.
!The maximum load capacity of dry clothes depends on the model used (see control panel).
!To consult the product fiche please refer to the manufacturer website.
!Do not expose the washing machine to rain, direct sunlight or other weather elements.
!When moving, do not lift the washing machine by the knobs or detergent drawer; during transport, never rest the porthole on the trolley. We recommend two people lift the washing machine.
Safety instructions
!Before cleaning or maintaining the washing machine, unplug the appliance and turn off the water faucet.
!Make sure the electrical system is grounded. Otherwise, seek qualified professional assistance.
!Please do not use converters, multiple sockets or extension cords.
 WARNING:
water may reach very high temperatures during the wash cycle.
!Make sure there is no water in the drum before opening the porthole.
!Do not pull on the power cord or appliance to unplug the machine.
!In the event of fault and/or malfunction, turn off the washing machine, close the water faucet and do not tamper with the appliance.
Immediately contact the Customer Service Centre and only use original spare parts. Failure to observe these instruction may jeopardise appliance safety.
Appliance complies with European Directives:
!2006/95/EC (LVD);
!2004/108/EC (EMC);
!2009/125/EC (ErP);
!2011/65/EU (RoHS)
and subsequent amendments.
4

2. INSTALLATION
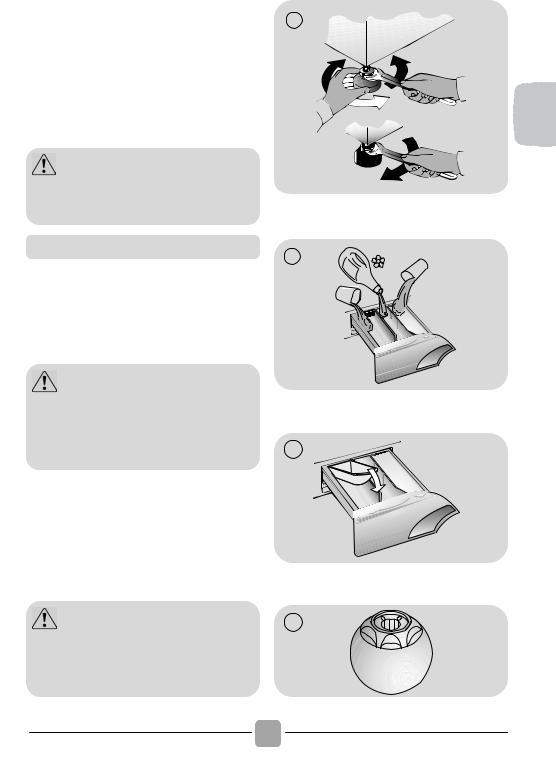
!Cut the tube straps, being careful not to damage the tube and power cord.
!Unscrew the 2 or 4 screws (A) on the back and remove the 2 or 4 shims (B) as illustrated in figure 1.
!Close the 2 or 4 holes using the plugs included in the instruction envelope.
!If the washing machine is built-in, after cutting the hose straps, unscrew the 3 or 4 screws (A) and remove the 3 or 4 shims (B).
!In some models, 1 or more shims will fall inside the machine: tilt the washing machine forward to remove them. Close the holes using the plugs found in the envelope.
 WARNING:
keep packaging materials away from children.
!Place the polionda sheet on the bottom as shown in figure 2 (according to the model, consider version A, B or C).
5
1
A  A
A
BA B A
B B
B
2
A |
|
3 |
|
1 |
2 |
||
|
B
C
3
2 |
1 |
EN

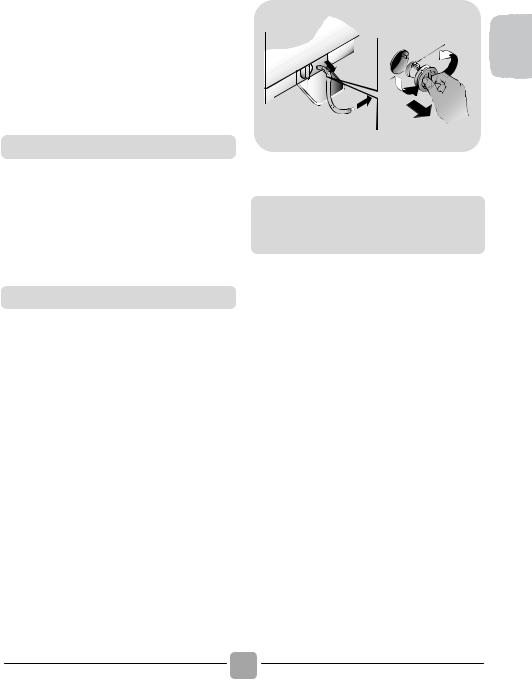
Hydraulic connections
!Connect the water tube to the faucet, only using the drain tube supplied with the washing machine (fig. 3).
DO NOT OPEN THE FAUCET.
!Some models may include one or more of the following features:
!HOT&COLD (fig. 4):
water mains connection settings with hot and cold water for higher energy savings.
Connect the grey tube to the cold water faucet  and the red one to the hot water faucet. The machine can be connected to the cold water faucet only: in this case, some programs may start a few minutes later.
!AQUASTOP (fig. 5):
a device located on the supply tube that stops water flow if the tube deteriorates; in this case, a red mark will appear in the window “A” and the tube must be replaced. To unscrew the nut, press the one-way lock device "B".
!AQUAPROTECT – SUPPLY TUBE WITH GUARD (fig. 6):
Should water leak from the primary internal tube "A", the transparent containment sheath "B" will contain water to permit the washing cycle to complete. At the end of the cycle, contact the Customer Service Centre to replace the supply tube.
1
5 |
6 |
B |
B |
|
A 

 A
A 

7
Setting
!Near the washing machine to the wall, being careful that the tube is not bent or crushed, and place the drain tube in the tub or, preferably, connect it to a wall drain at least 50 cm high with diameter greater than the washing machine tube
(fig. 7).
6
max 100 cm
|
min 4 cm |
+2,6 mt |
|
max |
min 50 cm |
|
max 85 cm |
!Level the appliance using the feet as |
8 |
|
|
|
illustrated in figure 8: |
|
|
|
|
a. turn the nut clockwise to release the |
|
|
|
|
screw; |
|
|
|
A |
b. rotate the foot to raise or lower it until it |
|
|
|
|
adheres to the floor; |
|
|
|
|
c. lock the foot, screwing in the nut, until it |
|
|
|
|
adheres to the bottom of the washing |
|
|
|
B |
machine. |
|
|
|
|
!Plug in the appliance. |
|
|
|
|
WARNING: |
|
|
|
|
|
|
|
|
|
|
|
|
|
|
|
C |
|||
contact the Customer Service Centre |
|
|||
should the power cord need |
|
|
|
|
replacement. |
|
|
|
|
Detergent drawer
The detergent draw is split into 3 compartments as illustrated in figure 9:
!compartment "1": for prewash detergent;
!compartment “ ”: for special additives, softeners, starch fragrances, etc.;
 WARNING:
only use liquid products; the washing machine is set to automatically dose additives at each cycle during the last rinse.
!compartment "2": for washing detergent.
A liquid detergent cup is also included in some models (fig. 10). To use it, place it in compartment "2". This way, liquid detergent will only enter the drum at the right time. The cup can also be used for bleach when the “Rinse” program is selected.
 WARNING:
some detergents are hard to remove. In this case we recommend using the specific container to be placed in the drum (example in figure 11).
7
9
10
11
1 |
2 |
EN

3. PRACTICAL TIPS
Load tips
WARNING: when sorting laundry, make sure:
-have eliminated metallic objects such as barrettes, pins, coins, from laundry;
-to have buttoned pillow cases, closed zips, tied loose belts and long robe ribbons;
-to have removed rollers from curtains;
-to have carefully read clothing washing labels;
-to have removed any persistent stains using specific detergents.
!When washing rugs, bedcovers or other heavy clothing, we recommend you avoid centrifuging.
!To wash wool, make sure the item can be machine washed and marked by the “Pure virgin wool” symbol with the “Does not mat” or “Machine washable” label.
Helpful suggestions for the user
A guide environmentally friendly and economic use of your appliance.
Maximise The Load Size
!Achieve the best use of energy, water, detergent and time by using the recommended maximum load size.
Save up to 50% energy by washing a full load instead of 2 half loads.
Do you need to pre-wash?
!For heavily soiled laundry only!
SAVE detergent, time, water and between 5 to 15% energy consumption by NOT selecting Prewash for slight to normally soiled laundry.
8
Is a hot wash required?
!Pretreat stains with stain remover or soak dried in stains in water before washing to reduce the necessity of a hot wash programme.
Save up to 50% energy by using a 60°C wash programme.
Following is a quick guide with tips and recommendations on detergent use at the various temperatures. In any case, always read the instructions on the detergent for correct use and doses.
When washing heavily soiled whites, we recommend using cotton programs of 60°C or above and a normal washing powder (heavy duty) that contains bleaching agents that at medium/high temperatures provide excellent results.
For washes between 40°C and 60°C the type of detergent used needs to be appropriate for the type of fabric and level of soiling.
Normal powders are suitable for “white” or colour fast fabrics with high soiling, while liquid detergents or “colour protecting” powders are suitable for coloured fabrics with light levels of soiling.
For washing at temperatures below 40°C we recommend the use of liquid detergents or detergents specifically labeled as suitable for low temperature washing.
For washing wool or silk, only use detergents specifically formulated for these fabrics.
4.MAINTENANCE AND CLEANING
To clean the washing machine exterior, use a damp cloth, avoiding abrasives, alcohol and/or solvents. The washing machine does not require any special care for ordinary cleaning: clean drawer compartments and the filter; some tips on how to move the machine or on long periods of disuse are provided below.
EN
Drawer cleaning
!We recommend you clean the drawer to avoid accumulating detergent and additive residue.
!To do this, extract the drawer using slight force, clean it with running water and reinsert it in its housing.
Filter cleaning
!The washing machine comes with a special filter able to trap large residue, such as buttons or coins, which could clog the drain.
!Only available on certain models: pull out the corrugated hose, remove the stopper and drain the water into a container.
!Before unscrewing the filter, we recommend you place an absorbent cloth under it to keep the floor dry.
!Turn the filter counter-clockwise to the limit stop in the vertical position.
!Remove and clean the filter; when finished, replace it turning it clockwise.
!Repeat the previous steps in reverse order to reassemble all parts.
Suggestions for moves or prolonged disuse
!Should the washing machine be stored in an unheated room for a long period of time, drain all water from tubes.
!Unplug the washing machine.
!Detach the tube from the strap and lower it, fully draining water into a bowl.
!Secure the drain tube with the strap when finished.
9
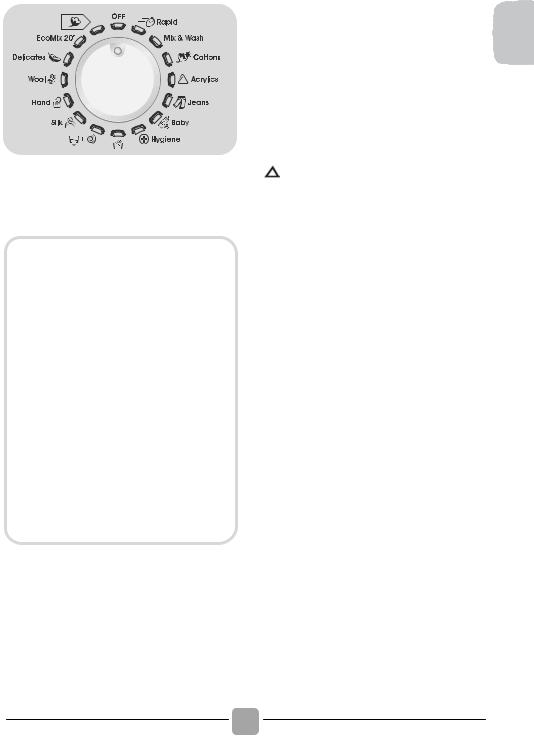
5. QUICK USER GUIDE
This washing machine automatically adapts the level of the water to the type and quantity of washing. This system gives a decrease in energy consumption and a sensible reduction in washing times.
Program selection
6.CONTROLS AND PROGRAMS
A
!Turn on the washing machine and select the required program.
!Adjust the washing temperature if necessary and press the required "option" buttons.
!Press the START/PAUSE button to start washing.
Should power go out when the washing machine is running, a special memory saves the settings and, when power returns, the machine resumes the cycle from where it left off.
!The message "end" will appear on the display or the corresponding led will turn on at the end of the program.
Wait until the porthole locked light turns off: about 2 minutes after the program ends.
!Turn off the washing machine.
For any type of wash, see the program table and follow the operating sequence as indicated.
Technical data
Water pressure: min 0,05 Mpa max 0,8 Mpa
Spin r.p.m.:
See rating plate.
Power input / Power current fuse amp / Supply voltage:
See rating plate.
10
M |
N O P |
I |
B |
L |
C D E F G H
AProgramme selector with OFF position
BSTART/PAUSE button
CDELAY START button
DPREWASH button
EEASY IRON button
FSPIN SELECTION button
GTEMPERATURE SELECTION button
HRAPID button
IDigital display
LBUTTONS indicator lights
MDOOR LOCKED indicator light
NSPIN SELECTION indicator lights
OTEMPERATURE SELECTION indicator lights
PRAPID indicator lights
Opening the door
A special safety device prevents the door from being opened immediately after the end of the cycle.
Wait for 2 minutes after the wash cycle has finished and the "Door Security" light has gone out before opening the door.
PROGRAMME selector with OFF position
When the programme selector is turned the display lights up to show the settings for the programme selected.
For energy saving, at the end of the cycle or with an inactivity period, the display level contrast will decrease.
N.B.: To switch the machine off, turn the programme selector to the OFF position.
!Press the START/PAUSE button to start the selected cycle.
!Once a programme is selected the programme selector remains stationary on the selected programme till cycle ends.
!Switch off the washing machine by turning the selector to OFF.
The programme selector must be returned to the OFF position at the end of each cycle or when starting a subsequent wash cycle prior to the next programme being selected and started.
!Press to start the selected cycle.
When the START/PAUSE button has been pressed, the appliance can take few seconds before it starts working.
ADD OR REMOVE ITEMS AFTER THE PROGRAMMES HAS STARTED (PAUSE)
!Press and hold the START/PAUSE button for about 2 seconds (some indicator light and the time remaining indicator will flash, showing that the machine has been paused).
!Wait 2 minutes until the safety device unlocks the door.
!After you have added or removed items, close the door and press the START/PAUSE button (the programme will start from where it left off).
CANCELLING THE PROGRAMME
!To cancel the programme, set the selector to the OFF position.
!Select a different programme.
!Re-set the programme selector to the OFF position.
DELAY START button
!This button allows you to pre-programme the wash cycle to delay the start of the cycle for up to 24 hours.
!To delay the start use the following procedure:
-Set the required programme.
START/PAUSE button
Close the door BEFORE selecting the button START/PAUSE.
11
-Press the button once to activate it (h00 appears on the display) and then press it again to set a 1 hour delay (h01 appears on the display). The pre-set delay increases by 1 hour each time the
EN

button is pressed, until h24 appears on the display, at which point pressing the button again will reset the delay start to zero.
-Confirm by pressing the START/PAUSE button (the light on the display starts to flash). The countdown will begin and when it has finished the programme will start automatically.
!It is possible to cancel the delay start by turning the programme selector to OFF.
If there is any break in the power supply while the machine is operating, a special memory stores the selected programme and, when the power is restored, it continues where it left OFF.
SPIN SELECTION button
!By pressing this button, it is possible to reduce the maximum speed, and if you wish, the spin cycle can be cancelled.
!To reactivate the spin cycle press the button until you reach the spin speed you would like to set.
To prevent damage to the fabrics, it is not possible to increase the speed over that which is automatically suitable during the selection of the program.
!It is possible to modify the spin speed without pausing the machine.
The option buttons should be selected before pressing the START/PAUSE button.
If an option is selected that is not compatible with the selected programme then the option indicator first flashes and then goes off.
The machine is fitted with a special electronic device, which prevents the spin cycle should the load be unbalanced.
This reduces the noise and vibration in the machine and so prolongs the life of your machine.
PREWASH button
It allows you to do a preliminary wash at the beginning of the cycle. The temperature does not exceed 40°C and in any case it does not exceed the maximum temperatures of the selected washing program (ex. the temperature of HAND program will be 30°C.
TEMPERATURE SELECTION button
When you select a program, the light illuminates the recommended temperature. It is also possible to change the temperature but not over the maximum in order to save the fabrics.
EASY IRON button |
RAPID button |
|
This function allows you to minimizes creases as much as possible, eliminating the intermediate spins or reducing the intensity of the last one.
The button becomes active when you select the RAPID program on the knob; it allows you to select one of three durations indicated.
12

Digital Display
The display’s indicator system allows you to be constantly informed about the status of the machine.
2 1
|
|
|
|
|
|
|
|
|
|
|
|
|
|
|
|
|
|
|
|
|
|
|
|
|
|
|
|
|
|
|
|
|
|
|
|
|
|
|
|
|
|
|
|
|
|
|
|
|
|
3 |
3 |
|
|
3 |
|
||||
1) DOOR LOCKED INDICATOR LIGHT
!The indicator light is illuminated when the door is fully closed.
Close the door BEFORE selecting the START/PAUSE button.
!When START/PAUSE is pressed on the machine with the door closed, the indicator will flash momentarily and then illuminate.
If the door is not properly closed, the light will continue to flash for about 7 seconds, after which the start command will be automatically delete. In this case, close the door in the proper way and press the START/PAUSE button.
!A special safety device prevents the door from being opened immediately after the end of the cycle. Wait for 2 minutes after the wash cycle has finished and the DOOR LOCKED light has gone out before opening the door. At the end of the cycle turn the programme selector to OFF.
2) CYCLE DURATION |
|
|
!When a programme is selected the |
EN |
|
display automatically shows the cycle |
||
|
||
duration, which can vary, depending on |
|
|
the options selected. |
|
|
!Once the programme has started you will |
|
|
be kept informed constantly of the time |
|
|
remaining to the end of the wash. |
|
|
!The appliance calculates the time to the |
|
|
end of the selected programme based |
|
|
upon a standard loading, during the cycle, |
|
|
the appliance corrects the time to that |
|
|
applicable to the size and composition of |
|
|
the load. |
|
3) BUTTONS INDICATOR LIGHTS
!These light up when the relevant buttons are pressed.
!If an option is selected that is not compatible with the selected programme then the light on the button first flashes and then goes off.
13

Table of programmes |
|
|
|
|
|
|
|
2 |
1 |
|
|
|
|
|
|
|
|
|
|
PROGRAM |
|
|
|
kg * |
|
TEMP.°C |
DETERGENT |
||
|
|
|
|
|
|
|
|
||
|
|
(MAX.) |
|
Recommended |
Max. |
2 |
1 |
||
|
|
|
|
|
|
||||
1) |
1 |
1 |
1 |
1,5 |
30° |
30° |
|
|
|
Rapid |
|
1,5 |
2 |
2,5 |
2,5 |
30° |
30° |
|
|
(14’ – 30’ – 44’) |
|
|
|||||||
|
|
|
|
|
|
|
|
||
|
|
3 |
3 |
3,5 |
3,5 |
30° |
40° |
|
|
Mix & Wash |
|
5 |
6 |
7 |
8 |
40° |
40° |
|
|
Whites |
|
5 |
6 |
7 |
8 |
60° |
90° |
|
( ) |
Mixed |
|
2,5 |
3 |
3,5 |
4 |
40° |
60° |
|
( ) |
Jeans |
|
3 |
3 |
3 |
3 |
40° |
40° |
|
|
Baby |
|
3,5 |
4 |
4,5 |
5,5 |
60° |
60° |
|
|
Hygiene |
|
5 |
6 |
7 |
8 |
60° |
60° |
|
|
Rinse |
|
- |
- |
- |
- |
- |
- |
|
|
Drain + Spin |
|
- |
- |
- |
- |
- |
- |
|
|
Silk |
|
1 |
2 |
2 |
2 |
30° |
30° |
|
|
Hand |
|
1 |
2 |
2 |
2 |
30° |
30° |
|
|
Wool |
|
1 |
2 |
2 |
2 |
40° |
40° |
|
|
Delicates |
|
2 |
2 |
2,5 |
2,5 |
40° |
40° |
|
|
EcoMix 20° |
|
5 |
6 |
7 |
8 |
20° |
20° |
|
|
Cottons |
** |
5 |
6 |
7 |
8 |
40° |
60° |
|
( ) |
|
|
|
|
14 |
|
|
|
|
|
Please read these notes:
*Maximum load capacity of dry clothes, according to the model used (see control panel).
**STANDARD COTTON PROGRAMMES ACCORDING TO (EU) No 1015/2010 and No 1061/2010.
COTTON PROGRAMME WITH A TEMPERATURE OF 60°C.
COTTON PROGRAMME WITH A TEMPERATURE OF 40°C.
These programmes are suitable to clean normally soiled cotton laundry and they are the most efficient programmes in terms of combined energy and water consumptions for washing cotton laundry.
These programmes have been developed to be compliant with the temperature on the wash label on the garments and the actual water temperature may slightly differ from the declared temperature of the cycle.
The spin speed may also be reduced, to match any guidelines suggested on the fabric label, or for very delicate fabrics cancel the spin completely this option is available with a spin speed button. This function can be activated with the button SPIN SELECTION.
If the label does not indicate specific information, it is possible to use the maximum spin expected in the program.
An over dosing of detergent can cause |
EN |
excessive foaming. |
|
If the appliance detects the presence of |
|
excessive foam, it may exclude the spinning |
|
phase or extend the duration of the program |
|
and increase water consumption. |
|
( ) Only with PREWASH option selected (programmes with PREWASH option available).
(Only for models with liquid detergent compartment)
When only a limited number of articles have stains which require treatment with liquid bleaching agents, preliminary removal of stain can be carried out in the washing machine.
Pour the bleach into the liquid bleach container, inserted into the compartment marked "2" in the detergent drawer, and set the special programme RINSE.
When this phase has terminated, turn the programme selector on the OFF position, add the rest of the fabrics and proceed with a normal wash on the most suitable programme.
1)Selecting the RAPID program on the knob, it will be possible to select with the RAPID button, one of the three rapid programs available among 14’, 30’ and 44’.
15

Programmes selection
To clean different types of fabrics and various levels of dirt, the washing machine has specific programs to meet every need of washing (see table of programmes).
Rapid
Washing cycle suggested for low loads and slightly dirty. With this program it is recommended to reduce the quantity of detergent normally used, in order to avoid unnecessary waste. Selecting the RAPID program and acting on the button you can choose one of three programs available.
Mix & Wash
The program allow you to mix different fabrics (ex: cotton + synthetic, etc. ..) and wash them with low energy consumption, because the temperature in the wash step does not exceed 40°C.
Whites
Made to have a perfect washing. The final spin at maximum speed gives more efficient removal.
Mixed
The washing and rinsing are optimized in the rhythms of rotation of the drum and to the water levels. The gentle spin, ensures a reduced formation of creases in the fabric.
Jeans
This program has been designed to have the highest quality cleaning of fabrics such as jeans resistant: ideal for removing dirt without affecting the elasticity of the fibers.
Baby
This program allows you to wash all baby clothes getting a perfect clean and sanitizing effect, setting the temperature at 60°C minimum.
To optimize the result of the sanitizing effect we recommend the use of powder detergent.
Hygiene
Program for durable fabrics, it allows you to sanitize the laundry. We recommend the use of powder detergents to increase the effectiveness of sanitizing.
16
Rinse
This program performs 3 rinses with an intermediate spin (which can be reduced or excluded by using the appropriate button) . It is used for rinsing any type of fabric, for example after a wash carried out by hand.
Drain + Spin
The program completes the drain and a maximum spin. It is possible to delete or reduce the spin with the SPIN SELECTION button.
Silk
Dedicated program for silk fabrics that can be wash with a washing machine washable. The rotations of the drum are delicate, the temperature does not exceed 30°C and the program ends with a gentle spin.
Hand
Program for hand wash only clothes, the program ends with 3 rinses and a slow spin.
Wool
This program performs a wash cycle dedicated to the wool fabrics that can be washed in a washing machine, or the articles to be washed by hand.
Delicates
This program alternates among moments of work during breaks and is particularly suitable for washing delicate fabrics . The wash cycle and rinses are carried out with a high level of water to ensure the best performance.
EcoMix 20°
This innovative programme, allows you to wash different fabrics and colours together, such as cottons, synthetics and mixed fabrics at only 20°C and provides an excellent cleaning performance. Consumption on this program is about 40% of a conventional 40°C. cottons wash.
Cottons 40°C - 60°C
This program is suitable to clean normally soiled cotton laundry and it is the most efficient program in terms of combined energy and water consumptions for washing cotton laundry.

7. CUSTOMER SERVICE CENTRE AND WARRANTY
If you believe the washing machine is not working correctly, consult the quick guide provided below with some practical tips on how to fix the most common problems.
Problem |
Possible causes and practical solutions |
|
|
|
|
The washing machine |
Make sure it is correctly plugged in. |
|
does not work/start |
Make sure power is on. |
|
|
Check whether the required program was correctly selected and to |
|
|
have correctly started the machine. |
|
|
Make sure the fuse has not blown and that the wall socket is working, |
|
|
testing it with another appliance such as a lamp. |
|
|
The porthole may not be correctly closed: open and close it again. |
|
The washing machine |
Make sure the water faucet is open. |
|
does not fill with |
|
|
Make sure the timer is correct set. |
||
water |
||
The washing machine |
Make sure the filter is not clogged. |
|
does not drain water |
Make sure the drain hose is not bent. |
|
|
Make sure there are no foreign objects in the filter. |
|
Water leaked on the |
This may be due to a leak in the gasket between the faucet and supply |
|
floor near the washing |
||
tube; in this case, replace it and tighten the tube and faucet. |
||
machine |
||
|
||
The washing machine |
This could be due to the fact that water has not been completely |
|
does not centrifuge |
drained: wait a few minutes. |
|
|
Some models include a "no centrifuge" function: make sure it is not on. |
|
|
An excessive amount of detergent could prevent centrifuge: reduce the |
|
|
amount at the next wash. |
|
Strong vibrations are |
The washing machine may not be fully levelled: if necessary, adjust |
|
heard during centrifuge |
the feet as indicated in the specific section. |
|
|
Make sure transport brackets were removed. |
|
|
Make sure the load is evenly distributed. |
|
If a specific ERROR |
If error no. 0, 1, 5, 7 or 8 appears or blinks, contact the Customer |
|
appears of blinks |
Service Centre directly. |
|
|
If error no. 2 appears or blinks, the machine does not load water. |
|
|
Make sure the water faucet is open. |
|
|
If error no. 3 appears or blinks, the machine does not correctly drain. |
|
|
Make sure the drain is free and that the drain hose is not bent. |
|
|
If error no. 4 appears or blinks, the machine is too full. Close the |
|
|
water faucet and contact the Customer Service Centre. |
|
|
If error no. 9 appears or blinks, turn off the washing machine, wait 10 |
|
|
– 15 seconds and restart the program. |
17
EN

The use of ecological detergents without phosphates may cause the following effects:
-cloudier rinse drain water: This effect is tied to the suspended zeolites which do not have negative effects on rinse efficiency.
-white powder (zeolites) on laundry at the end of the wash: this is normal, the powder is not absorbed by fabric and does not change its colour.
-foam in the water at last rinse: this does not necessary indicate poor rinsing.
-abundant foam: This is often due to the anionic surfactants found in the detergents which are hard to eliminate from laundry.
In this case, do not re-rinse to eliminate these effects: it will not help at all.
If the problem persists or if you suspect a malfunction, immediately contact the Candy Customer Service Centre.
You can also register for the Candy service plan to receive free home service after the warranty expires.
Attention: the call is not toll-free. The cost will be communicated in a voice message by your telephone operator's customer service.
Warranty
The product is guaranteed under the terms and conditions stated on the certificate included with the product. The warranty certificate must be duly filled in and stored, so as to be shown to the Authorised Candy Service Centre in case of need.
Register your product!
Don’t waste time. Register your washing machine at once, and discover the benefits to which you are entitled. Discover how at www.registercandy.com or by calling the number stated on the related material.
The manufacturer declines all responsibility for any printing errors in the booklet included with this product. Moreover, it also reserves the right to make any changes deemed useful to its products without changing their essential characteristics.
Candy recommends you always use original spare parts available at our Customer Service Centre.
18

EN
19

Obrigado por ter escolhido uma máquina de lavar roupa Candy. Estamos confiantes de que este electrodoméstico o vai ajudar, no dia-a-dia, a lavar e cuidar das suas roupas, mesmo as mais delicadas, de forma bastante segura.
Pode registar o seu produto em www.registercandy.com para ter acesso mais rápido aos serviços especiais reservados para clientes habituais.
Leia este manual cuidadosamente para uma utilização correcta e segura do electrodoméstico e para que possa usufruir de dicas úteis para uma eficiente manutenção do aparelho.
 Comece a usar a máquina de lavar roupa apenas depois de ler cuidadosamente estas instruções. Recomendamos que tenha sempre este manual à mão e em boas condições para que possa ser entregue a futuros proprietários do aparelho.
Por favor verifique se o aparelho é fornecido com o manual de instruções, contactos do Serviço Técnico, etiqueta e certificado de eficiência energética. Verifique também se as fichas, curvas de tubos de descarga, bandejas e gavetas de detergentes estão incluídos e se não falta nenhum desses componentes, pois é importante que os tenha consigo.
Cada produto está identificado com um código único de 16 dígitos, também intitulado de número de série, impresso no autocolante do produto, em local visível, ou nos documentos que acompanham o electrodoméstico. Este número de código é uma espécie de bilhete de identidade do produto que vai ser necessário para registar o seu produto e sempre que necessite da assistência técnica da Candy.
Questões ambientais
Este aparelho está classificado de acordo com a Directiva Europeia 2012/19/UE relativa aos Resíduos de Equipamentos Eléctricos e Electrónicos (REEE).
20
REEE contém substâncias poluentes (que podem trazer consequências negativas para o meio ambiente) e componentes básicos (que podem ser reutilizados). É importante ter os REEE submetidos a tratamentos específicos, a fim de remover e eliminar adequadamente todos os componentes poluentes e recuperar e reciclar todos os materiais. Os consumidores podem desempenhar um papel importante no sentido de garantir que os REEE não se tornem num problema ambiental. Para isso é essencial seguir algumas regras básicas:
!REEE não devem ser tratadas como lixo doméstico.
!REEE devem ser entregues nos pontos de coleta próprios geridos pelo município ou por empresas especializadas para o efeito. Em alguns países a recolha de REEE de grandes dimensões podem ser alvo de recolha ao domicílio.
Em muitos países, quando se adquire um novo aparelho, o antigo pode ser devolvido na loja ou recolhido pelo retalhista sem custos para o consumidor, desde que o equipamento seja de um género semelhante.
Indice
1.REGRAS DE SEGURANÇA GERAIS
2.INSTALAÇÃO
3.DICAS PRÁTICAS
4.MANUTENÇÃO E LIMPEZA
5.GUIA RÁPIDO DE UTILIZAÇÃO
6.CONTROLOS E PROGRAMAS
7.SERVIÇO DE ASSISTÊNCIA TÉCNICA AO CLIENTE E GARANTIA
1.REGRAS DE SEGURANÇA GERAIS
!Este electrodoméstico foi concebido para ser utilizado apenas em ambientes domésticos ou similares, tais como:
−Pequenas cozinhas de staff em lojas, escritórios e outros ambientes de trabalho;
−Turismo rural ou de habitação;
−Por clientes alojados em hotéis, motéis ou outro género de residenciais e afins;
−Alojamento tipo “cama e pequenoalmoço” (bed and breakfast).
Uma utilização diferente deste electrodoméstico em situações que não sejam as tarefas domésticas para que foi concebido, tal como utilizações comerciais ou profissionais, estão excluídas das utilizações explicitadas e em conformidade. Se o aparelho for utilizado para além das situações previstas, isso pode reduzir a vida útil do electrodoméstico e anular a garantia do fabricante, dado que as utilizações não foram as previstas em conformidade com o uso a que o aparelho se destina. Qualquer dano no equipamento que seja devido a utilizações não conformes com o que é suposto com a utilização doméstica e familiar (mesmo que o aparelho esteja localizado em casa), não são cobertas pela garantia dada por lei.
!Este electrodoméstico não deve ser usado por crianças com menos de 8 anos nem por pessoas com reduzidas capacidades físicas, sensoriais ou mentais ou pessoas que tenham falta de experiência e não saibam operar com o aparelho, a menos sejam supervisionadas por alguém com experiência e que supervisione a sua segurança e que entenda os riscos envolvidos. As crianças não devem brincar com o electrodoméstico. A limpeza e manutenção também não devem ser feitas por crianças.
!As crianças devem ser supervisionadas para que se garanta que não brincam com o electrodoméstico.
!Crianças com menos de 3 anos devem ser mantidas afastadas do aparelho a menos que tenham supervisão constante de um adulto.
!Se o cabo de alimentação do electrodoméstico estiver danificado, este deve ser substituído por um técnico qualificado para se evitarem acidentes.
!Para as ligações de abastecimento de água, use apenas as mangueiras e tubos fornecidos com a máquina (nunca use material velho).
!A pressão de água deve estar situada entre 0,05 MPa e 0,8 MPa.
!Certifique-se de que nenhum tapete ou carpete por baixo da
PT
21
máquina ficam a obstruir a sua base e a sua correcta ventilação.
!A posição OFF/desligado obtém-se quando o botão selector de programas está na posição vertical. Qualquer outra posição deste comando, significa que a máquina está ligada (apenas em modelos com selector de programas).
!Após a instalação a máquina deve estar posicionada de forma a que a ficha fique acessível.
!A capacidade máxima de roupa seca, depende do modelo (veja o painel de controlo).
!Para consultar a ficha de produto, por favor veja o site da marca.
Instruções de segurança
!Antes de proceder à limpeza ou manutenção da máquina de lavar, desligue o electrodoméstico da tomada e feche a torneira da água.
!Certifique-se de que o sistema eléctrico está ligado à terra. Se assim não for, chame um técnico qualificado para fazer essa ligação.
!Por favor não use extensões, conversores, fichas triplas ou múltiplas.
 ATENÇÃO:
A água pode alcançar temperaturas muito altas durante os ciclos de lavagem.
!Certifique-se de que não existe água no tambor antes de abrir a porta.
!Nunca puxe o cabo de alimentação para desligar a máquina.
!Não exponha a máquina a chuva, luz directa do sol ou outro tipo de elementos ambientais.
!Quando quiser movimentar a máquina não a puxe pelos botões ou gavetas de detergente. Durante o transporte nunca se encoste ou se apoie na porta. É aconselhável que sejam pelo menos duas pessoas a levantar e transportar a máquina de lavar.
!No caso de detectar algum mau funcionamento ou avaria, deligue a máquina de lavar, feche a torneira da água e não mexa no aparelho.
Contacte imediatamente o Centro de Assistência Técnica e use apenas peças originais, se for necessário repor alguma. O não cumprimento destes conselhos pode comprometer o seguro e correcto funcionamento do aparelho.
Electrodoméstico conforme com as seguintes Directivas Europeias:
!2006/95/EC (LVD);
!2004/108/EC (EMC);
!2009/125/EC (ErP);
!2011/65/EU (RoHS);
e alterações posteriores.
22

2. INSTALAÇÃO
!Corte os atilhos da embalagem, tenha cuidado para não estragar os tubos e cabos de alimentação.
!Desaparafuse os 2 ou 4 parafusos (A) na traseira para remover os 2 ou 4 calços (B) como está ilustrado na imagem 1.
!Feche os 2 ou 4 orifícios usando as tampas incluídas.
!Se a máquina de lavar for de encastre, depois de cortar as tiras da mangueira desaparafuse os 3 or 4 parafusos (A) e remova os 3 ou 4 calços (B).
!Em alguns modelos, 1 ou mais calços podem cair dentro da máquina: incline-a para os remover. Feche os orifícios utilizando as tampas fornecidas.
 ATENÇÃO:
Mantenha o material de embalamento longe das crianças.
1
A |
BA |
B |
B |
A |
|
A |
||
|
||
B |
PT |
2
A |
|
3 |
|
1 |
2 |
||
|
B
!Coloque a folha de polionda |
|
C |
|
||
|
no fundo, na base, como é |
|
|
||
|
|
|
|
||
|
demonstrado na imagem 2 (de |
|
|
3 |
|
|
acordo com o modelo, considere |
2 |
1 |
||
|
a versão A, B ou C). |
||||
|
|
|
|
||
|
|
|
23 |
|
|
|
|
|
|
|
|

Ligações hidráulicas
!Ligue o tubo da água à torneira, usando apenas o tubo fornecido com a máquina (fig. 3).
NÃO ABRA A TORNEIRA.
!Alguns modelos podem incluir uma ou mais das seguintes opções:
!HOT&COLD (fig. 4): Ligações à água da rede para água quente e água fria para
maior poupança energética. Ligue o tubo cinzento para a torneira de água fria e a vermelha para a torneira de água quente. A máquina pode ser ligada apenas à torneira de água fria; neste caso alguns programas podem começar alguns minutos mais tarde.
!AQUASTOP (fig. 5): Um dispositivo localizado no cabo de alimentação interrompe o fluxo de água se o tubo se deteriorar. Neste caso uma marca vermelha irá surgir na janela “A”, o que significa que o tubo tem que ser substituído. Para desapertar a porca, pressione o dispositivo “B” de bloqueio.
!AQUAPROTECT - TUBO FORNECIDO COM PROTECÇÃO (fig. 6): Caso a água escorra do tubo interno primário "A", a protecção de contenção transparente "B" vai reter a água para permitir que o ciclo de lavagem seja concluído. No fim do ciclo, entre em contacto com o Serviço de Assistência Técnica para que o tubo seja substituído.
Posicionamento
!Cuidado ao instalar a máquina de lavar roupa perto de uma parede para que o tubo não fique dobrado e coloque o tubo de drenagem a descarregar para um grande recipiente (cuba ou balde) ou, de preferência, para uma parede com um orifício a 50 cm de altura, pelo menos, e de forma a que o diâmetro do orifício seja maior que o do tubo da máquina de lavar (fig. 7).
24
1
5 |
6 |
B |
B |
|
A 

 A
A 

7
|
|
min 4 cm |
cm |
|
|
100 |
+2,6 mt |
|
|
|
|
max |
max |
min 50 cm |
|
max 85 cm |
!Nivele a máquina com os pés, como está |
8 |
|
|
|
ilustrado na imagem 8: |
|
|
|
|
a.gire a porca no sentido dos ponteiros |
|
|
|
|
do relógio para soltar o parafuso; |
|
|
|
A |
b.gire o pé para levantar ou baixar até que |
|
|
|
|
fique ao nível do chão, ao nível pretendido; |
|
|
|
|
c.fixe o pé, enroscando a porca, até à |
|
|
|
|
parte de baixo da máquina, mas sem |
|
|
|
B |
que interfira com esta zona. |
|
|
|
|
!Ligue o aparelho à corrente. |
|
|
|
|
ATENÇÃO: |
|
|
|
|
|
|
|
|
|
|
|
|
|
|
|
C |
|||
Contacte o serviço de Assistência |
|
|||
Técnica se o cabo de alimentação |
|
|
|
|
necessitar de ser substituído. |
|
|
|
|
Gaveta do detergente |
9 |
|
A gaveta do detergente está dividida em 3 compartimentos, tal como ilustrado na imagem 9:
!compartimento “1”: para detergente de pré-lavagem;
!compartimento “ ”:para aditivos especiais, como amaciador, fragrâncias perfumadas, etc.;
ATENÇÃO: |
|
Use apenas produtos líquidos; a |
|
máquina de lavar está programada para |
|
definir automaticamente as doses de |
|
aditivos durante o último enxaguamento |
10 |
em cada ciclo de lavagem. |
|
!compartimento “2”: para detergente de lavagem.
Alguns modelos têm incluído |
um recipiente |
para detergente líquido (fig. 10). |
Para o utilizar, |
coloque-o no compartimento "2". Desta forma, o detergente líquido apenas vai entrar no tambor da máquina no momento certo do ciclo. O recipiente também pode ser usado no branqueamento quando o programa de “Enxaguamento” está seleccionado.
ATENÇÃO: |
11 |
Alguns detergentes são difíceis de remover. Nesse caso recomendamos a utilização do recipiente especial que possa ser colocado no tambor (exemplo imagem 11).
25
1 |
2 |
PT

3. DICAS PRÁTICAS
Dicas de carregamento da roupa
AVISO: quando estiver a escolher a roupa, certifique-se de que:
-retirou todos os objectos metálicos, como pins, moedas ou outros de todas as peças de roupa;
-fechou os botões de fronhas, fechou fechos e amarrou cintos soltos;
-removeu argolas de cortinados;
-leu cuidadosamente as etiquetas com as recomendações de lavagem das peças de roupa;
-removeu as manchas persistentes causadas pelo detergentes específicos.
!Quando lavar cobertas, cobertores, edredons ou outras peças de grande porte, recomendamos que evite a centrifugação.
!Para lavar lãs, certifique-se de que estas podem ser lavadas na máquina e que estão identificadas com o símbolo “Pura lã virgem” e etiqueta de que não é um tapete e que é “Lavável na máquina”.
Sugestões úteis para o utilizador
Um guia amigo do ambiente e da poupança para a utilização do seu electrodoméstico.
Maximize a capacidade de carga
!Garanta a melhor utilização e racionalização da energia, água, detergente e tempo ao utilizar a carga máxima da máquina. Poupe até 50% de energia ao lavar uma carga completa em vez de duas máquinas com meia carga.
É necessária a pré-lavagem?
!POUPE detergente, tempo, água e entre 5 e 15% de consumo de energia ao NÃO selecionar Pré-lavagem para lavar a roupa diária com um nível de sujidade normal. Apenas para roupa com muita sujidade entranhada!
É necessária a lavagem com água quente?
!O pré-tratamento de manchas com um removedor de nódoas ou a imersão das peças com nódoas em água antes de as pôr a lavar pode reduzir a necessidade de um programa de lavagem a quente para que as nódoas sejam removidas.
Segue-se um guia rápido com dicas e recomendações sobre que detergente usar a várias temperaturas. Em qualquer caso, leia sempre as instruções nas embalagens dos detergentes para uma utilização e dosagem correctas.
Quando lavar roupa branca com muita sujidade, recomendamos a escolha de programas de algodões a 60°C ou mais e um regular detergente em pó para roupas com muita sujidade, dado que esses detergentes contêm agentes branqueadores que a temperaturas médias/altas garantem excelentes resultados.
Para lavar a temperaturas entre 40°C e 60°C o tipo de detergente usado deve ser adequado ao tipo de tecidos a lavar e ao nível de sujidade. Os normais detergentes em pó são indicados para cores claras, a chamada “roupa branca” ou cores “fixas” de fábrica, em qualquer dos casos, roupa com muita sujidade, enquanto os detergentes líquidos ou “protectores de cores” devem ser usados para roupas de cor mais delicadas e com níveis baixos de sujidade.
Para lavar a temperaturas abaixo dos 40°C recomendamos o uso de detergentes líquidos ou detergentes especificamente adequados a lavar a baixas temperaturas.
Para lavar sedas ou lãs, use apenas detergentes específicos e recomendados para estes tecidos delicados.
26
4.MANUTENÇÃO E LIMPEZA
Para limpar o exterior da máquina de lavar, use um pano ou esfregão macio, evitando detergentes abrasivos, álcool ou solventes. A máquina não necessita de nenhum cuidado especial para a limpeza regular: apenas limpar os compartimentos da gaveta de detergentes e o filtro; algumas dicas sobre como mover a máquina ou o que fazer quando está longos períodos sem utilização encontram-se de seguida.
Limpeza da gaveta
!Repita os passos anteriores de forma inversa para voltar a colocar o filtro e montar todos os componentes.
PT
!Recomendamos que limpe a gaveta de forma a evitar a acumulação de resíduos de detergentes e aditivos.
!Para fazer isto, retire a gaveta usando uma força ligeira, lave-a debaixo de água corrente e volte a coloca-la no local certo.
Limpeza do filtro
!A máquina de lavar vem equipada com um filtro especial que retém resíduos ou objectos maiores, como botões ou moedas, de forma a que estes não entupam a máquina e os sistemas de drenagem.
!Apenas disponível em alguns modelos: puxe a mangueira ondulada, retire o bujão e despeje a água para um recipiente.
!Antes de desencaixar o filtro, recomendamos que use um pano absorvente, para que o chão não fique molhado com a água que se possa espalhar.
!Rode o filtro no sentido contrário ao dos ponteiros do relógio até o ter no limite da posição vertical.
!Remova e limpe o filtro; quando terminar, volte a colocá-lo, girando no sentido dos ponteiros do relógio.
Sugestões de mudança de local da máquina ou períodos prolongados de não utilização
!No caso da máquina estar num local não aquecido durante um longo período de tempo, drene e retire toda a água das tubagens.
!Desligue a máquina da corrente.
!Retire o tubo de drenagem e deixe escorrer toda a água para um recipiente.
!Fixe o tubo de drenagem com a correia assim que terminar a operação.
27

5.GUIA RÁPIDO DE UTILIZAÇÃO
Esta máquina de lavar adapta automaticamente o nível da água ao tipo e quantidade de roupa a lavar. Este sistema permite uma redução nos consumes de energia e uma sensível redução dos tempos de lavagem.
Selecção de programas
!Ligue a máquina e seleccione o programa pretendido.
!Ajuste a temperatura de lavagem se necessário e pressione os botões de “opções”, escolhendo as pretendidas.
!Pressione o botão INÍCIO/PAUSA para iniciar a lavagem.
Porque pode acontecer que falte a energia quando a máquina está em funcionamento, esta possui uma memória que salva as configurações escolhidas, permitindo que o ciclo de lavagem retome onde parou assim que a energia eléctrica regresse.
!A mensagem "end/fim" vai aparecer no display ou o led correspondente vai acender-se no fim do programa.
Aguarde até que as luzes da fechadura da porta se apaguem: acontece cerca de 2 minutos depois do programa acabar.
!Desligue a máquina.
Para qualquer tipo de lavagem, veja a tabela de programas e siga as operações pela sequência indicada.
Dados técnicos
Pressão do sistema hidráulico: min 0,05 Mpa
max 0,8 Mpa
Velocidade de centrifugação: verifique a placa de identificação.
6.CONTROLOS E PROGRAMAS
A
M |
N O P |
I |
B |
L |
C D E F G H
ASelector de programas com posição OFF
BBotão INÍCIO/PAUSA
CBotão de INÍCIO DIFERIDO
DBotão de PRÉ-LAVAGEM
EBotão ENGOMAR FÁCIL
FBotão de SELECÇÃO DA VELOCIDADE DE CENTRIFUGAÇÃO
GBotão de SELECÇÃO DA TEMPERATURA
HBotão RÁPIDOS
IPainel Digital
LIndicadores luminosos dos BOTÕES
MIndicador luminoso de SEGURANÇA DA PORTA
NIndicador luminoso de VELOCIDADE DE CENTRIFUGAÇÃO
OIndicadores luminosos de SELECÇÃO DE TEMPERATURA
Potência absorvida/ Fusível/ Tensão: verifique a placa de identificação.
PIndicadores luminosos de PROGRAMAS RÁPIDOS
28
 Loading...