


THREAD BREAKAGE DETECTOR
DETECTOR DE RUPTURA DE HILO
BAS-311G, 326G, 342G
|
|
|
|
|
CONTENTS |
|
1. |
···········································2 |
1. |
Installation··········································2 |
|||
2. |
································5 |
2. |
Connecting the fibers························5 |
|||
|
2-1. |
····································· 5 |
|
2-1. Cutting the fibers ······································· 5 |
||
|
2-2. |
········································ 6 |
|
2-2. Connecting to the amplifier························ 6 |
||
3. |
·························7 |
3. |
Routing the amplifier cable···············7 |
|||
4. |
·····························9 |
4. |
Adjusting the sensor sensitivity·······9 |
|||
5. |
···················11 |
5. |
Setting memory switches ···············11 |
|||
6. |
|
|
6. |
If error code [E600] is displayed·····14 |
||
|
|
E600 |
|
|
||
|
··································14 |
PARTS LIST |
||||
|
|
|
|
|||
|
|
|
|
|||
|
|
|
|
|
CONTENIDO |
|
1. |
··············································2 |
1. |
Instalación··········································2 |
|||
2. |
·························5 |
2. |
Conexión de las fibras ······················5 |
|||
|
2-1. |
································· 5 |
|
2-1. Cortando las fibras ···································· 5 |
||
|
2-2. |
····························· 6 |
|
2-2. Conexión al amplificador ··························· 6 |
||
3. |
·····················7 |
3. |
Pasando el cable del amplificador ···7 |
|||
4. |
·························9 |
4. |
Ajuste de sensibilidad del sensor····9 |
|||
5. ······························ 11 |
5. |
Ajuste de interruptores |
||||
6. E600 ··················15 |
|
de memoria·······································11 |
||||
6. |
Si se exhibe el código de error [E600] |
|||||
|
|
|||||
|
|
···························································15 |
||||
LISTA DE PIEZAS

 /DANGER/ /PELIGRO
5
Wait at least 5 minutes after turning off the power switch and disconnecting the power cord from the wall outlet before opening the cover of the control box. Touching areas where high voltages are present can result in severe injury.
, 5 ,
Después de desconectar el interruptor principal y desenchufar el cable de alimentación del tomacorriente en la pared esperar al menos 5 minutos antes de abrir la cubierta de la caja de controles. El tocar las áreas donde exista alto voltaje puede ocasionar heridas graves.
 /CAUTION/ /ATENCION
さい。
Turn off the power switch and disconnect the power cord before installing any optional parts. The machine may operate if the foot switch is depressed by mistake, which could result in injury.
Close the air cock of the air supply source, and then open the drain cock to bleed the air until the needle of the pressure gauge points to “0”.
 ,
,
Desconectar el interrouptor principal y desconectar el cable de alimentación antes de cambiar las piezas opcionales. La maquina podria comenzar a funcionar si por descuido se presionara el interruptor de pie de comienzo de costura, lo que podría resultar en heridas.
Cierre el grifo de aire de la alimentación de aire, y luego abra el grifo de drenaje para purgar el aire hasta que la aguja del indicador de presión apunte a “0”.
1 |
BAS-311G, BAS-326G, BAS-342G |

1.
1. Installation
1.
1. Instalación
[BAS-311G, 326G]
[BAS-342G]
1327B
1.(1) (2)
1.Remove the motor cover (1), and then remove the top cover (2).
1.(1) (2)
1.Desmontar la caja de la bobina (1), y luego desmonte la cubierta superior (2).
BAS-311G, BAS-326G, BAS-342G |
2 |

2. (3) (4) (5)
3. (6) (7)(3) 4mm (5)
4. 2 (3) (8)(9)
2. Provisionally install the fibers (3) to the arm with the sensor setting plate (4) and the screw (5).
3. Tighten the screw (5) so that there is a clearance of 4 mm between the thread and the fiber (3) when the thread is passed through the arm thread guide (6) and the needle bar thread guide (7).
4. Clamp the two fibers (3) with nylon clamp (8), and install the nylon clamp (8) to the underside of the arm with the screw
(9).
1361B
2.(4) (5) (3)
3.(6) (7) (3) 4mm (5)
4.(8) (3) (9)
2.Instale provisoriamente las fibras (3) en el brazo con la placa de ajuste de sensor (4) y el tornillo (5).
3.Apriete el tornillo (5) de manera que haya una separación de 4 mm entre el hilo y la fibra (3) cuando se pasa el hilo por la guía de hilo del brazo (6) y la guía de hilo de barra de agujas (7).
4.Apriete las dos fibras (3) con la prensa de nailón (8), e instale la prensa de nailón (8) en la parte de abajo del brazo con el tornillo (9).
5.2 (3) (10)
[ ]
5. Pass the two fibers (3) through the cord bushing (10) into the arm.
NOTE:
Pass the fibers into the arm so that they do not touch the moving parts inside the arm when the sewing machine is running.
5. (3) (10)
运动部分接触。
5. Pase las dos fibras (3) a través del buje de cable (10) en el 1362B brazo.
NOTA:
Pase las fibras dentro del brazo de manera que no toquen las partes en movimiento dentro del brazo cuando la máquina de coser está funcionando.
3 |
BAS-311G, BAS-326G, BAS-342G |

1363B |
1328B |
[BAS-311G, 326G] |
[BAS-342G] |
[BAS-311G, 326G]
[BAS-342G]
|
1350B |
1364B |
1329B |
6.2 (3)
[ ]
7.(11) (12) 2
8.(13) (11) (14)
6.Pass the two fibers (3) through to the back of the sewing machine as shown in the illustration.
NOTE:
Be careful not to bend or break the fibers or damage them with the cord holder at this time. If this is not observed, thread breakages may not be detected correctly.
7.Install the metal fitting (11) to the back of the sewing machine with the two screws (12).
8.Hook the tabs (13) of the amplifier onto the metal fitting (11) to install the amplifier (14).
6.2 (3)
7.(12) 2 (11)
8.(13) (11) (14)
6.Pase las dos fibras (3) por la parte de atrás de la máquina de coser tal como se indica en la figura.
NOTA:
En este momento tenga cuidado de no doblar o romper las fibras o dañarlas con el soporte de cable. Si no tiene en cuenta lo anterior, las roturas de hilo no serán detectadas correctamente.
7.Instale la pieza metálica (11) en la parte de atrás de la máquina de coser con los dos tornillos (12).
8.Enganche las lengüetas (13) del amplificador en la pieza metálica (11) para instalar el amplificador (14).
BAS-311G, BAS-326G, BAS-342G |
4 |
2.
2. Connecting the fibers
2.
2. Conexión de las fibras
2-1.
2-1. Cutting the fibers
2-1.
2-1. Cortando las fibras
Cut the fibers to a length so that they can be easily inserted into the amplifier.
Corte las fibras al largo que permita insertarlas fácilmente en el amplificador.
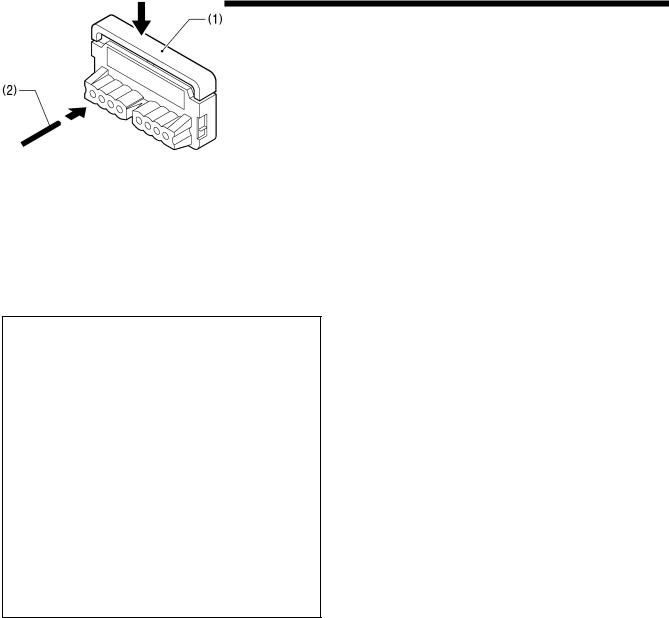
(1) (2)φ2.2
[ ]
With the lever (1) of the fiber cutter raised, insert the fiber (2) into the 2.2 mm diameter hole, and push down the knife in one movement to cut the fiber (2) to the desired length.
NOTE:
Do not use holes that have already been used for cutting. If they are used, cutting performance will worsen and the sensing distance will become less.
(1)(2) φ2.2
5263Q ,
Con la palanca (1) del cortador de fibra levantada, inserte la fibra (2) en el agujero de diámetro 2,2 mm, y empuje la cuchilla en un movimiento para cortar la fibra (2) al largo deseado.
NOTA:
No use los agujeros que han sido usados para cortar. Si se usan, el rendimiento de corte se dificultará y la distancia de sensibilidad será menor.
5 |
BAS-311G, BAS-326G, BAS-342G |
 Loading...