


 Loading...
SOFTWARE USER’S GUIDE
MFC-8460N
MFC-8860DN
MFC-8870DW
DCP-8060
DCP-8065DN
Version B

Table of Contents |
|
||
Section I |
Windows® |
|
|
1 |
Printing |
|
|
|
Using the Brother printer driver.................................................................................................................. |
2 |
|
|
Printing a document................................................................................................................................... |
3 |
|
|
Duplex (two-sided) printing ........................................................................................................................ |
4 |
|
|
|
Guidelines for printing on both sides of the paper ............................................................................... |
4 |
|
|
Manual duplex (two-sided) printing...................................................................................................... |
4 |
|
|
Automatic duplex (two-sided) printing (For models that support automatic duplex printing) ............... |
5 |
|
Simultaneous scanning, printing and faxing .............................................................................................. |
5 |
|
|
Printer operation key.................................................................................................................................. |
6 |
|
|
|
Job Cancel........................................................................................................................................... |
6 |
|
|
Secure Key.......................................................................................................................................... |
6 |
|
|
Printer Emulation Support ................................................................................................................... |
7 |
|
|
Printing the Internal Font List............................................................................................................... |
8 |
|
|
Printing the Print Configuration List ..................................................................................................... |
8 |
|
|
Restoring default printer settings......................................................................................................... |
8 |
|
Status Monitor............................................................................................................................................ |
9 |
|
|
|
Turning on the status monitor.............................................................................................................. |
9 |
|
|
Monitoring the machine’s status ........................................................................................................ |
10 |
|
Printer driver settings (For Windows®) .................................................................................................... |
11 |
|
|
How to access the printer driver settings (For Windows®) ...................................................................... |
12 |
|
|
Features in the Windows® printer driver.................................................................................................. |
13 |
|
|
|
Basic tab............................................................................................................................................ |
13 |
|
|
Advanced tab..................................................................................................................................... |
16 |
|
|
Print Quality ....................................................................................................................................... |
17 |
|
|
Duplex (two-sided) (For MFC-8860DN, MFC-8870DW and DCP-8065DN)...................................... |
18 |
|
|
Duplex (For MFC-8460N and DCP-8060) ......................................................................................... |
19 |
|
|
Watermark ......................................................................................................................................... |
21 |
|
|
Page Setting ...................................................................................................................................... |
23 |
|
|
Device Options ................................................................................................................................. |
24 |
|
|
Support tab ........................................................................................................................................ |
29 |
|
|
Accessories tab ................................................................................................................................. |
30 |
|
Features in BR-Script3 (Post Script® 3™ language emulation) Printer compatible driver ...................... |
31 |
|
|
|
Ports tab ............................................................................................................................................ |
31 |
|
|
Layout tab.......................................................................................................................................... |
32 |
|
|
Paper/Quality tab............................................................................................................................... |
32 |
|
|
Advanced Options ............................................................................................................................. |
33 |
i

2 |
Scanning |
|
|
Scanning a document using the TWAIN driver........................................................................................ |
34 |
|
TWAIN compliant............................................................................................................................... |
34 |
|
Accessing the scanner ...................................................................................................................... |
35 |
|
Scanning a document into the PC ..................................................................................................... |
36 |
|
Settings in the Scanner Setup dialog box.......................................................................................... |
40 |
|
Scanning a document using the WIA driver (For Windows® XP only)..................................................... |
43 |
|
WIA compliant ................................................................................................................................... |
43 |
|
Accessing the scanner ...................................................................................................................... |
43 |
|
Scanning a document into the PC ..................................................................................................... |
44 |
|
Using the Scan key (For USB or Parallel cable users)............................................................................ |
48 |
|
Scan to E-mail ................................................................................................................................... |
49 |
|
Scan to Image ................................................................................................................................... |
50 |
|
Scan to OCR ..................................................................................................................................... |
50 |
|
Scan to File........................................................................................................................................ |
51 |
|
Using ScanSoft® PaperPort® SE with OCR ............................................................................................ |
52 |
|
Viewing items .................................................................................................................................... |
53 |
|
Organizing your items in folders ........................................................................................................ |
54 |
|
Quick links to other applications ........................................................................................................ |
54 |
|
ScanSoft® PaperPort® OCR lets you convert image text into text you can edit................................ |
54 |
|
You can import items from other applications ................................................................................... |
55 |
|
You can export items into other formats............................................................................................ |
55 |
|
Uninstalling ScanSoft® PaperPort® SE with OCR............................................................................. |
55 |
3 |
ControlCenter2 |
|
|
Using ControlCenter2 .............................................................................................................................. |
56 |
|
Turning the AutoLoad feature off....................................................................................................... |
57 |
|
SCAN................................................................................................................................................. |
58 |
|
CUSTOM SCAN ................................................................................................................................ |
58 |
|
COPY ................................................................................................................................................ |
58 |
|
PC-FAX (Not available for DCP models)........................................................................................... |
59 |
|
DEVICE SETTINGS .......................................................................................................................... |
59 |
|
SCAN....................................................................................................................................................... |
60 |
|
Image (example: Microsoft Paint)...................................................................................................... |
60 |
|
OCR (word processing application)................................................................................................... |
62 |
|
E-mail ................................................................................................................................................ |
63 |
|
Supported file types........................................................................................................................... |
64 |
|
File..................................................................................................................................................... |
64 |
|
CUSTOM SCAN ...................................................................................................................................... |
65 |
|
Customizing a user-defined button.................................................................................................... |
66 |
|
COPY ...................................................................................................................................................... |
70 |
|
PC-FAX (Not available for DCP models)................................................................................................. |
72 |
|
Send .................................................................................................................................................. |
72 |
|
Receive/View Received..................................................................................................................... |
72 |
|
Address Book .................................................................................................................................... |
73 |
|
Setup ................................................................................................................................................. |
73 |
|
DEVICE SETTINGS ................................................................................................................................ |
74 |
|
Remote Setup (Not available for DCP models) ................................................................................. |
74 |
|
Quick-Dial (Not available for DCP models) ....................................................................................... |
75 |
|
Status Monitor .................................................................................................................................. |
75 |
|
|
ii |

4 |
Network Scanning |
|
|
(For models with built-in network support) |
|
|
Before using Network Scanning .............................................................................................................. |
76 |
|
Network license ................................................................................................................................. |
76 |
|
Configuring Network Scanning .......................................................................................................... |
77 |
|
Using the Scan key (For models that support duplex scanning) ............................................................. |
79 |
|
Scan to E-mail (PC)........................................................................................................................... |
79 |
|
Scan to E-mail (E-mail Server) (For MFC-8860DN and MFC-8870DW) ........................................... |
80 |
|
Scan to Image ................................................................................................................................... |
81 |
|
Scan to OCR ..................................................................................................................................... |
82 |
|
Scan to File........................................................................................................................................ |
83 |
|
Scan to FTP....................................................................................................................................... |
84 |
|
Scan to FTP Manual Method............................................................................................................. |
86 |
5Remote Setup
(Not available for DCP models)
|
Remote Setup.......................................................................................................................................... |
88 |
6 |
Brother PC-FAX Software |
|
|
(Not available for DCP models) |
|
|
PC-FAX sending ...................................................................................................................................... |
90 |
|
Setting up user information................................................................................................................ |
91 |
|
Sending setup.................................................................................................................................... |
92 |
|
Address Book .................................................................................................................................... |
93 |
|
Setting up a cover page..................................................................................................................... |
94 |
|
Entering cover page information........................................................................................................ |
94 |
|
Speed Dial setup ..................................................................................................................................... |
95 |
|
Brother Address Book ....................................................................................................................... |
96 |
|
Setting up a member in the Address Book ........................................................................................ |
96 |
|
Setting up a group for broadcasting .................................................................................................. |
97 |
|
Editing member information............................................................................................................... |
97 |
|
Deleting a member or group.............................................................................................................. |
97 |
|
Exporting the Address Book .............................................................................................................. |
98 |
|
Importing to the Address Book .......................................................................................................... |
99 |
|
Sending a file as a PC-FAX using the Facsimile style user interface.............................................. |
100 |
|
Sending a file as a PC-FAX using the Simple style user interface .................................................. |
101 |
|
PC-FAX receiving ................................................................................................................................. |
103 |
|
Enabling PC-FAX on your machine................................................................................................. |
104 |
|
Running the PC-FAX receiving software on your PC ...................................................................... |
104 |
|
Setting up your PC .......................................................................................................................... |
105 |
|
Configuring the Network PC-FAX Receiving Settings ..................................................................... |
106 |
|
Viewing new PC-FAX messages..................................................................................................... |
107 |
iii

Section II Apple® Macintosh® |
|
|
7 |
Printing and Faxing |
|
|
Setting up your USB-equipped Apple® Macintosh® .............................................................................. |
109 |
|
Printer operation key ............................................................................................................................. |
110 |
|
Job Cancel....................................................................................................................................... |
110 |
|
Secure Key ..................................................................................................................................... |
110 |
|
Printer Emulation Support ............................................................................................................... |
111 |
|
Printing the Internal Font List........................................................................................................... |
112 |
|
Printing the Print Configuration List ................................................................................................. |
112 |
|
Restoring default printer settings..................................................................................................... |
112 |
|
Status Monitor........................................................................................................................................ |
113 |
|
Updating the machine’s status ........................................................................................................ |
113 |
|
Hiding or showing the window ......................................................................................................... |
113 |
|
Quitting the window ......................................................................................................................... |
113 |
|
Web Based Management (Network models Only) .......................................................................... |
113 |
|
Using the Brother Laser driver for Macintosh® (Mac OS® X) ................................................................ |
114 |
|
Choosing page setup options .......................................................................................................... |
114 |
|
Specific settings............................................................................................................................... |
114 |
|
Using the Brother Laser driver for Macintosh® (Mac OS® 9.1 to 9.2).................................................... |
117 |
|
Choosing a printer ........................................................................................................................... |
117 |
|
Page Setup...................................................................................................................................... |
117 |
|
Using the BR-Script3 (Post Script® 3™ language emulation printer driver) .......................................... |
120 |
|
For Mac OS® X users ..................................................................................................................... |
120 |
|
For Mac OS® 9.1 to 9.2 users ......................................................................................................... |
123 |
|
Sending a fax (Not available for DCP models) ...................................................................................... |
126 |
|
For Mac OS® X ............................................................................................................................... |
126 |
|
For Mac OS® 9.1 - 9.2..................................................................................................................... |
129 |
8 |
Scanning |
|
|
Scanning from a Macintosh® ................................................................................................................. |
131 |
|
Accessing the scanner .................................................................................................................... |
131 |
|
Scanning an image into your Macintosh® ....................................................................................... |
131 |
|
Scanning a duplex document (for models that support duplex scanning) ....................................... |
132 |
|
Pre-Scanning an image ................................................................................................................... |
133 |
|
Settings in the Scanner window ...................................................................................................... |
134 |
|
Using the Scan key (For USB cable users Mac OS® 10.2.4 or greater) ............................................... |
137 |
|
Scan to E-mail ................................................................................................................................. |
138 |
|
Scan to Image ................................................................................................................................. |
139 |
|
Scan to OCR ................................................................................................................................... |
139 |
|
Scan to File...................................................................................................................................... |
140 |
|
Using Presto!® PageManager® ............................................................................................................. |
141 |
|
Features .......................................................................................................................................... |
141 |
|
System requirements for Presto!® PageManager® ......................................................................... |
141 |
|
Technical support ............................................................................................................................ |
142 |
iv

9 |
ControlCenter2 |
|
|
(For Mac OS® 10.2.4. or greater) |
|
|
Using ControlCenter2 ............................................................................................................................ |
144 |
|
Turning the AutoLoad feature off..................................................................................................... |
145 |
|
SCAN............................................................................................................................................... |
145 |
|
CUSTOM SCAN .............................................................................................................................. |
146 |
|
COPY / PC-FAX .............................................................................................................................. |
146 |
|
DEVICE SETTINGS ........................................................................................................................ |
146 |
|
SCAN..................................................................................................................................................... |
147 |
|
Image (example: Apple PreView) .................................................................................................... |
147 |
|
OCR (word processing application)................................................................................................. |
149 |
|
E-mail .............................................................................................................................................. |
150 |
|
Supported file types......................................................................................................................... |
150 |
|
File................................................................................................................................................... |
151 |
|
CUSTOM SCAN .................................................................................................................................... |
152 |
|
User-defined button ......................................................................................................................... |
152 |
|
Scan to Image ................................................................................................................................. |
153 |
|
Scan to OCR ................................................................................................................................... |
154 |
|
Scan to E-mail ................................................................................................................................. |
155 |
|
Scan to File...................................................................................................................................... |
156 |
|
COPY / PC-FAX .................................................................................................................................... |
157 |
|
DEVICE SETTINGS .............................................................................................................................. |
159 |
|
Remote Setup (Not available for DCP models) ............................................................................... |
159 |
|
Quick-Dial (Not available for DCP models) ..................................................................................... |
160 |
|
Status Monitor ................................................................................................................................. |
160 |
10 |
Network Scanning |
|
|
(Not available for DCP-8060) |
|
|
Before using Network Scanning ............................................................................................................ |
161 |
|
Configuring network scanning ......................................................................................................... |
161 |
|
Using the Scan key................................................................................................................................ |
163 |
|
Scan to E-mail (PC)......................................................................................................................... |
163 |
|
Scan to E-mail (E-mail server) (For MFC-8860DN and MFC-8870DW).......................................... |
164 |
|
Scan to Image ................................................................................................................................. |
166 |
|
Scan to OCR ................................................................................................................................... |
167 |
|
Scan to File...................................................................................................................................... |
168 |
|
Scan to FTP..................................................................................................................................... |
169 |
|
Scan to FTP Manual Method........................................................................................................... |
171 |
11 |
Remote Setup |
|
|
(Not available for DCP models) |
|
|
Remote Setup (For Mac OS® X 10.2.4 or greater)................................................................................ |
173 |
I |
Index |
|
v

Section I
Windows®
Printing |
2 |
Scanning |
34 |
ControlCenter2 |
56 |
Network Scanning (For models with built-in |
76 |
network support) |
|
Remote Setup (Not available for DCP models) |
88 |
Brother PC-FAX Software (Not available for DCP models) 90

1 Printing
Using the Brother printer driver
A printer driver is software that translates data from the format used by a PC into the format needed by a particular printer, using a printer command language or page description language.
The printer drivers are on the CD-ROM we have supplied. Install the drivers by following Quick Setup Guide. The latest printer driver can also be downloaded from the Brother Solutions Center at:
http://solutions.brother.com
Windows® Printing
The dedicated printer driver for Microsoft® Windows® 98/98SE/Me/2000 Professional/XP and Windows NT® 4.0 are available on the CD-ROM supplied with your Brother device. You can install them easily into your Windows® system using our installer program. The driver supports our unique compression mode to enhance
printing speed in Windows® applications, and allows you to set various printer settings, including economy printing mode and custom paper size.
 Note
Note
If your PC is protected by a firewall, and is unable to print, you may need to configure the firewall settings to allow communication through port number 137. Visit the Brother Solutions Center (http://solutions.brother.com) for more information.
2

1. Printing
Printing a document
When the machine receives data from your computer, it begins printing by picking up paper from the paper tray. Your machine can print on many different types of paper and envelopes. (See the User’s Guide for information about the Paper Tray and Recommended paper.)
a From your application, choose the Print command.
If any other printer drivers are installed on your computer, choose Brother MFC-XXXX or DCP-XXXX Printer* as your printer driver from the Print or Print Settings menu in your software application, and then click OK to begin printing.
*(Where XXXX is your model name. If you are using a USB cable to connect your machine then USB will be in the printer driver name.)
 Note
Note
For Macintosh® users, see Using the Brother Laser driver for Macintosh® (Mac OS® X) on page 114 or Using the Brother Laser driver for Macintosh® (Mac OS® 9.1 to 9.2) on page 117.
b Your computer sends the data to the machine. The Status LED blinks in yellow and the machine starts to print.
c When the machine finishes printing all the data, the LCD shows the machine status.
 Note
Note
You can choose the paper size and orientation in your application software.
If your application software does not support your custom paper size, choose the next larger paper size. Then adjust the print area by changing the right and left margins in your application software.
3

1. Printing
Duplex (two-sided) printing
The supplied printer driver supports duplex printing.
Guidelines for printing on both sides of the paper
If the paper is thin, it may wrinkle.
If paper is curled, straighten it and then put it back in the paper tray or the MP tray.
If the paper is not feeding properly, it may be curled. Remove the paper and straighten it.
Manual duplex (two-sided) printing
The machine prints all the even-numbered pages on one side of the paper first. Then, the Windows® driver instructs you (with a pop-up message) to reinsert the paper. Before reinserting the paper, straighten it well, or you may get a paper jam. Very thin or thick paper is not recommended.
4
1. Printing
Automatic duplex (two-sided) printing
(For models that support automatic duplex printing)
 Note
Note
•Use A4, Letter or Legal size paper when you use the automatic duplex printing function.
•Make sure that the back cover is closed.
•Make sure that the duplex tray is installed correctly in the printer.
•If paper is curled, straighten it and then put it back in the paper tray.
•You should use regular paper. Do not use bond paper or thin paper.
a b
Put paper in the paper tray or MP tray.
For the Windows printer driver
1Open the Properties dialog box in the printer driver.
2From the General tab, click the Printing Preferences icon.
3From the Advanced tab, click the Duplex icon.
4Make sure that Use Duplex Unit has been chosen.
5Click OK. The printer will print on both sides of the paper automatically.
For the BR-Script printer driver
1Open the Properties dialog box in the printer driver.
2From the General tab, click the Printing Preferences icon.
3From the Layout tab, choose Orientation, Print on Both Sides (Duplex) and Page Order.
4Click OK. The printer will print on both sides of the paper automatically.
Simultaneous scanning, printing and faxing
Your machine can print from your computer while sending or receiving a fax in memory, or while scanning a document into the computer. Fax sending will not be stopped during PC printing. However, when the machine is copying or receiving a fax on paper, it pauses the PC printing operation, and then continues printing when copying or fax receiving has finished.
5
1. Printing
Printer operation key
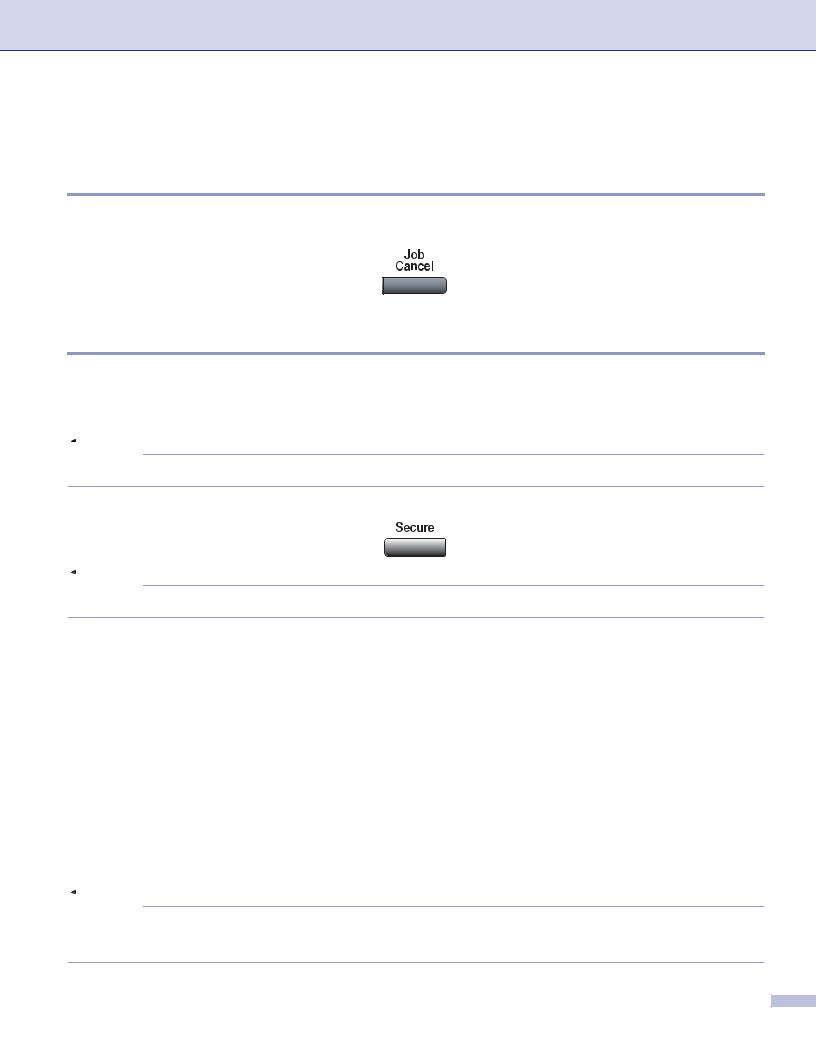
Job Cancel
To cancel the current print job, press Job Cancel. If the status LED turns Yellow, you can clear the data that is left in the printer memory by pressing Job Cancel.
Secure Key
Secured data is password protected. Only those people that know the password will be able to print the secured data. The machine will not print secure data until the password is entered. After the document is printed, the data will be cleared from the memory. To use this function, you need to set your password in the printer driver dialog box. (See Secure Print on page 25.)
 Note
Note
The password is a 4 digit number.
a Press Secure.
 Note
Note
The LCD displays No Data! if there is no secured data in the memory.
b c d e
f
Press a or b to choose the user name.
Press OK. The LCD displays job selections.
Press a or b to choose the job.
Press OK. The LCD prompts you to enter your four-digit password.
Enter your password using the control panel.
Press OK.
To print the data, press a or b to choose Print. Press OK.
The machine prints the data.
To delete the secured data, press a or b to choose Delete. Press OK.
Press Stop/Exit.
 Note
Note
•If you turn the power switch Off, the secured data saved in memory will be cleared.
•After you print the secured data it will be cleared from memory.
6

1. Printing
Printer Emulation Support
Your machine will receive print commands in a printer job language or emulation. Different operating systems and applications will send the print commands in different languages. Your machine can receive print commands in a variety of emulations and has an automatic emulation selection feature. When the machine receives data from the computer, it automatically chooses the emulation mode. The default setting is Auto(Epson).The machine can choose from the following combinations:
Auto (Epson) - default |
Auto (IBM) |
HP LaserJet |
HP LaserJet |
BR-Script3 |
BR-Script3 |
EPSON FX-850 |
IBM Proprinter XL |
|
|
Your machine has the following emulation modes. You can change the setting by using the control panel.
HP LaserJet Mode
The HP LaserJet mode (or HP mode) is the emulation mode in which this printer supports the PCL6 language of a Hewlett-Packard® LaserJet laser printer. Many applications support this type of laser printer. Using this mode will allow your printer to run at its best with those applications.
BR-Script3 Mode
BR-Script is an original Brother page description language and a PostScript® language emulation interpreter. This printer supports level 3. The BR-Script interpreter of this printer allows you to control text and graphics on the page.
For technical information about PostScript® commands, see the following manuals:
•Adobe Systems Incorporated. PostScript® Language Reference, 3rd edition. Addison-Wesley Professional, 1999. ISBN: 0-201-37922-8
•Adobe Systems Incorporated. PostScript® Language Program Design. Addison-Wesley Professional, 1988. ISBN: 0-201-14396-8
•Adobe Systems Incorporated. PostScript® Language Tutorial and Cookbook. Addison-Wesley Professional, 1985. ISBN: 0-201-10179-3
EPSON FX-850 and IBM Proprinter XL Mode
The EPSON FX-850 and IBM Proprinter XL modes are the emulation modes that this printer supports to meet the industry-standard for dot matrix printers. Some applications support these dot matrix printer emulations. Use these emulation modes so your printer will work well when printing from those types of applications.
7

1. Printing
Setting the Emulation mode
a Press Menu, 4, 1.
(For DCP models press Menu, 3, 1.)
b Pressa or b to choose Auto (EPSON), Auto (IBM), HP LaserJet, BR-Script 3, Epson FX-850 or IBM Proprinter.
Press OK.
c Press Stop/Exit.
 Note
Note
We recommend that you set the emulation setting with your application software or network server. If the setting does not work properly, choose the required emulation mode manually using the control panel buttons of the machine.
Printing the Internal Font List
You can print a list of the machine’s internal (or resident) fonts to see how each font looks before you choose it.
a Press Menu, 4, 2, 1.
(For DCP models, press Menu, 3, 2, 1.)
b c
Press Start. The machine prints the list.
Press Stop/Exit.
Printing the Print Configuration List
You can print a list of current printer settings.
a Press Menu, 4, 2, 2.
(For DCP models, press Menu, 3, 2, 2.)
b c
Press Start. The machine prints the settings.
Press Stop/Exit.
Restoring default printer settings
You can return the machine’s printer settings to the default settings. Fonts and macros loaded to the machine’s memory will be cleared.
a Press Menu, 4, 3.
(For DCP models, press Menu, 3, 3.)
b To restore the default settings, press 1. To exit without making a change, press 2.
c Press Stop/Exit.
8
1. Printing
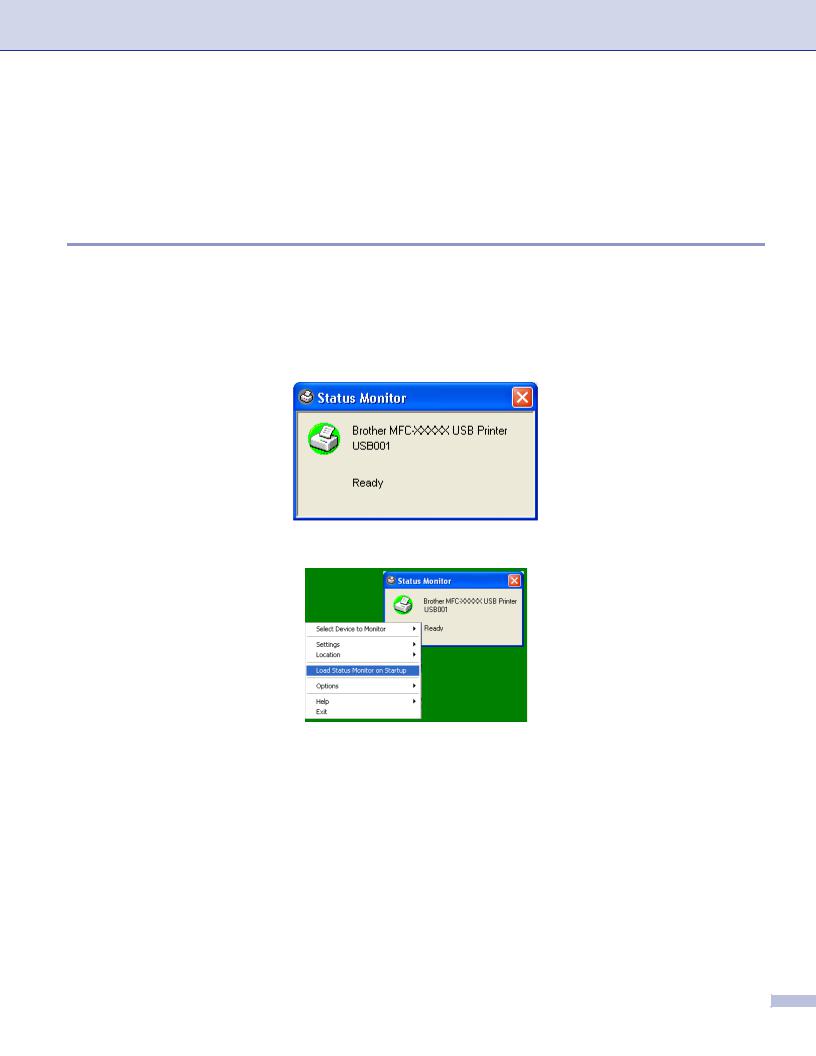
Status Monitor
The Status Monitor utility is a configurable software tool that allows you to monitor the status of one or more devices, allowing you to get immediate notification of errors such as paper empty or paper jam.
Turning on the status monitor
a Click Brother MFC-XXXX (or DCP-XXXX) Printer* located in the Start/All Programs/Brother/ MFL-Pro Suite MFC-XXXX (or DCP-XXXX)/Status Monitor on your PC. The Status Monitor window will appear.
*(Where XXXX is your model name and if you are connected by USB then USB will be in the printer driver name.)
b Right-click on the Status Monitor window and choose Load Status Monitor on Startup in the menu.
c Right-click on the Status Monitor window and choose Location, and then choose the way to display the status monitor on your PC—in the Taskbar, in the Tasktray, in the Tasktray (on Error) or on the
Desktop.
9

1. Printing
Monitoring the machine’s status
The Status Monitor icon will change color depending on the machine’s status.
A green icon indicates the normal stand-by condition.
A yellow icon indicates a warning.
A red icon indicates a printing error has occurred.
 Note
Note
•You can check the device status at anytime by double-clicking the icon in the tasktray or selecting the
Status Monitor located in the Start/All Programs/Brother/MFL-Pro Suite MFC-XXXX (or DCP-XXXX) on your PC.
•For more information about using the Status Monitor software, right click the Status Monitor icon and choose Help.
10

1. Printing
Printer driver settings (For Windows®)
 Note
Note
For Macintosh® users, see Using the Brother Laser driver for Macintosh® (Mac OS® X) on page 114 or Using the Brother Laser driver for Macintosh® (Mac OS® 9.1 to 9.2) on page 117.
You can change the following printer settings when you print from your computer:
Paper Size
Multiple Page
Orientation
Copies
Media Type
Duplex / Booklet
Paper Source
Resolution
Toner Save Mode
Watermark 1
Scaling 1
Secure Print 1
Quick Print Setup 1
Print Date & Time 1
Status Monitor 1
Macro
Administrator (For Windows® 98/98SE/Me users only)
Insert Command/File (For Windows® 98/98SE/Me users only)
Density Adjustment
1 These settings are not available with the BR-Script driver.
11

1. Printing
How to access the printer driver settings (For Windows®)
a Choose Print from the File menu in your application software.
b Choose Brother MFC-XXXX (or DCP-XXXX) Printer* and click Properties or Preferences. (Document Defaults for Windows NT® 4.0) The Printer dialog box will appear.
*(Where XXXX is your model name and if you are connected by USB then USB will be in the printer driver name.)
 Note
Note
The way you access the printer driver settings depends on your operating system and software applications.
12

1. Printing
Features in the Windows® printer driver
Basic tab
1
2
3
4
a b c
Choose the Paper Size, Multiple Page, Orientation, Copies and Media Type.
Choose the Duplex / Booklet setting.
Choose the Paper Source (First Page and Other Pages).
d Click the OK button to apply your selected settings.
To return to the Default settings, click the Default and then OK.
Paper Size
From the drop-down box choose the Paper Size you are using.
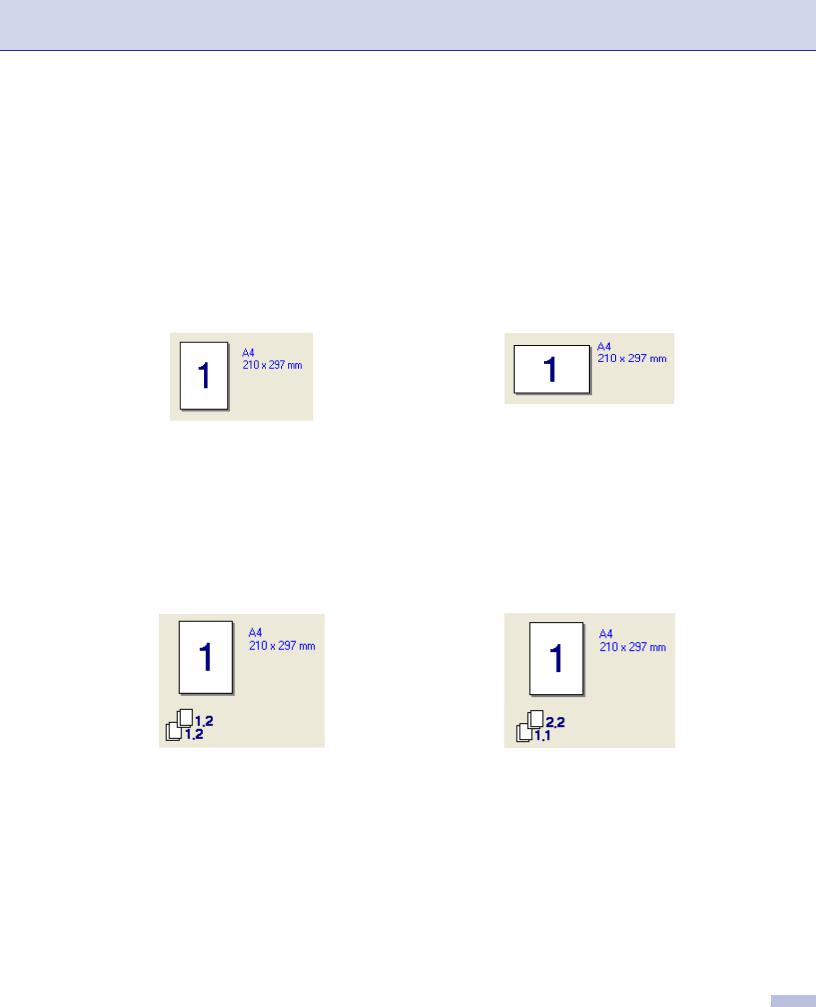
Multiple Page
The Multiple Page selection can reduce the image size of a page allowing multiple pages to be printed on one sheet of paper or enlarging the image size for printing one page on multiple sheets of paper.
13
1. Printing
Page Order
When N in 1 option is selected, the page order can be selected from the drop-down list.
Border Line
When printing multiple pages on one sheet with the Multiple Page feature you can choose to have a solid border, dash border or no border around each page on the sheet.
Orientation
Orientation selects the position of how your document will be printed (Portrait or Landscape).
Copies
The copies selection sets the number of copies that will be printed.
Collate
With the Collate check box selected, one complete copy of your document will be printed and then repeated for the number of copies you selected. If the Collate check box is not selected, then each page will be printed for all the copies selected before the next page of the document is printed.
14
1. Printing
Media Type
You can use the following types of media in your machine. For the best print quality, select the type of media that you wish to use.
Plain Paper |
Thin Paper |
Thick Paper |
Thicker Paper |
Bond Paper |
Transparencies |
Envelopes |
Env. Thick |
Env. Thin |
Recycled Paper |
 Note
Note
•When using ordinary plain paper (19 to 25 lb) choose Plain Paper. When using heavier weight paper, envelopes or rough paper choose Thick Paper or Thicker Paper. For bond paper, choose Bond Paper; for OHP transparencies, choose Transparencies.
•When you use envelopes, choose Envelopes. If the toner is not fixed to the envelope correctly when Envelopes has been selected, choose Env. Thick. If the envelope is crumpled when Envelopes has been selected, choose Env.Thin.
Duplex / Booklet (For models that support automatic Duplex printing)
When you want to print a booklet or do duplex printing, use this function, and then from the Advanced tab, choose a Duplex Type (See Duplex (two-sided) (For MFC-8860DN, MFC-8870DW and DCP-8065DN) on page 18).
Paper Source
You can choose Auto Select, Tray1, MP Tray or Manual and specify separate trays for printing the first page and for printing from the second page onwards.
15
1. Printing
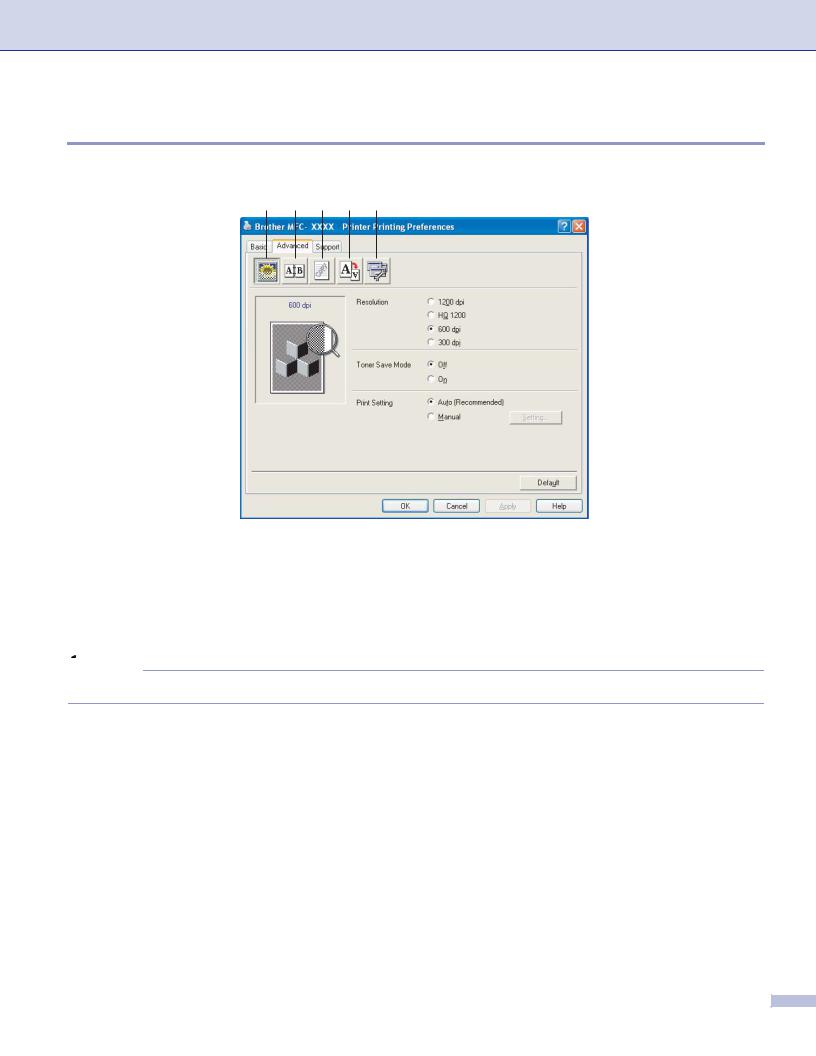
Advanced tab
Change the tab settings by selecting one of the following icons:
1 2 3 4 5
1Print Quality
2Duplex
3Watermark
4Page Setting
5Device Options
 Note
Note
To return to the default settings, click the Default button.
16

1. Printing
Print Quality
Resolution
You can change the resolution as follows:
1200 dpi
HQ1200
600 dpi
300 dpi
 Note
Note
If you use the high quality 1200 dpi setting, the print speed will be slower.
Toner Save Mode
You can conserve toner using this feature. When you set Toner Save Mode to On, print appears lighter. The default setting is Off.
 Note
Note
We do not recommend Toner Save Mode for printing Photo or Greyscale images.
Print Setting
You can manually change the Print settings.
Auto
Selecting the Auto (Recommended) button will allow automatic printing with the most suitable print settings for your print job.
Manual
You can change the settings manually by choosing Manual and clicking the Setting... button. You can set brightness, contrast and other settings.
17
1. Printing
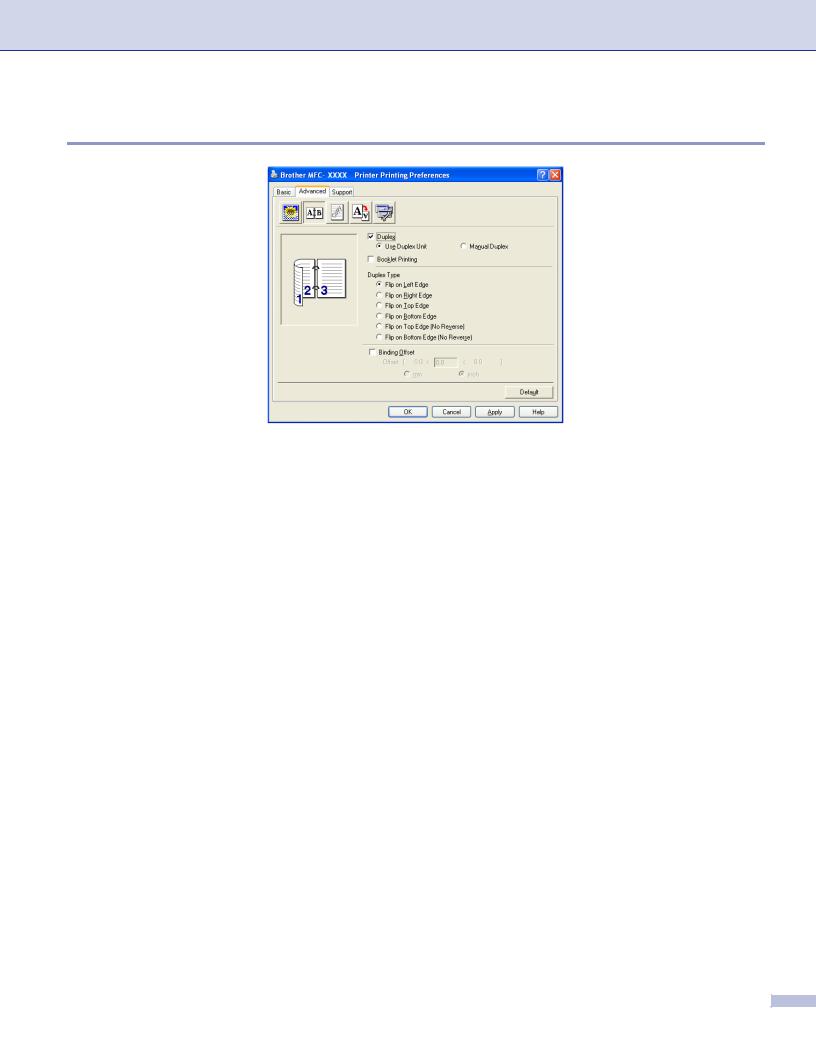
Duplex (two-sided) (For MFC-8860DN, MFC-8870DW and DCP-8065DN)
Check Duplex if you want to use the Duplex (two-sided) printing feature.
Use Duplex Unit
Check the Duplex box and then choose Use Duplex Unit.
In this mode the machine prints on both sides of the paper automatically.
Manual Duplex
Check the Duplex box and choose Manual Duplex. In this mode, the machine prints all the even numbered pages first. Then the printer driver stops and shows the instructions required to re-install the paper. When you click OK the odd numbered pages are printed.
Booklet Printing
When you want to print a booklet, use this Function. To make the Booklet, fold the printed pages down the middle, when using the booklet printing function.
18
1. Printing
Duplex Type
You can choose Duplex Type. There are six types of duplex directions available for each orientation.
Flip on Left Edge Flip on Right Edge
 Flip on Top Edge
Flip on Bottom Edge 
Flip on Top Edge (No Reverse)
Flip on Bottom Edge (No Reverse)
Binding Offset
Check the Binding Offset option, you can specify the offset value of the binding side in inches (0 - 8 inches) or millimetres (0 - 203.2 mm).
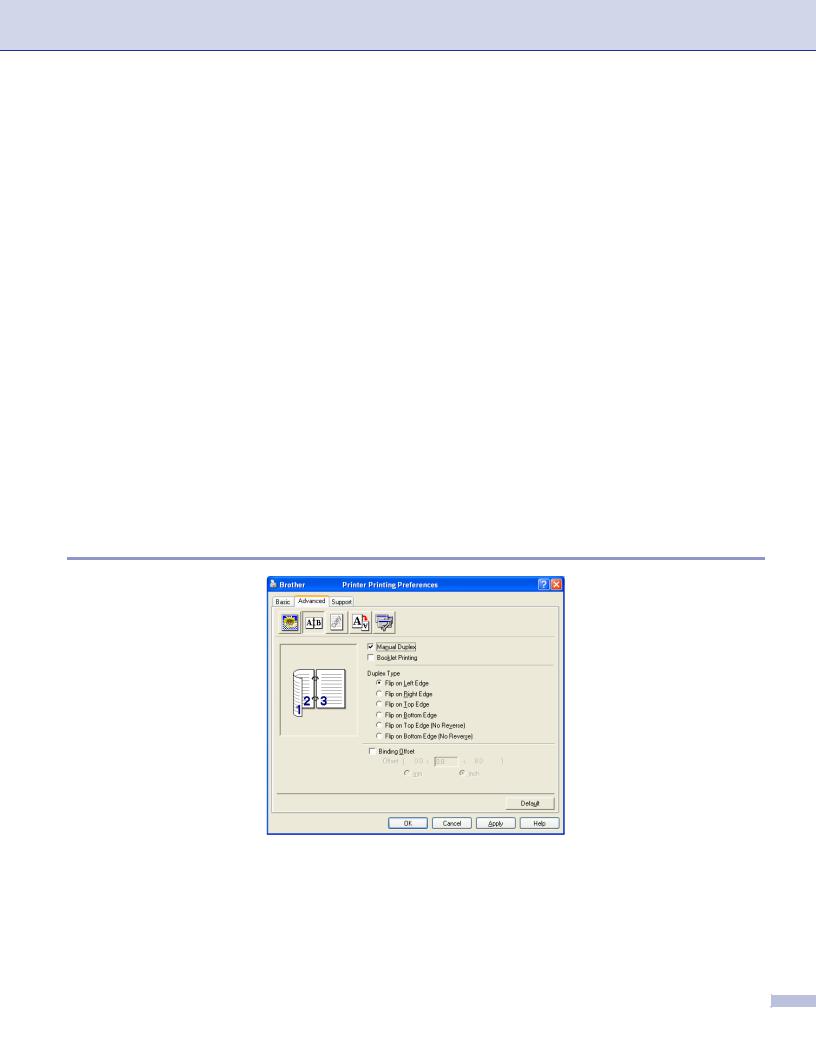
Duplex (For MFC-8460N and DCP-8060)
Manual Duplex
Check Manual Duplex. In this mode, the machine prints all the even numbered pages first. Then the printer driver stops and shows the instructions required to re-install the paper. When you click OK the odd numbered pages are printed.
19

1. Printing
Duplex Type
There are six types of duplex directions available for each orientation.
Flip on Left Edge Flip on Right Edge
 Flip on Top Edge
Flip on Bottom Edge 
Flip on Top Edge (No Reverse)
Flip on Bottom Edge (No Reverse)
Binding Offset
Check the Binding Offset option, you can specify the offset value of the binding side in inches or millimeters (0 - 8 inches) [0 - 203.2 mm].
20

1. Printing
Watermark
You can put a logo or text into your document as a watermark. You can choose one of the preset Watermarks, or you can use a bitmap file that you have created. Check Use Watermark, and then choose the watermark you want to use.
Transparent
Check Transparent to print the watermarked image in the background of your document. If this feature is not checked then the watermark will be printed on top of your document.
In Outline Text
(Windows® 2000/XP/Windows NT® 4.0)
Check In Outline Text if you only want to print an outline of the watermark.
Print Watermark
You can print the watermark in any of the following ways.
On all pages
On first page only
From second page
Custom
21

1. Printing
Watermark Setting
You can change the watermark’s size and position on the page by selecting the watermark, and clicking the Edit button. If you want to add a new watermark, click the New button, and then choose Text or Bitmap in the Watermark Style.
Title
You can choose the CONFIDENTIAL, COPY or DRAFT as the standard title or enter a title you like in the field.
Watermark Text
Enter your Watermark Text into the Text box, and then choose the Font, Size, Darkness and Style.
Watermark Bitmap
Enter the file name and location of your bitmap image in the File box, or Browse for the file location. You can also set the scaling size of the image.
Position
Use this setting if you want to control the position of the watermark on the page.
22
1. Printing
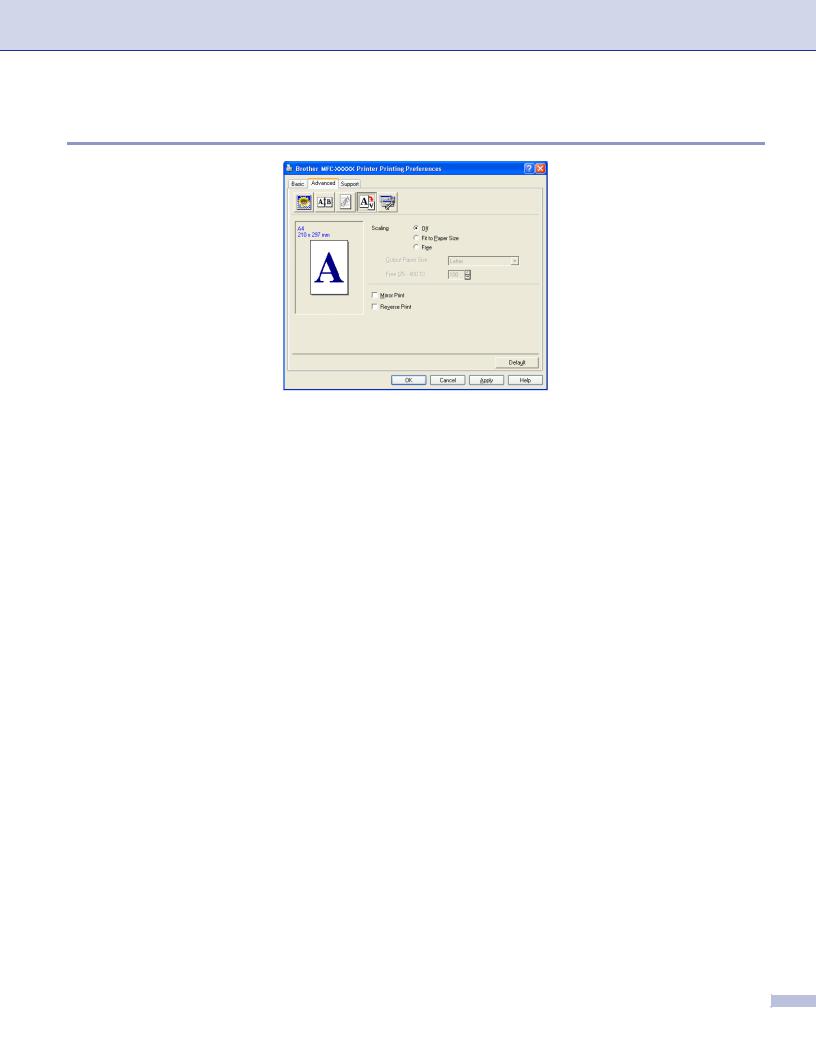
Page Setting
Scaling
You can change the print size of your document with the Scaling feature.
Check Off if you want to print the document as it appears on your screen.
Check Fit to Paper Size if your document has an unusual size, or if you have only the standard size paper.
Check Free if you want to change the size.
You can also use the Mirror Print or Reverse Print feature for your page setting.
23
1. Printing
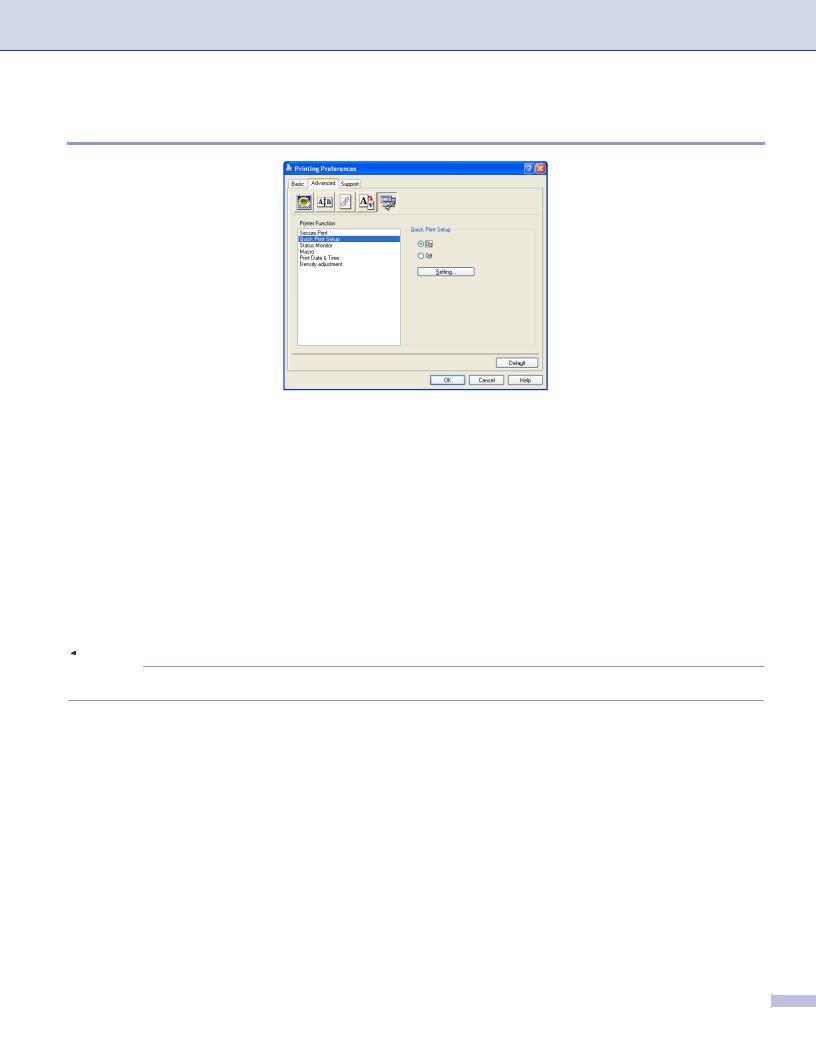
Device Options
You can set the following Printer Function modes in this tab:
Secure Print
Quick Print Setup
Status Monitor
Macro
Administrator (For Windows® 98/98SE/Me users only)
Insert Command/File (For Windows® 98/98SE/Me users only)
Print Date & Time
Density adjustment
Error Message Printout
 Note
Note
The Device Options list may differ depending on the model.
24
Loading...