


Bosch PIL631B18E Manual
PIL...B...
Hob
[en] Instructions for installation and use
PIL...B...
|
|
|
: : |
|
: : |
|
: : |
|
,(& |
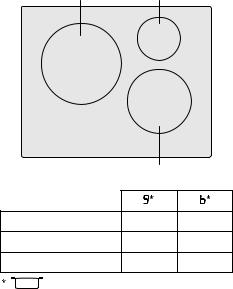
2 |
Ø = cm |

Ú Table of contents |
|
INSTALLATION INSTRUCTIONS ............................................... |
4 |
Assembly................................................................................ |
4 |
Important notes .............................................................................. |
6 |
Preparation of assembly kitchen units, figures 1/2/3/4 ........ |
6 |
Installing the appliance, figures 5/6........................................... |
7 |
Changing the intensity of the 13 / 16 / 20 Amp connection |
|
current, figure 7.............................................................................. |
7 |
Uninstalling the appliance ............................................................ |
7 |
INSTRUCTION MANUAL ............................................................ |
8 |
Safety precautions................................................................. |
8 |
Elements that may damage the appliance ............................... |
9 |
Protecting the environment ................................................ |
10 |
Environmentally-friendly disposal............................................. |
10 |
Energy-saving advice ................................................................. |
10 |
Induction cooking................................................................ |
10 |
Advantages of induction cooking ............................................ |
10 |
Cookware ..................................................................................... |
10 |
Getting to know your appliance.......................................... |
11 |
The control panel ........................................................................ |
11 |
The hotplates ............................................................................... |
11 |
Residual heat indicator .............................................................. |
11 |
Programming the hob.......................................................... |
12 |
Turning the hob on and off ....................................................... |
12 |
Set the hotplate ........................................................................... |
12 |
Cooking guidelines table........................................................... |
12 |
Childproof lock..................................................................... |
13 |
Activating and deactivating the childproof lock .................... |
13 |
Childproof lock ............................................................................ |
13 |
Powerboost function ........................................................... |
14 |
To activate ................................................................................... |
14 |
To deactivate ............................................................................... |
14 |
Time programming function ............................................... |
14 |
Turning off a hotplate automatically ........................................ |
14 |
The timer....................................................................................... |
14 |
Automatic time limitation .................................................... |
15 |
Basic settings....................................................................... |
15 |
Accessing the basic settings.................................................... |
16 |
Care and cleaning................................................................ |
16 |
Hob ................................................................................................ |
16 |
Hob frame .................................................................................... |
16 |
Fixing malfunctions ............................................................. |
16 |
Normal noise while the appliance is working........................ |
17 |
After-sales service............................................................... |
17 |
Tested dishes ....................................................................... |
18 |
3
INSTALLATION INSTRUCTIONS
Assembly |
|
|
|
|
|
|
|
|
|
|
|
|
|
|
[ |
|
|
|
5 |
|
|
|
|
|
|
|
|
|
|
|
% |
' |
|
|
|
|
|
|
|
& |
|
|
|
( |
|
|
|
|
|
$ |
|
% |
|
|
PLQ |
|
|
||
|
|
|
PLQ |
||
|
$ |
|
|
PLQ |
|
|
|
& |
|
' |
|
|
PLQ |
|
|
||
|
|
PLQ |
PLQ |
||
|
& |
|
|||
|
|
PLQ |
PLQ |
||
|
|
|
|||
|
D |
|
E |
|
|
( |
PLQ |
|
|
PLQ |
|
|
|
PLQ |
|
PLQ |
|
4

PLQ 


 PLQ
PLQ
PLQ
|
PLQ |
D |
E |
|
PLQ |
|
PLQ |

 PLQ
PLQ
|
5
|
|
|
|
|
|
9 1a |
|
|
|
|
/ |
|
|
|
|
9 |
9 |
|
|
|
1 |
|
|
|
|
|
|
|
|
|
|
D |
E |
|
|
|
|
|
|
|
|
|
|
|
|
|
|
|
|
|
|
F |
|
|
|
|
|
|
|
|
|
|
|
|
Important notes
Safety: Safety in use is only guaranteed if the technical installation of the hob has been carried out correctly and in accordance with the assembly instructions. The installation technician shall be liable for any damage caused as a result of unsuitable installation.
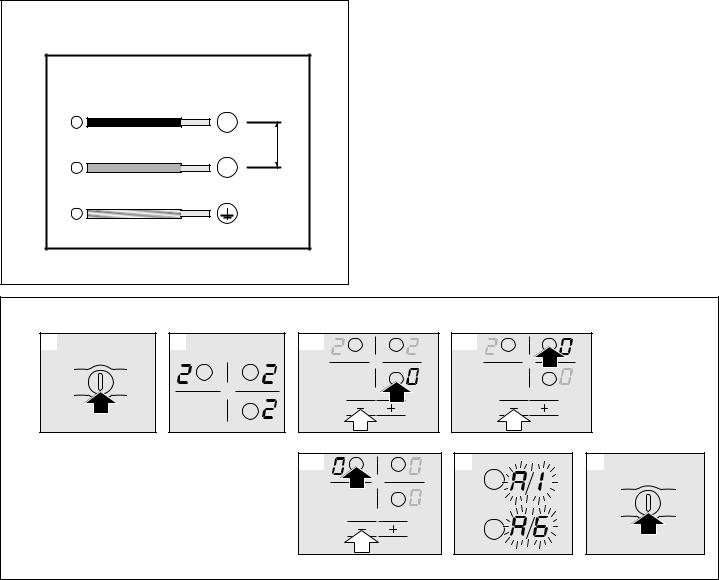
Electric connection: Only by an authorised specialist technician. The guidelines set out by the local electricity provider must be observed.
Type of connection: The appliance falls under protection class I and can only be used in combination with a grounding conductor connection.
The manufacturer accepts no responsibility for any malfunction or damage caused by incorrect electrical installations.
Installation: The appliance must be connected to a fixed installation and the means of disconnecting it from the fixed installation must be installed according to the installation instructions.
Built-in assembly under worktop: The induction hobs may only be installed over a drawer, ovens with forced ventilation from the same brand and dishwashers from the same brand. Refrigerators, unventilated ovens and washing machines may not be installed beneath the hob.
Power cable: Do not tie the power cable or pass it along sharp edges. If there is an oven installed below, pass the cable along the rear corners of the oven to the connection box. It must be positioned so that it does not touch any of the hot parts of the hob or the oven.
Hob: flat, horizontal, stable. Follow the hob manufacturer's instructions.
Warranty: an unsuitable installation, connection or assembly will invalidate the product warranty.
Note: Any change to the appliance's interior, including changing the power cable, must only be performed by specially trained members of the Technical Assistance Service.
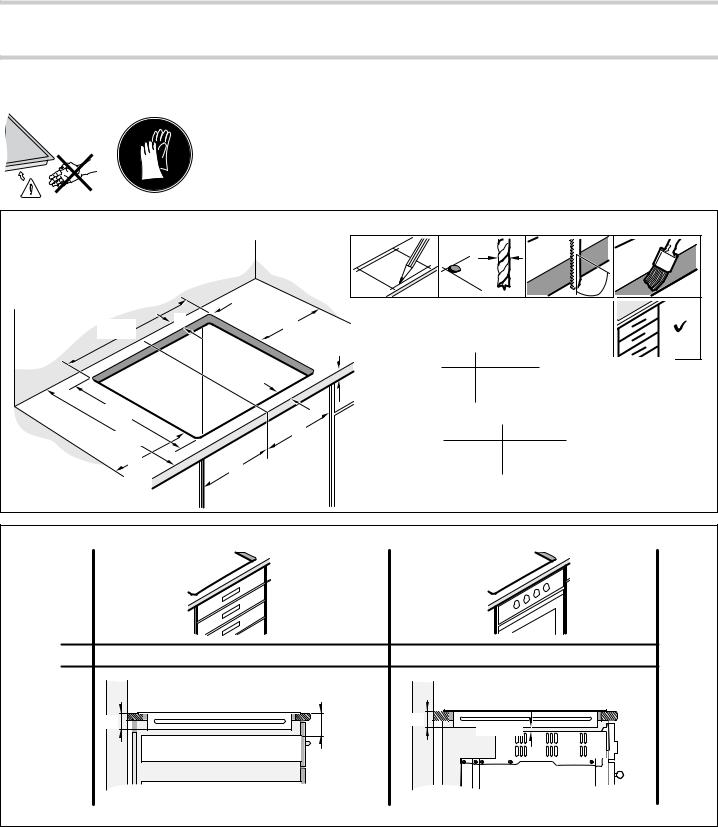
Preparation of assembly kitchen units, figures 1/2/3/4
Built-in kitchen units: Minimum temperature resistance of 90°C.
Gap: Remove any shavings after performing cutting work. Cut surfaces: Seal with heat resistant material.
Assembly over drawer, figure 2a
Metal objects stored inside the drawer could become very hot due to the air recirculating from the hob ventilation system. If this occurs, an intermediate support is recommended.
Intermediate support: A wooden panel can be used (figure 3) or you may order a suitable accessory from our Technical Assistance Service. The reference code for this accessory
is 686002.
Worktop: Must have a minimum thickness of 20 mm.
The distance between the top of the working surface and the top of the drawer must be 65 mm.
6
 Loading...