


WS-S1
WS-S1
ENGLISH
Water Detector
Follow instruction in this document to
setup and use the accessory, refer to
illustration on the right for detail. For
further setting or operation information,
please visit Blaupunkt website
http://www.blaupunkt.com to download
the complete manual.
Getting Started
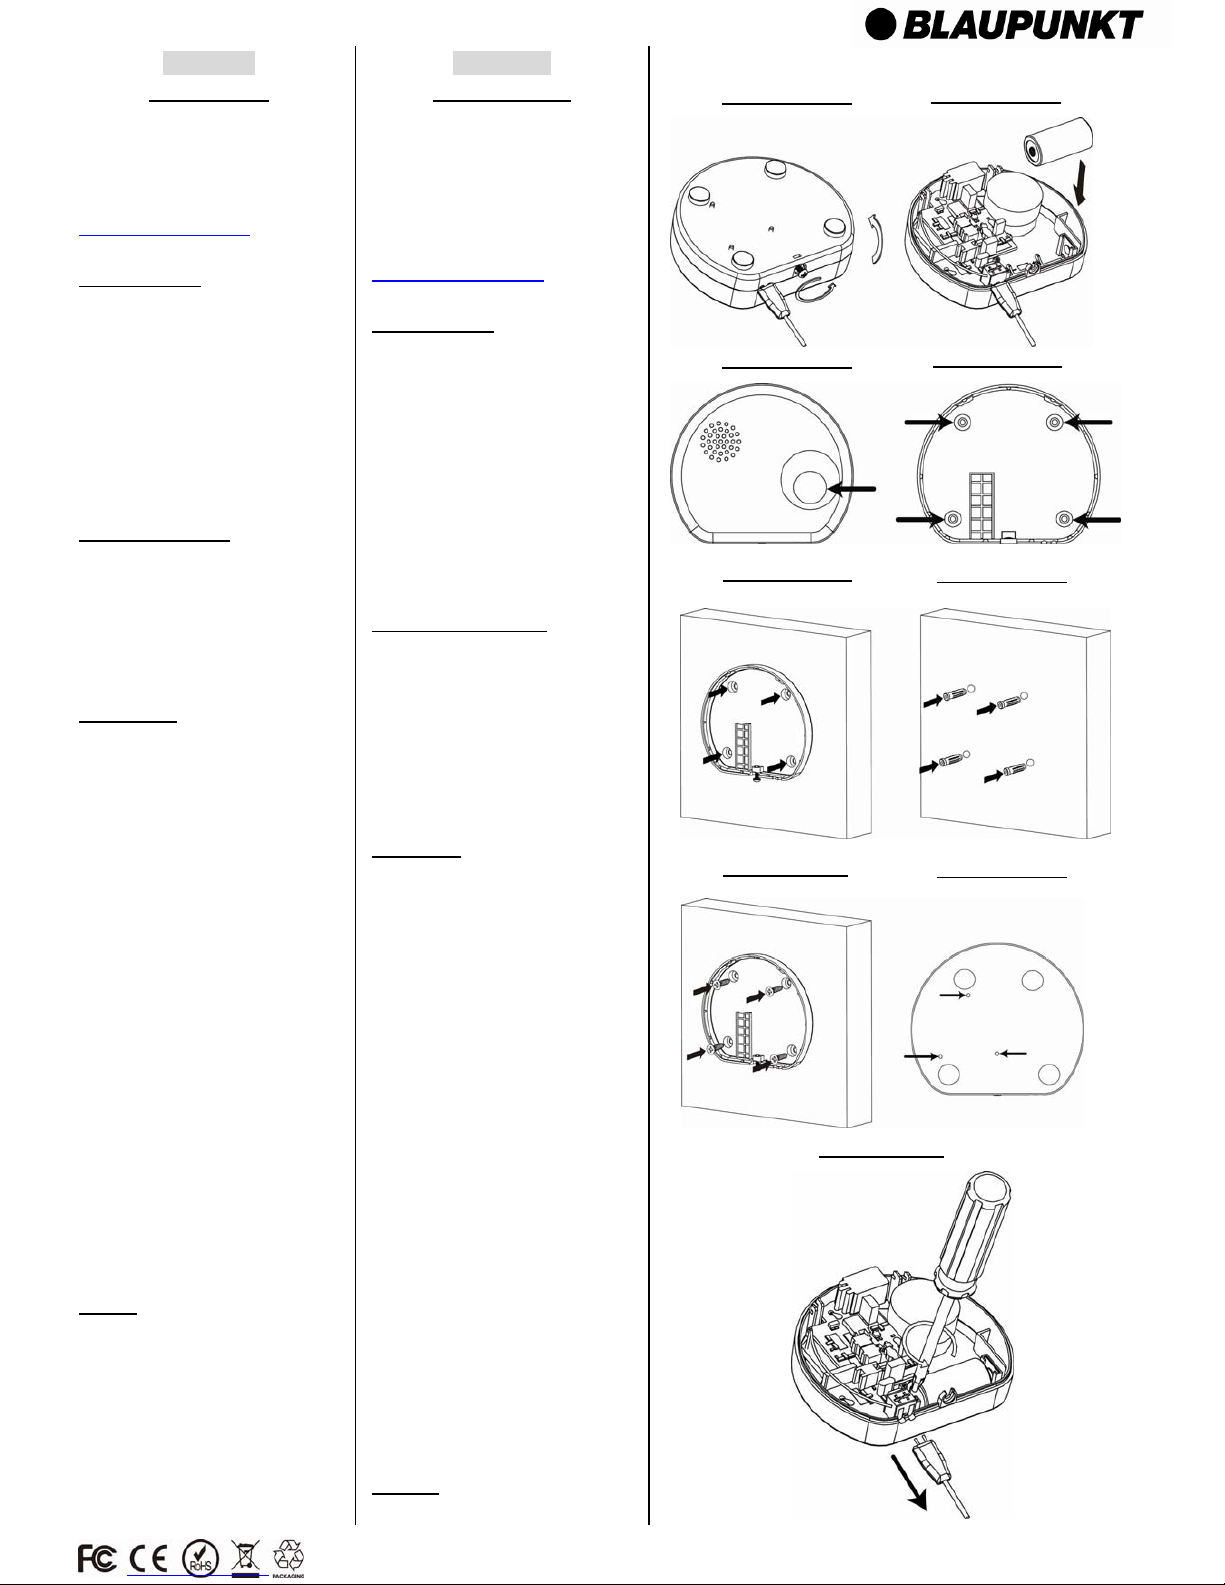
1. Remove the screw at bottom to
open cover (Figure 1)
2. Insert the supplied battery (Figure
2)
3. Put the Control Panel into learning
mode.
4. Press the learn button in the front
(Figure 3)
5. Refer to Control Panel manual to
complete learning process.
Mounting Location
Mount the Water Detector near
water using appliances such as
dishwasher, refrigerator, or toilet.
For wall mounting, install the
Water Sensor on the wall and
drop the extension probe to the
desired water detection level.
Installation
Wall Mounting
1. The back cover has 4 knockouts on
inside for wall mounting (Figure 4)
2. Break through the knockouts and
use the knockouts as template to
mark position on the wall. (Figure
5)
3. If required, drill holes into marked
location and insert wall plug.
(Figure 6)
4. Screw the back cover onto the wall.
(Figure 7)
5. Replace the front cover on the back
cover.
Ground Deployment
1. The Water Sensor has 3 water
probes on the back for ground
deployment. (Figure 8)
2. Open the Water Sensor cover,
loosen the screw on the terminal
and disconnect the extension probe
for wall mounting. (Figure 9)
3. Replace the cover and place the
Water Sensor on the ground
standing on the 4 stands.
Battery
3 x AA alkaline batteries
ESPAÑOL
Detector de agua
Siga las instrucciones del documento
para configurar y operar éste
accesorio, consultando las gráficas de
la derecha para ver detalles. Para
obtener más información de
configuración y operación, por favor
visite la página web
http://www.blaupunkt.com para
descargar el manual completo.
Pasos iniciales
1. Aflojar el tornillo de la parte inferior
para abrir la tapa (Figura 1)
2. Introduzca la pila suministrada en el
compartimento. (Figura 2)
3. Colocar el panel de control en
modo de aprendizaje.
4. Oprimir el botón de prueba del
frente para el aprendizaje.(Figura
3)
5. Consulte el manual del panel de
control para completar el proceso
de aprendizaje.
Ubicación de montaje
Ubicar el detector de agua cerca a
dispositivos que usan agua, como
el lavaplatos, refrigerador, o
inodoros.
Para montaje de pared, instalar el
sensor de agua sobre la pared y
colocar la extensión del terminal
para el nivel de detección
deseado.
Instalación
Montaje de pared
1. La tapa posterior tiene 4 orificios
ciegos por dentro para montarlo a
la pared. (Figura 4)
2. Romper los orificios ciegos y
usarlos como plantilla para marcar
los puntos en la pared. (Figura 5)
3. Si es necesario, perforar los
orificios de montaje sobre las
marcas realizadas e insertar los
tacos de pared.(Figura 6)
4. Atornillar la tapa posterior al sitio
elegido en la pared. (Figura 7)
5. Poner la tapa frontal sobre la tapa
posterior.
Despliegue sobre el piso
1. El sensor de agua tiene 3
terminales de agua en la parte
posterior del despliegue de piso.
(Figura 8)
2. Abrir la tapa del sensor de agua,
aflojar el tornillo del conector y
desconectar la extensión del
terminal para el montaje de pared.
(Figura 9)
3. Poner la tapa frontal sobre la base
de 4 soportes del sensor de agua.
Baterías
3 x pilas alcalinas AA.
Figure 1 / Figura 1
Figure 6 / Figura 6
Figure 2 / Figura 2
Figure 3 / Figura 3
Figure 4 / Figura 4
Figure 5 / Figura 5
Figure 8 / Figura 8
Figure 7/ Figura 7
Figure 9/ Figura 9
 Loading...