


880
Table of contents
 Loading...
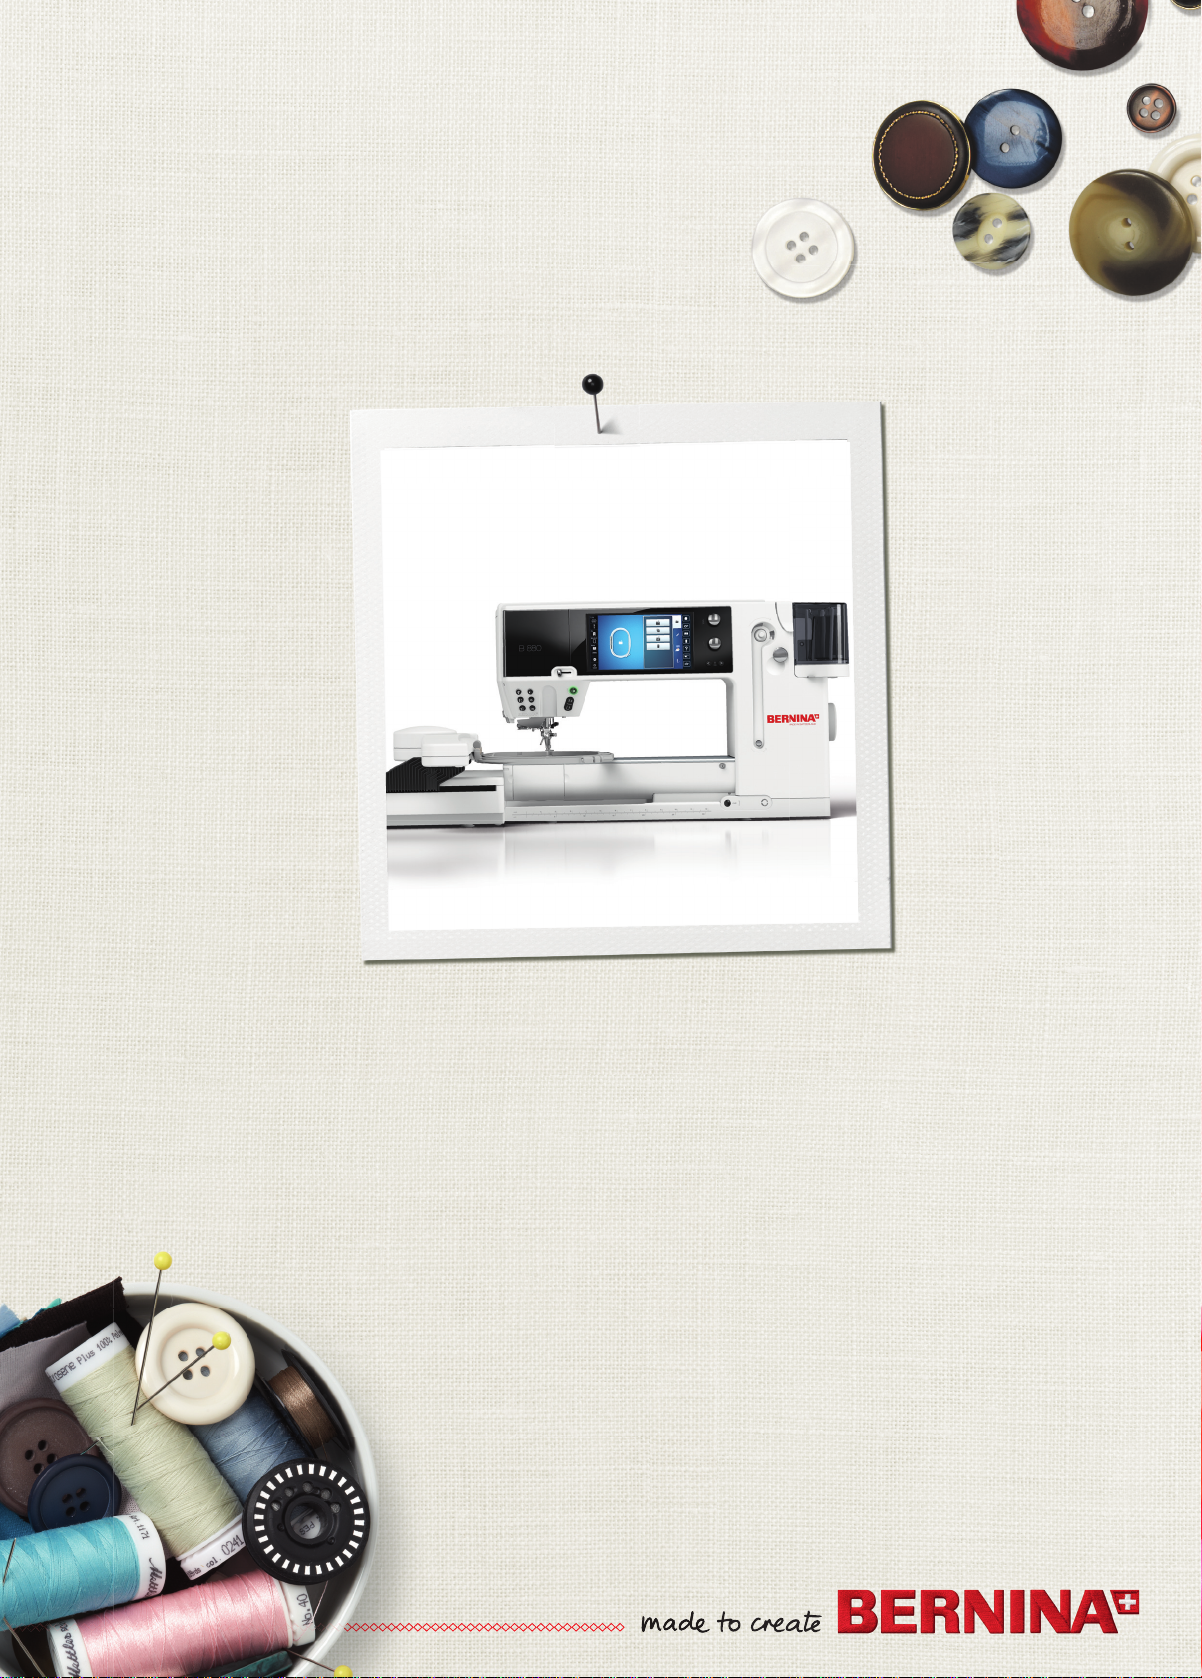
BERNINA 880
034791.50.04_Manual_B880_EN
Introduction
034791.50.04_Manual_B880_EN
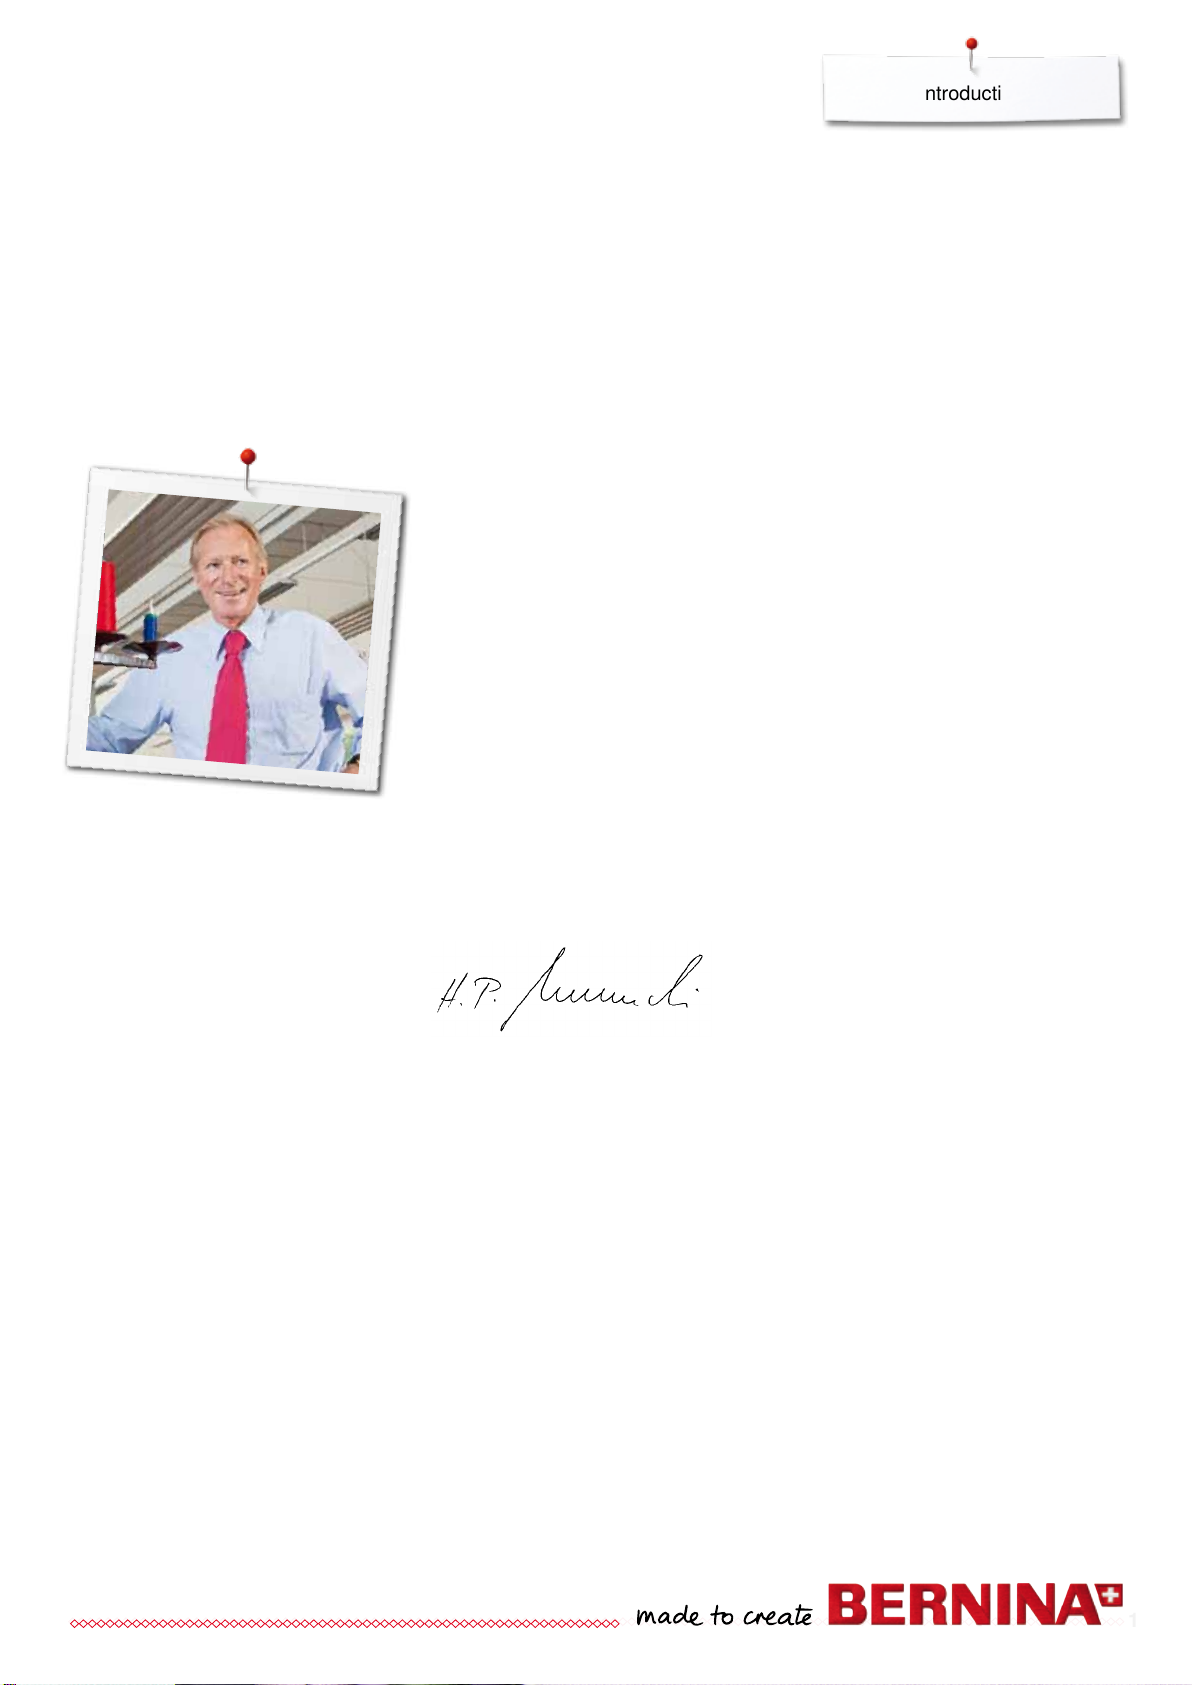
Dear BERNINA Customer
Congratulations! You have decided on BERNINA and therefore on a product which will
delight you for years. For more than 100 years our family company has attached
greatest importance to satisfied customers. As for me, it is a matter of personal concern
to offer you Swiss development and precision at the height of perfection, futureorientated sewing technology and a comprehensive customer service.
The BERNINA 880 is our top model - and during its development not only was focus
placed on technique and ease of use but also the design of the product was well
considered. After all we sell our products to creative people like you, who do not only
appreciate high quality but also form and design. By means of the BERNINA sewing and
embroidery system, sewing and embroidering becomes faster, more intelligent, more
constant, more creative and is even more fun.
Enjoy creative sewing, embroidering and quilting on your new BERNINA 880 and keep
informed about the various accessories at www.bernina.com.
On our homepage you will also find a lot of inspiring sewing instructions, to be
downloaded for free.
Our highly trained BERNINA dealers will provide you with more information on service
and maintenance offers.
I wish you lots of pleasure and many creative hours with your new BERNINA.
H.P. Ueltschi
Owner
BERNINA International AG
CH-8266 Steckborn
www.bernina.com
1st Edition
1

Safety Instructions
034791.50.04_Manual_B880_EN
IMPORTANT SAFETY INSTRUCTIONS
IMPORTANT
INFORMATION
When using an electrical appliance, basic safety
precautions should always be followed, including
the following:
Read all the instructions before using this
sewing-/embroidery computer.
When the sewing-/embroidery computer is not
in use, it should be disconnected from the
electricity supply by removing the plug from
the outlet.
DANGER!
To reduce the risk of electrical shock:
1. The sewing-/embroidery computer should
never be left unattended when plugged in.
2. Always unplug this sewing-/embroidery
computer from the electrical outlet
immediately after using and before cleaning.
3. LED Radiation – Do not view directly with
optical instruments. Class 1M LED product.
WARNING!
To reduce the risk of burns, fire, electric shock or
injury to persons:
1. Use this sewing-/embroidery computer only
for purposes as described in this manual. Use
only attachments, accessories and parts
recommended by the manufacturer.
2. Do not allow this sewing-/embroidery
computer to be used as a toy. Close attention
is necessary when this sewing-/embroidery
computer is used by or near children and
infirm persons. The sewing-/embroidery
computer is not intended for use by persons
(including children) with reduced physical,
sensory or mental capabilities or lack of
experience and knowledge, unless they have
been given supervision or instruction
concerning use of the sewing-/embroidery
computer by a person responsible for their
safety. To ensure children do not play with
2
the sewing-/embroidery computer they must
be supervised.
3. Never operate this sewing-/embroidery
computer if:
⦁
it has a damaged cord or plug,
⦁
it is not working properly,
⦁
it has been dropped or damaged,
⦁
it has fallen into water
Return the sewing-/embroidery computer to
your local authorized BERNINA dealer for
examination or repair.
4. Never operate the sewing-/embroidery
computer with any air openings blocked.
Keep ventilation openings of the sewing-/
embroidery computer free from the
accumulation of lint, dust and loose cloth.
5. Keep fingers away from all moving parts.
Special care is required around the sewing
needle.
6. Never insert any objects into any openings on
the sewing-/embroidery computer.
7. Do not use the sewing-/embroidery computer
outdoors.
8. Do not operate the sewing-/embroidery
computer where aerosol products (sprays) or
oxygen are being used or where oxygen is
being administered.
9. Do not pull or push the fabric while stitching.
This may deflect the needle, causing it to
break.
10. Do not use bent needles.
11. Always use the original BERNINA stitch plate.
The wrong stitch plate can cause needle
breakage.
12. To disconnect, turn power switch to «0» (off),
then remove the plug from the outlet. Do not
unplug by pulling the cord, instead grasp the
plug to pull it from the outlet.
13. Turn power switch to «0» (off) when making
any adjustments in the needle area, such as
changing the needle or the presser foot, etc.
14. Always unplug the sewing-/embroidery
computer from the electrical outlet when
carrying out cleaning or maintenance work or
any other user servicing adjustments
mentioned in this manual.
15. This sewing-/embroidery computer is provided
with double insulation (except USA and
Canada). Use only identical replacement
parts. See instructions for servicing of doubleinsulated products.
Safety Instructions
034791.50.04_Manual_B880_EN
SERVICING DOUBLEINSULATED PRODUCTS
In a double-insulated product two systems of
insulation are provided instead of grounding. No
grounding means is provided on a doubleinsulated product, nor should a means for
grounding be added to the product. Servicing a
double-insulated product requires extreme care
and knowledge of the system and should be done
only by qualified service personnel. Replacement
parts for a double-insulated product must be
identical to the original parts in the product. A
double-insulated product is marked with the
words: «DOUBLE INSULATION» or «DOUBLE
INSULATED».
The symbol
product.
may also be marked on the
DISCLAIMER
No liability will be assumed for any possible
damage which arises from misuse of this sewing-/
embroidery computer.
This sewing-/embroidery computer is intended for
household use only.
This sewing-/embroidery computer meets the
European Standard 2004/108/EC concerning the
electromagnetic tolerance.
Environmental Protection
BERNINA is committed to the protection
of the environment. We strive to
minimize the environmental impact of
our products by continuously improving
product design and our technology of
manufacturing.
When your sewing computer won't be
used anymore, dispose this product in
an environmentally responsible way
according to the national directive. Do
not throw away this product with your
household waste. In case of doubt,
please contact your BERNINA dealer.
If the sewing computer is stored in a cold
room, it should be brought to a warm
room about one hour before use.
SAVE THESE
INSTRUCTIONS!
Please find the latest version of your
instruction manual at www.bernina.com
3

Contents
034791.50.04_Manual_B880_EN
Contents
Contents Sewing
Important Safety Instructions 2
Environmental Protection 3
Key to Signs 10
Breadcrumb navigation 10
Accessory Sewing 11
Standard Accessories 11
Presser feet 12
Accessory box free standing 13
Bobbin 13
Overview sewing computer 14
Front view 14
Detail view 14
Important Sewing information 16
Thread 16
Needle, thread and fabric 16
Needles, threads 17
⦁
Correct needle/Thread combination 17
⦁
Too thin thread or too thick needle 17
⦁
Too thick thread or too thin needle 17
Overview needles 18
Sewing preparation 19
Battery 19
Power Switch/Power Cable 19
Magnetic holder for Touchscreen pen 19
Foot control 20
Slide-on table 20
⦁
Seam guide 20
Presser foot lifter 21
Pivotable Triple Spool Holder 21
Winding the Bobbin 22
⦁
Preparation 22
⦁
Winding the Bobbin 22
⦁
Manual mode 22
⦁
Interrupting the winding process 22
⦁
Continuing the winding process 22
Removing the Bobbin 23
⦁
Removing the Bobbin 23
⦁
Inserting the Bobbin 23
⦁
Threading lower thread 23
⦁
Thread cutter lower thread 23
⦁
Check the threading path 23
Threading the Upper Thread 24
⦁
Automatic 24
⦁
Manual 24
Changing the needle 25
⦁
Removing the needle 25
⦁
Inserting the needle 25
Threading Double/Triple Needle 26
⦁
Threading Double Needle 26
⦁
Working with the Double needle 26
⦁
Triple Needle 26
⦁
Changing the thread 26
Changing the presser foot 27
⦁
Removing the presser foot 27
⦁
Attaching the presser foot 27
Stitch plate 27
⦁
Marks on the stitch plate 27
⦁
Removing the Stitch Plate 27
⦁
Replacing the Stitch Plate 27
Thread-Guide-and-Lubricating Unit 28
⦁
As a thread-guide eyelet (Fig. 1) 28
⦁
As a thread lubricator (Fig. 2) 28
⦁
Assembly 28
⦁
Various Options of Application 29
Radial Thread Guide 29
Upper thread tension 30
⦁
Altering upper thread tension 30
⦁
Saving the upper thread tension 30
⦁
Back to basic settings 30
Lower Thread Tension 31
Security Program 32
⦁
Display 32
⦁
Selecting the needle 32
⦁
Selecting the stitch plate 32
⦁
Saving 32
Needle Chart 32
⦁
Selecting needle 32
Selecting a Presser Foot 33
⦁
Display 33
⦁
Optional presser feet 33
⦁
Saving 33
⦁
Return to basic settings 33
Altering presser foot pressure 34
⦁
When sewing thick material, e.g. quilting 34
⦁
Saving presser foot pressure 34
⦁
Resetting the basic setting 34
Feed dog position 34
⦁
Feed dog position down 34
⦁
Feed dog position up 34
Bobbin filling 34
⦁
Amount of remaining thread 34
Alarm 35
⦁
Setting the time of the alarm 35
⦁
Individual alarm message 35
⦁
Deleting an alarm message 35
⦁
Corrections 35
⦁
Alarm Display 35
Feed dog and Fabric feed 36
Functions 38
Overview «Function»-buttons 38
⦁
«Start/Stop/hover»-button 38
⦁
«Quick reverse»/
«Permanent reverse sewing»-button 38
4

Contents
034791.50.04_Manual_B880_EN
⦁
Slide speed control 38
⦁
«Automatic threader»-button 38
⦁
Programmable «Pattern end-/Securing»-button 38
⦁
«Needle stop»-button 39
⦁
«Automatic Securing Program»-button 39
⦁
«Presser foot position»-button 39
⦁
«Automatic thread cutter»-button 39
⦁
Stitch width and Stitch length Knobs (Multifunction) 39
⦁
«Needle position»-buttons 39
⦁
Needle stop position up and
«Quick reverse»-button 39
⦁
Needle stop position down and
«Quick reverse»-button 39
Display 40
Overview Main Display 40
⦁
System settings 40
⦁
External Functions/Views 40
⦁
Menu Selection 40
⦁
Selection 41
⦁
Stitch Pattern Area 41
⦁
Stitch Pattern Display 41
Functions - Display 42
Sewing Functions Overview 42
Scrolling Functions 42
General Functions 42
Overview Functions Buttonholes 46
Overview Functions Alphabets 47
Overview Functions Combi mode 48
Setup-Program 52
Overview «Setup»-Display 52
Sewing settings 53
⦁
Altering Upper thread tension 53
⦁
Sewing speed control 53
⦁
Securing stitches on/off 53
⦁
Programming «Function»-buttons/«Function»-icon 54
⦁
Automatic securing program 54
⦁
Automatic thread cutter 54
⦁
Raising the presser foot 54
⦁
Programming «Securing»-button 54
⦁
Hover position of the presser foot 54
⦁
Automatic thread cutter and securing stitches 55
⦁
Programming «Quick reverse»-button 55
⦁
Presser foot position with needle stop down 55
⦁
Programming the foot control 56
⦁
Programming securing stitches 56
⦁
Automatic thread cutter 56
⦁
Raising the presser foot 56
Embroidery settings 57
⦁
Calibrating the hoop 57
⦁
Fabric Thickness 58
⦁
Activating or deactiving securing stitches 58
⦁
Automatic cut 58
Personal settings 59
⦁
Welcome text 59
⦁
Deleting Welcome text 59
⦁
Corrections 59
Monitoring 59
⦁
Upper-/Lower thread indicator/Thread knots 59
Altering the acoustic signals 60
⦁
Selecting Stitch Pattern/Function/BSR 60
Sewing computer settings 60
⦁
Language selection 60
⦁
Display settings 61
⦁
Display Calibration 61
⦁
Basic setting 62
Cleaning/Update 63
⦁
Calibrating Buttonhole foot No. 3A 63
⦁
Updating the sewing-/embroidery computer 63
⦁
Cleaning the thread clamp/Thread catcher 64
⦁
Cleaning the thread catcher 64
⦁
Lubricating the sewing-/embroidery computer 65
⦁
Packing position 65
⦁
Setting the clock 65
Information 66
⦁
Version 66
⦁
Dealer details 66
⦁
Service data 66
Tutorial 67
Overview Tutorial 67
Creative Consultant 68
Overview Creative Consultant 68
Overview Sewing techniques/Recommendations 68
Leaving the Creative consultant 68
Help Program 69
⦁
Stitch patterns 69
⦁
Functions 69
⦁
Leaving the Help Program 69
Balance 70
Practical and decorative stitches, alphabets 70
⦁
Practical and decorative stitches 70
⦁
Corrections 70
⦁
Sideways-motion patterns 70
⦁
Vertical corrections 71
⦁
Horizontal corrections 71
⦁
Back to basic settings 71
BERNINA Dual Transport 71
⦁
Balance BERNINA Dual Transport 71
⦁
Back to basic setting 71
eco description 72
⦁
Activating eco 72
⦁
Deactivating eco 72
5

Contents
034791.50.04_Manual_B880_EN
Practical stitches 74
Overview Practical stitches 74
Selecting stitch pattern 76
⦁
Direct-Option 1 76
⦁
Direct-Option 2 76
⦁
By stitch number 76
⦁
Cancelling 76
Customizing stitch patterns individually 77
Temporary Altered Stitch Memory 77
Personal memory permanent 78
Altering stitch width and stitch length 79
Application Examples of
Practical Stitches 80
Straight stitch 80
Triple Straight Stitch 80
Triple Zig-zag 81
Zipper 82
Manual darning 83
Automatic Darning 84
Reinforced darning, automatic 85
Reinforced Darning program 85
Finishing Edges 86
Double overlock 86
Topstitching edges 87
Blind Hems 88
Visible Hem 88
Securing Program 89
Basting Stitch 89
Flat joining seam 90
Height Compensation of uneven layers 91
Sewing Corners 91
Buttonholes 92
Overview Buttonholes 92
Important information 94
⦁
Marking the length of manual buttonholes 94
⦁
Marking the length of automatic buttonholes 94
⦁
Marking the length of keyhole buttonholes 94
⦁
Test sample 94
⦁
Adjusting the bead width 94
⦁
Altering the stitch length 94
Stabilizer 95
Cord 96
⦁
Ideal cords 96
⦁
Cord with the automatic Buttonhole foot No. 3A 96
⦁
Cord with the Buttonhole foot No. 3C
(optional accessory) 96
⦁
Fixing the cord 96
⦁
Cutting buttonholes open with the seam ripper 96
⦁
Cutting open buttonholes with the buttonhole cutter
(optional accessory) 96
Altering the balance 97
⦁
Balance with direct entry length buttonholes 97
⦁
Balance with direct entry length keyhole or round
buttonholes 97
⦁
Balance for manual keyhole or round buttonhole 97
⦁
Balance for manual standard buttonhole 97
⦁
Balance for stitch counter buttonhole 97
⦁
Clear Balance 97
Programming buttonholes 98
Standard and stretch buttonhole with auto-length,
automatically 98
Automatic with Direct Entry Length 99
Automatic with Button measuring 99
Automatic round and keyhole buttonhole 100
Heirloom Buttonhole 102
Stitch Counter Buttonhole 102
Buttonhole in Long Term Memory 103
7- or 5-step Buttonhole, manually 105
Button sew-on program 106
Eyelet Program 107
Decorative Stitches 108
Overview Decorative Stitches 108
Application 108
Tapering 109
⦁
Altering angle 109
⦁
Tapering Functions 110
Stitch Designer 112
Stitch designer functions 112
Creating or editing stitch design 114
⦁
Opening the Stitch Designer 114
⦁
Creating a stitch design using the guides 114
⦁
Creating stitch designs using screen dots 114
⦁
Free hand drawing 114
⦁
Selecting and moving a single point 114
⦁
Moving several stitches 115
⦁
Inserting a point 115
⦁
Duplicating 115
⦁
Reversing the stitch sequence 115
⦁
Sewing stitch designs 116
Application examples of
Decorative stitches 117
Cross Stitch 117
Pintucks 118
Bobbin-Play Sewing 120
Quilt Stitches 121
Overview Quilt Stitches 121
Application examples of Quilt stitches 122
Handlook quilt stitch 122
Free-motion quilting 123
6

Contents
034791.50.04_Manual_B880_EN
BSR (BERNINA Stitch Regulator) 124
Quilting with BSR 124
⦁
BSR-Function 124
⦁
BSR function with straight stitch No. 1 124
⦁
BSR function with zig-zag No. 2 124
⦁
Two different BSR modes 124
⦁
Preparation 125
⦁
Remove presser foot sole 125
⦁
Attaching the presser foot sole 125
Functions in the BSR mode 126
⦁
Needle stop down (standard) 126
⦁
Needle stop up 126
⦁
Raising or lowering the needle 126
⦁
Securing with «Start/Stop»-button (only Mode 1) 126
⦁
Securing function (only Mode 2) 126
⦁
Free motion quilting (only Mode 2) 126
⦁
Free motion quilting without BSR activation 126
⦁
Beeper (audio signal) activation/deactivation 127
⦁
Selecting sound for BSR in the Setup Program 127
⦁
Selecting sound for BSR in the «BSR»-Display 127
⦁
Activating BSR Sewing Function 128
⦁
Deactivating BSR Sewing Function by using
«Start/Stop»-button 128
⦁
BSR Function deactivation 128
BERNINA Dual Feed 130
⦁
Presser Feet Selection 130
⦁
Switching on BERNINA Dual Feed 130
⦁
Switching off BERNINA Dual Feed 130
Fabrics 131
Alphabets 132
Overview Alphabets 132
⦁
Lettering 132
⦁
Perfect stitch formation 132
Combining characters 133
⦁
Selecting the next letter 133
⦁
Large view of the Display 133
⦁
Corrections 133
Correcting the combination 134
⦁
Inserting character 134
⦁
Deleting Letters 134
Alphabet in combination with functions 134
⦁
Selecting lower case letters 134
⦁
Altering font size 134
Monograms 135
⦁
Monogram Sizes 136
⦁
Balance 136
Personal Program 137
Creating a personal Display 137
Preparing stitch patterns 137
⦁
Programming/Saving first stitch pattern 137
⦁
Programming/Saving second stitch pattern 138
⦁
Stitch pattern selection in the Personal program 138
⦁
Personal Display 138
Altering/Overwriting stitch patterns 139
Deleting stitch patterns 140
Combi Mode 141
Creating Stitch pattern combinations 141
⦁
Programming and saving 141
Deleting Stitch patterns 142
⦁
Deleting entire combination 142
⦁
Deleting individual stitches 142
Overview Combination 142
Opening a saved combination 143
Correcting a stitch pattern combination 144
⦁
Inserting a stitch pattern 144
⦁
Altering stitch patterns 144
⦁
Adjusting the length within the combination 144
⦁
Adjusting the width within the combination 145
⦁
Mirroring complete combinations 145
⦁
Combination subdivider 1 145
⦁
Combination Subdivider 2 145
⦁
Moving individual stitch patterns in a combination 146
⦁
Moving multiple stitch patterns in a combination 146
⦁
Sewing individual stitch patterns of a combination
in any direction 146
⦁
Sewing the complete combination in any direction 146
Stitch pattern combination 147
⦁
Overwriting 147
⦁
Deleting 147
History 148
Contents Embroidery
Accessory Embroidery 149
Standard Accessory 149
Embroidery module 150
Detail view 150
Important Embroidery information 151
Embroidery threads 151
Lower threads 151
Choosing the embroidery motif 152
Embroidery test 152
Scaling/Sizing motifs 152
Different stitch types 153
⦁
Underlay stitches 153
⦁
Satin stitch 153
⦁
Step stitch 153
⦁
Connecting stitches 153
Preparing for embroidery 154
Attaching the Module 154
Embroidery foot/Embroidery needle 155
Straight-/CutWork stitch plate 155
Threading lower thread 155
⦁
Checking the thread position 155
7

Contents
034791.50.04_Manual_B880_EN
Embroidery hoop 156
⦁
Center determination 156
⦁
Using the embroidery hoop 156
⦁
Embroidery template 156
⦁
Hooping the material 156
Stabilizer 157
Stabilizers 157
Adhesive Spray 157
Iron-on interfacing 158
⦁
Paper-backed adhesive stabilizer 158
⦁
Water soluble stabilizer 158
Functions 159
Overview «Function»-buttons embroidery
computer 159
⦁
«Start/Stop/hover»-button 159
⦁
«Automatic thread cutter»-button 159
⦁
«Presser foot position»-button 159
⦁
«Automatic threading»-button 159
⦁
Slide speed control 159
⦁
Stitch width and stitch length knob 159
Overview Display 160
Entry to Embroidery mode 160
Embroidery Alphabet 161
BERNINA Embroidery motifs 162
BERNINA Stitch patterns 162
My Design 162
Embroidery motif from USB stick 163
«Edit»-Display 164
Overview «Edit»-Display 166
Scrolling Functions 166
General Functions 166
Overview Embroidery menu 170
Overview Selection menu 171
Overview Color Display 172
Rescale motif width and height 175
Rescale the motif proportionally 176
Mirror motifs 176
Select hoop 177
⦁
Motif Center 177
⦁
Grid 177
Absolute Embroidery check 178
⦁
Checking the motif size 178
Zoom 179
⦁
Moving the motif 179
Motif size and embroidery time 179
Endless Embroidery 180
⦁
Increase/decrease number of motifs 180
⦁
Increase/decrease spacing 180
⦁
Fit to hoop 180
Shape designer 182
⦁
Selecting the array 182
⦁
Increasing/reducing the number of motifs 182
⦁
Altering the size of the array shape 182
⦁
Rotating the motifs 183
⦁
Mirroring motifs 183
⦁
Embroidering the motifs 183
⦁
Closing the «Shape designer»-Display 183
Combinations 184
Creating combinations 184
⦁
Adding a motif 184
⦁
Duplicating a motif 184
⦁
Duplicating a combination 184
Lettering 185
⦁
Combining 185
⦁
Positioning 185
⦁
Further text lines 185
Lettering and Embroidery motifs 186
⦁
Combining 186
⦁
Adjusting text to motif 186
⦁
Lettering Manipulation 186
⦁
Deleting stitch patterns/individual characters/text 186
Motifs 173
Selecting a motif 173
Alphabets 173
⦁
Selecting alphabet 173
⦁
Entering/Correcting lettering 173
⦁
Deleting lettering 173
⦁
Corrections 173
BERNINA embroidery motifs 174
⦁
Motif Overview 174
Stitch patterns 174
⦁
Stitch pattern overview 174
My Design 174
⦁
Motif Overview 174
Motifs in combination with functions 175
Moving the motif 175
Rotating the motif 175
8
Change stitch type 187
Fill stitch types 188
⦁
Changing stitch type 188
⦁
Altering stitch density 188
Motif colors 189
⦁
Reallocating motif colors 189
⦁
Changing the colors of the motif via the
color wheel 189
⦁
Adjusting the brightness of the colors 190
⦁
Changing the thread brand 190
⦁
Embroidering the motif by color 191
⦁
Reducing color changes 191
⦁
Embroidering motifs in one color 191
⦁
Embroidering lettering in multi colors 191
⦁
Embroidering lettering in one color 191
Basting 192
⦁
Deactivating basting 192

Contents
034791.50.04_Manual_B880_EN
Saving the motif 194
Memory Embroidery computer 194
USB stick 194
Overwriting motifs 195
Deleting saved single motif 196
⦁
Cancelling delete 196
Deleting all saved motifs 197
⦁
Cancelling delete 197
Starting to embroider 198
Select hoop 198
⦁
Attaching the embroidery hoop 198
⦁
Attaching the hoop to the embroidery arm 198
⦁
Removing the hoop 198
Embroidery menu 199
Embroidering using the «Start/Stop»-button 199
⦁
Interrupting the process 199
⦁
Completing the color 199
⦁
Color change 199
⦁
«Embroidery»-Display 199
⦁
Embroidery speed 199
⦁
End of embroidery 200
Embroidering via foot control 200
⦁
Interrupting the process 200
⦁
Completing the color 200
⦁
Color change 200
⦁
«Embroidery»-Display 200
Monograms 241
DesignWorks designs 243
BC Embellishment 244
BC Quilting 246
BC Borders 248
BC Flowers 250
BC Seasons 252
BC Children 253
BC Hobby 255
BC Animals 256
BC Flowers Outline 257
BC Switzerland 258
Alphabets 260
Index 262
Thread breakage when embroidering 201
Upper or lower thread breaks 201
Embroidery sequence control when
thread breaks 201
⦁
Returning to original position 201
⦁
Resuming embroidery 201
Cleaning 202
⦁
Exchanging the battery 203
Troubleshooting 204
Overview Stitch patterns 213
Practical stitches 213
Buttonholes 213
Decorative stitches 213
Quilt stitches 217
Alphabets 219
Overview Motifs 228
Diane Gaudynski 228
Exotic Rainforest 230
Floral Etchings 233
Projects 235
Shaping designs 237
9
Key to Signs
034791.50.04_Manual_B880_EN
Key to Signs
DANGER!
Very important!
Risk of injury!
ATTENTION!
Very important!
Risk of damage!
Tips!
Breadcrumb navigation
2
4
1
3
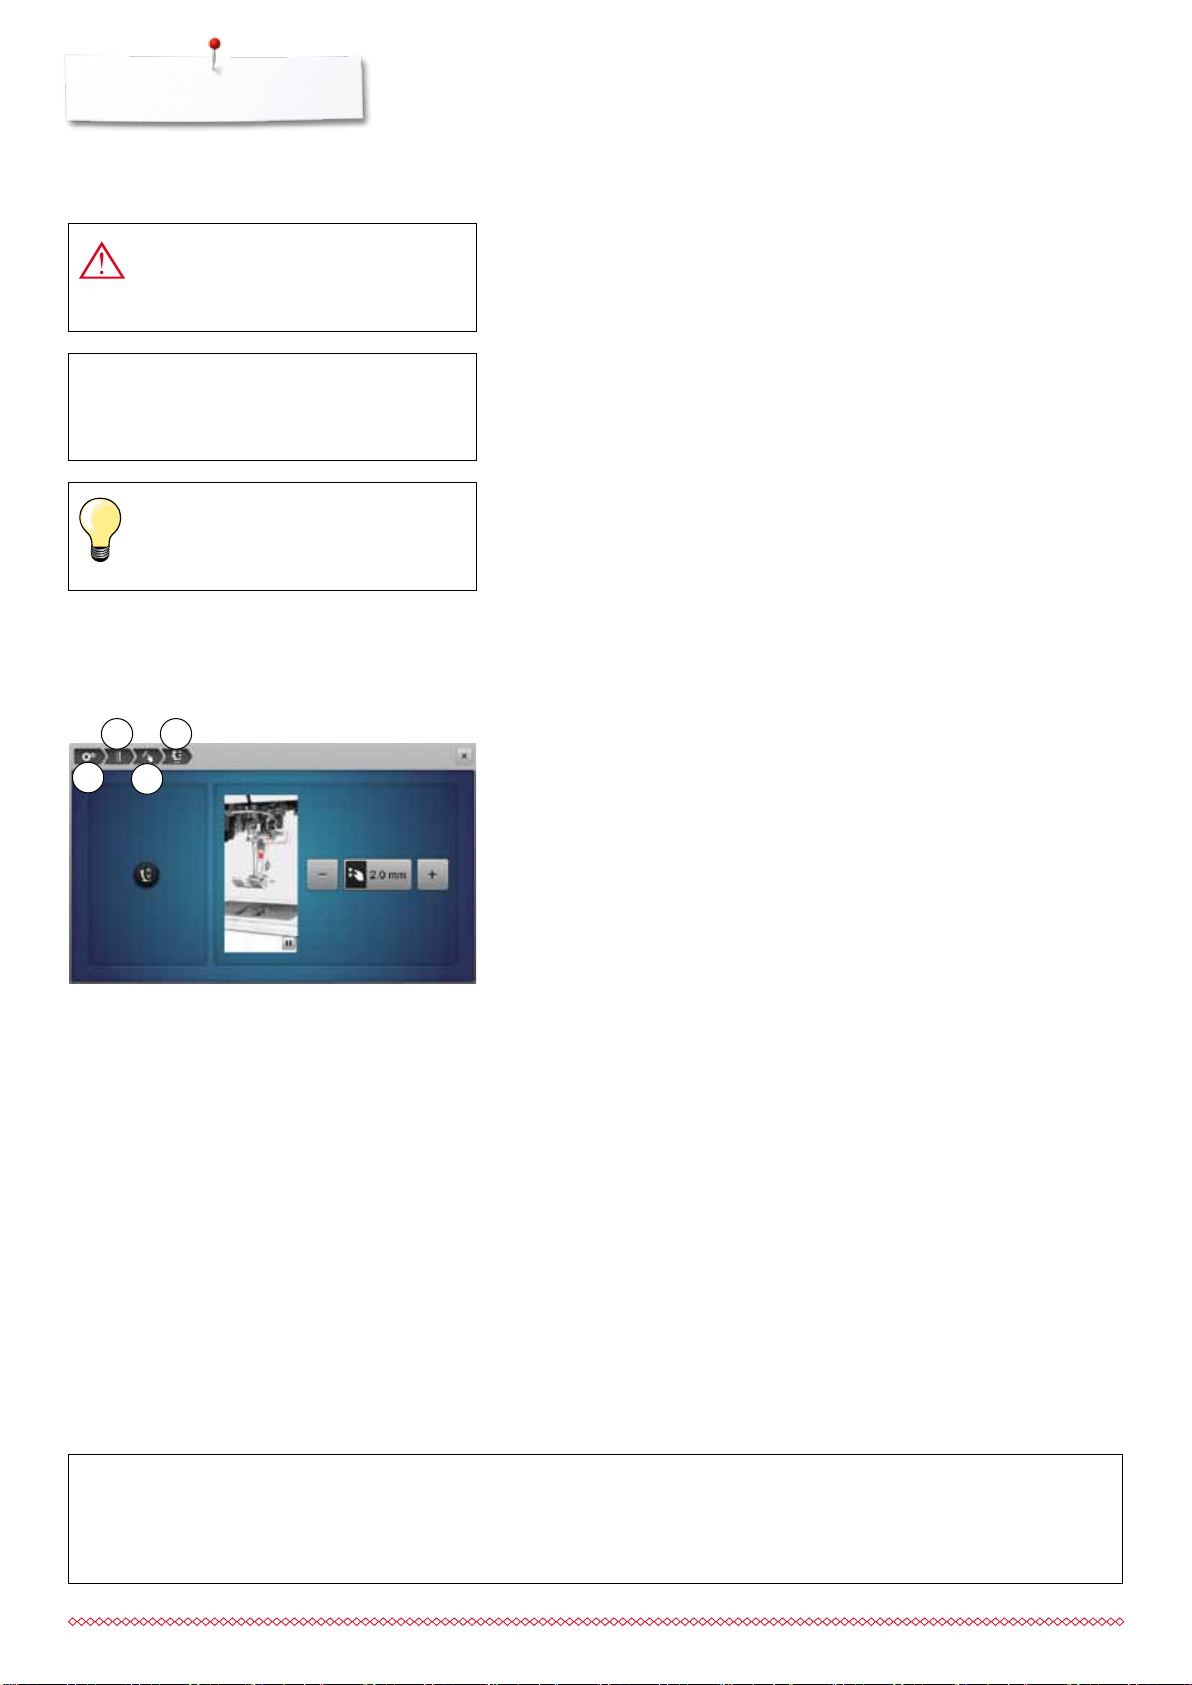
1 Setup program is selected
2 Sewing settings are selected
3 Programming «Function»-button/«Function»-icon is selected
4 Programming hovering position of the presser foot is selected
⦁
having selected the corresponding icon (as for this example 1-3) the
desired display opens
All rights reserved
For technical and product improvement reasons, the sewing computer's features, parts and accessory are subject to
unannounced changes and alterations at any time. The accessory included can differ from country to country.
10
Accessory Sewing
034791.50.04_Manual_B880_EN
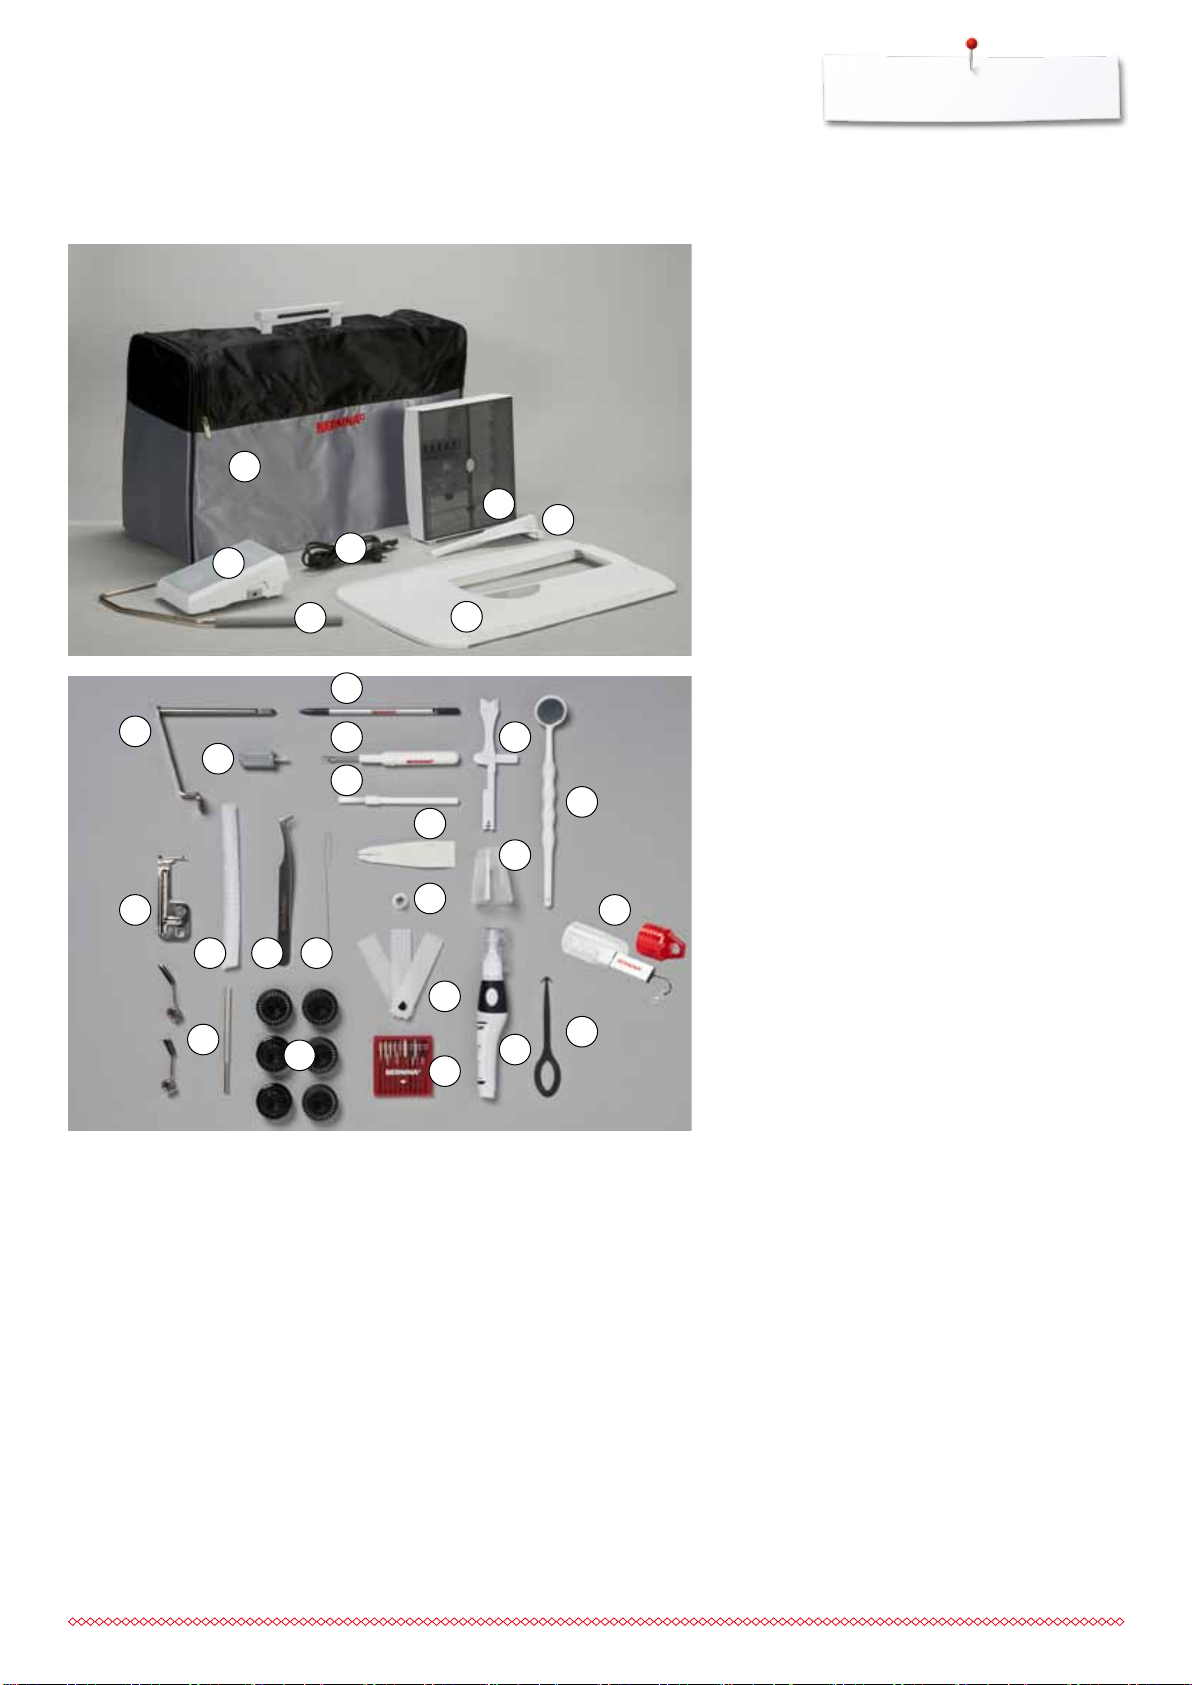
Standard Accessories
3
2
Accessory
1 Presser foot lifter
2 Foot control
3 Soft Cover with pocket
4 Accessory box
5 Power cable
6 Seam guide for slide-on table
7 Slide-on table
4
6
5
15
13
1
16
7
8 7 bobbins (one of them in the sewing computer)
9 Adjustable guides
10 Wire threader for threading cording for bobbin
play
11 Tweezers
12 2 nets
13 Cording attachment
14 Small screwdriver, gray
15 Magnifying glass adapter
16 Touchscreen pen
17 Seam ripper
14
17
18
20
21
19
26
22
27
18 Lint brush
1112 10
19 Multifunction tool
20 Manual threader
23
9
8
24
25
28
21 Spool disc small
22 Holder for king-size spools, cone holder
23 Height compensating tool
24 Needle pack 130/705H
25 Lubricator
26 Monitoring mirror
27 USB stick
28 Hook cleaning tool
11
Accessory
034791.50.04_Manual_B880_EN
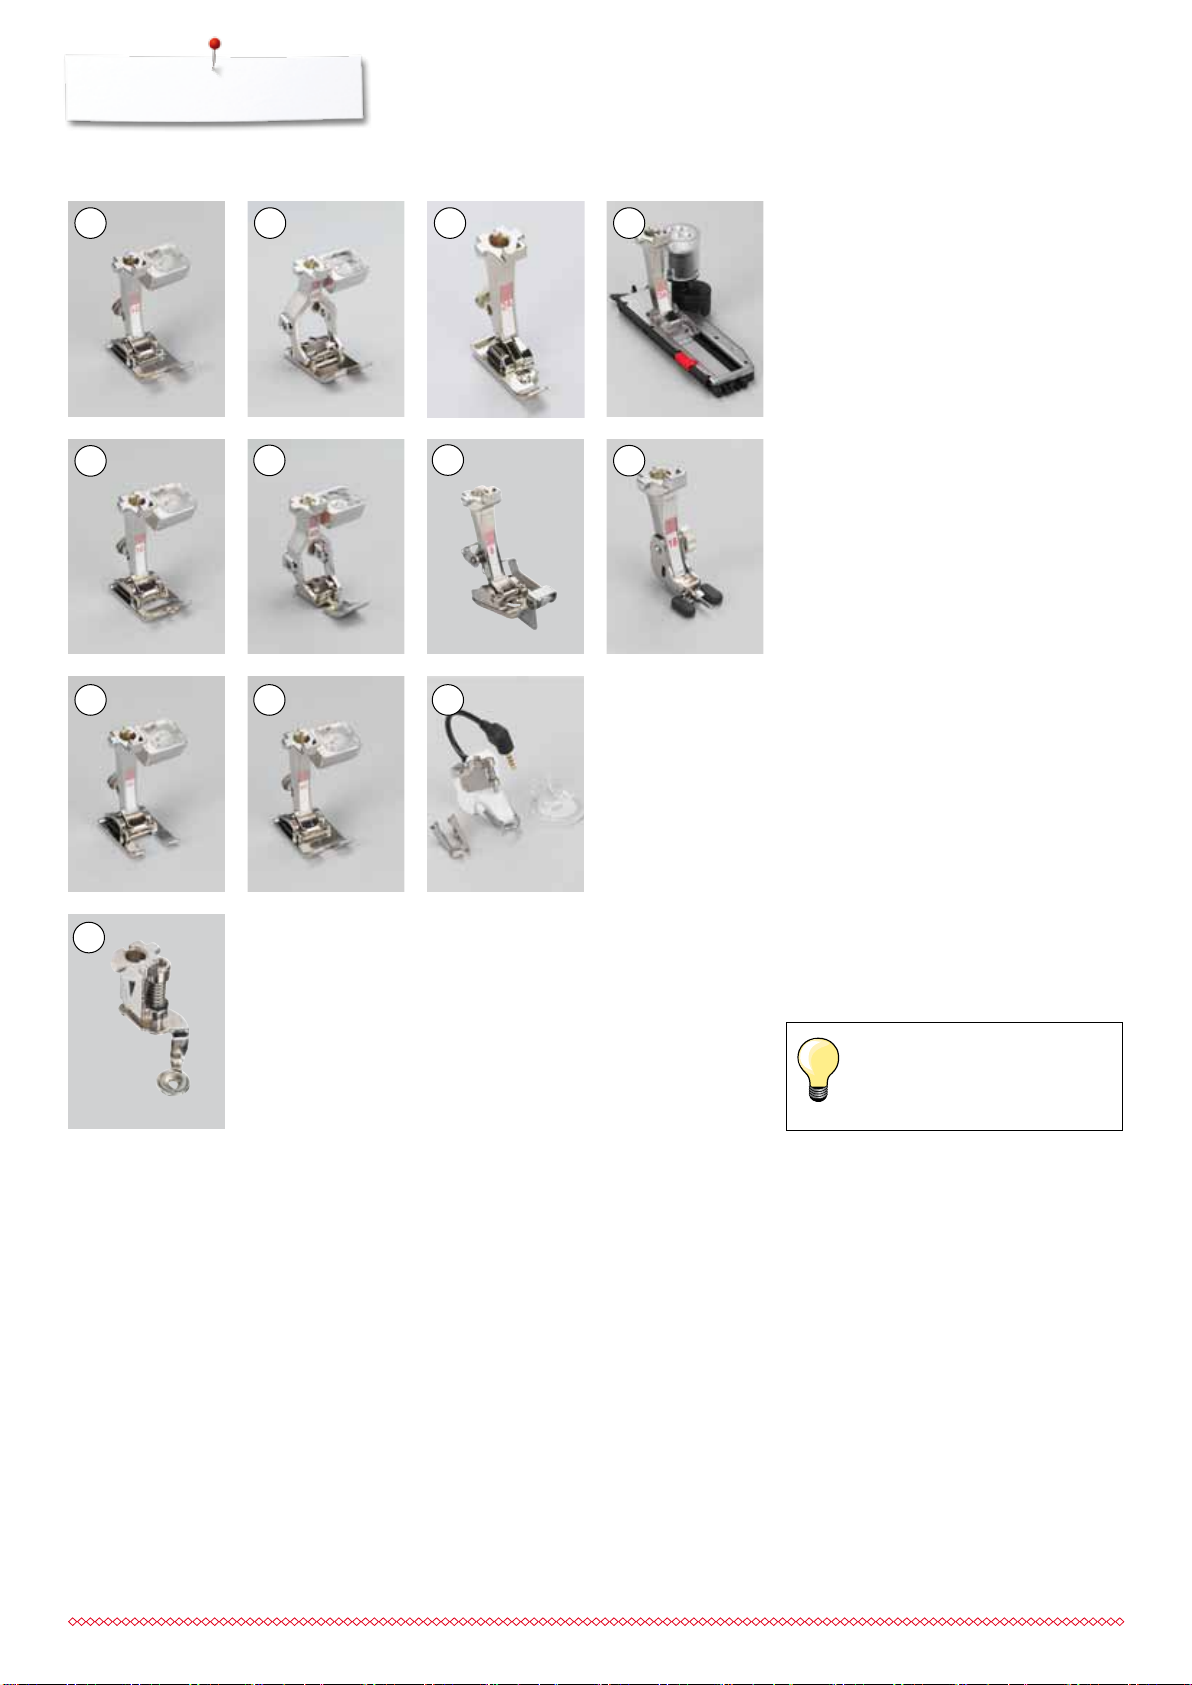
Presser feet
2 31 4
1 No. 1C Reverse pattern foot
2 No. 1D Reverse pattern foot
3 No. 2A Overlock foot
4 No. 3A Automatic buttonhole foot
with slide
5
6
7
8
5 No. 3C Buttonhole foot
6 No. 4D Zipper foot
7 No. 5 Blind stitch foot
8 No. 18 Button sew-on foot
9
9
10
10 11
9 No. 20C Open embroidery foot
10 No. 40C Sideways motion foot
11 No. 42 BSR foot
12
12 No. 26 Embroidery foot
Visit www.bernina.com for
more accessory information.
12
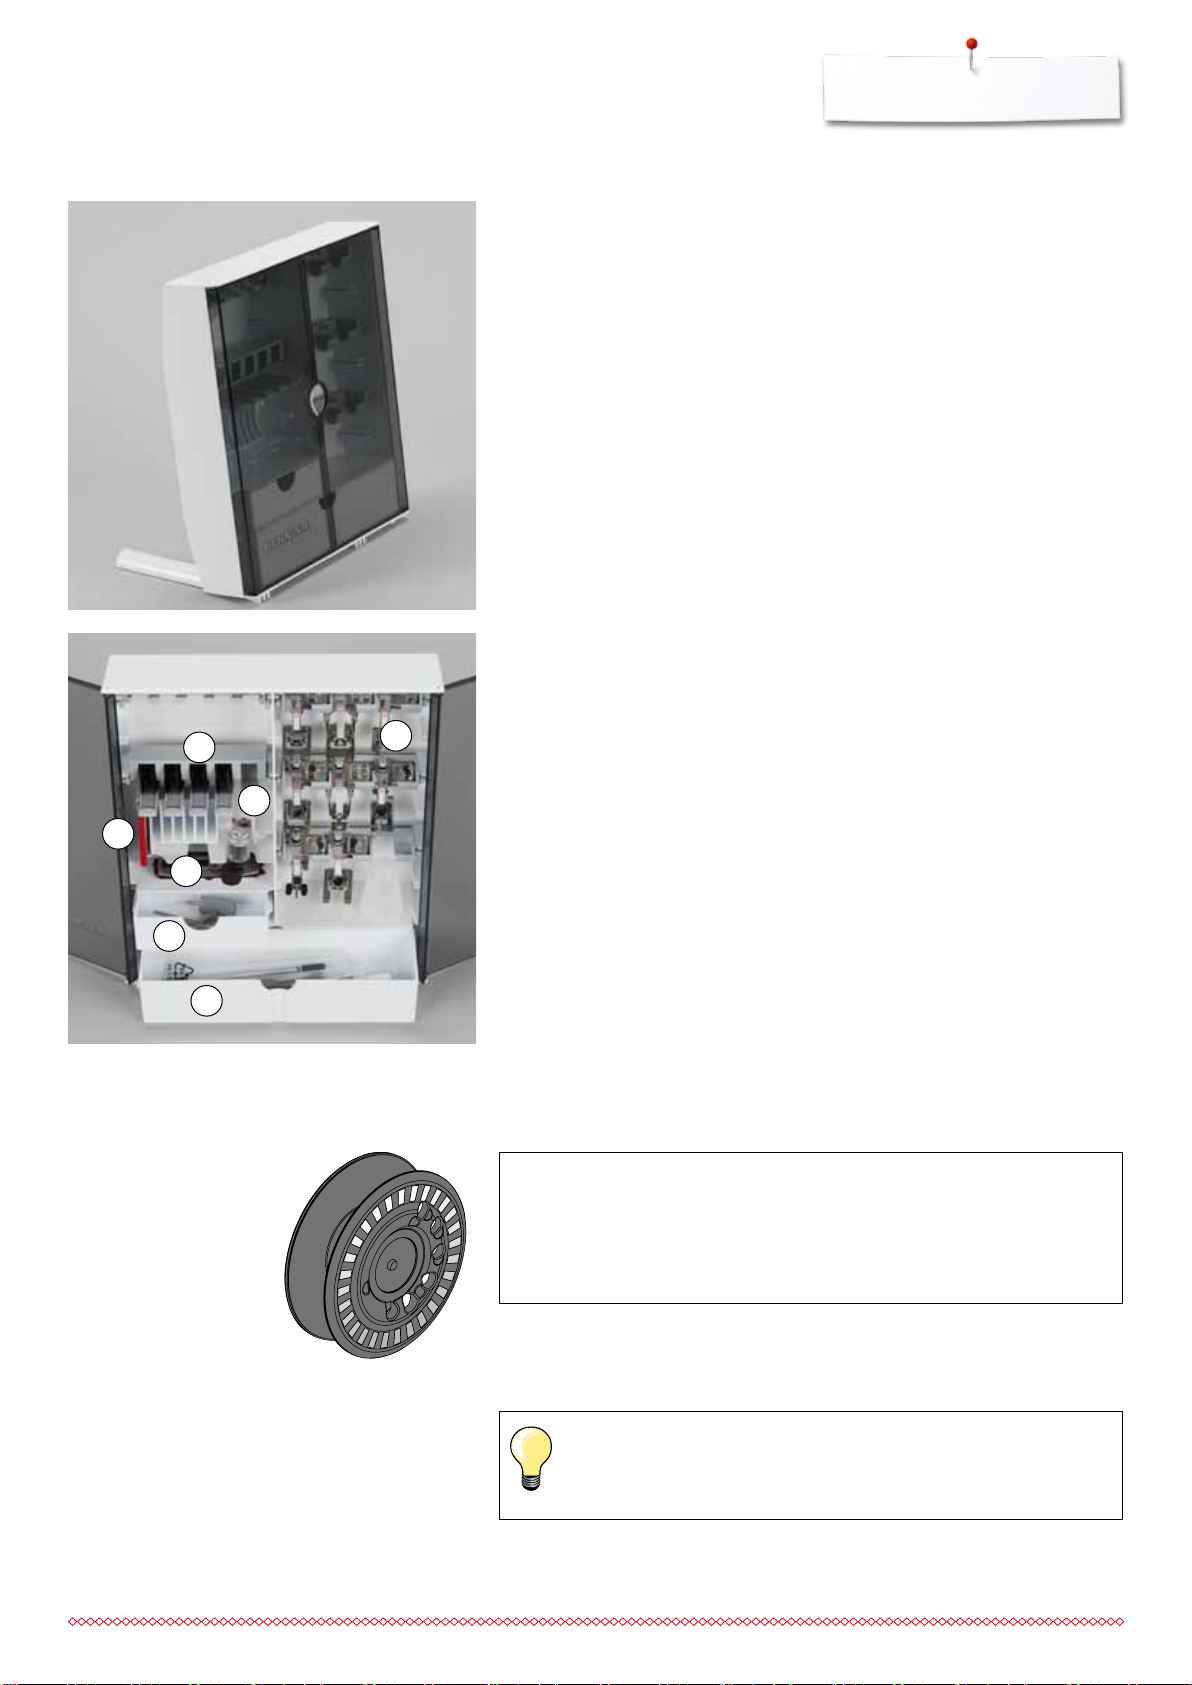
Accessory box free standing
034791.50.04_Manual_B880_EN
5
Accessory
⦁
on the back of the box, pull both extensions out until they click into place
Lay-out
The box is equipped as standard with one large 1 and one small 2 drawer as
well as a compartment for bobbin holders 5 and presser feet 7.
⦁
to remove a bobbin, press the compartment holder 6 lightly
⦁
7
buttonhole foot with slide No. 3A can be stored in the left compartment 4
⦁
store the needle package in the special compartment 3
3
4
2
Storage example
Bobbin
6
1
ATTENTION!
Treat the bobbins with care. Keep the white sensor surfaces
free of scratches or stains to ensure correct functioning of the
lower thread indicator. Store the bobbins in the respective
compartment of the accessories box.
The bobbin of the B 880, exclusive to BERNINA, supplies up to 40% more
lower thread. If the bobbin is not inserted correctly, an error message is
displayed.
You can preselect a bobbin fill of 25%, 50% or 100%.
13
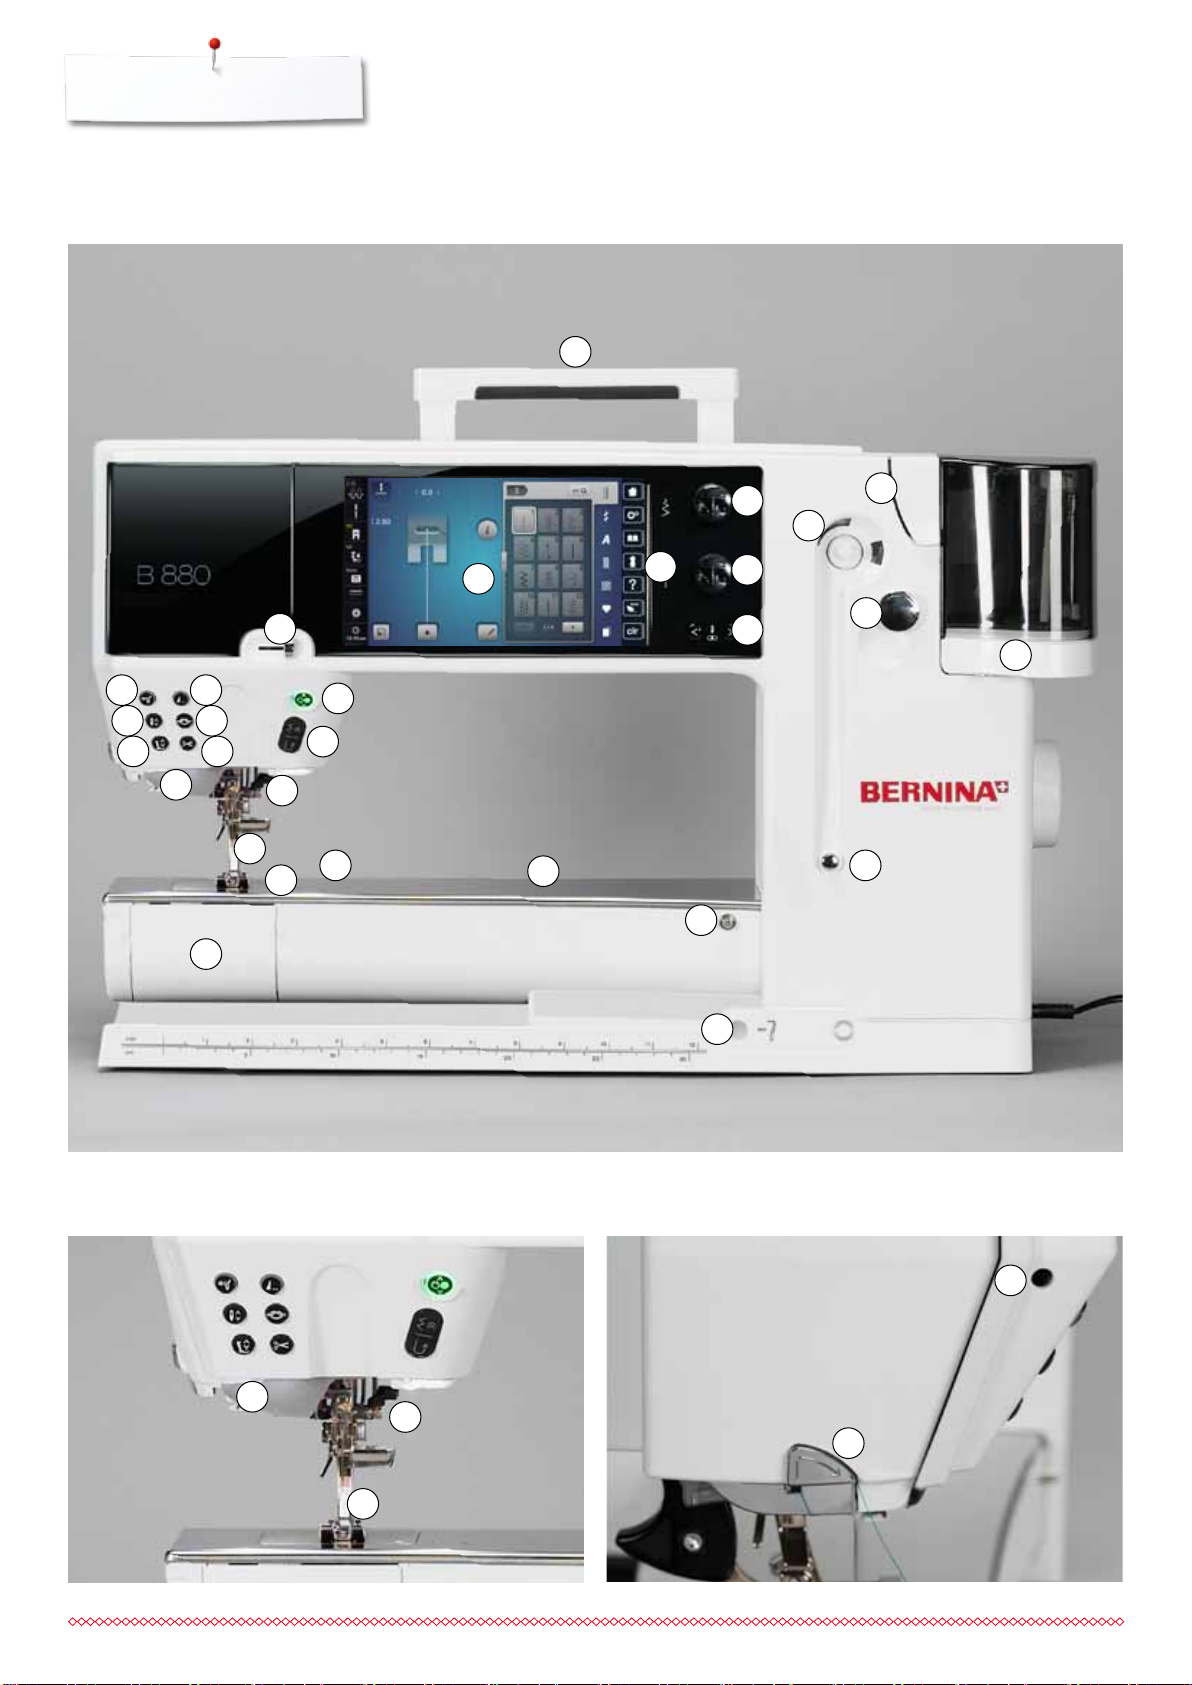
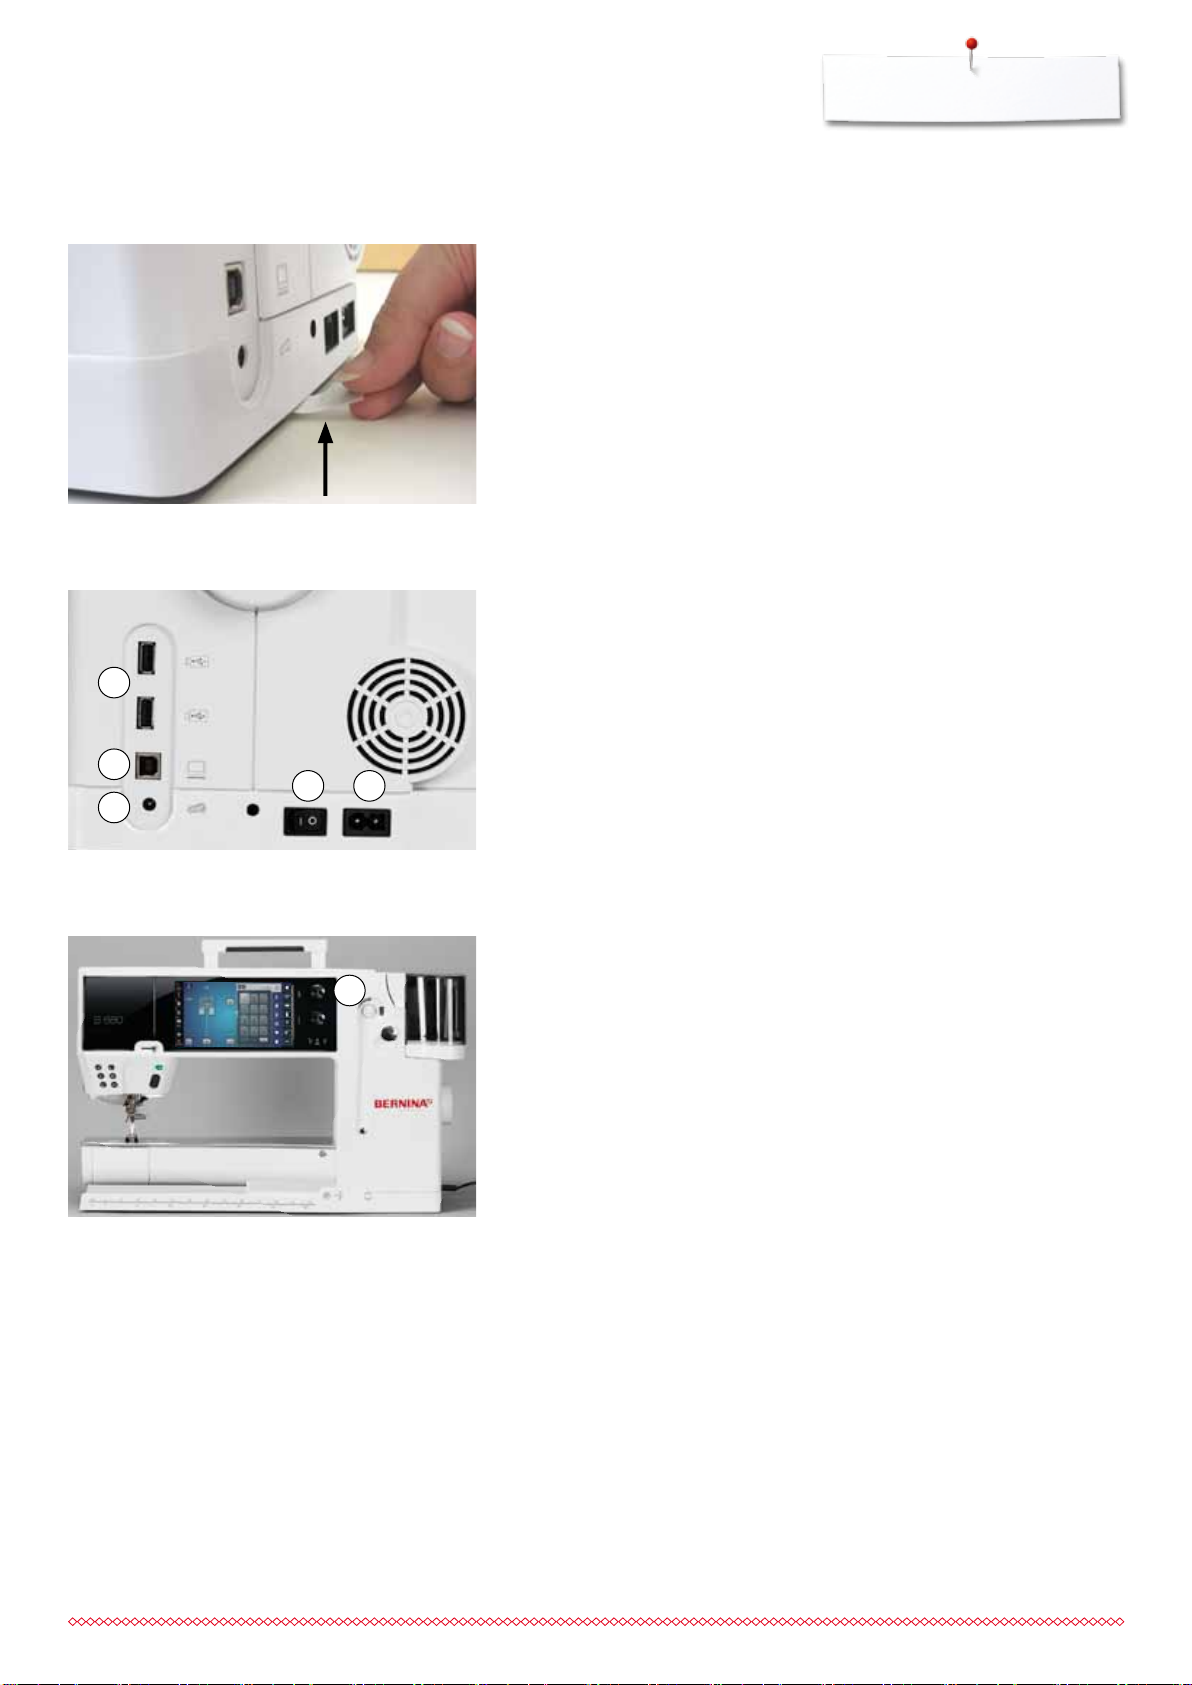
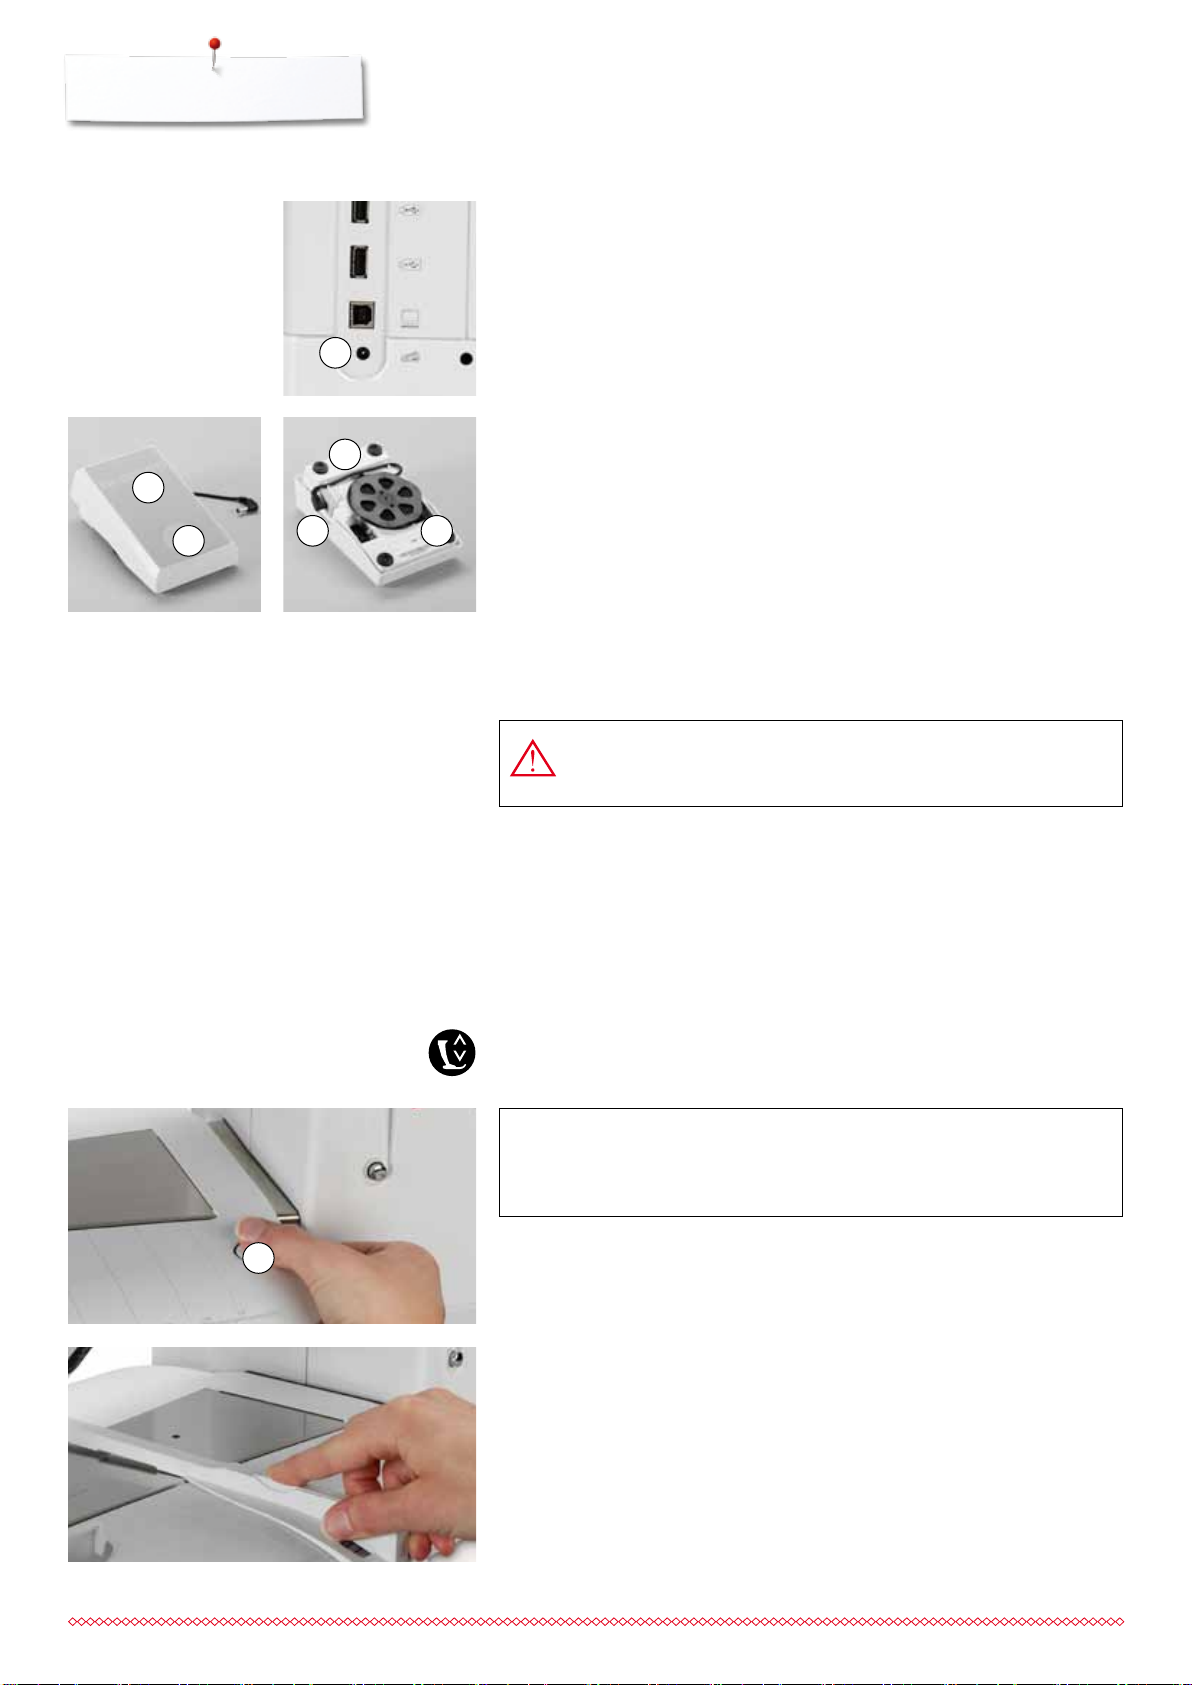
Overview sewing computer
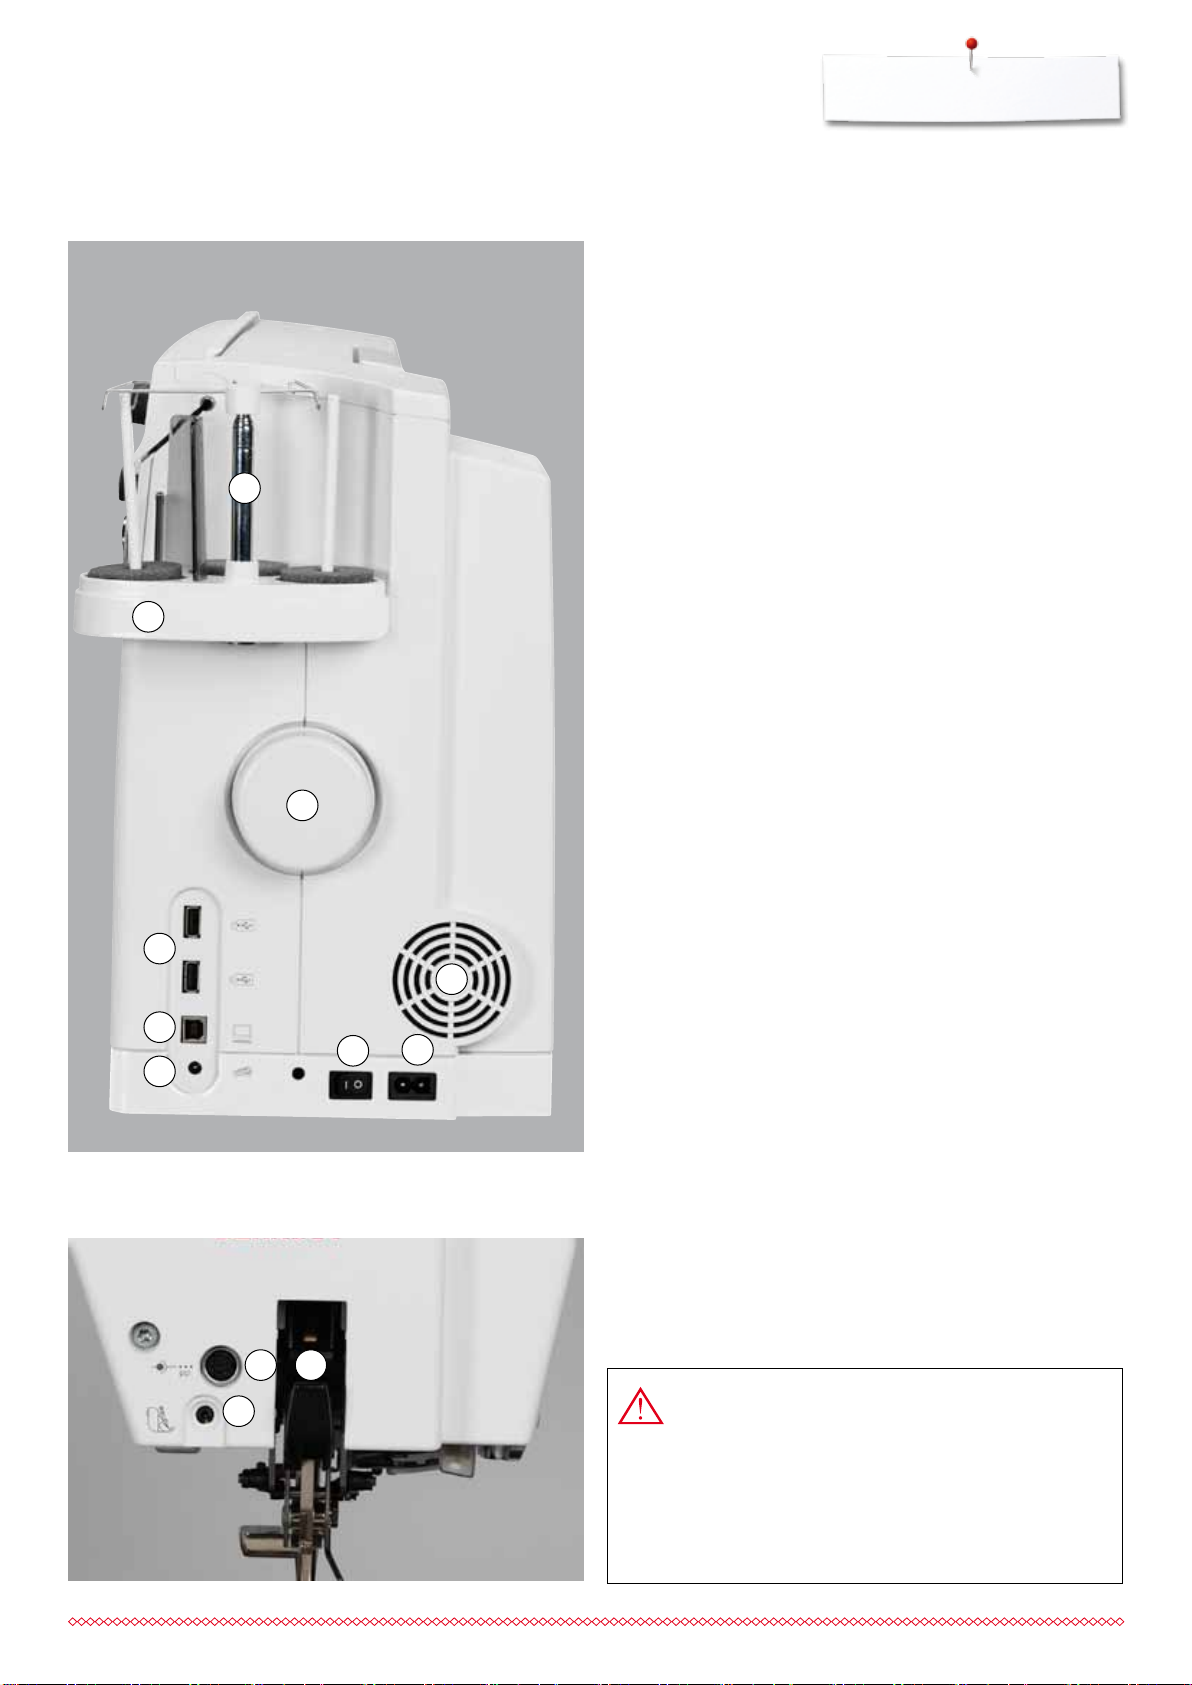
034791.50.04_Manual_B880_EN
Overview sewing computer
Front view
17
12
10 9
5
19
22
16
15
1314
11
4
1
8
7
6
3
2
40
18
20
21
41
42
24
23
26
25
Detail view
14
35
5
6
36
4
Overview sewing computer
034791.50.04_Manual_B880_EN
36
19
26
29
27
20
28
32
21
22
33
30
31
1 Bobbin cover
2 Stitch plate
3 Special-accessories port
4 Presser foot
5 LED-Sewing light
6 Needle clamp
7 «Quick reverse»-button
8 «Start/Stop/hover»-button
9 «Automatic thread cutter»-
button
10 «Presser foot lift»-button
11 «Securing»-button
12 «Needle stop up/down»-
button
13 «Pattern end»-button
14 «Automatic needle
threader»-button
15 Slide speed control
16 Display
17 Carrying handle
18 «Sewing support»-buttons
⦁
«Home»-button
⦁
«Setup»-button
⦁
«Tutorial»-button
⦁
«Creative Consultant»button
⦁
«Help»-button
⦁
«eco»-button
⦁
«clr»-button (clear)
19 Stitch width knob
20 Stitch length knob
21 «Needle position»-buttons
22 Bobbin winder
23 Thread cutter for bobbin
winder
24 Threading slit
25 Bobbin pre-tension
26 Triple spool pin
27 Telescope
28 Handwheel
29 USB-connection
30 PC-connection
31 Foot control socket
32 Power switch On «I»/
Off «0»
33 Power plug socket
34 Air vents
35 Connection for Magnifying
glass (optional accessory)
36 Thread cutter on the
headframe
37 Special-accessories port
38 BSR-connection
39 BERNINA Dual Feed
40 Darning hoop connection
41 Slide-on table socket
42 Free Hand System
connection
29
30
38
31
37
38
37
39
32
33
33
35
34
USA/Canada only: The sewing computer has a
polarized plug (one blade wider than the other). To
reduce the risk of electrical shock, this plug is
intended to fit in a polarized outlet only one way. If
the plug does not fit fully in the outlet, reverse the
plug. If it still does not fit, contact a qualified
electrician to install the proper outlet. Do not
modify the plug in any way!
15

Important Sewing information
034791.50.04_Manual_B880_EN
Important Sewing information
Thread
Be sure to select the appropriate thread type and weight for the fabric. For a
perfect sewing result, thread and fabric quality play an important role. It is
recommended to use quality brands.
Cotton threads
cotton threads have the advantage of being a natural fiber and therefore
are especially suitable for sewing cotton fabrics
if cotton thread is mercerized, it has a slight sheen that is not lost with
washing
Polyester threads
polyester threads have a high tensile strength and are particularly colorfast
polyester threads are more flexible and are recommended where a strong
and elastic seam is required
Rayon threads
rayon threads are made of natural fibers and have a brilliant sheen
rayon threads are suitable for decorative stitches and achieve a more
beautiful effect
Needle, thread and fabric
ATTENTION!
Check the needle condition.
As a guide: Replace the needle before starting a new sewing
project. A defective needle does not only damage the sewing
project but also the sewing computer.
Care must be taken when choosing needle and thread.
The correct needle size depends on the selected thread and fabric. The fabric
weight and type determine the thread weight, needle size and point form.
16
Needles, threads
034791.50.04_Manual_B880_EN
Important Sewing information
Correct needle/Thread combination
To sew optimally, the thread should travel smoothly down the long groove on
the front of the needle.
Too thin thread or too thick needle
The thread has too much clearance in the long groove. Skipped stitches and
damage to the thread can occur.
Too thick thread or too thin needle
The thread rubs on the edges of the long groove and can get jammed. This
can result in thread breakage.
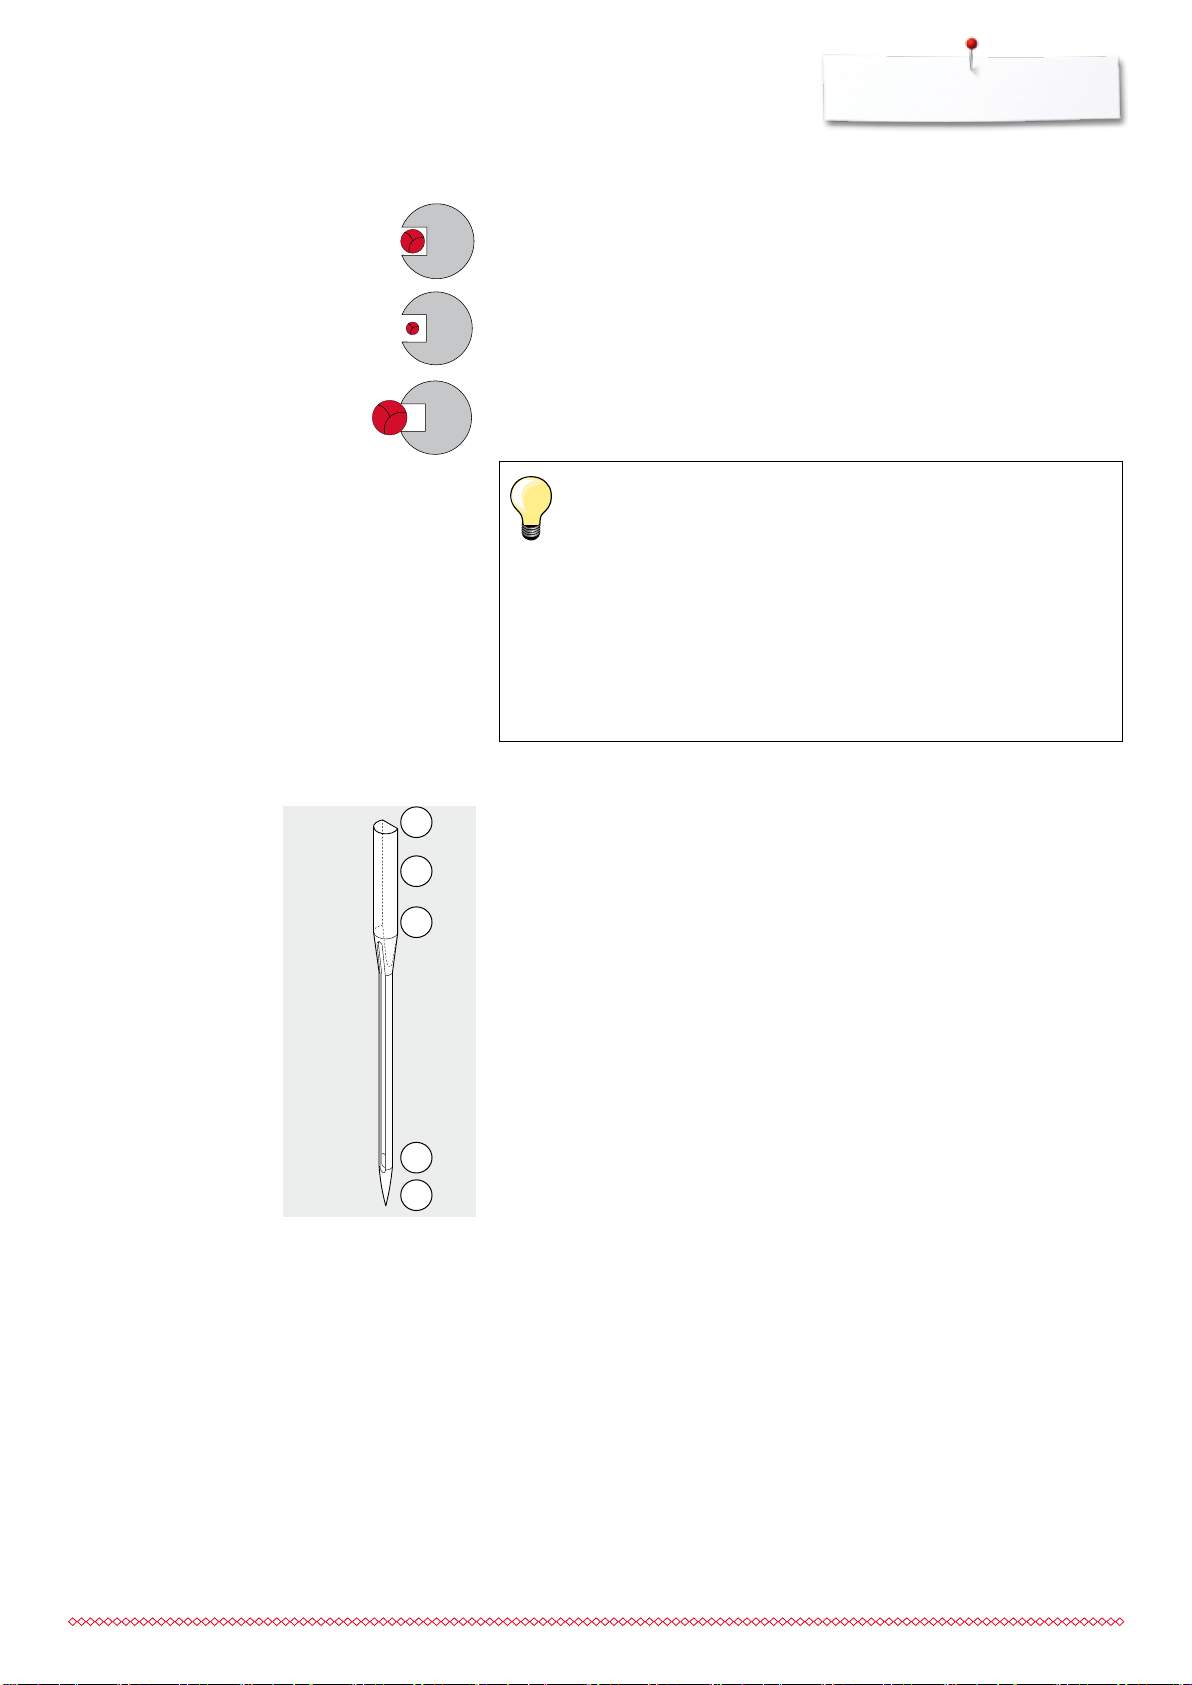
Guidelines
Material and thread Needle size
Light weight materials:
Fine thread (darning thread, embroidery thread) 70-75
Medium weight materials:
Sewing thread 80-90
Heavy weight materials:
Sewing thread (quilting thread, topstitching) 100, 110, 120
130/705 H-S/70
2
1
5
3
4
1 130 Shank length
2 705 Flat shank
3 H Needle scarf
4 S Needle point (here e.g. medium ball point)
5 70 Needle size (shank diameter)
17
Important Sewing information
034791.50.04_Manual_B880_EN
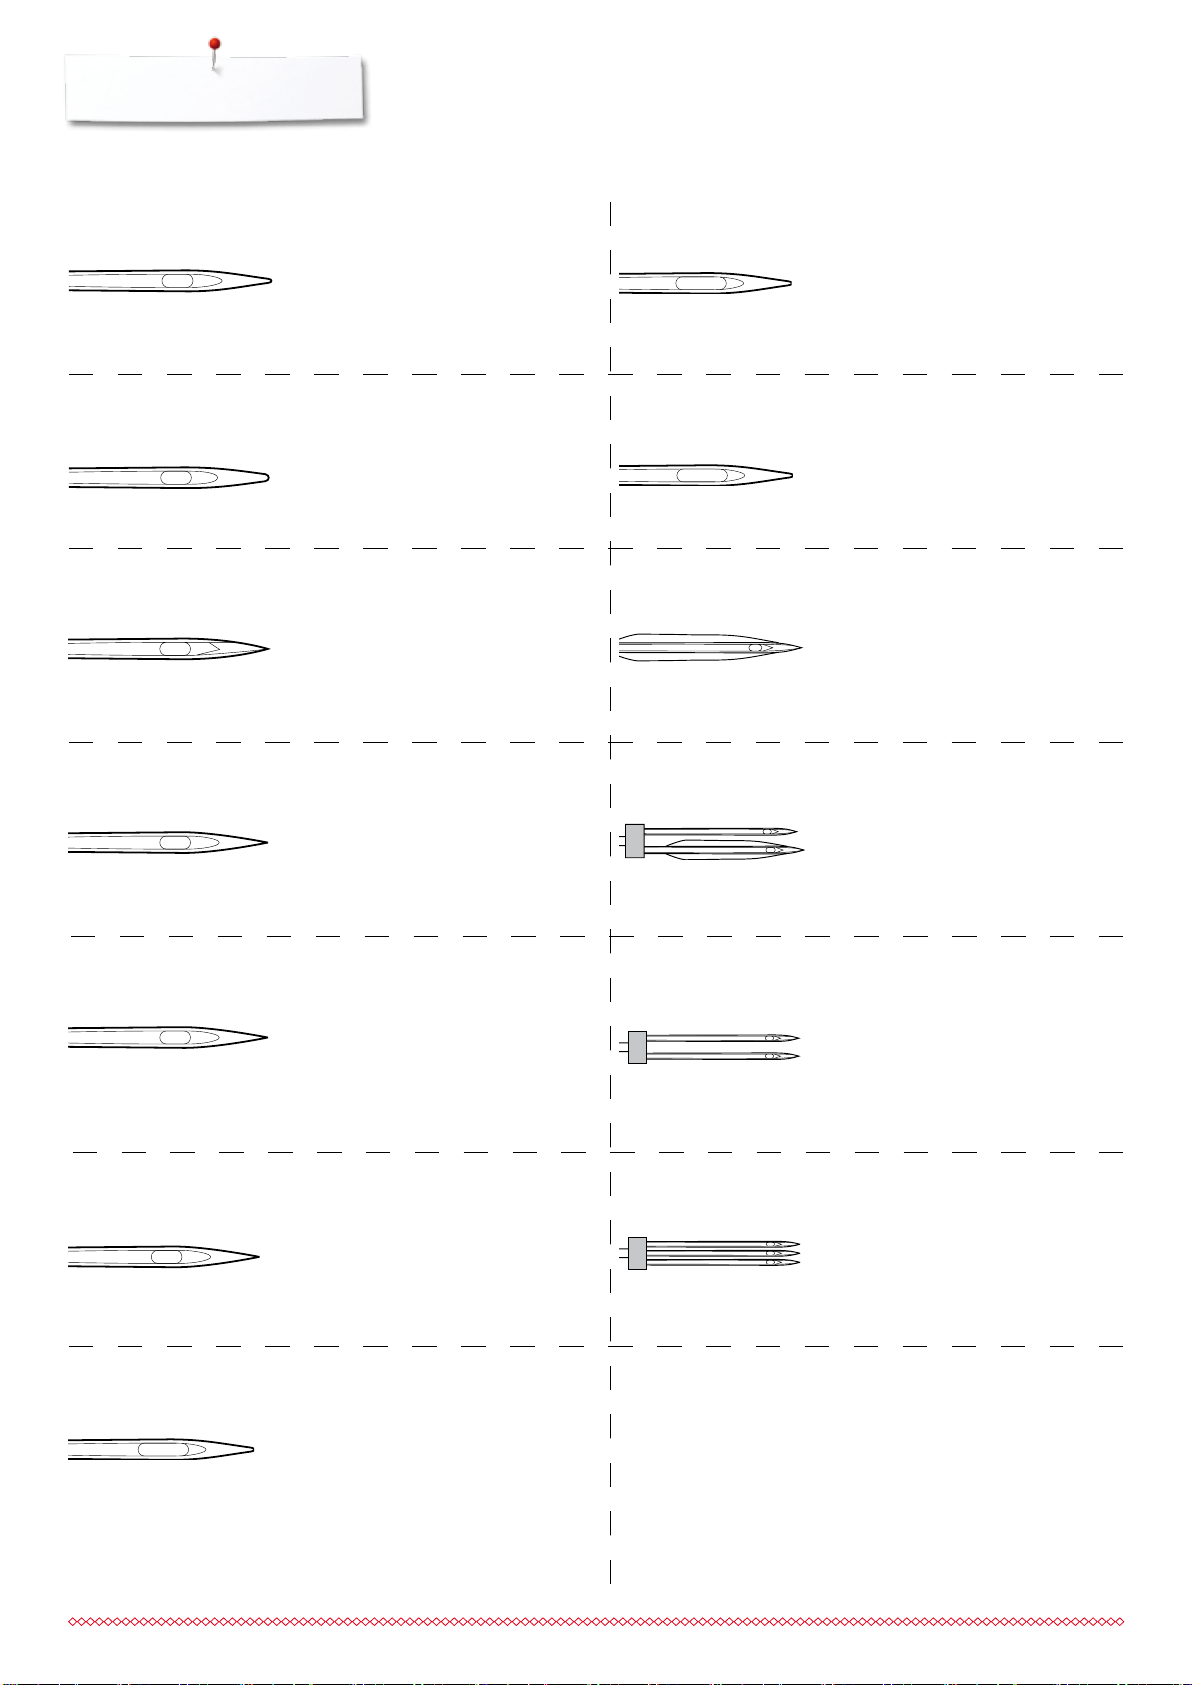
Overview needles
Universal
130/705 H/60-100
Normal point, slightly rounded
For nearly all natural and synthetic
fabrics (woven and knitted)
Jersey/Stretch
130/705 H-S, H-SES, H-SUK/70-90
Ball point
Jersey, knit and stretch material
Leather
130/705 H-LL, H-LR/90-100
With cutting point
All types of leather, synthetic leather,
plastic, sheeting
Jeans
130/705 H-J/80-110
Metafil
130/705 H-MET/75-80 or H-SUK/90-100
Large eye
Sewing with metallic threads
Cordonnet (Topstitching)
130/705 H-N/80-100
Small ball point, long eye
Topstitching with thick thread
Wing needle (Hemstitch needle)
130/705 HO/100-120
Wide needle (wing)
Hemstitching
Double wing needle
130/705 H-ZWI-HO/100
Very fine sharp point
Heavy weight fabrics such as denim,
canvas, overalls
Microtex
130/705 H-M/60-90
Especially fine sharp point
Mircro fiber fabrics and silk
Quilting
130/705 H-Q/75-90
Fine sharp point
Straight and topstitching
Embroidery
130/705 H-SUK/70-90
For special effects with hemstitch
embroidery
Double needle
130/705 H-ZWI/70-100
Needle distance:
1.0/1.6/2.0/2.5/3.0/4.0/6.0/8.0
Visible hems in stretch fabrics, pintucks,
decorative sewing
Triple needle
130/705 H-DRI/80
Needle distance: 3.0
Visible hems in stretch fabrics;
Decorative sewing
18
Large eye, slight ball point
Embroidery on all natural and synthetic
fabrics
Sewing preparation
034791.50.04_Manual_B880_EN
Battery
Power Switch/Power Cable
Sewing preparation
⦁
please remove the protective sticker of the battery before taking the sewing
computer in use
1 Power Switch
The sewing computer is switched on («I») and off («0») with the power switch.
5
4
1 2
3
Magnetic holder for Touchscreen pen
1
I the sewing computer is switched on
0 the sewing computer is switched off
2 Power plug socket
3 Foot control socket
4 PC-connection
5 USB-connection
The Touchscreen pen can be stored easily and securely at the two magnets 1.
19
Sewing preparation
034791.50.04_Manual_B880_EN
Foot control
2
3
1
4
6 5
Connecting the foot control
⦁
unwind the cable
⦁
plug the cable in the outlet 1
⦁
unwind the cable to the desired length and slip into 4 or 5
Sewing speed control
Control the sewing speed by pressing the foot control 2.
Raising or lowering the needle
⦁
sink the heel back 3 on the foot control
►
the needle adjusts the position up/down
In the Setup-Program additional functions for the «back heel kicking» can be
programmed.
Removing the foot control
⦁
wind the cable around the reel
⦁
plug cable into 6
Slide-on table
USA/Canada only: Use only foot controller type LV-1 with
sewing computer B 880.
The slide-on table increases sewing surface.
Attaching the slide-on table
⦁
turn the handwheel or press the «Needle stop up/down»-button
(see page 15)
►
needle is raised
⦁
press «Presser Foot lift»-button
►
presser foot is raised
⦁
slide table to the right, over the free arm until it engages
ATTENTION!
Remove the slide-on table only when bobbin cover is closed.
1
Removing the slide-on table
⦁
raise the needle and presser foot
⦁
press button 1 down
⦁
pull slide-on table to the left
20
Seam guide
⦁
press the release button and insert into the groove (underside of table) from
left or right
Can be moved over the entire table length.
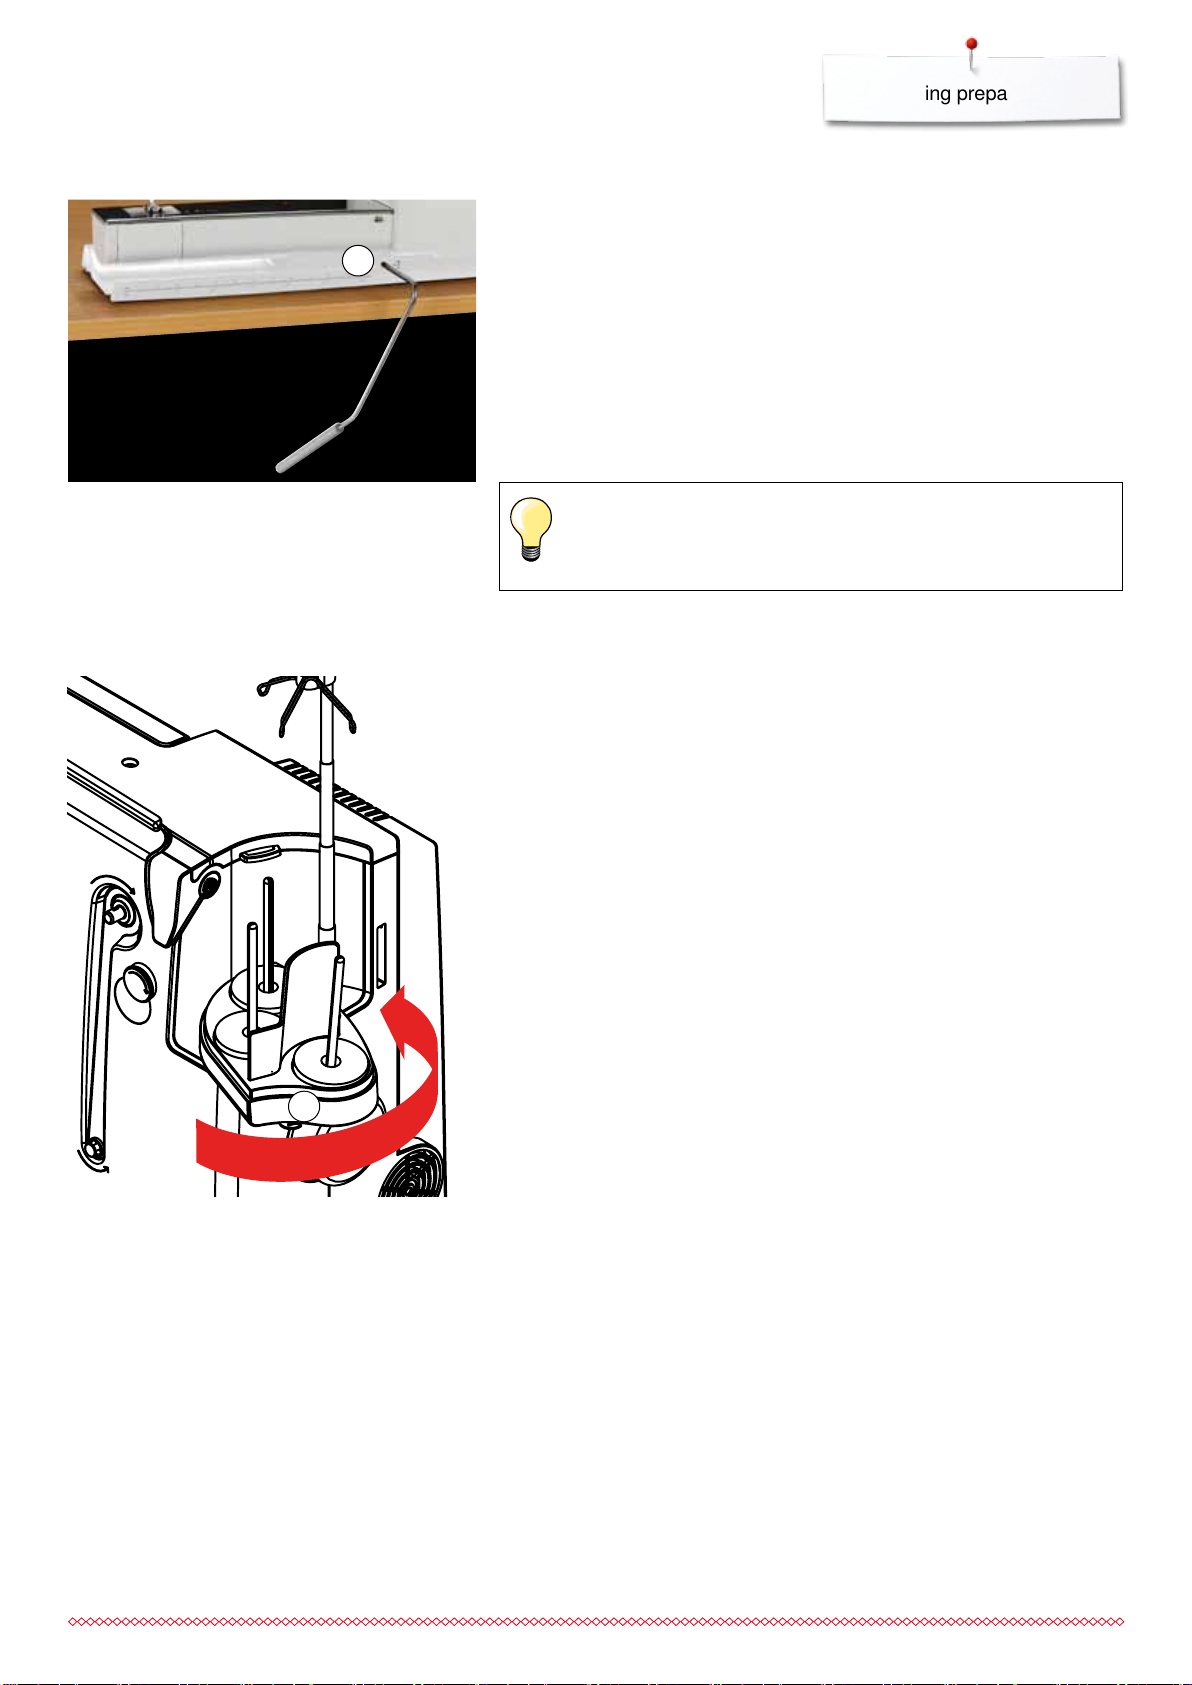
Presser foot lifter
034791.50.04_Manual_B880_EN
Sewing preparation
Raising or lowering presser foot via FHS.
1
Pivotable Triple Spool Holder
Attaching the Free Hand System
⦁
insert into the opening 1
Raising and lowering the presser foot
⦁
with your knee, push lever to the right
⦁
you should be able to operate the FHS with your knee in your normal sitting
position
►
the presser foot is raised; the feed dog is lowered simultaneously. The
thread tension is released
►
the feed dog is raised as soon as the first stitch is sewn
Your dealer can adjust the FHS if necessary.
⦁
remove spool-pin cover vertically upwards
⦁
pull up the telescopic rod and ensure that all the parts snap into place
⦁
swing spool pin to the right until it is engaged
►
this ensures a good overall view and access to the spool pins
►
eyelet 1 is used when winding a bobbin
1
21
Sewing preparation
034791.50.04_Manual_B880_EN
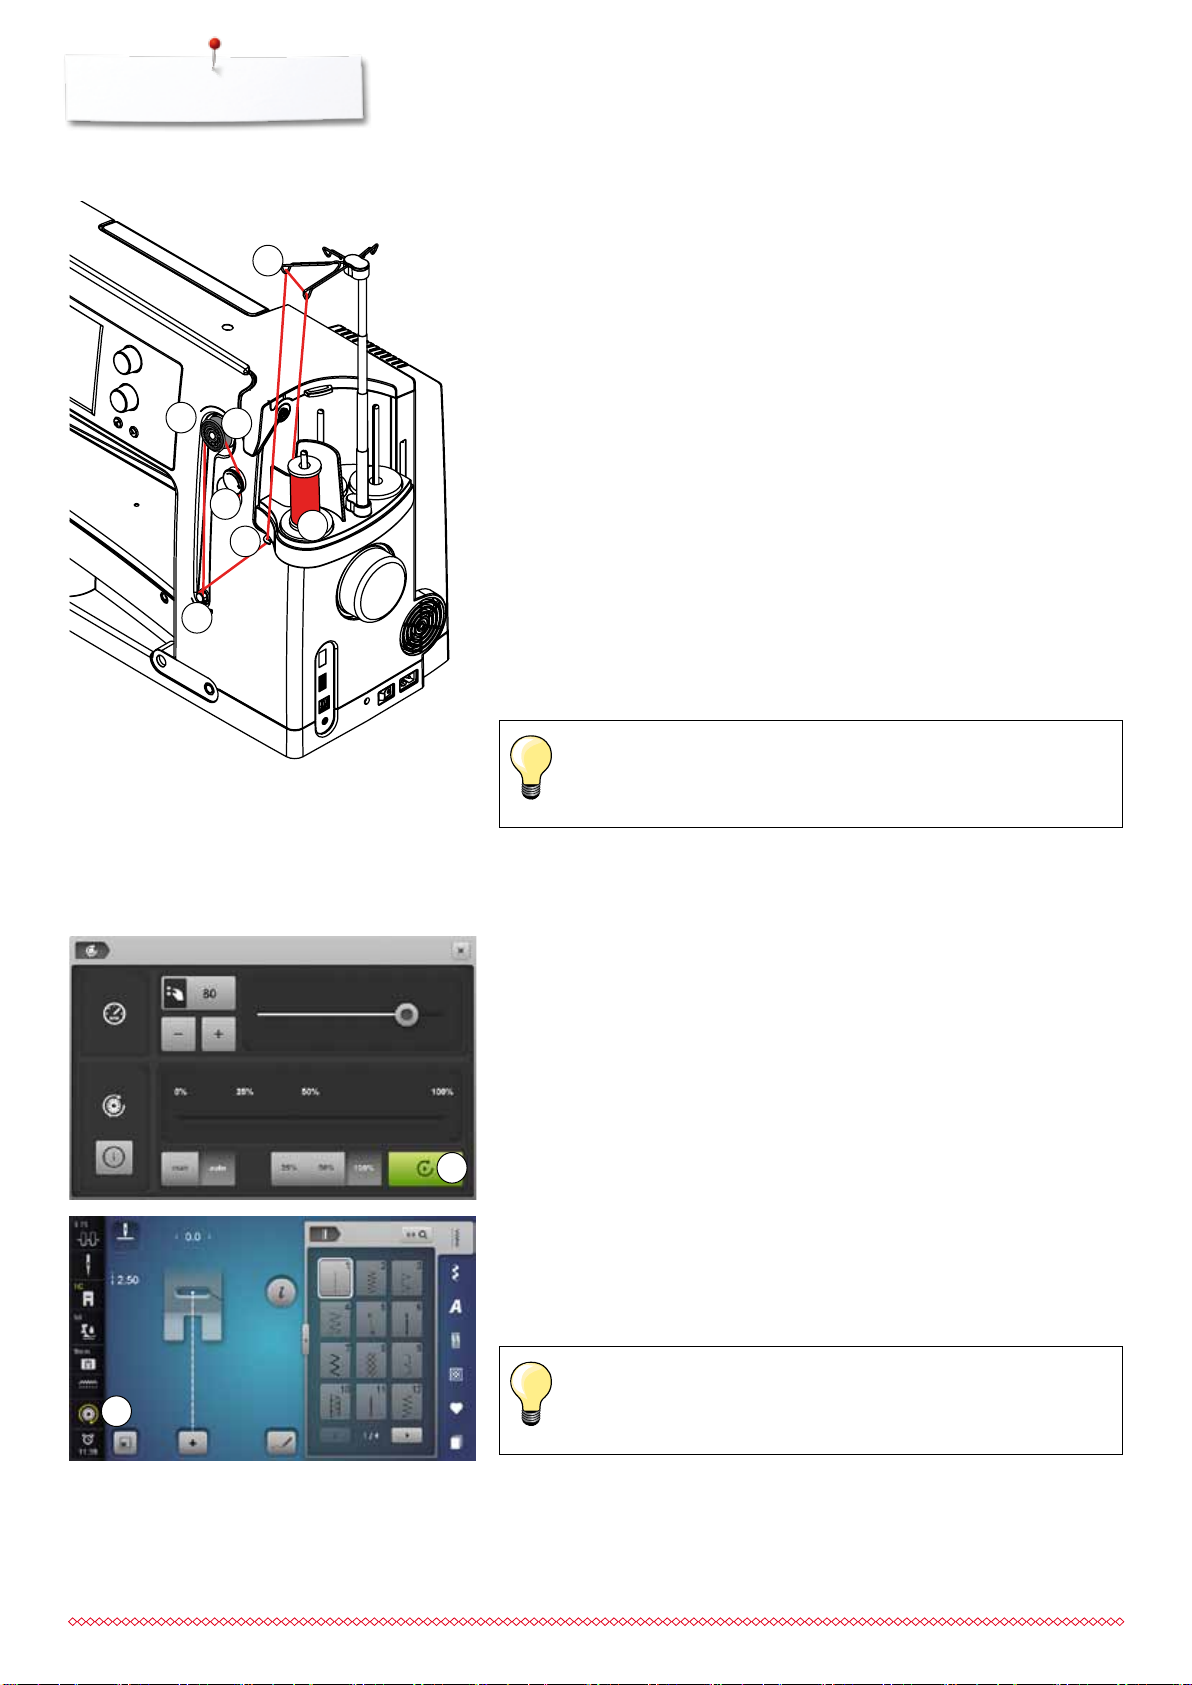
Winding the Bobbin
3
Preparation
⦁
turn power switch on (to «I»)
⦁
place empty bobbin on Pin 1, white mark in front
►
the bobbin winding screen appears
►
the amount of bobbin fill is recognized by the system and displayed by a
bar above the selectable bobbin fill
⦁
place thread spool on the front spool pin 2 and thread the respective guides
3 on the telescope
6
1
Winding the Bobbin
⦁
hold thread with both hands, guide the thread in the thread guide on the
swivel plate 4 in the direction of the arrows and around the bobbin pretension 5
⦁
7
4
5
2
wind the thread one to two times around the empty bobbin 6 following the
direction of the arrows and pull any excess thread in the direction of the
arrows, cut off on the thread cutter 7
⦁
select the bobbin filling, standard = 100%
⦁
touch the green «Start»-icon 8
⦁
adjust the winding speed via the «+»- or «-»-icon or the stitch width or stitch
length knob
►
winding process stops as soon as the selected fill percentage is reached
⦁
remove the bobbin and pull the thread over the thread cutter
►
the screen is closed
⦁
touch the «i»-icon in the bobbin winder Display
►
an animation how to wind the lower thread appears
Manual mode
⦁
touch the «man»-icon
►
the winder will run as long as the «Start»-icon is pressed
Interrupting the winding process
⦁
the winding process can be interrupted while winding by touching the
«Start»-icon 8 and the Display can be closed by touching the «Close»-icon
top right
9
22
8
Continuing the winding process
⦁
touch the «bobbin»-icon 9
►
the winding Display opens
⦁
touch «Start» to start winding process
►
the winding process is continued
It is possible to wind the bobbin while embroidering.
We recommend, however, to reduce the winding speed.

Removing the Bobbin
034791.50.04_Manual_B880_EN
Sewing preparation
ATTENTION!
Only remove the bobbin if the hook is at the end position
(threading position).
Removing the Bobbin
⦁
open bobbin cover
►
the hook system swings to the front
⦁
push the latch in the center of the bobbin to the left
⦁
the bobbin pops out and can be removed
Inserting the Bobbin
⦁
with bobbin markings facing the front, place the bobbin into the hook and
push until it clicks into place
Threading lower thread
⦁
pull the thread to the right into slit 1 then left under the spring
Thread cutter lower thread
⦁
pull thread over thread cutter 2 and cut
2
1
Check the threading path
⦁
after threading the hook, hold the mirror under the swung-out hook unit as
shown in the pictures below
►
position of bobbin thread when threaded for sewing
⦁
close the bobbin cover slowly
►
the hook swings back to the rear
23
Sewing preparation
034791.50.04_Manual_B880_EN
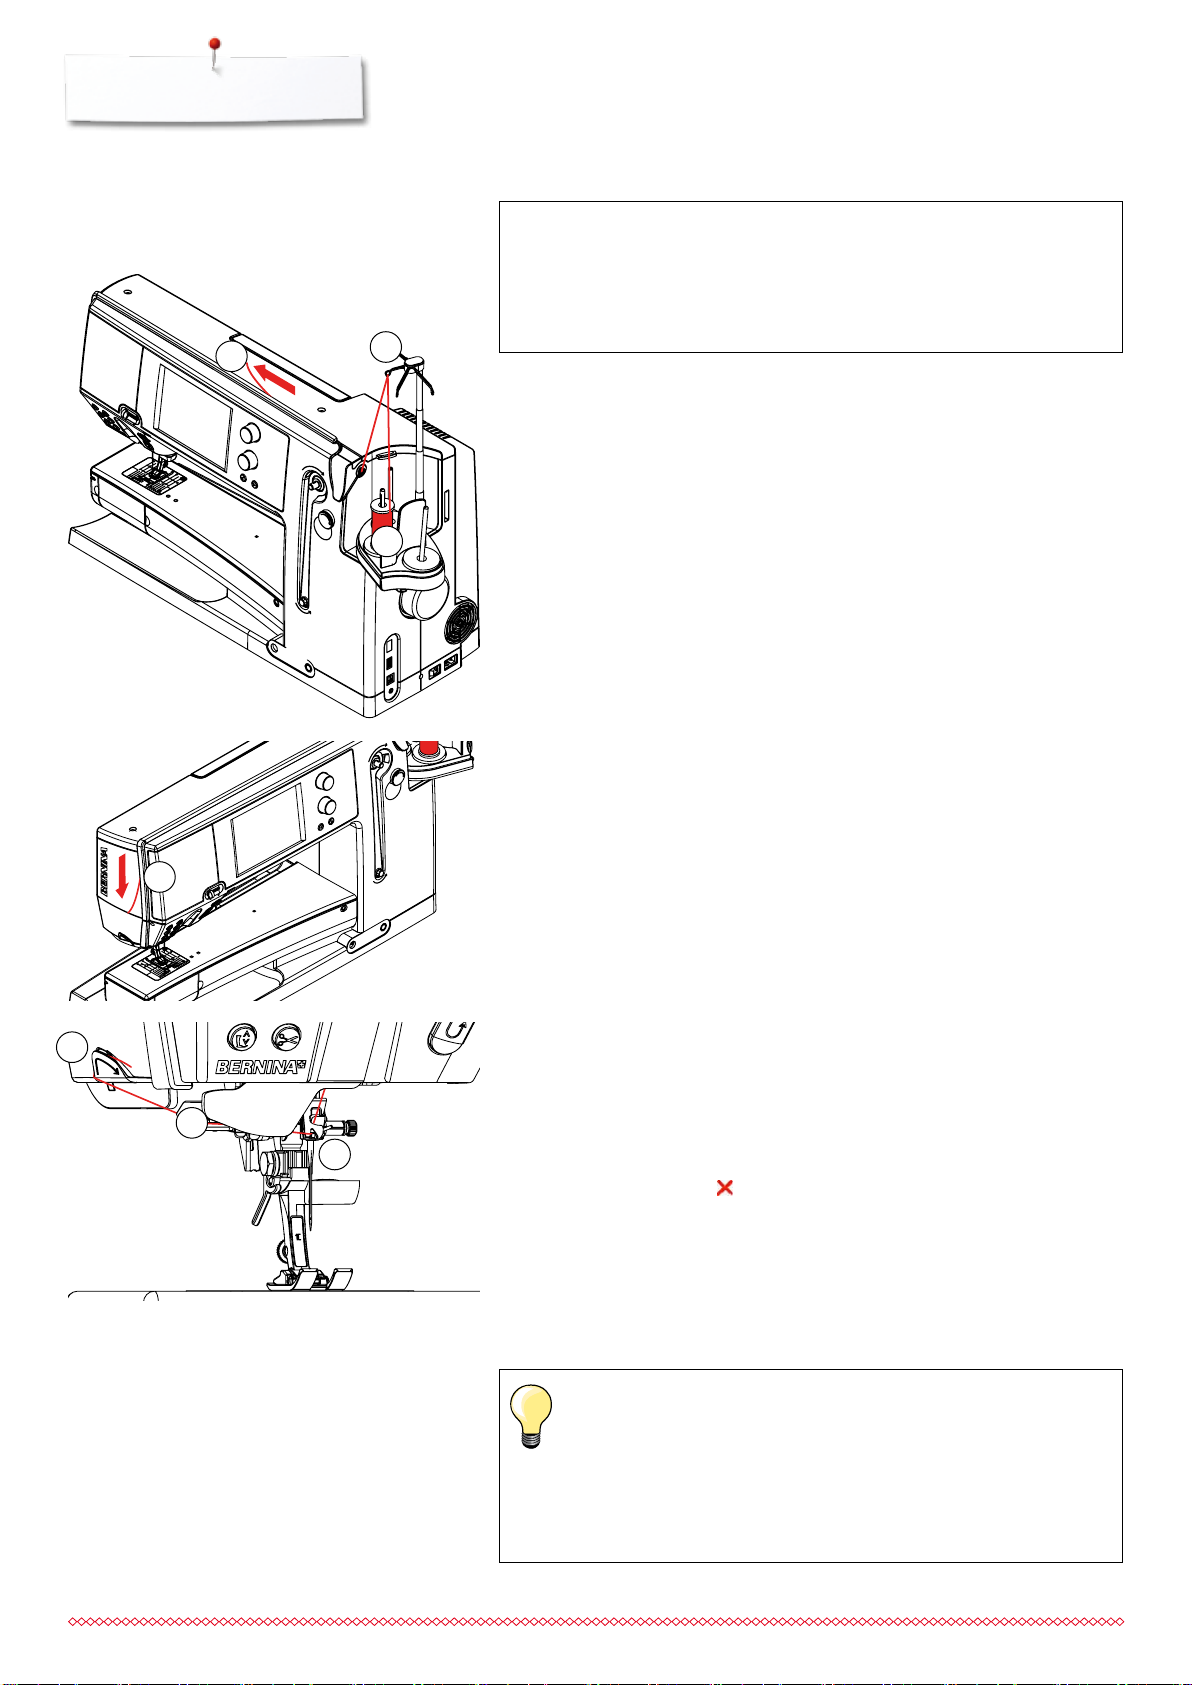
Threading the Upper Thread
3
ATTENTION!
Do not start the threaded sewing-/embroidery computer if there
is no fabric on the stitch plate.
The sewing-/embroidery computer must be switched ON for
threading.
2
Automatic
⦁
place thread spool on the rear or center spool pin 1
⦁
thread the corresponding guide 2 on the telescopic rod
⦁
hold with both hands and guide into the threading opening 3 of the sewing
computer until ...
1
3
⦁
6
... taking it up to the thread guide in the needle clamp 4
⦁
then lead it to the left into the thread clamp 5 and pull it over the thread
cutter 6 from the back to the front
⦁
touch the «Automatic threader»-button
5
4
►
this will be indicated by a message and shown in an animation
►
during threading the «Start/Stop/hover»-button is illuminated red
►
if the thread has not been threaded correctly, an error message appears
⦁
close the message with and start again
►
if the thread has been threaded correctly the «Start/Stop/hover»-button is
illuminated green
Manual
⦁
follow the five first steps as described above
⦁
touch the «Manual threading»-icon in the Display
⦁
touch the «Automatic threading»-button, then thread the needle by hand
when using unruly threads, slip the net over the upper thread
spool
large net for large spools, small net for small spools
this prevents the upper thread from slipping and gives an even
thread feed
place the thread(s) under the presser foot and to the back before
starting to sew
24
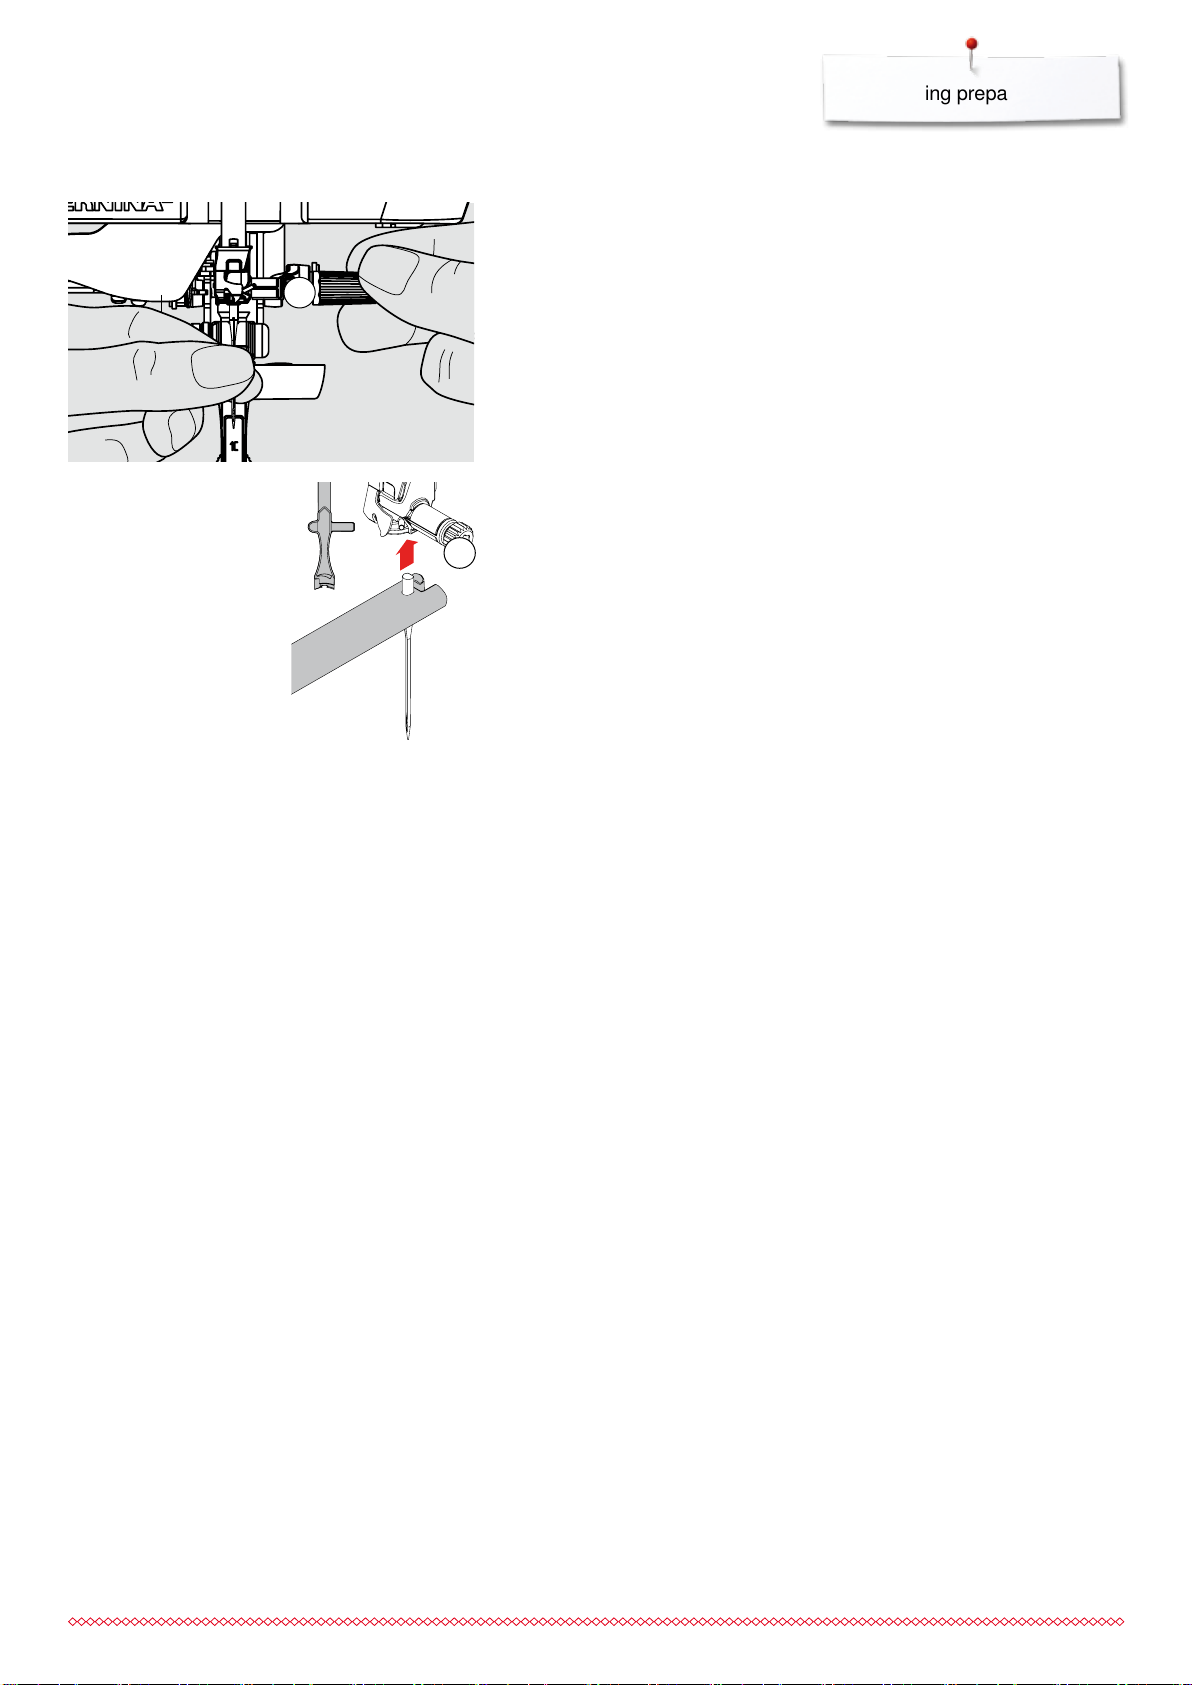
Changing the needle
034791.50.04_Manual_B880_EN
Sewing preparation
Removing the needle
⦁
raise the needle
⦁
remove or lower presser foot (see page 27, 39)
⦁
1
1
turn power switch to «0» (off)
⦁
loosen the needle clamp screw 1 using the gray screwdriver
⦁
pull the needle down to remove
Inserting the needle
⦁
flat side of needle to the back
⦁
insert the needle with the mulitfunction tool as far as it will go
⦁
tighten needle clamp 1 using the gray screwdriver
25
Sewing preparation
034791.50.04_Manual_B880_EN
Threading Double/Triple Needle
1
Threading Double Needle
⦁
touch the «Security Program»-icon
⦁
touch the corresponding needle icon in the «Security Program»-Display
⦁
close the «Security Program»-Display
⦁
place a thread spool on the center spool pin and one on the rear spool pin
and thread the corresponding guides on the telescopic rod
⦁
insert the two threads together into the threading slit, guiding the thread of
the rear spool pin behind the thread-tension disc 1 while guiding the thread
of the center spool pin in front of the tension disc 1. Then guide the two
threads through the thread guide at the needle clamp
⦁
touch the «Manual Threading»-icon in the threading animation Display.
Next touch the illuminated automatic threading button
⦁
using the manual threader in your accessory kit, manually thread the left
needle and then the right needle
Working with the Double needle
To achieve the best sewing quality:
Upper threads must be guided separately into the thread guide of the needle
clamp.
⦁
at that point, thread the first thread behind the wire as usual (red arrow),
thread the second thread in front of the wire (picture 2)
⦁
the recommended optimal speed for Double Needles ranges from about
350-500 stitches per minute. Set the slide speed control as shown below
(picture 3)
⦁
2
3
make sure that the threads are not twisted after the thread take-up lever.
For a better sight the cover can be removed
As a general guideline:
⦁
replace the needle before starting a new sewing project
Needles are wearing parts and by frequent use they change their features. Even
after 1.5 hours of useage first abrasions are recognizable. After about 8 hours,
increases in thread breakage, loops and poor stitch formation may occur.
Triple Needle
⦁
touch the «Security Program»-icon
⦁
1
touch the icon of the triple needle in the «Security Program»-Display
⦁
place a thread spool on each spool pin and thread the respective guides on
the telescopic rod
⦁
thread as usual, guiding the thread from the rear and center spool pin in the
threading slit to the rear of thread tension disc 1 and the thread from the
front spool pin in front of the tension disc
26
Changing the thread
⦁
cut the spool thread before the pre-tension and pull out of the sewing
computer in front of near the needle
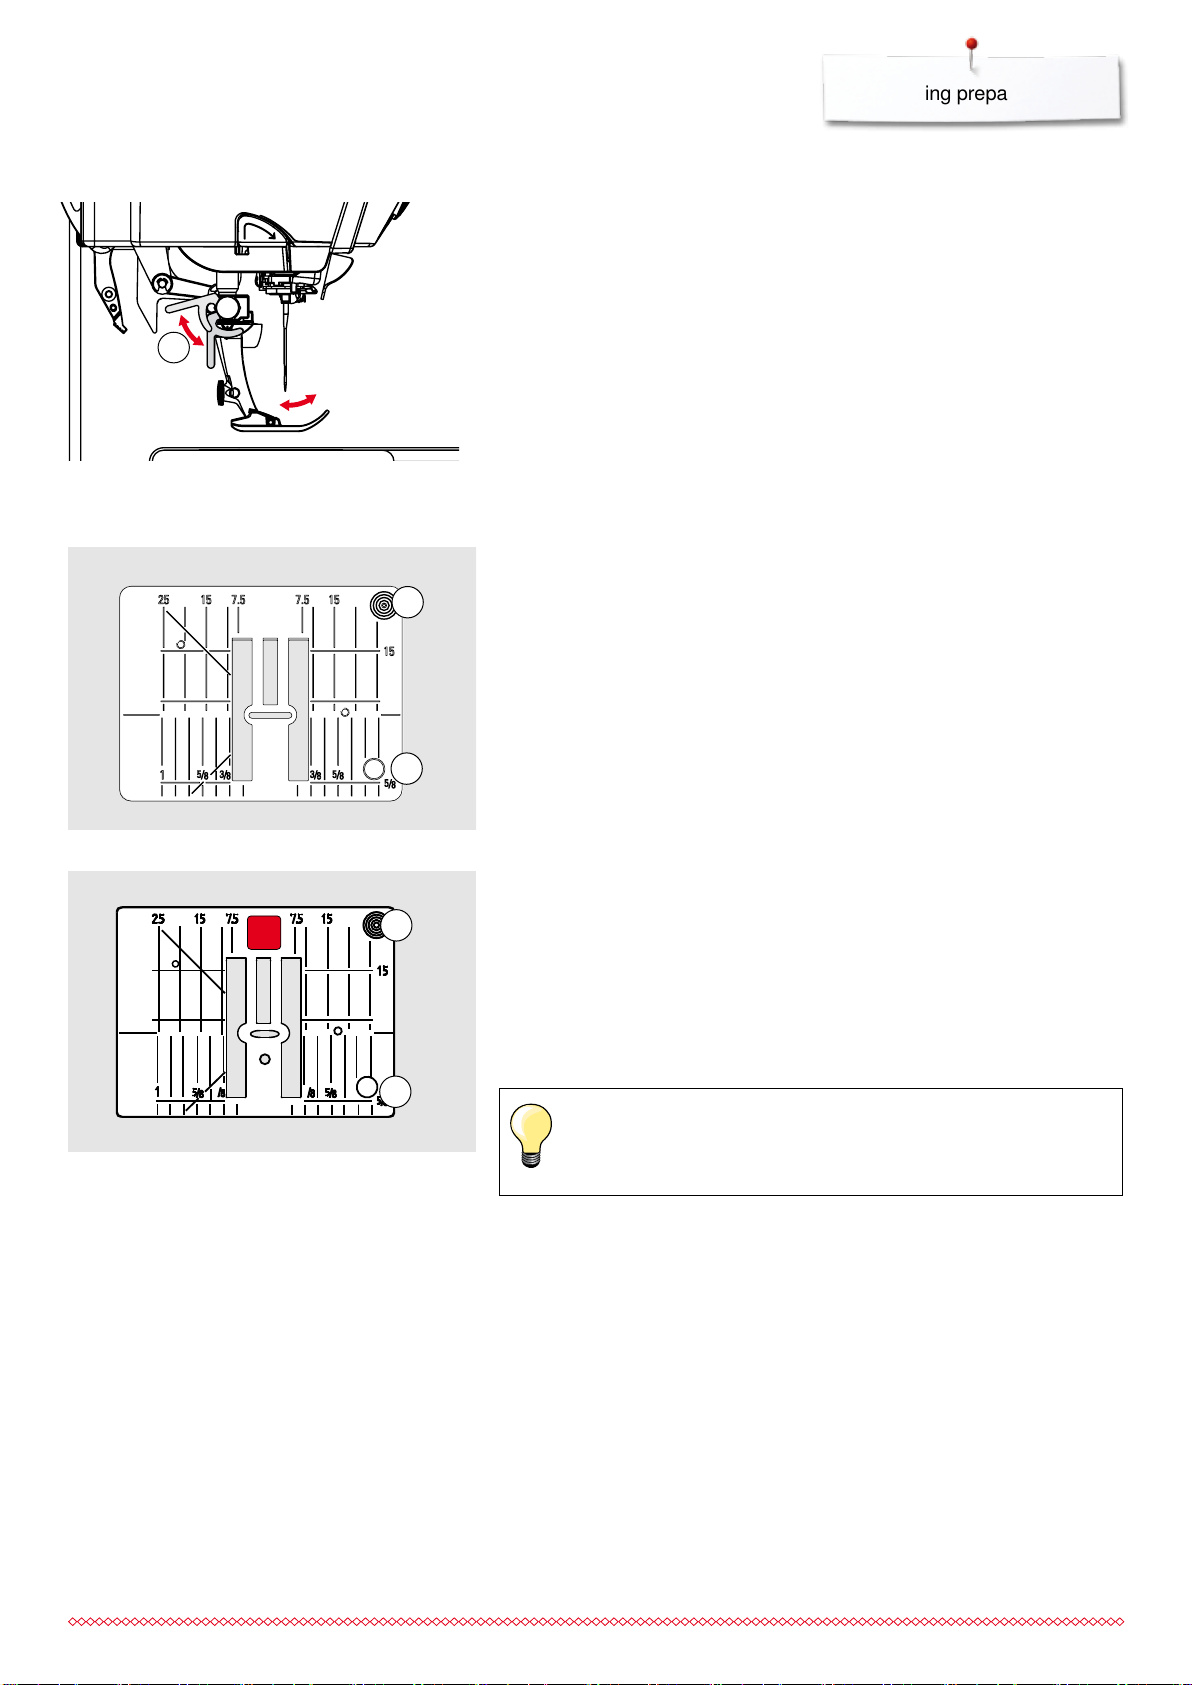
Changing the presser foot
034791.50.04_Manual_B880_EN
1
Stitch plate
Sewing preparation
Removing the presser foot
⦁
raise the needle and presser foot
⦁
turn power switch to «0» (off)
⦁
raise the clamping lever 1
⦁
remove the presser foot
Attaching the presser foot
⦁
guide the presser foot upwards over the cone
⦁
press the clamping lever 1 down
Marks on the stitch plate
1
2
the stitch plate is marked with vertical, horizontal and diagonal lines in mm
and inches
the lines help to guide the fabric for sewing seams and precise topstitching,
etc.
the horizontal markings are helpful for sewing corners and buttonholes, etc.
the diagonal markings are useful for quilting
needle insertion point is position «0» (center needle position)
the vertical measurements correspond to the distance between the needle
and the line
measurements are marked to the right and to the left of center needle
position
9 mm
3
5.5 mm (optional accessory)
Removing the Stitch Plate
⦁
1
raise the presser foot and needle
⦁
turn power switch to «0» (off)
⦁
press the stitch plate down at the right back corner 1 until it flips up
►
remove stitch plate
Replacing the Stitch Plate
⦁
place the stitch plate over the opening 2 and press down until it clicks into
place
3
2
Exchanging the Stitch Plate
Whenever the stitch plate is exchanged, it is imperative to adjust the
settings in Security Program accordingly, see page 32.
27
Sewing preparation
034791.50.04_Manual_B880_EN
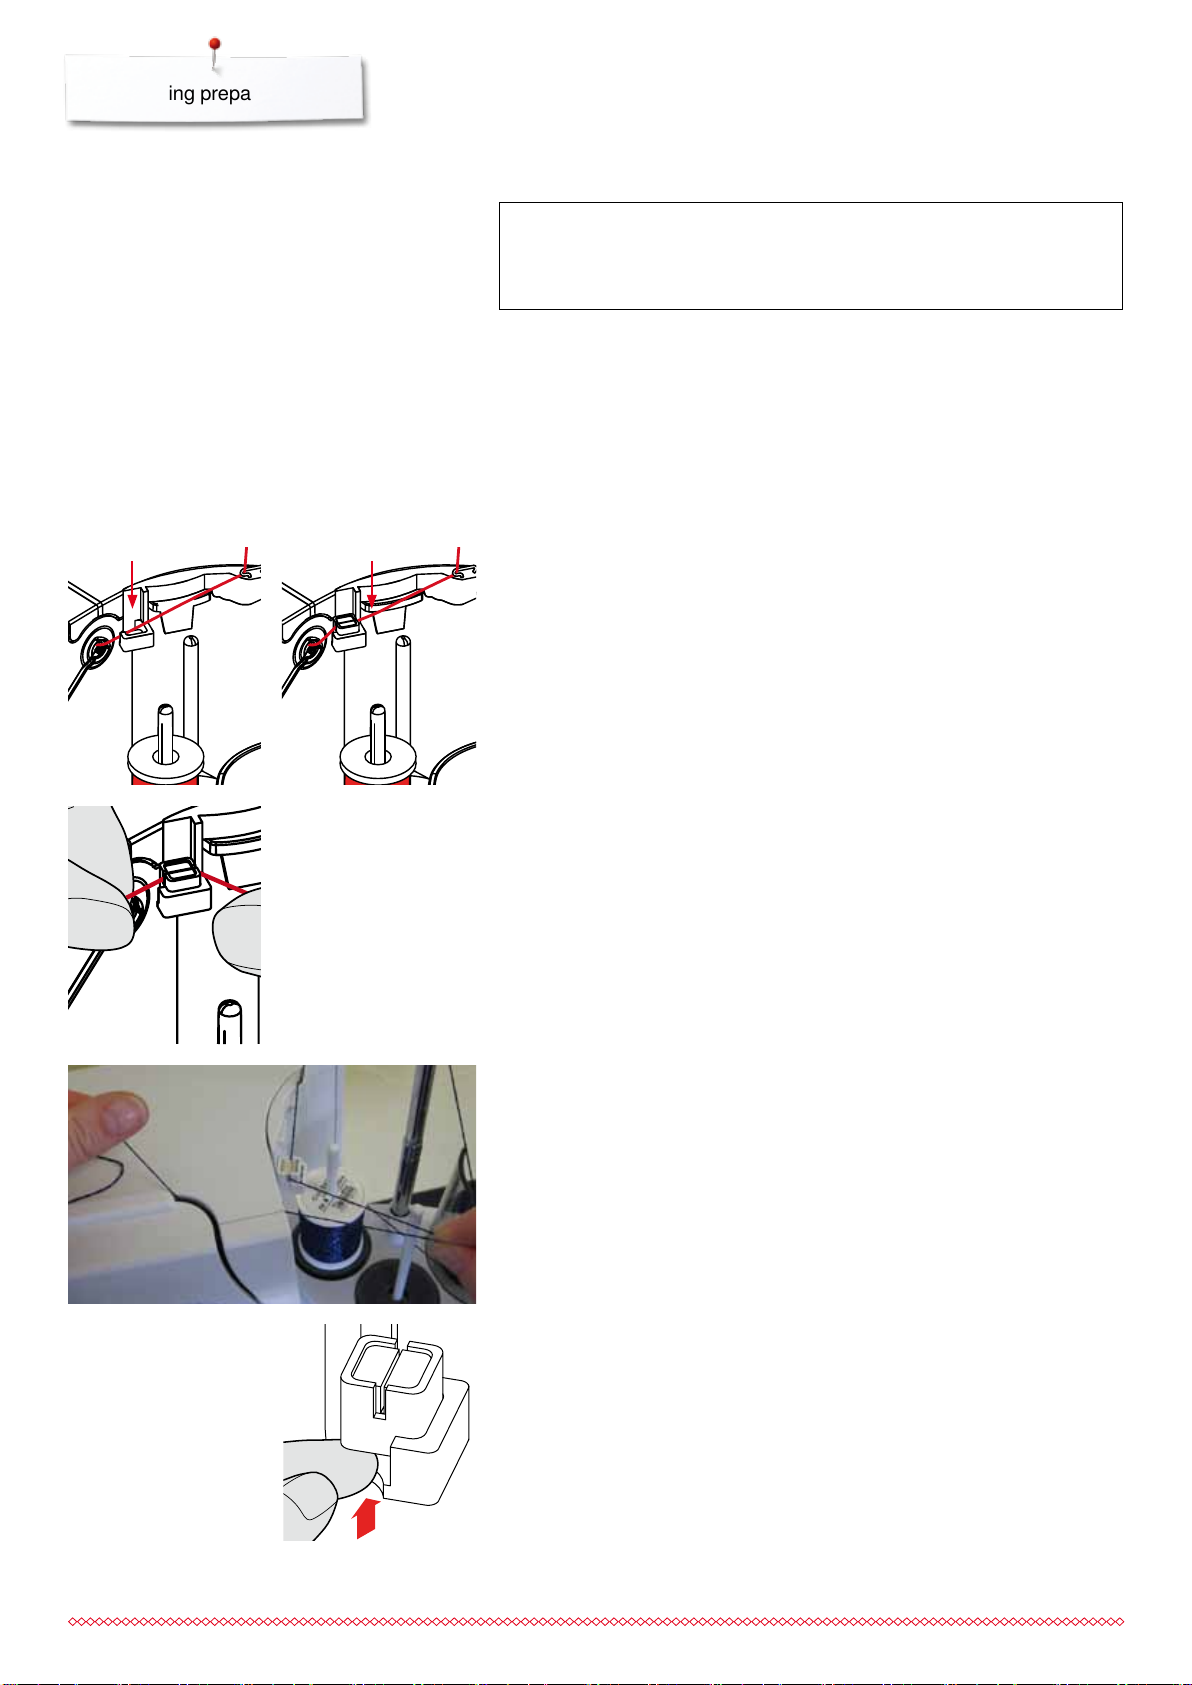
Thread-Guide-and-Lubricating Unit
1
2
ATTENTION!
The silicone fluid must ONLY be used for thread lubrication.
Never use it to lubricate the hook system!
As a thread-guide eyelet (Fig. 1)
Use the unit without lubricator for a controlled guiding of the thread into the
pretensioner, e.g. when using lively thread types.
As a thread lubricator (Fig. 2)
Using the lubricator is advisable when using e.g. threads with high function
values, metallic threads, loosely twisted thread types etc. The silicone fluid
improves the threads‘ gliding properties considerably and therefore helps to
produce flawless stitching results.
Assembly
⦁
insert the unit into the spool-holder cover fixture and push down entirely
(Fig. 1)
⦁
insert the lubricator into the holder on the left side of the unit, taking care to
place the lubricator in such way that the openings for the thread are in line
with the thread flow or thread direction (Fig. 2)
⦁
moisten the felt, add a few drops of silicone fluid
⦁
place the thread spool onto the middle or rear spool pin as usual. Then
guide the thread through the respective eyelet of the telescopic rod and the
eyelet of the thread-guide-and-lubricating unit
⦁
hold the thread with both hands, pull it in to the slit of the felt, pulling it
down as far as it goes so that it‘ll stay in the felt during machine operation
(Fig. 3)
⦁
continue and complete threading the sewing computer as normal
⦁
take care that the felt remains moistened. It mustn‘t dry out. Apply some
drops of silicone fluid once in a while to keep it moist
3
During the initial threading of the sewing computer and when the radial thread
release is used it is advisable to pull an extra inch of thread from the spool
before the threader button is pushed (Fig. 4).
4
When using the Thread-Guide-and-Lubrification Unit and depending on the
type of thread used it might be necessary to reduce the upper-thread tension
slightly to achieve perfect stitching results.
⦁
to remove the Thread-Guide-and-Lubrification Unit, push the entire unit up
⦁
Reattach the Thread-Guide-and-Lubrification Unit. Thread the sewing
computer as usual, including the eyelet of the unit (Fig. 2).
28
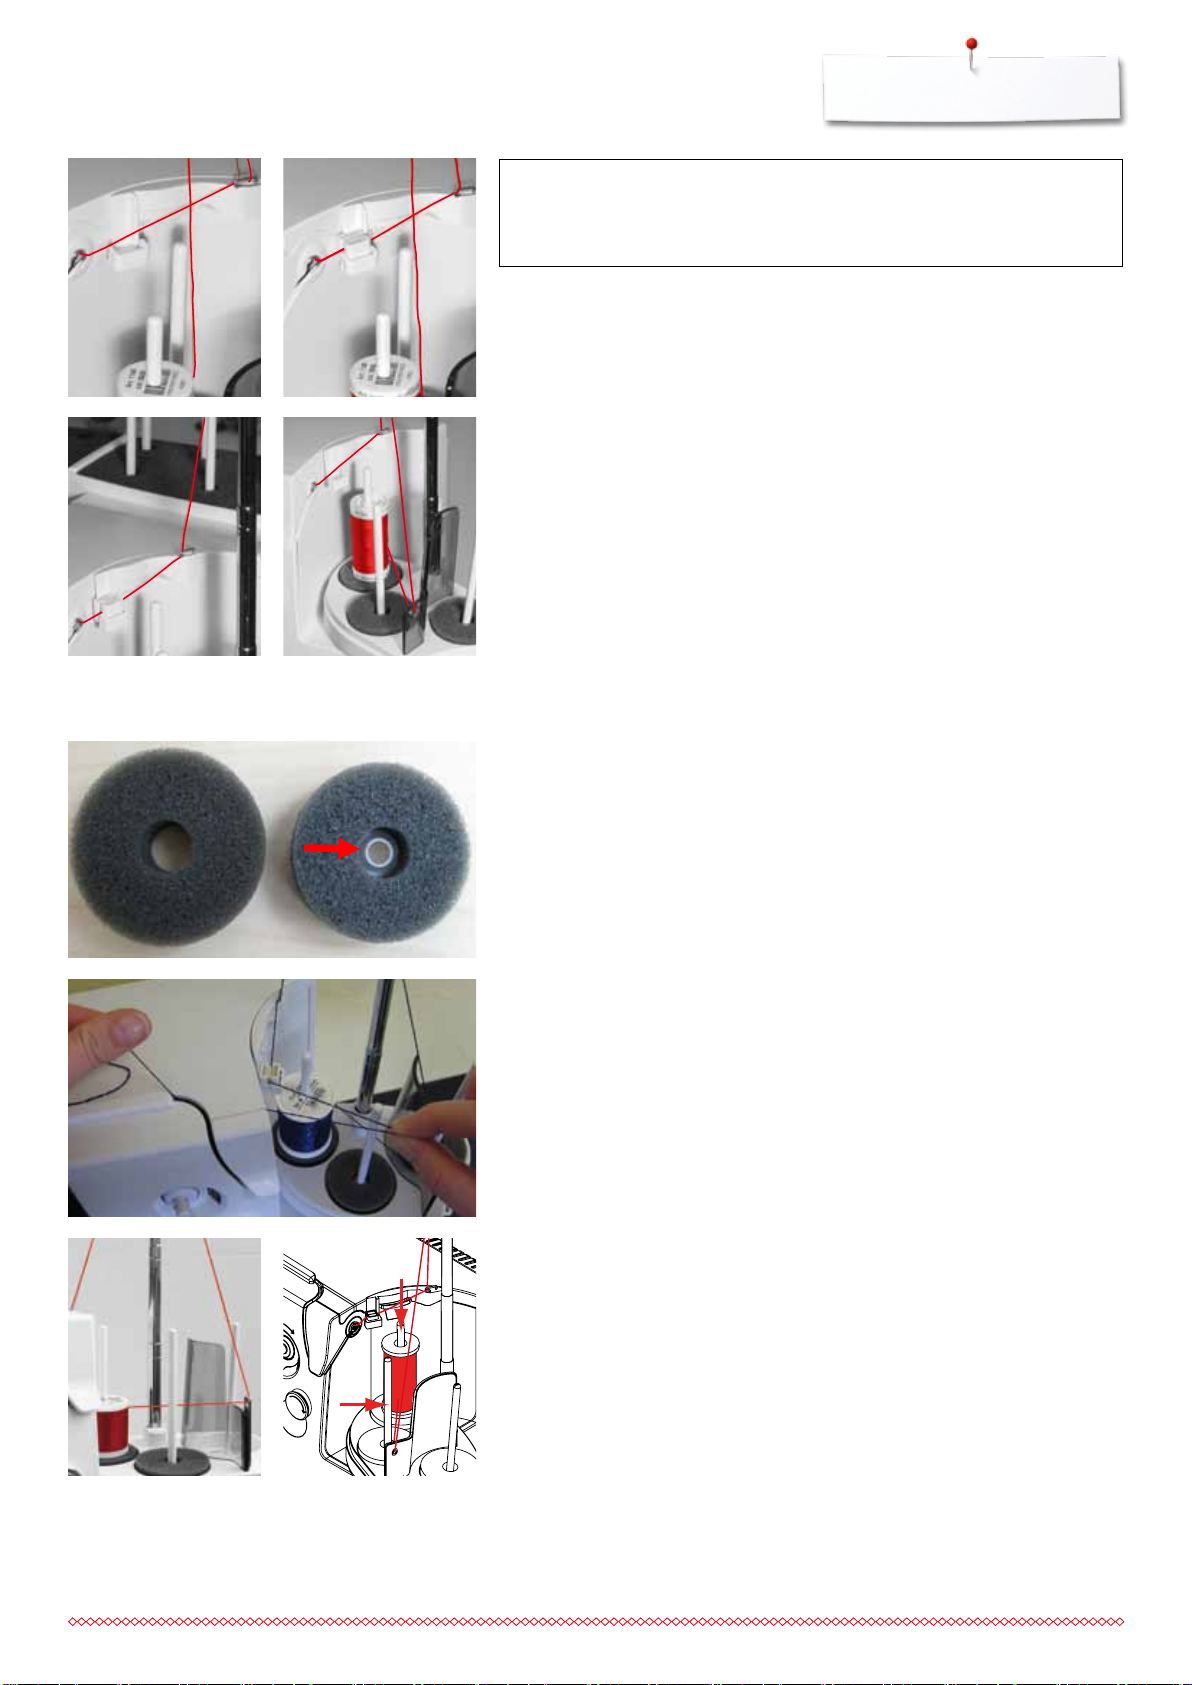
Sewing preparation
034791.50.04_Manual_B880_EN
ATTENTION!
It is absolutely essential to use the correct foam disc under the
thread spool.
Various Options of Application
Vertical thread unwinding (with or without lubricator) from normal spool pin
or optional multiple spool holder (Fig. 5-7)
5
7
Radial Thread Guide
6
8
Radial thread unwinding (with or without lubricator) (Fig. 8)
during the initial threading of the sewing computer and when the radial
thread release is used it is advisable to pull an extra inch of thread from the
spool before the threader button is pushed (Fig. 9)
How to use the thread guide:
it is preferable to replace the standard foam disc with the foam rotary disc (with
white plastic inner part) on the rear spool pin.
Application
The extra thread guide ensures the consistent thread release, when using
threads i.e. metallic, lively or evenly wound thread spools.
place thread spool on spool pin and guide thread through thread guide.
Then run thread via middle eyelet of telescopic rod. Continue threading the
sewing computer as normal
during the initial threading of the sewing computer and when the radial
thread release is used it is advisable to pull an extra inch of thread from the
spool before the threader button is pushed
9
Any of the two spool pins (see arrow markings) can be used. However, it is
best to use the rear pin due to its more favorable unwinding angle. Refrain
from using the pin of the winder.
In order to achieve perfect stitching results, it might be necessary to reduce the
upper-thread tension slightly when using the radial thread unwinding and
depending on the thread used.
29
Loading...