


ACS 6000

SECURITY WARNING
The ACS 6000 advanced console
server provides extensive access
to the devices attached to this
equipment. As a result, care must be
taken to avoid compromising your
security policies.
From the factory, this equipment is
shipped with the following settings:
• DHCP, Telnet, SSH v1 & SSHv2,
HTTP & HTTPS – ENABLED
• All Serial, USB and AUX ports –
DISABLED
• Ethernet and Console Port –
ENABLED
• PCMCIA Drivers – DISABLED
• Two Default Users with passwords:
– root – linux
– admin – avocent
• Shell Access for root and admin
– ENABLED
Avocent strongly recommends that
you change the default password
and carefully select a Security Profile
immediately after initial setup.
Please consult the Installation/
Administration/User Guide for more
information on Security Prole
selections.
For manual downloads, visit:
www.avocent.com/manuals
The following instructions will help you
install your console server.
Should you require further assistance,
please contact Avocent Technical Support.
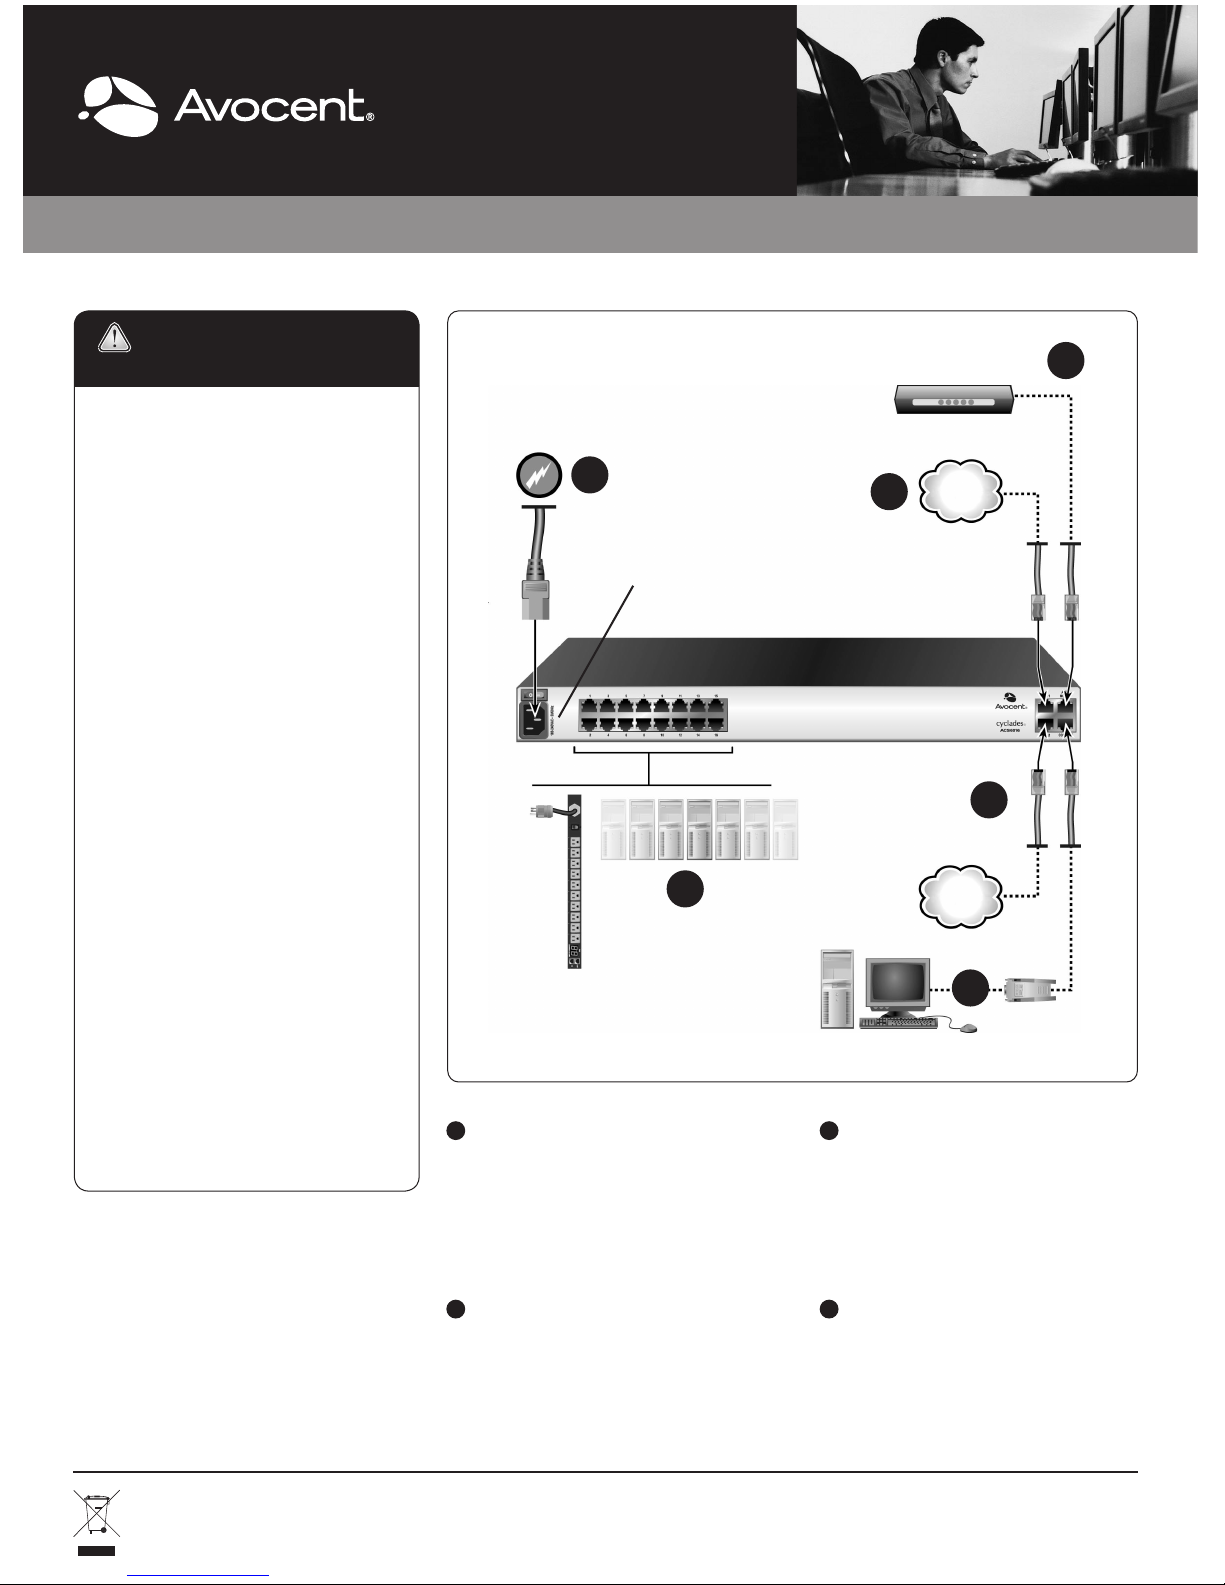
1
Rack mounting the console server
For detailed rack mounting instructions,
see the ACS 6000 Installation/
Administration/User Guide.
2
Connecting to your network
Connect an Avocent-recommended
CAT 5e or CAT 6 cable from the
10/100/1000BaseT port to your network.
You may connect to either or both
network ports for redundancy.
3
Connecting devices
Using CAT 5e or CAT 6 cables and DB9
or DB25 console adaptors, connect the
appropriate serial and power devices to
the serial ports on the console server.
4
Connecting USB, PMCIA and
CardBus devices
Connect a supported USB, PCMCIA
or CardBus device to the appropriate
ports located on the front of the console
server.
QUICK INSTALLATION GUIDE ACS 6000 Advanced Console Server
To Contact Avocent Technical Support: Visit www.avocent.com 590-769-629C
Avocent and the Avocent logo are registered trademarks of Avocent Corporation or its affiliates in the U.S. and other countries. ©2009 Avocent Corporation.
2
3
5
Optional DC, Dual AC
or Dual DC power
ACS 6016 console server shown
6
2
AUX or modem port
RJ-45 console
adaptor
Console user
PDU
7

QUICK INSTALLATION GUIDE ACS 6000 Advanced Console Server
5
Connecting the power cable(s)
and turning on the console server
For AC powered units, connect the
power cable to the console server. For
DC powered units, please consult the
ACS 6000 Installation/Administration/
User Guide.
6
Connecting to the Console port
Using one of the supplied RJ-45
console adaptors, connect a terminal
or workstation to the Console port on
the console server. The console server
will be congured using a terminal
or terminal emulator with session
settings of: 9600, 8, N and 1, with no
flow control.
7
Connecting to the AUX or
modem port (AUX/modem port on
some models)
For models without an internal modem,
connect an external modem or
supported PDU. For models with an
internal modem, connect a phone line.
NOTE: All remaining manual setup steps
are required the first time you configure
the ACS 6000 advanced console server.
8
Configuring network parameters
Log in to the console server as admin,
with the default password avocent. At
the command prompt, enter wiz to view
the current IP conguration.
NOTE: DHCP is the default IP
configuration. If no DHCP server is
available, the console server must be
reconfigured manually as described
below.
To change the IP conguration, press
Enter to move through the parameters,
accepting the current values. Type the
new value for the selected parameter or
press Ctrl + E to edit the current value.
When you are nished, enter yes to
conrm and save the new parameters.
9
Completing the First Time
Configuration screen
To congure the ACS 6000 advanced
console server for the rst time, open
a web browser and enter the console
server’s IP address in the address
eld. Press Enter to access the
Web Manager.
Log in to the advanced console server
as admin with the password avocent.
The Security screen of the Wizard tab
appears. Perform the conguration
described in the steps below.
Step 1 - Security Profile
Select the desired Security Prole. Click
Next when nished.
Step 2 - Network Parameters
Set the desired Network parameters.
Click Next when nished.
Step 3 - Ports
The default CAS Prole conguration
will be applied for all serial ports. Check
the box to enable all ports and set the
desired CAS Prole parameters. Click
Next when nished.
Step 4 - Change root/admin
Password
Click the root link in the Users table. The
Root User Information screen appears.
Enter the new password in the Password
eld and conrm it. Click Next. Click the
admin link. The Admin Information screen
appears. Enter the new password in the
Password eld and conrm it. Click Next.
Click the Save button to apply and save
the conguration.
The console server is now congured
and ready to accept users and
connections to the ports.
To Contact Avocent Technical Support: Visit www.avocent.com 590-769-629C
Avocent and the Avocent logo are registered trademarks of Avocent Corporation or its affiliates in the U.S. and other countries. ©2009 Avocent Corporation.

SICHERHEITSWARNUNG
Der ACS 6000 Advanced Console
Server bietet weitreichenden Zugriff
auf die Geräte, die an den Console
Server angeschlossen sind. Schützen
Sie Ihre Sicherheitsrichtlinien durch
entsprechende Vorkehrungen.
Dieses Gerät wird mit den folgenden
Einstellungen ab Werk versandt:
• DHCP, Telnet, SSH V1 & SSH V2
HTTP & HTTPS – AKTIVIERT
• Alle seriellen, USB- und AUX-Ports –
NICHT AKTIVIERT
• Ethernet- und Konsolenport – AKTIVIERT
• PCMCIA-Treiber – NICHT AKTIVIERT
• Zwei Standardbenutzer mit Kennwörtern:
– root – linux
– admin – avocent
• Shell-Zugriff für „root“ und „admin“ –
AKTIVIERT
Avocent empfiehlt, dass die
Standardkennwörter geändert
werden und dass sofort nach der
Ersteinrichtung ein Sicherheitsprofil
ausgewählt wird.
Weitere Informationen zur Auswahl
von Sicherheitsprolen nden Sie in
der Installations-/Administrations- und
Bedienungsanleitung.
Hier können Sie die
Bedienungsanleitung herunterladen:
www.avocent.com/manuals
Die folgenden Anweisungen helfen Ihnen,
Ihren Konsolenserver einzurichten.
Nehmen Sie bei weiteren Fragen Kontakt
mit dem technischen Kundendienst von
Avocent auf.
1
Rackbefestigung des Konsolenservers
Detaillierte Anweisungen zur
Rackbefestigung nden Sie in der
Installations-/Administrations- und
Bedienungsanleitung des ACS 6000.
2
Herstellen einer Verbindung mit
dem Netzwerk
Schließen Sie ein von Avocent
empfohlenes CAT 5e- oder CAT 6-Kabel
vom 10/100/1000BaseT-Port an Ihr
Netzwerk an. Zwecks Redundanz können
Sie den Anschluss für einen der beiden
oder für beide Netzwerkports vornehmen.
3
Anschließen von Geräten
Schließen Sie die geeigneten seriellen
Geräte und Stromversorgungsgeräte
unter Verwendung von CAT 5e- oder
CAT 6-Kabeln und DB9- oder DB25Konsolenadaptern an die seriellen Ports
des Konsolenservers an.
4
Anschließen von USB-, PCMCIA-
und CardBus-Geräten
Schließen Sie ein unterstütztes USB-,
PCMCIA- oder CardBus-Gerät an die
entsprechenden Ports an, die sich an der
Vorderseite des Konsolenservers benden.
SCHNELLINSTALLATIONSANLEITUNG
ACS 6000 Advanced Console Server
So erreichen Sie den technischen Kundendienst von Avocent: Besuchen Sie www.avocent.com 590-769-629C
Avocent und das Avocent Logo sind eingetragene Marken der Avocent Corporation oder ihrer Tochterunternehmen in den USA und anderen Ländern. © 2009 Avocent Corporation.
2
3
5
Optionale Gleichstrom-, duale
Wechselstrom- oder duale
Gleichstromversorgung
Konsolenserver ACS 6016 abgebildet
6
2
AUX- oder Modemport
RJ-45-Konsolenadapter
Konsolenbenutzer
PDU
7

SCHNELLINSTALLATIONSANLEITUNG ACS 6000 Advanced Console Server
5
Anschließen der Netzkabel und
Hochfahren des Konsolenservers
Schließen Sie bei Einheiten mit
Wechselstrom das Netzkabel
an den Konsolenserver an.
Anweisungen für Modelle mit
Gleichstromversorgung nden Sie in
der Installations-/Administrations- und
Bedienungsanleitung des ACS 6000.
6
Anschluss an den Konsolenport
Schließen Sie ein Terminal oder
eine Workstation mit einem der im
Lieferumfang enthaltenen RJ-45Konsolenadapter an den Konsolenport
des Konsolenservers an. Die
Konguration des Konsolenservers
erfolgt unter Verwendung eines
Terminals oder Terminal-Emulators mit
folgenden Sitzungseinstellungen: 9600,
8, N und 1, no ow control.
7
Anschluss an den AUX- oder
Modemport (AUX/Modemport an
bestimmten Modellen)
Schließen Sie bei Modellen ohne
internes Modem ein externes Modem
oder eine unterstützte PDU an.
Schließen Sie bei Modellen mit internem
Modem eine Telefonleitung an.
HINWEIS: Alle verbleibenden Setup-
Schritte sind bei der Erstinstallation des
ACS 6000 Advanced Console Server
erforderlich.
8
Konfigurieren von Netzwerkparametern
Melden Sie sich am Konsolenserver als
admin an. Verwenden Sie dazu das
Standardkennwort avocent. Geben Sie
an der Eingabeaufforderung wiz ein, um
die aktuelle IP-Konguration anzuzeigen.
HINWEIS: DHCP ist die Standard-IP-
Konfiguration. Wenn kein DHCP-Server
verfügbar ist, muss der Konsolenserver,
wie unten beschrieben, manuell neu
konfiguriert werden.
Betätigen Sie die Eingabetaste, um
die Markierung durch die Parameter zu
bewegen und die aktuellen Werte zu
bestätigen. Geben Sie den neuen Wert
für den ausgewählten Parameter ein
oder betätigen Sie Strg + E, um den
aktuellen Wert zu bearbeiten. Geben
Sie anschließend yes ein, um die neuen
Parameter zu speichern.
9
Fertigstellen des Bildschirms für
die Erstkonfiguration
Öffnen Sie zur Erstkonguration des
ACS 6000 Advanced Console Server
einen Webbrowser und geben Sie die
IP-Adresse des Konsolenservers in das
Adressenfeld ein. Betätigen Sie die
Eingabetaste, um den Webmanager zu
öffnen.
Melden Sie sich am Advanced
Console Server als admin mit dem
Kennwort avocent an. Der Bildschirm
„Security“ der Registerkarte „Wizard“
wird angezeigt. Führen Sie die in
den Schritten unten aufgeführte
Konguration durch.
Schritt 1 – Sicherheitsprofil
Wählen Sie das gewünschte
Sicherheitsprol aus. Klicken Sie auf
Next.
Schritt 2 – Netzwerkparameter
Wählen Sie die gewünschten
Netzwerkparameter aus. Klicken Sie auf
Next.
Schritt 3 – Ports
Die standardmäßige CASProlkonguration wird auf alle seriellen
Ports angewendet. Aktivieren Sie das
Kontrollkästchen, um alle Ports zu
aktivieren und die gewünschten CASProlparameter einzustellen. Klicken Sie
auf Next.
Schritt 4 – Ändern des Kennworts
für root/admin
Klicken Sie in der Benutzertabelle
auf root. Die Benutzerinformationen
für „root“ werden angezeigt. Geben
Sie das neue Kennwort in das Feld
„password“ ein und bestätigen Sie
es. Klicken Sie auf Next. Klicken Sie
auf den Link Admin. Die Informationen
für „admin“ werden angezeigt. Geben
Sie das neue Kennwort in das Feld
„password“ ein und bestätigen Sie es.
Klicken Sie auf Next. Klicken Sie auf die
Schaltäche Save, um die Änderungen
zu übernehmen und die Konguration zu
speichern.
Der Konsolenserver ist nun konguriert
und kann Benutzer sowie Verbindungen
zu den Ports aufnehmen.
So erreichen Sie den technischen Kundendienst von Avocent: Besuchen Sie www.avocent.com 590-769-629C
Avocent und das Avocent Logo sind eingetragene Marken der Avocent Corporation oder ihrer Tochterunternehmen in den USA und anderen Ländern. © 2009 Avocent Corporation.
AVERTISSEMENT DE
SÉCURITÉ
Le serveur de ports console avancé
ACS 6000 fournit un accès complet
à tous les périphériques qui lui sont
reliés. Restez donc très vigilant
afin d'éviter de compromettre vos
politiques de sécurité.
Les paramètres prédénis pour cet
appareil sont les suivants :
• DHCP, Telnet, SSH v1 et SSH v2,
HTTP et HTTPS – ACTIVÉS
• Tous les ports série, USB et AUX –
DÉSACTIVÉS
• Éthernet et port de la console –
ACTIVÉS
• Pilotes PCMCIA – DÉSACTIVÉS
• Deux utilisateurs par défaut avec
mots de passe associés :
– root – linux
– admin – avocent
• Accès Shell pour les utilisateurs
root et admin – ACTIVÉ
Avocent vous recommande vivement de
modifier le mot de passe par défaut et
de sélectionner un profil de sécurité dès
que la configuration initiale est achevée.
Pour plus d'informations sur la sélection
des prols de sécurité, consultez le
guide d'installation, d'administration et
d'utilisation.
Pour les téléchargements de manuels,
visitez le site :
www.avocent.com/manuals
Pour installer votre serveur de ports
console, suivez la procédure ci-dessous.
Pour de plus amples informations,
contactez le service d'assistance
technique d'Avocent.
1
Montage en rack du serveur de
ports console
Pour obtenir des instructions détaillées
sur le montage en rack, consultez le guide
d'installation, d'administration et d'utilisation
du serveur de ports console ACS 6000.
2
Connexion au réseau
Reliez le port 10/100/1000BaseT et le
réseau par un câble CAT 5e ou CAT 6
recommandé par Avocent. Vous pouvez
établir la connexion à l'un ou aux deux ports
du réseau pour assurer la redondance.
3
Connexion de périphériques
À l'aide de câbles CAT 5e ou CAT 6
et d'adaptateurs pour console DB9 ou
DB25, connectez les périphériques
d'alimentation et série appropriés aux
ports série du serveur de ports console.
4
Connexion de périphériques
USB, PCMCIA et CardBus
Vous pouvez connecter un périphérique
USB, PCMCIA ou CardBus pris en
charge aux ports adéquats situés à
l'avant du serveur de ports console.
GUIDE D'INSTALLATION RAPIDE
- ACS 6000 - Serveur de ports console avancé
Pour contacter le service d'assistance technique d'Avocent, visitez le site www.avocent.com 590-769-629C
Avocent et le logo Avocent sont des marques déposées d'Avocent Corporation ou de ses filiales aux États-Unis ou dans d'autres pays. ©2009 Avocent Corporation.
2
3
5
Alimentation c.c. ou c.a.
double, ou c.c. facultative
Présentation du serveur de ports
console ACS 6016
6
2
Port AUX ou modem
Adaptateur pour
console RJ-45
Utilisateur de
console
PDU
7
Éthernet
Éthernet

GUIDE D'INSTALLATION RAPIDE - ACS 6000 - Serveur de ports console avancé
5
Branchement du ou des cordons
d'alimentation et démarrage du
serveur de ports console
Pour les unités alimentées par
courant alternatif, branchez le cordon
d'alimentation sur le serveur de ports
console. Pour celles alimentées par
courant continu, reportez-vous au
guide d'installation, d'administration et
d'utilisation du serveur de ports console
ACS 6000.
6
Connexion au port de la console
Utilisez l'un des adaptateurs pour
console RJ-45 fournis pour brancher
un terminal ou une station de travail sur
le port de console du serveur de ports
console. Pour congurer ce dernier,
vous devez entrer les paramètres de
session suivants dans un terminal ou un
émulateur de terminal : 9600, 8, N et 1,
sans contrôle de flux.
7
Connexion au port AUX ou
modem (port mixte sur certains
modèles)
Pour les modèles non dotés d'un
modem interne, branchez un modem
externe ou une PDU prise en charge.
Pour les modèles dotés d'un modem
interne, établissez une liaison par ligne
téléphonique.
REMARQUE : toutes les opérations
manuelles restantes sont nécessaires lors
de la première configuration du serveur
de ports console avancé ACS 6000.
8
Définition des paramètres
réseau
Connectez-vous au serveur de ports
console en tant qu'admin, avec le mot
de passe par défaut avocent. À l'invite
de commande, saisissez wiz pour
afcher la conguration IP actuelle.
REMARQUE : DHCP est le protocole IP
défini par défaut. Si aucun serveur DHCP
n'est disponible, le serveur de ports
console doit être reconfiguré manuellement, comme suit.
Si vous souhaitez modier la
conguration IP, appuyez sur Entrée
an de parcourir les paramètres et
d'accepter les valeurs actuelles. Pour
modier ces valeurs, tapez une nouvelle
valeur pour le paramètre sélectionné
ou appuyez sur Ctrl + E. Une fois que
vous avez modié toutes les valeurs
voulues, saisissez yes pour enregistrer
les nouveaux paramètres.
9
Écran affiché lors de la configu-
ration initiale
Pour congurer le serveur de ports
console avancé ACS 6000 pour la
première fois, ouvrez un navigateur
Web, puis saisissez l'adresse IP du
serveur dans la barre d'adresse.
Appuyez sur Entrée pour accéder au
Gestionnaire Web.
Connectez-vous au serveur de ports
console avancé en tant qu'admin, avec
le mot de passe avocent. L'écran de
sécurité de l'onglet Assistant apparaît.
Suivez la procédure de conguration
décrite ci-après.
Étape 1 : Profil de sécurité
Sélectionnez le prol de sécurité de
votre choix. Cliquez ensuite sur Suivant.
Étape 2 : Paramètres réseau
Dénissez les paramètres réseau de
votre choix. Cliquez ensuite sur Suivant.
Étape 3 : Ports
La conguration du prol CAS par
défaut sera appliquée à tous les ports
série. Cochez la case pour activer
l'ensemble des ports et dénir les
paramètres de prol CAS souhaités.
Cliquez ensuite sur Suivant.
Étape 4 : Modification de root/admin
Mot de passe
Cliquez sur le lien root dans le tableau
Utilisateurs. L'écran contenant les
informations relatives à l'utilisateur root
apparaît. Entrez le nouveau mot de
passe dans le champ Mot de passe, puis
conrmez-le. Cliquez sur Suivant. Cliquez
sur le lien admin. L'écran contenant les
informations relatives à l'utilisateur admin
apparaît. Entrez le nouveau mot de
passe dans le champ Mot de passe, puis
conrmez-le. Cliquez sur Suivant. Cliquez
sur le bouton Enregistrer pour appliquer
et enregistrer la conguration.
Le serveur de ports console est désormais
conguré et prêt à accepter les utilisateurs
et les connexions aux ports.
Pour contacter le service d’assistance technique d’Avocent, visitez le site www.avocent.com 590-769-629C
Avocent et le logo Avocent sont des marques déposées d’Avocent Corporation ou de ses filiales aux États-Unis ou dans d’autres pays. ©2009 Avocent Corporation.
 Loading...